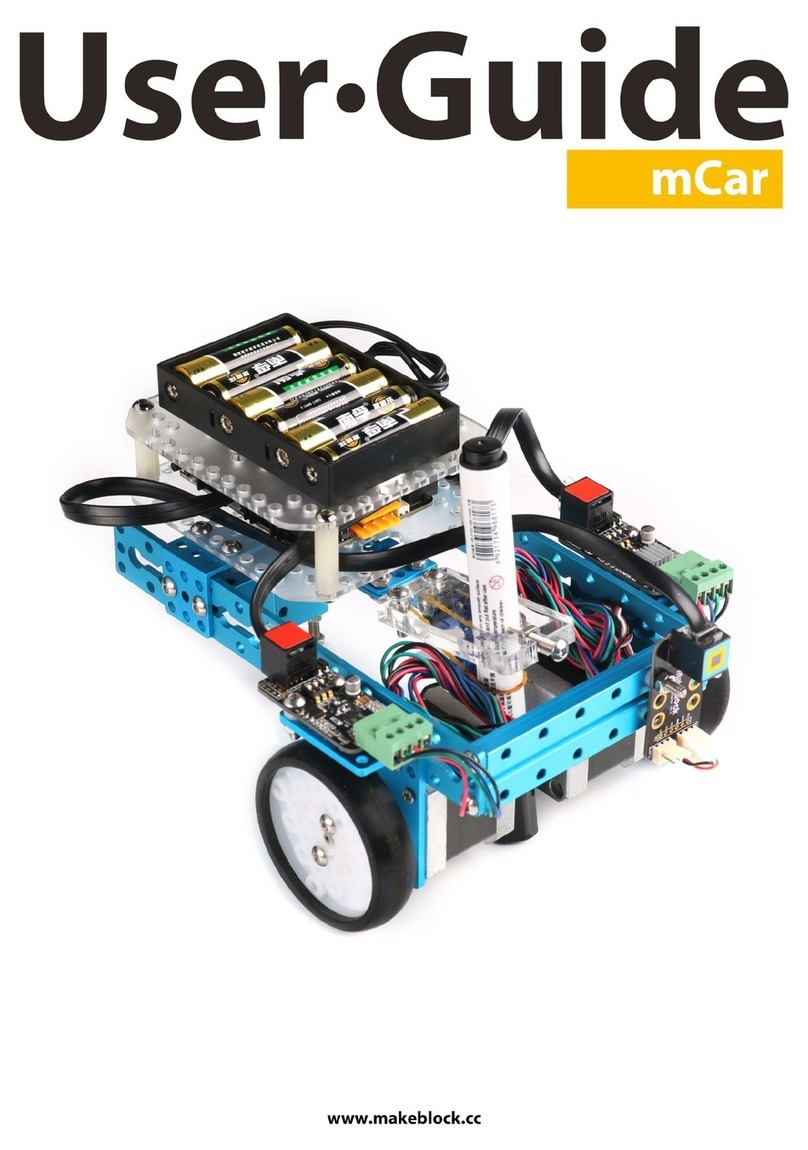
Makeblock mDrawBot Kit User manual

mScara | mSpider | mEggBot | mCar
mDrawBot Kit
Four-In-One Drawbot Kit
MAKER WORKS TECHNOLOGY INC
Technical support: [email protected]
www.makeblock.cc
:@Makeblock : @Makeblock : +Makeblock

1
3
Part List
Quick Intro
※mDrawBot is an advanced transformable drawing robot kit based on Makeblock platform. It can be
assembled into 4 forms — mScara, mSpider, mEggBot and mCar. It also comes with a matched software
named mDraw.
12
Tip 9
Pen Lift Mechanism 11
mScara
Check the parts according to the
Part List. Anything missing, please
contact Makeblock.
Explain in detail how to use the
instructions for you.
Pen Lift Mechanism is applied to every
forms of this four-in-one drawbot.
Refer here to see the assembly of the
Pen Lift Mechanism.
mScara is one form of this four-in-one
drawbot which can be fixed on the
table to draw. Refer here to see the
assembly of mScara.
··
··
(1)
Screw M3×5(2)
1.5mm
Make sure the end of
Circle Shaft4×80
Desktop
3
2
1

Part List
3× Beam0324-184
2× Beam0824-096
1× Beam0824-032
3× Bracket 3×3
3× Plate 3×6
1× Bracket U1
4× Timing Pulley Slice 90T
2× 42BYG Stepper Motor Bracket
2× Plastic Timing Pulley 90T
2× Tire 90T B
1× Caster Wheel
2× Rubber Blanket
2× Shaft Connector 4mm
2× Timing Pulley 18T
1× Pen Holder and V Clamp
2× 2 inch G Clamp
1× Plastic Hinge
1× Plastic Hinge Gasket
1× Spring 0.6×6×50
1× Threaded Shaft 4×39mm
1× Circle Shaft 4×80mm
2× Shaft Collar 4mm
5× Flange Bearing 4×8×3mm
1× Square Nut M4
3× Nylon Cap M4
1× Polyester Thread(8m)
2× Timing Belt 112MXL
1× Cross&2.5mm HEX Screwdriver
1× Rubber Bank
1× HEX Key 1.5mm
1× Wrench 5mm&7mm
26× Screw M4×8
42× Screw M4×16
5× Screw M4×22
1× Screw M4×35
6× Headless Set Screw M3×5
8× Countersunk Screw M3×8
50× Nut M4
4× Nylon Stud M4×30
2× Plastic Ring 4×8×1mm
8× Plastic Ring 4×7×3mm
4× Plastic Ring 4×7×10mm
1× 9g Micro Servo Pack
2× 42BYG Stepper Motor
2× Base Bracket
1× Battery Holder
1× Makeblock Orion
2× Me Stepper Motor Driver
1× RJ25 Adapter
1× AC/DC Adapter 12V2A
2× 6P6C RJ25 Cable-20cm
1× 6P6C RJ25 Cable-35cm
1× Micro USB Cable
1× 9g Servo Extension Cord
2× Plastic Rivet R4060
4× Plastic Rivet R4120
10× Nylon Cable Tie 2×100
※All pictures in this manual do not
represent the actual scale of them.
3
※Warning: Keep this kit out of the reach of children or animals.
Small parts may cause choking or serious injury if swallowed.
19
mSpider 24
mEggBot 31
mCar 35
Wiring and Software
mEggBot is one form of this four-in-one
drawbot which enables you to draw on
an egg or a ping-pong. Refer here to see
the assembly of mEggBot.
mCar is one form of this four-in-one
drawbot which enables you to draw on the
ground. Refer here to see the assembly of
mCar.
To enable the Drawbot to move, it's
required to use the software mDraw with
the Drawbot. Refer here to see the
instruction for wiring, software, and
related details.
mSpider is one form of this four-in-one
drawbot which enables you to draw on
a blackboard or a wall. Refer here to
see the assembly of mSpider.
····
1× tape 100cm(Paper)
2
5
Tip
※With too many parts contained in this product, please assemble the Drawbot as per the steps
indicated in this instruction to avoid confusion. Pay especially attention to the mark of “O”,”X”.
Make sure you are doing exactly as required by the diagram marked with "O", otherwise the parts
may be broken and the robot may fail to work normally.
7
(1)
Screw M3×5(2)
1.5mm
Ensure the end of the Shaft is
pushing against the desktop.
Circle Shaft4×80 1
2
3
Diagram
Notes
Assembled Diagram
Assembly Sequence
Assembly Path
Quantity
Parts that are required
in this step
Assembly Step
Part Name
Part Number
Tool
Tool Model
4
1.Make sure to tighten the screw and the nut.
Assembly Requirement
Please assemble the robot in strict accordance with the following three requirements,
Otherwise it will result in inaccuracy or unsatisfying performance.
01.Tighten the screw with force according
to the direction of the diagram
02.Tighten the nut with force according
to the direction of the diagram

2.Make sure all parts are placed evenly before tightening the screws.
O X
O X
X
O
3.Press downward the parts related to the shaft with force to eliminate the gap before
tightening the screw M3x5.
Pressure Pressure
O X 76

Makeblock Orion & Battery Holder
Headless Set Screw M3×5
Wrench
Nut M4
Hex Allen Key 1.5mm
Screw M3×8Screw M4
Tools Pen Lift Mechanism
Assembled Diagram Rubber Bank
Pen
9g Servo Motor Servo Motor Bracket
Pen Holder and V
Clamp(together)
Square Nut M4
1
Pen Holder(1)
Plastic Hinge(1)
Hinge Gasket(1)
Screw M4×16(2)
Nut M4(2)OX
2
(1)
(1)
Nut M4(2)
Screw M4×8(2)
15°~45°
※Before tightening the two screws, make sure the Pen Holder
can be easily lifted up for 15°~45°.
3
Nut M4(1)
Screw M4×22(1)
98
Note: Make sure to assemble the robot in strict accordance with the requirements
from P5 - P7, otherwise it may result in inaccuracy or poor performance.
Screw M4×16
Makeblock Orion
Plastic Ring
4×7×3mm
Base Bracket
Nut M4
Plastic Rivet R4060
Battery Holder
Base Bracket
Batteries
Screw M4×8
Screw M4×8
Nylon Stud M4×30

4
(1)
(1)
(1)
Nut M2(2)
Screw M2×10(2)
(1)
5
The long side is upturned.
The short side is downturned.
Steering Wheel
※You can change the installation angle of the Steeling Wheel to
adjust the height of pen.
Screw M4×16(2)
Nut M4(2)
Two plates are
joint together.
6
(1)
XO
※Pay attention to the direction when you installing the Square Nut
M4,otherwise the Pen Holder will be broken.
7
Screw M4×16(1)
8
(1)(1)
The long side.
mScara mSpider mEggbot mCar
mScara Structure Diagram
Motor B
Motor A
Desk
1
Screw M4×8(2)
(1)
(1)
4×7×3(2)
2
Screw M4×8(2)
(1)
(1)
3
Screw M4×16(2)
(1)
(1)
Nut M4(2)
4
Screw M4×8(1)
Nut M4(1)
5
Screw M4×8(4)
(2)
Plastic Gasket
4×7×3
Flange Bearing
4×8×3
Make sure all the
three parts are
properly aligned.
Make sure all the
three parts are
properly aligned.
1
2
2
Threaded Hole
Threaded Hole
11
10
Note: Make sure to assemble the robot in strict accordance with the requirements
from P5 - P7, otherwise it may result in inaccuracy or poor performance.

mScara mSpider mEggbot mCar
7
(2)
6
(1)
Screw M3×5(2)
1.5mm
Make sure the end of the shaft is
pushing against the desktop.
8
Screw M4×22(4)
(2)
(1)
Nut M4(4)
(1)
(2)
9
(2)
OX
Desk
Circle Shaft4×80
Desktop
Flange Bearing
4×8×3
Plastic Rivet
R4120
3
2
1
10
(1)
Screw M3×5(1)
1.5mm
2
Shaft Collar 4mm
1
11
(1)
Screw M4×16(2)
Nut M4(2)
12
Screw M4×8(2)
(1)
(1)
13
Screw M4×8(2)
Nut M4(2)
14
112MXL(1)
10 13
12 mScara mSpider mEggbot mCar
※Use one hand to press the Shaft
Collar downward to minimize the
gap betweenthe parts, meanwhile
use the other handto tighten the
M3x5 screw.

15
Screw M4×16(2)
(1)
16
(1)
Screw M3×5(1)
1.5mm
(1)1
2
17
OX
18
Screw M3×8(4)
To avoid over-tension,do not tighten
the screw.
Timmy Pulley 18T
21
(2)
OX
22
(1)
Screw M3×5(1)
1.5mm
1
2
Shaft Collar 4mm
19
(1)
Nut M4(1)
20
Screw M4×16(4)
(1)
(1)
Nut M4(4)
(1)
(2)
15
14 mScara mSpider mEggbot mCar 10 mScara mSpider mEggbot mCar
※Use one hand to press the Shaft Collar
downward to minimize the gap between
the parts, meanwhile use the other hand
to tighten the M3x5 screw.

23
(1)
(1)
Screw M3×8(4)
24
112MXL(1)
(1)
25
Screw M4×16(2)
Nut M4(2)
Tight
Timmy Pulley 18T
26
Screw M3×5(1)
1.5mm
27
Screw M4×8(2)
Nut M4(2)
Pen Lift Mechanism
28
Screw M4×8(8)
Refer to Page 8
(4)
(1)
29
Screw M4×8(2)
30
Screw M4×16(4)
(2)
Nut M4(4)
31
(2)
Nut M4(2)
Screw M4×8(2)
17
16 mScara mSpider mEggbot mCar 10 mScara mSpider mEggbot mCar

mScara mSpider mEggbot mCar
32
6P6C RJ25 Cable-20cm(2)
6P6C RJ25 Cable-35cm(1)
Micro USB Cable(1)
AC/DC Adapter 12V2A(1)
Screw M4×16(2)
Nut M4(2)
(2)
Screw M4×35(1)
Nut M4(3)
(1)
(1)
(1)
Screw M4×8(4)
Nut M4(2)
mSpider
1
(2)
(1)
Screw M4×22(2)
Nut M4(2)
Motor A
Motor B
String A
2
3
4
String B
19
18 mScara mSpider mEggbot mCar
Assembled Diagram
Structure Diagram
35
Software Download >
Note: Make sure to assemble the robot in strict accordance with the requirements
from P5 - P7, otherwise it may result in inaccuracy or poor performance.

5
Screw M4×8(2)
Pen Lift Mechanism
6
(1)
(1)
Screw M4×8(2)
(1)
Screw M4×16(4)
7
(1)
Screw M3×8(4)
Nut M4(4)
×2×2
mScara mSpider
8
(1)
(1)
Screw M4×16(2)
9
Screw M4×16(3)
(2)
Nut M4(3)
10
2m(1)
×2
×2
×2
※The length of the string is
around 8 meters, you can cut it
into 2 strings with 4 meters
each at most.
mEggbot mCar
Threaded Hole
11
Screw M4×16(1)
12
Nut M4(1)
13 ×2
Screw M4
The size of the circle should be
bigger than the head of screw
M4.
OX
14
Screw M3×5(1)
1.5mm
×2
×2×2
1
2
OX
15
Motor AString A
O X
21
20 mScara mSpider mEggbot mCar

16
Motor B
String B
O X
17
(2)
18
String A
String B
mScara mSpider mEggbot mCar
19
Screw M4×8(8)
Refer to Page 8
(4)
(1)
20
Screw M4×16(4)
(2)
Nut M4(4)
Screw M4×16(2)
Nut M4(2)
21
RJ25 Adapter(1)
22
6P6C RJ25 Cable-20cm(2)
6P6C RJ25 Cable-35cm(1)
Micro USB Cable(1)
9g Servo Extension Cord(1)
AC/DC Adapter 12V2A(1)
23
22 mScara mSpider mEggbot mCar
Assembled Diagram
Motor A
Motor B
Motor A
Motor A
35
Software Download >

mEggBot
Motor A
Motor B
Egg
(2)
1
Screw M4×8(8)
(2)
2
(1)
(1)
Screw M3×8(4)
3
Screw M4×16(2)
Nut M4(2)
1
2
5
(1)
Screw M4×22(2)
Nut M4(4)
(2)
6
Nut M4(2)
Flange Bearing
4×8×3
Plastic Gasket
4×8×1
7
(1)
4
(1)
Screw M3×5(1)
1.5mm
mScara mSpider mEggbot mCar mScara mSpider mEggbot mCar
24 25
(5~8) mm
Structure Diagram
Note: Make sure to assemble the robot in strict accordance with the requirements
from P5 - P7, otherwise it may result in inaccuracy or poor performance.

10
(1)
(1)Spring
11
Screw M3×5(1)
Compress the spring.
12
(2)
13
Screw M4×8(2)
Nut M4(2)
14
Screw M4×8(2)
Nut M4(2)
(1)
(1)
(2)
15
1.5mm
26 27
(1)
8
4×80(1)
4×7×3(1)
4×7×10(2)
Plastic Gasket 4×7×3
Plastic Gasket 4×7×10
Flange Bearing 4×8×3
Circle Shaft 4×80
(5~8) mm
1
2
9
Screw M3×5(1)
(1)
(5~8) mm
adjustable
mScara mSpider mEggbot mCar mScara mSpider mEggbot mCar

18
(1)
(1)
Screw M3×5(1)
(1)
Screw M3×8(3)
OX
1
2
19
Screw M4×16(2)
Nut M4(2)
20
112MXL(1)
4×7×3(4)
4×7×10(2)
Nut M4(2)
Screw M4×22(2)
21
Screw M4×16(2)
(1)
Nut M4(2)
22
Screw M4×8(2)
Nut M4(2)
(1)
23
Screw M4×8(2)
Nut M4(2)
Pen Lift Mechanism
1.5mm
28 29
16
(1)
Nut M4(1)
17
(1)
Screw M3×5(1)
1.5mm
(2)
Flange Bearing
4×8×3
OX
1
2
mScara mSpider mEggbot mCar mScara mSpider mEggbot mCar

mScara mSpider mEggbot mCar mScara mSpider mEggbot mCar
24
Screw M4×8(8)
Refer to Page 8
(4)
(1)
25
Screw M4×16(4)
(2)
Nut M4(4)
Screw M4×16(2)
Nut M4(2)
26
RJ25 Adapter(1)
27
6P6C RJ25 Cable-20cm(2)
6P6C RJ25 Cable-35cm(1)
Micro USB Cable(1)
AC/DC Adapter 12V2A(1)
mCar
Motor A
1
Screw M4×8(4)
(2)
(1)
2
Screw M4×16(4)
(1)
(2)
3
(1)
(1)
Screw M3×8(4)
4
Screw M4×16(2)
Nut M4(2)
×2
Motor B
31
30 mScara mSpider mEggbot mCar mScara mSpider mEggbot mCar
Assembled Diagram
Structure Diagram
Note: Make sure to assemble the robot in strict accordance with the requirements
from P5 - P7, otherwise it may result in inaccuracy or poor performance.
35
Software Download >

5
Screw M4×16(2)
Nut M4(2)
1
2
2
6
(1)
(1)
Screw M4×16(2)
×2
(2)
8
7
Screw M3×5(2)
1.5mm
OX
11
2
2
Screw M3×5
mScara mSpider mEggbot mCar mScara mSpider mEggbot mCar
Threaded Hole
10
Screw M4×16(2)
Screw M4×16(2)
Nut M4(2)
11
9
(1)
Nut M4(4)
Screw M4×22(2)
(1)
1
1
2
2
13 mm
Screw M4×16(2)
Nut M4(2)
12
RJ25 Adapter(1)
33
32 mScara mSpider mEggbot mCar mScara mSpider mEggbot mCar

mScara mSpider mEggbot mCar mScara mSpider mEggbot mCar
Screw M4×16(2)
Nut M4(2)
13
4×7×3(2)
(1)
Me Stepper
Motor Driver
Screw M4×16(2)
Nut M4(2)
14
4×7×3(2)
(1)
Me Stepper
Motor Driver
Screw M4×8(2)
Nut M4(2)
15 Refer to Page 8
16
6P6C RJ25 Cable-20cm(2)
6P6C RJ25 Cable-35cm(1)
Assembled Diagram
Software & Related Details
Working With mDraw
Makeblock Orion Driver Installation
The USB interface of Makeblock Orion uses the chip CH340,you may need to install the chip
Ch340 driver manually.
Visit the following URL for more details:
http://learn.makeblock.cc/driver_installation/
Stepper Motor B
Stepper Motor A
Microstep Resolution:HHH
9g Micro Servo
Connect to Slot2
HL
35
34
Wiring
mDraw is the software designed to work with the mDrawBot. It's required to download,
install mDraw, and use it correctly in order to make your mDrawBot move.
1. Visit to download mDraw and related specific instruction. http://learn.makeblock.cc/mdrawbot/
Note: It's required to download the material mentioned above.
2. It's strongly recommended that you should read the specific instruction before using the software.
3. Here's the basic interface of mDraw.
(More details are included in the package downloaded from the URL mentiond on Step 1.)
mDraw is an open source project hosted on Github. Fork it here:
https://github.com/Makeblock-official/mDrawBot/

36
Warnings
• Adult supervision and assistance are required.
• CHOKING HAZARD — This product contains small parts and functional sharp points on
components. Keep away from children under age 3.
• Read and follow all instructions in the user guide before using.
• Retain this user guide for future reference.
Battery Notes
• Use only fresh batteries of the required size and type. Do not mix old and new batteries, different
types of batteries (standard, alkaline, or rechargeable), or rechargeable batteries of different capacities.
• Dispose of batteries promptly and properly. Do not burn or bury them.
• If you do not plan to play with the robot for an extended period of time, remove the batteries.
Caution
• Do not insert the wires into telecommunication or network socket outlets.
• As an extra precaution, check this product regularly for signs of wear or damage.
• Ensure all wiring connections are correct before inserting batteries and switching on the product.
Failure to do so may result in damage to components and the product.
• Ensure all wires are correctly connected to the battery terminals and other connectors. If the circuit
does not work, make sure the plastic insulation of the wire is not obstructing the connection to the
connector.
• When you have finished playing, remove the batteries and switch off the unit before you disconnect
the wires. Do not apply any components or parts to the unit other than those provided with this kit.
• To prevent overheating and damage, do not short-circuit the battery terminals and connectors. Do
not block or cover the motor or other moving parts.
service. Repaired or replaced parts and products are warranted for the remainder of the original warranty period.
You will be charged for repair or replacement of the product made after the expiration of the warranty period.
ALL IMPLIED WARRANTIES, INCLUDING THE IMPLIED WARRANTY OF MERCHANTABILITY AND, IF APPLICABLE, THE
IMPLIED WARRANTY OF FITNESS FOR A PARTICULAR PURPOSE, SHALL EXPIRE ON THE EXPIRATION OF THE
STATED WARRANTY PERIOD.
EXCEPT AS DESCRIBED ABOVE, THE WARRANTOR SHALL HAVE NO LIABILITY OR RESPONSIBILITY TO THE
PURCHASER OF THE PRODUCT OR ANY OTHER PERSON OR ENTITY WITH RESPECT TO ANY LIABILITY, LOSS OR
DAMAGE CAUSED DIRECTLY OR INDIRECTLY BY USE OR PERFORMANCE OF THE PRODUCT OR ARISING OUT OF
ANY BREACH OF THIS WARRANTY, INCLUDING, BUT NOT LIMITED TO, ANY DAMAGES RESULTING FROM
INCONVENIENCE AND ANY LOSS OF TIME, DATA, PROPERTY, REVENUE, OR PROFIT AND ANY INDIRECT, SPECIAL,
INCIDENTAL, OR CONSEQUENTIAL DAMAGES, EVEN IF THE WARRANTOR HAS BEEN ADVISED OF THE POSSIBILITY
OF SUCH DAMAGES.BEEN ADVISED OF THE POSSIBILITY OF SUCH DAMAGES.
FCC Information
Product
Model 90070
mDrawBot
This device complies with part 15 of the FCC Rules. Operation is subject to the following two conditions: (1) This device may not
cause harmful interference, and (2) this device must accept any interference received, including interference that may cause
undesired operation.
Changes or modifications not expressly approved by the party responsible for compliance could void the user's authority to
operate the equipment.
NOTE: This equipment has been tested and found to comply with the limits for a Class B digital device, pursuant to Part 15 of
the FCC Rules. These limits are designed to provide reasonable protection against harmful interference in a residential
installation. This equipment generates, uses and can radiate radio frequency energy and, if not installed and used in accordance
with the instructions, may cause harmful interference to radio communications. However, there is no guarantee that interference
will not occur in a particular installation. If this equipment does cause harmful interference to radio or television reception, which
can be determined by turning the equipment off and on, the user is encouraged to try to correct the interference by one or more
of the following measures:
– Reorient or relocate the receiving antenna.
-- Increase the separation between the equipment and receiver.
-- Connect the equipment into an outlet on a circuit different from that to which the
receiver is connected.
-- Consult the dealer or an experienced radio/TV technician for help.
when the module is installed inside another device, the user manual of this device must contain below warning statements;
1. This device complies with Part 15 of the FCC Rules. Operation is subject to the following two conditions:
(1) This device may not cause harmful interference.
(2) This device must accept any interference received, including interference that may cause undesired operation.
2. Changes or modifications not expressly approved by the party responsible for compliance could void the user's authority
to operate the equipment.
The devices must be installed and used in strict accordance with the manufacturer's instructions as described in the user
documentation that comes with the product
Limited Warranty
This product is warranted against defects in materials and workmanship under normal use by the original purchaser
for 90 days after the date of purchase from an authorized retailer. THERE ARE NO OTHER EXPRESS WARRANTIES.
This warranty does not cover: (a) damage or failure caused by or attributable to abuse, misuse, failure to follow
instructions, improper installation or maintenance, alteration, accident, Acts of God (such as floods or lightning), or
excess voltage or current; (b) improper or incorrectly performed repairs by non-authorized service facilities; (c)
consumables such as fuses or batteries; (d) ordinary wear and tear or cosmetic damage; (e) transportation, shipping
or insurance costs; (f) costs of product removal, installation, set-up service, adjustment or reinstallation; and (g) claims
by persons other than the original purchaser.
Should a problem occur that is covered by this warranty, take the product and the original sales receipt as proof of
purchase date to the place of purchase.The product, at the warrantor's option, unless otherwise provided by law: (a)
be repaired without charge for parts and labor; (b) be replaced with the same or a comparable product; or (c) a
refund of the purchase price will be provided. All replaced parts and products, and products on which a refund is
made, become the property of the warrantor. New or reconditioned parts and products may be used in the
performance of warranty
mDrawBot
Other manuals for mDrawBot Kit
1
Table of contents
Other Makeblock Toy manuals

Makeblock
Makeblock Explorer Kit User manual

Makeblock
Makeblock Gizmos User manual

Makeblock
Makeblock mBot User manual

Makeblock
Makeblock Neuron User manual

Makeblock
Makeblock N65DV User manual

Makeblock
Makeblock neuron Inventor Kit User manual

Makeblock
Makeblock Dragon Knight User manual

Makeblock
Makeblock Ultimate Robot Kit User manual

Makeblock
Makeblock HaloCode User manual

Makeblock
Makeblock Codey Rocky User manual