manuals.online logo
Brands
  1. Home
  2. •
  3. Brands
  4. •
  5. Makita
  6. •
  7. Impact Driver
  8. •
  9. Makita TW0350 Manual

Makita TW0350 Manual

Continuous Rating (W)
Voltage (V) Cycle (Hz) Input Output Max. Output(W)
110 400
2,000
2,000
Yes (Rocker type)
350 (260)
400
400
400
400
230
230
230
230
230
350
350
350
350
350
120
220
230
240
3.8
3.5
1.9
1.8
1.8
12.7 (1/2)
2.5 (8.2) for other than Australia2.0 (6.6) for Australia
2.9 (6.4)
M12 - M22
M12 - M16
Models No.
Description
PRODUCT
Current (A)
TECHNICAL INFORMATION
CONCEPTION AND MAIN APPLICATIONS
Specification
Standard equipment
Optional accessories
< Note > The standard equipment for the tool shown may differ from country to country.
P 1 / 8
Dimensions : mm ( " )
Width ( W )
Height ( H )
Length ( L )
TW0350
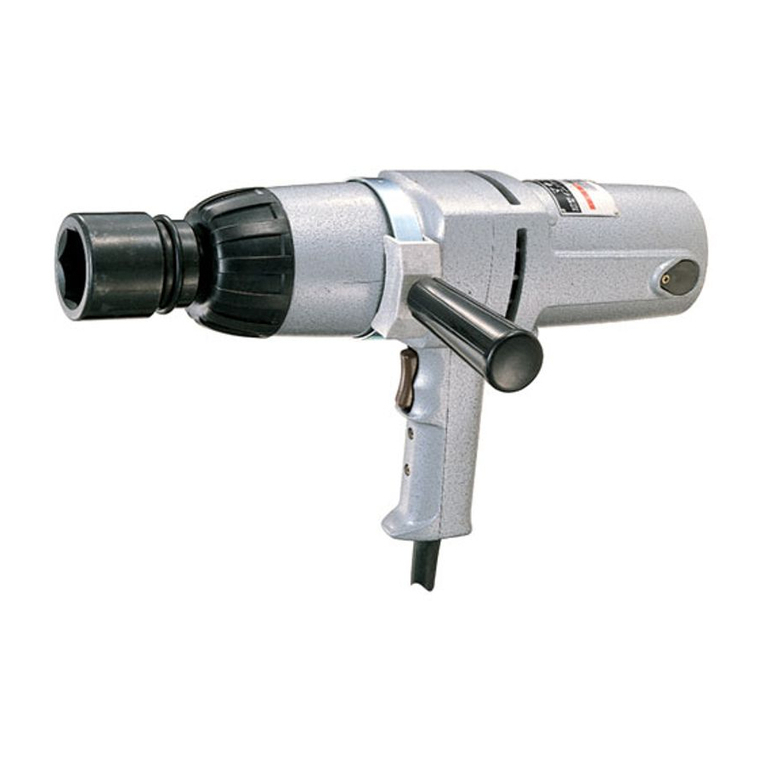
Impact Wrench
50 / 60
50 / 60
50 / 60
50 / 60
50 / 60
283 (11-1/8)
233 (9-1/8)
87 (3-7/16)
* Socket 24-45 .................................... 1 pc.
* Plastic carrying case ....................... 1 pc.
* Socket 19-38
* Socket 19-52
* Socket 19-78
* Socket 21-38
* Socket 21-52
* Socket 21-78
* Socket 21-150
* Socket 22-38
* Socket 22-52
* Socket 23-38
* Socket 23-52
* Socket 24-45
* Socket 24-52
* Socket 26-50
* Socket 26-78
* Socket 27-50
* Socket 27-78
* Socket 30-50
* Socket 30-78
* Socket 32-50
* Socket 32-78
Max. fastening torque : N.m (ft.lbs)
Reverse switch
Net weight: kg (lbs)
No load speed (min-1=rpm)
Impact per minute (min-1=bpm)
Square drive : mm ( " )
Capacities
Power supply cord : m ( ft )
High Tensile bolt
Standard bolt
L
H
W
In order to occupy the advantageous position in the market,
we have developed the above impact wrench with the following
features.
* Incredibly high torque of 350 N.m (260 ft.lbs)
* Equipped with palm-fitting soft grip for comfortable work.
* Extension bar
* Universal joint
* Elliptic socket
* Time switch
Repair P 2/ 8
< 1 > Lubrication
Apply MAKITA grease N. No.1 to the following portions designated by black triangle to protect
parts and product from unusual abrasion.
Sleeve 18
8
8
10 13
10
13
19
19
7
Hammer case
Anvil
Hammer
Spindle
Spring holder
Spur gear 19-41
* The surface which contacts sleeve 18.
* The outer surface which contacts the inner surface of 8 Hammer
* The inner surface where contacts 10 Spring holder.
* The inner surface where contacts 13 Spindle.
* The wing portion which is percussed by cam portion of 8 Hammer.
* The cam portion which transmits the percussion to 7 Anvil.
* The edge portion where 19 pcs.of steel ball 4 roll.
* The groove where 2 pcs. of steel ball 6.4 roll.
* The gear portion
* The teeth portion
* The surface where flat washer 8 contacts.
* The joining hole in which 13 Spindle is inserted.
19 cps. of
steel ball 4 Steel ball 6.4
Compression
spring 28
Position
No. Parts item Portion
to be lubricated Amount : g
( oz )
7
Flat
washer 8
0.5 (0.02)
0.5 (0.02)
0.5 (0.02)
1.0 (0.04)
0.1 (0.01)
10 .0 (0.35)
10 .0 (0.35)
2.0 (0.08)
3.5 (0.13)
3.5 (0.13)
3.0 (0.12)
3.0 (0.12)
Fig. 1
< 2 > Removing armature
Fig. 2
Cup washer
Motor housing
Hammer case cover
Urethane ring 5
Hex socket
head bolt M5x50
Hammer case
Armature
Mechanical section
( 1 ) Remove brush holder cap and carbon brush.
See Fig. 2.
( 2 ) Remove hex socket head bolt M5x50, cup
washer and urethane ring 5 each 4 pcs.
See Fig. 2.
( 3 ) Separate mechanical section (hammer case
and hammer case cover) from motor
housing. Then, armature can be separated
from motor housing together with
mechanical section. See Fig. 2.
< Note >
If the armature remains in the motor housing
at the step (3), it can be removed by knocking
the edge of motor housing with plastic hammer.
Repair P 3/ 8
< 4 > Disassembling hammer unit
Fig. 4
Fig. 5
Fig. 6
< 3 > Disassembling the mechanical section
Fig. 3R Fig. 3F
Hammer case
Hammer case
cover
Hammer unit
(hammer, spindle,
compression spring 28, etc.)
This part can remain
in the hammer case.
Anvil
Flat washer 19
( 1 ) Separate hammer case cover from hammer case by pulling in the vertical direction as illustrated in Fig. 3R
in stead of Fig. 3F.
( 2 ) Remove anvil and flat washer 19 from hammer case. See Fig. 4.
( 3 ) Remove the hammer unit and spur gear 19-41 and 3 pcs. of flat washer 8 from hammer case cover.
See Fig. 5.
The parts can fall
off the hammer case
cover.
The hammer unit
(hammer, spindle,
compression spring 28, etc.)
Spur gear 19-41 Flat washer 8
Flat washer 8
< Note > Be careful, not to lose flat washers.
Steel ball 6.4
Steel
ball 6.4
( 1 )Pull hammer toward gear
side with "No.1R045 Gear
extractor", and in order to
take out steel ball 6.4
align the top of cam groove
of spindle with the opening
portion of hammer.
See Fig. 6. Gear
Top of cam
groove
Opening
portion
Repair P 4/ 8
< 5 > Assembling hammer unit
Fig. 7R Fig. 7F
Fig. 8 Fig. 9
Fig.10R
Fig.10F
( 2 )After removing steel ball 6.4, loosen the handle of "No.1R045 Gear extractor" slowly until the spindle is free
from the compression spring 28.
( 1 ) Put 19 pcs. of steel ball 4 in the groove of spindle's gear portion. See Fig. 8.
( 2 ) Put spring holder, compression spring 28 and hammer on the spindle. See Fig. 9.
( 3 ) Pressing the hammer to the gear side, align the top of cam groove of spindle with the opening of hammer.

And mount 2 pcs. of steel ball 6.4 as illustrated in Fig. 10R.
The assembling of hammer unit has been finished at this step.
( 3 )Putting the hammer unit as illustrated in Fig. 7R, remove the following parts.
* Hammer
* Compression
spring 28
* Spring holder
* 19 pcs. of steel
ball 4
* Spindle
Hammer
Compression
spring 28
19 pcs. of steel ball 4
The steel balls 4
fall off the spindle
and can be lost.
Spindle
Spindle
Spring holder
Compression
spring 28
Hammer
Spring holder
19 pcs. of steel ball 4
Apply grease to the groove
of spindles's gear portion for
prevention against the falling
off of steel ball.
19 pcs. of steel ball 4
Spindle
Spring holder
Compression
spring 28
Hammer
Steel ball 6.4
Steel ball 6.4
Do not hold the hammer unit as illustrated
in Fig. 10F, when pressing hammer to
the gear side.
The steel ball 4 can fall off the groove
of spindle's gear portion and scatter in
the hammer.
Repair P 5 / 8
Fig.11
Fig.12
Fig.13
The hammer unit
(hammer, spindle,
compression spring 28, etc.)
Spur gear 19-41 Flat washer 8
Flat washer 8
( 4 ) Mount the hammer unit and spur gear 19-41 to the hammer case cover. See Fig. 11.
( 5 ) Mount flat washer 19 and anvil to the hammer case. See Fig. 12.
( 6 ) Mount hammer case cover as illustrated in Fig. 13. The assembling of mechanical section has been finished
at this step.
< Note >
Do not forget to mount flat washers 8 to the following portion.
* Spindle of hammer unit
* Shaft of hammer case cover for spur gear 19-41 (both side of spur gear 19-41)
This part can remain
in the hammer case.
Anvil
Flat washer 19
Hammer case
Hammer case
cover
Hammer unit
(hammer, spindle,
compression spring 28, etc.)
Hammer
case cover
Repair P 6/ 8
< 7 > Replacing electrical parts in the handle
Fig.14
Fig.15
Fig.16
( 1 ) Unscrew 2 pcs. of tapping screw 4x18 and remove handle cover. Then, the electrical parts
(switch, line coil, resister, etc.) can be replaced. See Fig.14.
( 2 ) Put the sponge into the position as illustrated in Fig. 15.
( 3 ) Inflect the insulated terminals as illustrated in Fig. 16,
when connecting with switch terminals.
37
34
38
40
42
39
49
48
Tapping screw 4x18
Tapping screw 4x18
Strain relief
Handle cover.
37 Switch
34 Sponge
38 Line coil
40 Terminal block
42 Noise suppressor
39 Resister
49 Cord guard
48 Power supply cord
If sponge is used, put it
in the illustrated place.
Handle cover
Switch
For the countries where Radio
Interference Suppression is required.
For the other countries
Circuit diagram P 7 / 8
Color index of lead wires
Black
White
Red
Orange
Brush holder
Left
Brush holder
Right
Brush holder
Left
Brush holder
Right
Brush holder
(Left)
Brush holder
(Right)
Brush holder
(Left) Brush holder
(Right)
Noise
suppressor
Terminal block
Terminal block Power supply
cord Power supply
cord
Resister
Field
Clear
Purple
Blue
Brown
Line
coil
3 6
2 5
Switch
Fastened
on field
core.
For some country insulated terminal can be used
in stead of terminal block.
For some country insulated terminal can be used
in stead of terminal block.
3 6
2 5
Switch
Tube
red or white
Wiring diagram P 8 / 8
Do not cross the lead wires with which
line coil and terminal block are connected.
Line coil
Terminal block
The lead wires (red or white ) for
connecting line coil with terminal
block have to be put as shown.
(between resister and noise
suppressor.
Noise suppressor
Resister
Insert the tube for protecting
lead wires, deep in the motor housing.
Fasten the lead wire
(clear) of noise
suppressor with screw.
Lead holder
Hold the following lead wires
with this lead holder.
* Lead wire (see through) of noise
suppressor
* Field lead wire (purple) to be
connected to switch
* Field lead wire (white) to be
connected to switch
* Field lead wire (black) to be
connected to insulated terminal
This lead wire has to be put in
the bottom of lead holder.
Lead holder
Hold the following lead wires
with lead holder.
* Field lead wire (red) to be
connected to switch
* Field lead wire (orange) to be
connected to switch
* Field lead wire (black) to be
connected to insulated terminal
Line
coil
Terminal block
Rib
Put lead wires of power supply cord
on the left side of rib.
Right side
Left side
Put the insulated terminals
under the lead wires of
power supply cord.

Other manuals for TW0350

15

Other Makita Impact Driver manuals

Makita 6953 User manual

Makita

Makita 6953 User manual

Makita 6932FD User manual

Makita

Makita 6932FD User manual

Makita TD0101 User manual

Makita

Makita TD0101 User manual

Makita TD090D User manual

Makita

Makita TD090D User manual

Makita 6916FD User manual

Makita

Makita 6916FD User manual

Makita DTD156SF1J User manual

Makita

Makita DTD156SF1J User manual

Makita DTD157 User manual

Makita

Makita DTD157 User manual

Makita BTP130 User manual

Makita

Makita BTP130 User manual

Makita BTP131 User manual

Makita

Makita BTP131 User manual

Makita TD090DZ User manual

Makita

Makita TD090DZ User manual

Makita 6952 Quick start guide

Makita

Makita 6952 Quick start guide

Makita DTP141RTJ User manual

Makita

Makita DTP141RTJ User manual

Makita 6933FD User manual

Makita

Makita 6933FD User manual

Makita DTD152 User manual

Makita

Makita DTD152 User manual

Makita TD001G User manual

Makita

Makita TD001G User manual

Makita BTL063 Quick start guide

Makita

Makita BTL063 Quick start guide

Makita TD003GM201 User manual

Makita

Makita TD003GM201 User manual

Makita BTD120 User manual

Makita

Makita BTD120 User manual

Makita TD126D User manual

Makita

Makita TD126D User manual

Makita TW0350 User manual

Makita

Makita TW0350 User manual

Makita TW1000 User manual

Makita

Makita TW1000 User manual

Makita BTW450 User manual

Makita

Makita BTW450 User manual

Makita BTL063 User manual

Makita

Makita BTL063 User manual

Makita BTD129 User manual

Makita

Makita BTD129 User manual

Popular Impact Driver manuals by other brands

Parkside 96878 Operation and safety notes

Parkside

Parkside 96878 Operation and safety notes

Panasonic EYFLA4A operating instructions

Panasonic

Panasonic EYFLA4A operating instructions

Ryobi CID120L Operator's manual

Ryobi

Ryobi CID120L Operator's manual

DeWalt XR DCF892 Original instructions

DeWalt

DeWalt XR DCF892 Original instructions

Cornwell Tools IR--C2112 instructions

Cornwell Tools

Cornwell Tools IR--C2112 instructions

EINHELL CC-IW 950 operating instructions

EINHELL

EINHELL CC-IW 950 operating instructions

DeWalt DCF850 instruction manual

DeWalt

DeWalt DCF850 instruction manual

Neilsen CT0672 Original instructions

Neilsen

Neilsen CT0672 Original instructions

Festool PDC 18/4 Li Original operating manual

Festool

Festool PDC 18/4 Li Original operating manual

HIKOKI WH 18DD Handling instructions

HIKOKI

HIKOKI WH 18DD Handling instructions

Northern Industrial 157831 owner's manual

Northern Industrial

Northern Industrial 157831 owner's manual

Truper TPN-734H-2 manual

Truper

Truper TPN-734H-2 manual

F1 IW350 Original operating instructions

F1

F1 IW350 Original operating instructions

Sumake ST-6SL manual

Sumake

Sumake ST-6SL manual

Unimac ATOIMPUMCA12V user manual

Unimac

Unimac ATOIMPUMCA12V user manual

Panasonic EY75A1 operating instructions

Panasonic

Panasonic EY75A1 operating instructions

Sumake ST-4522 manual

Sumake

Sumake ST-4522 manual

DeWalt XR LI-ION DCF835C2 Original instructions

DeWalt

DeWalt XR LI-ION DCF835C2 Original instructions

manuals.online logo
manuals.online logoBrands
  • About & Mission
  • Contact us
  • Privacy Policy
  • Terms and Conditions

Copyright 2025 Manuals.Online. All Rights Reserved.