Makita DLM539 User manual

DLM480
DLM481
DLM538
DLM539
EN Cordless Lawn Mower INSTRUCTION MANUAL 10
ZHCN 充电式草坪修剪机 使用说明书 24
ID Mesin Pemotong Rumput
Tanpa Kabel PETUNJUK PENGGUNAAN 38
MS Pemangkas Laman Kordles MANUAL ARAHAN 54
VI Máy Cắt Cỏ Đẩy Cầm Tay
Hoạt Động Bằng Pin TÀI LIỆU HƯỚNG DẪN 69
TH 83

2
1 32
4
Fig.1
1 32
4
Fig.2
1
Fig.3
1
Fig.4
1
Fig.5

3
1
Fig.6
1
Fig.7
Fig.8
Fig.9
1
1
1
Fig.10
1
Fig.11
3
2
1
Fig.12

4
1
2
Fig.13
1
2
Fig.14
1
2
Fig.15
1
Fig.16
1
Fig.17
1
Fig.18
1
2
Fig.19
1
2
Fig.20

5
12
Fig.21
1
Fig.22
1 2
Fig.23
1
Fig.24
1
2
Fig.25
1
Fig.26
1
Fig.27
2
1
Fig.28

6
1
Fig.29
1
Fig.30
1
2
Fig.31
Fig.32
Fig.33
12 3
Fig.34
Fig.35

7
Fig.36
1
3
2
Fig.37
1
Fig.38
Fig.39
1
2
Fig.40
1
Fig.41

8
1
Fig.42
1
Fig.43
2
1
Fig.44
1
Fig.45
1
Fig.46
2
1
3
Fig.47

9
3
2
4
1
Fig.48

10 ENGLISH
ENGLISH (Original instructions)
SPECIFICATIONS
Model: DLM480 DLM481 DLM538 DLM539
Mowing width (blade diameter) 480 mm 534 mm
No load speed 3,100 min-1 3,000 min-1
Part number of
replacement
mower blade
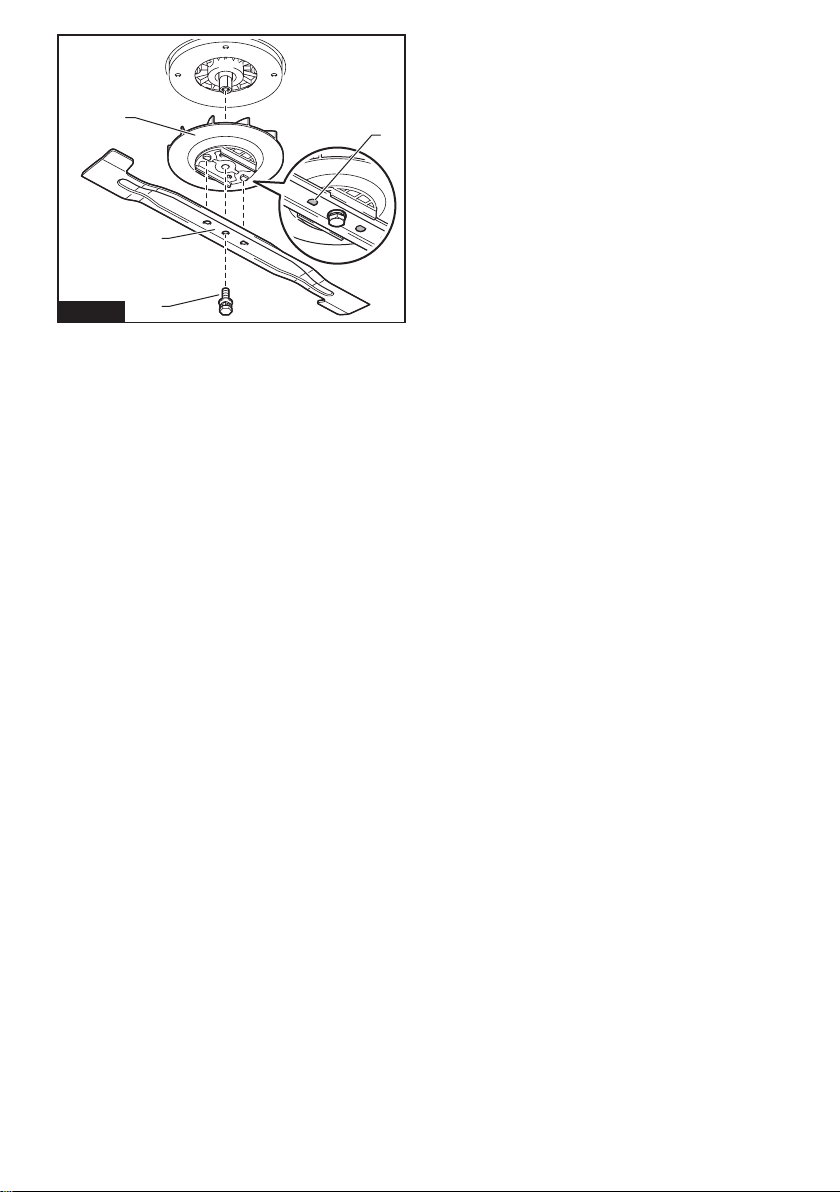
Straight mower blade 191V97-3 191V96-5 / 191W87-2
Mulching blade 191Y64-6 191Y65-4
Dimensions
(L x W x H)
during operation L: 1,690 mm to 1,740 mm
W: 530 mm
H: 930 mm to 1,060 mm
L: 1,810 mm to 1,870 mm
W: 580 mm
H: 920 mm to 1,040 mm
when stored
(without grass basket)
580 mm x 530 mm x 870 mm 610 mm x 580 mm x 925 mm
Traveling speed –2.5 - 5.0 km/h –2.5 - 5.0 km/h
Rated voltage D.C. 36 V
Net weight 24.5 - 26.8 kg 27.0 - 29.3 kg 25.5 - 28.0 kg 27.9 - 30.4 kg
Protection degree IPX4
• Duetoourcontinuingprogramofresearchanddevelopment,thespecicationshereinaresubjecttochange
without notice.
• Specicationsmaydierfromcountrytocountry.
• Theweightmaydierdependingontheattachment(s),includingthebatterycartridge.Thelightestandheavi-
est combination, according to EPTA-Procedure 01/2014, are shown in the table.
Applicable battery cartridge and charger
Batterycartridge BL1815N / BL1820B / BL1830B / BL1840B / BL1850B / BL1860B
Charger DC18RC / DC18RD / DC18RE / DC18SD / DC18SE / DC18SF /
DC18SH / DC18WC
• Someofthebatterycartridgesandchargerslistedabovemaynotbeavailabledependingonyourregionof
residence.
WARNING: Only use the battery cartridges and chargers listed above.Useofanyotherbatterycartridges
andchargersmaycauseinjuryand/orre.
WARNING: Do not use a corded power supply such as battery adapter or portable power pack with
this machine.Thecableofsuchpowersupplymayhindertheoperationandresultinpersonalinjury.
Symbols
Thefollowingsshowthesymbolswhichmaybeused
fortheequipment.Besurethatyouunderstandtheir
meaning before use.
Take particular care and attention.
Read instruction manual.
Danger;beawareofthrownobjects.
The distance between the tool and
bystandersmustbeatleast15m.
Neverputyourhandsandfeetnearthe
mower blade under the mower. Mower
blades continue to rotate after the motor is
switchedo.
Removethelockkeybeforeinspecting,
adjusting,cleaning,servicing,leavingand
storing the mower.
Warning;Disconnectbatterybefore
maintenance.
Electrical hazard. Contact with water can
cause electric shock.
Do not pour water.

11 ENGLISH
Ni-MH
Li-ion
OnlyforEUcountries
Due to the presence of hazardous com-
ponents in the equipment, waste electrical
and electronic equipment, accumulators
andbatteriesmayhaveanegativeimpact
on the environment and human health.
Do not dispose of electrical and electronic
appliances or batteries with household
waste!
In accordance with the European Directive
on waste electrical and electronic equip-
ment and on accumulators and batteries
and waste accumulators and batteries,
as well as their adaptation to national law,
waste electrical equipment, batteries and
accumulatorsshouldbestoredseparately
and delivered to a separate collection point
for municipal waste, operating in accor-
dance with the regulations on environmen-
tal protection.
Thisisindicatedbythesymbolofthe
crossed-out wheeled bin placed on the
equipment.
Guaranteed sound power level according
to EU Outdoor Noise Directive.
Sound power level according to Australia
NSW Noise Control Regulation.
Intended use
The machine is intended for lawn mowing.
SAFETY WARNINGS
General power tool safety warnings
WARNING: Read all safety warnings, instruc-
tions, illustrations and specications provided
with this power tool. Failure to follow all instructions
listedbelowmayresultinelectricshock,reand/or
seriousinjury.
Save all warnings and instruc-
tions for future reference.
Theterm“powertool”inthewarningsreferstoyour
mains-operated(corded)powertoolorbattery-operated
(cordless) power tool.
Work area safety
1. Keep work area clean and well lit. Cluttered or
dark areas invite accidents.
2. Do not operate power tools in explosive atmo-
spheres, such as in the presence of ammable
liquids, gases or dust. Power tools create sparks
whichmayignitethedustorfumes.
3. Keep children and bystanders away while
operating a power tool. Distractions can cause
youtolosecontrol.
Electrical safety
1. Power tool plugs must match the outlet. Never
modify the plug in any way. Do not use any
adapter plugs with earthed (grounded) power
tools. Unmodiedplugsandmatchingoutletswill
reduce risk of electric shock.
2. Avoid body contact with earthed or grounded
surfaces, such as pipes, radiators, ranges and
refrigerators. There is an increased risk of elec-
tricshockifyourbodyisearthedorgrounded.
3. Do not expose power tools to rain or wet con-
ditions. Water entering a power tool will increase
the risk of electric shock.
4. Do not abuse the cord. Never use the cord for
carrying, pulling or unplugging the power tool.
Keep cord away from heat, oil, sharp edges
or moving parts. Damaged or entangled cords
increase the risk of electric shock.
5. When operating a power tool outdoors, use an
extension cord suitable for outdoor use. Use of
a cord suitable for outdoor use reduces the risk of
electric shock.
6. If operating a power tool in a damp location
is unavoidable, use a residual current device
(RCD) protected supply. Use of an RCD reduces
the risk of electric shock.
7. Power tools can produce electromagnetic
elds (EMF) that are not harmful to the user.
However, users of pacemakers and other similar
medical devices should contact the maker of their
device and/or doctor for advice before operating
this power tool.
Personal safety
1. Stay alert, watch what you are doing and use
common sense when operating a power tool.
Do not use a power tool while you are tired or
under the inuence of drugs, alcohol or med-
ication. A moment of inattention while operating
powertoolsmayresultinseriouspersonalinjury.
2. Use personal protective equipment. Always
wear eye protection. Protective equipment such
asadustmask,non-skidsafetyshoes,hardhator
hearing protection used for appropriate conditions
willreducepersonalinjuries.
3. Prevent unintentional starting. Ensure the
switch is in the o-position before connecting
to power source and/or battery pack, picking
up or carrying the tool.Carryingpowertoolswith
yourngerontheswitchorenergisingpowertools
that have the switch on invites accidents.
4. Remove any adjusting key or wrench before
turning the power tool on.Awrenchorakeyleft
attachedtoarotatingpartofthepowertoolmay
resultinpersonalinjury.
5. Do not overreach. Keep proper footing and
balance at all times. This enables better control
of the power tool in unexpected situations.
6. Dress properly. Do not wear loose clothing or
jewellery. Keep your hair and clothing away
from moving parts.Looseclothes,jewelleryor
long hair can be caught in moving parts.

12 ENGLISH
7. If devices are provided for the connection of
dust extraction and collection facilities, ensure
these are connected and properly used. Use of
dust collection can reduce dust-related hazards.
8. Do not let familiarity gained from frequent use
of tools allow you to become complacent and
ignore tool safety principles. A careless action
cancausesevereinjurywithinafractionofa
second.
9. Always wear protective goggles to protect
your eyes from injury when using power tools.
The goggles must comply with ANSI Z87.1 in
the USA, EN 166 in Europe, or AS/NZS 1336
in Australia/New Zealand. In Australia/New
Zealand, it is legally required to wear a face
shield to protect your face, too.
It is an employer's responsibility to enforce
the use of appropriate safety protective equip-
ments by the tool operators and by other per-
sons in the immediate working area.
Power tool use and care
1. Do not force the power tool. Use the correct
power tool for your application. The correct
powertoolwilldothejobbetterandsaferatthe
rate for which it was designed.
2. Do not use the power tool if the switch does
not turn it on and o.Anypowertoolthatcannot
be controlled with the switch is dangerous and
must be repaired.
3. Disconnect the plug from the power source
and/or remove the battery pack, if detachable,
from the power tool before making any adjust-
ments, changing accessories, or storing power
tools.Suchpreventivesafetymeasuresreduce
theriskofstartingthepowertoolaccidentally.
4. Store idle power tools out of the reach of chil-
dren and do not allow persons unfamiliar with
the power tool or these instructions to operate
the power tool. Power tools are dangerous in the
hands of untrained users.
5. Maintain power tools and accessories. Check
for misalignment or binding of moving parts,
breakage of parts and any other condition that
may aect the power tool’s operation. If dam-
aged, have the power tool repaired before use.
Manyaccidentsarecausedbypoorlymaintained
power tools.
6. Keep cutting tools sharp and clean.Properly
maintained cutting tools with sharp cutting edges
arelesslikelytobindandareeasiertocontrol.
7. Use the power tool, accessories and tool bits
etc. in accordance with these instructions, tak-
ing into account the working conditions and
the work to be performed. Use of the power tool
foroperationsdierentfromthoseintendedcould
result in a hazardous situation.
8. Keep handles and grasping surfaces dry,
clean and free from oil and grease.Slippery
handles and grasping surfaces do not allow for
safe handling and control of the tool in unexpected
situations.
9. When using the tool, do not wear cloth work
gloves which may be entangled. The entangle-
mentofclothworkglovesinthemovingpartsmay
resultinpersonalinjury.
Battery tool use and care
1. Recharge only with the charger specied by
the manufacturer. A charger that is suitable for
onetypeofbatterypackmaycreateariskofre
whenusedwithanotherbatterypack.
2. Use power tools only with specically desig-
nated battery packs.Useofanyotherbattery
packsmaycreateariskofinjuryandre.
3. When battery pack is not in use, keep it away
from other metal objects, like paper clips,
coins, keys, nails, screws or other small metal
objects, that can make a connection from one
terminal to another.Shortingthebatterytermi-
nalstogethermaycauseburnsorare.
4. Under abusive conditions, liquid may be
ejected from the battery; avoid contact. If con-
tact accidentally occurs, ush with water. If
liquid contacts eyes, additionally seek medical
help.Liquidejectedfromthebatterymaycause
irritation or burns.
5. Do not use a battery pack or tool that is dam-
aged or modied.Damagedormodiedbatteries
mayexhibitunpredictablebehaviourresultingin
re,explosionorriskofinjury.
6. Do not expose a battery pack or tool to re or
excessive temperature.Exposuretoreortem-
peratureabove130°Cmaycauseexplosion.
7. Follow all charging instructions and do not
charge the battery pack or tool outside the
temperature range specied in the instruc-
tions.Chargingimproperlyorattemperatures
outsidethespeciedrangemaydamagethe
batteryandincreasetheriskofre.
Service
1. Have your power tool serviced by a qualied
repair person using only identical replacement
parts.Thiswillensurethatthesafetyofthepower
tool is maintained.
2. Never service damaged battery packs. Service
ofbatterypacksshouldonlybeperformedbythe
manufacturer or authorized service providers.
3. Follow instruction for lubricating and chang-
ing accessories.

13 ENGLISH
Cordless Lawn Mower Safety
Warnings
1. Do not use the lawnmower in bad weather
conditions, especially when there is a risk of
lightning. This decreases the risk of being struck
bylightning.
2. Thoroughly inspect the area for wildlife where
the lawnmower is to be used.Wildlifemaybe
injuredbythelawnmowerduringoperation.
3. Thoroughly inspect the area where the lawn-
mower is to be used and remove all stones,
sticks, wires, bones, and other foreign objects.
Thrownobjectscancausepersonalinjury.
4. Before using the lawnmower, always visually
inspect to see that the blade and the blade
assembly are not worn or damaged. Worn or
damagedpartsincreasetheriskofinjury.
5. Check the grass catcher frequently for wear or
deterioration. A worn or damaged grass catcher
mayincreasetheriskofpersonalinjury.
6. Keep guards in place. Guards must be in work-
ing order and be properly mounted. A guard
that is loose, damaged, or is not functioning cor-
rectlymayresultinpersonalinjury.
7. Keep all cooling air inlets clear of debris.
Blockedairinletsanddebrismayresultinover-
heatingorriskofre.
8. While operating the lawnmower, always wear
non-slip and protective footwear. Do not oper-
ate the lawnmower when barefoot or wearing
open sandals.Thisreducesthechanceofinjury
to the feet from contact with the moving blade.
9. While operating the lawnmower, always wear
long trousers. Exposed skin increases the likeli-
hoodofinjuryfromthrownobjects.
10. Do not operate the lawnmower in wet grass.
Walk, never run. This reduces the risk of slipping
andfallingwhichmayresultinpersonalinjury.
11. Do not operate the lawnmower on excessively
steep slopes. This reduces the risk of loss of
control,slippingandfallingwhichmayresultin
personalinjury.
12. When working on slopes, always be sure of
your footing, always work across the face
of slopes, never up or down and exercise
extreme caution when changing direction. This
reduces the risk of loss of control, slipping and
fallingwhichmayresultinpersonalinjury.
13. Use extreme caution when reversing or pulling
the lawnmower towards you. Always be aware
of your surroundings. This reduces the risk of
tripping during operation.
14. Do not touch blades and other hazardous
moving parts while they are still in motion. This
reducestheriskofinjuryfrommovingparts.
15. When clearing jammed material or cleaning
the lawnmower, make sure all power switches
are o and the battery pack is disconnected.
Unexpectedoperationofthelawnmowermay
resultinseriouspersonalinjury.
SAVE THESE INSTRUCTIONS.
WARNING: DO NOT let comfort or familiarity
with product (gained from repeated use) replace
strict adherence to safety rules for the subject
product.
MISUSE or failure to follow the safety rules stated
in this instruction manual may cause serious
personal injury.
IMPORTANT SAFETY
INSTRUCTIONS
WARNING: Read all safety warnings and
all instructions. Failure to follow the warnings and
instructionsmayresultinelectricshock,reand/or
seriousinjury.
Save all warnings and instruc-
tions for future reference.
Training
1. Read the instructions carefully. Be familiar
with the controls and the proper use of the
mower.
2. Never allow children or people unfamiliar with
these instructions to use the mower. Local
regulations can restrict the age of the operator.
3. Never operate the mower while people, espe-
cially children, or pets are nearby.
4. Keep in mind that the operator or user is
responsible for accidents or hazards occurring
to other people or their property.
5. Children should be supervised to ensure that
they do not play with the mower.
6. Physical condition - Do not operate mower
while under the inuence of drugs, alcohol, or
any medication.
Preparation
1. While operating the mower, always wear sub-
stantial footwear and long trousers. Do not
operate the mower when barefoot or wearing
open sandals. Avoid wearing clothing or jew-
elry that is loose tting or that has hanging
cords or ties. They can be caught in moving
parts.
2. Before use, always visually inspect the mower
for damaged, missing or misplaced guards or
shields.
3. Be sure the area is clear of other people before
mowing. Stop mower if anyone enters the area.
4. Do not insert the lock key into mower until it is
ready to be used.
5. Always wear protective goggles to protect
your eyes from injury when using power tools.
The goggles must comply with ANSI Z87.1 in
the USA, EN 166 in Europe, or AS/NZS 1336
in Australia/New Zealand. In Australia/New
Zealand, it is legally required to wear a face
shield to protect your face, too.

14 ENGLISH
It is an employer's responsibility to enforce
the use of appropriate safety protective equip-
ments by the tool operators and by other per-
sons in the immediate working area.
6. Check the blades or blade bolts carefully for
cracks or damage before operation. Replace
cracked or damaged blades or blade bolts
immediately.
7. Remove foreign matters such as rocks, wire,
bottles, bones and large sticks from the work
area before mowing to prevent personal injury
or damage to the mower.
8. Objects struck by the mower blade can cause
severe injuries to persons. The lawn should
always be carefully examined and cleared of
all objects prior to each mowing.
9. Watch for holes, ruts, bumps, rocks, or other
hidden objects. Uneven terrain could cause a slip
and fall accident. Tall grass can hide obstacles.
10. Use personal protective equipment. Always
wear eye protection. Protective equipment such
asadustmask,non-skidsafetyshoes,hardhator
hearing protection used for appropriate conditions
willreducepersonalinjuries.
Operation
1. Do not overreach. Keep the balance at all
times. Always be sure of the footing on slopes.
Walk, never run.
2. Stop the mower and remove the lock key, and
make sure that all moving parts have come to
a complete stop:
- whenever you leave the mower,
- before clearing blockages or unclogging
chute,
- before checking, cleaning or working on the
mower,
- after striking a foreign object. Inspect the
mower for damage and make repairs before
restarting and operating the mower,
- whenever the mower starts vibrating
abnormally.
3. Never operate the mower with defective
guards or shields, or without safety devices,
for example deectors and/or grass basket, in
place.
4. Avoid using the mower in bad weather con-
ditions especially when there is a risk of
lightning.
5. Wear eye protection and stout shoes at all
times while operating the mower.
6. Operate the mower only in daylight or in good
articial light.
7. Switch on the mower carefully according to
instructions and with feet well away from the
blade(s).
8. Take care against injury to feet and hands from
the mower blades.
9. Always ensure that the ventilation openings
are kept clear of debris.
10. Mow across the face of slopes, never up and
down. Exercise extreme caution when chang-
ing direction on slopes. Do not mow exces-
sively steep slopes.
11. Use extreme caution when reversing or pulling
the mower towards you.
12. Stop the blade(s) if the mower has to be tilted
for transportation when crossing surfaces
other than grass, and when transporting the
mower to and from the area to be used.
13. Do not tilt the mower when switching on the
motor, except if the mower has to be tilted
for starting. In this case, do not tilt it more
than absolutely necessary and lift only the
part, which is away from the operator. Always
ensure that both hands are in the operating
position before returning the mower to the
ground.
14. Do not put hands or feet near or under rotating
parts. Keep clear of the discharge opening at
all times.
15. Do not transport the mower while the mower is
turned on.
16. Avoid operating the mower in wet grass.
17. Always keep a rm hold on the handle.
18. Don't grasp the exposed cutting blades or
cutting edges when picking up or holding the
mower.
19. Keep hands and feet away from rotating
blades. Caution - Blades coast after the mower
is switched o.
20. Stop operation immediately if you notice
anything unusual. Switch o the mower and
remove the lock key. Then inspect the mower.
21. Never attempt to make cutting height adjust-
ments while mower is running if the mower
has cutting height adjustment feature.
22. Release switch lever and wait for blade rota-
tion to stop before crossing driveways, walks,
roads, and any gravel-covered areas. Also
remove the lock key if you leave the mower,
reach to pick up or remove something out of
your way, or for any other reason that may
distract you from what you are doing.
23. If the mower strikes a foreign object, follow
these steps:
- Stop the mower, release the switch lever and
wait until the blade comes to a complete stop.
- Remove the lock key and the battery
cartridge.
- Thoroughly inspect the mower for any
damage.
- Replace the blade if it is damaged in any way.
Repair any damage before restarting and con-
tinuing to operate the mower.

15 ENGLISH
24. Do not start the mower when standing in front
of the discharge opening.
25. If the mower starts to vibrate abnormally
(check immediately)
- inspect for damage,
- replace or repair any damaged parts,
- check for and tighten any loose parts.
26. Never direct discharged material toward
anyone. Avoid discharging material against a
wall or obstruction.Materialmayricochetback
toward the operator. Stop the blade when crossing
gravel surfaces.
27. Do not pull the mower backwards unless
absolutely necessary.Whenyouarecompelled
to back the mower from a fence or other similar
obstruction, look down and behind before and
while moving backwards.
28. Shut the motor o and wait until the blade
comes to a complete stop before removing the
grass catcher. Beware that the blades coast after
turno.
29. When you use the machine on muddy ground,
wet slope, or slippery place, pay attention to
your footing.
30. Do not submerge the machine into a puddle.
31. When operating the machine, pay attention to
piping and wiring.
Maintenance and storage
1. Replace worn or damaged parts for safety.
Use only genuine replacement parts and
accessories.
2. Inspect and maintain the mower regularly.
3. When not in use, store the mower out of the
reach of children.
4. Keep all nuts, bolts, and screws tight to
be sure the equipment is in safe working
condition.
5. Check the grass basket frequently for wear or
deterioration. For storage, always make sure
the grass basket is empty. Replace a worn
grass basket with a new factory replacement
for safety.
6. Use only the manufacturer genuine blades
specied in this manual.
7. Be careful during adjustment of the mower
to prevent entrapment of the ngers between
moving blades and xed parts of the mower.
8. Check the blade mounting bolt at frequent
intervals for proper tightness.
9. Always allow the mower to cool down before
storing.
10. When servicing the blades be aware that, even
though the power source is switched o, the
blades can still be moved.
11. Never remove or tamper with safety devices.
Check their proper operation regularly. Never
do anything to interfere with the intended
function of a safety device or to reduce the
protection provided by a safety device.
12. Do not leave the machine unattended outdoors
in the rain.
13. When storing the machine, avoid direct sun-
light and rain, and store it in a place where it
does not get hot or humid.
Battery tool use and care
1. Recharge only with the charger specied by
the manufacturer. A charger that is suitable for
onetypeofbatterypackmaycreateariskofre
whenusedwithanotherbatterypack.
2. Use power tools only with specically desig-
nated battery packs.Useofanyotherbattery
packsmaycreateariskofinjuryandre.
3. When battery pack is not in use, keep it away
from other metal objects, like paper clips,
coins, keys, nails, screws or other small metal
objects, that can make a connection from one
terminal to another.Shortingthebatterytermi-
nalstogethermaycauseburnsorare.
4. Under abusive conditions, liquid may be
ejected from the battery; avoid contact. If con-
tact accidentally occurs, ush with water. If
liquid contacts eyes, additionally seek medical
help.Liquidejectedfromthebatterymaycause
irritation or burns.
5. Do not use a battery pack or tool that is dam-
aged or modied.Damagedormodiedbatteries
mayexhibitunpredictablebehaviourresultingin
re,explosionorriskofinjury.
6. Do not expose a battery pack or tool to re or
excessive temperature.Exposuretoreortem-
peratureabove130°Cmaycauseexplosion.
7. Follow all charging instructions and do not
charge the battery pack or tool outside the
temperature range specied in the instruc-
tions.Chargingimproperlyorattemperatures
outsidethespeciedrangemaydamagethe
batteryandincreasetheriskofre.
Electrical and battery safety
1. Do not dispose of the battery(ies) in a re.
Thecellmayexplode.Checkwithlocalcodesfor
possible special disposal instructions.
2. Do not open or mutilate the battery(ies).
Releasedelectrolyteiscorrosiveandmaycause
damagetotheeyesorskin.Itmaybetoxicif
swallowed.
3. Do not charge battery in rain, or in wet
locations.
4. Do not charge the battery outdoors.
5. Do not handle charger, including charger plug,
and charger terminals with wet hands.
6. Do not replace the battery in the rain.
7. Do not wet the terminal of battery with liquid
such as water, or submerge the battery. Do not
leave the battery in the rain, nor charge, use,
or store the battery in a damp or wet place. If
the terminal gets wet or liquid enters inside of bat-
tery,thebatterymaybeshortcircuitedandthereis
ariskofoverheat,re,orexplosion.
8. After removing the battery from the machine or
charger, be sure to attach the battery cover to
the battery and store it in a dry place.
9. Do not replace the battery with wet hands.

16 ENGLISH
10. Avoid dangerous environment. Don't use the
machine in dump or wet locations or expose it
to rain. Water entering the machine will increase
the risk of electric shock.
11. If the battery cartridge gets wet, drain the
water inside and then wipe it with a dry cloth.
Dry the battery cartridge completely in a dry
place before use.
Service
1. Have your power tool serviced by a qualied
repair person using only identical replacement
parts.Thiswillensurethatthesafetyofthepower
tool is maintained.
2. Never service damaged battery packs. Service
ofbatterypacksshouldonlybeperformedbythe
manufacturer or authorized service providers.
SAVE THESE INSTRUCTIONS.
WARNING: DO NOT let comfort or familiarity
with product (gained from repeated use) replace
strict adherence to safety rules for the subject
product.
MISUSE or failure to follow the safety rules stated
in this instruction manual may cause serious
personal injury.
Important safety instructions for
battery cartridge
1. Before using battery cartridge, read all instruc-
tions and cautionary markings on (1) battery
charger, (2) battery, and (3) product using
battery.
2. Do not disassemble or tamper with the battery
cartridge.Itmayresultinare,excessiveheat,
or explosion.
3. If operating time has become excessively
shorter, stop operating immediately. It may
result in a risk of overheating, possible burns
and even an explosion.
4. If electrolyte gets into your eyes, rinse them
out with clear water and seek medical atten-
tion right away. It may result in loss of your
eyesight.
5. Do not short the battery cartridge:
(1) Do not touch the terminals with any con-
ductive material.
(2) Avoid storing battery cartridge in a con-
tainer with other metal objects such as
nails, coins, etc.
(3) Do not expose battery cartridge to water
or rain.
A battery short can cause a large current
ow, overheating, possible burns and even a
breakdown.
6. Do not store and use the tool and battery car-
tridge in locations where the temperature may
reach or exceed 50 °C (122 °F).
7. Do not incinerate the battery cartridge even if
it is severely damaged or is completely worn
out. The battery cartridge can explode in a re.
8. Do not nail, cut, crush, throw, drop the battery
cartridge, or hit against a hard object to the
battery cartridge.Suchconductmayresultina
re,excessiveheat,orexplosion.
9. Do not use a damaged battery.
10. The contained lithium-ion batteries are subject
to the Dangerous Goods Legislation require-
ments.
Forcommercialtransportse.g.bythirdparties,
forwarding agents, special requirement on pack-
aging and labeling must be observed.
For preparation of the item being shipped, consult-
ing an expert for hazardous material is required.
Pleasealsoobservepossiblymoredetailed
national regulations.
Tapeormaskoopencontactsandpackupthe
batteryinsuchamannerthatitcannotmove
around in the packaging.
11. When disposing the battery cartridge, remove
it from the tool and dispose of it in a safe
place. Follow your local regulations relating to
disposal of battery.
12. Use the batteries only with the products
specied by Makita. Installing the batteries to
non-compliantproductsmayresultinare,exces-
siveheat,explosion,orleakofelectrolyte.
13. If the tool is not used for a long period of time,
the battery must be removed from the tool.
14. During and after use, the battery cartridge may
take on heat which can cause burns or low
temperature burns. Pay attention to the han-
dling of hot battery cartridges.
15. Do not touch the terminal of the tool imme-
diately after use as it may get hot enough to
cause burns.
16. Do not allow chips, dust, or soil stuck into the
terminals, holes, and grooves of the battery
cartridge.Itmaycauseheating,catchingre,
burstandmalfunctionofthetoolorbatterycar-
tridge,resultinginburnsorpersonalinjury.
17. Unless the tool supports the use near
high-voltage electrical power lines, do not use
the battery cartridge near high-voltage electri-
cal power lines.Itmayresultinamalfunctionor
breakdownofthetoolorbatterycartridge.
18. Keep the battery away from children.
SAVE THESE INSTRUCTIONS.
CAUTION: Only use genuine Makita batteries.
Use of non-genuine Makita batteries, or batteries that
havebeenaltered,mayresultinthebatterybursting
causingres,personalinjuryanddamage.Itwill
alsovoidtheMakitawarrantyfortheMakitatooland
charger.

17 ENGLISH
Tips for maintaining maximum
battery life
1. Charge the battery cartridge before completely
discharged. Always stop tool operation and
charge the battery cartridge when you notice
less tool power.
2. Never recharge a fully charged battery car-
tridge. Overcharging shortens the battery
service life.
3. Charge the battery cartridge with room tem-
perature at 10 °C - 40 °C (50 °F - 104 °F). Let
a hot battery cartridge cool down before
charging it.
4. When not using the battery cartridge, remove
it from the tool or the charger.
5. Charge the battery cartridge if you do not use
it for a long period (more than six months).
ASSEMBLY
WARNING: Always be sure that the lock key
and battery cartridge are removed before carrying
out any work on the mower. Failure to remove the
lockkeyandthebatterycartridgemayresultinseri-
ouspersonalinjuryfromaccidentalstart-up.
WARNING: Never start the mower unless it is
completely assembled. Operation of the machine
inapartiallyassembledstatemayresultinserious
personalinjuryfromaccidentalstart-up.
Installing the handle
NOTICE: When installing the handles, be careful
not to pinch the cord between the handles. If the
cordisdamaged,themowerswitchmaynotwork.
1. Align the hole in the lower handle with the hole
in the upper handle, then insert the bolt from outside,
and then tighten the thumb nut from inside. Perform the
same procedure on the other side.
For DLM481/DLM539
►Fig.1: 1. Bolt 2. Thumb nut 3. Lower handle
4. Upper handle
For DLM480/DLM538
►Fig.2: 1. Bolt 2. Thumb nut 3. Lower handle
4. Upper handle
2. Turn the knob 90° while pulling the knob on the
lower handle to release the locking pin. Perform the
same procedure on the other side. Raise the handle,
and then turn the knob on both sides 90°. Make sure
thattheknobsaresecurelyxed.
►Fig.3: 1. Knob
NOTE: Supporting the handle makes it easier to
release the locking pin when pulling the knob.
Removing the mulching plug
1. Open the rear cover.
►Fig.4: 1. Rear cover
2. Liftupthemulchingplugslightly,andthenremove
it.
►Fig.5: 1. Mulching plug
Assembling the grass basket
1. Pick up the upper clip of the grass basket.
►Fig.6: 1. Upper clip
2. Insert the frame into the grass basket as far as it
will go while holding the handle of the frame.
►Fig.7: 1. Handle
NOTICE: Do not insert the handle into the grass
basket. Be sure to insert the frame along the stitch of
the grass basket.
3. Make sure that there is no sagging on the corners
of the grass basket.
►Fig.8
4. Open the upper clip, and attach it to the frame.
►Fig.9
5. Attachalltheotherclipsasshowninthegure.
Makesurethatalltheclipsaresecurelyattachedtothe
frame.
►Fig.10: 1. Clip
Installing or removing the grass
basket
To install the grass basket, follow the steps below.
1. Open the rear cover.
►Fig.11: 1. Rear cover
2. Hold the handle of the grass basket, and then
hookthegrassbasketontherodofthemowerbodyas
showninthegure.
►Fig.12: 1. Grass basket 2. Handle 3. Rod
To remove the grass basket, open the rear cover, and
thenremovethegrassbasketbyholdingthehandle.
Attaching the mulching plug
1. Open the rear cover, and then remove the grass
basket.
►Fig.13: 1. Rear cover 2. Grass basket
2. Attachthemulchingplugbypushingitasfarasit
willgosothattheprotrusionsonthemulchingplugt
into the holes on the machine.
►Fig.14: 1. Mulching plug 2. Protrusion

18 ENGLISH
FUNCTIONAL
DESCRIPTION
Installing or removing battery
cartridge
CAUTION: Always switch o the machine
before installing or removing of the battery
cartridge.
CAUTION: Hold the machine and the battery
cartridge rmly when installing or removing bat-
tery cartridge. Failure to hold the machine and the
batterycartridgermlymaycausethemtoslipo
yourhandsandresultindamagetothemachineand
batterycartridgeandapersonalinjury.
CAUTION: Make sure that you lock the battery
cover before use. Otherwise,mud,dirt,orwatermay
causedamagetotheproductorthebatterycartridge.
CAUTION: Always install the battery cartridge
fully until the red indicator cannot be seen. If not,
itmayaccidentallyfalloutofthemachine,causing
injurytoyouorsomeonearoundyou.
CAUTION: Do not install the battery cartridge
forcibly.Ifthecartridgedoesnotslideineasily,itis
notbeinginsertedcorrectly.
CAUTION: Hold the battery cover rmly when
installing or removing the battery cartridge.
NOTE:Themachinedoesnotworkwithonlyone
batterycartridge.
To install the battery cartridge;
1. Pullupthelockinglever,andthenopenthebattery
cover.
►Fig.15: 1.Batterycover2. Locking lever
2. Alignthetongueonthebatterycartridgewiththe
slot on the machine, and then slide the cartridge until it
locks in place with a little click.
►Fig.16: 1.Batterycartridge
3. Insertthelockkeyintheplaceshowninthegure
as far as it will go.
►Fig.17: 1.Lockkey
4. Closethebatterycoverandpushituntilitis
latched with the locking lever.
To remove the battery cartridge;
1. Pullupthelockingleverandopenthebattery
cover.
2. Pulloutthebatterycartridgefromthemachine
while sliding the button on the front of the cartridge.
3. Pulloutthelockkey.
4. Closethebatterycover.
Machine / battery protection system
Themachineisequippedwithamachine/battery
protectionsystem.Thissystemautomaticallycutso
powertothemotortoextendmachineandbatterylife.
Themachinewillautomaticallystopduringoperationif
themachineorbatteryisplacedunderoneofthefol-
lowing conditions:
Overload protection
Whenthebatteryisoperatedinamannerthatcauses
ittodrawanabnormallyhighcurrent,themachine
automaticallystopsandthemainpowerlampblinksin
green.Inthissituation,turnthemachineoandstop
the application that caused the machine to become
overloaded. Then turn the machine on to restart.
Overheat protection
Whenthemachineorbatteryisoverheated,the
machinestopsautomaticallyandthemainpowerlamp
lightsupinred.Inthiscase,letthemachineandbattery
cool before turning the machine on again.
Overdischarge protection
Whenthebatterycapacityisnotenough,themachine
stopsautomaticallyandthemainpowerlampblinksin
red.Inthiscase,removethebatteryfromthemachine
andchargethebatterycartridgesorchangethebattery
cartridgestofullychargedones.
Protections against other causes
Protectionsystemisalsodesignedforothercausesthat
could damage the machine and allows the machine to
stopautomatically.Takeallthefollowingstepstoclear
the causes, when the machine has been brought to a
temporaryhaltorstopinoperation.
1. Turnthemachineo,andthenturnitonagainto
restart.
2. Chargethebattery(ies)orreplaceit/themwith
rechargedbattery(ies).
3. Letthemachineandbattery(ies)cooldown.
Ifnoimprovementcanbefoundbyrestoringprotection
system,thencontactyourlocalMakitaServiceCenter.
NOTICE: If the machine stops due to a cause
not described above, refer to the section for
troubleshooting.
Indicating the remaining battery
capacity
►Fig.18: 1.Batteryindicator
Whentheremainingbatterycapacitygetslow,thebat-
teryindicatorblinksontheapplicablebatteryside.By
furtheruse,themachinestopsandthebatteryindicator
lightsup.Inthissituation,chargethebatterycartridge.

19 ENGLISH
Indicating the remaining battery
capacity
Only for battery cartridges with the indicator
►Fig.19: 1. Indicator lamps 2. Check button
Pressthecheckbuttononthebatterycartridgetoindi-
catetheremainingbatterycapacity.Theindicatorlamps
light up for a few seconds.
Indicator lamps Remaining
capacity
Lighted O Blinking
75% to 100%
50% to 75%
25% to 50%
0% to 25%
Charge the
battery.
Thebattery
mayhave
malfunctioned.
NOTE: Depending on the conditions of use and the
ambienttemperature,theindicationmaydierslightly
fromtheactualcapacity.
NOTE:Therst(farleft)indicatorlampwillblinkwhen
thebatteryprotectionsystemworks.
Main power switch
WARNING: Always turn o the main power
switch when not in use.
►Fig.20: 1. Main power lamp 2. Main power switch
To turn on the machine, press the main power switch.
Themainpowerlamplightsupingreen.Toturnothe
machine, press the main power switch again.
NOTE: If the main power lamp lights up in red or
blinks in red or green, refer to the instructions for
machine/batteryprotectionsystem.
NOTE:Thismachineemploystheautopower-o
function. To avoid unintentional start up, the main
powerswitchwillautomaticallyshutdownwhenthe
switch lever and drive lever (if equipped) are not
pulled for a certain period after the main power switch
is turned on.
Switch action
WARNING: Before installing the battery car-
tridge, always check to see that the switch lever
actuates properly and returns to the original posi-
tion when released. Operating the machine with a
switchthatdoesnotactuateproperlycanleadtoloss
ofcontrolandseriouspersonalinjury.
NOTE: The mower does not start without pressing the
switch button even the switch lever is pulled.
NOTE:Mowermaynotstartduetotheoverload
whenyoutrytomowlongordensegrassatatime.
Increase the mowing height in this case.
Thismowerisequippedwiththelockkeyandhandle
switch.Ifyounoticeanythingunusualwitheitherofthe
lockkeyorswitch,stoptheoperationimmediatelyand
havethemcheckedbyyournearestMakitaAuthorized
Service Center.
For DLM481/DLM539
1. Installthebatterycartridges.Insertthelockkey,
andthenclosethebatterycover.
2. Press the main power switch.
3. Pulltheswitchlevertowardyouwhileholding
down the switch button. Release the switch button as
soon as the motor starts running.
►Fig.21: 1. Switch button 2. Switch lever
4. While holding the switch lever, push the drive lever
forward and hold it to drive the rear wheels.
►Fig.22: 1. Drive lever
NOTE:Youcandrivetherearwheelsbypushing
the drive lever forward and hold it without pulling the
switch lever.
5. Release the drive lever and the switch lever to
stop the machine.
For DLM480/DLM538
1. Installthebatterycartridges.Insertthelockkey,
andthenclosethebatterycover.
2. Press the main power switch.
3. Pulltheswitchlevertowardyouwhileholding
down the switch button. Release the switch button as
soon as the motor starts running.
►Fig.23: 1. Switch button 2. Switch lever
4. Release the switch lever to stop the motor.
Adjusting the mowing height
WARNING: Never put your hand or leg under
the mower body when adjusting the mowing
height.
WARNING: Always make sure that the lever
ts in the groove properly before operation.
Themowingheightcanbeadjustedintherangeof
between 20 mm and 100 mm.
Removethelockkey,andthenpullthemowingheight
adjustingleveroutwardofthemowerbodyandmoveit
toyourdesiredmowingheight.

20 ENGLISH
►Fig.24: 1.Mowingheightadjustinglever
The table below shows the relationship between the
numberonthemowerbodyandtheapproximatemow-
ing height.
Number Mowing height
120 mm
226 mm
332 mm
440 mm
549 mm
659 mm
770 mm
881 mm
992 mm
10 100 mm
Hold the lower handle with one hand, and then move
themowingheightadjustingleverwiththeotherhand.
►Fig.25: 1.Mowingheightadjustinglever2. Lower
handle
NOTE:Themowingheightguresshouldbeused
justasaguideline.Dependingontheconditionsof
thelawnortheground,theactuallawnheightmay
becomeslightlydierentfromthesetheight.
NOTE:Tryatestmowingofgrassinalessconspicu-
ousplacetogetyourdesiredheight.
Grass level indicator
Grass level indicator shows the volume of mowed
grass. When the grass basket is not full, the indicator
oatswhilethebladesarerunning.
►Fig.26: 1. Grass level indicator
When the grass basket is almost full, the indicator does
notoatwhilethebladesarerunning.Inthiscase,stop
theoperationimmediatelyandemptythebasket.
►Fig.27: 1. Grass level indicator
NOTE: This indicator is a rough guide. Depending on
the conditions of inside of the basket, this indicator
maynotworkproperly.
Adjusting the handle height
Thehandleheightcanbeadjustedintwolevels.
1. Hold the lower handle, and then turn the knob 90°
while pulling the knob on the lower handle to release
the locking pin. Perform the same procedure on the
other side.
►Fig.28: 1. Lower handle 2. Knob
NOTE: Supporting the handle makes it easier to
release the locking pin when pulling the knob.
2. Adjustthehandleheight,andthenturnthe
knob on both sides 90°. Make sure that the knobs are
securelyxed.
►Fig.29: 1. Knob
Adjusting the traveling speed
For DLM481/DLM539
►Fig.30: 1. Speed lever
Thetravelingspeedcanbeadjustedwiththespeed
lever.Todecreasethespeed,pullthelevertowardyou,
and to increase the speed, turn the lever forward.
Using mulching plug
Themulchingplugallowsyoutoreturnthecutgrassto
the ground without gathering the cut grass in the grass
basket.Whenyouoperatethemachinewiththemulch-
ing plug, be sure to remove the grass basket.
NOTICE: When using the machine with the
mulching plug, make sure that the total length of
grass after cutting is 30 mm or more, and the cut
length is 15 mm or less.
►Fig.31: (1) 30 mm or more (2) 15 mm or less
Using the rear discharge
Usingthereardischargeallowsyoutodischargethecut
grass to the ground from the rear side of the machine
without gathering the cut grass in the grass basket.
Whenyouoperatethemachineusingthereardis-
charge, be sure to remove the grass basket and mulch-
ing plug, and close the rear cover.
Electronic function
The machine is equipped with the electronic functions
foreasyoperation.
• Softstartatdriving
The soft-start function minimizes start-up shock,
andmakesthemachinestartsmoothly.
• Electricbrake
This machine is equipped with an electric brake.
Ifthemachineconsistentlyfailstoquicklystop
the mower blades after releasing the switch lever,
have the machine serviced at Makita Authorized
Service Center.
OPERATION
Mowing
WARNING: Before mowing, clear away sticks
and stones from mowing area. Furthermore, clear
away any weeds from mowing area in advance.
WARNING: Always wear the safety goggles or
safety glasses with side shields when operating
the mower.
CAUTION: If the cut grass or foreign object
blocks up inside of the mower body, be sure to
remove the lock key and battery cartridge and
wear gloves before removing the grass or foreign
object.
This manual suits for next models
1
Table of contents
Languages:
Other Makita Lawn Mower manuals

Makita
Makita ELM4110 User guide

Makita
Makita PLM4630N User guide

Makita
Makita DLM533ZX2 User manual

Makita
Makita RBE250 User manual

Makita
Makita DLM431 User manual

Makita
Makita DLM463 User manual

Makita
Makita DLM460 User manual

Makita
Makita DLM382CM2 User manual

Makita
Makita XML12 User manual

Makita
Makita DLM534 User manual

Makita
Makita ELM3711 User guide

Makita
Makita DLM380 User manual

Makita
Makita ELM4120 User manual

Makita
Makita DLM431 User manual

Makita
Makita DLM462 User manual

Makita
Makita DLM330 User manual

Makita
Makita PTM1000 User manual

Makita
Makita DLM330RM User manual

Makita
Makita DLM533 User manual

Makita
Makita UV380 User manual