Makita BBC231U User manual

GB Cordless Brushcutter / Instruction manual
Cordless String Trimmer
ID
Mesin Pemotong Semak Nirkabel / Petunjuk penggunaan
Mesin Pemangkas Bermata Senar
Nirkabel
VI Máy Caét Coû chaïy Pin / Taøi lieäu höôùng daãn
Máy Tæa hàng Rào chaïy Pin
TH /
BBC231U
BBC300L
BC231UD
BC300LD
010751

2
1013122 2013863
3013864 4010752
5011720 6011723
7011722 8011726
12
3
BBC231U/BC231UD
4
5
BBC300L/BC300LD
4
5
BBC231U/BC231UD
6, 7, 8
AB
BBC300L/BC300LD
6, 7, 8
A
B

3
9011721 10 011724
11 010765 12 010770
13 011715 14 012456
15 011485 16 013123
BBC231U/BC231UD
9
BBC300L/BC300LD 9
1
2
10
11
12
13
14
16
15
17
18
19
20
22
21
14
23

4
17 013140 18 010768
19 012457 20 010778
21 010777 22 010849
23 010756 24 010757
24 25
26 25
27
28
29
30
31
25
25
27
32
24
34
35
36
33
32

5
25 010758 26 010769
27 010753 28 010760
29 010759 30 012478
31 010767 32 010816
37
32
33
38
39
40

6
33 010817 34 012479
35 010812 36 010772
37 010992 38 010993
39 010994 40 010776
40
41
42
43
44
45 45
46
47
80 mm
48
100 mm
49
43
50
51

7
ENGLISH (Original instructions)
Explanation of general view
SPECIFICATIONS
• Due to our continuing program of research and development, the specifications herein are subject to change without
notice.
• Specifications and battery cartridge may differ from country to country.
• Weight, with battery cartridge, according to EPTA-Procedure 01/2003
Symbols END008-5
The following show the symbols used for the equipment.
Be sure that you understand their meaning before use.
................. Take particular care and attention.
....... Read instruction manual.
................ Danger; be aware of thrown objects.
................ The distance between the tool and
bystanders must be at least 15 m.
.......... Keep bystanders away.
........ Keep distance at least 15 m.
................ Avoid kickback.
................ Wear a helmet, goggles and ear
protection.
................. Wear protective gloves.
1. Red indicator
2. Slide button
3. Battery cartridge
4. Lock-off button
5. Switch trigger
6. Reversing switch
7. A position depressed for normal
operation
8. B position depressed for weed
and debris removal
9. Speed change switch lever
10. Indication lamp
11. Most effective cutting area
12. Indicator lamps
13. CHECK button
14. Grip
15. Handle
16. Screw
17. Knob
18. Handle clamp
19. Handle holder
20. Compression spring
21. Barrier
22. Spacer
23. Arrow mark
24. Cutter blade
25. Guard
26. Nylon cutting head
27. Guard extension
28. Bolt
29. Wing
30. Two bolts
31. Protector cover
32. Hex wrench
33. Receive washer
34. Clamp washer
35. Cup
36. Hex nut
37. Threaded spindle
38. Lever
39. Buckle
40. Hanger
41. Grease hole
42. Gear case
43. Cover
44. Latches
45. Press
46. Spool
47. For left hand rotation
48. Notches
49. Eyelets
50. Protrusion (Not shown)
51. Slot of the eyelet
Model BBC231U/BC231UD BBC300L/BC300LD
Type of handle Bike handle Loop handle
No load speed
Nylon cutting head High 0 - 6,600 min-1
Low 0 - 4,900 min-1
4 teeth blade High 0 - 7,300 min-1
–
Low 0 - 5,300 min-1
3 teeth blade High 0 - 7,700 min-1
–
Low 0 - 5,600 min-1
Overall length With blade 1,880 mm –
With nylon cutting head 1,850 mm
Cutting blade diameter 230 mm –
Cutting diameter with nylon cutting head 300 mm 300 mm
Net weight (with battery
BL3626)
Nylon cutting head 6.9 kg 5.9 kg
4 teeth blade 7.1 kg –
3 teeth blade 7.0 kg –
Rated voltage D.C. 36 V
Standard battery cartridge(s)
Warning: Use only the battery cartridge(s) described. BL3626/BL3622A/BL36120A

8
................ Wear sturdy boots with nonslip soles.
Steeltoed safety boots are
recommended.
................ Do not expose to moisture.
................ Top permissible tool speed.
IMPORTANT SAFETY
INSTRUCTIONS GEB068-6
WARNING! Read all safety warnings and all
instructions. Failure to follow the warnings and
instructions may result in electric shock, fire and/or
serious injury.
Save all warnings and
instructions for future reference.
Intended use
1. The cordless grass trimmer/brushcutter/string trimmer
is only intended for cutting grass, weeds, bushes and
undergrowth. It should not be used for any other
purpose such as edging or hedge cutting as this may
cause injury.
General instructions
1. Never allow people unfamiliar with these instructions,
people (including children) with reduced physical,
sensory or mental capabilities, or lack of experience
and knowledge to use the tool. Children should be
supervised to ensure that they do not play with the
tool.
2. Before starting the tool, read this instruction manual to
become familiar with the handling of the tool.
3. Do not lend the tool to a person with insufficient
experience or knowledge regarding handling of
brushcutters and string trimmers.
4. When lending the tool, always attach this instruction
manual.
5. Handle the tool with the utmost care and attention.
6. Never use the tool after consuming alcohol or drugs,
or if feeling tired or ill.
7. Never attempt to modify the tool.
8. Follow the regulations about handling of brushcutters
and string trimmers in your country.
Personal protective equipment (Fig. 1)
1. Wear safety helmet, protective goggles and protective
gloves to protect yourself from flying debris or falling
objects.
2. Wear ear protection such as ear muffs to prevent
hearing loss.
3. Wear proper clothing and shoes for safe operation,
such as a work overall and sturdy, non-slip shoes. Do
not wear loose clothing or jewelry. Loose clothes,
jewelry or long hair can be caught in moving parts.
4. When touching the cutting blade, wear protective
gloves. Cutting blades can cut bare hands severely.
Work area safety
1. Operate the tool under good visibility and daylight
conditions only. Do not operate the tool in darkness or
fog.
2. Do not operate the tool in explosive atmospheres,
such as in the presence of flammable liquids, gases or
dust. The tool creates sparks which may ignite the
dust or fumes.
3. During operation, never stand on an unstable or
slippery surface or a steep slope. During the cold
season, beware of ice and snow and always ensure
secure footing.
4. During operation, keep bystanders or animals at least
15 m away from the tool. Stop the tool as soon as
someone approaches.
5. Before operation, examine the work area for stones or
other solid objects. They can be thrown or cause
dangerous kickback and result in serious injury and/or
property damage.
6. WARNING: Use of this product can create dust
containing chemicals which may cause respiratory or
other illnesses. Some examples of these chemicals
are compounds found in pesticides, insecticides,
fertilizers and herbicides. Your risk from these
exposures varies, depending on how often you do this
type of work. To reduce your exposure to these
chemicals: work in a well ventilated area, and work
with approved safety equipment, such as those dust
masks that are specially designed to filter out
microscopic particles.
Electrical and battery safety
1. Do not expose the tool to rain or wet conditions. Water
entering the tool will increase the risk of electric shock.
2. Do not use the tool if the switch does not turn it on and
off. Any tool that cannot be controlled with the switch
is dangerous and must be repaired.
3. Prevent unintentional starting. Ensure the switch is in
the off-position before installing a battery pack, picking
up or carrying the tool. Carrying the tool with your
finger on the switch or energising the tool that have
the switch on invites accidents.
4. Recharge only with the charger specified by the
manufacturer. A charger that is suitable for one type of
battery pack may create a risk of fire when used with
another battery pack.
5. Use the tool only with specifically designated battery
packs. Use of any other battery packs may create a
risk of injury and fire.
6. When battery pack is not in use, keep it away from
other metal objects, like paper clips, coins, keys, nails,
screws or other small metal objects, that can make a
connection from one terminal to another. Shorting the
battery terminals together may cause burns or a fire.
7. Under abusive conditions, liquid may be ejected from
the battery; avoid contact. If contact accidentally
occurs, flush with water. If liquid contacts eyes, seek
medical help. Liquid ejected from the battery may
cause irritation or burns.
Putting into operation
1. Before assembling or adjusting the tool, remove the
battery cartridge.

9
2. Before handling the cutter blade, wear protective
gloves.
3. Before installing the battery cartridge, inspect the tool
for damages, loose screws/nuts or improper
assembly. Sharpen blunt cutter blade. If the cutter
blade is bent or damaged, replace it. Check all control
levers and switches for easy action. Clean and dry the
handles.
4. Never attempt to switch on the tool if it is damaged or
not fully assembled. Otherwise serious injury may
result.
5. Adjust the shoulder harness and hand grip to suit the
operator’s body size.
6. When inserting a battery cartridge, keep the cutting
attachment clear of your body and other object,
including the ground. It may rotate when starting and
may cause injury or damage to the tool and/or
property.
7. Remove any adjusting key, wrench or blade cover
before turning the tool on. An accessory left attached
to a rotating part of the tool may result in personal
injury.
Operation
1. In the event of an emergency, switch off the tool
immediately.
2. If you feel any unusual condition (e.g. noise, vibration)
during operation, switch off the tool. Do not use the
tool until the cause is recognized and solved.
3. The cutting attachment continues to rotate for a short
period after turning the tool off. Don’t rush to contact
the cutting attachment.
4. During operation, use the shoulder harness. Keep the
tool on your right side firmly.
5. Do not overreach. Keep proper footing and balance at
all times. Watch for hidden obstacles such as tree
stumps, roots and ditches to avoid stumbling.
6. Never work on a ladder or tree to avoid loss of control.
7. If the tool gets heavy impact or fall, check the
condition before continuing work. Check the controls
and safety devices for malfunction. If there is any
damage or doubt, ask our authorized service center
for the inspection and repair.
8. Do not touch the gear case. The gear case becomes
hot during operation.
9. Take a rest to prevent loss of control caused by
fatigue. We recommend taking a 10 to 20-minute rest
every hour.
10. When you leave the tool, even if it is a short time,
always remove the battery cartridge. The unattended
tool with the battery cartridge installed may be used by
unauthorized person and cause serious accident.
11. If grass or branches get caught between the cutting
attachment and guard, always turn the tool off and
remove the battery cartridge before cleaning.
Otherwise the cutting attachment may rotate
unintentionally and cause serious injury.
12. If the cutting attachment hits stones or other hard
objects, immediately turn the tool off. Then remove the
battery cartridge and inspect the cutting attachment.
13. Check the cutting attachment frequently during
operation for cracks or damages. Before the
inspection, remove the battery cartridge and wait until
the cutting attachment stops completely. Replace
damaged cutting attachment immediately, even if it
has only superficial cracks.
14. Never cut above waist height.
15. Before starting the cutting operation, wait until the
cutting attachment reaches a constant speed after
turning the tool on.
16. When using metal blades, swing the tool evenly in
half-circle from right to left, like using a scythe.
17. Hold the tool by insulated gripping surfaces only,
because the cutter blade may contact hidden wiring.
Cutter blades contacting a “live” wire may make
exposed metal parts of the tool “live” and could give
the operator an electric shock.
Cutting attachments
1. Use an applicable cutting attachment for the job in
hand.
– Nylon cutting heads (string trimmer heads) are
suitable for trimming lawn grass.
– Metal blades are suitable for cutting weeds, high
grasses, bushes, shrubs, underwood, thicket, and
the like.
– Never use other blades including metal multi-piece
pivoting chains and flail blades. It may result in
serious injury.
2. Always use the cutting attachment guard properly
suited for the cutting attachment used.
3. When using metal blades, avoid “kickback” and
always prepare for an accidental kickback. See the
section “Kickback.”
4. When not in use, attach the blade cover onto the
blade. Remove the cover before operation.
Kickback (Blade thrust)
1. Kickback (blade thrust) is a sudden reaction to a
caught or bound cutting blade. Once it occurs, the tool
is thrown sideway or toward the operator at great force
and it may cause serious injury.
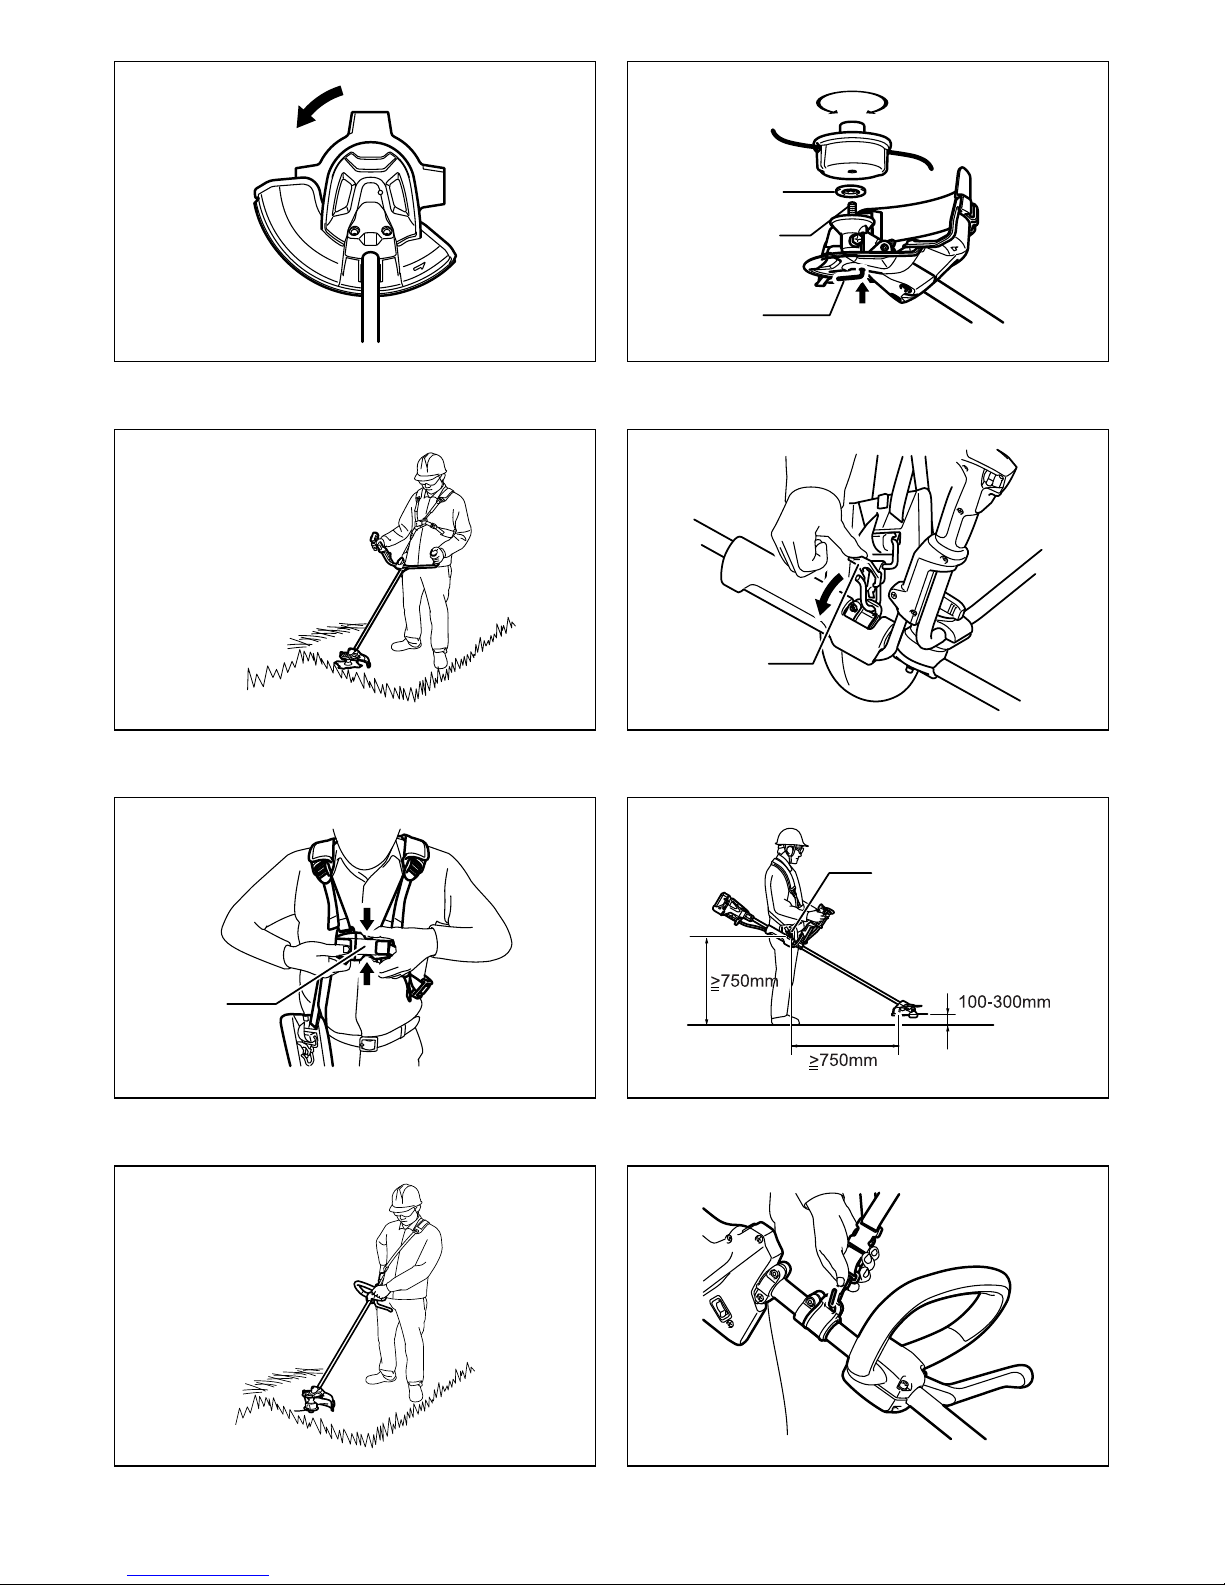
2. Kickback occurs particularly when applying the blade
segment between 12 and 2 o’clock to solids, bushes
and trees with 3 cm or larger diameter. (Fig. 2)
3. To avoid kickback: (Fig. 3)
– Apply the segment between 8 and 11 o’clock.
– Never apply the segment between 12 and 2
o’clock.
– Never apply the segment between 11 and 12
o’clock and between 2 and 5 o’clock, unless the
operator is well trained and experienced and does it
at his/her own risk.
– Never use cutting blades close to solids, such as
fences, walls, tree trunks and stones.
– Never use cutting blades vertically, for such
operations as edging and trimming hedges.
Vibration
1. People with poor circulation who are exposed to
excessive vibration may experience injury to blood
vessels or the nervous system. Vibration may cause
the following symptoms to occur in the fingers, hands
or wrists: “Falling asleep” (numbness), tingling, pain,
stabbing sensation, alteration of skin color or of the
skin. If any of these symptoms occur, see a physician!

10
2. To reduce the risk of “white finger disease”, keep your
hands warm during operation and well maintain the
tool and accessories.
Transport
1. Before transporting the tool, turn it off and remove the
battery cartridge. Attach the cover to the cutting blade.
2. When transporting the tool, carry it in a horizontal
position by holding the shaft.
3. When transporting the tool in a vehicle, properly
secure it to avoid turnover. Otherwise damage to the
tool and other baggage may result.
Maintenance
1. Have your tool serviced by our authorized service
center, always using only genuine replacement parts.
Incorrect repair and poor maintenance can shorten the
life of the tool and increase the risk of accidents.
2. Before doing any maintenance or repair work or
cleaning the tool, always turn it off and remove the
battery cartridge.
3. Always wear protective gloves when handling the
cutting blade.
4. Always clean dust and dirt off the tool. Never use
gasoline, benzine, thinner, alcohol or the like for the
purpose. Discoloration, deformation or cracks of the
plastic components may result.
5. After each use, tighten all screws and nuts.
6. Do not attempt any maintenance or repair not
described in the instruction manual. Ask our
authorized service center for such work.
7. Always use our genuine spare parts and accessories
only. Using parts or accessories supplied by a third
party may result in the tool breakdown, property
damage and/or serious injury.
8. Request our authorized service center to inspect and
maintain the tool at regular interval.
Storage
1. Before storing the tool, perform full cleaning and
maintenance. Remove the battery cartridge. Attach
the cover to the cutting blade.
2. Store the tool in a dry and high or locked location out
of reach of children.
3. Do not prop the tool against something, such as a
wall. Otherwise it may fall suddenly and cause an
injury.
First aid
1. Always have a first-aid kit close by. Immediately
replace any item taken from the first aid kit.
2. When asking for help, give the following information:
– Place of the accident
– What happened
– Number of injured persons
– Nature of the injury
– Your name
SAVE THESE INSTRUCTIONS.
WARNING:
DO NOT let comfort or familiarity with product (gained
from repeated use) replace strict adherence to safety
rules for the subject product. MISUSE or failure to
follow the safety rules stated in this instruction
manual may cause serious personal injury.
IMPORTANT SAFETY
INSTRUCTIONS ENC007-8
FOR BATTERY CARTRIDGE
1. Before using battery cartridge, read all
instructions and cautionary markings on (1)
battery charger, (2) battery, and (3) product using
battery.
2. Do not disassemble battery cartridge.
3. If operating time has become excessively shorter,
stop operating immediately. It may result in a risk
of overheating, possible burns and even an
explosion.
4. If electrolyte gets into your eyes, rinse them out
with clear water and seek medical attention right
away. It may result in loss of your eyesight.
5. Do not short the battery cartridge:
(1) Do not touch the terminals with any
conductive material.
(2) Avoid storing battery cartridge in a container
with other metal objects such as nails, coins,
etc.
(3) Do not expose battery cartridge to water or
rain.
A battery short can cause a large current flow,
overheating, possible burns and even a
breakdown.
6. Do not store the tool and battery cartridge in
locations where the temperature may reach or
exceed 50°C (122°F).
7. Do not incinerate the battery cartridge even if it is
severely damaged or is completely worn out. The
battery cartridge can explode in a fire.
8. Be careful not to drop or strike battery.
9. Do not use a damaged battery.
10. Follow your local regulations relating to disposal
of battery.
SAVE THESE INSTRUCTIONS.
Tips for maintaining maximum battery life
1. Charge the battery cartridge before completely
discharged.
Always stop tool operation and charge the battery
cartridge when you notice less tool power.
2. Never recharge a fully charged battery cartridge.
Overcharging shortens the battery service life.
3. Charge the battery cartridge with room
temperature at 10°C - 40°C (50°F - 104°F). Let a hot
battery cartridge cool down before charging it.
4. Charge the battery cartridge once in every six
months if you do not use it for a long period of
time.

11
PARTS DESCRIPTIONS
013124
FUNCTIONAL DESCRIPTION
WARNING:
•Always be sure that the tool is switched off and
battery cartridge is removed before adjusting or
checking the functions on the tool. Failure to switch
off and remove the battery cartridge may result in
serious personal injury from accidental start-up.
Installing or removing battery cartridge
CAUTION:
•Hold the tool and the battery cartridge firmly when
installing or removing battery cartridge. Failure to
hold the tool and the battery cartridge firmly may cause
them to slip off your hands and result in damage to the
tool and battery cartridge and a personal injury.
• Always switch off the tool before insertion or removal of
the battery cartridge. (Fig. 4)
To remove the battery cartridge, withdraw it from the tool
while sliding the button on the front of the cartridge.
To insert the battery cartridge, align the tongue on the
battery cartridge with the groove in the housing and slip it
into place. Always insert it all the way until it locks in place
with a little click. If you can see the red indicator on the
upper side of the button, it is not locked completely. Insert
it fully until the red indicator cannot be seen. If not, it may
accidentally fall out of the tool, causing injury to you or
someone around you.
NOTE:
• Do not use force when inserting the battery cartridge. If
the cartridge does not slide in easily, it is not being
inserted correctly.
Power switch action
WARNING:
•Before inserting the battery cartridge in the tool,
always check to see that the switch trigger
actuates properly and returns to the “OFF”
position when released. Do not pull the switch
1 Battery cartridge 7 Gear case
2 Indication lamp 8 Cutting tool
3 Switch trigger 9 Shoulder harness
4 Hanger (suspension point) 10 Buckle
5 Grip 11 Barrier
6 Guard (cutting attachment guard) 12 Guard extension
BBC231U / BC231UD BBC300L / BC300LD
1
2
3
4
5
9
7
8
1
2
6
4
6
7
8
9
10
3
5
11
12 10

12
trigger hard without pressing in the lock-off button.
This can cause switch breakage. Operating a tool
with a switch that does not actuate properly can lead to
loss of control and serious personal injury. (Fig. 5 & 6)
To prevent the switch trigger from being accidentally
pulled, a lock-off button is provided. To start the tool,
press in the lock-off button and pull the switch trigger. The
tool speed is increased by increasing pressure on the
switch trigger. Release the switch trigger to stop.
Reversing Switch for Debris Removal
(Fig. 7 & 8)
This tool has a reversing switch which is only provided to
change the direction of rotation so that it can be used to
remove weeds and debris entangled in the tool. To
operated the tool normally the “A” side of the switch
should be depressed.
To remove weeds and debris that are jammed in the
rotating head the tool can be reversed by depressing the
“B” side of the switch. In the reverse position the tool will
only operate for a short period of time and automatically
shut off.
WARNING:
•Always be sure that the tool is switched off and
battery cartridge is removed before removing
weeds or debris entangled in the tool that could not
be removed when operated in the reverse mode.
Failure to switch off and remove the battery cartridge
may result in serious personal injury from accidental
start-up.
NOTICE:
• Always check the direction of rotation before operation.
• Use the reversing switch only after the tool comes to a
complete stop. Changing the direction of rotation
before the tool stops may damage it.
Speed change (Fig. 9 & 10)
Two speed ranges can be preselected with the speed
change switch.
Flipping the speed change switch lever to the “1” position
will set the tool to the low speed range and the “2” position
will set the tool to the high speed range.
Battery/motor protection system
The battery cartridge and tool are provided with protection
devices that will automatically reduce or cut off power to
the tool when overload situations develop that may cause
damage to the tool or battery cartridge. If the tool
becomes overloaded but not locked up a protector is
provided to reduce the revolutions to protect the motor. In
this case the two indicator lamps described in the table
below do not light or blink.
All other protection functions can be identified by the
indicator lights described in the table below. (Fig. 11)
010823
Nylon cutting head (optional accessory
for a product that comes with a cutter
blade)
NOTICE:
• Do not attempt to bump feed the head while the tool is
operating at a high RPM. Bump feeding at a high RPM
may cause damage to the nylon cutting head.
• The bump feed will not operate properly if the head is
not rotating. (Fig. 12)
The nylon cutting head is a dual string trimmer head
provided with a bump & feed mechanism. To cause the
nylon cord to feed out, the cutting head should be bumped
against the ground while rotating at a low RPM. As the
nylon cord is feeding out it will automatically be cut to the
proper length by the cutters on the guard extension.
NOTE:
If the nylon cord does not feed out while bumping the
head, rewind/replace the nylon cord by following the
procedures described under “Maintenance.”
Battery remaining capacity indicator (only
for models with Battery BL3622A)
Battery BL3622A is equipped with the battery remaining
capacity indicator. (Fig. 13)
Press the CHECK button to indicate the battery remaining
capacity. The indicator lamps will then light for approx.
three seconds.
Status Action to be taken
- Blinking Battery power has been nearly used up. Replace the battery with fully charged
one.
- Lighting On
Battery protector is shutting off the
power - battery power has been used
up.
Replace the battery with fully charged
one.
Blinking - Overload protector is shutting off the
power - the motor was locked.
Release the switch trigger and remove
the cause of the motor lock or overload.
If the cutting tool is locked by entangling
weeds or the like, always remove the
battery cartridge before clearing it.
Lighting On - Overheat protector is shutting off the
power - overheating. Rest the equipment for a while.
Blinking Blinking Electric or electronic malfunction Ask your local authorized service center
for repairs.

13
011713
• When only the lowermost indicator lamp (next to the
“E”) blinks, or when none of the indicator lamps light,
the battery capacity has run out, so the tool does not
operate. In these cases, charge the battery or replace
the empty battery with a fully charged one.
• When two or more indicator lamps do not light even
after charging is complete, the battery has reached the
end of its service life.
• When the upper two and lower two indicator lamps light
alternately, the battery may have malfunctioned.
Contact your local Makita authorized service center.
NOTE:
• The indicated capacity may be lower than the actual
level during use or immediately after using the tool.
• Depending on the conditions of use and the ambient
temperature, the indication may differ slightly from the
actual capacity.
ASSEMBLY
WARNING:
•Always be sure that the tool is switched off and
battery cartridge is removed before carrying out
any work on the tool. Failure to switch off and remove
the battery cartridge may result in serious personal
injury from accidental start-up.
•Never start the tool unless it is completely
assembled. Operation of the tool in a partially
assembled state may result in serious personal injury
from accidental start-up.
Installing the handle
For model BBC231U, BC231UD
Insert the shaft of the handle into the grip as shown. Align
the screw hole in the grip with the one in the shaft. Tighten
the screw securely. (Fig. 14)
Loosen knob.
Place handle between handle clamp and handle holder.
Adjust the handle to an angle that provides a comfortable
working position and then secure by firmly hand-
tightening knob. (Fig. 15)
For model BBC300L, BC300LD (Fig. 16)
Fit the barrier and grip onto the shaft pipe with four
screws. Make sure that the grip/barrier assembly is fitted
between the spacer and the arrow mark.
Position the barrier on the left side of the tool. Then
tighten four screws so that the grip/barrier assembly
cannot move or rotate on the shaft pipe.
WARNING:
•Do not remove or shrink the spacer. The spacer
keeps a certain distance between both hands. Setting
the grip/barrier assembly close to the other grip beyond
the length of the spacer may cause loss of control and
serious personal injury.
Installing the guard (Fig. 17 & 18)
WARNING:
•Never use the tool without the guard illustrated in
place. Failure to do so can cause serious personal
injury.
CAUTION:
•While installing the guard extension be careful not
to contact the sharp nylon cord cutter provided on
the guard extension. Contact with the cutter could
result in personal injury.
Attach the protector cover onto the gear case. Slightly
push the wings outward and put the bolts into the holes in
the wings. (Fig. 19)
NOTICE:
•Do not push the wings outward too much.
Otherwise it may break.
Fix the guard to the clamp with two bolts as shown.
Tighten the right and left bolts evenly. (Fig. 20)
When using a nylon cutting head, mount the guard
extension. Place the guard extension onto the mounting
track provided on the lower edge of the guard. And slide it
into position until the guard extension clicks and locks into
place. The guard extension is designed so that it will only
mount onto the guard in one direction. (Fig. 21)
NOTE:
• Remove tape adhered to cutter, which cuts nylon cord,
on guard extension at the first use. (Fig. 22)
To remove the guard extension, use a flat-blade
screwdriver and place it into the small notch provided on
the locking nub. To unlock the guard extension press
down on the locking nub while sliding the lower guard
extension in the direction indicated in the figure. Once the
guard extension starts to slide it is unlocked and can be
removed by continuing to slide it off of the guard.
Installing the cutter blade
WARNING:
•The outside diameter of the cutter blade must be
230 mm. Never use any blade exceeding 230 mm in
outside diameter.
CAUTION:
• The cutter blade must be well polished, free of cracks
or breakage. Polish or replace the cutter blade every
three hours of operation.
• Always wear gloves when handling the cutter blade.
• Always attach the blade cover when the tool is not in
use or is being transported.
Indicator lamps
Remaining capacity
Lighted Off Blinking
E F 70% to 100%
45% to 70%
20% to 45%
0% to 20%
Charge the battery.
The battery may have
malfunctioned.

14
• The cutter blade-fastening nut (with spring washer) is a
consumable part. If there appears any wear or
deformation on the spring washer, replace the nut. Ask
your local authorized service center to order it.
• Replace the cup in case of crack or breakage due to
attrition.
NOTICE:
• Be sure to use genuine Makita cutter blade.
Turn the tool upside down so that you can replace the
cutter blade easily. (Fig. 23)
To dismount the cutter blade, insert the hex wrench
through the hole on the protector cover and gear case.
Rotate the receive washer until it is locked with the hex
wrench. Loosen the hex nut (left-hand thread) with the
socket wrench and remove the nut, cup, clamp washer
and hex wrench. (Fig. 24)
Mount the cutter blade onto the shaft so that the guide of
the receive washer fits in the arbor hole in the cutter
blade. Install the clamp washer, cup, and secure the
cutter blade with the hex nut with 13 to 23 Nm of
tightening torque during holding the receive washer with
hex wrench. (Fig. 25)
Make sure that the blade is the left way up.
Installing nylon cutting head
CAUTION:
•Only use the nylon cutting head with the guard and
guard extension in place. Failure to do so can cause
serious personal injury.
NOTICE:
• Be sure to use genuine Makita nylon cutting head.
Turn the tool upside down so that you can replace the
nylon cutting head easily. (Fig. 26)
Insert the hex wrench through the hole on the protector
cover and the gear case and rotate the receive washer
until it is locked with the hex wrench. Mount the nylon
cutting head onto the threaded spindle directly and tighten
it by turning it counterclockwise. Remove the hex wrench.
To remove the nylon cutting head, turn the nylon cutting
head clockwise while holding the receive washer with the
hex wrench.
CAUTION:
•If during operation the nylon cutting head
accidentally impacts a rock or hard object the
trimmer should be stopped and inspected for any
damage. If the nylon cutting head is damaged it
should be replaced immediately. Use of a damaged
nylon cutting head could result in serious personal
injury.
OPERATION
Correct handling of tool (BBC231U,
BC231UD)
Correct posture
WARNING:
•Always position the tool on your right-hand side so
that the shaft of the left handle is always in front of
your body. Correct positioning of the tool allows for
maximum control and will reduce the risk of serious
personal injury caused by kickback.
As shown in the figure fit the shoulder harness and hang
the tool firmly on your right side so that the shaft of the left
handle is always ahead of you. (Fig. 27)
Attachment of shoulder harness (Fig. 28)
Wear the shoulder harness on your back and buckle it up
until a click is heard. Make sure that it cannot be taken off
with pulling it off. Hang the tool as shown.
Detachment (Fig. 29)
The buckle is provided with a means of quick release
which can be accomplished by simply squeezing the
sides and the buckle.
WARNING:
•Be extremely careful to maintain control of the tool
at this time. Do not allow the tool to be deflected
toward you or anyone in the work vicinity. Failure to
do so could result in serious injury.
Adjustment of the hanger position and shoulder
harness
When replacing an accessory with another, the weight
balance of the tool may change. In such case, adjust the
hanger position and shoulder harness length as follows.
To change the hanger position, loosen the fixing screw on
the hanger with the supplied wrench and then move the
hanger and the cushion. The cushion can be moved
easily by twisting it.
Adjust the hanger position and shoulder harness length
so that:
- the hanger positions 750 mm or higher from the
ground,
- the cutting tool positions 100 mm to 300 mm high from
the ground and
- the unguarded part of cutting tool is horizontally
750 mm or farther away from the hanger. (Fig. 30)
After adjusting the hanger position, tighten the screw with
the wrench securely.
Correct handling of tool (BBC300L,
BC300LD)
Correct posture
WARNING:
•Always position the tool on your right-hand side so
that the barrier is always in front of your body.
Correct positioning of the tool allows for maximum
control and will reduce the risk of serious personal
injury caused by kickback.
As shown in the figure, put the shoulder harness on your
left shoulder by putting your head and right arm through it
and keep the tool on your right side while always keeping
the barrier in front of your body. (Fig. 31)
Attachment of shoulder harness (Fig. 32)
After putting the shoulder harness on it can be attached to
the tool by connecting the buckles provided on both the
tool hook and the harness. Be sure that the buckles click
and lock completely in place.
Detachment (Fig. 33)
The buckle is provided with a means of quick release
which can be accomplished by simply squeezing the
sides and the buckle.

15
WARNING:
•Be extremely careful to maintain control of the tool
at all times. Do not allow the tool to be deflected
toward you or anyone in the work vicinity. Failure to
keep control of the tool could result in serious injury to
the bystander and the operator.
Adjustment of the hanger position and shoulder
harness
When replacing an accessory with another, the weight
balance of the tool may change. In such case, adjust the
hanger position and shoulder harness length as follows.
To change the hanger position, loosen the fixing screw on
the hanger with the supplied wrench and then move the
hanger.
Adjust the hanger position and shoulder harness length
so that:
- the hanger positions 750 mm or higher from the
ground,
- the cutting tool positions up to 300 mm high from the
ground and
- the unguarded part of cutting tool is horizontally
750 mm or farther away from the hanger. (Fig. 34)
After adjusting the hanger position, tighten the screw with
the wrench securely.
MAINTENANCE
WARNING:
•Always be sure that the tool is switched off and
battery cartridge is removed before attempting to
perform inspection or maintenance on the tool.
Failure to switch off and remove the battery cartridge
may result in serious personal injury from accidental
start-up.
NOTICE:
• Never use gasoline, benzine, thinner, alcohol or the
like. Discoloration, deformation or cracks may result.
Supply of grease to gear case (Fig. 35)
Supply grease (Shell Alvania 2 or equivalent) to the gear
case through the grease hole every 30 hours. (Genuine
Makita grease may be purchased from your Makita
dealer.)
Replacing the nylon cord
WARNING:
•Always be sure that the tool is switched off and
battery cartridge is removed before attempting to
perform inspection or maintenance on the tool.
Failure to switch off and remove the battery cartridge
may result in serious personal injury from accidental
start-up.
•Make sure that the cover of the nylon cutting head
is secured to the housing properly as described
below. Failure to properly secure the cover may cause
the nylon cutting head to fly apart resulting in serious
personal injury. (Fig. 36)
Press inward on the housing latches and lift upward to
remove the cover. Discard any of the remaining nylon
cord. (Fig. 37)
Hook the middle of the new nylon cord to the notch
located at the center of the spool between the 2 channels
provided for the nylon cord. One side of the cord should
be about 80mm longer than the other side.
Wind both ends firmly around the spool in the direction
marked on the head for left hand direction indicated by
LH. (Fig. 38)
Wind all but about 100 mm of the cords, leaving the ends
temporarily hooked through a notch on the side of the
spool. (Fig. 39)
Mount the spool in the housing so that the grooves and
protrusions on the spool match up with those in the
housing. Keep the side with letters on the spool visible on
the top. Now, unhook the ends of the cord from their
temporary position and feed the cords through the eyelets
to come out of the housing. (Fig. 40)
Align the protrusion on the underside of the cover with the
slots of the eyelets. Then push cover firmly onto the
housing to secure it. Make sure the latches fully spread in
the cover.
To maintain product SAFETY and RELIABILITY, repairs,
any other maintenance or adjustment should be
performed by Makita Authorized Service Centers, always
using Makita replacement parts.
TROUBLE SHOOTING
Before asking for repairs, conduct your own inspection
first. If you find a problem that is not explained in the
manual, do not attempt to dismantle the tool. Instead, ask
Makita Authorized Service Centers, always using Makita
replacement parts for repairs.

16
010824
OPTIONAL ACCESSORIES
CAUTION:
• These accessories or attachments are recommended
for use with your Makita tool specified in this manual.
The use of any other accessories or attachments might
present a risk of injury to persons. Only use accessory
or attachment for its stated purpose.
If you need any assistance for more details regarding
these accessories, ask your local Makita Service Center.
• Cutter blade
• Nylon cutting head
• Pole hedge trimmer attachment (for model BBC300L,
BC300LD)
• Pole saw attachment (for model BBC300L, BC300LD)
• Cultivator attachment (for model BBC300L, BC300LD)
• Makita genuine battery and charger
NOTE:
• Some items in the list may be included in the tool
package as standard accessories. They may differ
from country to country.
Malfunction status Cause Action
Motor does not run.
Battery cartridge is not installed. Install the battery cartridge.
Battery problem (under voltage) Recharge the battery. If recharging is
not effective, replace battery.
The drive system does not work
correctly.
Ask your local authorized service
center for repair.
Motor stops running after a little use.
Rotation is reverse. Change the direction of rotation with
the reversing switch.
Battery’s charge level is low. Recharge the battery. If recharging is
not effective, replace battery.
Overheating. Stop using of tool to allow it to cool
down.
It does not reach maximum RPM.
Battery is installed improperly. Install the battery cartridge as
described in this manual.
Battery power is dropping. Recharge the battery. If recharging is
not effective, replace battery.
The drive system does not work
correctly.
Ask your local authorized service
center for repair.
Cutting tool does not rotate:
stop the machine immediately!
Foreign object such as a branch is
jammed between the guard and the
nylon cutting head or cutter blade.
Remove the foreign object.
Cutter blade fastening nut is loose. Tighten the nut properly as described
in this manual.
The cutter blade is bended. Replace the cutter blade.
The drive system does not work
correctly.
Ask your local authorized service
center for repair.
Abnormal vibration:
stop the machine immediately!
One of nylon cord has been broken
and the head got unbalanced.
Bump the nylon cutting head against
the ground while it is rotating to cause
the cord to feed.
The cutter blade is bended, cracked or
worn. Replace the cutter blade.
Cutter blade fastening nut is loose. Tighten the nut properly as described
in this manual.
Cutter blade is fastened improperly.
The drive system does not work
correctly.
Ask your local authorized service
center for repair.
Cutting tool and motor cannot stop:
Remove the battery immediately! Electric or electronic malfunction. Remove the battery and ask your local
authorized service center for repair.

17
BAHASA INDONESIA (Petunjuk Asli)
Penjelasan tampilan keseluruhan
SPESIFIKASI
• Karena kesinambungan program penelitian dan pengembangan kami, spesifikasi yang disebutkan di sini dapat
berubah tanpa pemberitahuan.
• Spesifikasi dan kartrid baterai dapat berbeda dari satu negara ke negara lainnya.
• Berat, dengan kartrid baterai, menurut Prosedur EPTA 01/2003
Simbol-simbol END008-5
Berikut ini adalah simbol-simbol yang digunakan pada
alat ini. Pastikan Anda mengerti makna masing-masing
simbol sebelum menggunakan mesin ini.
................. Perhatikan dan berhati-hatilah.
....... Baca petunjuk penggunaan.
................ Bahaya; waspadalah terhadap benda
beterbangan.
................ Jarak antara mesin dan orang terdekat
harus paling sedikit 15 m.
.......... Jauhkan orang yang tak berkepentingan.
........ Jaga jarak sedikitnya 15 m.
................ Hindari tendang-balik.
................ Kenakan helm, kaca mata, dan
pelindung telinga.
1. Indikator merah
2. Tombol geser
3. Kartrid baterai
4. Tombol kunci-mati
5. Picu sakelar
6. Sakelar pembalik
7. Posisi A ditekan untuk
pengoperasian normal
8. Posisi B ditekan untuk membuang
gulma dan kotoran
9. Tuas sakelar pengubah
kecepatan
10. Lampu indikasi
11. Bagian pemotongan paling efektif
12. Lampu indikator
13. Tombol CHECK
14. Pegangan
15. Gagang
16. Sekrup
17. Kenop
18. Klem gagang
19. Penahan gagang
20. Pegas penekan
21. Penghalang
22. Penjarak
23. Tanda panah
24. Bilah pemotong
25. Pelindung
26. Head pemotongan nilon
27. Perpanjangan pelindung
28. Baut
29. Sayap
30. Dua baut
31. Penutup pelindung
32. Kunci heksa
33. Cincin penerima
34. Cincin klem
35. Mangkuk
36. Mur heksa
37. Spindel berdrat
38. Tuas
39. Gesper
40. Penggantung
41. Lubang gemuk
42. Kotak gir
43. Penutup
44. Kancing
45. Tekan
46. Gulungan
47. Untuk rotasi ke arah kiri
48. Takik
49. Lubang senar
50. Tonjolan (Tidak diperlihatkan)
51. Belahan lubang senar
Model BBC231U/BC231UD BBC300L/BC300LD
Jenis gagang Stang sepeda Gagang bundar
Kecepatan tanpa
beban
Head pemotongan
nilon
Tinggi 0 - 6.600 men-1
Rendah 0 - 4.900 men-1
Bilah 4 gigi Tinggi 0 - 7.300 men-1
–
Rendah 0 - 5.300 men-1
Bilah 3 gigi Tinggi 0 - 7.700 men-1
–
Rendah 0 - 5.600 men-1
Panjang keseluruhan Dengan bilah 1.880 mm –
Dengan head pemotongan nilon 1.850 mm
Diameter bilah pemotong 230 mm –
Diameter pemotongan dengan head pemotongan nilon 300 mm 300 mm
Berat bersih (dengan
baterai BL3626)
Head pemotongan nilon 6,9 kg 5,9 kg
Bilah 4 gigi 7,1 kg –
Bilah 3 gigi 7,0 kg –
Tegangan yang sesuai D.C. 36 V
Kartrid baterai standar
Peringatan: Gunakan hanya kartrid baterai yang
ditentukan.
BL3626/BL3622A/BL36120A

18
................. Kenakan sarung tangan pelindung.
................ Kenakan sepatu yang kuat dengan sol
antiselip. Sepatu pengaman dengan
pelindung ujung dari baja adalah yang
dianjurkan.
................ Jangan biarkan terkena kelengasan
(kondisi basah).
................ Kecepatan tertinggi mesin yang
diperbolehkan.
PETUNJUK KESELAMATAN
PENTING GEB068-6
PERINGATAN! Bacalah semua peringatan
keselamatan dan semua petunjuk. Kelalaian mematuhi
peringatan dan petunjuk dapat menyebabkan sengatan
listrik, kebakaran, dan/atau cedera serius.
Simpanlah semua peringatan dan
petunjuk untuk acuan di masa
mendatang.
Maksud penggunaan
1. Mesin pemangkas rumput nirkabel/pemotong semak/
mesin pemangkas bermata senar ini hanya
dimaksudkan untuk memotong rumput, gulma, semak,
dan perdu kecil. Mesin ini sebaiknya tidak digunakan
untuk tujuan lain seperti merapikan tepian atau
memotong tanaman pagar karena dapat menimbulkan
cedera.
Petunjuk umum
1. Jangan sekali-kali membiarkan orang yang tidak
memahami petunjuk ini, orang (termasuk anak-anak)
dengan kemampuan fisik, inderawi, atau mental
kurang, atau yang kurang pengalaman dan
pengetahuan menggunakan mesin ini. Anak-anak
harus diawasi demi memastikan bahwa mereka tidak
bermain-main dengan mesin ini.
2. Sebelum menghidupkan mesin, bacalah petunjuk
penggunaan ini untuk membiasakan diri dengan
penanganan mesin ini.
3. Jangan meminjamkan mesin ini kepada orang yang
kurang pengalaman atau pengetahuan tentang
penanganan pemotong semak dan mesin pemangkas
bermata senar.
4. Saat meminjamkan mesin ini, selalu serahkan juga
petunjuk penggunaan ini.
5. Tangani mesin dengan kehati-hatian dan perhatian
maksimal.
6. Jangan sekali-kali menggunakan mesin setelah
mengonsumsi alkohol atau obat, atau jika merasa
lelah atau sakit.
7. Jangan sekali-kali mencoba memodifikasi mesin ini.
8. Patuhilah peraturan tentang penanganan pemotong
semak dan mesin pemangkas bermata senar di
negara Anda.
Alat pelindung diri (Gb. 1)
1. Kenakan helm pengaman, kacamata pelindung, dan
sarung tangan pelindung untuk melindungi diri Anda
dari serpihan yang beterbangan atau benda yang
jatuh.
2. Kenakan pelindung telinga seperti penutup telinga
untuk mencegah gangguan pendengaran.
3. Kenakan pakaian dan sepatu yang sesuai untuk
penggunaan yang aman, seperti pakaian kerja
terusan dan sepatu antiselip yang kuat. Jangan
mengenakan pakaian yang kedodoran atau
perhiasan. Pakaian kedodoran, perhiasan, atau
rambut panjang dapat tersangkut pada bagian yang
bergerak.
4. Saat menyentuh bilah pemotong, kenakan sarung
tangan pelindung. Bilah pemotong dapat melukai
tangan telanjang dengan sangat parah.
Keselamatan tempat kerja
1. Operasikan mesin hanya dalam kondisi pandangan
dan sinar matahari yang baik. Jangan
mengoperasikan mesin dalam kegelapan atau kondisi
berkabut.
2. Jangan mengoperasikan mesin ini dalam atmosfer
yang mudah meledak, seperti bila ada cairan, gas,
atau debu mudah menyala. Mesin ini menimbulkan
percikan api yang dapat menyulut debu atau uap
tersebut.
3. Selama mengoperasikan, jangan sekali-kali berdiri di
atas permukaan yang tidak stabil atau licin atau di
lereng yang curam. Dalam musim dingin, awaslah
terhadap es dan salju dan selalu pastikan pijakan
yang aman.
4. Selama mengoperasikan, jauhkan orang lain atau
binatang paling tidak 15 m dari mesin. Hentikan mesin
segera bila ada orang yang mendekat.
5. Sebelum mengoperasikan, periksa tempat kerja dari
adanya batu atau benda padat lainnya. Benda-benda
demikian dapat terlempar dan menyebabkan
tendang-balik yang berbahaya dan mengakibatkan
cedera serius dan/atau kerusakan harta benda.
6. PERINGATAN: Penggunaan produk ini dapat
menimbulkan debu yang mengandung bahan kimia,
yang dapat menyebabkan penyakit pernapasan atau
penyakit lainnya. Beberapa contoh bahan kimia ini
adalah senyawa yang ada dalam pestisida,
insektisida, pupuk, dan herbisida. Risiko Anda terkena
keterpaparan ini berbeda-beda, tergantung pada
seberapa sering Anda melakukan jenis pekerjaan ini.
Untuk mengurangi keterpaparan Anda terhadap
bahan-bahan kimia ini: bekerjalah di tempat yang
berventilasi baik, dan bekerjalah dengan
menggunakan peralatan keselamatan yang disetujui,
seperti masker debu yang secara khusus dirancang
untuk menyaring partikel mikroskopis.
Keamanan kelistrikan dan baterai
1. Jangan membiarkan mesin ini kehujanan atau basah.
Air yang masuk ke dalam mesin akan meningkatkan
risiko sengatan listrik.
2. Jangan gunakan mesin jika sakelar tidak bisa
menghidupkan atau mematikannya. Mesin yang tidak
dapat dikendalikan dengan sakelarnya berbahaya dan
harus diperbaiki.

19
3. Cegah penyalaan yang tidak disengaja. Pastikan
bahwa sakelar berada dalam posisi mati (off) sebelum
memasang baterai, mengangkat, atau membawa
mesin. Membawa mesin ini dengan jari menempel
pada sakelar atau mengalirkan listrik pada mesin yang
sakelarnya hidup (on) akan mengundang kecelakaan.
4. Isi ulang baterai hanya dengan pengisi baterai
(charger) yang ditentukan oleh pabrik pembuat mesin.
Pengisi baterai yang cocok untuk suatu jenis baterai
dapat menimbulkan risiko kebakaran bila digunakan
dengan baterai yang lain.
5. Gunakan mesin hanya dengan baterai yang khusus
ditentukan untuknya. Penggunaan baterai yang lain
dapat menimbulkan risiko cedera dan kebakaran.
6. Bila baterai tidak sedang digunakan, jauhkanlah dari
benda logam lain, seperti klip kertas, koin, anak kunci,
paku, sekrup, atau benda logam kecil lainnya, yang
dapat menjadi penghubung antara
terminal-terminalnya. Menghubungsingkatkan
(mengkorsletkan) terminal-terminal baterai dapat
menyebabkan luka bakar atau kebakaran.
7. Bila disalahgunakan, baterai dapat mengeluarkan
cairan; hindari terkena cairan ini. Jika terkena cairan
ini secara tidak sengaja, bilaslah dengan air. Jika
cairan mengenai mata, mintalah bantuan medis.
Cairan yang keluar dari baterai dapat menyebabkan
iritasi atau luka bakar.
Mengoperasikan
1. Sebelum merakit atau menyetel mesin, lepaskan dulu
kartrid baterainya.
2. Sebelum menangani bilah pemotong, kenakan sarung
tangan pelindung.
3. Sebelum memasang kartrid baterai, periksa mesin
dari kerusakan, sekrup/mur yang kendur atau
perakitan yang tidak benar. Asahlah bilah pemotong
yang tumpul. Jika bilah pemotong tertekuk/bengkok
atau rusak, gantilah. Periksa apakah semua tuas
pengendali dan sakelar dapat dengan mudah
dioperasikan. Bersihkan dan keringkan semua
gagang.
4. Jangan sekali-kali mencoba menghidupkan mesin jika
mesin rusak atau belum dirakit lengkap. Ini dapat
mengakibatkan cedera serius.
5. Setel tali bahu dan pegangan tangan sesuai dengan
ukuran tubuh operator.
6. Saat memasukkan kartrid baterai, jauhkan alat
tambahan pemotong dari tubuh Anda dan benda lain,
termasuk tanah. Komponen ini dapat berputar saat
mesin dihidupkan dan dapat menyebabkan cedera
atau kerusakan pada mesin dan/atau harta benda.
7. Lepaskan kunci penyetel, kunci pas, atau penutup
bilah sebelum menghidupkan mesin. Aksesori yang
masih melekat pada bagian mesin yang berputar
dapat menyebabkan cedera.
Pengoperasian
1. Apabila terjadi keadaan darurat, matikan mesin
dengan segera.
2. Jika Anda merasakan kondisi yang tidak biasa
(misalnya kebisingan, getaran) selama
mengoperasikan, matikan mesin. Jangan gunakan
mesin sampai penyebabnya diketahui dan
dibereskan.
3. Alat tambahan pemotong akan terus berputar selama
beberapa saat setelah mesin dimatikan. Jangan
tergesa-gesa menyentuh alat tambahan pemotong.
4. Selama mengoperasikan, gunakan tali bahu.
Pertahankan mesin di sisi kanan Anda dengan kuat.
5. Jangan meraih terlalu jauh. Pertahankan pijakan dan
keseimbangan yang baik setiap saat. Awaslah
terhadap rintangan tersembunyi seperti tunggak
pohon, akar, dan selokan agar Anda tidak tersandung
jatuh.
6. Jangan sekali-kali bekerja di atas tangga atau pohon
untuk menghindari kehilangan kendali.
7. Jika mesin terkena benturan keras atau terjatuh,
periksa kondisinya sebelum melanjutkan bekerja.
Periksa alat-alat pengendali dan perangkat pengaman
dari adanya malfungsi. Jika ada kerusakan atau Anda
ragu-ragu, mintalah pusat servis resmi kami
memeriksa dan memperbaikinya.
8. Jangan menyentuh kotak gir. Kotak gir menjadi panas
selama mesin dioperasikan.
9. Beristirahatlah untuk mencegah kehilangan kendali
akibat kelelahan. Kami menganjurkan istirahat selama
10 sampai 20 menit setiap satu jam bekerja.
10. Bila Anda meninggalkan mesin, meskipun untuk
waktu yang singkat, selalu lepaskan kartrid
baterainya. Mesin yang tidak ditunggui dengan kartrid
baterai terpasang dapat digunakan oleh orang yang
tidak berwenang dan menyebabkan kecelakaan
serius.
11. Jika ada rumput atau ranting yang tersangkut di
antara alat tambahan pemotong dan pelindung, selalu
matikan mesin dan lepaskan kartrid baterainya
sebelum membersihkan. Jika tidak, alat tambahan
pemotong dapat berputar secara tidak sengaja dan
menyebabkan cedera serius.
12. Jika alat tambahan pemotong mengenai batu atau
benda keras lainnya, segera matikan mesin.
Kemudian lepaskan kartrid baterai dan periksa alat
tambahan pemotong.
13. Periksa alat tambahan pemotong sering-sering
selama digunakan dari adanya retakan atau
kerusakan. Sebelum memeriksa, lepaskan kartrid
baterai dan tunggu sampai alat tambahan pemotong
berhenti sepenuhnya. Ganti segera alat tambahan
pemotong yang rusak, meskipun hanya retak pada
permukaannya.
14. Jangan sekali-kali memotong pada ketinggian di atas
pinggang.
15. Sebelum memulai pekerjaan pemotongan, tunggulah
sampai alat tambahan pemotong mencapai kecepatan
konstan setelah menghidupkan mesin.
16. Bila menggunakan bilah logam, ayunkan mesin
secara merata dalam gerakan setengah-lingkaran dari
kanan ke kiri, seperti menggunakan sabit besar
bergagang panjang.
17. Pegang mesin hanya pada permukaan genggam yang
berisolasi, karena bilah pemotong dapat menyentuh
perkabelan yang tersembunyi. Bilah pemotong yang
menyentuh kawat “hidup” (teraliri arus listrik) dapat
menyebabkan bagian logam yang terbuka pada mesin
ikut teraliri arus listrik dan menyengat pengguna.

20
Alat tambahan pemotong
1. Gunakan alat tambahan pemotong yang tepat untuk
pekerjaan yang dilakukan.
– Head pemotongan nilon (head pemangkas senar)
sesuai untuk memangkas rumput halaman.
– Bilah logam sesuai untuk memotong gulma, rumput
tinggi, semak, belukar, pohon pendek, perdu, dan
sejenisnya.
– Jangan sekali-kali menggunakan bilah lain
termasuk rantai logam putar multi-keping dan bilah
perontok (flail blade). Penggunaan bilah demikian
dapat mengakibatkan cedera serius.
2. Selalu gunakan pelindung alat tambahan pemotong
yang sesuai untuk alat tambahan pemotong yang
digunakan.
3. Bila menggunakan bilah logam, hindari
“tendang-balik” dan selalu persiapkan diri untuk
menghadapi tendang-balik yang tidak disengaja. Lihat
bagian “Tendang-balik.”
4. Bila mesin tidak sedang digunakan, pasang penutup
bilah pada bilah. Lepaskan penutup sebelum
digunakan.
Tendang-balik (Hentakan bilah)
1. Tendang-balik (hentakan bilah) adalah reaksi tiba-tiba
terhadap tersangkut atau terjepitnya bilah pemotong.
Saat hal itu terjadi, mesin terlempar ke samping atau
ke arah operator dengan kekuatan besar dan dapat
menyebabkan cedera serius.
2. Tendang-balik terjadi khususnya bila mengaplikasikan
segmen bilah di arah antara pukul 12 dan 2 pada
benda padat, semak, dan pohon dengan diameter
3 cm atau lebih. (Gb. 2)
3. Untuk menghindari tendang-balik: (Gb. 3)
– Aplikasikan segmen antara pukul 8 dan 11.
– Jangan sekali-kali mengaplikasikan segmen di arah
antara pukul 12 dan 2.
– Jangan sekali-kali mengaplikasikan segmen bilah
di arah antara pukul 11 dan 12 dan antara pukul 2
dan 5, kecuali jika operator telah terlatih baik dan
berpengalaman, dan itu pun dengan risiko
ditanggung sendiri.
– Jangan sekali-kali menggunakan bilah pemotong di
dekat benda padat, seperti pagar, dinding, batang
pohon, dan batu.
– Jangan sekali-kali menggunakan bilah pemotong
secara vertikal, untuk pekerjaan seperti merapikan
dan memangkas tepi tanaman.
Getaran
1. Orang dengan kondisi sirkulasi darah kurang baik
yang terpapar pada getaran berlebihan dapat
mengalami cedera pada pembuluh darah atau sistem
sarafnya. Getaran dapat menyebabkan timbulnya
gejala-gejala berikut ini pada jari, tangan, atau
pergelangan tangan: “Mati rasa” (baal), kesemutan,
nyeri, sensasi seperti tertusuk, perubahan kulit atau
warna kulit. Jika ada di antara gejala ini yang timbul,
hubungi dokter!
2. Untuk mengurangi risiko “white finger disease”
(penyakit jari putih), jaga tangan Anda selalu hangat
saat mengoperasikan mesin dan rawat mesin serta
aksesorinya dengan baik.
Pengangkutan
1. Sebelum mengangkut mesin, matikan mesin dan
lepaskan kartrid baterainya. Pasang penutup pada
bilah pemotong.
2. Saat mengangkut mesin, bawalah dalam posisi
horizontal dengan memegang tangkainya.
3. Bila mengangkut mesin dalam kendaraan, amankan
mesin dengan kuat agar tidak terbalik. Jika sampai
terbalik, mesin dan muatan bagasi yang lain dapat
rusak.
Perawatan
1. Serviskan mesin Anda pada pusat servis resmi kami,
dan selalu gunakan suku cadang pengganti yang asli.
Reparasi yang keliru dan perawatan yang buruk dapat
memperpendek usia pakai mesin dan meningkatkan
risiko kecelakaan.
2. Sebelum melakukan pekerjaan pemeliharaan atau
perbaikan pada mesin atau membersihkannya, selalu
matikan mesin dan lepaskan kartrid baterainya.
3. Selalu kenakan sarung tangan pelindung saat
menangani bilah pemotong.
4. Selalu bersihkan debu dan kotoran dari mesin.
Jangan sekali-kali menggunakan bensin, tiner,
alkohol, atau bahan sejenisnya untuk maksud
tersebut. Penggunaan bahan demikian dapat
menyebabkan perubahan warna dan bentuk serta
timbulnya retakan pada komponen plastik.
5. Setiap kali setelah digunakan, kencangkan semua
sekrup dan mur.
6. Jangan mencoba melakukan pekerjaan perawatan
dan perbaikan yang tidak diuraikan dalam petunjuk
penggunaan. Mintalah pusat servis resmi kami
melakukan pekerjaan demikian.
7. Selalu gunakan hanya suku cadang dan aksesori asli
kami. Menggunakan suku cadang atau aksesori yang
dipasok oleh pihak ketiga dapat mengakibatkan
kerusakan mesin, kerugian harta benda, dan/atau
cedera serius.
8. Mintalah pusat servis resmi kami memeriksa dan
merawat mesin pada interval yang teratur.
Penyimpanan
1. Sebelum menyimpan mesin, lakukan pembersihan
dan pemeliharaan menyeluruh. Lepaskan kartrid
baterai. Pasang penutup pada bilah pemotong.
2. Simpanlah mesin di tempat yang kering dan tinggi
atau terkunci, yang tidak bisa dijangkau anak-anak.
3. Jangan menyandarkan mesin pada sesuatu, seperti
dinding. Jika disandarkan, mesin dapat tiba-tiba jatuh
dan menyebabkan cedera.
Pertolongan pertama
1. Sediakan selalu kotak pertolongan pertama di dekat
Anda. Segera ganti setiap barang yang diambil dari
kotak pertolongan pertama.
2. Saat meminta bantuan, berikanlah informasi berikut
ini:
– Tempat kecelakaan
– Apa yang telah terjadi
– Jumlah orang yang cedera
– Sifat cedera
– Nama Anda
Other manuals for BBC231U
10
This manual suits for next models
3
Table of contents
Languages:
Other Makita Trimmer manuals

Makita
Makita BUR141 User manual

Makita
Makita UH013G User manual

Makita
Makita ER2550LH Instruction Manual

Makita
Makita UH4570 User manual

Makita
Makita DUH501 User manual

Makita
Makita DUR142L User manual

Makita
Makita DUR141 User manual

Makita
Makita EH 620 User manual

Makita
Makita UH6570 Manual

Makita
Makita EM4351UH User guide

Makita
Makita PTR2500 User manual

Makita
Makita EM4250 User manual

Makita
Makita UH4261 User manual

Makita
Makita UM600D User manual

Makita
Makita UH200D Manual

Makita
Makita M3702 User manual

Makita
Makita HTR5600 User manual

Makita
Makita RT001G User manual

Makita
Makita DUH521 User manual

Makita
Makita DRT50 User manual