Makita DUH754SZ User manual

DUH604S
DUH754S
EN Cordless Hedge Trimmer INSTRUCTION MANUAL 8
FR MANUEL D’INSTRUCTIONS 17
DE Akku-Heckenschere BETRIEBSANLEITUNG 27
IT Tagliasiepi a batteria ISTRUZIONI PER L’USO 37
NL Accuheggenschaar GEBRUIKSAANWIJZING 47
ES Cortasetos Inalámbrico MANUAL DE
INSTRUCCIONES 57
PT Aparador De Cerca Viva a
Bateria MANUAL DE INSTRUÇÕES 67
DA Akku hækketrimmer BRUGSANVISNING 76
EL 85
TR KULLANMA KILAVUZU 95

1
2
3
Fig.1
1
2
Fig.2
1
2
Fig.3
1
2
Fig.4
2
1
3
Fig.5
2
1
Fig.6
2
1
Fig.7
1
Fig.8
2

1
2
Fig.9
1
2
Fig.10
2
1
3
4
Fig.11
Fig.12
1
2
Fig.13
1
Fig.14
1
2
3
Fig.15
3

12
3
4
Fig.16
1
Fig.17
1
Fig.18
1
Fig.19
1
2
3
Fig.20
1
2
Fig.21
1
2
Fig.22
4

2
1
Fig.23
2
1
Fig.24
(1)
(2)
Fig.25
Fig.26
Fig.27
Fig.28
Fig.29
Fig.30
5

Fig.31
Fig.32
Fig.33
1
Fig.34
Fig.35
1
2
Fig.36
1
Fig.37
1
Fig.38
6

21
Fig.39
7

8ENGLISH
ENGLISH (Original instructions)
SPECIFICATIONS
Model: DUH604S DUH754S
Blade length 600 mm 750 mm
Strokes per minute 2,000 / 3,600 / 4,400 min-1
Overall length 1,061 mm 1,200 mm
Rated voltage D.C. 18 V
Net weight 3.4 - 3.9 kg
•
-
Applicable battery cartridge and charger
BL1815N / BL1820 / BL1820B / BL1830 / BL1830B / BL1840 /
BL1840B / BL1850 / BL1850B / BL1860B
Charger
DC18SH
•
WARNING: Only use the battery cartridges and chargers listed above.
Recommended battery adapter
Symbols
-
Read instruction manual.
Do not expose to moisture.
Beware of pinching.
Ni-MH
Li-ion
pack together with household waste material!
and their implementation in accordance with national
-
Intended use
The tool is intended for trimming hedges.
Noise
-
Model DUH604S
Model DUH754S
NOTE:
another.
NOTE:
exposure.

9ENGLISH
WARNING: Wear ear protection.
WARNING: The noise emission during actual
value(s) depending on the ways in which the
tool is used especially what kind of workpiece is
processed.
WARNING: Be sure to identify safety mea-
sures to protect the operator that are based on an
estimation of exposure in the actual conditions of
use (taking account of all parts of the operating
cycle such as the times when the tool is switched
trigger time).
Vibration
-
Model DUH604S
h2or less
2
Model DUH754S
h2or less
2
NOTE:
measured in accordance with a standard test method
NOTE:
WARNING: The vibration emission during
declared value(s) depending on the ways in which
the tool is used especially what kind of workpiece
is processed.
WARNING: Be sure to identify safety mea-
sures to protect the operator that are based on an
estimation of exposure in the actual conditions of
use (taking account of all parts of the operating
cycle such as the times when the tool is switched
trigger time).
EC Declaration of Conformity
For European countries only
to this instruction manual.
SAFETY WARNINGS
General power tool safety warnings
WARNING: Read all safety warnings, instruc-
with this power tool.
Save all warnings and instruc-
tions for future reference.
Cordless Hedge Trimmer Safety
Warnings
1. Keep all parts of the body away from the blade.
Do not remove cut material or hold material
to be cut when blades are moving. Blades
moment of inattention while operating the hedge
2. Carry the hedge trimmer by the handle with the
blade stopped and taking care not to operate
any power switch.
trimmer will decrease the risk of inadvertent start-
3. When transporting or storing the hedge trim-
of the hedge trimmer will decrease the risk of
4. When clearing jammed material or servicing
and the battery pack is removed or discon-
nected. Unexpected actuation of the hedge trim-
5. Hold the hedge trimmer by insulated gripping
surfaces only, because the blade may contact
hidden wiring. Blades contacting a "live" wire
-
mer "live" and could give the operator an electric
shock.
6. Keep all power cords and cables away from
cutting area.-
7. Do not use the hedge trimmer in bad weather
conditions, especially when there is a risk of
lightning.
Additional Safety Instructions
Preparation
1. Check the hedges and bushes for foreign
objects, such as wire fences or hidden wiring
before operating the tool.
2. The tool must not be used by children or
young persons under 18 years of age. Young
under the supervision of an expert.
3. First-time users should have an experienced
user show them how to use the tool.
4.
Use the tool only if you are in good physical
condition.
-
5.
alcohol, drugs or medication.

10 ENGLISH
6. Work gloves of stout leather are part of the
basic equipment of the tool and must always
be worn when working with it. Also wear
sturdy shoes with anti-skid soles.
7. Before starting work check to make sure that
the tool is in good and safe working order.
must not be used unless fully assembled.
Operation
1.
using the tool.
2. The tool is intended to be used by the operator
at ground level. Do not use the tool on ladders
or any other unstable support.
3. Do not simultaneously wear multiple belt har-
nesses and/or shoulder harnesses when oper-
ating the tool.
4.
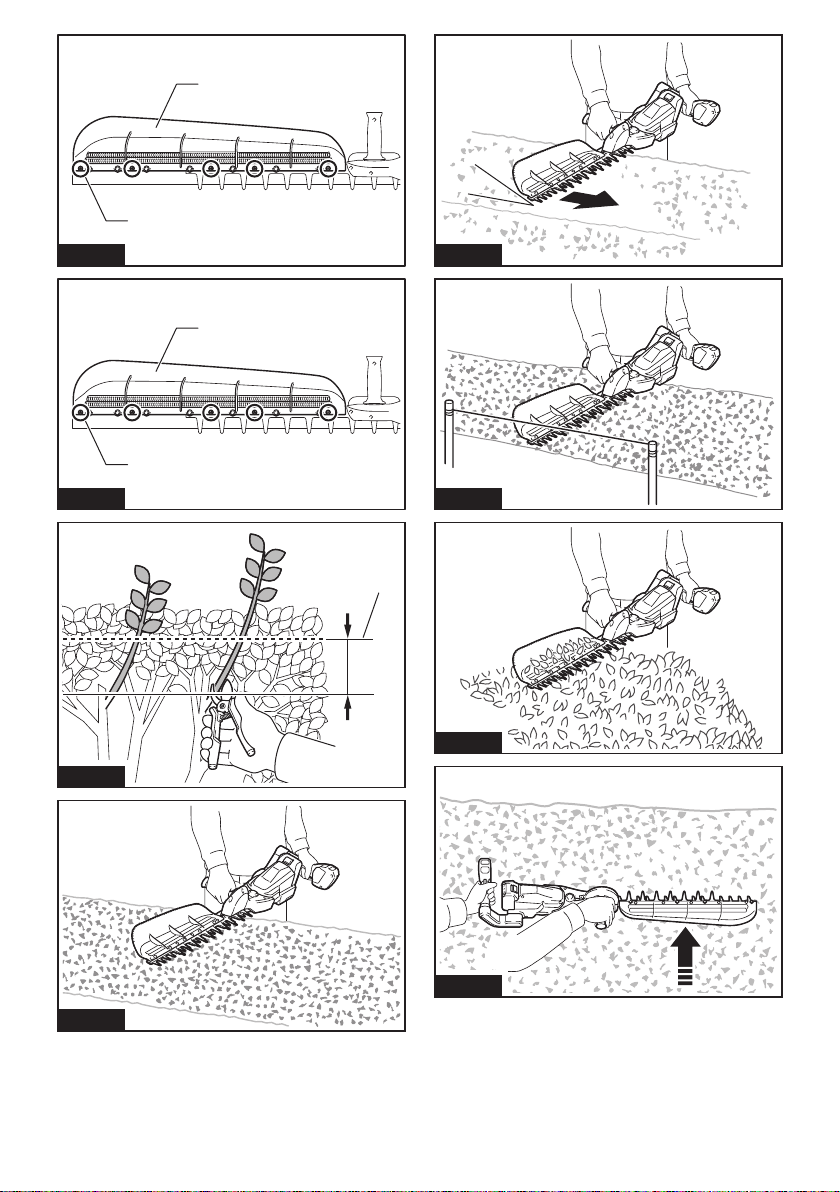
DANGER - Keep hands away from blade. Contact
5. Do not use the tool in the rain or in wet or
very damp conditions. The electric motor is not
waterproof.
6. Make sure you have a secure footing before
starting operation.
7. Do not operate the tool at no-load
unnecessarily.
8.
battery cartridge if the shear blades should
come into contact with a fence or other hard
object. Check the blades for damage, and if
damaged, replace the blades immediately.
9. Before checking the shear blades, taking care
of faults, or removing material caught in the
remove the battery cartridge.
10.
Never point the shear blades to yourself or others.
11. If the blades stop moving due to the stuck of
foreign objects between the blades during
battery cartridge, and then remove the foreign
objects using tools such as pliers. Removing
-
12. Avoid dangerous environment. Don't use the
tool in damp or wet locations or expose it to
rain. Water entering the tool will increase the
risk of electric shock.
Maintenance and storage
1.
cartridge before doing any maintenance work.
2. When moving the tool to another location,
including during work, always remove the
battery cartridge and put the blade cover on
the shear blades. Never carry or transport the
tool with the blades running. Never grasp the
blades with your hands.
3. Clean the tool and especially the shear blades
after use, and before putting the tool into stor-
age for extended periods. Lightly oil the blades
and put on the blade cover.
4. Store the tool with the blade cover on, in a dry
room. Keep it out of reach of children. Never
store the tool outdoors.
5.
cell may explode. Check with local codes for
possible special disposal instructions.
6. Do not open or mutilate the battery(ies).
Released electrolyte is corrosive and may
cause damage to the eyes or skin. It may be
toxic if swallowed.
7. Do not charge battery in rain, or in wet
locations.
SAVE THESE INSTRUCTIONS.
WARNING: DO NOT let comfort or familiarity
with product (gained from repeated use) replace
strict adherence to safety rules for the subject
product. MISUSE or failure to follow the safety
rules stated in this instruction manual may cause
serious personal injury.
Important safety instructions for
battery cartridge
1.
Before using battery cartridge, read all instruc-
tions and cautionary markings on (1) battery char-
ger, (2) battery, and (3) product using battery.
2. Do not disassemble or tamper the battery
cartridge.
or explosion.
3. If operating time has become excessively
shorter, stop operating immediately. It may
result in a risk of overheating, possible burns
and even an explosion.
4. If electrolyte gets into your eyes, rinse them
out with clear water and seek medical atten-
tion right away. It may result in loss of your
eyesight.
5. Do not short the battery cartridge:
Do not touch the terminals with any con-
ductive material.
Avoid storing battery cartridge in a con-
tainer with other metal objects such as
nails, coins, etc.
Do not expose battery cartridge to water
or rain.
A battery short can cause a large current
breakdown.
6. Do not store and use the tool and battery car-
tridge in locations where the temperature may
reach or exceed 50 °C (122 °F).
7. Do not incinerate the battery cartridge even if
it is severely damaged or is completely worn
8. Do not nail, cut, crush, throw, drop the battery
cartridge, or hit against a hard object to the
battery cartridge.
9. Do not use a damaged battery.
10. The contained lithium-ion batteries are subject
to the Dangerous Goods Legislation require-
ments.
-

11 ENGLISH
-
national regulations.
around in the packaging.
11. When disposing the battery cartridge, remove
it from the tool and dispose of it in a safe
place. Follow your local regulations relating to
disposal of battery.
12. Use the batteries only with the products
-
13. If the tool is not used for a long period of time,
the battery must be removed from the tool.
14. During and after use, the battery cartridge may
take on heat which can cause burns or low
temperature burns. Pay attention to the han-
dling of hot battery cartridges.
15. Do not touch the terminal of the tool imme-
diately after use as it may get hot enough to
cause burns.
16. Do not allow chips, dust, or soil stuck into the
terminals, holes, and grooves of the battery
cartridge.
17. Unless the tool supports the use near
high-voltage electrical power lines, do not use
the battery cartridge near high-voltage electri-
cal power lines.
18. Keep the battery away from children.
SAVE THESE INSTRUCTIONS.
CAUTION: Only use genuine Makita batteries.
charger.
Tips for maintaining maximum
battery life
1. Charge the battery cartridge before completely
discharged. Always stop tool operation and
charge the battery cartridge when you notice
less tool power.
2. Never recharge a fully charged battery car-
tridge. Overcharging shortens the battery
service life.
3. Charge the battery cartridge with room tem-
perature at 10 °C - 40 °C (50 °F - 104 °F). Let
a hot battery cartridge cool down before
charging it.
4. When not using the battery cartridge, remove
it from the tool or the charger.
5. Charge the battery cartridge if you do not use
it for a long period (more than six months).
FUNCTIONAL DESCRIPTION
CAUTION: Always be sure that the tool is
before adjusting or checking function on the tool.
Installing or removing battery cartridge
CAUTION:
installing or removing of the battery cartridge.
CAUTION: Hold the tool and the battery car-
cartridge.
Fig.1: 1. Red indicator 2. Button 3.
CAUTION: Always install the battery cartridge
fully until the red indicator cannot be seen. If not,
CAUTION: Do not install the battery cartridge
forcibly.
Indicating the remaining battery capacity
Only for battery cartridges with the indicator
Fig.2: 1. Indicator lamps 2.
-
light up for a few seconds.
Indicator lamps Remaining
capacity
Lighted Blinking
75% to 100%
50% to 75%
25% to 50%
0% to 25%
Charge the
malfunctioned.

12 ENGLISH
NOTE:
-
NOTE:
Speed adjusting
Fig.3: 1. Speed indicator 2.
Indicator Mode Stroke speed
High 4,400 min-1
Medium 3,600 min-1
Low 2,000 min-1
Tool / battery protection system
Status Indicator lamps
On Blinking
Overload
Overheat
Over
discharge
Overload protection
NOTICE:
Depending on the usage conditions, the tool
tool is overloaded by entangled branches or debris. In this
and then remove entangled branches or debris using tools
such as pliers. After removing the branches or debris,
install the battery cartridge and turn on the tool again.
Overheat protection for tool or
battery
tool on again.
Overdischarge protection
If the tool does not operate even when the switches are
Power switch action
WARNING: For your safety, this tool is
equipped with lever which prevents the tool from
unintended starting. NEVER use the tool if it runs
when you simply pull the switch triggers without
pressing the lever. Return the tool to our autho-
rized service center for proper repairs BEFORE
further usage.
WARNING: NEVER tape down or defeat pur-
pose and function of the lever.
WARNING: Before installing the battery
cartridge on the tool, always check to see that
the switch triggers and lever actuate properly
and return to the "OFF" position when released.
Operating a tool with a switch that does not actuate
-
CAUTION:
switch triggers when carrying.
NOTICE: Do not pull the switch trigger hard
without pressing the lever. This can cause switch
breakage.
power lamp lights up when the tool is turned on. To turn
Fig.4: 1.2.
NOTE:
not operated for a certain period.
pulled, the lever is provided. To start the tool, pull the
front switch trigger, and then pull the rear switch trigger
switch triggers, the tool stops.
Fig.5: 1. Lever 2. Rear switch trigger 3.
trigger

13 ENGLISH
Reverse button for debris removal
WARNING: If the entangled branches or
debris cannot be removed by the reverse func-
-
tery cartridge, and then remove the entangled
branches or debris using tools such as pliers.
-
from accidental start-up. Removing the entangled
removing them.
then pull the front switch trigger, and then pull the rear
switch trigger while pressing the lever. The power lamp
direction.
the tool returns to the regular movement and the power
Fig.6: 1.2.
NOTE:
removed, release the switch triggers, then press the
NOTE:
ASSEMBLY
CAUTION: Always be sure that the tool is
before carrying out any work on the tool.
CAUTION: When replacing the shear blades,
always wear gloves so that your hands do not
directly contact the blades.
NOTICE: When replacing the shear blades, do
Installing or removing the shear
blades
CAUTION: Attach the blade cover before
removing or installing the shear blades.
tool.
NOTE:
1.
the tool.
Fig.7: 1. Chip receiver 2. Screw
2.
Fig.8: 1. Bolt
3. Remove the cover and the plate.
Fig.9: 1. Cover 2.
NOTE:
4.
Fig.10: 1. Rod 2. Bearing
NOTE:
5. Remove three screws, three sleeves and the felt
Fig.11: 1. Screw 2. Sleeve 3.4. Shear
NOTICE: Be careful not to lose the screws.
6.
Fig.12
7.
the alignment line.
Fig.13: 1. Hole 2.
8.
at the same position.
Fig.14: 1.
9. Insert the screw removed in step 5 into the hole
Fig.15: 1. Screw 2.3. Hole
10.
hole on the rod, then align the position of the felt pad
Fig.16: 1.2.3. Hole 4. Sleeve
NOTICE: Apply a small amount of grease to the
inner periphery of the hole of the rod.
NOTICE: Be careful not to lose the sleeves.
11.
with the holes on the tool, and then tighten two screws
Fig.17: 1. Screw
12.
Fig.18: 1. Sleeve
13. Remove the screw inserted into the hole on the
Fig.19: 1. Screw
14.
15.
Fig.20: 1. Rod 2. Small hole 3. Bearing

14 ENGLISH
NOTICE: Apply a small amount of grease to the
inner periphery of the small hole of the rod.
NOTICE: Make sure that the protrusion on the
16.
Fig.21: 1.2.
NOTICE: Make sure that the protrusion on the
17.
Fig.22: 1. Bolt 2. Cover
18. -
Fig.23: 1. Chip receiver 2. Screw
NOTICE: If the shear blades do not move
smoothly, the shear blades are not engaged with
the rods properly. Install the shear blades again.
NOTICE: If the parts other than the shear
blades such as the rods are worn out, ask Makita
Authorized Service Centers for parts replacement
or repairs.
Removing or installing the chip receiver
CAUTION: When installing or removing the
chip receiver, always wear gloves so that your
hands do not directly contact the shear blades.
The chip receiver gathers discarded leaves and makes
clean-up afterward much easier.
remove the chip receiver from the tool. To install the
chip receiver, follow the removal procedure in reverse.
Fig.24: 1. Chip receiver 2. Screw
OPERATION
WARNING: Keep hands away from shear
blades.
CAUTION: Avoid operating the tool in very
hot weather as much as practicable. When operat-
ing the tool, be careful of your physical condition.
CAUTION: Be careful not to accidentally
contact a metal fence or other hard objects while
trimming.
CAUTION: Be careful not to allow the shear
blades to contact the ground.
CAUTION: Overreaching with a hedge trim-
mer, particularly from a ladder, is extremely
dangerous.
NOTICE: Do not attempt to cut branches thicker
than 10 mm in diameter with the tool.
Fig.25: (1) Cutting height (2) 10 cm
NOTICE: Do not cut down dead trees or similar
hard objects.
NOTICE: Do not trim the grass or weeds while
using the shear blades.
the rear switch trigger while pressing the lever, and then
move the tool forward.
Fig.26
speed rate of 3 to 4 seconds per meter.
Fig.27
height and trim along it.
Fig.28
The chip receiver gathers discarded leaves and makes
clean-up afterward much easier.
Fig.29
Fig.30
-
Fig.31
MAINTENANCE
CAUTION: Always be sure that the tool is
before attempting to perform inspection or
maintenance.
Cleaning the tool
NOTICE: Never use gasoline, benzine, thinner,
alcohol or the like. Discoloration, deformation or
cracks may result.

15 ENGLISH
Shear blade maintenance
Before the operation or once per hour during operation,
-
Fig.32
Fig.33
NOTICE: Do not wash the shear blades in water.
NOTICE: Dirt and corrosion cause excessive
blade friction and shorten the operating time per
battery charge.
Storage
-
ing the tool from a nail or screw on the wall.
of children. Store the tool in a place not exposed to
moisture or rain.
Fig.34: 1. Hole
Grinding the shear blades
NOTICE: If the shear blades have considerably
deformed by grinding, replace the shear blades
with new ones.
1.
2.
Fig.35
3.
from the tool.
4.
Fig.36: (1)(2)
CAUTION: Before grinding the shear blades,
battery cartridge is removed from the tool.
5.
Fig.37: 1. Dressing stone
6.
7. Return the tool to normal position, and then
-
ing stone.
Grease lubrication
Interval of lubrication:
1.
Fig.38: 1. Bolt
2.
outlet of the grease vessel with the hole on the cover,
and then press the outlet of the grease vessel onto the
hole.
Fig.39: 1. Grease vessel 2. Hole
3.
4.

16 ENGLISH
TROUBLESHOOTING
-
ment parts for repairs.
State of abnormality Probable cause (malfunction) Remedy
Motor does not run.
Motor stops running after a little use.
Overheating. Stop using of tool to allow it to cool down.
manual.
-
tools such as pliers.
service center for repair.
OPTIONAL
ACCESSORIES
CAUTION: These accessories or attachments
are recommended for use with your Makita tool
accessories or attachments might present a risk of
for its stated purpose.
-
Center.
• Chip receiver
• Grease vessel
NOTE:

17 FRANÇAIS
FRANÇAIS (Instructions originales)
SPÉCIFICATIONS
Modèle : DUH604S DUH754S
Longueur de la lame 600 mm 750 mm
2 000/3 600/4 400 min-1
Longueur totale 1 061 mm 1 200 mm
Tension nominale 18 VCC
3,4 - 3,9 kg
Batterie et chargeur applicables
Batterie BL1815N / BL1820 / BL1820B / BL1830 / BL1830B / BL1840 /
BL1840B / BL1850 / BL1850B / BL1860B
Chargeur
DC18SH
•
AVERTISSEMENT : N’utilisez que les batteries et les chargeurs répertoriés ci-dessus. L’utilisation
Adaptateur de batterie recommandé
•
Symboles
Lire le mode d’emploi.
Ni-MH
Li-ion
Conformément aux directives européennes
piles et d’accumulateurs et leur mise en
œuvre conformément aux lois nationales,
l’environnement.
Utilisations
L’outil est conçu pour tailler les haies.
Bruit
Modèle DUH604S

18 FRANÇAIS
Modèle DUH754S
NOTE :-
de test standard et peuvent être utilisées pour com-
parer les outils entre eux.
NOTE :-
rées peuvent aussi être utilisées pour l’évaluation
préliminaire de l’exposition.
AVERTISSEMENT : Portez un serre-tête
antibruit.
AVERTISSEMENT : L’émission de bruit
lors de l’usage réel de l’outil électrique peut être
la façon dont l’outil est utilisé, particulièrement
selon le type de pièce usinée.
AVERTISSEMENT : Les mesures de sécurité
à prendre pour protéger l’utilisateur doivent être
basées sur une estimation de l’exposition dans
des conditions réelles d’utilisation (en tenant
compte de toutes les composantes du cycle
d’utilisation, comme par exemple le moment de
sa mise hors tension, lorsqu’il tourne à vide et le
moment de son déclenchement).
Vibrations
Modèle DUH604S
h2ou moins
2
Modèle DUH754S
h2ou moins
2
NOTE :-
de test standard et peuvent être utilisées pour com-
parer les outils entre eux.
NOTE :-
rées peuvent aussi être utilisées pour l’évaluation
préliminaire de l’exposition.
AVERTISSEMENT : L’émission de vibrations
lors de l’usage réel de l’outil électrique peut être
la façon dont l’outil est utilisé, particulièrement
selon le type de pièce usinée.
AVERTISSEMENT : Les mesures de sécurité
à prendre pour protéger l’utilisateur doivent être
basées sur une estimation de l’exposition dans
des conditions réelles d’utilisation (en tenant
compte de toutes les composantes du cycle
d’utilisation, comme par exemple le moment de
sa mise hors tension, lorsqu’il tourne à vide et le
moment de son déclenchement).
Déclaration de conformité CE
Pour les pays européens uniquement
CONSIGNES DE SÉCURITÉ
Consignes de sécurité générales
pour outils électriques
AVERTISSEMENT : Veuillez lire les
consignes de sécurité, instructions, illustrations
électrique. Le non-respect de toutes les instructions
-
Conservez toutes les mises en
garde et instructions pour réfé-
rence ultérieure.
-
Consignes de sécurité pour taille-
1. Prenez soin de n’approcher aucune partie
du corps de la lame. Ne retirez pas le maté-
riau coupé, ni ne tenez le matériau à couper
lorsque les lames sont en mouvement. Les
l’interrupteur est en position d’arrêt. Un moment
d’inattention en cours d’utilisation du taille-haie
2. Transportez le taille-haie par la poignée avec
la lame arrêtée et en prenant soin de ne pas
actionner l’interrupteur d’alimentation.
transportant correctement le taille-haie, vous
3. Lors du transport ou du rangement du taille-
haie, mettez toujours en place le couvre-lame.
Une manipulation correcte du taille-haie réduira le
4.
Lorsque vous dégagez un matériau bloqué ou
dépannez l’appareil, assurez-vous que tous les
interrupteurs d’alimentation sont en position d’ar-
rêt et que la batterie est retirée ou débranchée. Le
5.
Tenez le taille-haie uniquement par ses surfaces
de prise isolées, car la lame pourrait entrer en
contact avec le câblage caché. Le contact des
taille-haie et électrocuter l’opérateur.

19 FRANÇAIS
6. Éloignez les cordons d’alimentation et les
câbles de la zone de coupe. Les cordons d’ali-
coupés accidentellement par la lame.
7. N’utilisez pas le taille-haie par mauvais temps,
particulièrement en cas d’orage. Vous éviterez
ainsi d’être frappé par la foudre.
Consignes de sécurité
supplémentaires
Préparatifs
1.
haies et les buissons avant d’utiliser l’outil.
2. L’outil ne doit pas être utilisé par des enfants
ou des adolescents de moins de 18 ans. Cette
de plus de 16 ans s’ils sont en cours de formation
sous la surveillance d’un expert.
3. Les utilisateurs novices doivent être formés
par un utilisateur expérimenté pour leur mon-
trer comment utiliser l’outil.
4. N’utilisez l’outil que si vous êtes en bonne
condition physique. Si vous êtes fatigué, votre
-
-
5. N’utilisez jamais l’outil lorsque vous êtes
médicaments.
6. Les gants de travail en cuir robuste font partie
de l’équipement de base de l’outil et leur port
est obligatoire pendant que vous l’utilisez.
Portez également des chaussures solides à
semelles antidérapantes.
7. Avant de commencer la tâche, assurez-vous
que l’outil est dans un bon état de marche
sécuritaire. Assurez-vous que les carters de
protection sont correctement installés. L’outil
ne doit pas être utilisé tant qu’il n’est pas com-
plètement assemblé.
Fonctionnement
1. Tenez l’outil fermement avec les deux mains
lorsque vous l’utilisez.
2. L’outil est conçu pour être utilisé par l’opéra-
teur au niveau du sol. N’utilisez pas l’outil sur
une échelle ou tout autre support instable.
3. Ne portez pas simultanément de cein-
tures-baudriers et/ou de bandoulières lorsque
vous utilisez l’outil.
4. DANGER - Gardez vos mains à l’écart de la
lame.
5. N’utilisez pas l’outil sous la pluie ou dans
des conditions mouillées ou très humides. Le
6. Assurez-vous que vous avez une bonne assise
avant la mise en marche.
7. Ne faites pas tourner l’outil à vide inutilement.
8. Éteignez immédiatement l’outil et retirez la
batterie si les lames de cisaille entrent en
contact avec une clôture ou un autre objet dur.
remplacez-les sur-le-champ, le cas échéant.
9.
dépanner ou de retirer des matériaux pris
dedans, éteignez toujours l’outil et retirez la
batterie.
10. Ne dirigez jamais les lames de cisaille vers
vous-même ou quelqu’un d’autre.
11. Si les lames cessent de bouger, car des corps
étrangers sont collés entre elles pendant le
fonctionnement, éteignez l’outil et retirez
la batterie, puis ôtez les corps étrangers en
utilisant un outil comme une pince. Ôter les
réaction au retrait des corps étrangers.
12. Évitez les environnements dangereux.
N’utilisez pas l’outil dans un endroit humide, ni
ne l’exposez à la pluie. Le risque d’électrocu-
tion augmente si de l’eau pénètre dans l’outil.
Entretien et rangement
1. Éteignez l’outil et retirez la batterie avant de
procéder à l’entretien.
2. Lorsque vous déplacez l’outil dans un autre
endroit, y compris pendant le travail, retirez
toujours la batterie et placez le couvre-lame
sur les lames de cisaille. Ne transportez jamais
l’outil avec les lames fonctionnant. Ne saisis-
sez jamais les lames avec les mains.
3. Nettoyez l’outil et particulièrement les lames
de cisaille après utilisation et avant de le ran-
ger pendant une période prolongée. Huilez
légèrement les lames et mettez le couvre-lame
en place.
4. Rangez l’outil avec le couvre-lame en place
dans une pièce sèche. Gardez-le hors de
portée des enfants. Ne rangez jamais l’outil à
l’extérieur.
5. Ne jetez pas la ou les batteries au feu.
L’élément de la pile pourrait exploser.
Consultez les codes locaux pour de possibles
instructions de mise au rebut spéciales.
6. N’ouvrez ni ne manipulez la ou les batteries.
L’électrolyte qui s’échappe de la batterie est
corrosif et peut irriter la peau ou les yeux. Il
peut être toxique en cas d’ingestion.
7. Ne chargez pas la batterie sous la pluie ou
dans un endroit mouillé.
CONSERVEZ CES
INSTRUCTIONS.
AVERTISSEMENT : NE vous laissez PAS
sentiment d’aisance et de familiarité avec le
produit, en négligeant le respect rigoureux des
consignes de sécurité qui accompagnent le pro-
duit en question. La MAUVAISE UTILISATION de
l’outil ou l’ignorance des consignes de sécurité
indiquées dans ce mode d’emploi peut entraîner
de graves blessures.

20 FRANÇAIS
Consignes de sécurité importantes
pour la batterie
1. Avant d’utiliser la batterie, lisez toutes les
instructions et précautions relatives (1) au
chargeur de batterie, (2) à la batterie, et (3) au
produit utilisant la batterie.
2.
batterie.
chaleur excessive ou une explosion.
3. Cessez immédiatement l’utilisation si le temps
de fonctionnement devient excessivement
voire d’explosion.
4. Si l’électrolyte pénètre dans vos yeux, rin-
cez-les à l’eau claire et consultez immédiate-
ment un médecin. Il y a risque de perte de la
vue.
5. Ne court-circuitez pas la batterie :
Ne touchez les bornes avec aucun maté-
riau conducteur.
Évitez de ranger la batterie dans un
conteneur avec d’autres objets métal-
liques, par exemple des clous, des pièces
de monnaie, etc.
N’exposez pas la batterie à l’eau ou à la
pluie.
Un court-circuit de la batterie peut provoquer
une intensité de courant élevée, une sur-
panne.
6. Ne rangez ni n’utilisez l’outil et la batterie dans
un endroit où la température risque d’atteindre
ou de dépasser 50 °C.
7. Ne jetez pas la batterie au feu même si elle est
sérieusement endommagée ou complètement
épuisée. La batterie peut exploser au contact
du feu.
8. Abstenez-vous de clouer, couper, écraser,
jeter, laisser tomber la batterie, ou de la heur-
ter contre un objet dur.
un incendie, une chaleur excessive ou une
explosion.
9. N’utilisez pas la batterie si elle est
endommagée.
10. Les batteries au lithium-ion contenues sont
soumises aux exigences de la législation sur
les marchandises dangereuses.
Lors du transport commercial par des tierces
parties ou des transitaires par exemple, des exi-
nécessaire de consulter un expert en matériau
dangereux. Veuillez également respecter les
plus détaillées.
11. Lors de la mise au rebut de la batterie, reti-
réglementations locales en matière de mise au
rebut des batteries.
12. Utilisez les batteries uniquement avec les
L’insertion de
13. Lorsque vous n’utilisez pas l’outil pendant une
période prolongée, la batterie doit être retirée
de l’outil.
14. Pendant et après l’utilisation, la batterie peut
compris en cas de température relativement
basse. Manipulez les batteries chaudes avec
précaution.
15. Ne touchez pas la borne de l’outil immédiate-
ment après utilisation car elle peut être assez
16. Évitez que des copeaux, de la poussière ou
du sol adhèrent aux bornes, aux trous et aux
rainures de la batterie. Cela pourrait réduire les
17. À moins que l’outil prenne en charge un tel
usage, n’utilisez pas la batterie à proximité de
lignes électriques haute tension. Cela pourrait
18. Conservez la batterie hors de portée des
enfants.
CONSERVEZ CES
INSTRUCTIONS.
ATTENTION : N’utilisez que des batteries
Makita d’origine.
-
-
rels. Cela annulera également la garantie Makita pour
l’outil et le chargeur Makita.
Conseils pour assurer la durée
de vie optimale de la batterie
1. Chargez la batterie avant qu’elle ne soit com-
plètement déchargée. Arrêtez toujours l’outil
et rechargez la batterie quand vous remarquez
que la puissance de l’outil diminue.
2. Ne rechargez jamais une batterie complète-
ment chargée. La surcharge réduit la durée de
service de la batterie.
3. Chargez la batterie à une température
ambiante comprise entre 10 °C et 40 °C. Avant
de charger une batterie chaude, laissez-la
refroidir.
4. Lorsque vous n’utilisez pas la batterie, reti-
rez-la de l’outil ou du chargeur.
5. Rechargez la batterie si elle est restée inutili-
sée pendant une période prolongée (plus de
six mois).
This manual suits for next models
2
Table of contents
Languages:
Other Makita Trimmer manuals

Makita
Makita DUR361U User manual

Makita
Makita DUH202 User manual

Makita
Makita DUR369N User manual

Makita
Makita DUR365U User manual

Makita
Makita XNU01 User manual

Makita
Makita DUR364L User manual

Makita
Makita UR016G User manual

Makita
Makita EE400MP User manual

Makita
Makita ER2600L User guide

Makita
Makita UR101C User manual

Makita
Makita N3701 User manual

Makita
Makita Trimmer User manual

Makita
Makita EH6000W Instruction Manual

Makita
Makita EN422MP User manual

Makita
Makita EM4351UH User guide

Makita
Makita UR006G User manual

Makita
Makita HU02 User manual

Makita
Makita XRU01 User manual

Makita
Makita 4050, 4850, 5550, 6350 Manual

Makita
Makita UR012G User manual