Makita DRC200 User manual

DRC200
BY
GB Robotic Cleaner INSTRUCTION MANUAL 7
RUS Роботизированный
Уборщик ИНСТРУКЦИЯ ПО
ЭКСПЛУАТАЦИИ 19
KK Роботты тазалаушы ПАЙДАЛАНУ НҰСҚАУЛЫҒЫ 33
AR 54
FA 64

Fig. A
Fig. B
1
2
3
Fig. C
1
Fig. D
Fig. E
2

1 2 3 4
5
6
12
710
11
9
8
Fig. F
1
2
3
4
6
7
5
Fig. G
1 2
ab
c
d
Fig. H
1
2
Fig. I
3

4
1
Fig. J
1
3
2
4
5
6
Fig. K
1
2
Fig. L
4

5
4
2
3
1
Fig. M
13
4
2
8
7
5
6
Fig. N
5

6
2
1
Fig. O
2
3
4
5
4
1
Fig. Q
1
2
Fig. R
1
2
Fig. P

7ENGLISH
SPECIFICATIONS
Standard battery
cartridge
BL1815N, BL1820B, BL1830B,
BL1840B, BL1850B, BL1860B
Battery life
(using optional lithium
ion batteries)
Approx. 120 min. using two BL1830s
(18 V, 3 Ah ea.)
Approx. 200 min. using two BL1850s
(18 V, 5 Ah ea.)
Bin capacity 2.5 L
Dimensions (w/l/h)
(incl. BL1830 batteries) Approx. 460 x 460 x 180 mm
Weight (incl. two
BL1830 batteries) Approx. 7.8 kg
• Thespecicationsherearesubjecttochange
without notice, due to our continuing program of
research and development.
• Specicationsmaydifferfromcountrytocountry.
Symbols
Read instruction manual.
Li-ion
Only for EU countries
Do not dispose of electric equipment or
battery pack together with household waste
material!
In observance of the European Directives,
on Waste Electric and Electronic Equipment
and Batteries and Accumulators and Waste
Batteries and Accumulators and their
implementation in accordance with national
laws, electric equipment and batteries and
battery pack(s) that have reached the end
of their life must be collected separately and
returned to an environmentally compatible
recycling facility.
DonotsteporputobjectsontheRobotic
Cleaner.
Do not use the Robotic Cleaner near an
openameorammableand/ordangerous
materials.
Clean the cliff sensors on the bottom face if
they are dirty or wet.
ENGLISH (Original instructions)
WARNING: This machine is not intended for use by persons (including
children) with reduced physical, sensory or mental capabilities, or lack
of experience and knowledge. Children should be supervised to ensure
that they do not play with the appliance.
Intended use
This is the Robotic Cleaner intended for cleaning indoor
oors.TheremotecontrollerconnectstotheRobotic
Cleaner by wireless (2.4 GHz ZigBee).
Wireless interactive communication
by ZigBee
Remote Controller, Designation of Type(s):
SH00000219, can control Robotic Cleaner.
WirelesscommunicationspecicationsofRobotic
Cleaner and Remote Controller.
Frequency : 2.425 GHz, 2.450 GHz, 2.475 GHz
OutputPower:≤3dBm
SAFETY PRECAUTIONS
WARNING
Do not use the Robotic Cleaner near or vacuum up
inammable substances.
Thismayresultinexplosionorre.
• Kerosene, gasoline, incense, candles
• Benzine, thinner
• Cigarette butts
• Toner or other combustible substances
• Carpet cleaner or other foamy substances
Do not use the Robotic Cleaner in wet locations,
locations that may become wet, or locations with
high temperatures and humidity. Also, do not
vacuum up water.
Thismayresultinelectricshock,short-circuit,re,
deformation or malfunction.
• Kitchens and other areas where water is used
• Bathrooms
• Shower rooms
• Attics, etc.
Do not touch the Robotic Cleaner with wet hands.
This may result in electric shock.
Do not use the Robotic Cleaner around stoves or
other heating equipment.
Thismayresultinelectricshock,short-circuit,re,
deformation or malfunction.

8ENGLISH
Do not use the Robotic Cleaner in the following
types of locations.
Thismayresultinelectricshockorinjury.
• Near infants or persons with reduced physical,
sensory or mental capabilities, or lacking in the
necessary experience and knowledge
• Near animals
• Nearlargenumbersofpeopleorhighlytrafcked
areas
Do not allow unsupervised children or persons
who are unable to express their will or operate the
Robotic Cleaner by themselves to use the Robotic
Cleaner.
Thismayresultinelectricshockorinjury.
Discontinue operation immediately in the event
of an abnormality or malfunction such as the
following.
Failure to observe this instruction may result in smoke,
reorelectricshock.
• The Robotic Cleaner will not operate even though it
is turned ON.
• The Robotic Cleaner is deformed or abnormally hot.
• The Robotic Cleaner stops sometimes during
operation.
• The Robotic Cleaner makes abnormal noises during
operation.
• The Robotic Cleaner gives off a burnt smell.
Turn OFF the Robotic Cleaner in locations where
use is prohibited.
Failure to observe this instruction may cause medical
equipment to operate improperly.
Be sure to follow the instructions of each medical
institution when using equipment that emits radio waves
inside medical institutions.
Do not use the Robotic Cleaner in narrow and
unenclosed high locations.
This may cause the Robotic Cleaner to fall from the
area,resultingininjuryormalfunction.
• Stairs
• On top of a table, shelf, dresser, refrigerator, etc.
• Mezzanines,lofts,oorswithadirectdroponto
stairwells or entranceways, etc.
• Locations with an incline of 10° or more
Do not expose the Robotic Cleaner to direct
sunlight or infrared rays.
Improper operation due to a sensor error may cause the
RoboticCleanertofall,resultingininjuryormalfunction.
• Halogen heaters
• Remote controls or sensors, etc.
• Sun rays entering through frosted glass
Move any objects that may cause an accident in the
event of contact with the Robotic Cleaner.
Failuretoobservethisinstructionmayresultininjury
duetoobjectstippingoverorfalling.
• Lit candles, vases, etc.
• Electronics with controls located around the same
height as the Robotic Cleaner.
Do not cover the Robotic Cleaner.
Thismayresultinreduetooverheating.
Do not ride or place heavy objects on the Robotic
Cleaner. Do not apply strong physical shocks.
Thismayresultininjury,damageormalfunction.
In particular, pay close attention to children around the
Robotic Cleaner.
Never modify the Robotic Cleaner.
Thismayresultinre,electricshockorinjury.
Consult the dealer where you purchased the Robotic
Cleaner for repairs.
Do not block or insert metallic or easily combustible
foreign object into the suction or exhaust openings.
Also, do not use the Robotic Cleaner around
objects that may block the suction opening.
Thismayresultinelectricshock,reormalfunction.
Do not heat or expose the Robotic Cleaner to re or
leave it in a hot location such as near a re or stove,
exposed to direct sunlight, or inside a vehicle under
the blazing sun.
Thismayresultinshort-circuit,re,orcausethebattery
toleakuidorburst.
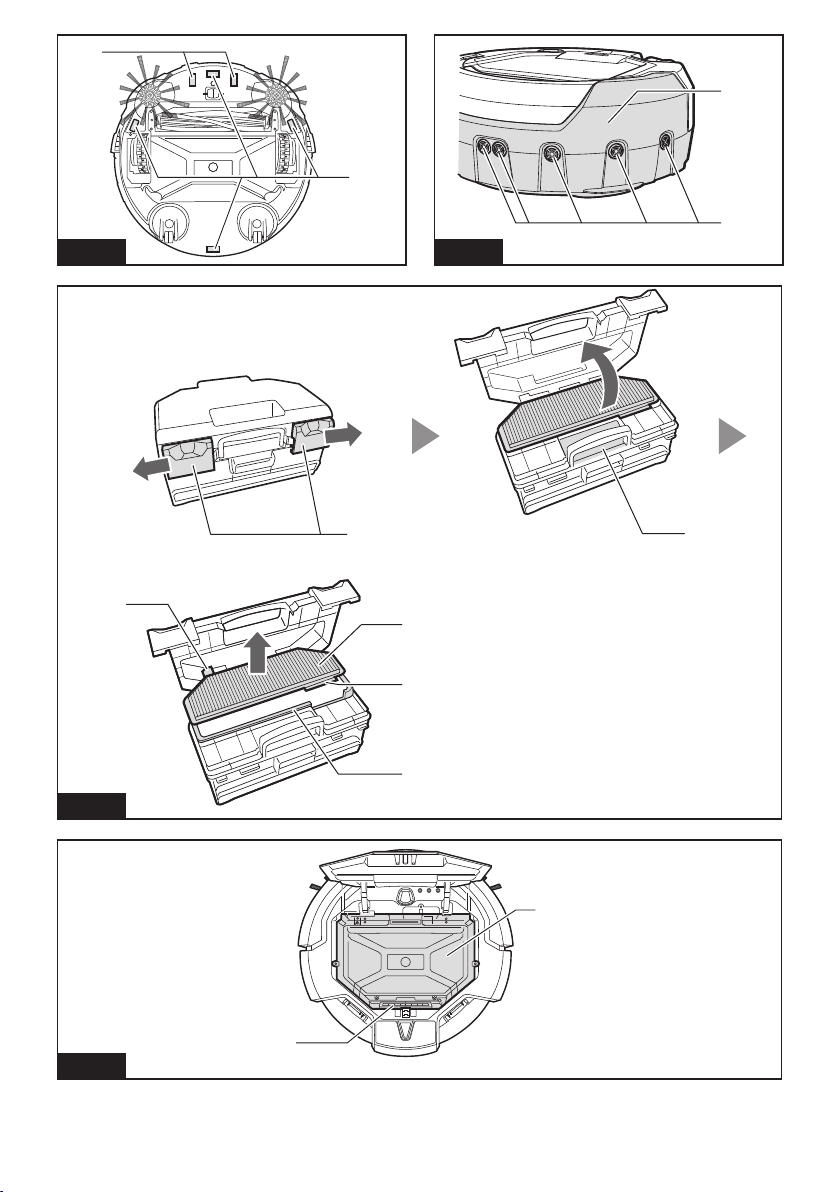
Do not wash or expose the Robotic Cleaner* to
water or detergents.
Thismayresultinelectricshock,short-circuitorre.
* Excluding the main brush, bottom plate, side
brushes,dustboxandlter
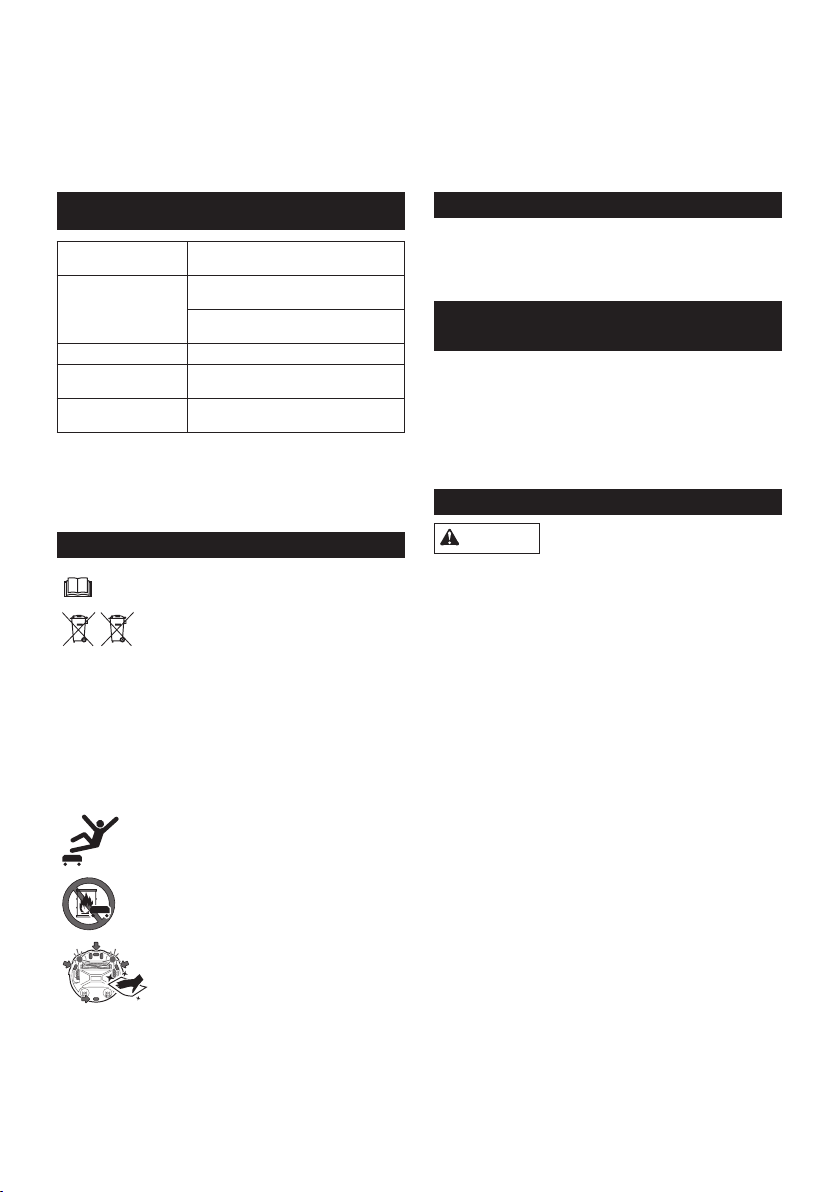
Do not touch the drive wheels or insert hands or
feet under the Robotic Cleaner during operation.
Thismayresultininjury.
In particular, pay close attention to children around the
Robotic Cleaner.
Do not block or insert foreign matter into the
Robotic Cleaner’s sensors.
Thismayresultinoperationalfailure,injurydueto
the Robotic Cleaner falling as a result of improper
operation, or malfunction.
Do not attach tape to the sensors or wheels. Do
not alter the bumper or wheel shapes or press the
bumper with excessive force.
Thismayresultinoperationalfailure,injurydueto
the Robotic Cleaner falling as a result of improper
operation, or malfunction.
Periodically clean each sensor.
Failure to observe this instruction may result in
operationalfailure,injuryduetotheRoboticCleaner
falling as a result of improper operation, or malfunction.
Do not use boundary tape (sold separately) that is
dirty, peeling or torn.
ThismayresultininjuryduetotheRoboticCleaner
falling as a result of operational failure.

9ENGLISH
CAUTION
Do not use the Robotic Cleaner in the following
locations.
This may cause other equipment to operate improperly.
• Inside a hospital or around medical equipment
• Inside an airplane
• Around electronic equipment that requires precision
control or uses weak signals.
Be sure to keep the Robotic Cleaner and the remote
control more than 15 cm away from implantable
cardiac pacemakers and debrillators.
Failure to observe this instruction may result in
malfunction of the medical devices.
Do not insert foreign matter into the gaps and
openings.
Thismayresultinelectricshockorinjury.
Be careful not to get your ngers caught when
cleaning the Robotic Cleaner.
Thismayresultininjury.
Be sure to read this INSTRUCTION MANUAL
thoroughly before using the Robotic Cleaner.
Failuretoobservethisinstructionmayresultininjuryor
malfunction.
NOTICE
Immediately discontinue use of the battery
cartridge if an unpleasant odor, battery leakage,
abnormal heating, deformation, or discoloration is
observed.
Failure to observe this instruction may result in
malfunction.
Do not use the Robotic Cleaner outdoors or in
locations where it may wander outdoors.
This may result in malfunction.
Do not use the Robotic Cleaner in the following
locations.
This may result in malfunction.
• Locations where cooking oil particles or other oil
components are suspended in the air
• Locations where aerosol sprays or chemical
products are used, such as barber shops, beauty
salons, and dry cleaning shops
• Dusty locations
Do not use the Robotic Cleaner in the following
locations.
Thismaydamageoorcoveringsorscratchoor
surfaces.
• Locationswitheasilydamagedoorcoverings
(sheepskin, felt materials, etc.)
• Unnishedwoodormarbleoors
• Freshlywaxedoors
Do not use the Robotic Cleaner on oor coverings
with a long pile length (7 mm or more).
Thismayresultindamagetotheoorcoveringsor
cause the Robotic Cleaner to malfunction.
Do not use the Robotic Cleaner on hard, uneven
oor surfaces such as concrete oors, etc.
This may result in increased brush and wheel wear.
Do not use the Robotic Cleaner if the brushes or
wheels are worn.
Thismayresultinscratchedoorsurfaces.
Discontinue operation and consult the dealer where you
purchased the Robotic Cleaner.
Remove any sandy dirt adhering to the main brush,
side brushes and wheels.
Failure to observe this instruction may result in
scratchedoorsurfaces.
Do not vacuum up the following items.
This may scratch or clog the inside of the Robotic
Cleaner or result in malfunction.
• Liquids or wet garbage
• Chemicals or oils
• Pet excrement
• Large amounts of sand or powder
• Sharpobjects(glass,blades,pins,etc.)
• Large paper or vinyl garbage
• Cord or string
Clean the lter after vacuuming up ne powder
(plaster, cement, chalk, etc.).
Failure to observe this instruction may result in
malfunction.
Do not use the Robotic Cleaner if the lter is
clogged or the sensors are soiled.
This may result in malfunction.
Do not oil the rotating brush or other moving parts.
This may result in plastic cracking.
SAVE THESE INSTRUCTIONS.
Battery tool use and care
1. Recharge only with the charger specied by the
manufacturer. A charger that is suitable for one
type of battery pack may create the risk of re
when used with another battery pack.
2. Use power tools only with specically
designated battery packs. Use of any other
battery pack may create the risk of injury or re.
3. When (the) battery pack is not in use, keep it
away from paper clips, coins, keys, nails, screws
and other small metal objects that can make a
connection from one terminal to another.
4. Under extreme conditions, liquid may be ejected
from the battery; avoid contact. If accidental
contact occurs, ush with water.
Important safety instructions for the
battery cartridge
1. Before using the battery cartridge, read all
instructions and precautionary markings on
(1) the battery charger, (2) the battery, and (3)
product using the battery.
2. Do not disassemble the battery cartridge.

10 ENGLISH
3. If operating time has become signicantly
shorter than usual, stop operating immediately.
It may result in a risk of overheating, possible
burns and even an explosion.
4. If electrolyte gets into your eyes, rinse them out
with clear water and seek medical attention right
away. It may result in loss of your eyesight.
5. Do not short-circuit the battery cartridge:
(1) Do not touch the terminals with any
conductive material.
(2) Avoid storing the battery cartridge in a
container with other metal objects such as
nails, coins, etc.
(3) Do not expose the battery cartridge to water
or rain.
A battery short-circuit can cause a large current
ow, overheating, possible burns and even a
breakdown.
6. Do not store the Robotic Cleaner and battery
cartridge in any location where the temperature
may reach or exceed 50°C (122°F).
7. Do not incinerate the battery cartridge even if it
is severely damaged or is completely worn out.
The battery cartridge can explode in a re.
8. Be careful not to drop or strike the battery
cartridge.
9. Do not use a damaged battery cartridge.
10. Follow your local regulations relating to the
disposal of battery cartridges.
SAVE THESE INSTRUCTIONS.
CAUTION: Only use genuine Makita batteries.
Using non-genuine Makita batteries, or batteries that
have been altered, may result in the battery bursting
causingres,personalinjuryanddamage.Itwill
also void the Makita warranty for the Makita tool and
charger.
Tips for maintaining maximum
battery life
1. Charge the battery cartridge before it becomes
completely discharged. Always stop operation
and charge the battery cartridge when you
notice less tool power.
2. Never recharge a fully charged battery cartridge.
Overcharging shortens the battery service life.
3. Charge the battery cartridge within a room
temperature range of 10°C - 40°C (50°F - 104°F).
Let a hot battery cartridge cool down before
charging it.
4. It is recommended that you charge the battery
cartridge before storing it for a long period
(more than six months).
Tool/battery cartridge protection
system
The Robotic Cleaner is equipped with a tool/battery
cartridge protection system that automatically cuts
OFF the power to the motor to extend the life cycle of
the Robotic Cleaner and the battery cartridges. The
Robotic Cleaner automatically stops under the following
conditions.
Overload
When the Robotic Cleaner is overloaded and an
abnormally high current is drawn, the Robotic Cleaner
automatically stops without any indication.
To restart the Robotic Cleaner, turn the power OFF,
eliminate the cause of the overload, and then turn the
power back ON.
Overheating
When the Robotic Cleaner overheats, the lamp
ashes5or7timesforeachsequenceandtheRobotic
Cleaner automatically stops.
In this case, leave the Robotic Cleaner to cool down
before turning the power back ON.
Overdischarge
When the remaining battery level becomes low, the
Robotic Cleaner automatically stops and does not
respond to any switch operations.
In this case, remove and recharge the battery
cartridges.
BUTTONS AND
INDICATORS
Youcannddetailsofthepartsbysearchingfor
thegurenumbercorrespondingtoeachpartinthis
document (e.g. search for “Fig. F-8” for the POWER
button).
Robotic Cleaner (Fig. F)
1. Pilot lamp
2. Troubleshooting lamp
3. Filter maintenance lamp
4. Brush maintenance lamp
5. Battery indicators (for the right-hand and left-
hand battery cartridges)
6. Timer button and lamps
7. Cruise mode button and lamps
: Pattern mode
: Random mode
8. POWER (start/stop) button
9. Buzzer button and lamp
10. Vacuum button and lamp
11. Boundary sensor button and lamp
Remote control (Fig. G)
1. POWER OFF button
2. Start/Stop button
3. Location beacon button
4. / Cruise mode buttons

11 ENGLISH
5. Timer button
6. Buzzer button
7. Vacuum button
PRIOR TO USE
Assembly and battery installation
CAUTION: Always be sure to turn OFF the Robotic
Cleaner before carrying out any work on the Robotic
Cleaner.
Supplied accessories
Check that the items in the following list are included in
the package.
• Size AAA (LR03) batteries (x2)
• Side brushes (x4, incl. two spare brushes)
• Screws for side brush installation (x4)
• Boundary tape (15 m x1)
• Instruction Manual (x1)
• Quick start guide (x1)
• Notes on use (x1)
Installing the side brushes (Fig. A)
Install the side brushes on both sides of the bottom front
of the Robotic Cleaner.
NOTICE: Before work, be sure to spread a rug or
othercushioningmaterialontheoortoprevent
damagetotheoorandRoboticCleaner(Fig.B).
1. Place the side brush on the rotating shaft head on
the Robotic Cleaner with the groove of the brush
ttedtotheshafthead.
2. Secure the side brush using the supplied screw.
NOTICE: Make sure that the Robotic Cleaner is
operated with the side brushes installed.
Installing the battery cartridges
Align the groove (Fig. C-2) on the battery cartridge with
the tongue (Fig. C-3) on the battery dock and slip it into
place. Insert it all the way until it locks in place with a
small click.
If you can see the red indicator (Fig. C-1) on the upper
side of the release button, the battery cartridge is not
completely locked.
CAUTION: Care must be taken in installing the
batterycartridgessothatngersarenotcaught
between the dock and the battery cartridge.
The Robotic Cleaner operates with only one battery
cartridge installed on either of the battery dock.
To remove the battery cartridge, slide it from the battery
dock while pressing the release button (Fig. D-1) on the
cartridge.
Installing batteries in the remote control (Fig. E)
Slide off the battery compartment lid, and insert two
AAA size (LR03) batteries, taking care to align correctly
the polarity (+/–).
NOTICE: Do not use new and old batteries together,
nor use different types of battery together.
NOTICE: Remove the batteries, if the remote control
is not going to be used for a long time.
CAUTION: If the skin or eyes come into
contact with electrolyte leaking from the batteries,
immediatelyushwithwater.
Pairing the Robotic Cleaner and the remote control
The Robotic Cleaner comes already paired with the
remote control. However, the pairing process must be
performed again if you replace the remote control.
1. Press and hold the Timer (Fig. F-6)
and Cruise mode (Fig. F-7) buttons
simultaneously on the Robotic Cleaner until the
buzzer beeps twice.
2. Press and hold the Timer (Fig. G-5)
and Location beacon (Fig. G-3) buttons
simultaneously on the remote control until the
buzzer beeps once.
If pairing fails and the buzzer beeps 5 times, retry
pairing again.
Organizing rooms
To ensure smooth cruising
• Shut the doors to the room. If the difference in the
level of the door threshold is small enough that the
Robotic Cleaner can pass over it without problem,
the door can also be left open so that the Robotic
Cleanercontinuesandcleanstheadjoiningroom.
• Place obstacles in front of easily damaged furniture,
etc.
• Place obstacles to prevent the Robotic Cleaner from
entering locations where it may become stuck, such
as under low shelves.
• Movetall,thinandunstableobjectsandothereasily
tippedoverobjectstoanotherroom.
• Lockthewheelsofcartsorotherobjects,ormove
them to another room.
• Arrange electrical cords along the walls.
• Movecushions,booksorotherobjectsthatmay
impede the Robotic Cleaner from cruising to another
room.
• Raisethepartsofcurtainsorotherobjectsthat
droopontotheoor.
• Moveanyoorcoveringswitheasilypulled-out
strandsordifferencesinlevelandoorcoverings
that are thin and slide easily to another room.
• Foldanyoorcoveringtasselsbeneaththeoor
coverings.
• Putawayanysmallorexpensiveobjectsthatmay
be easily vacuumed up.

12 ENGLISH
• Put away any cords, belts, strings, thin papers, or
plasticbags,lyingontheoor.
• Retractanyretractableoorpowersockets.
• Coveranygratingsdividingoorsectionswith
boards, etc. as the Robotic Cleaner may detect
them as boundaries and fail to move across them.
Preventing the Robotic Cleaner from falling
• Ifthecleaningareacontainsaightofstairsorother
section where the Robotic Cleaner may fall down, in
order to keep the Robotic Cleaner out of the section,
placeobjectswithaheightof15cmortallerand
that are heavy enough to withstand the impact of the
Robotic Cleaner in front of the section.
• Block sunlight and infrared rays with curtains. (The
Robotic Cleaner may fall to a lower level when
backing up to avoid sunlight or infrared rays.)
• Close aluminum sash doors. (The Robotic Cleaner
may not detect the difference in level between the
aluminumsashrailandtheoorandmayfalloutof
the door.)
• Moveanyoorcoveringsneardifferencesinlevelto
another room. (The Robotic Cleaner may not detect
the difference and may fall.)
NOTE
• Do not use the Robotic Cleaner near or to vacuum
upammablesubstances.(Itmayresultinexplosion
orre.)
• Do not use the Robotic Cleaner in wet locations,
locations that may become wet, or locations with
high temperature and humidity. Also, do not vacuum
up water. (This may result in electric shock, short-
circuit,re,deformationormalfunction.)
• Do not use the Robotic Cleaner in locations where
the distance from the wall to a difference in level
is approx. 1 m or less. (In rare cases the Robotic
Cleaner may fall while backing up.)
• Do not use the Robotic Cleaner in areas where
barriers that the Robotic Cleaner cannot climb over
are located in the vicinities of walls or obstacles.
The Robotic Cleaner may get stuck on the barrier
while moving backward to avoid the wall or the
obstacle.
• Deactivate any home security systems, etc. (The
Robotic Cleaner may be mistakenly detected as an
intruder.)
• The Robotic Cleaner may not avoid differences in
level of 5.5 cm or less.
• Noise may appear on TV screens during operation.
(This is not a malfunction of the television.)
• Do not leave the Robotic Cleaner for long periods
with the battery cartridge installed. (The battery
electrolyte may leak.)
• Do not turn the Robotic Cleaner upside down with
the battery cartridge installed. (A button may be
pressed, resulting in unintended operation.)
OPERATION
TheRoboticCleanercruisesaroundontheoor
according to the preset cruising mode, avoiding
obstacles using ultrasonic sensors (Fig. P-1), and
captures dust and dirt and other debris on the route
using the side brushes, main brush, and vacuum fan.
However, the sensors may not detect an obstacle
in some situations. If your Robotic Cleaner hits an
obstacle, the Robotic Cleaner’s bumper (Fig. P-2)
absorbs impact and changes the direction of travel.
NOTE: There may be cases where the Robotic
Cleaner could not pass over the barriers at the height
of up to 1.5 cm, even though the Robotic Cleaner is
designed to pass over such barriers.
NOTE: The Robotic Cleaner may avoid an area
where is colored in black, having black wood-grain
patterns, or an area made of glass.
NOTE: After a cleaning cycle is completed, some dust
and dirt may remain under certain conditions.
NOTE: Wireless communication may be interrupted
or blocked under the following conditions:
• Inside structures built with reinforced concrete or
metallic building materials
• When the Robotic Cleaner is behind an obstacle
• Near radio communication equipment that uses
the same frequency band
• Neardevicesthatgenerateelectromagneticelds
(microwave ovens, etc.) or static electricity, or that
cause radio wave interference
Basic operations
CAUTION: Always make sure that the Robotic
CleaneristurnedOFFbeforeadjustingorchecking
any function on the Robotic Cleaner.
NOTICE: If dew condensation has occurred, turn
OFF the Robotic Cleaner and wait until the Robotic
Cleaner dries up, before restarting operation.
NOTICE: All settings are not cleared when the
RoboticCleaneristurnedOFF.Besuretoconrm
that the settings are right by the lamps (Figs. F-6, 7,
9, 11) on the Robotic Cleaner to prevent unexpected
operation.
1. Press the POWER button (Fig. F-8) on the
Robotic Cleaner.
The Robotic Cleaner enters standby mode and
the Battery indicator (Fig. F-5) lights up.
(For details, see “Battery indicator on the Robotic
Cleaner” below.)
2. Press the Cruise mode button (Fig. F-7) on the
Robotic Cleaner repeatedly to select mode, or press
the or Cruise mode button (Fig. G-4) on the
remote control.
The selected mode lamp lights up. (For details, see
“Cruise mode” below.)

13 ENGLISH
3. Press the POWER button (Fig. F-8) on the
Robotic Cleaner or the Start/Stop button (Fig.
G-2) on the remote control to start cleaning.
Thepilotlamp(Fig.F-1)ashesandthebuzzer
beeps while cleaning.
To pause the cleaning operation, perform step 3 again.
To resume the cleaning operation, perform step 3 again.
To turn OFF the Robotic Cleaner, press and hold
the POWER button (Fig. F-8) on the Robotic Cleaner
until all indicators turn OFF, or press the POWER
OFF button (Fig. G-1) on the remote control.
CAUTION: Do not get a close look at the pilot lamp
light, or avoid the light getting in your eyes. Doing so
may harm your eyes.
Battery indicator on the Robotic Cleaner
The battery indicator located on the corresponding
battery cartridge side lights up and indicates the
remaining power of the battery cartridge.
NOTICE: The table below provides a rough indication
of the remaining battery power. The remaining
amount may vary depending on the conditions of use
and the room temperature.
50% or more
Between 20% and 50%
20% or lower
Empty/No battery cartridge
installed
Battery error
Battery indicator on the battery cartridge
The remaining power can also be checked using the
battery indicator (Fig. I-1) on battery cartridges with
model numbers ending in the letter “B.”
Remove the battery cartridge and press the button
(Fig. I-2).
NOTICE: The table below provides a rough indication
of the remaining battery power. The remaining
amount may vary depending on the conditions of use
and the room temperature.
75% or more
Between 50% and 75% (incl.
50%)
Between 25% and 50%
25% or lower
Empty
Battery error
Cruise mode
Pattern mode
Application:
Largeoorswithlessobstaclessuch
as in a well-organized warehouse and
long gallery.
Description (Fig. H-1):
The Robotic Cleaner repeats a cycle of
vertical (a) and horizontal (b) travels.*
Random mode
Application:
Floors with many obstacles such as in
anofce.
Description (Fig. H-2):
The Robotic Cleaner repeats a cycle of
bouncing off (c) and along-the-wall (d)
travels.
* Depending on the conditions encountered, the
actual trail of the Robotic Cleaner may differ from
this chart.
NOTE: The Robotic Cleaner could not clean a narrow
area where the Robotic Cleaner could not travel or
where is out of the reach of the side brush.
NOTE: After a cleaning cycle is over, some dust may
remainontheoorinsomeconditions.
Sleep mode
If the Robotic Cleaner is left as it is for approx. 5
minutes in standby mode, the Robotic Cleaner
automatically enters sleep mode to save the batteries,
andthepilotlamp(Fig.F-1)slowlyashes.TheRobotic
Cleaner also enters sleep mode when the auto-on timer
has been activated.
To return to standby mode, perform step 3 in “Basic
operations.”
NOTICE: Changes of settings and starting of cleaning
operations are not possible in this mode.
Carrying the Robotic Cleaner
CAUTION: Before carrying the Robotic Cleaner,
be sure to turn OFF the Robotic Cleaner.
CAUTION: Care must be taken that your hand
never be caught between the handle and the Robotic
Cleaner’s body.
Grip the handle (Fig. J-1).
NOTICE: If you support the rear bottom of the Robotic
Cleaner with another hand, care must be taken so as
not to lift that side too much as the dust and dirt in the
Robotic Cleaner drop out of the main brush opening.
NOTICE: Do not haul the Robotic Cleaner.

14 ENGLISH
Emptying the bin
Empty the bin after every use to keep the Robotic
Cleaner operating at peak performance.
1. Press and hold the POWER button (Fig. F-8) on
the Robotic Cleaner until all indicators turn OFF, or
press the POWER OFF button (Fig. G-1) on the
remote control to turn OFF the Robotic Cleaner.
2. Press and release the top lid (Fig. K-1) to unlock it,
and then fully open the lid.
3. Take out the dust box (Fig. K-2).
4. Undo both locks (Fig. K-3), and open the dust box
lid.
5. Take out and empty the upper bin (Fig. K-4).
6. Removesmallclumpsofdustfromthelter(Fig.
K-5) and empty the lower bin (Fig. K-6).
7. Replace the dust box in the Robotic Cleaner in the
reverse sequence.
Advanced operations
The following features can be set only when the Robotic
Cleaner is in standby mode (see step 1 in “Basic
operations”).
Saving power
The Robotic Cleaner can capture most visible dust
withoutusingthevacuumfan.Ifnedustdoesnotneed
to be removed, turning OFF the vacuum fan saves
the battery power to prolong the operating time of the
Robotic Cleaner.
In standby mode, press the Vacuum button on the
Robotic Cleaner (Fig. F-10) or on the remote control
(Fig. G-7) to turn OFF the Vacuum lamp (Fig. F-10).
To turn ON the vacuum fan, press the Vacuum button
on the Robotic Cleaner (Fig. F-10) or on the remote
control (Fig. G-7). The lamp lights up again.
NOTICE: This setting is not possible in sleep mode
with the auto-on timer activated.
NOTICE: In cases where the vacuum fan is turned
OFF, the Filter maintenance lamp (Fig. F-3) does
notlightevenifthelterisfullofdirt.
Adjusting the buzzer volume
Three levels of buzzer volume including mute can be
selected.
In standby mode, repeatedly press the Buzzer button
on the Robotic Cleaner (Fig. F-9) or on the remote
control (Fig. G-6). Each time you press the button, the
buzzer beeps in the following order: at high volume (the
lamp lights up), at low volume (the lamp lights up), and
then no sound (the lamp goes off).
NOTICE: This setting is not possible in sleep mode
with the auto-on timer activated.
Locating the Robotic Cleaner
This feature is useful for locating the Robotic Cleaner
whichmaybeoutofsightonalargeoorwithdesks,
cabinets,andotherxtures.
Press the Location beacon button on the remote
control (Fig. G-3) while the Robotic Cleaner is in
standby or sleep mode. The buzzer beeps for approx.
10secondsandthepilotlampashes.
Tostopthebuzzerandashing,pressthe Location
beacon button again.
NOTE: There may be cases where the Robotic
Cleaner does not respond because the Robotic
Cleaner is out of range of the remote control. The
problem can be resolved by pressing the Location
beaconbuttonwhileyouaremovingaroundtheoor.
Using the auto-on timer
This feature enables the Robotic Cleaner to start
cleaningautomaticallyafterthespeciedtime.
As the setting is cleared once the auto-timed cleaning
is completed, perform the following procedure to
reactivate the auto-on timer.
1. In standby mode, repeatedly press the Timer
button on the Robotic Cleaner (Fig. F-6) or on the
remote control (Fig. G-5). Each time you press the
button, the setting changes in the following order:
Lamp status Cleaning starts
after 1 hour.
after 3 hours.
after 5 hours.
Auto-on timer is disengaged.
2. Press the POWER button (Fig. F-8) on the
Robotic Cleaner to activate the auto-on timer. The
Robotic Cleaner enters sleep mode.
To clear the timer in standby mode, press and hold
the POWER button (Fig. F-8) on the Robotic Cleaner
until all indicators go off, or press the POWER OFF
button (Fig. G-1) on the remote control.
NOTICE: If the status of both right and left battery
indicators is or , the auto-on timer may not
activate and cleaning may not start automatically.
NOTICE: Changes of settings or starting of cleaning
operations are not possible in this mode.
NOTICE: The auto-on timer setting is cleared if the
batteries are completely discharged.

15 ENGLISH
Conning the Robotic Cleaner to a particular
area
Boundary tape (Fig. L-1) and the boundary-sensing
feature that employs infrared sensors, enable the
Robotic Cleaner to avoid the following areas (Fig. L-2):
• An area that is divided into sections because the
entireoorissolargethattheRoboticCleaner
cannotcleantheooratatime
• An area where fragile articles are present that the
Robotic Cleaner could damage
• Anareafullofgoodsandxtures,barriers,orof
an intricate shape, resulting in the Robotic Cleaner
getting stuck
• An area in the vicinity of a staircase
• An area with a low barrier that the Robotic Cleaner
canclimboverandfalldowntoaloweroor,orthat
the Robotic Cleaner will get stuck on
Preparations
1. Selectanevenandsmoothsurfaceontheoor
where you plan to place the boundary tape, and
then clean the surface.
2. Place the boundary tape so that the side with the
shortbarsisadjacenttothecleaningareaandthere
arenoairbubblesbetweenthetapeandtheoor.
NOTICE: Be sure to use only genuine boundary tape.
Using a tape other than the genuine article might risk
malfunctioning of the boundary-sensing feature.
NOTICE: Do not place the boundary tape on uneven
surfaces that may cause erroneous detection or
on surfaces where the tape may become soiled or
damaged.
NOTICE: Be aware that some adhesive agent may
remainonoors,ortheoormaybedamagedwhen
you remove the boundary tape.
NOTICE: Keep the boundary tapes clean and check
if any positions torn or ripped. If the tape is damaged,
replace it.
WARNING: Do not place the boundary tape in
any area where an accident occurs resulting from
the Robotic Cleaner entering the area or the Robotic
Cleaner falling down from the area. In such a case,
placeobjectswhoseheightis15cmorhigherand
that are heavy enough to withstand the impact of the
Robotic Cleaner, in place of the boundary tapes.
Operations
In standby mode, press the Boundary sensor button
(Fig. F-11) on the Robotic Cleaner to activate the
boundary sensor (Fig. O-2).
The lamp (Fig. F-11) lights up.
To deactivate the boundary sensor, press
the Boundary sensor button again.
NOTICE: This setting is not possible in sleep mode
with the auto-on timer activated.
MAINTENANCE
CAUTION: Always make sure that both battery
cartridges are removed before attempting to perform
inspection or maintenance.
NOTICE: Be sure to take out the dust box before
turning over the Robotic Cleaner to prevent dust and
dirt from dropping out of the main brush opening.
NOTICE: Be sure to spread a rug or other cushioning
materialontheoortopreventdamagetotheoor
and the Robotic Cleaner (Fig. B).
NOTICE: Never use hot water (higher than 40°C
(104°F)), gasoline, benzine, thinner, alcohol or the
like. Discoloration, deformation, or cracks may result.
To maintain product SAFETY and RELIABILITY,
repairs,anyothermaintenance,oradjustmentshould
be performed by Makita Authorized or Factory Service
Centers, always using Makita replacement parts.
Cleaning the side brushes
(Figs. A, M-1)
• Threads and hairs tangled in the bristles of the
side brushes may cause the brush to stop rotating.
Remove them using tweezers or similar tools.
• If the bristles are deformed or missing, replace with
the spare brush (see “Installing the side brushes” for
details).
Cleaning the wheels
• Remove threads and hairs from the drive wheels
(Fig. M-2) using tools such as tweezers and
scissors. Turning the wheel facilitates the cleaning.
• Remove threads and hairs from the swivel wheels
(Fig. M-3) using tweezers, scissors, or similar tools.
NOTICE:Caremustbetakensothatngersarenot
caught between the wheels and the Robotic Cleaner
body.
Cleaning the main brush
Removing the side brushes (see “Installing the side
brushes” for details) facilitates the following work.
1. Remove four screws (Fig. N-1), and then the bottom
plate (Fig. N-2) and main brush (Fig. N-3).
2. Wipe the bottom plate (Fig. N-2) with a cloth slightly
moistened with mild detergent or wash the plate in
water if necessary.
3. Remove threads and hairs from the main brush (Fig.
N-3) using scissors and wash the main brush in
water if necessary.

16 ENGLISH
4. Wipe the inside of the vacuum vent (Fig. N-4) with a
cloth slightly moistened with mild detergent.
5. To replace the main brush, align the protruding
portion (Fig. N-5) on the right end of the main brush
with the indentation on the right shaft bush (Fig.
N-6),andtheninsertthemainbrushtojointhem
together.
6. Insert the left square end of the main brush (Fig.
N-7) into the left square shaft bush (Fig. N-8).
7. Replace the bottom plate in the reverse sequence.
NOTE: When the side brushes remain attached to
the body of the Robotic Cleaner, manually rotating
the side brush facilitates attachment of the bottom
plate without pinching the bristles of the side brushes
between the plate and body of the Robotic Cleaner.
Cleaning the sensors
• Clean the cliff sensors (Fig. O-1) and boundary
sensors (Fig. O-2) using a clean, dry cotton
applicator.
• Clean the ultrasonic sensors (Fig. P-1) using
another vacuum cleaner set in gentle suction mode.
A total of 8 sensors are located on the front and both
sides of the bumper (Fig. P-2).
Cleaning the lter and dust box
NOTICE: To avoid damaging the upper dust box lid,
do not open or close it forcibly.
1. Undo both locks (Fig. Q-1) and lift the upper dust
box lid while holding the Filter maintenance
mark(Fig.Q-2)toopentheltercompartment.
2. Takeoutthelter(Fig.Q-3)andtapitagainstthe
garbage bag or on a waste sheet spread on an even
surface to shake off the dust and dirt.
NOTICE:Donotscruborsquashthelter,norusea
pointedobjecttocleanthelter.
3. WashthelterifthesuctionpoweroftheRobotic
Cleaner becomes weak.
NOTICE:Iftheltersmells,soakthelterina
diluted solution of household bleach (10 milliliters of
bleach per 1 liter of water) for approx. 3 hours before
washingthelterinrunningwater.
4. Wash the dust box.
5. Drythelter(ifyouhavewashedit)andthedust
box for 1 day in a well-ventilated place to prevent
unpleasant odor or malfunctions.
NOTICE:Donotdrythewetlterusingahairdryeror
other heat source.
6. Replacethelterinthedustboxinthereverse
sequence.
NOTICE:Whenyoureplacethelterinthe
compartment, make sure that the tabs (Fig. Q-4) on
thelterarettedtothecutintheedgeofthelter
holder (Fig. Q-5).
Cleaning the body
1. Wipe the Robotic Cleaner’s exterior with a cloth
slightly moistened with mild detergent.
2. Press and release the top lid (Fig. K-1) to unlock,
and then fully open the lid.
3. Take out the dust box (Fig. K-2).
4. Wipe the Robotic Cleaner’s interior (Fig. R-1)
including the vent grill (Fig. R-2) with a cloth slightly
moistened with mild detergent.
RESTORING THE
ROBOTIC CLEANER
When the Robotic Cleaner cannot continue to operate
under such conditions as drive wheel hanging down or
running out of battery power, the Robotic Cleaner will
stop cleaning and tell you something is wrong by the
following lamps and buzzers.
• Troubleshooting lamp (Fig. F-2)
• Filter maintenance lamp (Fig. F-3)
• Brush maintenance lamp (Fig. F-4)
• Timer lamps (Fig. F-6)
• Buzzer lamp (Fig. F-9)
• Vacuum lamp (Fig. F-10)
• Boundary sensor lamp (Fig. F-11)
1. Identify the problem using the following table.
2. Resolve the problem.
3. Press the POWER button (Fig. F-8) on the
Robotic Cleaner or the Start/Stop button (Fig.
G-2) on the remote control to enter standby mode.
The error indication stops and the Robotic Cleaner
is ready for cleaning.
NOTICE: If the error occurs again, turn OFF and ON
the Robotic Cleaner.
NOTICE: If the problem persists after the remedial
action is complete, consult your nearest Makita
Service Center.
Indication Cause/Remedy
lampashes
once, twice, or
6 times for each
sequence
• The drive wheel is hanging down.
• The Robotic Cleaner has gotten stuck
on a barrier.
• The Robotic Cleaner has been
exposed to direct sunlight.
• The Robotic Cleaner has stopped on a
blackoor.
Move the Robotic Cleaner away from
the area.
If the error occurs again, clean the cliff
sensors (Fig. O-1).
lampashes
3 times for each
sequence
• A bumper sensor error has occurred.
Push the bumper (Fig. P-2) 10 times.

17 ENGLISH
lampashes
4 times for each
sequence
• Threads and hairs are tangled with the
drive wheels.
Remove them from the drive wheels
(Fig. M-2).
• The Robotic Cleaner passed through
aconnedareawhereitstopsurface
was pushed down.
This is not a malfunction.
lampashes5
or 7 times for each
sequence
• The Robotic Cleaner has overheated.
Turn the Robotic Cleaner OFF,
remove the battery cartridge(s), and
wait for an hour. Use the Robotic
Cleaner only at room temperatures
not exceeding 40°C (104°F).
and
lampsashonce
for each sequence
• Thedustboxorthelterhasnotbeen
installed.
Installthedustboxorthelter.
and
all lampsash
once for each
sequence
• The remaining battery charge was
not enough ( or ) to start
cleaning.
Fully charge the battery cartridges.
and lamps
light up
• Threads and hairs are tangled in the
drive wheels.
Remove them from the drive wheels
(Fig. M-2).
• The Robotic Cleaner passed through
aconnedareawhereitstopsurface
was pushed down.
This is not a malfunction.
and lamps
light up
• A sensor error has occurred.
Turn the Robotic Cleaner OFF and
then ON.
and lamps
light up
• An error has occurred in the Robotic
Cleaner.
Turn the Robotic Cleaner OFF and
then ON.
lampashes
once for each
sequence
• Threads and hairs are tangled in the
side brushes and main brush.
Remove them from the brushes (Figs.
A, N-3).
lamp
lights up
• The dust box is full of dust and dirt or
thelterisclogged.
Empty the dust box (Fig. K-2) and
cleanthelter(Fig.K-5).
TROUBLESHOOTING
NOTE: If the problem persists after the remedial
action is taken, consult your nearest Makita Service
Center.
Symptom Cause/Remedy
The lamps do
not light up
when you press
the button.
The Robotic
Cleaner does not
operate when you
press the button
on the Robotic
Cleaner or the
remote control.
Install the battery cartridges correctly.
Fully charge the battery cartridges.
Press the button to turn the
Robotic Cleaner ON.
The Robotic
Cleaner does not
operate.
If the Troubleshooting
lamp, Filter maintenance lamp,
or Brush maintenance lamp lights
uporashes,see“RESTORINGTHE
ROBOTIC CLEANER” to resolve the
problem.
Ifthepilotlampashesslowly,press
and hold the POWER button on
the Robotic Cleaner until all indicators
go off, or press the POWER OFF
button on the remote control to clear
the timer.
The Robotic
Cleaner starts
operation
automatically.
• The auto-on timer has been activated.
The Robotic
Cleaner stops
operation during
cleaning.
Turn the Robotic Cleaner OFF, and
then remove any cords, strings, etc.
from the drive wheels.
If the Robotic Cleaner has gotten
stuck on a barrier or other obstacle,
move the Robotic Cleaner to a
different location.
The cruising speed
is not constant.
• If an obstacle is detected, the Robotic
Cleaner will slow down as it takes time
to calculate a traveling direction. This
is not a malfunction of the Robotic
Cleaner.
The Robotic
Cleaner does not
travel straight
forward.
Turn the Robotic Cleaner OFF, and
thenremoveanyforeignobjects
tangled in the drive wheels.
Clean the ultrasonic sensors.
The Robotic
Cleaner is hitting
obstacles more
frequently than
before.
Clean the ultrasonic sensors.
The Robotic
Cleaner falls down
stairs or to a lower
oor.
Clean the cliff sensors.
• The Robotic Cleaner may not avoid
differences in level of 5.5 cm or
less. This is not a malfunction of the
Robotic Cleaner.
The operating
sound is louder
than usual.
Empty the dust box and clean the
lter,thesidebrushes,andthemain
brush.

18 ENGLISH
The suction power
is not strong
enough to capture
dust and dirt.
Empty the dust box and clean the
lter.
Press the Vacuum button on the
Robotic Cleaner or on the remote
control to turn ON the vacuum fan.
The side brushes
fall off.
Install the side brushes correctly
(Fig. A).
The side brushes
do not rotate
or rotate with
difculty.
Clean the side brushes and the main
brush.
Install the main brush and the plate
correctly (Fig. N).
The exhaust air
smells.
Empty the dust box and clean the
lter.
The remote control
does not work.
Install the remote control batteries
correctly (Fig. E).
Replace the batteries with new ones.
Press the POWER button on the
Robotic Cleaner to turn it ON.
Move closer to the Robotic Cleaner
or remove obstacles between the
Robotic Cleaner and the remote
control.
Stop using the Robotic Cleaner near
or move it away from equipment that
uses radio frequencies in the 2.4 GHz
band (kitchen microwaves, Bluetooth
devices, Wi-Fi devices, etc.).
Turn the Robotic Cleaner OFF and
then ON.
The auto-on timer
does not work.
Use fully charged battery cartridges.
Reactivate the auto-on timer.
OPTIONAL
ACCESSORIES
CAUTION: These accessories or attachments are
recommendedforusewithyourMakitatoolspecied
in this manual. The use of any other accessories or
attachmentsmightpresentariskofinjurytopersons.
Only use the accessory or attachment for its stated
purpose.
• Boundary tape
• Side brush
• Soft side brush
• Main brush
• Soft power brush assy
• Combination power brush assy
• Bottom plate
• Filter
• Makita genuine battery and charger
NOTE: Some items in the list may be included in the
tool package as standard accessories. They may
differ from country to country.
REFERENCE
INFORMATION
MakitaCorporationanditssubsidiaries,afliates,and
distributors may use Usage Information for the purpose
of after-sales services such as maintenance and repair.
Usage Information consists of number of operations,
distribution load, error information, operational status,
and/or maintenance record of the power tool.
TRA
REGISTERED No:
ER48274/16
DEALER No:
DA52605/16
OMAN - TRA
R/3478/16
D090258
TRA
REGISTERED No:
ER48723/16
DEALER No:
DA52605/16
OMAN - TRA
R/3587/16
D090258

19 РУССКИЙ
ТЕХНИЧЕСКИЕ
ХАРАКТЕРИСТИКИ
Стандартныйблок
аккумулятора
BL1815N, BL1820, BL1820B, BL1830,
BL1840, BL1840B, BL1850, BL1850B,
BL1860B
Времяработыот
аккумуляторной
батареи
(прииспользовании
литий-ионных
аккумуляторных
батарей,не
входящихв
комплектпоставки)
Около120минприиспользовании
двухаккумуляторныхбатарей
BL1830(18В,3А·чкаждая)
Около200минприиспользовании
двухаккумуляторныхбатарей
BL1850(18В,5А·чкаждая)
Объемконтейнера 2,5л
Габаритныеразмеры
(ШxДxВ)
(с аккумуляторными
батареямиBL1830)
Примерно460ммx460ммx180мм
Масса(сдвумя
аккумуляторными
батареямиBL1830)
Примерно7,8кг
• Вследствиепродолжающейсяпрограммы
научно-исследовательскихиопытно-
конструкторскихработтехнические
характеристикимогутбытьизмененыбез
предварительногоуведомления.
• Техническиехарактеристикимогутотличатьсяв
зависимостиотстраны.
Условные обозначения
Прочитайтеруководствопоэксплуатации.
Li-ion
Li-ion
ТолькодлястранЕС
Невыбрасывайтеэлектрооборудованиеили
аккумуляторывместесбытовыммусором!
Всоответствиисевропейскимидирективами
обутилизацииэлектрическогои
электронногооборудования,обатареяхи
аккумуляторах,атакжеиспользованных
батареяхиаккумуляторахиихприменении
всоответствиисместнымизаконами
электрооборудование,батареии
аккумуляторы,срокэксплуатациикоторых
истек,должныутилизироватьсяотдельно
ипередаватьсядляутилизациина
предприятие,соответствующееприменяемым
правиламохраныокружающейсреды.
Нестановитесьнароботизированный
уборщикинепомещайтенанего
предметы.
РУССКИЙ (Оригинальная инструкция)
ПРЕДУПРЕЖДЕНИЕ: Данноеустройствонепредназначено
дляэксплуатациилюдьми(включаядетей)сограниченными
физическими,сенсорнымиилиумственнымиспособностями,
недостаточнымиопытомизнаниями.Детидолжнынаходитьсяпод
присмотром,чтобыубедиться,чтоонинеиграютсустройством.
Неиспользуйтероботизированный
уборщиквблизиоткрытогопламени,
воспламеняющихсяи/илиопасных
веществ.
Очиститедатчикиобрывананижней
поверхности,еслинанихнаходитсягрязь
иливлага.
Назначение
Этоустройствопредставляетсобой
роботизированныйуборщик,предназначенный
дляуборкиполоввнутрипомещения.Для
подключенияпультадистанционногоуправления
кроботизированномууборщикуиспользуется
беспроводнаясвязь(2,4ГГцZigBee).
Беспроводная интерактивная
связь с помощью сети ZigBee
Пультдистанционногоуправления,Обозначение
типа(ов):SH00000219,можетиспользоватьсядля
управленияроботизированнымуборщиком.
Техническиехарактеристикибеспроводной
связироботизированногоуборщикаипульта
дистанционногоуправления.
Частота :2,425ГГц,2,450ГГц,
2,475ГГц
Выходнаямощность:≤3дБм
ПРАВИЛА ТЕХНИКИ БЕЗОПАСНОСТИ
ПРЕДУПРЕЖДЕНИЕ
Не используйте роботизированный уборщик
вблизи воспламеняющихся веществ или для их
сбора.
Этоможетпривестиквзрывуиливозгоранию.
• Керосин,бензин,благовония,свечи
• Бензин-растворитель,растворитель
• Окурки
• Тонерилидругиегорючиевещества
• Средстводляочисткиковровилидругие
пенистыевещества

20 РУССКИЙ
Не используйте роботизированный уборщик
во влажных местах, местах, в которые может
попасть влага, и местах с высокой температурой
и влажностью. Кроме того, не используйте
уборщик для сбора воды.
Этоможетпривестикпоражениюэлектрическим
током,короткомузамыканию,возгоранию,
деформацииилинеисправности.
• Кухниидругиеместа,вкоторыхиспользуется
вода
• Ванныекомнаты
• Душевыекомнаты
• Чердакиит.п.
Не прикасайтесь к роботизированному уборщику
влажными руками.
Этоможетпривестикпоражениюэлектрическимтоком.
Не используйте роботизированный уборщик
вблизи плит и другого нагревательного
оборудования.
Этоможетпривестикпоражениюэлектрическим
током,короткомузамыканию,возгоранию,
деформацииилинеисправности.
Не используйте роботизированный уборщик в
местах перечисленных ниже типов.
Этоможетпривестикпоражениюэлектрическим
токомилитравме.
• Вблизималенькихдетейилилюдейс
ограниченнымифизическими,сенсорными
илиумственнымиспособностямиилис
недостаточнымопытомизнаниями
• Вблизиживотных
• Влюдныхместахиливблизиместс
интенсивнымдвижением
Не позволяйте детям и людям, которые не могут
выражать свою волю или самостоятельно
использовать роботизированный уборщик,
использовать роботизированный уборщик без
присмотра.
Этоможетпривестикпоражениюэлектрическим
токомилитравме.
В случае возникновения отклонений или
неисправностей, аналогичных перечисленным
ниже, немедленно прекратите эксплуатацию
устройства.
Несоблюдениеэтогоуказанияможетпривестик
образованиюдыма,возгораниюилипоражению
электрическимтоком.
• Роботизированныйуборщикнефункционирует,
несмотрянато,чтоонвключен.
• Роботизированныйуборщикимеетдеформации
илианомальновысокуютемпературу.
• Роботизированныйуборщикпериодически
останавливаетсявовремяработы.
• Вовремяроботизированныйуборщикиздает
аномальныйшум.
• Отроботизированногоуборщикаисходитзапах
гари.
Выключайте роботизированный уборщик в
местах, где его использование запрещено.
Несоблюдениеэтогоуказанияможетпривестик
сбоямвработемедицинскогооборудования.
Прииспользованииоборудованиявмедицинских
учрежденияхобязательнособлюдайтеинструкции
медицинскогоучреждения,вкоторомиспользуется
оборудование,излучающеерадиоволны.
Не используйте роботизированный уборщик
в узких местах и на большой высоте без
ограждений.
Этоможетпривестикпадениюроботизированного
уборщикасвысоты,чтовсвоюочередьможет
вызватьтравмуилинеисправность.
• Ступеньки
• Настоле,полке,комоде,холодильникеит.п.
•
Антресоли,чердаки,этажиспрямымвыходомна
лестничныеклеткиилилестничныеплощадкиит.п.
• Местаснаклоном10°илиболее
Не подвергайте роботизированный уборщик
воздействию прямого солнечного света или
инфракрасных лучей.
Неправильноефункционированиеиз-за
ошибкидатчикаможетпривестикпадению
роботизированногоуборщика,чтовсвоюочередь
можетвызватьтравмуилинеисправность.
• Галогеновыеобогреватели
• Пультыдистанционногоуправленияилидатчики
ит.п.
• Лучисвета,попадающиенаматовоестекло
Уберите все предметы, которые могут упасть,
если с ними столкнется роботизированный
уборщик.
Несоблюдениеэтогоуказанияможетпривестик
травмеиз-заопрокидыванияилипаденияпредметов.
• Горящиесвечи,вазыит.п.
• Электроннаяаппаратура,органыуправления
которойнаходятсянатойжевысоте,чтои
роботизированныйуборщик.
Не накрывайте роботизированный уборщик.
Этоможетпривестиквозгораниювследствие
перегрева.
Не катайтесь на роботизированном уборщике
и не помещайте на него тяжелые предметы. Не
наносите по уборщику сильных механических
ударов.
Этоможетпривестиктравме,повреждению
устройстваилиегонеисправности.
Вчастности,обращайтепристальноевнимание
надетей,находящихсявблизироботизированного
уборщика.
Не модифицируйте роботизированный уборщик.
Этоможетпривестиквозгоранию,поражению
электрическимтокомилитравме.
Дляпроведенияремонтныхработобратитесь
кдилеру,укоторогобылприобретен
роботизированныйуборщик.
Не закрывайте всасывающее и выпускное
отверстие и не вставляйте в них металлические
или легко воспламеняющиеся объекты. Кроме
того, не используйте роботизированный
уборщик вблизи объектов, которые могут
закрыть всасывающее отверстие.
Этоможетпривестикпоражениюэлектрическим
током,возгораниюилинеисправности.
Other manuals for DRC200
11
This manual suits for next models
1
Table of contents
Languages:
Other Makita Vacuum Cleaner manuals

Makita
Makita XBV01B User manual

Makita
Makita DCL140 User manual

Makita
Makita VC011G User manual

Makita
Makita VC3211H User manual

Makita
Makita DCL140 User manual

Makita
Makita DVC860L Manual

Makita
Makita XCV11 User manual

Makita
Makita VC001GL User manual

Makita
Makita 447 L User manual

Makita
Makita DCL180F User manual

Makita
Makita DVC860L User manual

Makita
Makita DVC862L User manual

Makita
Makita DCL282F User manual

Makita
Makita 4013D Manual

Makita
Makita XCV18 User manual

Makita
Makita VC009G User manual

Makita
Makita DVC665 User manual

Makita
Makita CL107FDWAW User manual

Makita
Makita 4013D User manual

Makita
Makita DVC340 User manual