Malone DownLoader MPG114 User manual
MALONE
R
DownLoaderDownLoaderTM
J-STYLE FOLDING KAYAK CARRIER
Installation & Loading Instructions - Please Read Before Beginning
8818
MPG114
IMPORTANT WARNING: Allvehiculartransports arepotentially hazardous. Anyperson(s) usingMalone productsare personallyresponsible for
following the given directions for use and/or installation and accepts full responsibility for any and all damages or injury of any kind including death,
which may result from their use and/or installation.
It is critical that all Malone racks and accessories be properly and securely attached to your vehicle. Improper attachment could result in a serious
accident, and could cause serious bodily injury or death to you or to others. You are responsible for securing the racks and accessories to your car,
checking the attachment’s prior to use, and periodically inspecting the products for adjustment, wear, and damage.
You must read and understand all of the instructions and cautions supplied with your Malone products(s) prior to installation or use. If you do not
understand all of the instructions and cautions, or, if you have no mechanical experience and are not thoroughly familiar with the installation
procedures, you should have the product installed by a professional installer.
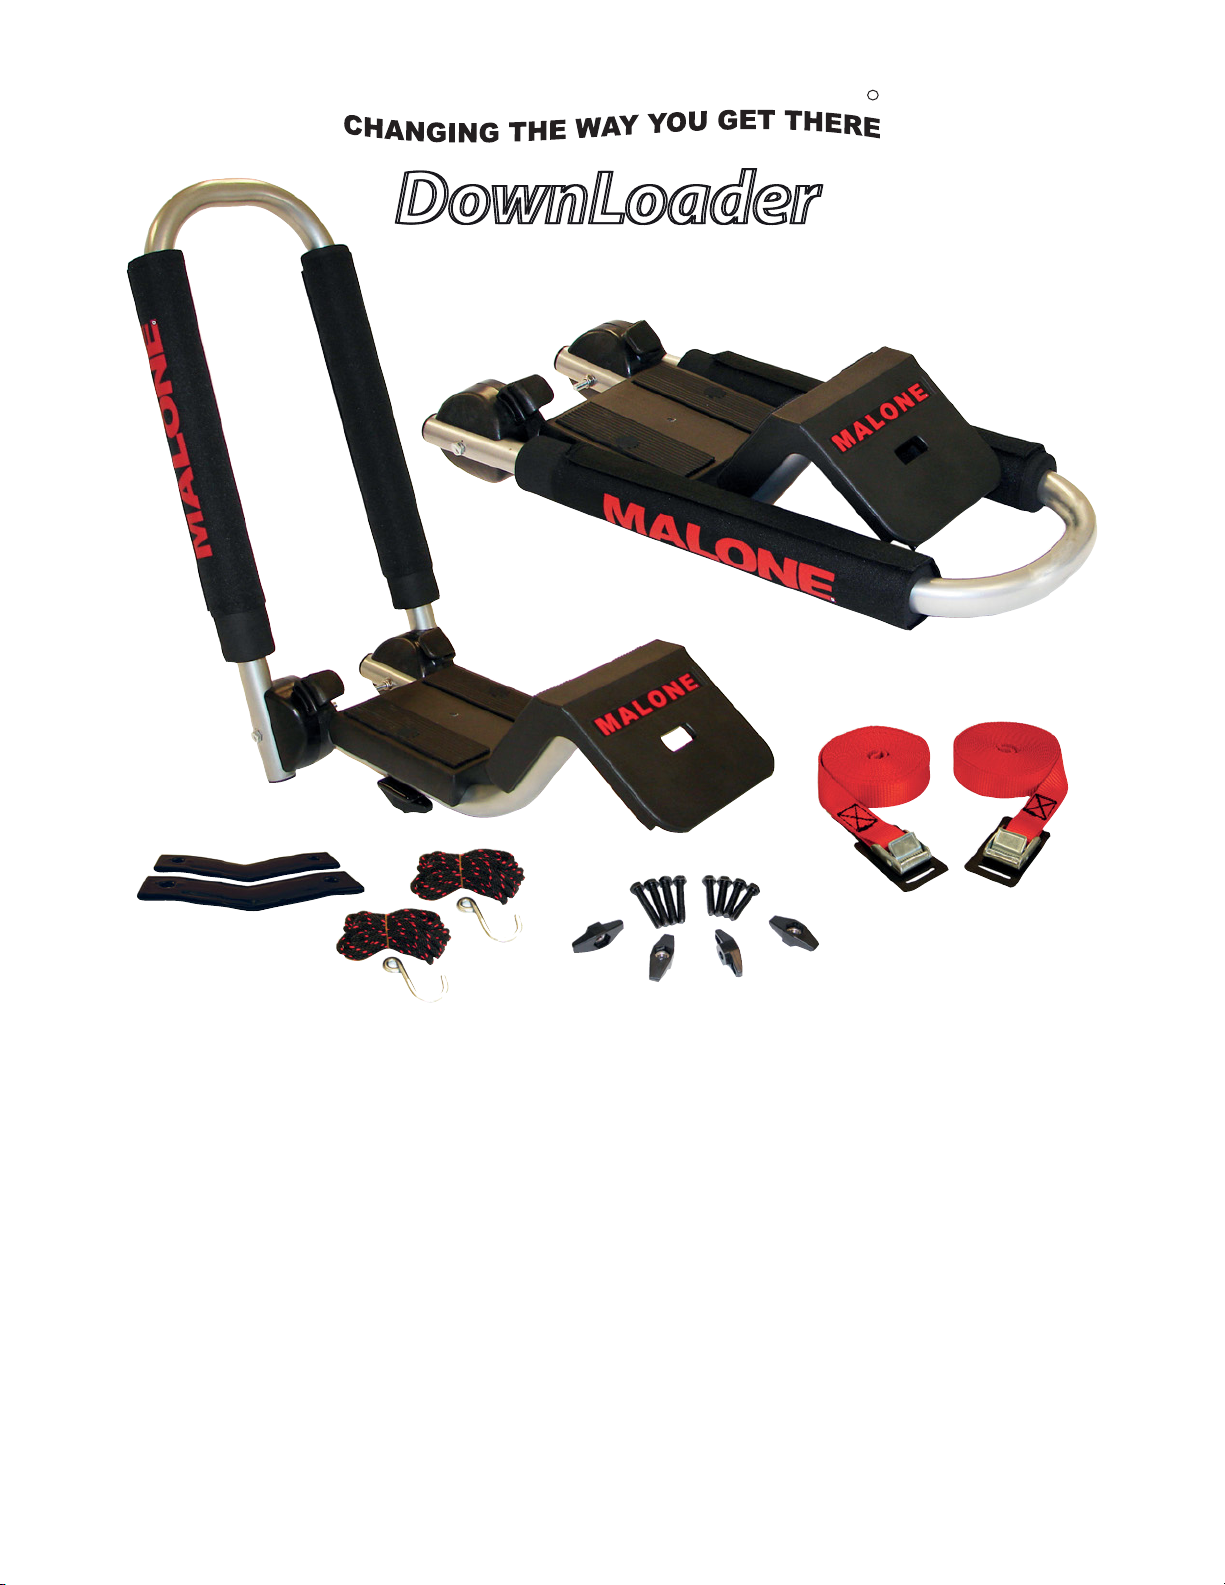
Product DownLoader™
Parent MPG/ER # MPG114
Revision # A
Date: 9/25/2019
SKU # DESCRIPTION Image
2018 Downloader™ Carrier (MPG114), Single
2007 Release Pins (MPG114) (set of 4)
2002 Strap Bails (MPG114) (set of 2)
2001 Carrier Sleeves (MPG114,117,118) (set of 4)
2005 Carrier Base Pads (MPG114,116,117,118) (set of 4)
2006 Carrier Ramp Pads (MPG114,118) (set of 4)
2009 11' Carrier Webbing Strap - Color: Red, Single
MPG306 Bow & Stern Tie Down (set of 2)
MPG362 60mm Bolt (set of 4)
MPG363 70mm Bolt (set of 4)
MPG369 T knob (set of 4)
MPG303NH Jawz2™ Adapter (set of 2)
MPG304 Jawz 2™ V-Style Mounting Kit w/60mm & 70mm bolts
& T-knobs
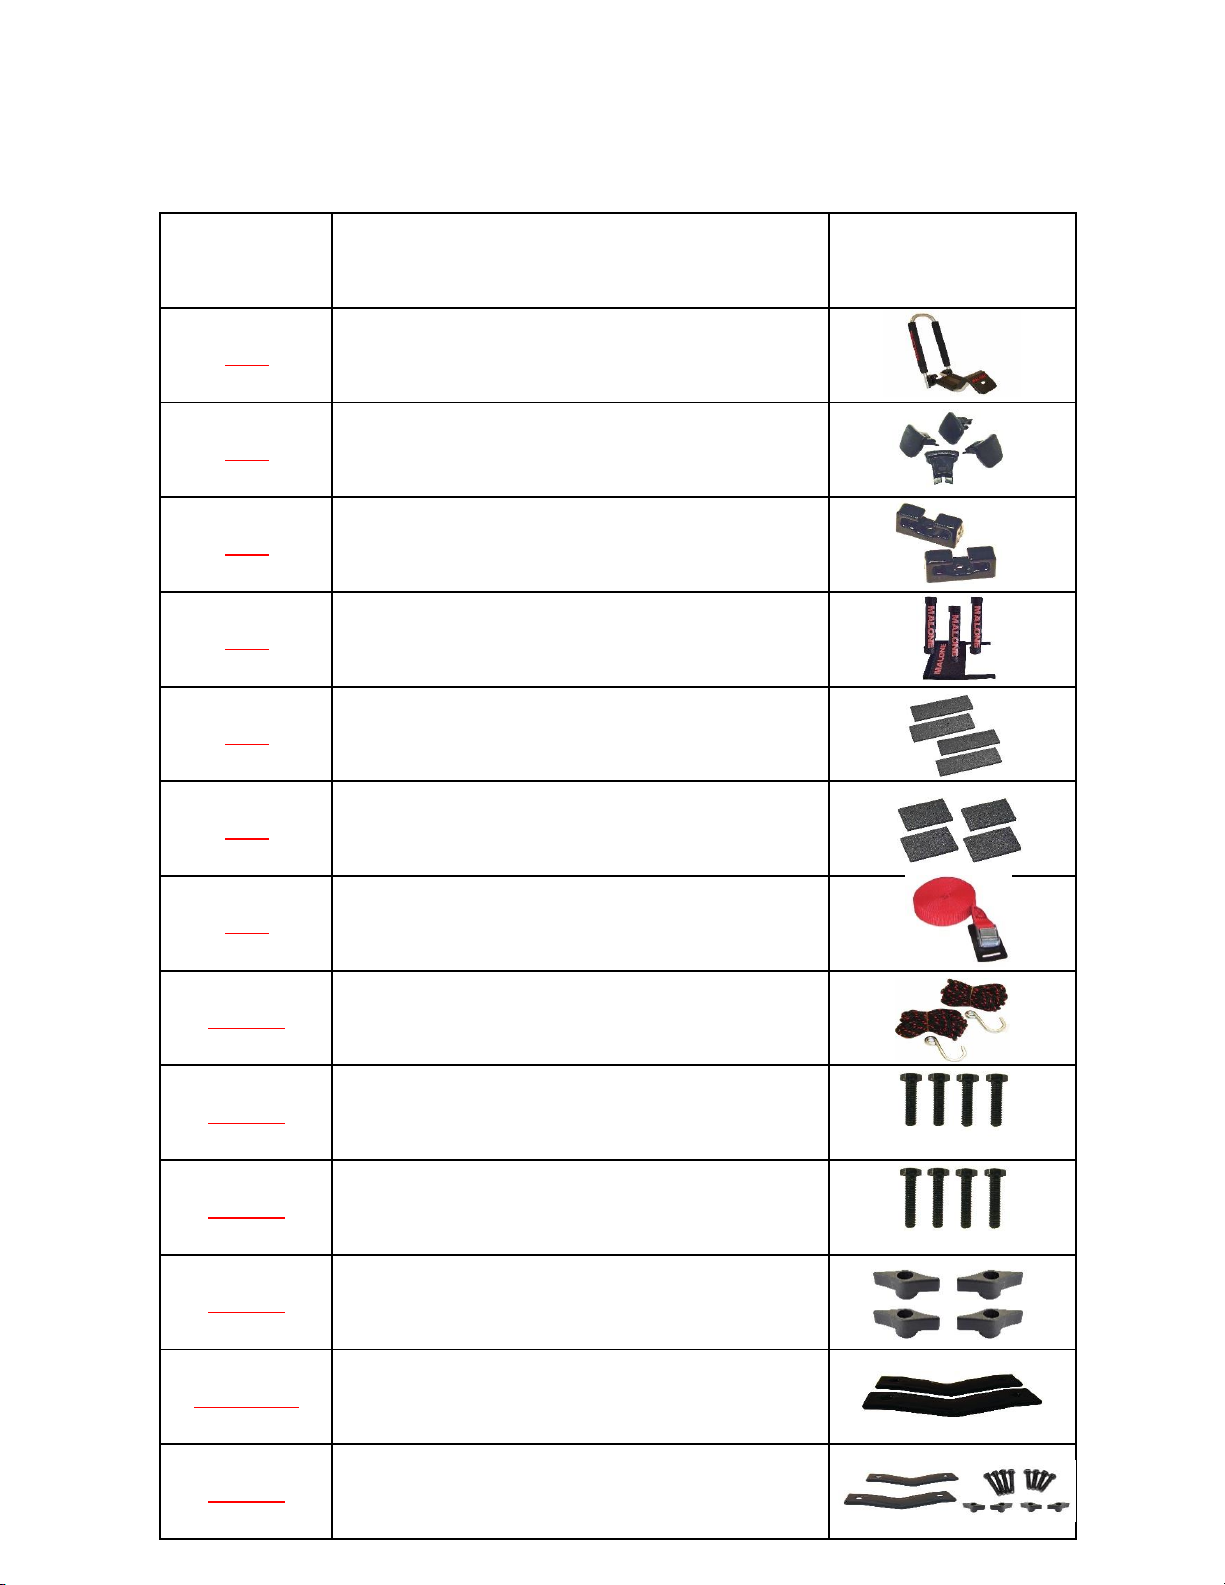
Spare Part Listing

1
3
2
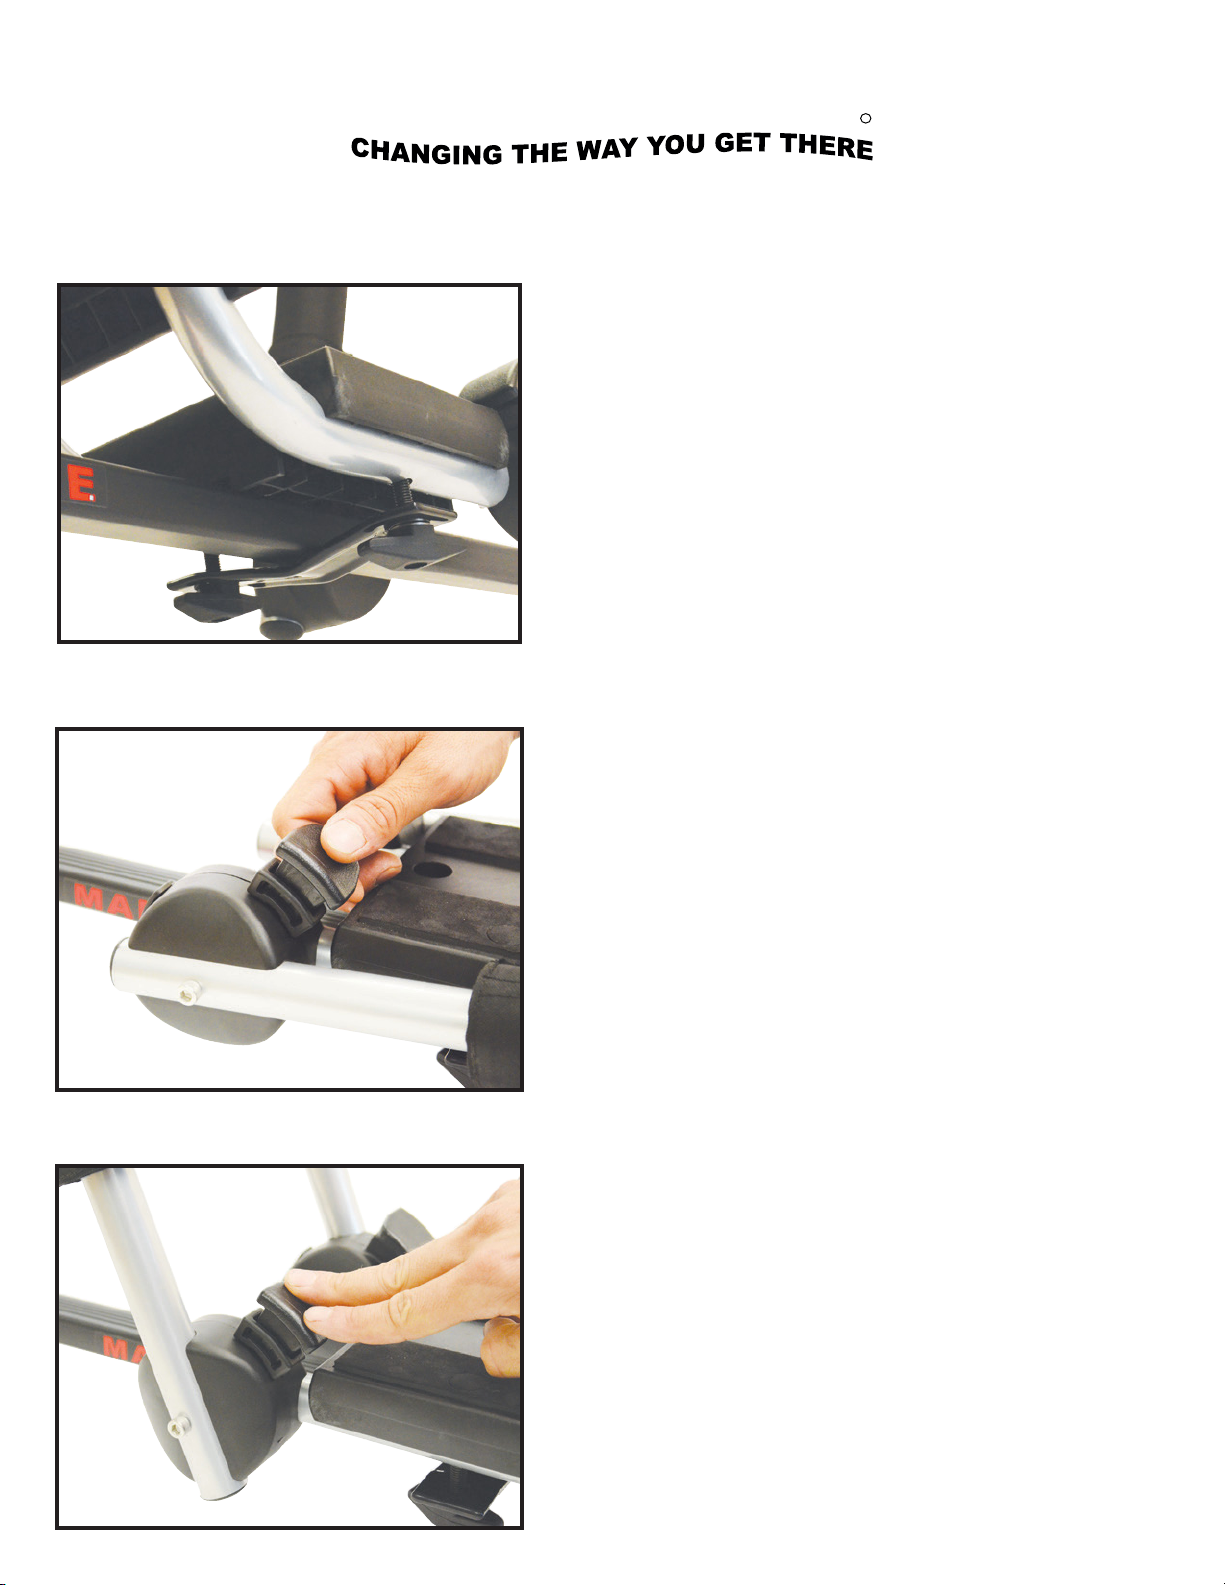
. Insert Mounting Bolt through one hole of a Jawz adapter.
Insert washer and loosely apply a T-knob. See image 2.
. Faites passer le boulon de fixation dans l’un des trous
d’un adaptateur Jawz puis vissez légèrement un bouton
en ‘‘T’’ à la base du boulon. (Figure 2)
. Prior to installation, insert a bolt into the mounting holes in
the bottom of the carriers. Push upward to open the two
mounting hole covers located in the Base pads.
. Insert a Mounting Bolt into one mounting hole from the top
side. Rotate and close the mounting hole cover.
See image 1.
. Insérez un boulon de fixation dans l’un des trous hexagonaux
situés sur le côté supérieur du support.
(Figure 1)
. Place the carrier onto the front cross bar with the boarding
ramp facing out. Swing the Jawz under the cross bar as
shown. See image 3.
. Placez le support sur la barre transversale avant, la rampe
de chargement vers l’extérieur. Faites passer l’adaptateur
Jawz sous la barre transversale, tel qu’indiqué. (Figure 3)
1
Base Pad
Covers
3
2
1
Insert Mounting Bolt through one hole of a Jawz
adapter and loosely apply a T-knob. See image 2.
Insérez Boulon de montage à travers un trou d’un
adaptateur Jawz et appliquer de manière lâche un
T-bouton. (Figure 2)
MALONE
R
Installation & Loading Instructions - MPG114MD DownLoader
TM
12’ Safety LinesJawz Universal Adapters Mounting BoltsKayak Carriers Load Straps T-Knobs
60mm
70mm
Mounting Bolt Washers
Red Load Straps Safety Tie-Downs
1RWH7KHEDVHRIWKHFDUULHUKDVDUHFWDQJXODU³FXWRXW´WKDWKDVEHHQLQFOXGHGIRUVTXDUHFURVVEDU¿W7KLV³FXWRXW´GRHVQRW
HIIHFWWKH¿WRUIXQFWLRQRIWKHFDUULHUVZKHQLQVWDOOHGWRURXQGRURYDOVKDSHGFURVVEDUV
Remarque: la base du support est munie d’une «découpe» rectangulaire qui a été incluse pour un ajustement carré. Cette
“découpe” n’affecte pas l’ajustement ou la fonction des supports lorsqu’ils sont installés sur des barres transversales de forme
ronde ou ovale.
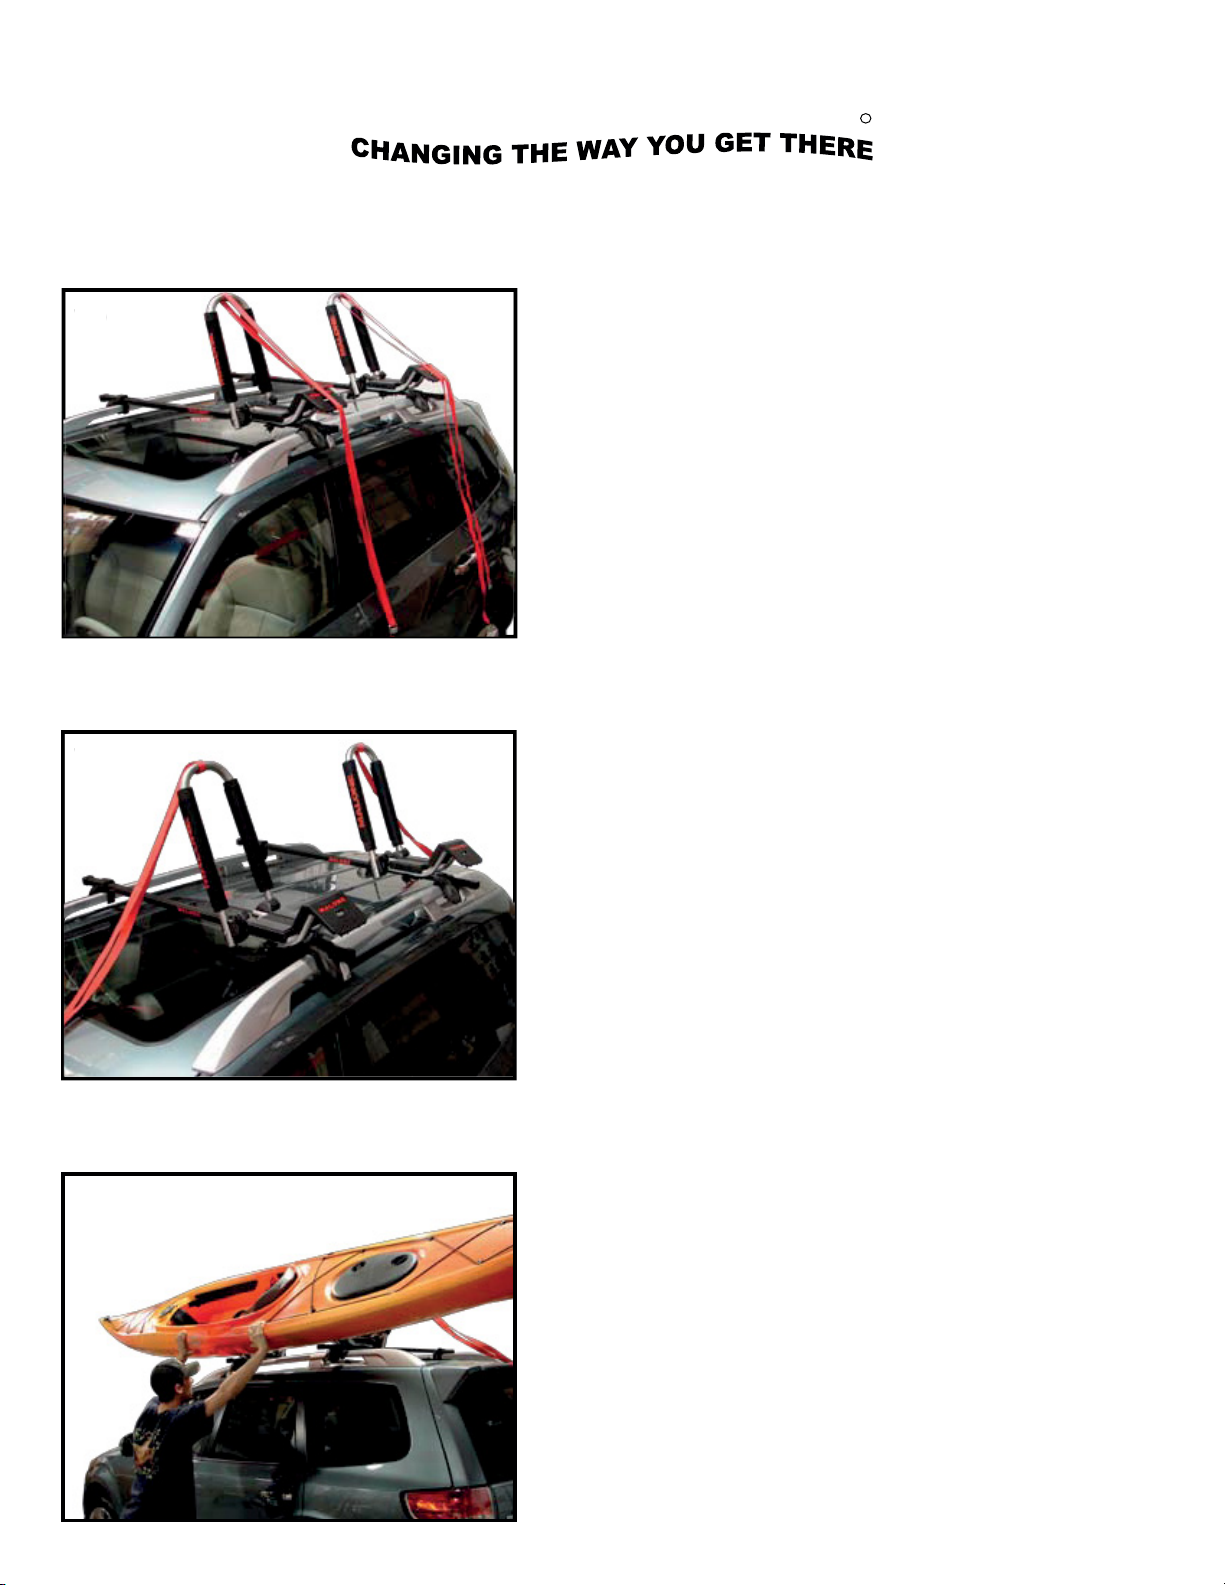
. With the carriers in the UP position. Gently push down
on the release pins. They will automatically stop, lock
in place, and remain fixed. See image 6.
. Lorsque les supports sont relevés, appuyez doucement
sur la goupille de verrouillage. Elle se bloquera
automatiquement et sera ainsi verrouillée. (Figure 6)
. With the carriers in the DOWN position. Gently pull up
on the release pins. Lift and rotate the rear of the carrier
until it stops in the UP position. See image 5.
. Lorsque les supports sont rabaissés, tirez doucement la
goupille de verrouillage vers le haut. Soulevez la partie
arrière du support jusqu’à ce que celui-ci se bloque en
position relevée. (Figure 5)
5
4
6
2
MALONE
R
. Insert a second Mounting Bolt into the top side unused
hex hole and down through the Jawz mounting adapter.
Close the mounting hole cover. Apply a washer and second
T-knob and slightly tighten until the carrier is secure.
Repeat steps 1-4 for the 2nd carrier and rear cross bar.
See image 4.
. Insérez un boulon de fixation dans le second trou hexagonal
situé sur le côté supérieur du support et faites-le passer
dans l’adaptateur Jawz. Vissez un bouton en T à la base du
second boulon, puis serrez légèrement jusqu’à ce que le
support soit bien fixé. Répétez les étapes 1 à 4 pour le
deuxième support et la barre transversale arrière.
(Figure 4)
Installation & Loading Instructions - MPG114MD DownLoader
TM
6
5
4
Insert a second mounting bolt into the top side unused
hex hole and down through the Jawz mounting adapter.
Close the mounting hole cover. Apply second T-knob
and slightly tighten until the carrier is secure. Repeat
steps 1-4 for the second carrier and rear cross bar.
See image 4.
,QVpUH]XQGHX[LqPHERXORQGH¿[DWLRQGDQVOHWURX
hexagonal utilisé côté haut et vers le bas par l’adap-
tateur de montage Jawz. Fermez le couvercle du trou
de montage. Appliquer la deuxième T-bouton et serrez
légèrement jusqu’à ce que le transporteur est sécurisé.
Répétez les étapes 1-4 pour le second transporteur et
barre transversale arrière. (Figure 4)
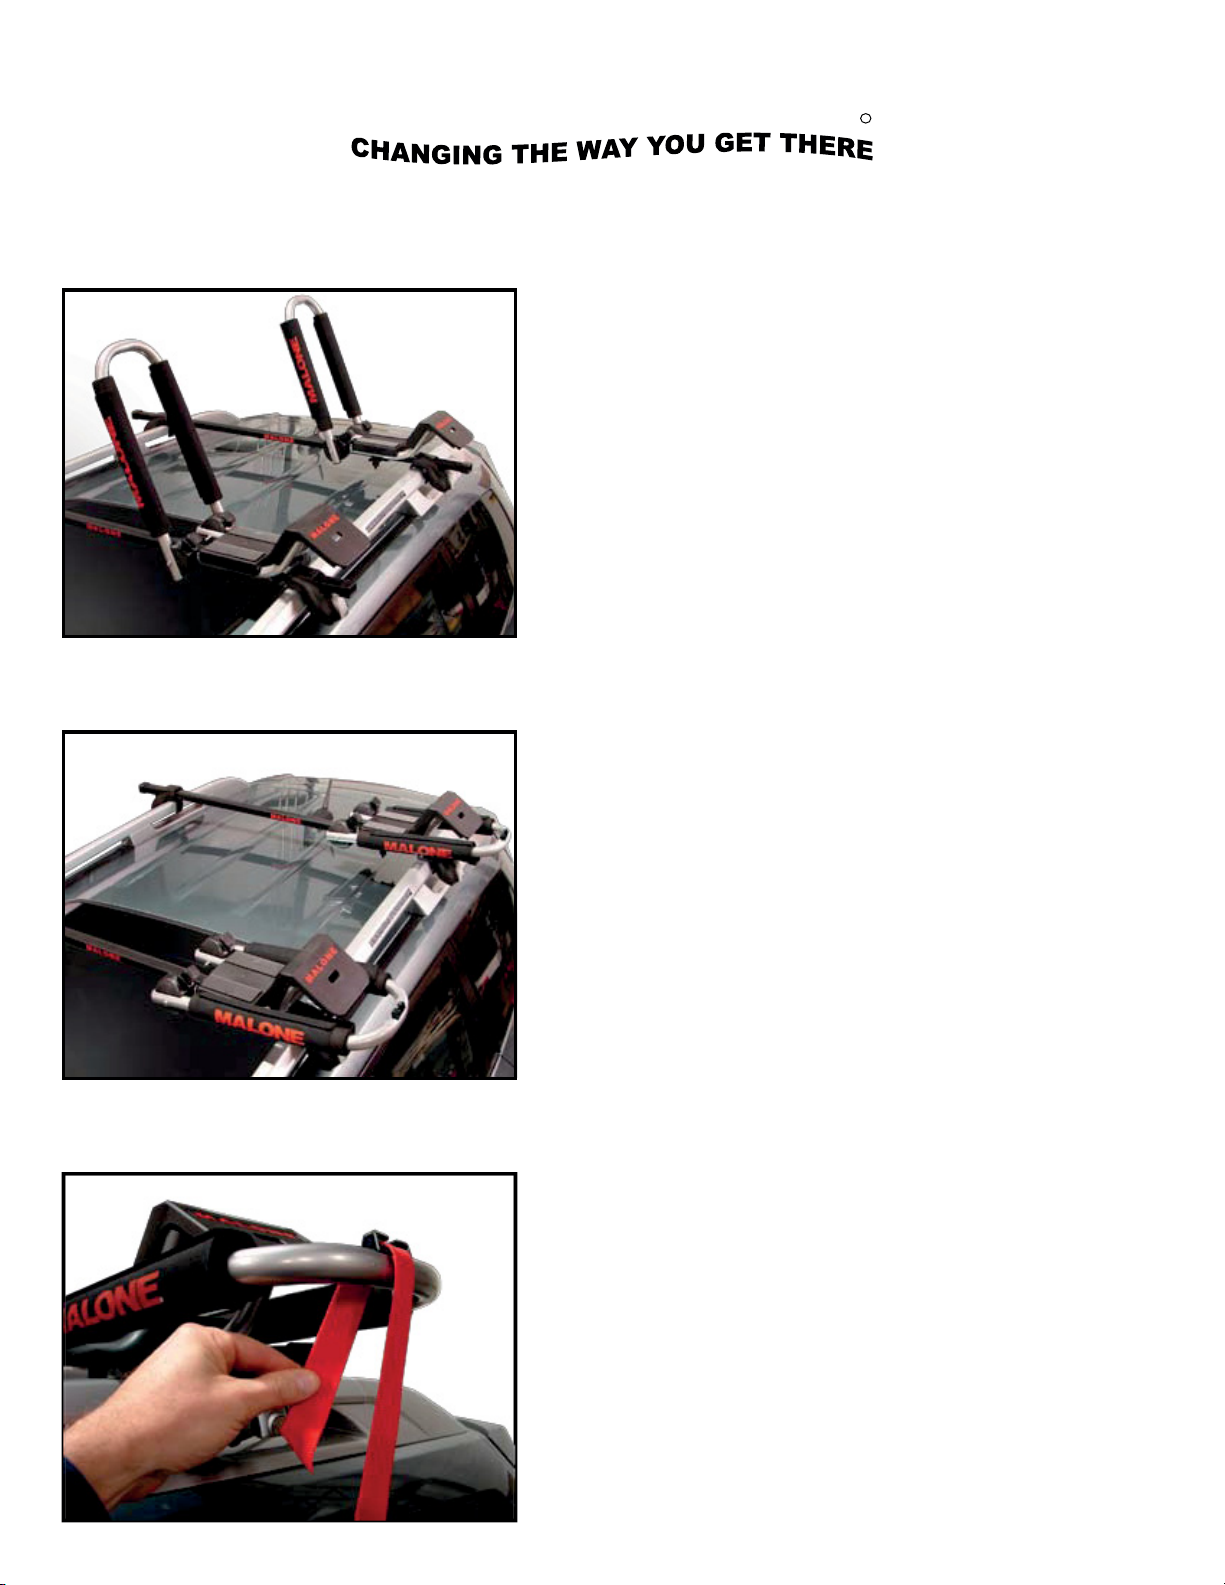
. Confirm the carriers are in alignment. Firmly tighten
the T-knobs until both carriers are securely fixed to
the cross bars. Installation is now complete. See image 7.
. Assurez-vous que les supports soient bien alignés. Vissez
fermement les boutons en ‘‘T’’ jusqu’à ce que les deux
supports soient solidement fixés aux barres transversales.
(Figure 7)
9
. When not transporting a kayak, the carriers should
always be in the DOWN position. The instructions for
loading the kayak will begin with the carriers in the
the DOWN position. See image 8.
. Lorsque vous ne transportez pas de kayak, les supports
devraient toujours être rabaissés. Débutez la lecture des
instructions entourant le chargement de votre kayak lorsque
les supports sont rabaissés.
(Figure 8)
8
7
3
MALONE
R
Installation & Loading Instructions - MPG114MD DownLoader
TM
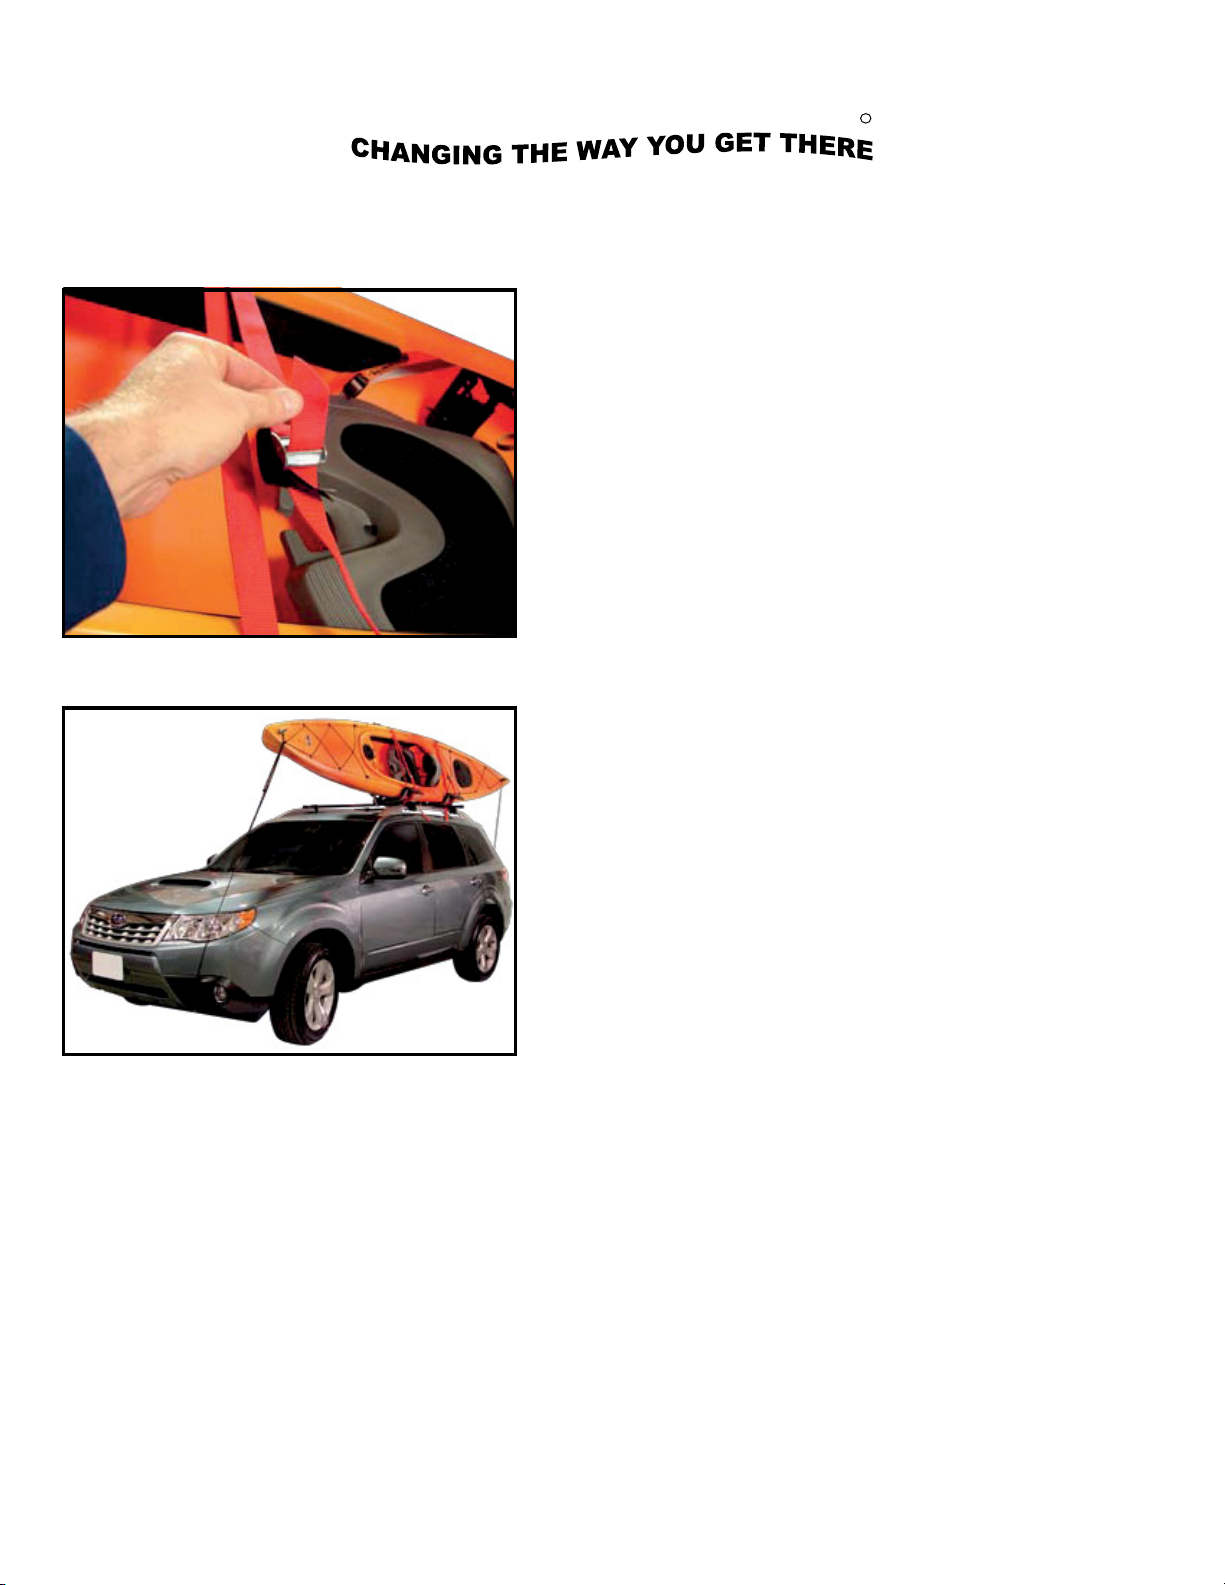
. Route the free end of a red Load Strap through the strap
bale and around the top rear of the carrier. Pull the free
end down until there is an even loop. Repeat for the second
carrier. See image 9.
. Faites passer le bout plat d’une des courroies de fixation
de 3,6 mètres autour de la partie supérieure du support
arrière.Tirez sur le bout plat de la courroie afin d’obtenir
une boucle de longueurs égales. Faites de même pour le
deuxième support. (Figure 9)
9
. Place the kayak on its side with the cockpit facing out.
Lift up and place kayak onto the boarding ramps. Push
the kayak up the ramps and allow it to drop into the
carriers. See image 12.
. Faites pivoter le kayak sur le côté, l’habitacle vers
l’extérieur. Soulevez le kayak et placez-le sur les rampes
de chargement. Poussez le kayak vers le haut afin de le
faire glisser sur les rampes, jusqu’à ce qu’il soit
positionné sur les supports. (Figure 12)
10
. Unlock the release pins. Raise the carriers to the UP
position. Re-lock the release pins. Place the strap loops
over the carriers as shown. See image 10.
. Débloquez les goupilles de verrouillage. Relevez les supports
et verrouillez les goupilles. Placez les boucles des courroies
sur les supports, tel qu’indiqué. (Figure 10)
1
0
11
. Place the straps parallel to the carriers with the front strap
loop on the windshield and the rear strap loop on the back
of the vehicle. See image 11.
. Placez les courroies afin qu’elles soient parallèles aux
supports. La boucle de la courroie avant devrait être placée
sur le pare-brise et la seconde boucle, sur la partie arrière
du véhicule. (Figure 11)
11
12
4
MALONE
R
Installation & Loading Instructions - MPG114MD DownLoader
TM

. Thread the free ends of each strap down and under the
cross bar, and, back up through the boarding ramp slot.
See image 15.
. En tirant vers le bas, faites passer le bout plat de chacune
des courroies sous la barre transversale, puis vers le haut,
dans la fente située sur la rampe de chargement.
(Figure 15)
. Pull the free end of each strap down until the buckles
are positioned half way up the side of the kayak. Thread
each free end down and through the inside bottom slot of
each carrier. See image 14.
. Tirez sur le bout plat de chacune des courroies, vers le
bas, jusqu’à ce que les boucles soient situées à mi-hauteur
sur le côtédu kayak. En tirant vers le bas, faites passer
l’extrémité de chacune des deux courroies dans la fente
inférieure de leur support respectif. (Figure 14)
. Place the strap loops over the kayak so that each loop
is positioned directly over a carrier. Position kayak so
the cockpit is evenly centered between the carriers.
See image 13.
. Placez les boucles des courroies sur le kayak afin que
chaque boucle soit bien alignée avec un support. Placez
le kayak de façon à ce que l’habitacle soit bien au centre,
entre les deux supports. (Figure 13)
13
14
15
5
MALONE
R
Installation & Loading Instructions - MPG114MD DownLoader
TM
. Thread the free end of each strap back up and through
the buckles. Pull down to tighten.
See image 16.
. Tirez le bout plat de chacune des courroies vers le haut
afin de les faire passer dans la boucle, puis tirez vers le
bas afin de bien les serrer.
(Figure 16)
. Dress extra strap down and around the cross bars. Install
the bow & stern safety lines per attached instructions.
See image 17.
. Tirez le bout plat de chacune des courroies vers le haut
en les faisant glisser dans la boucle, puis tirez vers le bas
afin de bien les serrer. Attachez la courroie d’appoint aux
barres transversales. Attachez les filins de sécurité avant et
arrière en suivant les instructions fournies.
(Figure 17)
17
MALONE
R
Installation & Loading Instructions - MPG114MD DownLoader
TM
16
Bow and Stern Safety tie-downs are required for all transport.
Failure to use these safety lines voids all warranty.
If your kit did not include safety tie-downs, we strongly recommend the use of the
Malone MPG316 Sentry Ratchet Tie-Down System or Malone MPG309 SpeedLine Mini Ratchet Tie-Down
6
Always check mounting hardware, load straps and safety tie-down lines for proper
and secure attachment before transport. Use of this product for any other
application other than kayak transport voids warranty.
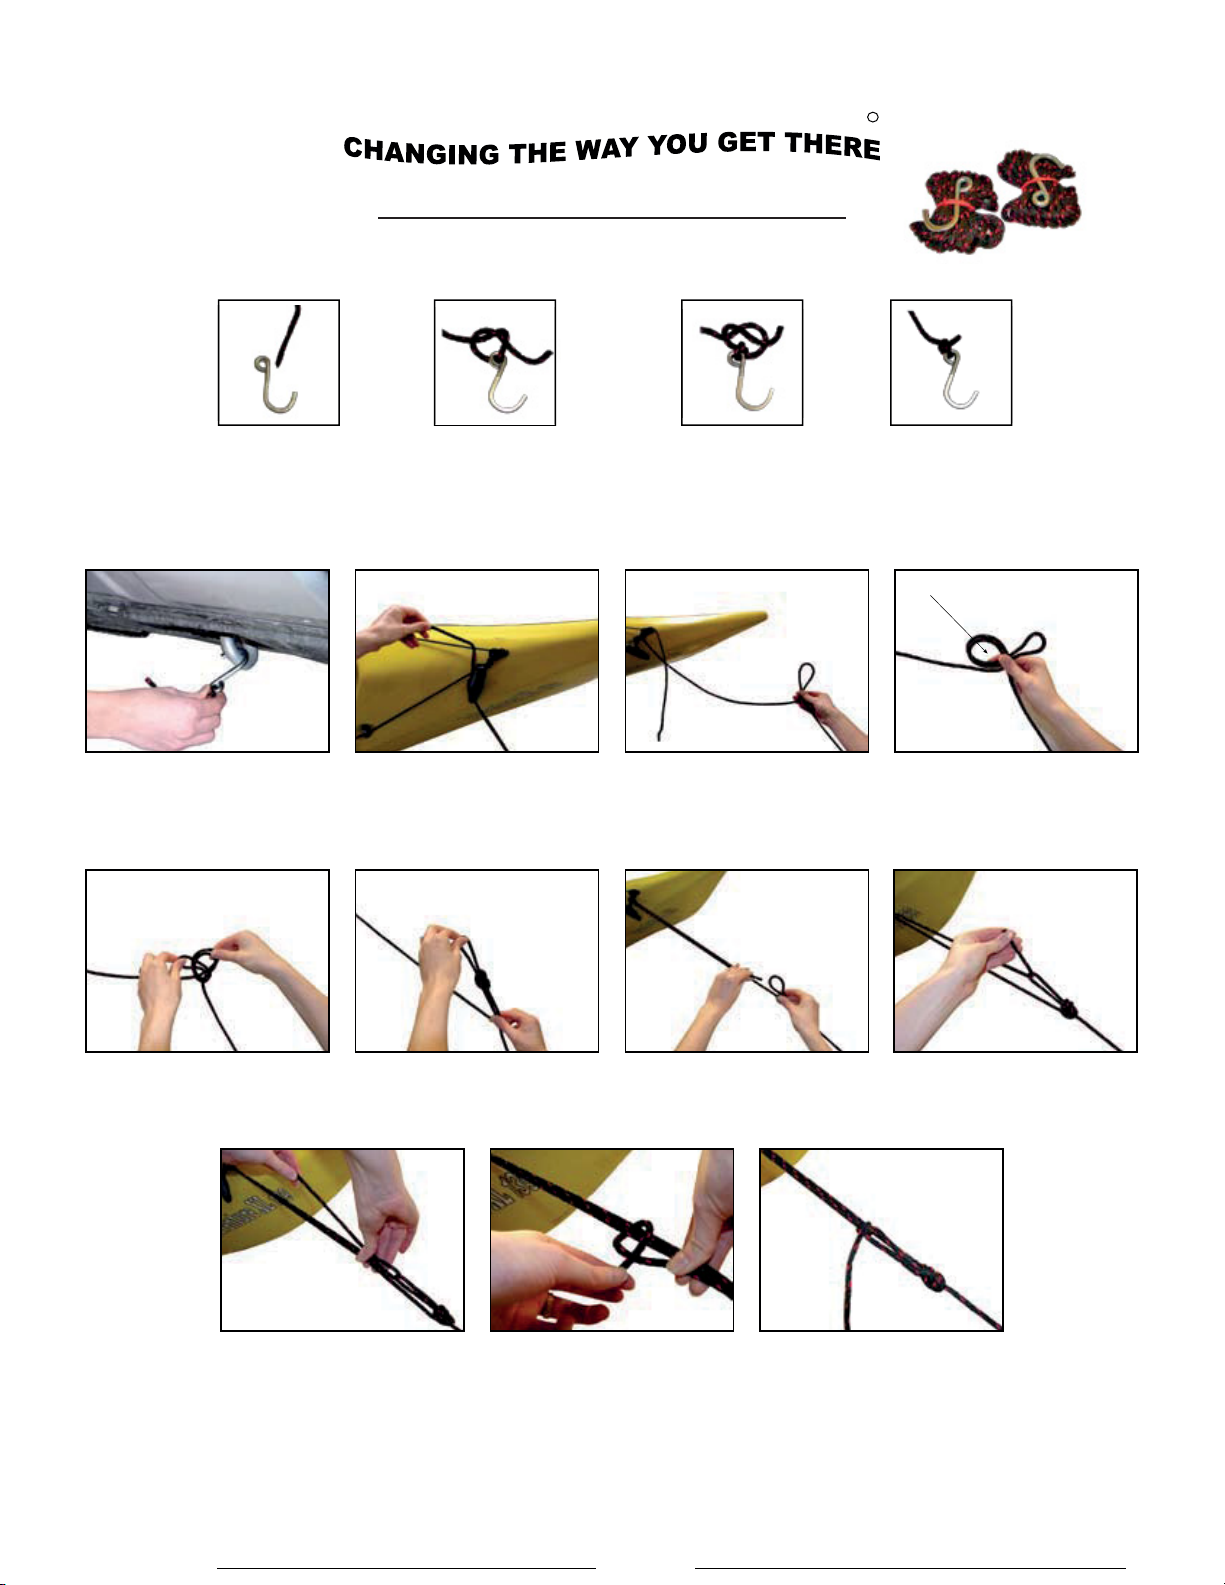
MPG306 BOW & STERN LINE KIT
MALONE
R
Thread free end
of cord through
hook.
Create a “left
over right”
knot & tighten.
Create a “right
over left”
knot & tighten.
Pull to test for
knot strength.
AB CD
Attach hook to rope (steps A-D)
Keeping the rope tight and
S-hook in place, thread the
free end up and through a
strong point on the kayak
F
Make a loop in the rope
12” to 14” away
from the kayak or canoe.
G
Attach and dress rope to vehicle and boat (steps E-O)
Attach S-hook to vehicle
tow ring or other sturdy
body part.
E
Bend the loop over leaving
a large opening as shown.
H
Opening
Pass the loop through the
opening.
I
Pull to create a tight knot.
JK
Thread the free end of
the rope
through the loop.
L
Pull the free end up until
the rope
is sufficiently tight.
M
Hold the rope secure with
one hand. Form a knot with the free
end and tighten. Form
a second knot for
safety purposes.
N
The line should be tight
and secure. Repeat for
second tie-down.
O
MPG306 BOW & STERN LINE KIT
NOTE: NOT REQUIRED ONTRAILER PACKAGES
Looking for dependable roof racks & cargo carriers? Rely on Malone for quality and long-lasting products.
Other manuals for DownLoader MPG114
1
This manual suits for next models
2
Table of contents
Other Malone Automobile Accessories manuals

Malone
Malone VersaRail MPG220-221 User manual

Malone
Malone Cargo Series User manual

Malone
Malone SaddleUp PRO MPG110 User manual

Malone
Malone BigFoot User manual

Malone
Malone BigFoot MPG112 User manual

Malone
Malone DownLoader MPG114 User manual

Malone
Malone Axis LoadRoller MPG909 User manual

Malone
Malone MPG201 User manual

Malone
Malone SaddleUp PRO Series User manual

Malone
Malone AutoLoader MPG106M User manual


