EUFAB PREMIUM TG User manual

1
Art.-Nr.: 11593
Radstopper für breite Reifen
PREMIUM TG
Bedienungsanleitung ...................... 3
Art. No. 11593
Wheel stopper for wide tyres
PREMIUM TG
Operating instructions ..................... 5
Réf. 11593
De cales-roues larges pour
PREMIUM TG
Manuel de l‘opérateur ..................... 7
© EAL GmbH, 11593, 09.2021
Cod. art. 11593
Fermaruote per pneumatici larghi
PREMIUM TG
Istruzioni per l‘uso ........................... 9
max.
3,25“

2

3
1. BESTIMMUNGSGEMÄSSER GEBRAUCH
Das Radstopperset dient zur Befestigung von Fahrrädern
mit breiten Reifen bis zu 82 mm Reifenbreite auf einem
Fahrradträger. Das Set ersetzt die Serienradstopper des
EUFAB Fahrradträgers PREMIUMTG, Artikelnummer 11571.
Dieses Gerät ist nicht dafür bestimmt, durch Kinder und
Personen mit eingeschränkten geistigen Fähigkeiten oder
ohne erforderliches Fachwissen benutzt zu werden. Kinder
sind von dem Gerät fernzuhalten.
Das Gerät ist nicht für den gewerblichen Einsatz bestimmt.
Zum bestimmungsgemäßem Gebrauch gehört auch
die Beachtung aller Informationen in dieser Anleitung,
insbesondere die Beachtung der Sicherheitshinweise. Jede
andere Verwendung gilt als nicht bestimmungsgemäß und
kann zu Sach- oder Personenschäden führen. Die EAL GmbH
übernimmt keine Haftung für Schäden, die durch nicht
bestimmungsgemäßen Gebrauch entstehen.
INHALT
• Das Warndreieck kennzeichnet alle für die
Sicherheit wichtigen Anweisungen. Befolgen
Sie diese immer, anderenfalls könnten Sie sich
verletzen oder das Gerät könnte beschädigt
werden.
• Kinder dürfen nicht mit dem Gerät spielen.
• Reinigung und Benutzerwartung dürfen
nicht von Kindern ohne Beaufsichtigung
durchgeführt werden.
• Lassen Sie das Verpackungsmaterial nicht
achtlos liegen. Dieses kann für Kinder zu einem
gefährlichen Spielzeug werden!
• Benutzen Sie dieses Produkt nur für die dafür
vorgeseheneVerwendung!
• Manipulieren oder zerlegen Sie das Gerät nicht!
• Verwenden Sie zu Ihrer eigenen Sicherheit
ausschließlich Zubehör oder Ersatzteile, die
in der Anleitung angegeben sind, oder deren
Verwendung durch den Hersteller empfohlen
wird!
• Beachten Sie die Spezikationen und
Sicherheitshinweise in der Anleitung Ihres
Fahrradträgers!
4. SICHERHEITSHINWEISE
2. LIEFERUMFANG
2 x Radstopper
3. SPEZIFIKATIONEN
Geeignet für EUFAB-Fahrradträger: PREMIUM TG, Art.-Nr.:
11571.
Reifenbreite 2,2 Zoll bis 3,25 Zoll, 56 mm bis 82 mm.
Radstopper für breite Reifen PREMIUM TG
1. BESTIMMUNGSGEMÄSSER GEBRAUCH_________3
2. LIEFERUMFANG_______________________3
3. SPEZIFIKATIONEN _____________________3
4. SICHERHEITSHINWEISE __________________3
5. BEDIENUNGSANLEITUNG _________________3
5.1 BEFESTIGUNG DER FAHRRÄDER _____________4
6. WARTUNG UND PFLEGE __________________4
7. HINWEISE ZUM UMWELTSCHUTZ ____________4
8. KONTAKTINFORMATIONEN ________________4
Lesen Sie die Bedienungsanleitung vor
Inbetriebnahme sorgfältig durch und
beachten Sie alle Sicherheitshinweise!
Nichtbeachtung kann zu Personenschäden,
Schäden am Gerät oder Ihrem Eigentum
führen!
Bewahren Sie die Originalverpackung,
den Kaufbeleg sowie diese Anleitung
zum späteren Nachschlagen auf! Bei der
Weitergabe des Produkts geben Sie auch
diese Anleitung weiter.
Prüfen Sie vor Inbetriebnahme den Inhalt
der Verpackung auf Unversehrtheit und
Vollständigkeit!
WARNUNG!
Für eine Nachrüstung früherer Fahrradträger
PREMIUM TG, ohne die Vorbereitung zur
Umrüstung, wenden Sie sich an unseren
Kundendienst, siehe Abschnitt 8.
Bevor Sie das Radstopperset einsetzen können, müssen Sie
zuerst die serienmäßigen Radstopper Ihres Fahrradträgers
entfernen. Nehmen Sie die Fahrräder vom Fahrradträger ab.
Lösen Sie die Schraube am Ende der Radschiene und
entfernen Sie die Abdeckung.
5. BEDIENUNGSANLEITUNG
1x Gebrauchsanleitung
Bild 1

4
• Drücken Sie den Entriegelungshebel (1) nach oben.
Jetzt können Sie den Spanngurt aus dem Spannschloss
herausziehen.
• Stellen Sie das Fahrrad auf den Fahrradträger und
befestigen Sie es mit dem Rahmenhalter, gemäß der
• Legen Sie den Spanngurt um die Felge des Fahrrads und
stecken Sie den Spanngurt in das Spannschloss (2).
• Positionieren Sie den Felgenschutz so, dass der Spanngurt
die Felge während des Transports nicht durch Scheuern
beschädigt.
• Durch mehrmaliges Hochziehen des Spannschlosses (3)
ziehen Sie den Spanngurt fest.
Setzen Sie den Radstopper in die Radschiene ein. Richten
Sie die Radstopper so aus, dass sie sich immer zwischen den
Rädern des Fahrrads benden, niemals davor oder dahinter.
Schieben Sie den Radstopper auf die Radschiene.
Lösen Sie die Flügelmutter des Radstoppers. Schieben Sie den
Radstopper bis zum Ende der Radschiene. Sie können jetzt
den Radstopper aus der Radschiene nehmen.
Setzen Sie die Abdeckung wieder ein und ziehen Sie die
Schraube fest.
5.1 BEFESTIGUNG DER FAHRRÄDER
Die Radstopper müssen sich immer
zwischen den Rädern des Fahrrads
benden, niemals davor oder dahinter.
8. KONTAKTINFORMATIONEN
7.HINWEISE ZUM UMWELTSCHUTZ
Entsorgen Sie Radstopper über die Wertstofftonne oder die
öffentlichen/kommunalen Sammelstellen.
Die Materialien sind recycelbar. Durch Recycling, stoffliche
Verwertung oder andere Formen derWiederverwendung von
Altgeräten leisten Sie einen wichtigen Beitrag zum Schutz
unserer Umwelt!
EAL GmbH
Otto-Hausmann-Ring 107
42115Wuppertal, Deutschland
+49 (0)202 42 92 83 0
+49 (0) 202 42 92 83 – 160
www.eal-vertrieb.com
6. WARTUNG UND PFLEGE
Reinigen Sie die Radstopper mit einem nur leicht feuchten,
weichen Tuch und einem milden Reinigungsmittel. Verwen-
den Sie keine scharfen Reinigungsmittel, Lösemittel oder
Benzin. Bewahren Sie Radstopper an einem trockenen Ort
auf.
ACHTUNG
Anleitung Ihres Fahrradträgers.
• Schieben Sie den Radstopper an den Reifen des Fahrrades
heran und ziehen Sie die Flügelmutter des Radstoppers
fest.
Bild 2
Bild 3
Bild 4
Bild 5

5
1.PROPER USE OF THE PRODUCT
The wheel stopper set is used to attach bicycles with wide
tyres in widths of up to 82 mm onto a bike rack. This set
substitutesthe standard wheel stopper of the EUFAB bikerack
PREMIUMTG, item number 11571.
This device is not designed to be used by children or persons
with limited mental abilities or without experience and/or
lack of required specialist knowledge. Keep children away
from the device.
The device is not designated for commercial use.
Utilisation according to the intended purpose also
includes the observance of all information in these operating
instructions, particularly the observance of the safety
instructions. Any other utilisation is considered to be contrary
to the intended purpose and may lead to material damage or
personal injuries. EAL GmbH assumes no liability for damage
resulting from improper use.
CONTENT
• The warning triangle sign indicates all
instructions which are important for safety.
Always follow these instructions, otherwise
you could injure yourself or damage the device.
• Children may not play with the device.
• Cleaning and user maintenance may not be
carried out by children without supervision.
• Do not leave packaging material lying around.
It may become a dangerous plaything for
children!
• Only use this product for its designated
purpose!
• Do not manipulate or disassemble the device!
• For your own safety, only use accessories and
spare parts that are stated in these instructions
or that are recommended by the manufacturer!
• Please observe the specications and safety
instructions in the instructions of your bike
rack!
4. SAFETY PRECAUTIONS
2. SCOPE OF DELIVERY
2 x wheel stopper
3. SPECIFICATIONS
Suitable for EUFAB bike racks: PREMIUM TG, Art. No.: 11571.
Tyre width 2.2 inches to 3.25 inches, 56 mm to 82 mm.
Wheel stopper for wide tyres PREMIUM TG
1. PROPER USE OFTHE PRODUCT______________5
2. SCOPE OF DELIVERY ____________________5
3. SPECIFICATIONS ______________________5
4. SAFETY PRECAUTIONS___________________5
5. OPERATING INSTRUCTIONS________________5
5.1 ATTACH THE BICYCLES ___________________6
6. MAINTENANCE AND CARE ________________6
7. NOTES REGARDING ENVIRONMENTAL PROTECTION _6
8. CONTACT INFORMATION__________________6
Please read the operating instructions
carefully prior to use and observe all safety
instructions!
Not observing these may lead to personal
injury, damage to the device or to your
property!
Store the original packaging, the receipt
and these instructions so that they
may be consulted at a later date! When
passing on the product, please include
these operating instructions as well.
Please check the contents of the
package to ensure that they are complete
and undamaged prior to use.
WARNING!
Please contact our customer services (see section
8) about retrotting former PremiumTG bike rack
models that are not prepared for retrotting.
Before you can replace the wheel stopper set, rst remove the
standard wheel stopper on your bike rack. Take the bicycles
off the bike rack.
Unscrew the screw at the end of the wheel rail and remove
the cover.
5. OPERATING INSTRUCTIONS
1x instructions of use
Fig. 1

6
• Push the unlocking lever (1) upwards. Now you can pull the
lashing strap from the turnbuckle.
• Now place the bicycle onto the bike rack and attach it to
the frame holder in line with the instructions issued for the
bike rack.
• Push the wheel stopper toward the tyres of the bicycle and
then tighten the wing nuts of the wheel stopper.
• Wrap the lashing strap around the wheel rim of the bicycle
and insert it into the turnbuckle (2).
• Position the wheel rim protector so that the lashing strap
cannot rub against and damage the wheel rim during
transportation.
• Tighten the lashing strap by levering the turnbuckle (3)
several times.
Insert the wheel stopper into the wheel rail. Align the wheel
stopper so that it is always positioned between the wheels
of the bike, never before or behind them. Push the wheel
stopper onto the wheel rail.
Release the wing nut of the wheel stopper. Push the wheel
stopper to the end of the wheel rail. You can now take the
wheel stopper out of the wheel rail.
Remount the cover and tighten the screw.
5.1 ATTACH THE BICYCLES
The wheel stopper must always be
positioned between the wheels of the
bike, never before or behind them.
8. CONTACT INFORMATION
7.NOTES REGARDING ENVIRONMENTAL PROTECTION
Please dispose of the wheel stopper via the recycling bin or
the public/municipal collection points.
The materials are recyclable. Play a part in protecting our
environment by recycling or reusing waste equipment.
EAL GmbH
Otto-Hausmann-Ring 107
42115Wuppertal, Germany
+49 (0)202 42 92 83 0
+49 (0) 202 42 92 83 – 160
www.eal-vertrieb.com
6.MAINTENANCE AND CARE
Clean the wheel stopper using a slightly moist, soft cloth and
a mild cleaning agent. Do not use aggressive cleaning agents,
solvents or petrol. Store the wheel stopper in a dry place.
CAUTION
Fig. 2
Fig. 3
Fig. 4
Fig. 5

7
• Le triangle d’avertissement indique toutes les
instructions relatives à la sécurité. Respec-
tez-les à tout moment car vous risqueriez sinon
de vous blesser ou l‘appareil risquerait d‘être
endommagé.
• Les enfants ne doivent pas jouer avec l‘appareil.
• Les tâches de nettoyage et d‘entretien à effec-
tuer chez soi ne doivent pas être exécutées par
des enfants qui ne sont pas sous surveillance.
• Ne laissez pas traîner le matériel d‘emballage.
Il pourrait devenir un jouet dangereux pour les
enfants!
• N‘utilisez cet appareil qu‘aux ns pour
lesquelles il a été prévu!
• Ne pas manipuler ni démonter l‘appareil!
• Pourvotrepropre sécurité, utilisezexclusivement
les accessoires ou pièces de rechange qui sont
indiqué(e)s dans la notice d‘utilisation ou dont
l‘utilisation est conseillée par le fabricant!
• Respectez les spécications et les consignes de
sécurité contenues dans la notice d’utilisation
de votre porte-vélos!
4. CONSIGNES DE SÉCURITÉ
3. SPÉCIFICATIONS
Convient pour les porte-vélos EUFAB : PREMIUM TG, réf. :
11571.
Largeur de pneu de 2,2 pouces à 3,25 pouces, de
56 mm à 82 mm.
De cales-roues larges pour PREMIUM TG
Pour une mise à niveau du porte-vélos
PREMIUMTG précédent sans la préparation pour
la conversion, adressez-vous à notre service à la
clientèle, voir section 8.
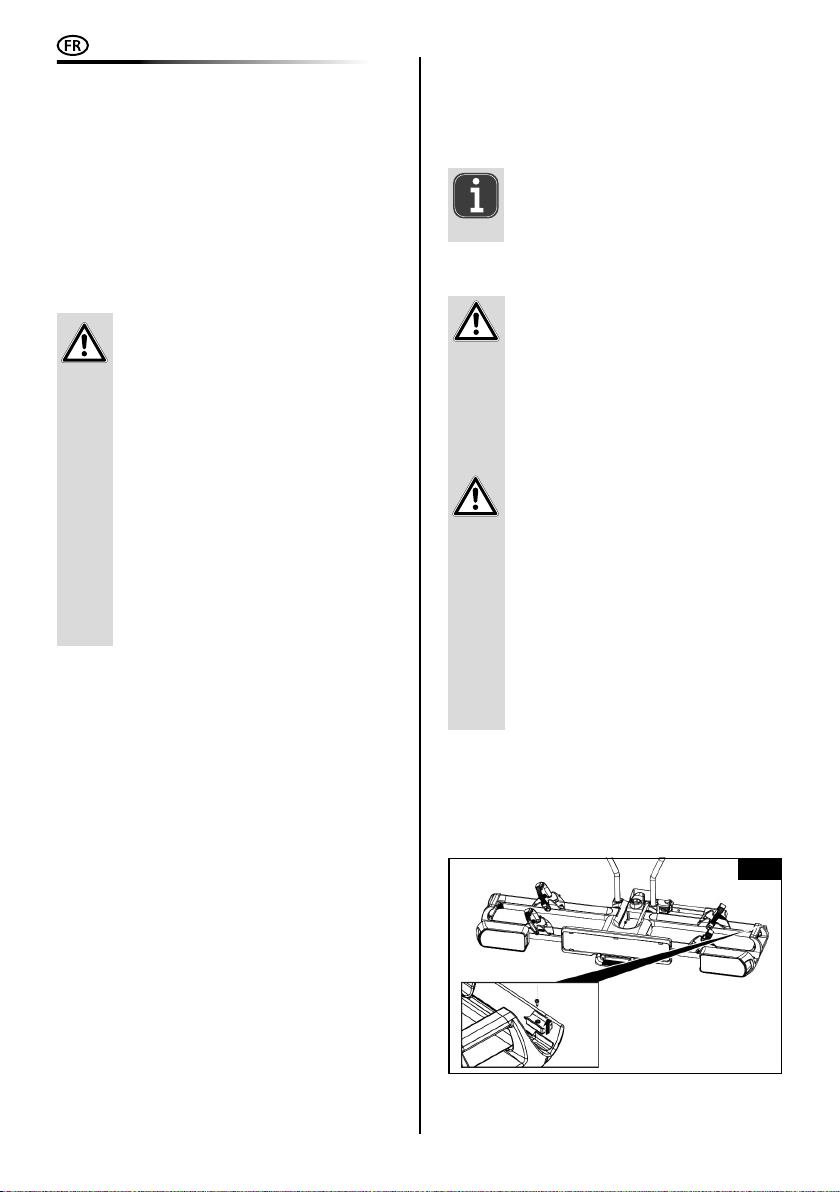
Avant de pouvoir utiliser le lot de cales-roues, vous devez
d’abord retirer la cale-roue de série de votre porte-vélos.
Retirez les vélos du porte-vélos.
Dévissez la vis à l’extrémité du rail porte-roues et retirez le
recouvrement.
5. NOTICE D‘UTILISATION
Fig. 1
1. UTILISATION CONFORME
La cale-roue sert à xer les vélos avec des pneus d’une
largeur de max. 82mm sur un porte-vélos. Le lot remplace
la cale-roue de série du porte-vélos EUFAB PREMIUM TG, réf.
11571.
Cet appareil n'est pas destiné à être utilisé par des enfants
ou des personnes aux capacités mentales restreintes ou ne
disposant pas de l'expérience ou des connaissances nécessai-
res. Les enfants doivent rester à distance de cet appareil.
L'appareil n'est pas destiné à une utilisation industrielle ou
commerciale.
L'utilisation conforme aux prescriptions implique également
le respect de toutes les informations contenues dans cette
notice d'utilisation, en particulier le respect des consignes
de sécurité.Toute autre utilisation est considérée comme non
conforme et peut entraîner des dommages matériels ou cor-
porels. La société EAL GmbH décline toute responsabilité en
cas de dommages découlant d’une utilisation non conforme
à l’emploi prévu.
SOMMAIRE
2. MATÉRIEL FOURNI
2 x cale-roue
1. UTILISATION CONFORME _________________7
2. MATÉRIEL FOURNI _____________________7
3. SPÉCIFICATIONS ______________________7
4. CONSIGNES DE SÉCURITÉ _________________7
5. NOTICE D‘UTILISATION___________________7
5.1 FIXATION DES VÉLOS ____________________8
6. ENTRETIEN ET NETTOYAGE ________________8
7. REMARQUES RELATIVES À LA PROTECTION DE ____
L‘ENVIRONNEMENT ____________________8
8. DONNÉES DE CONTACT___________________8
Avant la mise en service, lisez
attentivement le mode d’emploi et
observez toutes les consignes de sécurité!
Tout non-respect de ces consignes peut
entraîner des dommages corporels,
endommager l'appareil ou vos biens!
Conservez l'emballage d'origine, le justi-
catif d'achat et la présente notice pour
vous y référer ultérieurement ! Si vous
revendez ou remettez l'appareil à des
tiers, veuillez également leur remettre
cette notice d'utilisation.
Avant la mise en service, veuillez
contrôler le contenu de l'emballage quant
à l'absence de dommages et vérier si
toutes les pièces sont présentes!
AVERTISSEMENT!
1x notice d’utilisation

8
• Poussez le levier de déverrouillage (1) vers le haut. Vous
pouvez maintenant retirer la sangle de serrage du tendeur.
• Placez le vélo sur le porte-vélos et xez-le avec le
support de cadre conformément aux instructions de
votre porte-vélos.
• Faites glisser les cales-roues près des pneus du vélo et
serrez la vis papillon de la cale-roue.
• Placez la sangle de serrage autour de la jante du vélo et
insérez la sangle de serrage dans le tendeur (2).
• Positionnez la protection pour jante de sorte que la sangle
de serrage ne puisse pas endommager la jante durant le
voyage.
• Pour serrer la sangle de serrage, tirez plusieurs fois le
tendeur vers le haut (3).
Insérez le cale-roue dans le rail porte-roues. Orientez la
cale-roue de sorte qu’elle se trouve toujours entre les roues
du vélo, jamais devant ou derrière. Faites glisser la cale-roue
sur le rail porte-roues.
Dévissez la vis papillon du cale-roue. Faites glisser le
cale-roue à l’extrémité du rail porte-roues. Vous pouvez
maintenant le cale-roue du rail porte-roues.
Remettez le recouvrement en place et serrez la vis.
5.1 FIXATION DES VÉLOS
Les cales-roues doivent toujours se trouver
entre les roues du vélo, jamais devant ni
derrière.
8.DONNÉES DE CONTACT
7.REMARQUES RELATIVES À LA PROTECTION DE
L‘ENVIRONNEMENT
Veuillez vous débarrasser des cales-roues dans des
conteneurs pour matériaux recyclables ou auprès des services
de collecte publics/municipaux.
Les matériaux sont recyclables. Par le recyclage, la
récupération des matières ou d’autres formes de
réutilisation d’appareils usagés, vous contribuez activement
à la protection de notre environnement!
EAL GmbH
Otto-Hausmann-Ring 107
42115Wuppertal, Allemagne
+49 (0)202 42 92 83 0
+49 (0) 202 42 92 83 – 160
www.eal-vertrieb.com
6.ENTRETIEN ET NETTOYAGE
Nettoyez les cales-roues avec un chiffon doux très
légèrement humide et avec un nettoyant non agressif.
N'utilisez ni nettoyants agressifs, ni solvants, ni essence.
Conservez les cales-roues dans un endroit sec.
ATTENTION
Fig. 2
Fig. 3
Fig. 4
Fig. 5

9
1. USO CONFORME
Il kit fermaruote serve per ssare sui portabiciclette le
ruote di biciclette dotate di pneumatici larghi no a 82 mm
su un portabiciclette. Il kit sostituisce i fermaruote di serie del
portabiciclette EUFAB PREMIUMTG, codice articolo 11571.
Questo dispositivo non è destinato all'uso da parte di
bambini e persone con capacità mentali limitate o che non
siano in possesso delle necessarie conoscenze. Tenere il
dispositivo lontano dalla portata dei bambini.
Questo dispositivo non è destinato all'impiego industriale.
Dell’uso appropriato fa parte anche il rispetto di tutte le
informazioni fornite in queste istruzioni, soprattutto delle
avvertenze sulla sicurezza. Ogni altro utilizzo viene
considerato improprio e può causare danni a persone o
cose. EAL GmbH non risponde dei danni derivanti da un uso
improprio.
INDICE
• Il triangolo di segnalazione identica
tutte le istruzioni importanti per la sicurezza.
Rispettare sempre queste istruzioni, per
evitare il pericolo di lesioni personali o danni al
dispositivo.
• Ibambini non devono giocareconl'apparecchio.
• Non affidare pulizia e manutenzione ai
bambini se non sorvegliati.
• Non lasciare il materiale d'imballaggio in giro
con noncuranza. Potrebbe infatti diventare un
pericoloso giocattolo per i bambini!
• Utilizzare questo prodotto solo per l'impiego
previsto!
• Non manomettere né smontare il prodotto!
• Per la propria sicurezza, utilizzare solo gli
accessori e i pezzi di ricambio indicati nelle
istruzioni o il cui impiego sia consigliato dal
produttore!
• Rispettare le speciche e le avvertenze di
sicurezza contenute nelle istruzioni del
portabiciclette!
4.AVVERTENZE DI SICUREZZA
2. FORNITURA
2x fermaruote
3. SPECIFICHE
Adatto per portabiciclette EUFAB: PREMIUM TG, cod. art.:
11571.
Larghezza pneumatici da 2,2 pollici a 3,25 pollici, da 56 mm
a 82 mm.
Fermaruote per pneumatici larghi per
PREMIUM TG
1. USO CONFORME_______________________9
2. FORNITURA _________________________9
3. SPECIFICHE _________________________9
4. AVVERTENZE DI SICUREZZA________________9
5. ISTRUZIONI PER L‘USO___________________9
5.1 FISSAGGIO DELLE BICICLETTE _____________ 10
6. MANUTENZIONE E PULIZIA _______________ 10
7. INDICAZIONI SULLA TUTELA AMBIENTALE______ 10
8. COME CONTATTARCI ___________________ 10
Leggere attentamente le istruzioni per
l'uso prima della messa in funzione e osser-
vare tutte le avvertenze di sicurezza!
La mancata osservanza di queste istruzioni
può provocare lesioni personali, danni al
prodotto o alla vostra proprietà!
Conservare la confezione originale, la
prova d'acquisto e queste istruzioni come
riferimento futuro! In caso di cessione del
prodotto, consegnare anche le presenti
istruzioni.
Vericare l'integrità e la completezza del
contenuto della confezione prima della
messa in funzione!
AVVERTENZA!
Per l'installazione in portabiciclette
PREMIUM TG precedenti, senza predisposizione
per la conversione, rivolgersi al nostro centro
assistenza, vedi sezione 8.
Prima di poter utilizzare il kit fermaruote è necessario
rimuovere i fermaruote di serie dal proprio portabiciclette.
Rimuovere le biciclette dal portabiciclette.
Allentare la vite all'estremità del binario e rimuovere la
copertura.
5.ISTRUZIONI PER L‘USO
1x manuale d'uso
Fig. 1

10
• Spingere la leva di sblocco (1) verso l’alto. Adesso si può
estrarre la cinghia di ssaggio dal tenditore.
• Posizionare la bicicletta sul portabiciclette e ssarla con
il braccio di ssaggio seguendo le istruzioni del portabi-
ciclette.
• Spingere il fermaruote verso il pneumatico della bicicletta
e stringere il dado ad alette del fermaruote.
• Posizionare la cinghia di ssaggio intorno al cerchio della
bicicletta e inserirla nel tenditore (2).
• Posizionare la protezione cerchi in modo che la cinghia di
ssaggio non danneggi per sfregamento il cerchio durante
il trasporto.
• Per stringere la cinghia di ssaggio, stringere più volte il
tenditore (3).
Inserire il fermaruote nel binario. Orientare i fermaruote in
modo che si trovino sempre tra le ruote della bicicletta, mai
davanti o dietro. Spingere il fermaruote sul binario.
Allentare il dado ad alette del fermaruote. Spingere il
fermaruote no all'estremità del binario. Adesso si può
togliere il fermaruote dal binario.
Reinserire la copertura e stringere la vite a fondo.
5.1 FISSAGGIO DELLE BICICLETTE
I fermaruote devono trovarsi sempre tra le
ruote della bicicletta, mai davanti o dietro
di esse.
8. COME CONTATTARCI
7.INDICAZIONI SULLA TUTELA AMBIENTALE
Smaltire il fermaruote gettandolo nel bidone per il riciclo o
consegnandolo presso i punti di raccolta pubblici/comunali.
I materiali sono riciclabili. Con il riciclo, il recupero del
materiale e altre forme di riutilizzo di prodotti usati si fornisce
un contributo importante per la protezione dell'ambiente!
EAL GmbH
Otto-Hausmann-Ring 107
42115Wuppertal, Germania
+49 (0)202 42 92 83 0
+49 (0) 202 42 92 83 – 160
www.eal-vertrieb.com
6.MANUTENZIONE E PULIZIA
Pulire il fermaruote con un panno morbido solo
leggermente umido e un detergente delicato. Non
utilizzare detergenti aggressivi, solventi o benzina.
Conservare il fermaruote in un luogo asciutto.
ATTENZIONE
Fig. 2
Fig. 3
Fig. 4
Fig. 5

11

12
EAL GmbH
Otto-Hausmann-Ring 107
42115Wuppertal
Deutschland
+49 (0)202 42 92 83 0
+49 (0) 202 42 92 83 – 160
info@eal-vertrieb.com
www.eal-vertrieb.com
Other manuals for PREMIUM TG
2
This manual suits for next models
1
Table of contents
Languages:
Other EUFAB Automobile Accessories manuals

EUFAB
EUFAB Jake 11512 User manual

EUFAB
EUFAB AMBER 3 User manual

EUFAB
EUFAB BIKE FOUR User manual

EUFAB
EUFAB CROW 1 User manual

EUFAB
EUFAB BIKE THREE User manual

EUFAB
EUFAB 16471 User manual

EUFAB
EUFAB 11408 User manual

EUFAB
EUFAB 16256 User manual

EUFAB
EUFAB PREMIUM TG User manual

EUFAB
EUFAB 16501 User manual