Mannayan Trikombin User manual

Quick Guide
Software Version 5.0.1#3

©2019 Mannayan GmbH + Co KG 2
This user manual is exclusively provided for the TRIKOMBIN purchaser. It is not permitted to provide this manual
or extracts of it by means of printing, handwriting or in any other form to a third party.
TRIKOMBIN is a legally protected Community Trade Mark. The unauthorised use of the Trademark is
prohibited.

3 ©2019 Mannayan GmbH + Co KG
Table of Contents
Introduction ........................................................................................................................................................5
Front Side of the Trikombin ................................................................................................................................6
Back Side of the Trikombin .................................................................................................................................6
Before Initial Operation ......................................................................................................................................7
Cable Tester.........................................................................................................................................................7
Handling the Rechargeable Batteries..................................................................................................................7
Turning the Trikombin On and Off......................................................................................................................9
Charging the Trikombin.......................................................................................................................................9
Handling the Brass Cups......................................................................................................................................9
Basic Operation.................................................................................................................................................10
Function Keys ....................................................................................................................................................11
Overview ...........................................................................................................................................................15
Start Mode ........................................................................................................................................................15
Testing Mode ....................................................................................................................................................17
Application Mode..............................................................................................................................................19
Working with the Pulse/Wobble-Synchronization............................................................................................21
Working with Diamond Shield ChipCards .........................................................................................................23
Working with Libraries......................................................................................................................................24
Terminator Feature...........................................................................................................................................25
Accessories........................................................................................................................................................26

©2019 Mannayan GmbH + Co KG 4

5 ©2019 Mannayan GmbH + Co KG
Introduction
Trikombin is a powerful frequency generator with 3 outputs, which are mutually independent and isolated
from each other. It is equipped with rechargeable batteries, which enable an independent operation for
approximately 8 hours.
Range of Applications
•Matrix Discharge according to Baklayan –discharge instead of information charge
•Harmonical Frequency Procedure according to Baklayan
The frequencies of meridians and chakras are mathematically and harmonically related to each other –
within a frequency range of 0,000001 Hz to 36 MHz.
•Installation of compatible library-licensies
•Triple frequency generator for electrical frequency applications
•BNC socket for additional devices; e.g. loudspeakers for musical application
•Automated phase shift of the 3 channels by 120°
•Or bioresonance feature: Inversion of one channel by 180° (Ai)
•Optimisation with the help of user-defined customisation of one-sided Wobble, Modulation, Impulse,
Pitch, Sweep, etc.
•Terminator feature with automatic increase of Wobble time
•Puls/Wobble-Synchronisation: Synchronisation of Wobble and Intensity-Decrease/Increase with the
heart rate
•Compilation of Zapper-compatible Chipcards
Frequency therapy is a form of regulative therapy and is not yet part of conventional medicine-based scientific
research and therefore not yet recognized. The terminology of the individual programs does not represent
specific claims of efficacy. The device can be used to enhance the subjective well-being.

©2019 Mannayan GmbH + Co KG 6
Front Side of the Trikombin
1. Keypad
2. Ethernet socket
3. Rotary encoder
4. USB slot
5. Touchscreen
6. BNC sockets
7. Banana sockets
8. Channel I
9. Cup tray cover
10. Channel II
11. Charging switch
12. Charging-LED
13. Channel III
14. Power switch
Back Side of the Trikombin
1. Foot switch connector
2. DC terminal
3. Fuse A
4. Fuse B
5. Earth socket

7 ©2019 Mannayan GmbH + Co KG
Before Initial Operation
•Insert the fuse holder with the pre-assembled fuse completely into the socket and fasten it with a ¼
turn to the right.
•Remove the protective foil from the touchscreen.
•Connect the Trikombin and the antenna with the earthing cable to a suitable (earthed) power outlet.
For this purpose, please verify if the power outlet is suitably earthed with
the power outlet test instrument supplied.
Connect both earthing cables to the same outlet with the help of a splitter
or to two accompanying outlets –both earthing cables must be
assembled within the same circuit.
Caution: No other cables must be used for earthing. The earthing cables
of the Diamond Shield Zapper are NOT suited as well! Power outlet test instrument
A functional suitable earthing is precondition for operating the Trikombin!
Please FIRST insert the banana plug into the device, resp. antenna, and THEN insert the Schuko plug
into the power outlet.
•Please check all cables with the cable tester regularly. Due to usage, especially if the cables are
repeatedly pulled, contact errors may occur.
Cable Tester
All cables in use must be tested regularly with the incorporated cable tester.
•Disconnect all cables on the front side of the device.
•Start mode → Cable tester… → Channel I →connect the first cable to one of the two blue banana
sockets → now touch with the free end of the cable (when using the earthing cable with the metal
contact of the Schuko plug) the outer metal ring of the BNC socket, which is located directly below the
blue banana sockets → hold this contact for a few seconds
•The cable tester now indicates, whether there is a sufficient contact and therefore, if the cable is in
order or defect.
•To exclude a loose contact, you should bend the cable a little near the plugs while observing the
display. It should indicate a steady contact.
•The black-red cable with a BNC plug can be tested by connecting it to a BNC socket and touching the
banana cable’s red and black ends.
Handling the Rechargeable Batteries
•When storing the device, the rechargeable batteries should be recharged every six months.
•The rechargeable batteries can be partially charged –it does not cause any damage.
•As soon as the battery charge indicator in the display lights up red, the batteries should be recharged.
•Operating the Trikombin is not possible during the charging process. The device charges faster when it
is turned off.

©2019 Mannayan GmbH + Co KG 8
•If the device is not in operation for a longer period of time, the batteries should be previously
recharged completely.
•The rechargeable batteries are integrated and need not be removed for transportation.
However, both fuses must be removed before transportation.
•To achieve an optimal and radiation-free operation, the device should be disconnected from the main
power supply.
9 ©2019 Mannayan GmbH + Co KG
Turning the Trikombin On and Off
During operation, the power switch lights up.
Charging the Trikombin
Connect the power adapter to the charging socket of the Trikombin (see backside –DC terminal) and the power
outlet. Press the charging switch.
•Yellow charging-LED lights up; charging switch is dark: batteries are charging
•Yellow charging-LED is dark; charging switch lights up: batteries are completely charged
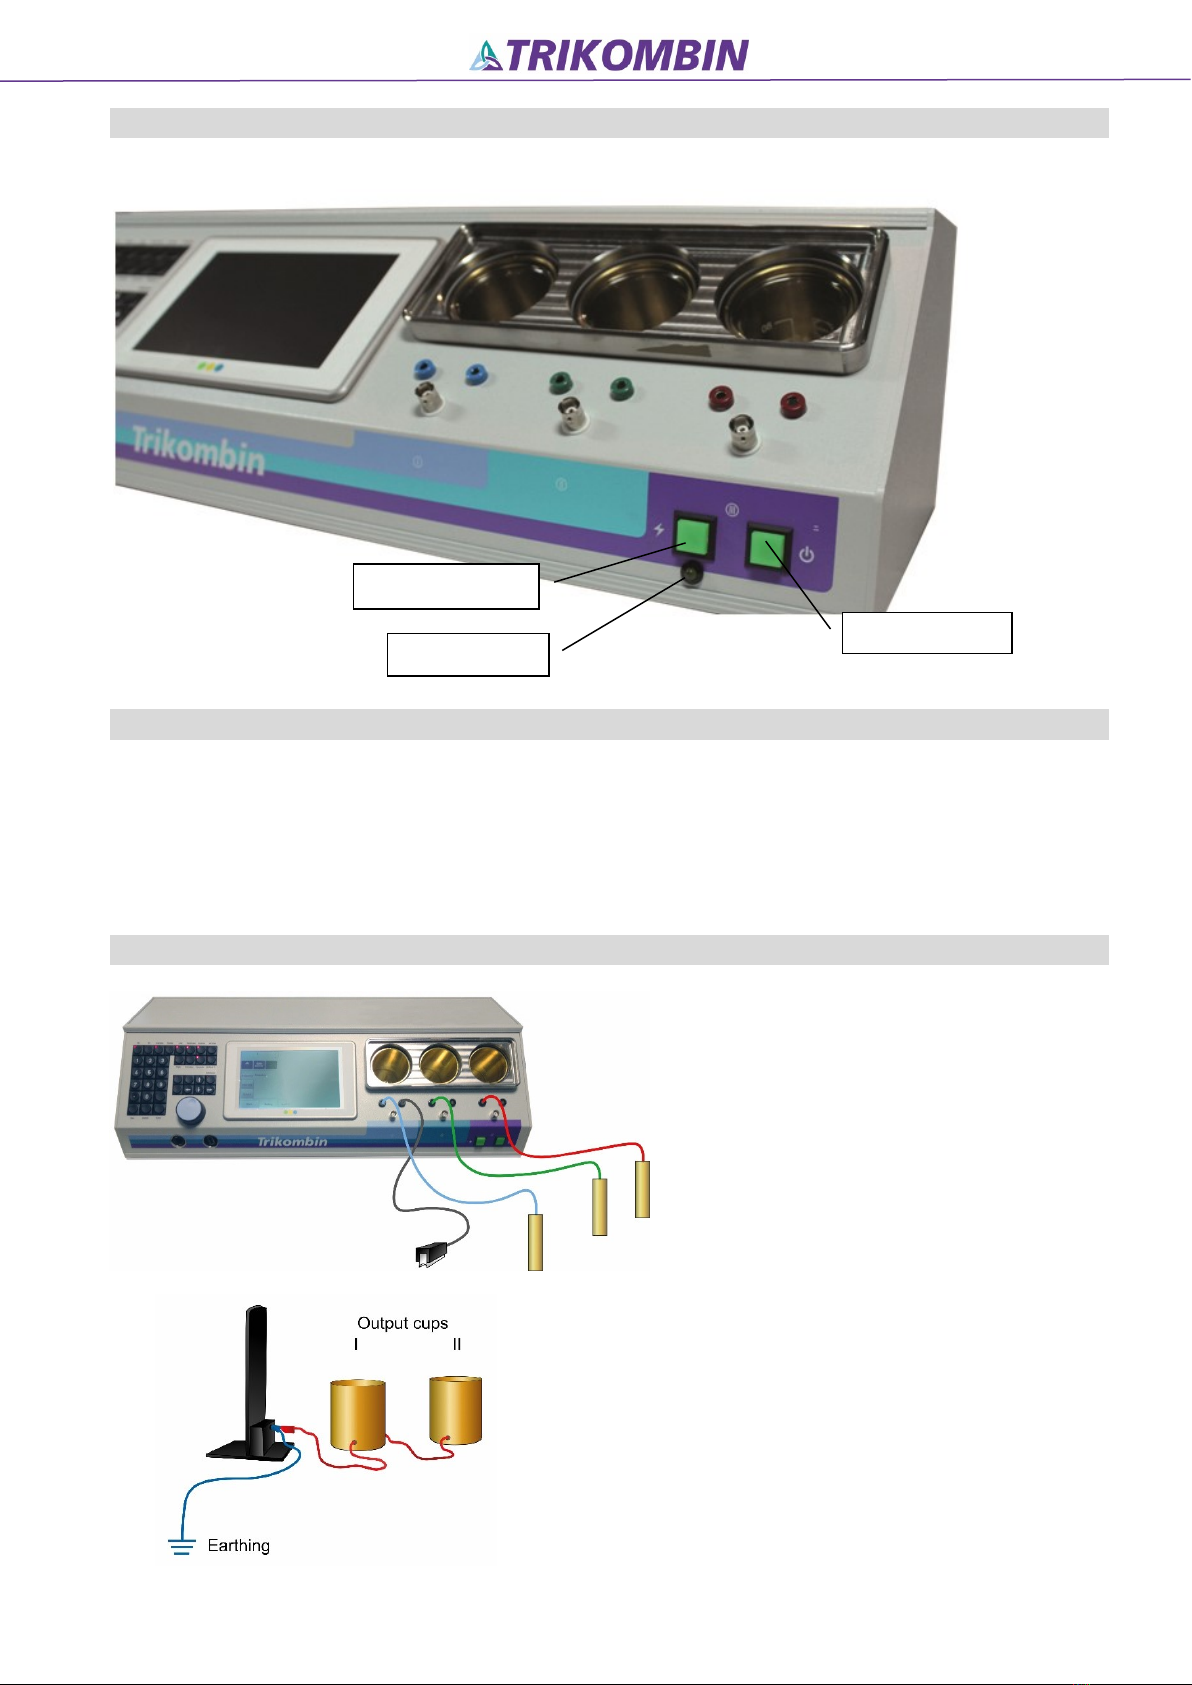
Handling the Brass Cups
A brass cup is assigned to each output
channel. The output signal is fed via the brass
cup and then to the banana sockets and the
BNC socket.
The banana cables are connected to the
device and the supplied hand electrodes.
An optional tapper is connected to one of
the right banana sockets.
Optional output cups are connected to the
earthing cable of the antenna.
Attention: if the cups are attached between
the antenna and the earthing cable a loss of
efficiency of the antenna is caused!
Charging switch
Charging-LED
Power switch

©2019 Mannayan GmbH + Co KG 10
Make sure the antenna is placed approximately one
hand’s width in front of the patient.
Electrode system:
EAV: blue: in the hand with connected EAV
green: at the thymus
red: below the navel
Biotensor: blue: below the navel
green: at the thymus
red: in the hand
Optional other compatible electrodes (spine electrodes, special animal electrodes) may be used instead of the
cylindrical electrodes.
The BNC sockets of the 3 channels can be used to connect suitable additional devices, such as optionally available
loudspeakers.
Basic Operation
Trikombin is operated using the touchscreen, the rotary encoder and the keypad. With the rotary encoder,
you can quickly select a listed item or change a numeric value which is activated by tapping it on the
touchscreen.
A foot switch with three pedals is available as an optional accessory. The foot switch only works in the testing
mode.
•Left pedal: Turns the frequency generator on and off (like On key)
•Central pedal: If the numeric field is activated: lowers the numeric value
Or selects the previous frequency program
•Right Pedal: If the numeric field is activated: increases the numeric value
Or selects the following frequency program

11 ©2019 Mannayan GmbH + Co KG
Function Keys
Frequently used functions for the Testing Mode are readily available by using dedicated function keys. When
the lamp of a key is lit, the corresponding function is turned on.
1. iOni
2. iTrii
3. iImpulsei
4. iSweepy
5. iLowy
6. iHighi
7. iDecreasei
8. iIncreasei
9. Phase
10. Cascadei
11.IWobblei
12.IWobble 3i
13.IWob.diri
14.IModul.i
15.iDatabasei
16.iUseri
17.iEsci
18.iDeletei
19.IEnteri
20.Pulse
1. On: Turns the frequency generators on and off
2. Tri:
Active: All three frequency outputs are activated (blue, green, red)
Inactive: Only generator I is activated (blue).
3. Impulse: Impulse function. Generators are turned on and off in short intervals
4. Sweep: A predefined intensity range is passed through within a certain time
5. Low: The intensity is limited to values from 0 to 23
6. High: The intensity is limited to values from 25 to 160
7. Decrease: The intensity decreases gradually, starting from a peak value
8. Increase: The intensity increases gradually, starting from a minimum value
2
1
3
4
5
7
9
11
6
8
10
12
13
14
15
16
18
17
20
19
User
Pulse

©2019 Mannayan GmbH + Co KG 12
9. Phase: Phase shift
(The 2nd and the 3rd channel exhibit a phase shift compared to the 1st channel)
This function key switches between
„no phase shift“: (light off)
„phase shift 120°“: (light on) and
„phase shift 180°“: (invers, light on).
10. Cascade: The 2nd channel has one half of the intensity, the 3rd channel has one quarter of the intensity of
the first channel. For example: intensity = 100:
11. Wobble: The frequency range is continuously changed between two frequency values. The Wobble time
defines the time frame, during which the predefined range is passed through once.
12. Wobble 3: Like Wobble, yet the frequency range is expanded by the underlying and overlying frequency
range (e.g. 4600 Wobble 3 extends to 4500 - 4600 - 4700).

13 ©2019 Mannayan GmbH + Co KG
13. Wob.dir: (Wobble direction)
This key is used to switch between “Wobble in both directions”, “Wobble up”, “Wobble down”.
The lamp of this function key is on when either “Wobble up” (to the right) or “Wobble down”
(to the left) is activated.
1. Alternating in both directions
2. Only from the lower (slower) to the
higher (faster) frequency
3. Only from the higher to the lower
frequency
One-sided Wobble to the right
One-sided Wobble to the left
14. Modul.: (Modulation)
A second signal is generated simultaneously in each generator. Thus 6 frequencies are
generated simultaneously.
15. Database: A frequency program can be selected directly by entering a number.
The function of this key is only available in the testing mode. While this key is activated, the
keypad can only be used for program numbers.
In the Application Mode, it is always possible to directly choose a test program by entering a
number.
Library numbers start with the punctuation mark period (.). (e.g.: .11539)
If the data base key is activated, the four arrows of the keypad can be used for navigation. The
left and right arrows change the program, the up and down arrows change the hierarchy level.
If the key is inactive, these arrows switch between the screens Frequency, Intensity and Output.
100 Hz 200 Hz

©2019 Mannayan GmbH + Co KG 14
16. U (User) Cue the dialogue “Load frequency program” in the testing mode or the Application Mode. Within
this dialogue, this key is used to switch between user-defined frequency programs and stored frequency
programs.
17. Esc (Escape) cancel
18. Delete Delete
19. Enter Confirm
20. Pulse Activates the Pulse/Wobble-Synchronisation, Wobble and Wob.dir to the right

15 ©2019 Mannayan GmbH + Co KG
Overview
The Trikombin software offers three main modes: Start , Testing and Application . These are selected tapping
the tabs displayed in the lower left side of the screen:
Start Mode
A new session can be started and configurations can be made
1. Buttons: to switch between operator pre-defined presettings
2. Quick start Frequency program: buttons for the quick selection of frequently used frequency
programs
the frequency programs can be assigned via:
Testing → More… → Assign to Quick Start…
3. Quick start applications: buttons for quickly loading saved application lists. The
application lists can be assigned via:
Application → More… → Assign to Quick Start…i
4. Tabs of the three main modes: Start , Testing and Application
5. Activity state of generators (on or off)
6. Time display
7. Battery charge indicator

©2019 Mannayan GmbH + Co KG 16
8. Maintenance dialogue: It allows to update the current free firmware or new licenses (payable
upgrades or libraries).
Further information on installing libraries can be found in the chapter
“Working with Libraries”
The firmware file (name.7z) must be in the root directory of an USB
memory stick
1. Insert USB memory stick
2. Start →Maintenance…→Update firmware…i
3. Close
9. Settings: It allows to select language, date and time, brightness of the
touchscreen, the start program for the testing application, the volume
of the acoustic signals and enables you to delete quick start programs.
10. Cable tester: It allows you to test the coloured banana cables, the earthing cables and
the BNC cable. Select a channel, plug one contact of the banana cable
into the banana socket, now touch with the other end the outer metal
ring of the BNC-socket. (Attention: for testing the earthing cable, touch
the BNC socket with the outer metal grounding contact of the Schuko
plug). The cable with the BNC connector is plugged into the BNC socket
and between both banana plugs an electrical contact is established.
11. Starting a new session: - the Testing mode will be brought to the initial state. All changes made
to the frequency programs are reset
- all library chains added to the testing mode are removed
- the Pitch is reset
- the contents of the Application Mode are deleted

17 ©2019 Mannayan GmbH + Co KG
Testing Mode
This mode is disabled, when the device is being charged.
Load the frequency program and customise it if necessary. Start with On (keypad top left). If appropriate
frequency programs are found, they can be transferred to the application.
1. Overview bar: displays the current settings
2. Navigation bar: quick switching between the stored frequency programs via iPreviand iNexti
if the data base button is activated, the levels and programs can be changed via
the four navigation arrows of the keypad
Mode buttons: An (anatomical) / Clock (meridian clock) / BR (bioresonance)
An: programs according to the order of the anatomical position of the EAV-
points
Clock: programs according to the order of the Chinese organic clock
BR: the classic bioresonance range is wobbled
3. Frequency settings
4. Selection of the three main operating modes
5. Indication of the state of the generators (on or off). If the Pulse/Wobble-Stick is connected to the device
a grey heart appears left of the lamps. It turns red when the button Pulse is activated
6. Time display
7. Battery charge indicator
8. Removes the current frequency program from the application list
9. Adds the current frequency program with the current settings to the application list
10. Library mode (only available, if a library and the corresponding license is installed)
11. Additional functions of the frequency programs

©2019 Mannayan GmbH + Co KG 18
Options for Directly Loading a Frequency Program
A frequency program can be loaded by direct input using the numeric keypad:
•a program number, e.g. 1100, 1103
•a library number beginning with the punctuation mark period (.), e.g. .11543, .48020
•a user-defined program
Call up the "Load frequency program" dialog:
- Press the iUserikey once, or
- activate the Database button or
- Button More... and Freq.prg. Download
- and typing in the program number
In the application window, a frequency program can always be selected directly by entering a number via the
keypad.
The "Load frequency program" dialog
opens. Enter the frequency program
number using the keypad. Within this
dialog, the "User" key switches between
user-defined programs and stored
frequency programs.
"User-defined program" and "Library entry"
can also be selected by touching them.
Attention:
As long as the "Database" key is activated, the numeric keypad can only be used for program numbers. The
function of this key is only active in the test window.
When the Database key is activated, the four arrows of the keyboard field can be used for navigation. The
arrows to the right and left change the program, the arrows up and down change the hierarchy level. If the key
is inactive, the arrows change between the windows Frequency, Intensity and Output.
Transferring Frequency Programs into the Application Mode
Testing → Add program →enter desired application time →if necessary, select Stop before start if an
interruption of this frequency program is necessary to change the content of the brass cups or to place the
electrodes differently →Optional: enter a comment →Add or Enter key.
Loading Frequency Programs from the Application List to the Testing Mode
Select the desired frequency program in the application list →On →Testing →the program has been loaded
to the navigation bar and now can be altered and saved again.

19 ©2019 Mannayan GmbH + Co KG
Application Mode
This mode is disabled, when the device is being charged.
Executing Selected and Individualised Frequency Programs
Frequency programs have been transferred via testing or can be directly selected by entering the number of
the frequency program. A compiled list can be saved and used again at a later stage.
With the function key On , the frequency program can be started and stopped. After this duration, the next
program will start automatically.
Please note: if the frequency generators are active (function key On is lit, three little lamps in the touchscreen
are flashing green) and the same settings in the Testing and Application Mode have been applied, equal signals
will be generated.
1. Overview bar: settings of the current program
2. Application list: list of frequency programs
3. Selection of the three main modes
4. State of the generators:
On: all three lamps of the touchscreen flash green
Off: all three lamps of the touchscreen are black
If executing a TMC-chain: all three lamps shortly flash red while switching to the next
program
5. Time display
6. Battery charge indicator
7. Additional functions
8. Remove the current program from the application list
9. Disable / Enable the selected frequency program (a disabled entry is displayed in grey and is
skipped during execution.)

©2019 Mannayan GmbH + Co KG 20
10. Edit attributes of the selected frequency program
11. Total execution time of the listed frequency programs
12. Scroll bar
Columns of the Application List
•Prog Number of the frequency programs
•P „Yes“, when Stop before start was selected for the frequency program
•T Execution time of the frequency program in minutes and seconds
•Description
◦Name of the frequency program
◦Changes in comparison to the original frequency program
◦Comment (if entered by the operator)
•Remaining time of the entire application list (1) and the current program (2)
Move a frequency program in the list by selecting →More… →Move…→change the position of the entry
via the rotary encoder →Donei
Saving Application Lists
Save an application list by selecting Application → More… → Save application → name the list.
Load with Application → More… →select list → Loadi
Via Application → More… → Stored applications → select application → Set to quick start → i(not used)i
application lists may be assigned as quick start programs
Other manuals for Trikombin
1
This manual suits for next models
1
Table of contents
Other Mannayan Medical Equipment manuals

Popular Medical Equipment manuals by other brands


Getinge
Getinge Arjohuntleigh Nimbus 3 Professional Instructions for use

Mettler Electronics
Mettler Electronics Sonicator 730 Maintenance manual

Pressalit Care
Pressalit Care R1100 Mounting instruction

Denas MS
Denas MS DENAS-T operating manual

bort medical
bort medical ActiveColor quick guide

AccuVein
AccuVein AV400 user manual


