Mantech FT-6DOF-NB User manual

1/18
FT-6DOF-NB
FEETECH 6 Degrees of Freedom Nano Biped kit
FEETECH 6自由度双足机器人套件
Instruction Manual
使用说明手册
Version 1.00

2/18
目录 Table of Contents
免责声明 Disclaimer .................. .... .... .... .... ...... .... .............. ................................3
勘误Errata ...... ......... ... ... ... ... ......... .... .............. .... .............. ................................3
注意事项Precautions...... ................... .... .............. .... .............. ................................3
套件清单 Part list........................................................................................................5
使用工具Tools ...... ......... ................... .... .............. .... .............. ................................6
组装步骤 Assembly Procedure................ .................................................................7
下载安装SCServo Arduino库文件 Download and install SCServo Arduino lib 12
SCServo Arduino 库文件使用说明 SCServo Arduino lib instructions...............12
下载Arduino 程序 Download Arduino Program...................................................13
做示范动作 Perform Demonstrative Motions.........................................................14
关于(About)FT-NANO Shied and TTLinke_mini..........................................15
示例程序功能状态表 Sample program function status table... .... ...................................15
程序流程图 Program flow chart.......................... ..... ..... ..... ..... ...................................16

3/18
为不断地改进产品,本文档和本文档中提到的产品由本公司自行更改,恕不另行通知。
In view of unceasing improvement of products, this document and the product mentioned in
this document are subject to be changed by the company without notice.
免责声明 Disclaimer
使用者在使用本产品所做的任何应用,使用都必须自行承担一切风险。本公司对于因使用要产品
所产生的直接、间接或附带损害,包括设备损失、人身安全健康损失、利润信誉损失都不负任何
责任。本公司产品不可用于救生或相关仪器设置。未满14岁儿童必须有成人陪同方可使用本产
品进行相关试验。
The user shall undertake all the risks in the applications where this product is used. The
company shall not be liable for any direct, indirect or consequential damages due to the use of
the product including but not limited to the loss of equipment, the loss of human safety and
health and the loss of profit and reputation. The product of the company shall not be used in
life saving or any related instrument and equipment. Children under 14 shall not use this
product for any related experiment without being accompanied by adults.
勘误Errata
我们尽力让本使用手册更加完整且正确地表达我们希望用户了解的信息,然而难免仍有疏漏之处。
为了让使用手册提供最新最详细的信息,我们会持续改善增加手册内容。如在本手册中发现错误
之处,欢迎利用电子邮件 infofeetechrc@gmail.com 与我们联系。如有任何相关信息更新都会在
网站上公布,请经常浏览我们的公司网站 www.feetechrc.com 以便获知最新信息。
We have put tremendous efforts in making this instruction manual complete and correct;
however, there may be unavoidable missing parts or errors. With a view to providing the user
updated and complete information in the instruction manual, we keep improving and
supplement the contents of this instruction manual. If you find any error in this manual, please
contact us via the e-mail infofeetechrc@gmail.com any related update information will be
disclosed on our website. Please visit our website http://www.feetechrc.com for more updated
information.
注意事项Precautions
请确认TTLinker_mini的输入电压于6-9V之间。
Make sure the input voltage of TTLinker_mini is within the 6-9V range.
本套件提供的舵机支持电压6-8.4V。过高或过低的电压将造成无法完成预期的动作,甚至烧坏舵
机,连接电源前请确认提供的电压值。
Servos provided in this kit are rated 6-8.4V. Over or under voltage may cause unpredictable
results, even burning of the motor. Make absolutely sure of the correct voltage before
connecting the power supply.
本套件含六个舵机,所有舵机同时动作时需要较大电源,请确认连接到舵机的电源或电池,能提
供4A以上的电源值,以让套件能正常动作。提供电流不足时,可能造成无法达到预期的动作,
或损坏套件。
The kit provides a total of 6 servos. When operated simultaneously, they consume a large
current; make sure the power supply or battery connecting to servo is capable of providing 4A
of current, so as to properly operate the kit. Insufficient current may cause unexpected results
and damage of the kit.
如果使用电池作为套件的电源,在操作一段时间后,电池电压降低会造成套件无法正常动作,此
时请将电池取出,在充电完成后再使用。如果需要长时间的测试或操作,建议使用电源适配器以

4/18
维持电压一致的效能。
When using a battery power supply to the module, the voltage may lower after some while of
operation and cause abnormal actions of the kit. In such case, remove and fully charge the
battery before using again. If prolonged testing and operation is required, we suggest you use
a power supply unit to ensure uniform performance.

5/18
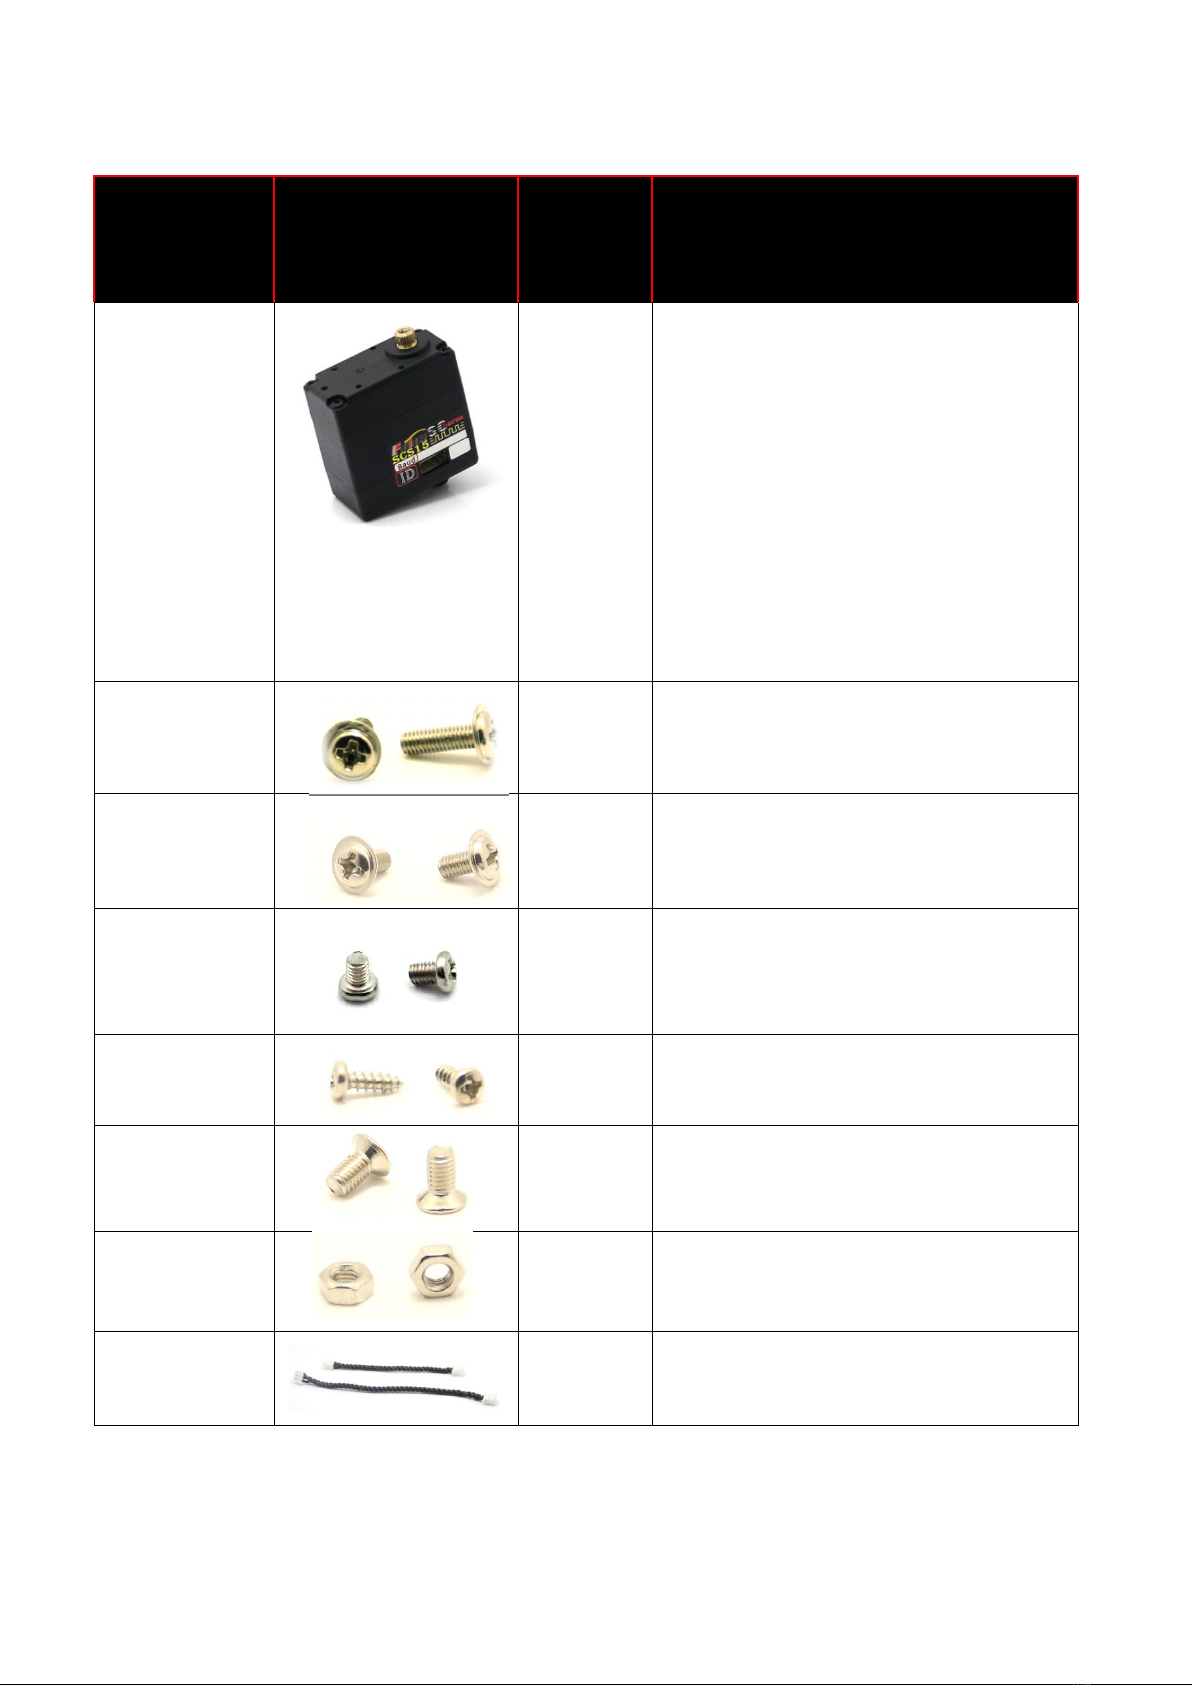
套件清单 Part list
Item
Illustration
Quantity
Specifications and
instructions
Aluminum Main
U-shape
Bracket
FK-MU-001
1
Aluminum Main U-shape Bracket for
linking robot electronic modules with
its leg parts
Aluminum
Foot Plate
FK-FP-001
2
For connecting with servo-side bracket
to fit the ankle servo
Aluminum
Servo-side
Bracket
FK-SB-001
2
For connecting with the ankle servo and
the foot bracket
Aluminum
U-shape
Bracket
37mm
FK-UB-001
6
Provides connection with the servo
round horn and movement space of the
Servo; It also provides connection with
two U-shape brackets for different
applications.
Aluminum
U-shape
Bracket
27mm
FK-UB-001
4
Provides connection with the servo
case; It also provides connection with
two U-shape Brackets for different
applications.
NANO Shield
1
The NANO Shield board is used to connect
the Arduino NANO board and
TTLinker_mini signal conversion board,
include two used to indicate the LED1
and LED2, two input buttons S1 and S2.
TTLinker_mini
1
TTLinker_mini is a signal conversion
board, connect to Arduino Nano TX1 and
RX0 two digital serial ports
6/18
Item
Illustration
Quantity
Specifications and
instructions
SCServo
(SCS15)
6
SCServo is meaning that Smart Control
Servo. SCServo can work at servo mode
and wheel mode, has a unique ID number
to identify on BUS network, have kinds
of baud rate available, and can
feedback the value of Position,
Temperature, Load, Speed and Input
Voltage. SCServo is easy to be
controlled by Arduino.
Dimensions (LxWxH):40.0X20.0X40.5mm
Weight: 56 g, Speed: 65RMP(7.4V)
Torque: 16.5kg.cm(7.4V)
Screw 1
10
ISOP 3 x 10 mm
Screw 2
30
ISOP 3 x 6 mm
Screw 3
50
ISOP 3 x 4 mm
Screw 4
40
TP1P 2 x 6 mm
Screw 5
10
ISOF 3 x 6 mm
Nut A
40
3 x 5 mm
Black Cable
6
5264 connecter
100mm *4
150mm *2
使用工具Tools
十字螺丝起子(需要使用3 mm)Cross Screwdriver (3 mm) 尖嘴钳 Long Nose Pliers
螺丝胶(可选择性使用在螺丝母与铝板接合处,减缓螺母松脱)Screw Glue (selectively used

7/18
between nut and bracket joints, to prevent the nut from loosening.)
组装步骤 Assembly Procedure.
套件包装及所有零部件 Kit packaging and all components
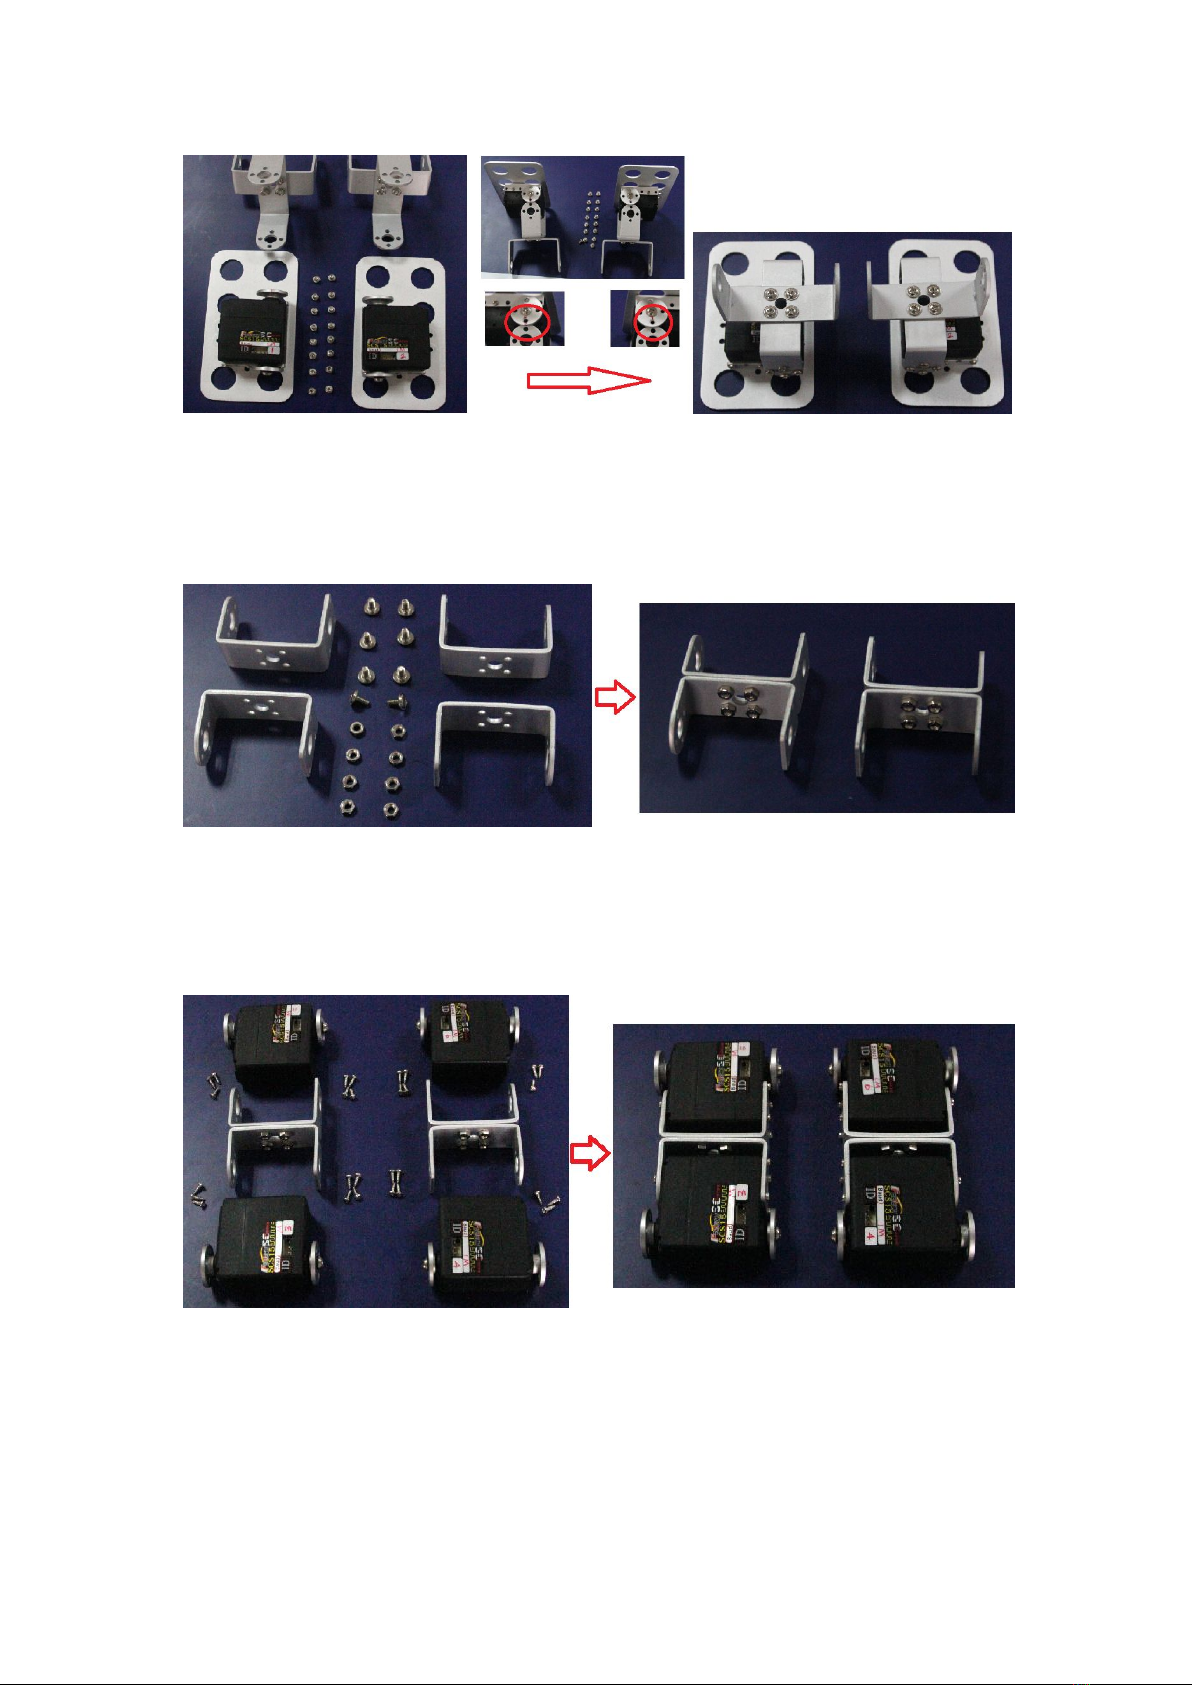
步骤 1 安装脚板与脚踝舵机侧面支架 Installation of Foot Bracket and Servo-side Bracket
需要脚板(Foot Bracket)x 2
舵机侧面支架(Servo-side Bracket)x 2
沉头M3螺丝(ISOF 3 x 6 mm)x 8
M3螺母(Nut 3 x 5 mm)x 8

8/18
步骤 2 安装两个脚踝舵机 Installation of two ankle servos
步骤 1组件(Part of step 1) x 2
SCS15 左脚踝舵机ID1,右脚踝舵机ID2(Left ankle servo use ID1; Right ankle servo use ID2)x 2
自攻螺丝(TP1P 2 x 6 mm)x 8
步骤 3 安装长 U 型支架 Installation of U-shape Bracket 37mm
长U型支架(U-shape Bracket 37mm)x 4
M3x6机牙螺丝(ISOP 3 x 6 mm) x 8
M3 螺母(Nut 3 x 5 mm) x 8
步骤 4 安装 U 型支架到脚踝舵机 Installation of U-shape Bracket to ankle servos
步骤 2组件(Part of step 2) x 2
步骤 3组件(Part of step 3) x 2
M3x4机牙螺丝(ISOP 3 x 4 mm) x 16
安装时请注意舵盘上的红色中点标志Pay attention to the red midpoint marks on the round servo horn
9/18
步骤 5 安装短 U 型支架 Installation of U-shape Bracket 27mm
短U型支架(U-shape Bracket 27mm)x 4
M3x6机牙螺丝(ISOP 3 x 6 mm) x 8
M3 螺母(Nut 3 x 5 mm) x 8
步骤 6 安装 U 型支架到舵机 Installation of U U-shape Bracket to servos
步骤 5组件(Part of step 5) x 2
SCS15舵机ID3、ID4、ID5、ID6 ( Servo ID3,ID4, ID5,ID6)x 4
自攻螺丝 (TP1P 2 x 6 mm)x 28
步骤 7 安装 U 型支架到舵机 Installation of U-shape Bracket to servos
步骤 4组件(Part of step 4) x 2
步骤 5组件(Part of step 5) x 2
M3x4机牙螺丝 (ISOP 3 x 4 mm) x 16
安装时请注意舵盘上的红色中点标志Pay attention to the red midpoint marks on the round servo horn

10 /18
步骤 8 安装 U 型支架到舵机 Installation of U-shape Bracket to servos
步骤 7组件(Part of step 7) x 2
长U型支架(U-shape Bracket 37mm)x 2
M3x4机牙螺丝 (ISOP 3 x 4 mm) x 16
安装时请注意舵盘上的红色中点标志Pay attention to the red midpoint marks on the round servo horn
步骤 9 安装主 U 型支架到舵机 Installation of Main U-shape Bracket to servos
步骤 8组件(Part of step 8) x 2
主U型支架 (Main U-shape)x 1
M3x6机牙螺丝(ISOP 3 x 6 mm) x 8
M3 螺母(Nut 3 x 5 mm) x 8

11 /18
步骤 10 连接舵机线 Connect black cable to servos
步骤 9组件(Part of step 9) x 1
黑色舵机3P绞线 (Black 3P cable )x 6
步骤 11 安装 NANO 扩展板与 TTLinker_mini Installation of NANO Shield and connect TTLi
12 /18
nker_mini
步骤 10组件(Part of step 10) x 1
NANO 扩展板 (NANO Shield ) x 1
TTLinker_mini x 1
M3x10机牙螺丝 (ISOP 3 x 10 mm) x 3
M3 螺母(Nut 3 x 5 mm) x 6
下载安装SCServo Arduino库文件 Download and install SCServo Arduino lib
在编辑及下载 Arduino程序之前,如果没有将SCServo 库文件放入Arduino软件安装路径的
libraries文件夹,请先到http://www.feetechrc.com/download/下载SCServo 库文件到本地电
脑,然后放解压放入libraries文件夹内。然后再运行Arduino软件。
Before editing and download the Arduino program, if there is no SCServo library file in the Ardui
no libraries folder of software installation path, please go to http://www.feetechrc.com/download/ to

13 /18
download SCServo library files to the local computer, and then put decompression into the librar
ies folder. At last run the Arduino software.
SCServo Arduino 库文件使用说明 SCServo Arduino lib instructions
先将SCServo 库引入程序头文件 #include <SCServo.h>
初始化必须设置串口通讯波特率,SCServo 出厂默认波特率设置是1M。
Serial.begin(1000000);//init Serial baudrate
SCServo 扭力输出使能指令有两个输入参数(SCServo.EnableTorque(ID,bit)),输入参数一是
ID(0~255),其中0xfe是广播ID;输入参数二是使能标志位,其中“1”为使能打开,“0”为
使能关闭。如使能处于关闭状态,那么舵机将没有任何扭力输出,但通讯正常工作。
SCServo.EnableTorque(1,1); //Enable ID 1 SCServo output torque; ON
SCServo.EnableTorque(1,0); //Enable ID 1 SCServo output torque; OFF
SCServo.EnableTorque(0xfe,1);// Enable ALL SCServo output torque; ON
SCServo.EnableTorque(0xfe,0); //Enable ALL SCServo output torque; OFF
读取SCServo 舵机当前位置信息指令有一个输入参数并返回一个参数。输入参数为SCServo ID,
一次只能读取一个ID的当前位置信息,此指令ID 不可以使用广播ID。使用广播ID时指令是不作
数据返回的。返回一个参数的数据类型是short型(即两个字节以上)。
#define s16 short
s16 pos = SCServo.ReadPos(1);//read Servo ID:1 position
写位置指令需要三个输入参数。输入参数一是 ID(0~255)),其中 0xfe 是广播 ID;输入参数
二是位置数值(0~1023 有效对应转动角度是 0~215 度,但实际转动角度会受到位置限制参数
设置影响);输入参数三是舵机运行速度级别(1~100),“1”对应舵机最慢转动速度级,“100”
对应最高转动速度级。当此指令对应 ID 的舵机收到指令后马上执行动作,不作任何等待。
SCServo.WritePos(0xfe,i,100);//All Servo(broadcast) rotate to the position i with max
speed
异步写指令(RegWritePos(ID,X,Y))必须与执行指令(RegWriteAction())配合使用才可以达到
写指令的效果,即异步写指令输入同写指令一样三个参数后,接收到此指令的舵机必须还要收到
执行指令后才进行对异步写指令动作,否则保持前一指令动作。
SCServo.RegWritePos(1, 512, 100);
SCServo.RegWritePos(2,512, 100);
SCServo.RegWriteAction(); When SCServo receive this instruction will action to rotation
同步写指令(SyncWritePos (ID,I,X,Y))需要四个输入参数。输入参数 ID 是含 1 个或含多个
ID 的数组,输入参数二定义第一个参数 ID 的数值个数,输入参数三是位置数值(0~1023 有效
对应转动角度是 0~215 度,但实际转动角度会受到位置限制参数设置影响);输入参数四是舵
机运行速度级别(1~100),“1”对应舵机最慢转动速度级,“100”对应最高转动速度级。当
此指令对应 ID 的舵机收到指令后马上执行动作,不作任何等待。
ID[0] = 1;
ID[1] = 2;

14 /18
SCServo.SyncWritePos(ID, 2, 100, 50);
delay(2000);
SCServo.SyncWritePos(ID, 2, 900, 100)
以上指令的具体运用可直接将SCServo库文件中示例下载到Arduino 控制板中,然后接上
TTLinker 信号转换板与SCServo舵机,即可以试验其功能。
下载Arduino 程序 Download Arduino Program
请先到http://www.feetechrc.com/download/下载Arduino_Program_biped_FT_6DOF_NB.rar到
本地电脑。然后解压。另外,请确认已将SCServo 库文件放入Arduino软件安装路径的libraries
文件夹,并且Arduino软件与控制板(Arduino Nano 需要另外购买)正常联接可以工作。
打开Arduino_Program_biped_FT_6DOF_NB.ino运行Arduino软件。选择控制板型号与联接端口(端
口号随不同Arduino Nano而不同)。
Please go to http://www.feetechrc.com/download/ to download Arduino_Program_biped_FT_6DOF_
NB. Rar to the local computer. Then unpack. In addition, please confirm SCServo library file in t
he Arduino libraries folder of software installation path, and the Arduino software and control boar
d (Arduino Nano is not include in this kit) connection can work normally. Open Arduino_Program_
biped_FT_6DOF_NB. Ino running the Arduino software. Select board model with connection port
(port number varies with different Arduino Nano and different).

15 /18
Arduino_Program_biped_FT_6DOF_NB.ino这个是工厂设置最简单的试验程序(程序流程图见附
件),用户可自行修改。
确认不修改或修改完成后点击upload
Arduino_Program_biped_FT_6DOF_NB.ino
This is the simplest factory test program (flow chart see attachment), User can mod
ify itself. After the completion of modify or the confirmation not modify click upl
oad
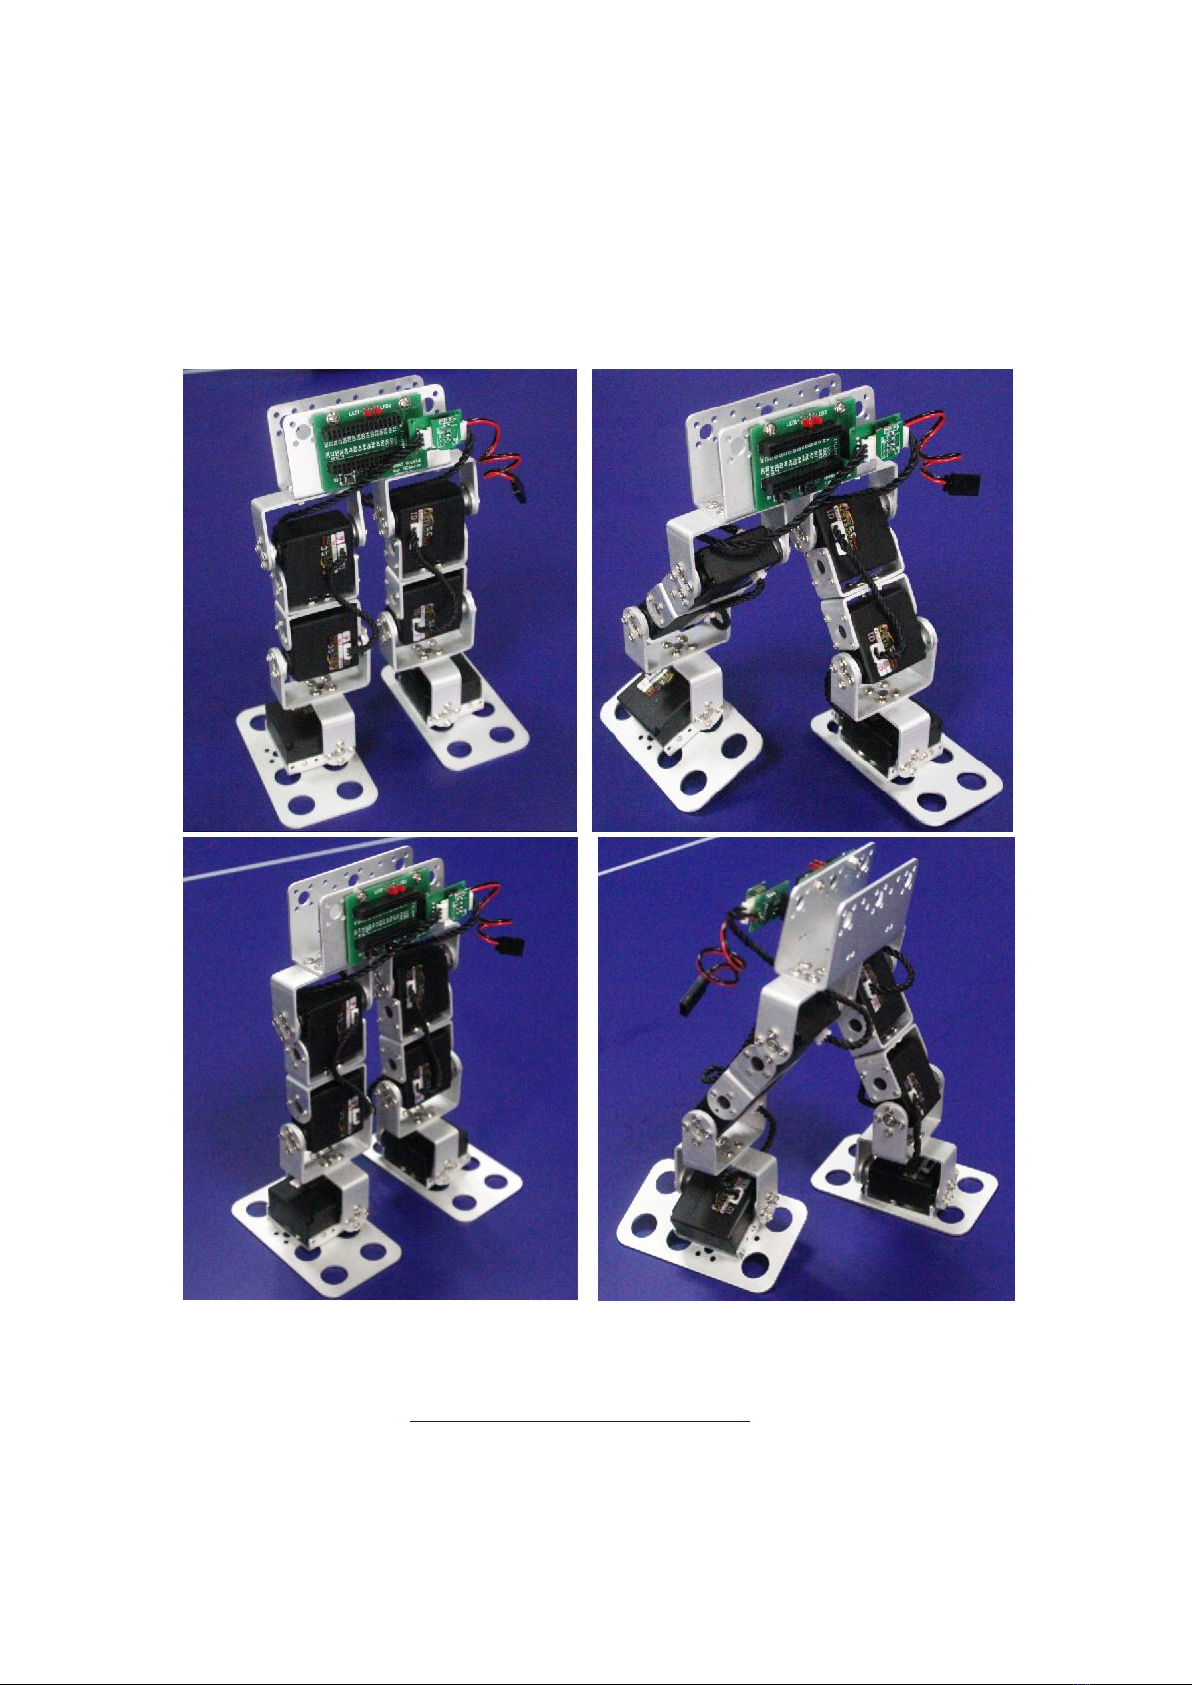
做示范动作 Perform Demonstrative Motions
确认已将以上步骤正确完成操作,以下是利用NANO Shield 上的两个按键及指示灯,来完成用手
动设置双足机器腿动作的操作视频。
Confirmed will be completed the above steps correctly, the following is the use of NANO shields on the
two buttons and indicator lights, to complete the leg movements by manually bipedal machine operation
video.
关于(About)FT-NANO Shied and TTLinke_mini
NANO 扩展板是用来连接 Arduino Nano 控制板与 TTLinker_mini 信号转换板 ,扩展板上有两
个用来指示的 LED1 和LED2, 以及用来作功能选择输入的两个按键 S1 和S2, 两个 LED 分别
对应连接 Arduino Nano 的D4 和D2 数字端口;另外两个按键分别对应连接 Arduino Nano
的A1 和A2 模拟端口。TTLinker_mini 与Arduino Nano 的TX1 和RX0 两个数字端口连接,并
将Arduino Nano 的串口信号转换成单总线信号从而控制 SCServo。
The NANO Shield board is used to connect the Arduino NANO board and TTLinker_mi
ni signal conversion board, include two used to indicate the LED1 and LED2, two input
buttons S1 and S2.Two LEDs corresponding connection Arduino Nano D2 and D4 digi
tal port, two buttons correspond to connect the Arduino Nano A1 and A2 Analog port.
TTLinker_mini connect to Arduino Nano TX1 and RX0 two digital serial ports and conve
rt the Arduino Nano control signals into a single bus to control SCServo.
NANO Shield 原理图

16 /18
TTLinker_mini 原理图
示例程序功能状态表 Sample program function status table
Function
State
S1
S2
LED1
LED2
Program Start Motion
Power on or Reset
within 1 second
-
Press
Off
Flash
Program Motion by Hand
Enter
Press
-
Flash
Off
Program Motion by Hand
Exit
Press
-
Off
On
Save Current Motion
Save
Press
ON
Flash
Perform Motion
Power on or Reset
after 2 second
Off
ON
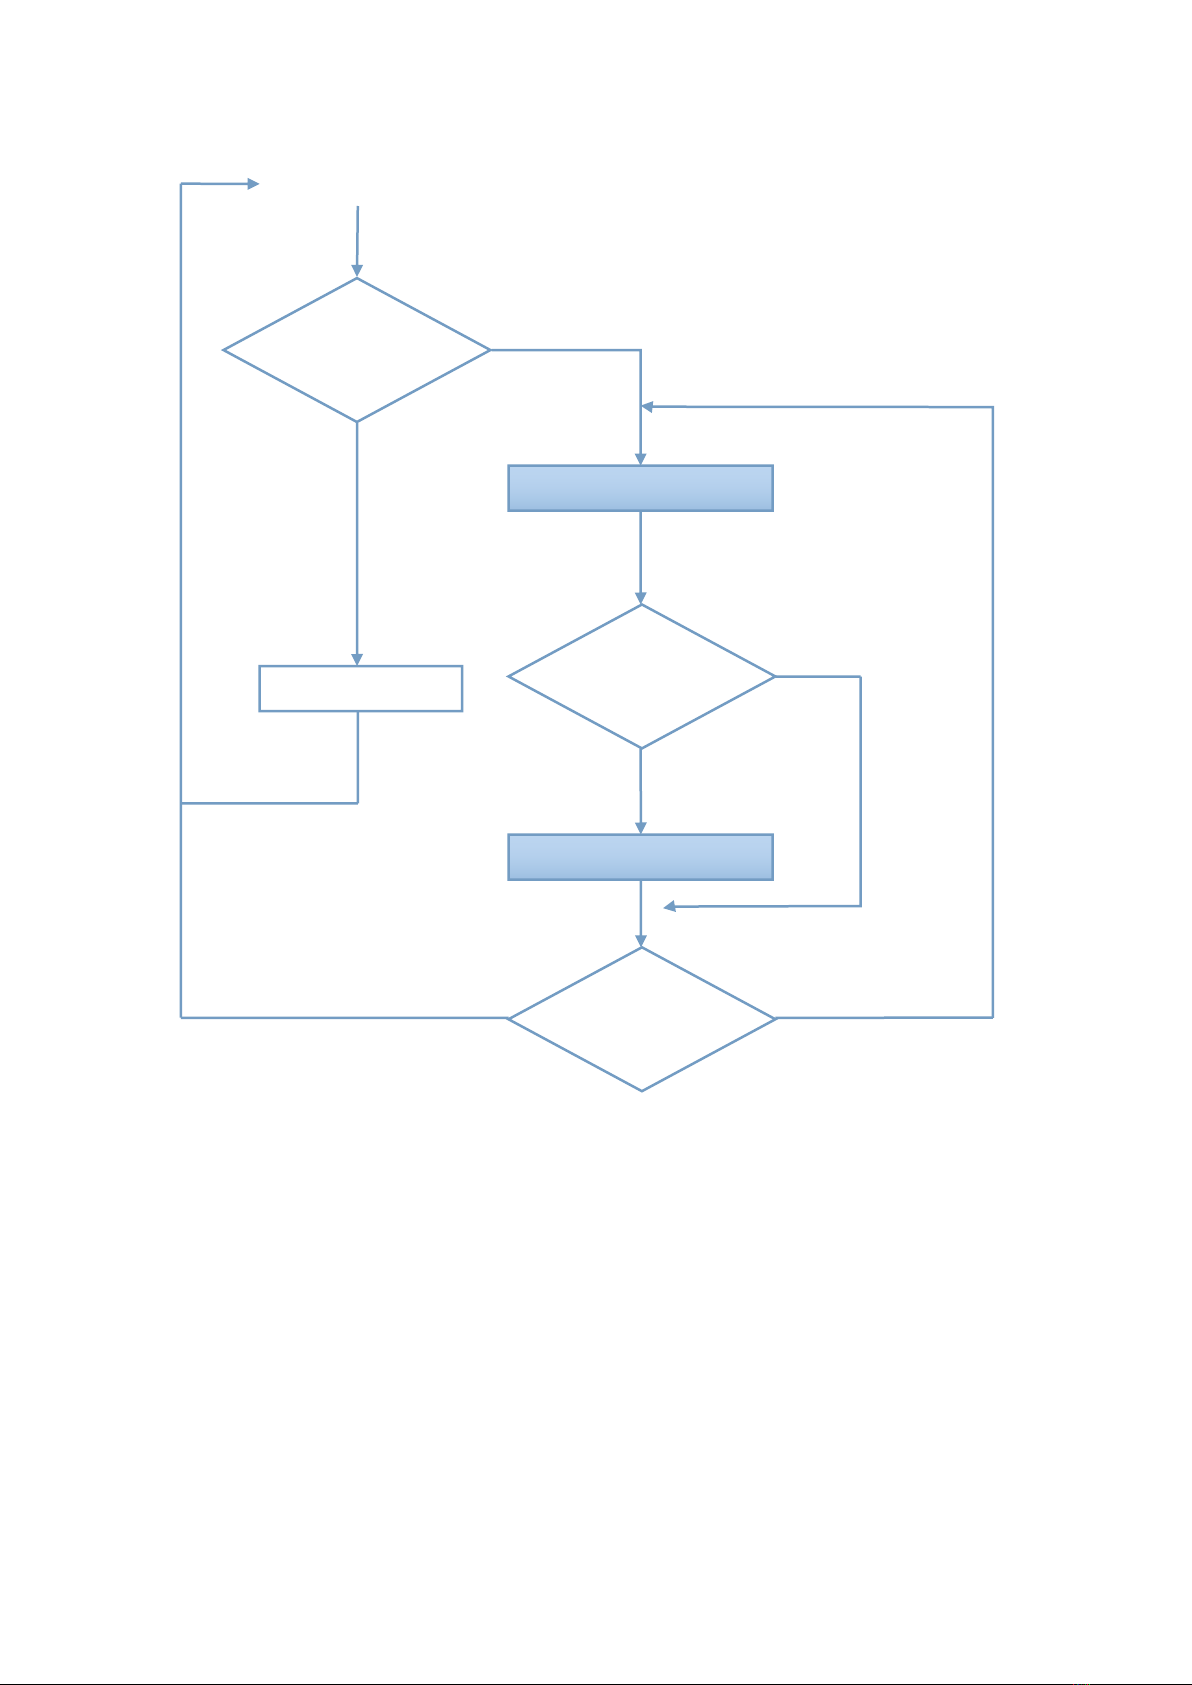
程序流程图 Program flow chart
Yes
POW_ON or Reset
S2
Press
Main
No
Program Start Motion
LED2_Flash
17 /18
初始动作设置 Program Start Motion
如果在第一次使用或要删除所有保存的动作,重新设置初始姿势,那么在上电或按了复位键
后1秒内按住 S2 键不放,直到 LED2 闪烁一次再放开。在直到 LED2 常亮为止这段时间内,
双足机器人必须保持想设置初始姿势的状态。LED2 常亮说明初始状态设置完成。
备注,如在上电或复位键按下后 1秒内没有按 S2 键,将跳过初始姿势设置。
If used for the first time or want to delete all saved motion, to set robot’s initial position, Please
press the S2 button after power on or press the reset button within 1 second, until the LED2 fla
sh one time. The time of between start works to LED2 normally on, biped robot must keep the
position to set up initial motion. LED2 normally on is mean that the initial state set up complete.
Note. If after power on or press reset button no press S2 key within 1 second, will skip the initi
al position setting.
Yes
S1
Press
Perform Motion
No
No
Yes
Program Motion by Hand
S2
Press
S1
Press
Save Current Motion
Yes
No
LED2_ON
LED1_Flash
LED2_OFF
LED2_Flash
LED1_ON
LED1_OFF
LED2_ON

18 /18
用手扳动姿势 Program Motion by Hand
当 LED2 常亮时,按下 S1 键让 LED2 灭同时 LED1 闪烁,此时即进入用手扳动双足机器人姿势
状态,所有舵机没有扭力输出,可以用手任意扳动各个关节来设置自己想要的姿势。
备注,为了让动作的连续性,请不要设置两个姿势之间的关节移动角度太大。
When LED2 normally on, press the S1 button to let LED2 off and LED1 flashing, at this time ca
n to set biped robot motion by hand, all SCServo torque output off, can be arbitrary flipping in bi
ped robot’s degree of freedom by hand to set up the position you want.
Note. In order to let the continuity of action, please do not set up movement angle too big what
between the two positions of joint.
保存当前姿势 Save Current Motion
当前姿势需要保存在 EEPROM 时,按下 S2 键此时 LED1 常亮 LED2 闪烁一次,完成保存返回
编程状态 LED1 闪烁 LED2 灭。
When current motion need to be saved into EEPROM, please press S2 button at this time LED1
normally on LED2 flashing one time, complete store return programming state LED1 flashing an
d LED2 off.
循环执行各种姿势 Perform Motion
当上电后没有进入初始姿势设置或完成后,LED1 灭LED2 常亮,双足机器人将会
循环执行保存在 EEPROM 里各种姿势。如果处于用手扳动姿势状态时,按住 S1 直
到LED1 灭LED2 常亮松开,则退出编程进行循环执行各种姿势,所有舵机恢复扭力
输出。
After power on, if no enter or completed program start motion, LED1 off and LED2 normally on,
bipedal robot will cyclically to action motions saved in the EEPROM. If Biped robot works at Pro
gram Motion by Hand, please press S1 until LED1 off and LED2 normally on, Biped robot will
exit programming and to start to perform motion, all SCServo will recovery torque output.
This manual suits for next models
1
Table of contents


