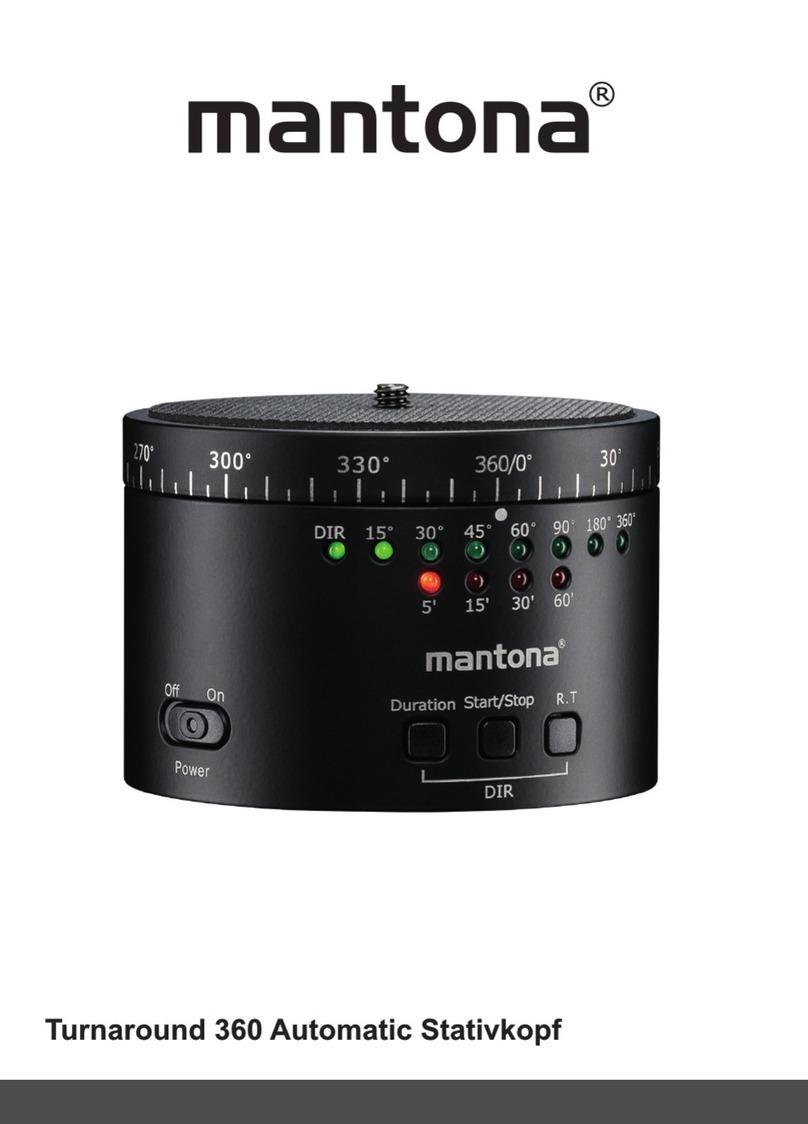
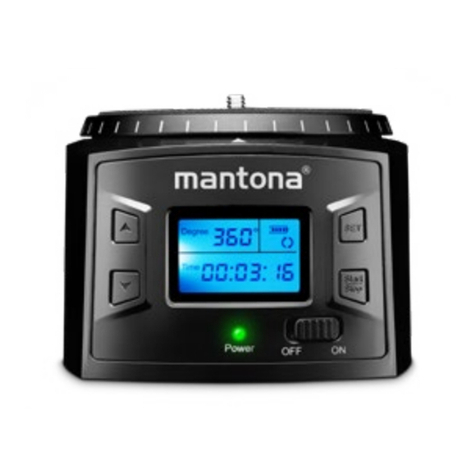
mantona Turnaround 360 User manual

Turnaround 360 Automatic Stativkopf Rev. 2
WALSER GmbH & Co. KG
Gewerbering 26
86666 Burgheim
Tel: +49 8432 9489-0
Fax: +49 8432 9489-8333
Germany
www.mantona.de
EN Made in China
ES Fabricado en China
IT Fabbricato in China
2/2017

1. So verstehen Sie diese Gebrauchsanleitung richtig ..........................3
1.1 Kennzeichnungen am Gerät..................................................................................................3
1.2 Kennzeichnungen in dieser Gebrauchsanleitung...............................................................3
2. Wichtige Sicherheitsinformation ..........................................................4
3. Gerät auspacken und prüfen.................................................................5
4. Übersicht über Bestandteile und Bedienelemente .............................6
4.1 Übersicht über die Geräteteile ..............................................................................................6
4.2 Kurzbedienungsanleitung .....................................................................................................7
5. Gerät für den Einsatz vorbereiten.........................................................8
5.1 Akku laden ..............................................................................................................................8
5.2 Einsatz Stativkopf auf Stativ (optional)................................................................................8
5.3 Montage des Aufnahmegerätes (optional)...........................................................................9
5.4.Gerät einschalten /ausschalten ............................................................................................9
6. Gerät einstellen/bedienen.....................................................................9
6.1 Gerät einschalten ...................................................................................................................9
6.2 Rotationswinkel einstellen ....................................................................................................9
6.3 Rotationszeit einstellen .......................................................................................................10
6.4 Drehrichtung festlegen........................................................................................................10
6.5 Vorgang starten....................................................................................................................10
6.6 Vorgang abbrechen..............................................................................................................10
7. Gerät instand halten.............................................................................11
8. Probleme beheben ...............................................................................11
8.1 Gerät regelmäßig prüfen und warten .................................................................................12
8.2 Gerät reinigen.......................................................................................................................12
9. Zubehör und Optionen.........................................................................12
10.Entsorgung und Umweltschutz ..........................................................12
11.Technische Daten.................................................................................13
1. Understanding these instructions for use correctly.........................15
1.1 Markings on the device........................................................................................................15
1.2Identicationsintheseinstructionsforuse......................................................................15
2. Important safety information...............................................................16
3. Unpack and check the device .............................................................17
4. Summary of components and control elements ...............................18
4.1 Summary of the device parts ..............................................................................................18
4.2 Short user instructions........................................................................................................19
5. Operating the device............................................................................20
5.1 Charging the battery ............................................................................................................20
5.2 Place the tripod head on the tripod (optional)...................................................................20
5.3 Mounting the recording device (optional)..........................................................................21
5.4 Switching device on/off .......................................................................................................21
6. Adjusting/operating the device..........................................................21
6.1 Switch on the device............................................................................................................21
6.2 Adjusting the rotation angle................................................................................................21
6.3 Adjusting the rotation time..................................................................................................22
6.4 Setting the rotation direction ..............................................................................................22
6.5 Starting the process.............................................................................................................22
6.6 Stopping the process...........................................................................................................22
7. Maintaining the device.........................................................................23
8. Troubleshooting ...................................................................................23
8.1 Check and service the device at regular intervals............................................................24
8.2 Clean the device...................................................................................................................24
9. Accessories and options.....................................................................24
10.Waste disposal and protection of the environment..........................24
11.Technicalspecications ......................................................................25
Inhaltsverzeichnis Table of Contents

2 3
Gebrauchsanleitung
Wir danken Ihnen für Ihr Vertrauen und wünschen Ihnen viel Freude und Erfolg
mit Ihrem Turnaround 360° Automatic Stativkopf Rev.2.
Die mantona Produktserie wurde speziell für den ambitionierten Einsteiger und
für den professionellen Anwender entwickelt. Der Turnaround 360° Automatic Stativ-
kopf eignet sich u. a. hervorragend für die Verwendung mit Smartphones, Action Cams
und Foto-und Videokameras bis 2 kg.
Ihr Gerät verfügt über folgende Hauptmerkmale:
■Einfache Bedienung
■Leiser, ruhiger und präzise gesteuerter Elektromotor
■Geschwindigkeits- und Rotationseinstellungen
■1200mAh Lithiumakku mit bis zu 6 Std. Betriebsdauer
■Universell Einsetzbar: Stand Alone, Montage auf Stativ oder Stativkopf
■Lesen Sie diese Gebrauchsanleitung sorgfältig durch, bevor Sie Ihr neues Gerät
das erste Mal benutzen. Sie enthält alles, was Sie wissen müssen, damit Sie
Personen- und Sachschäden vermeiden.
■Beachten Sie alle Sicherheitshinweise in dieser Gebrauchsanleitung sorgfältig.
■Bewahren Sie diese Gebrauchsanleitung sorgfältig auf. Geben Sie diese Ge-
brauchsanleitung an den neuen Besitzer weiter, wenn Sie das Gerät verkaufen
oder anderweitig überlassen.
1. So verstehen Sie diese Gebrauchsanleitung richtig
1.1 Kennzeichnungen am Gerät
Dieses Zeichen bedeutet, dass Ihr Gerät die Sicherheitsanforderungen
aller anwendbaren EU-Richtlinien erfüllt.
Entsorgung und Umweltschutz
Elektrische und elektronische Geräte sowie Batterien dürfen nicht mit dem
Hausmüll entsorgt werden. Der Verbraucher ist gesetzlich Verpichtet,
elektrische und elektronische Geräte sowie Batterien am Ende Ihrer
Lebensdauer an den dafür eingerichteten, öffentlichen Sammelstellen
oder an die Verkaufsstelle zurückzugeben. Einzelheiten dazu regelt das
jeweilige Landesrecht. Das Symbol auf dem Produkt, der Gebrauchsan-
leitung oder der Verpackung weist auf diese Bestimmungen hin. Mit der
Wiederverwertung, der stofichen Verwertung oder anderen Formen der
Verwertung von Altgeräten/Batterien leisten Sie einen wichtigen Beitrag
zum Schutz unserer Umwelt.
1.2 Kennzeichnungen in dieser Gebrauchsanleitung
Kennzeichnung
Macht Sie auf die Handhabung und Auswirkung von Sicherheitsinformationen
aufmerksam.
WARNUNG
Macht Sie auf eine gefährliche Situation aufmerksam, die eine schwere Verletzung
oder den Tod nach sich ziehen kann, wenn sie nicht vermieden wird.
VORSICHT
Macht Sie auf eine gefährliche Situation aufmerksam, die eine leichte bis mittel-
schwere Verletzung nach sich ziehen kann, wenn sie nicht vermieden wird.
HINWEIS
Macht Sie auf mögliche Sachschäden und andere wichtige Informationen in Verbin-
dung mit Ihrem Gerät aufmerksam.

4 5
2. Wichtige Sicherheitsinformation
WARNUNG
Bruchgefahr
Achten Sie auf einen sicheren Halt der angebrachten Geräte und Equipment.
Kontrollieren Sie vor jeder Benutzung alle Verschlüsse, Schrauben und Befestigun-
gen. Alle montierten Teile müssen fest und sicher sitzen.
WARNUNG
Stromschlaggefahr und Brandgefahr durch Kurzschluss oder Fehlfunktion –
Netzteil oder Ladegerät
Ein Kurzschluss kann u. a. durch defekte Kabel und durch Feuchtigkeit oder Nässe
verursacht werden. Bei einem Kurzschluss können sich die Leitungsdrähte so stark
erwärmen, dass deren Isolierung schmilzt oder die Leitungsdrähte sogar durch-
schmelzen. Dadurch kann es zu einem Brand kommen.
■Betreiben Sie das Gerät nicht mit nassen
Händen oder Füßen.
■Reinigen Sie das Gerät nur auf die in dieser Gebrauchsanleitung angegebene
Weise.
■Achten Sie darauf, dass das Gerät nicht herunterfällt. Lassen Sie ein herun-
tergefallenes Gerät von einer Elektrofachkraft prüfen, bevor Sie es wieder
einschalten.
■Wenn das Gerät einmal beschädigt oder defekt sein sollte oder wenn Sie Sch-
morgeruch feststellen:
Öffnen Sie das Gerät nicht. Reparieren Sie das Gerät niemals selbst. Lassen Sie
das Gerät ausschließlich von einer Elektrofachkraft reparieren.
■Halten Sie das Gerät stets so instand, wie diese Gebrauchsanleitung es vor-
schreibt.
■Prüfen Sie die örtliche Stromversorgung mit den Anschlusswerten des Gerätes
Netzteil (siehe technische Daten).
Sollten die Anschlusswerte nicht übereinstimmen, wenden Sie sich bitte an
info@walser.de oder Tel. +49 84 32 / 9489-0.
WARNUNG
Erstickungsgefahr durch Kleinteile
Halten Sie das Gerät und die Verpackung von Kindern und Haustieren fern.
WARNUNG
Vorsichtsmaßnahmen bei der Verwendung mit dem Akku – im Gerät integriert
Bei unsachgemäßer Handhabung kann der Akku auslaufen oder explodieren.
Beachten Sie folgende Sicherheitshinweise:
■Öffnen Sie das Gerät nicht
■Legen Sie den Akku nicht in ein Feuer oder setzen Sie sie direkter Hitze aus.
■Schützen Sie das Gerät vor Nässe und Feuchtigkeit
■Sollte Akku-Flüssigkeit mit Haut oder Kleidung in Kontakt kommen, spülen Sie
diese sofort mit frischem Wasser ab.
■Lassen Sie das Gerät/ den Akku nicht unbeaufsichtigt laden, trennen Sie nach
vollständiger Auadung der Akkus das Netzteil von der Stromzufuhr, in dem Sie
den Netzstecker ziehen. Die vollständige Ladezeit beträgt 4 Stunden.
3. Gerät auspacken und prüfen
1.
Packen Sie den Lieferumfang vorsichtig aus
2. Prüfen Sie, ob der Lieferumfang vollständig vorhanden ist:
• Gerät
• Micro-USB Ladekabel
• Transport- und Aufbewahrungstasche
3. Prüfen Sie, ob der Lieferumfang unbeschädigt ist.
HINWEIS
Wenn der Lieferumfang unvollständig oder beschädigt ist, wenden Sie sich bitte an
info@walser.de oder an unsere telefonische Servicehotline unter der Nummer
+49 8432 9489-0.
HINWEIS
Im Zuge von Produktverbesserungen behalten wir uns technische und optische
Veränderungen vor. Abbildungen können ähnlich sein. Nicht Kennzeichnungspich-
tig nach RL 2010/30/EU – Speziell für Foto- und Videobedarf der Bildaufnahme
entwickelt.
HINWEIS
Bewahren Sie Originalverpackung für die spätere Lagerung und den Transport des
Gerätes auf.

6 7
4. Übersicht über Bestandteile und Bedienelemente
4.1 Übersicht über die Geräteteile
1. LED Anzeige Grad/Rotationsradius
2. LED Anzeige Rotationsdauer/Zeit
3. LED Anzeige Drehrichtung
4. Einstellknopf Grad/Rotationsradius
5. Einstellknopf Rotationsdauer/Zeit
6. Start/Stopp Knopf
7. Drehrichtungsauswahl DIR (Direction)
8. Micro USB-Port (Ladeanschluss)
9. Anzeige Batterieladestatus
10. AN/AUS Schalter
11. 1/4 Zoll Anschlussgewinde auf der Stativkopfoberseite
12. Anschlussgewinde auf der Stativkopfunterseite (1/4 Zoll und 3/8 Zoll per Entfer-
nung des Gewindeadapters)
13. Micro USB-Ladekabel
4.2 Kurzbedienungsanleitung
HINWEIS
Die detaillierte Anleitung zu den nachfolgenden Tätigkeiten nden Sie in den
jeweiligen Abschnitten dieser Gebrauchsanleitung.
Halten Sie bei der ersten Inbetriebnahme die Reihenfolge der nachfolgenden
Tätigkeiten ein, um Schäden am Gerät zu vermeiden.
WARNUNG
Beachten Sie bei allen Tätigkeiten die Sicherheitshinweise in den jeweiligen
Abschnitten.
1. Akku lade/Akkuladestatusanzeige
2. Gerät auf Stativ montieren
3. Montage des Aufnahmegerätes
4. Gerät ein-/ausschalten
5. Rotationswinkel einstellen
6. Rotationszeit einstellen
7. Drehrichtung festlegen
8. Vorgang starten
9. Vorgang anhalten
HINWEIS
Bitte beachten Sie, das wir für die Ladung des intern verbauten Akkus des Gerätes
ein USB Ladegerät mit mindestens 5V/1A (5V/1000mA) Ladestromleistung emp-
fehlen. Bei schwächeren Ladegeräten kann es ansonsten unter Umständen zu
Problemen beim Ladevorgang kommen.

8 9
Stellen Sie sicher, dass das Stativ mit dem montierten Gerät kippsicher und rutschfest
steht. Achten Sie auf einen sicheren und festen Halt Ihres Gerätes und dem benutzten
Equipment.
5.3 Montage des Aufnahmegerätes (optional)
Schrauben Sie Ihr Aufnahmegerät mit dem 1/4 Zoll Anschlussgewinde auf den Turna-
round 360° Automatic Kopf.
VORSICHT
Achten Sie auf die maximale Belastbarkeit des Turnaround Kopfes. Siehe Techni-
sche Daten. Achten Sie auf einen sicheren und festen Halt Ihres Gerätes und dem
benutzten Equipment.
5.4. Gerät einschalten/ ausschalten
Einschalten:
1. Schalten Sie das Gerät mit dem ON/OFF Schalter auf „ON“ ein.
2. LED Rotationswinkel 15° und LED Rotationszeit 5 Min. leuchtet.
3. Gerät ist betriebsbereit
Ausschalten:
1. Hauptschalter auf „Off“ stellen.
2. Alle LED`s gehen aus.
6. Gerät einstellen/bedienen
6.1 Gerät einschalten
Siehe Gerät einschalten, ausschalten.
6.2 Rotationswinkel einstellen
1. Drücken Sie je nach Bedarf mehrmals auf
den Bedienknopf „Duration“. (15°-360°)
2. Die entsprechende LED leuchtet.
5. Gerät für den Einsatz vorbereiten
5.1 Akku laden
• Stecken Sie das USB-Kabel in die Buchse des
Gerätes und anschließend das andere Ende in
die Stromversorgung DC 5V/1A.
• Das Gerät beginnt mit dem Ladevorgang. Ein
aktiver Ladevorgang wird durch eine rot leucht-
ende LED angezeigt.
Bei zu schwacher Akkuleistung beginnen die vier
LEDs der Rotationsanzeige zu blinken. Laden Sie
zeitnah den Akku auf, um eine Tiefenentladung
des Akkus zu verhindern.Der Stativkopf kann bei
entladenem Akku auch während einer Auadung
z.B. durch eine Powerbank genutzt werden.
5.2 Einsatz Stativkopf auf Stativ (optional)
1. Den Turnaround Stativkopf per 3/8 oder 1/4 Zoll
Gewindeanschluss festschrauben.
2. Entfernen Sie für die Nutzung des 3/8 Zoll
Anschlusses den eingesetzten 3/8 auf 1/4 Zoll
Gewindeadapter mit einem geeigneten Werk-
zeug (Schraubenzieher).
HINWEIS
• Verwenden Sie nur das mitgelieferte Kabel,
schalten Sie das Gerät zum Laden aus
• Achten Sie auf einen sicheren Halt Ihrer
Geräte
• Montieren Sie das Gerät nur auf einem Stativ,
das für Gewicht und Abmessungen des Ge-
räts ausgelegt ist. Siehe Technische Daten.

10 11
- Zur schnellstmöglichen Drehung stellen Sie bitte den Rotationswinkel auf 360° und
die Rotationsdauer auf 5 Minuten ein.
- Beim Erreichen der gewünschten Markierung den Rotationsvorgang abbrechen
-
Für einen neuen Rotationsvorgang entsprechende Betriebsparameter neu einstellen
- Rotationsvorgang neu starten.
Beachten Sie bei der Nutzung des Stativkopfes die zulässigen Werte für die maxi-
male Belastbarkeit (siehe Abschnitt 12. Technische Daten).
Bei der Nutzung des Stativkopfes ist auf eine möglichst zentrale Gewichtsplatzie-
rung des befestigten Equipments zu achten.
7. Gerät instand halten
1. Gerät ausschalten. Siehe Gerät einschalten, ausschalten.
2. Kamere / Equipment evtl. Verbindungskabel demontieren.
3. Gerät ggf. reinigen. Siehe Gerät reinigen.
4. Gerät in die Originalverpackung legen und entsprechend den Vorgaben in den Tech-
nischen Daten transportieren oder lagern. Siehe Technische Daten.
8. Probleme beheben
Problem Reinigung Abhilfe
Gerät ist einge-
schaltet, zeigt aber
keine Funktion
Akku nicht ausreichend
geladen
Akku laden
Gerät defekt Kontaktieren Sie den Hersteller
Gerät ist herunter-
gefallen
Sturz (Gefahr der Akku-
schädigung)
Elektrofachkraft prüfen lassen
6.3 Rotationszeit einstellen
1. Drücken Sie den „R.T.“ (Rotation Time) Bedienknopf
mehrmals, bis die LED der gewünschten Zeit leuchtet
(5-60 Min.) Hinweis: Eine schnelle Drehung des Panora-
makopfes erreichen Sie durch die Einstellung eines
hohen Wertes für den Drehwinkel (z.B. 360°), kom-
biniert mit einer kurzen Laufzeit von z.B. 5 Minuten.
6.4 Drehrichtung festlegen
1. Drücken sie gleichzeitig den Bedienknopf „Duration“
und „R.T.“, um die Drehrichtung festzulegen.
2. Die erste LED (DIR) der oberen Reihe signalisiert die
eingestellte Drehrichtung.
DIR LED leuchtet – Drehung im Uhrzeigersinn
DIR LED leuchtet nicht - Drehung gegen den Uhrzeigersinn
6.5 Vorgang starten
Drücken Sie den Start-/ Stop-Bedienknopf, um den
Vorgang zu starten.
6.6 Vorgang abbrechen
Durch weiteres drücken des Start/Stop Bedienknopfes
wird der Vorgang abgebrochen.
HINWEIS
Nach dem Abbrechen des Rotationsvorganges beginnt bei einem erneuten Start der
Rotationsprozess komplett neu entsprechend der angezeigten Parameter.
Der Stativkopf darf keinesfalls manuell gedreht werden – dies führt zu einer
Beschädigung der verbauten Mechanik.
So erreichen Sie schnellstmöglich die gewünschte Grad Markierung (z.B. 360°/0)
- Rotationsvorgang durch Drücken von Start/Stop anhalten falls noch nicht erfolgt.
- Ermitteln des geringsten Rotationsweges bis zur gewünschten Gradmarkierung.
- Einstellen der passenden Drehrichtung im oder gegen den Uhrzeigersinn.
- Den Stativkopf elektrisch betrieben in die gewünschte Richtung rotieren lassen.

12 13
8.1 Gerät regelmäßig prüfen und warten
Was müssen Sie tun? Vor jedem Einsatz Nach Bedarf
Beschädigung:
Lassen Sie das Gerät durch
eine Elektrofachkraft prüfen.
X
8.2 Gerät reinigen
WARNUNG
Stromschlaggefahr / Brandgefahr (Akku)
Verwenden Sie ausschließlich die angegebenen Reinigungsmittel.
Bringen Sie das Gerät niemals mit Feuchtigkeit oder Wasser in Berührung.
Reinigen
Gerätteil Reinigung
Gehäuse
Leichte und hartnäckige Verschmutzungen mit trockenem
Microfasertuch beseitigen.
9. Zubehör und Optionen
In unserem Webshop nden Sie umfangreiches Zubehör zu Ihrem mantona Turna-
round 360 Automatic Stativkopf Rev.2.
10. Entsorgung und Umweltschutz
Entsorgen Sie das Gerät bei einer gesetzlich vorgeschriebenen Rücknahmestelle
wie z.B: beim Hersteller, Elektrofachmärkten oder örtlichen Entsorgungsstellen.
Dieser Service ist für Sie kostenlos.
11. Technische Daten
Im Gerät verbauter Akku Li-Polymer - 1200mAh
Stromversorgung, Ladespannung Micro-USB Port, Input DC 5V/1A
Akkuladezeit ca. 8. Std.
Stand-by-Zeit ca. 50 Std.
Betriebsdauer ca. 4-6 Std.
Gewicht Stativkopf ca. 505g
Maße 67 x 90 x 90mm
Max. Belastbarkeit 2kg
Max. Belastbarkeit 30° Neigung 2kg
Max. Belastbarkeit vertikal 1,5kg
Max. Belastbarkeit hängend
kopfüber 1,5kg
Zulässige Betriebsbedingung -10° C bis + 45° C
Lagerbedingungen Trocken und staubfrei bei -20 °C bis +50 °C

14 15
1. Understanding these instructions for use correctly
1.1 Markings on the device
This symbol indicates, that your device meets the safety requirements of
all applicable EU-directives.
Waste disposal and protection of the environment
Electric and electronic appliances as well as batteries must not be
disposed of together with domestic waste. The user is legally obliged to
return electric and electronic appliances as well as batteries to specially
set up public collecting points or the sales outlet once they have reached
the end of their service life. Details are regulated by national law. The
symbol on the product, the instructions for use or the packaging refers
to these provisions. The recycling, the material-sensitive recycling or
any other form of recycling of waste equipment/ batteries is an important
contribution to the protection of our environment.
1.2 Identicationsintheseinstructionsforuse
Identication
Draws your attention to the dealing with and the effect of safety information.
WARNING
Draws you attention to a dangerous situation, which can result in severe or even
fatal injury, if not avoided.
CAUTION
Indicates a hazardous situation, which,
if not avoided, may result in minor or
moderate injury.
NOTE
Draws your attention to possible material damage and other important information in
connection with your equipment.
Thank you for your condence in us. We hope you enjoy using your new Turnaround
360° automatic tripod head Rev.2.
This mantona product series was specially developed for both ambitious beginners
and for professionals. The Turnaround 360° automatic tripod head is suited, among
other things, perfectly for use with smartphones, action cams and photo and video
cameras weighing up to 2 kg.
Your equipment has the following features:
■Easy to use
■Quieter and more precisely controlled electronic motor
■Speed and rotation adjustments
■1,200mAh lithium battery with an autonomy of up to 6 hours
■Can be used for all purposes: stand alone, assembled on tripod or tripod head
■Please read these instructions for use thoroughly before you use this new equip-
ment for the rst time. It contains everything you need to know in order to avoid
damage to persons or property.
■Strictly follow all notes on safety in these instructions for use.
■Keep these instructions for use in a safe place. If you sell your equip-ment or
pass it on to someone else, you should also pass on these instructions for use.
Instruction Manual

16 17
2. Important safety information
WARNING
Risk of breakage
Ensure secure hold of the attached devices and equipment. Before each use check
all locks, screws and fastening elements. All mounted parts must be tight and
securely tted.
WARNING
Dangerofelectricshock,rethroughshort-circuit–Powersupplyunitor
charger
A short-circuit could be caused through defect cables and through humidity or
moisture. A short-circuit can warm up the conductors, so that there isolation will melt
or even melt thoroughly. This could lead to re.
■Don´t operate the device with wet hands or feet.
■Please only follow this instruction.
manual for cleaning your device.
■Prevent your device for falling-off. In case of falling-off, please let an electrician
check the device before switching on again.
■If your device should be damaged or defect or if you notice a burning smell:
Don´t open the device. Never repair the device on your own. The device should
only be repaired by electricians.
■Please follow this instruction manual for maintaining your device.
■Check whether the local power supply corresponds with the connecting values
of the power supply unit (see technical data). Should the connection values not
match, please contact info@walser.de or phone +49 8432 9489-0.
WARNING
Danger of suffocation caused by small parts
Keep the device out of the reach of children and pets.
WARNING
Precautions when using with rechargeable battery – integrated in device
These can run out or explode, if inappropriately handled. Please observe the follo-
wing safety notes:
■Do not open the device.
■Do not lay rechargeable battery into re or expose these to direct heat.
■Protect the unit/powerpack against wetness and moisture.
■If battery uid has come into contact with skin or clothes, ush it off immediately
with fresh water.
■Do not leave the powerpacks unattended when charging, after successful char-
ging disconnect the powerpacks from the power supply by simply pulling out the
mains plug. The total charging time is 4 hours.
3. Unpack and check the device
1. Carefully unpack the scope of delivery.
2. Check whether the scope of delivery is complete:
• Device
• Micro USB charging cable
• Includes transport and storage bag
3. Check whether the scope of delivery is free of damage.
NOTE
If the scope of delivery is incomplete or damaged, please contact info@walser.de
or
call our service hotline under the number +49 8432 9489-0.
NOTE
Within the scope of product improvements we reserve the right for technical and
optical changes. Illustrations may differ slightly. Labelling as per DIR 2010/30/EU is
not obligatory – specially developed for photo and video requirements.
NOTE
Keep the original packaging for storing and carrying the device.

18 19
4. Summary of components and control elements
4.1 Summary of the device parts
1. LED display of degree/rotation radius
2. LED display of rotation duration/time
3. LED display of rotation direction
4. Adjustment knob for degree/rotation radius
5. Adjustment knob for rotation duration/time
6. Start/stop knob
7. Rotation direction selection DIR (direction)
8. Micro USB port (charging connector)
9. Display of battery charge status
10. ON/OFF switch
11. 1/4-inch connector thread on the top of the tripod head
12. Connector thread on the bottom of the tripod head (1/4-inch and 3/8-inch by remo-
ving the thread adapter)
13. Micro USB charging cable
4.2 Short user instructions
Note
Detailed instructions for the following activities can be found in the relevant sections
of these instructions.
Strictly follow the sequence of the following stages when using the device for the
rst time to prevent damaging it.
WARNING
Whatever you do, pay attention to the safety notes in the corresponding paragraphs.
1. Charging battery / battery charge status
2. Mounting the device on a tripod
3. Attaching a recording device
4. Switching device On / Off
5. Adjusting the rotation angle
6. Adjusting the rotation time
7. Setting the rotation direction
8. Starting process
9. Stopping process
Note
Please note that we recommend a USB charger with a charging current of at least
5V / 1A (5V / 1000mA) for charging the internally installed battery of the device. In
the case of use of weaker chargers, problems may occur.

20 21
5.3 Mounting the recording device (optional)
Screw your recording device with the 1/4-inch connection thread on to the Turnaround
360° automatic head.
CAUTION
Check the maximum load-bearing capacity of the Turnaround head. See Technical
Data. Ensure the device and the equipment used are secure and stable.
5.4 Switching device on/off
Switching on:
1. Switch the device on using the ON/OFF button.
2. The LED rotation angle of 15° and the LED rotation time of 5 minutes will light up.
3. The device is ready for use
Switching off:
1. Place the main switch in the “OFF” position.
2. All LEDs will go off.
6. Adjusting/operating the device
6.1 Switch on the device
See Switching device on/off.
6.2 Adjusting the rotation angle
1. Press the operating knob the required number
of times to adjust the “duration” (15° - 360°).
2. The corresponding LED will light up.
5. Operating the device
5.1 Charging the battery
• Insert the USB cable into the jack of the device
and then into the DC 5V/1A power supply.
• The device will start charging. When charging is
taking place, a red LED will light up.
If the battery output is too low, the 4 LEDs of the
rotation display will start to ash.Charge the battery
immediately to prevent the battery level dropping too
far.The tripod head may be used with a power bank if
the battery charge is low, even while charging up.
5.2 Place the tripod head on the tripod (optional)
1. Screw the Turnaround tripod head with the 3/8 or
1/4-inch thread connector.
2. Remove the thread adapter with an appropriate
tool (screwdriver) to use the 3/8-inch connector.
Note
• Only use the cable provided. Switch the device
off for charging.
• Ensure your devices are securely locked into
place.
• Only mount the device on a tripod that has been
designed for the weight and dimensions of the
device. See Technical Data.
Ensure that the tripod is standing rmly with the
mounted device so that it will not tip over or slip. En-
sure the device and the equipment used are secure
and stable.

22 23
- For the fastest possible rotation, adjust the rotation angle to 360° and the duration
to 5 minutes.
- When the desired marking is reached, stop the rotation process.
- To start another rotation process, reset the corresponding operating parameters.
- Start the rotation process again.
When using the tripod head, make sure you are keeping to permitted values for
maximum load-bearing capacity (see section 12. Technical specications)
When using the tripod head, make sure the mounted equipment is placed as cent-
rally as possible.
7. Maintaining the device
1. Switch off the device. See „Switching device on/off“.
2. Remove the camera/equipment and possibly, the connector cable
3. Clean the device if necessary See cleaning the device.
4. Lay the device in the original packaging and store as specied in the technical
specications. See Technical Data.
8. Troubleshooting
Problem Cleaning Remedy
The device is
switched on, but
does not show any
function.
Battery not sufciently
charged
Charge battery
Device defective Contact the manufacturer
Device has fallen/
been dropped
Fall (risk of battery
damage)
Have the device checked by an
electrician
6.3 Adjusting the rotation time
Press the “R.T.” (rotation time) button several times until the
LED for the desired time lights up (5 - 60 minutes)
Note: You can achieve a faster rotation of the panorama
head by setting a higher value for the rotation angle (e.g.
360°), combined with a shorter run time of, for example, 5
minutes.
6.4 Setting the rotation direction
1. Press the “duration” and “R.T.” button at the same time to
set the rotation direction.
2. The rst LED (DIR) in the rst row indicates the set rotati-
on direction.
DIR LED lights up - clockwise rotation.
DIR LED does not light up - anticlockwise rotation.
6.5 Starting the process
Press the start/stop button to start the process
6.6 Stopping the process
Press the start/stop button to stop the process.
Note
After stopping the rotation process, the rotation process will start over again with the
displayed parameters.
The tripod head must under no circumstances be twisted – this can damage
the internal mechanics.
How to achieve the desired degree marking (e.g. 360°/0) as quickly as possible
- Stop the rotation process by pressing the start/stop button if not already done.
- Determine the lowest rotation movement up to the desired degree marking.
- Set the rotation direction to clockwise or anticlockwise as required.
- Operate the tripod head electrically and make it rotate in the desired direction.

24 25
8.1 Check and service the device at regular intervals
What should I do before using the device? As needed
Damage:
Have the device checked by
a professional electrician.
X
8.2 Clean the device
WARNING
Electricshockhazard/rerisk(battery)
Use only the specied cleaning agents.
Do not bring the device into contact with moisture or water.
Cleaning
Device part Cleaning
Housing
Remove light and stubborn dirt with a dry micro-bre cloth
9. Accessories and options
You nd the best accessories for your device in our web shop: www.foto-walser.de.
10. Waste disposal and protection of the environment
Dispose of the device at a legally specied collection point, such as with the manufac-
turer, electronics brands or at a local disposal depot. This service is free of charge.
11.Technicalspecications
Battery built into the device Li-Polymer - 1,200mAh
Power supply, charging voltage Micro USB port, input DC 5V/1A
Powerpack charge time approx. 8 hours
Standby time approx. 50 hours
Operating time approx. 4 - 6 hours
Weight of tripod head approx. 505g
Dimensions 67 x 90 x 90mm
Max. load bearing capacity 2kg
Max. load bearing capacity at 30° angle 2kg
Max. load-bearing capacity when vertical 1.5kg
Max. load-bearing capacity when han-
ging overhead 1.5kg
Permitted Operation Temperature -10° C to + 45° C
Storage Conditions Dry and dust-free at -20 °C to +50 °C
Table of contents
Languages:
Other mantona Camera Accessories manuals