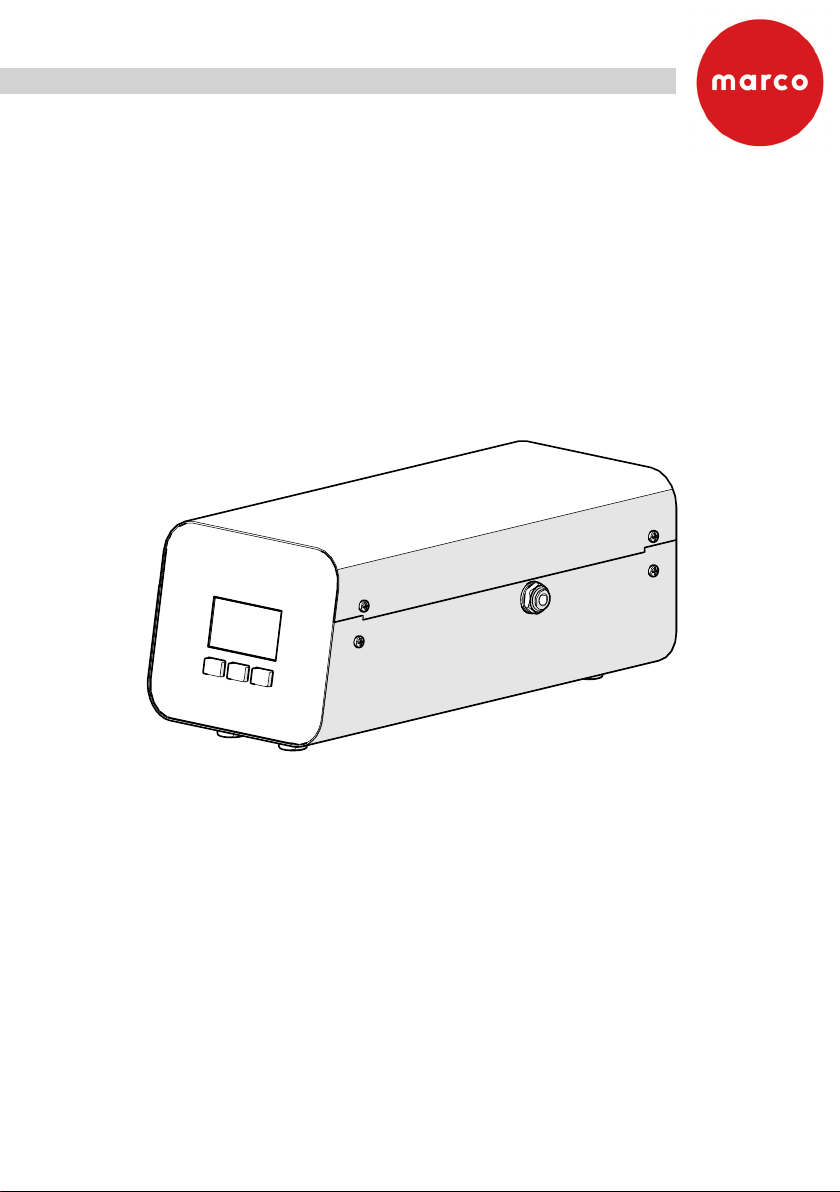
manuals.online logo
Brands
  1. Home
  2. •
  3. Brands
  4. •
  5. Marco
  6. •
  7. Dispenser
  8. •
  9. Marco POUR'D User manual

Marco POUR'D User manual

1
Instruction Manual: 1900089
Machine P/N: 1000940 POUR’D
Control Box
2
Contents
1. FontBoxContents................................................................................................2
2.Connections........................................................................................................3
3. Connecting to BIB...............................................................................................3
4. Installation.........................................................................................................6
POUR’D 3 Button font (Hot/Cold water, cold concentrate, concentrate shot)...........6
POUR’D 3 Button font (Hot/CHILLED water, cold concentrate, concentrate shot).......7
POUR’D 3 Button/ 1 button font (3 volumes or ratios) ..............................................8
POUR’D 3 Button font Ready to drink (3 volumes)....................................................10
POUR’D 1b Font (Concentrate or Ready to drink) ................................................... 10
POUR’D 3 Button/ 1 button font (multiple source)...................................................11
5. Engineering Setup & Calibration.........................................................................14
6. Changing buttons..............................................................................................15
7. Cleaning............................................................................................................16
8. Font Operation...................................................................................................17
Compatable with:
• Any POUR’D Font variation
• UNA font
• Control Box 1000940
• IEC power cable
• Inlet hose
• FRIIA chiller connector 3/4” to pushfit elbow 1400829
• Soft tubing for BIB connector (1m) 1800521
• Din connector cable 1501180
• SCHOLLE BIB connector 2100044
• VITOP BIB connector 2100043
• 5/16 to 3/8 barbed connector for BIB connector 1400773
• 2 x hard Concentrate 1/4” tube 1860372
• Instruction manual
Box Contents
3
IEC Power
cable
Beverage tube to
font (1/4”)
Cold water to font
Make sure rubber feet are only points of contact with
bottom surface.
Mains water to control box
if using chiller add chiller connector here
(3/4” to pushfit elbow) and connect to chiller output.
Connect to boiler
Connections
Connect to font
or another control box
(if applicable)
Beverage tube to
beverage source
5/16 to 3/8 barbed
connector for soft
tubing to BIB)
VITOP BIB connector
Remove red plastic
seal from tap
This equipment must be installed with adequate backflow protection to
comply with all applicable federal, state and local codes.
4
Introduction
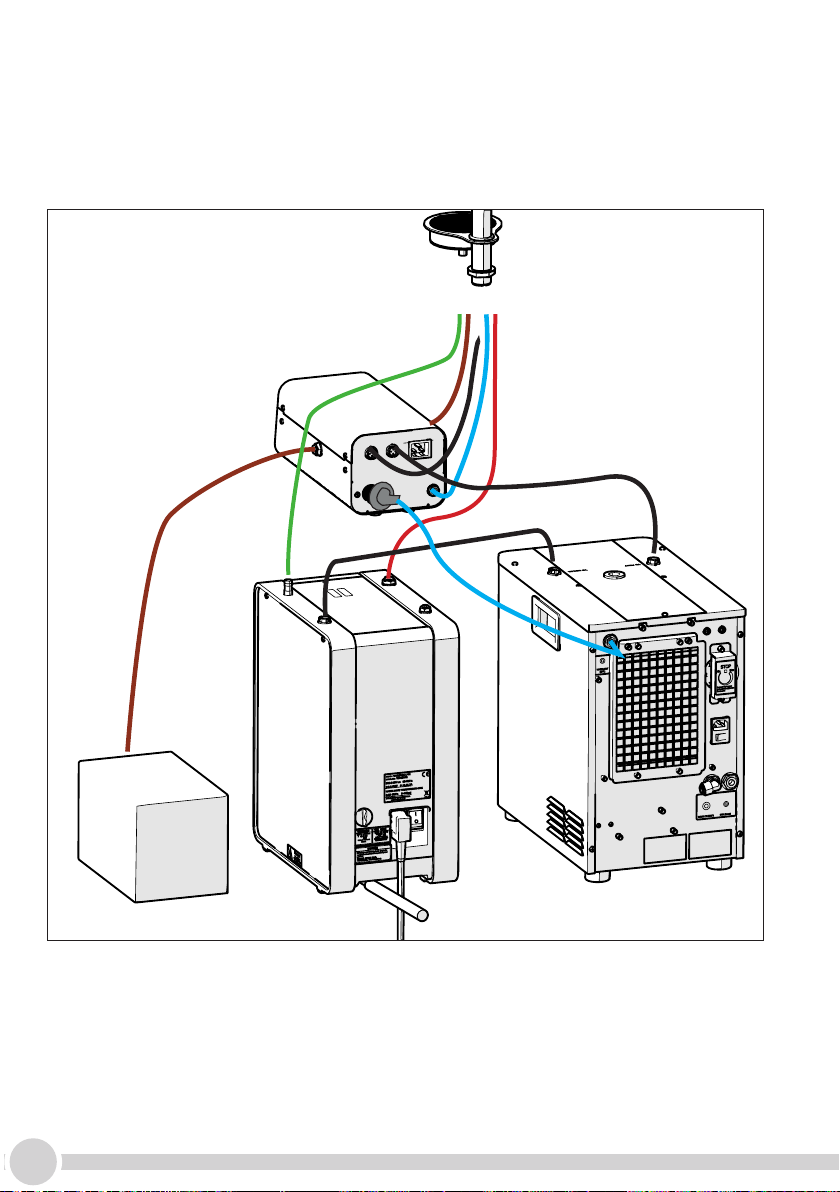
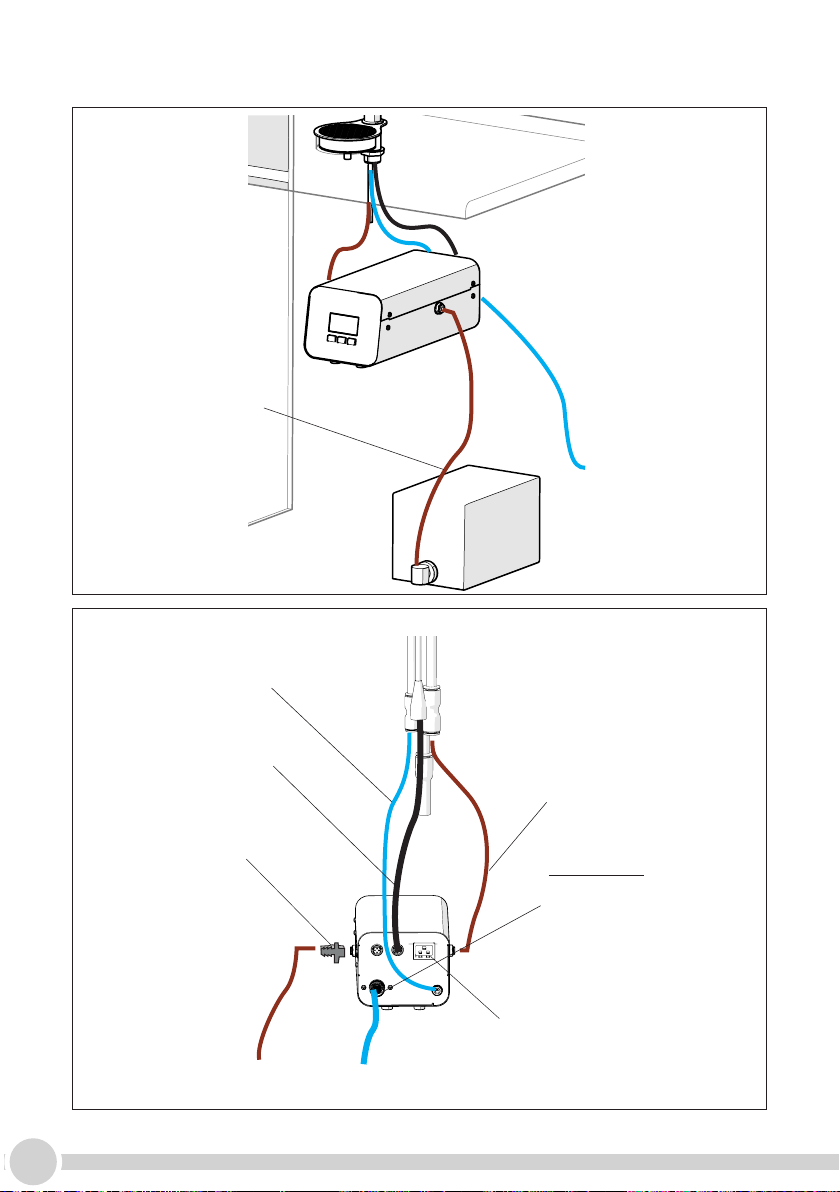
The information provided in this manual is intended to assist in the installation and
maintenance of the POUR’D Control Box. Please read the instructions carefully to prevent
accidents and ensure an efficient installation. This manual is not a substitute for any safety
instructions or technical data affixed to the machine or its packaging. All information in
this manual is current at the time of publication and is subject to change without notice.
The company accepts no responsibility for any damage or injury caused by incorrect or
unreasonable installation and operation.
Safety
When using electrical appliances, basic safety precautions should always be followed to
prevent
the risk of fire, electric shock, burns, or other injuries or damages.
• Read all operating and safety instructions carefully.
• This appliance is suitable for indoor use only.
• This appliance must be placed/installed on a horizontal flat stable surface.
• The ambient temperatures this appliance should operate within are 5 °C - 35 °C.
• Do not store the appliance in ambient temperature lower than 5 °C.
• This appliance is designed for use in commercial or self serve areas in which it can be
attended to by trained personnel.
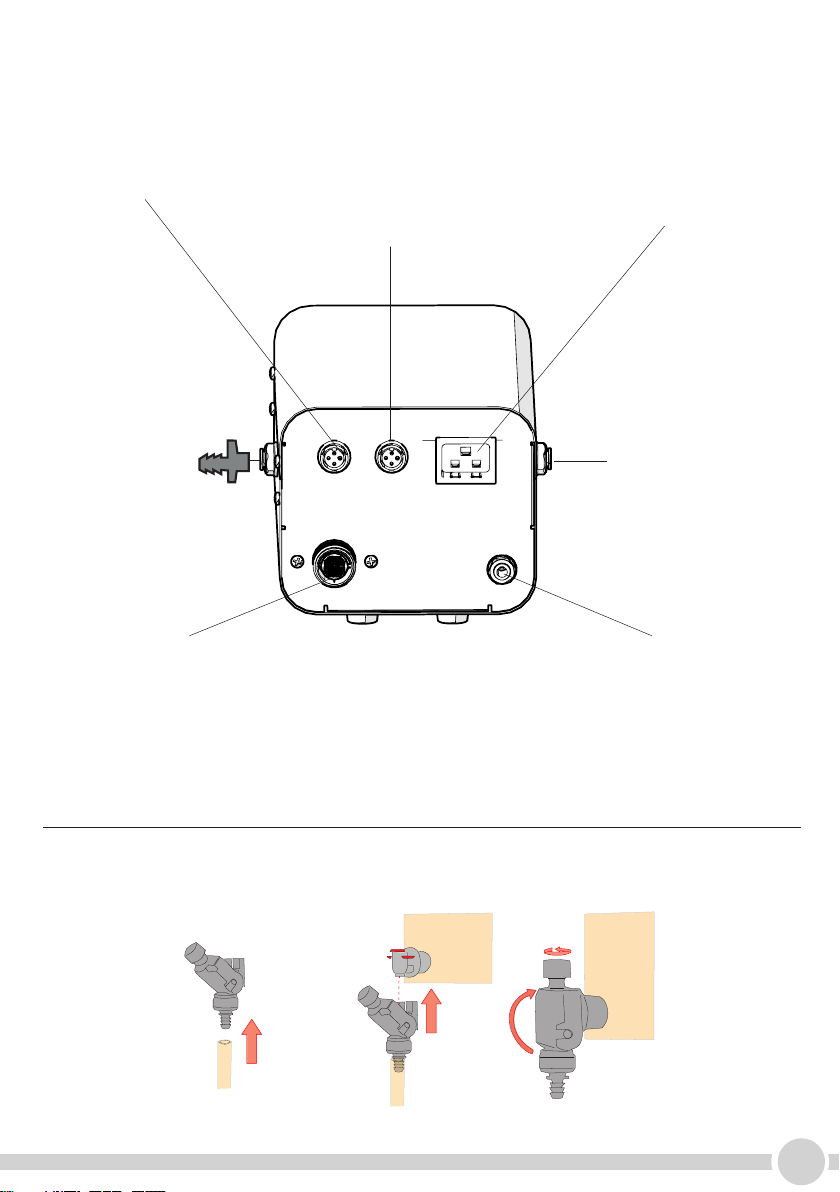
• The hose supplied with the machine is non-toxic food quality tested to 130kPa (190psi).
However, a hose is not a permanent connection. It is, therefore, advisable to switch off
machine and close the stopcock valve when machine is not in use, e.g. overnight etc.
• If a non-fixed water connection is implemented, use only the water hose provided with the
appliance, alternatively, if a fixed water connection is used it must be implemented using a
non-detachable water hose.
• If the water hose is disconnected the seals should be replaced before re-connection.
• The utmost care has been taken in the manufacture and testing of this machine. Failure to
install, maintain and / or operate this machine according to the manufacturer’s instructions
may result in conditions that can cause injury or damage to property. If in any doubt about
the serviceability of the machine always contact the manufacturer or your own supplier for
advice.
• This machine is not intended for use by persons (including children) with reduced physical,
sensory, or mental capabilities, or lack of experience and knowledge, unless they have been
given supervision or instruction concerning use of the machine by a person responsible for
their safety.
• Children should be supervised to ensure that they do not play with the machine.
• In the event where any wires are damaged, such wires can only be replaced by qualified
service technicians.
• CAUTION - Risk of fire and electric shock. Only to be used with manufacturer’s specified
power cord set.
• This appliance should not be installed in an area where a water jet could be used to clean it.
• Access to the service area of the appliance is restricted to persons having knowledge and
practical experience of the appliance and the relevant safety and hygiene requirements.
5
DANGER
ELECTRICAL MAINS
Always disconnect the equipment from the electricity supply before doing any work on it, to prevent
damage and health hazards.
CAUTION
ELECTRICAL REQUIREMENTS
The electrical circuit must be correctly earthed and connected by means of a suitable differential
safety breaker.
CAUTION
ELECTRIC POWER SUPPLY
Do not connect or disconnect the machine from the socket with wet hands.
Insert the plug into the wall socket rmly.
Do not pull on the supply cable in order to remove the plug from the socket.
CAUTION
REPLACEMENT OF THE POWER CABLE
If the power cable is damaged, it must be replaced by the manufacturer or their assistance
service or a similarly qualied person in order to prevent any possible risk.
WARNING
MALFUNCTION
If smoke, unusual smells or strange noises are emitted from the machine, disconnect it
immediately from the socket and contact the local retailer or technical service assistance.
Use of the machine in these conditions could cause res or electric shocks.
ATTENTION
If the equipment is installed in a kitchen, European Standard EN 60335-2/75 species that it
must be connected to an equipotential circuit via a wire with section between 2,5 and 10 mm2.
This connection must be carried-out by a skilled technician, in compliance with the regulation
in force in the country of use.
WARNING
WATER SUPPLY
Connect the water dispenser exclusively to a line of drinkable water supply.
WARNING
WATER SUPPLY
In order to avoid accidental ooding due to losses that may occur on the water supply line,
external or internal device it is necessary to install the appropriate anti-ooding valve “WATER
BLOCK” (not included in the unit) .
CAUTION
SANITISATION
Before sanitising the equipment, carefully read the instructions given by the sanitisation product
manufacturer and put on all the necessary personal protective equipment (gloves, masks, etc.).
Ensure that the premises are well ventilated.
The sanitisation operations should only be carried out by specialised technical assistance personnel.
6
HOT/AMBIENT WATER, DILUTED CONCENTRATE & CONCENTRATE SHOT
3 button connections (1000942 3b concentrate)
IEC Power cable
Din connector to
boiler
Soft tubing to Beverage
source
Hot water from
boiler 8mm tube
Mains
( if using water from chiller go to page 8)
Cold water hard 1/4” tube
Beverage tube control box to
font
hard 1/4” tube
5/16 to 3/8
barbed
connector
if using chiller
put 3/4” to push fit elbow here
and connect to Chiller output
(if using chiller select ‘chiller
present’ in engineering setup
pg 10)
Din connector to font
(Plummed to mains)
7
HOT/AMBIENT WATER, DILUTED CONCENTRATE & CONCENTRATE SHOT
3 button connections (1000942 3b concentrate)
Volumes must be calibrated, go to page 14
MODE DESCRIPTION
HOT Hot Water (set ratio to 0% )
COLD Cold / ambient water mixed with concentrate (set ratio
to 0% for just cold water)
RTD Ready to drink, undiluted concentrate
OFF Button non-active
PRI Triggers second control box, in case of 2 control boxes
primary must be one connected to the font
MODE
% CONCENTRATE (0% = just
water, 20%=4:1)
DISPENSE VOLUME
(P&H = push and hold)
3 nger press
short hold
% Concentrate Water to Coffee ratio
20% 4:1
10% 9:1
3 nger press
long hold
3 nger press
short hold
Set mode to UC MIX both
Control box setup
Boiler setup
.HOT
000%
P&H
Next
COLD
020%
200ml
RTD
--
30ml
--
.
Next - +
Factory preset
Mode: UC MIX BOTH
Temp units: ˚C
All temperatures the same
and volumes to 0
Off
Off
Descale weeks:
Filter Litres:
Set Pin:
Next - +
2.3.
UC MIX BOTH
°C
Factory preset
Mode:
Temp Units:
Next - +
6.
85°
183
5.
C
Factory preset
UC SINGLE°
Mode:
Temp Units:
Save - +
1.
DEFAULT
4.
UC SINGLE
°C
Factory preset
Mode:
Temp Units:
Next - +
Off
Off
Descale weeks:
Filter Litres:
Set Pin:
Next - +
2.3.
UC MIX BOTH
°C
Factory preset
Mode:
Temp Units:
Next - +
6.
85°
183
5.
C
Factory preset
UC SINGLE°
Mode:
Temp Units:
Save - +
1.
DEFAULT
4.
UC SINGLE
°C
Factory preset
Mode:
Temp Units:
Next - +
.
90˚
0ml
90˚
0ml
90˚
0ml
8
HOT/CHILLED WATER, DILUTED CONCENTRATE & CONCENTRATE SHOT
3 button connections (1000942 3b concentrate)
(Boiler and chiller setup)
9
MODE DESCRIPTION
HOT Hot Water (set ratio to 0% )
COLD Cold / ambient water mixed with concentrate (set ratio
to 0% for just cold water)
RTD Ready to drink, undiluted concentrate
OFF Button non-active
PRI Triggers second control box, in case of 2 control boxes
primary must be one connected to the font
MODE
% CONCENTRATE (0% = just
water, 20%=4:1)
DISPENSE VOLUME
(P&H = push and hold)
3 nger press
short hold
Control box setup
.HOT
000%
P&H
Next
COLD
020%
200ml
RTD
--
30ml
--
.
Next Go
Calibrate conc pump
Calibrate Cold water
Calibrate Hot water
RTD speed
3 nger press
long hold
Calibrate Hot water
RTD speed
Chiller present
Next Yes
3 nger press
long hold
Set mode to UC MIX SINGLE
Boiler setup
.
Next - +
Factory preset
Mode: UC MIX BOTH
Temp units: ˚C
Off
Off
Descale weeks:
Filter Litres:
Set Pin:
Next - +
2.3.
UC MIX BOTH
°C
Factory preset
Mode:
Temp Units:
Next - +
6.
85°
183
5.
C
Factory preset
UC SINGLE°
Mode:
Temp Units:
Save - +
1.
DEFAULT
4.
UC SINGLE
°C
Factory preset
Mode:
Temp Units:
Next - +
UC MIX SINGLE
HOT/CHILLED WATER, DILUTED CONCENTRATE & CONCENTRATE SHOT
3 button connections (1000942 3b concentrate)
10
POUR’D DILUTED CONCENTRATE
(3B/1B font, 3 volumes or ratios/ 1 volume or ratio)
IEC
Power cable
Mains water
5/16 to 3/8 barbed
connector
Soft tubing
to BIB beverage
source
Cold water hard 1/4”
tube
Beverage tube control box
to font
hard 1/4” tube
Din connector to font
Soft tubing to Beverage
source
Mains or chiller
water
if using chiller
put 3/4” to push fit elbow
here
and connect to Chiller
(If using chiller select
‘chiller present’ in
engineering setup pg 12)
11
POUR’D DILUTED CONCENTRATE
(3B/1B font, 3 volumes or ratios/ 1 volume or ratio)
MODE DESCRIPTION
HOT Hot Water mixed with concentrate
COLD Cold / ambient water mixed with concentrate
RTD Ready to drink (no dilution)
OFF Button non-active
PRI Triggers second control box, in case of 2 control boxes
primary must be one connected to the font
MODE
% CONCENTRATE (0% = just
water, 20%=4:1)
DISPENSE VOLUME
(P&H = push and hold)
3 nger press
short hold
% Concentrate Water to Coffee ratio
20% 4:1
10% 9:1
Control box setup
.COLD
025%
200ml
Next
COLD
020%
200ml
COLD
050%
100ml
--
Volumes must be calibrated, go to page 14
12
Concentrate Shot/ Ready to Drink
(1B Font, 1 Volume)
to coffee source
Power
font to control box
Concentrate source
(soft tubing for BIB
Hard tubing for urn)
5/16 to 3/8
barbed
connector
POUR’D Ready to Drink (3B font, 3 volumes)
Soft tubing
to BIB coffee
source
Power
font to control box
Connecting Hoses
IEC
Power
cable
5/16 to 3/8
barbed
connector
13
Concentrate Shot/ Ready to Drink
(1B Font, 1 Volume)
POUR’D Multiple Source Ready to Drink
IEC
Power
cable
5/16 to 3/8
barbed
connector
14
.
Next Go
Calibrate conc pump
Calibrate Cold water
Calibrate Hot water
RTD speed
3 nger press
long hold
OPTION DESCRIPTION
Calibrate conc pump Will pump concentrate using FAST speed for 10 seconds and ask for weight
to be entered – then again the same at SLOW speed. (for accurate results
make sure system is primed / tubes are full with liquid)
Calibrate Cold water Will dispense water until owmeter clicks 200 pulses and then will ask to
enter weight. (for accurate results make sure system is primed / tubes are
full with liquid)
Calibrate Hot water will dispense hot water from the boiler for 10 seconds and ask for weight to
be entered.
RTD speed This is the speed of the pump (in % of full speed) If ow rate is too violent
this should be reduced
Chiller present Select yes if you are using a chiller to supply cold water
Engineering Setup & Calibration
3 nger press
long hold
Set mode
UC MIX BOTH
Set all temperatures the same
15
3 nger press
long hold
Programmable buttons
Program and change buttons accordingly
Button Setup
16
6. Reconnect beverage source to
silicone tubing.
7. Press any buon on font 5 mes
to fully clear tubing/pump of any
residual water.
Cleaning takes approximately 60
seconds.
8. Font is now ready to operate.
x5
1. Disconnect Beverage source from
silicone tubing.
2. Put tubing into a bucket of
cleaning soluon.
3. Press cleaning opon on control
box.
4. Replace cleaning soluon with
clean water.
5. Press cleaning opon on control
box.
Cleaning
Clean
1.
Esc Go!
2.
Start cleaning?
Clean
1.
Esc Go!
2.
Start cleaning?
17
Operating Font
1. Push & Hold 2. Push & Release
85°
100
RISK OF SCALDING
If using a boiler, turn off before cleaning to
prevent accidental triggering of a
dispense.
Beware of accidentally operating the
control box especially when cleaning
around the push buttons.
Do not use abrasive cloths or creams, as
this will spoil the finish of the control box.
Marco Beverage Systems Limited.
63d Heather Road,
Sandyford Industrial Estate,
Dublin 18
t: +353 (0)1 295 2674
f: +353 (0)1 295 3715
e: sales@marco.ie
www.marcobeveragesystems.com
NSF/ANSI 4
E337347

Other manuals for POUR'D

1

This manual suits for next models

2

Other Marco Dispenser manuals

Marco UBER FONT User manual

Marco

Marco UBER FONT User manual

Marco MAXIBREW 2 User manual

Marco

Marco MAXIBREW 2 User manual

Marco JET 6 User manual

Marco

Marco JET 6 User manual

Marco MIX Font User manual

Marco

Marco MIX Font User manual

Popular Dispenser manuals by other brands

Casselin CDEC6.8 manual

Casselin

Casselin CDEC6.8 manual

Tork Essity Image Design 466000 manual

Tork

Tork Essity Image Design 466000 manual

Hewi SENSORIC 805 Series Mounting instructions

Hewi

Hewi SENSORIC 805 Series Mounting instructions

Georgia Pacific GP PRO enMotion 59762 reference guide

Georgia Pacific

Georgia Pacific GP PRO enMotion 59762 reference guide

The Splash Lab TSL-470 Installation & maintenance

The Splash Lab

The Splash Lab TSL-470 Installation & maintenance

ViscoTec Preeflow eco-PEN600 Operation & maintenance manual

ViscoTec

ViscoTec Preeflow eco-PEN600 Operation & maintenance manual

Curtis TP15T10A1100 troubleshooting guide

Curtis

Curtis TP15T10A1100 troubleshooting guide

KWC RODAN RODX674B Installation and operating instructions

KWC

KWC RODAN RODX674B Installation and operating instructions

START International TDH2O1 quick start guide

START International

START International TDH2O1 quick start guide

Rigel PD-108J instruction manual

Rigel

Rigel PD-108J instruction manual

Kraus KSD-30 installation guide

Kraus

Kraus KSD-30 installation guide

PMC PH-55 Service manual

PMC

PMC PH-55 Service manual

Sanela SLZN 59ESB Instructions for use

Sanela

Sanela SLZN 59ESB Instructions for use

ASI 0338 Installation & operation instructions

ASI

ASI 0338 Installation & operation instructions

Air Wolf Gamma II Series manual

Air Wolf

Air Wolf Gamma II Series manual

Waring WBD2G Series instructions

Waring

Waring WBD2G Series instructions

Nouvag DP 30 Instructions for use

Nouvag

Nouvag DP 30 Instructions for use

Buffalo GF539 instruction manual

Buffalo

Buffalo GF539 instruction manual

manuals.online logo
manuals.online logoBrands
  • About & Mission
  • Contact us
  • Privacy Policy
  • Terms and Conditions

Copyright 2025 Manuals.Online. All Rights Reserved.