Martinelli PRIMO VIAGGIO SL User manual

PRIMO VIAGGIO
SL

B
A
C
B
A
1
3
2
4

A
B
C
D
ok
5
7
6
8

ok
2
1
3
9
11
10
12

A
B
C
A
ok
B
4
5
1
23
4
5
6
13
15
14
16

B
3109
C
A
1
3
2
A
B
C
A
D
D
C
Bok
17
19 20
18

7
5
4
13
2
1) BCAASFMA*
2) BRIASFMA*
3) BSAASFMA*
4) ASPI0157NFGR
5) BSPASFMA*
Primo Viaggio SL
IT• Ricambi disponibili in piú colori da specificare nella richiesta.
EN•
Spare parts available in different colours to be specified when ordering.
FR• Pièces de rechange disponibles en plusieurs couleurs à spécifier
dans la demande.
DE• Ersatzteile in mehr Farben vorhanden, die in der Anfrage
spezifiziert werden müssen.
ES• Repuestos disponibles en otros colores que se especificarán en el
pedido.

8
Primo Viaggio SL
Primo Viaggio SL
+
Belted Base
Primo Viaggio SL
+
Isofix Base
• Categoria “Universale” .
• Il seggiolino auto "Primo Viaggio SL" viene fissato in
auto con la cintura di sicurezza a tre punti.
• Categoria “Universale” .
• La base “Belted Base”viene fissata in auto con la cintura di
sicurezza a tre punti e rimane in auto pronta per l'uso.
• Il seggiolino-auto "Primo Viaggio SL" si aggancia alla
”Belted Base”e fissato con la cintura di sicurezza.
• Consultare il manuale istruzioni ”Belted Base” per le
istruzioni di fissaggio in auto.
• Categoria “Semi-Universale” classe E.
• La base "Isofix Base" con sistema di fissaggio Isofix,
viene fissata in auto agli attacchi Isofix posizionati tra la
seduta del sedile e lo schienale dell'auto.
• Il seggiolino auto "Primo Viaggio SL" si aggancia alla
base.
• Consultare il manuale istruzioni di "Isofix Base" per le
istruzioni di fissaggio in auto.
IT_Italiano

9
Grazie per aver scelto un prodotto
Martinelli.
Caratteristiche prodotto
• "Primo Viaggio SL" seggiolino di sicurezza per auto,
Gruppo 0+, è stato sottoposto a tutti i test di sicurezza e
omologato secondo la normativa Europea in vigore ECE
R44/04, per bambini di peso da 0-13 kg (0-12/14 mesi).
• IMPORTANTE: Primo Viaggio SL deve essere
installato in senso contrario a quello di marcia, su
sedili sprovvisti di airbag. Non installare su sedili
rivolti in direzione opposta o trasversalmente al
senso comune di marcia del veicolo.
• E' dotato di “Adjustable Side Impact Protection”:
maggior protezione agli impatti laterali con il “sistema
simultaneo” di regolazione poggiatesta-cinture.
• E' omologato per essere fissato in auto senza base e
a scelta con due tipi di base (l'uso della base in auto
garantisce maggior sicurezza): "Belted Base" o "Isofix
Base" (assicurarsi che l'autoveicolo sia predisposto al
sistema Isofix; vedere anche l'elenco dei modelli delle
auto fornito insieme al prodotto).
AVVERTENZA
• Leggere attentamente le istruzioni prima dell’uso
e conservarle nell’apposita sede per riutilizzarle
in futuro. La mancata scrupolosa osservanza delle
istruzioni di installazione del seggiolino-auto
comporterebbe dei rischi al vostro bambino.
• Non lasciare mai il bambino incustodito.
• Utilizzare sempre il sistema di ritenuta.
• Le operazioni di montaggio e di installazione devono
essere effettuate da adulti.
• Evitare di introdurre le dita nei meccanismi.
• Installare questo seggiolino-auto gruppo 0+ in auto in
senso contrario alla direzione di marcia.
•
Causa pericolo di morte o lesioni gravi, non installare questo
seggiolino - auto su sedili passeggero dotati di airbag.
• Nel caso di sedili girevoli o riposizionabili installare questo
seggiolino-auto solo in senso opposto al senso di marcia.
• In auto prestare particolare attenzione a bagagli o altri
oggetti che possono causare lesioni al bambino nel
seggiolino-auto in caso di incidente.
• Non utilizzare metodologie di installazione diverse da
quelle indicate, pericolo di distacco dal sedile.
•
Seggiolino-auto, gruppo 0+, categoria “Universale”
omologato secondo la normativa Europea ECE R44/04
per bambini di peso da 0-13 kg (0-12/14 mesi). Adatto alla
maggior parte dei sedili delle autovetture, ma non a tutti.
• Seggiolino auto, Gruppo 0+, con Base Isofix (accessorio)
categoria Semiuniversale di classe E .
•
Il seggiolino-auto può essere correttamente installato se
nel manuale d’uso e manutenzione del veicolo è indicata la
compatibilità con sistemi di ritenuta “Universali” di gruppo 0+.
• Questo seggiolino-auto è classificato “Universale”
secondo criteri di omologazione più severi rispetto ai
modelli precedenti che non dispongono dell’etichetta
di omologazione.
• Il seggiolino-auto puó essere utilizzato solo su veicoli

10
approvati, dotati di cintura a tre punti statica o con
avvolgitore, omologati secondo il regolamento UN/ECE
n°16 o normative equivalenti. Non é consentito usare la
cintura a due punti o addominale.
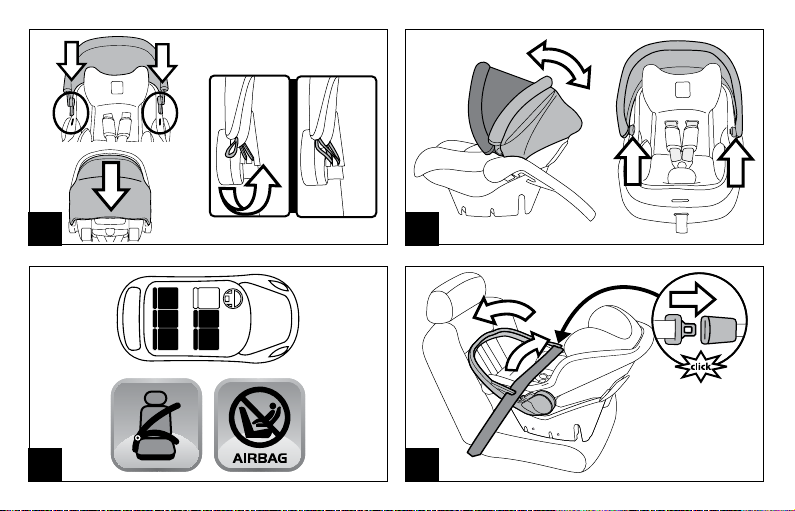
• Per l’installazione del seggiolino-auto, far passare la
cintura della vettura a tre punti nelle sedi apposite
del seggiolino contraddistinte dal colore azzurro. Non
utilizzare metodologie di installazione diverse da quelle
indicate, pericolo di distacco dal sedile.
• Assicurarsi che la cintura a tre punti del veicolo
per fissare il seggiolino-auto sia sempre tesa e non
attorcigliata, si raccomanda di sostituirla in caso di
sollecitazioni eccessive dovute ad un incidente.
• Se la vettura é in movimento, non togliere mai il
bambino dal seggiolino-auto.
•
Prestare attenzione che il seggiolino-auto non rimanga
bloccato da una parte mobile del sedile o da una portiera.
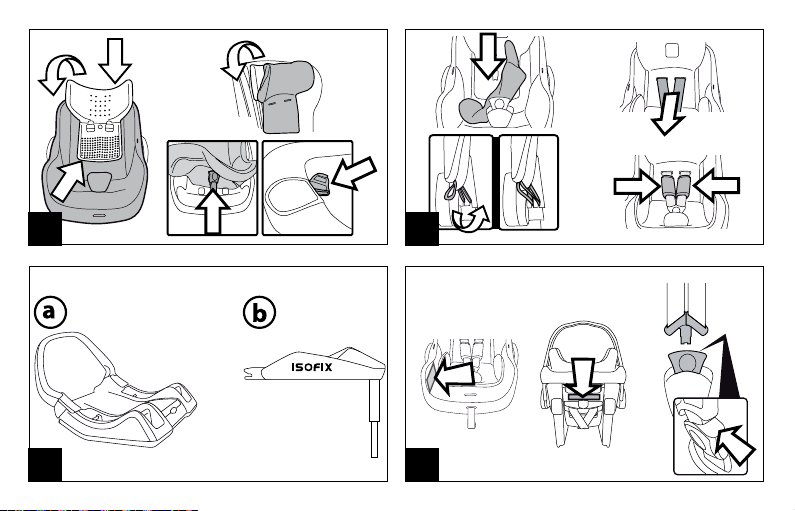
• Per evitare il rischio di caduta, utilizzare sempre il
cinturino di sicurezza del seggiolino-auto anche per
il trasporto fuori dalla vettura. Regolare l’altezza e la
tensione delle bretelle verificando che siano aderenti
al corpo del bambino senza stringere troppo; verificare
che il cinturino di sicurezza non sia attorcigliata e che il
bambino non la sganci da solo.
• Il seggiolino-auto non sostituisce il lettino, se il bambino
ha bisogno di dormire è importante metterlo sdraiato.
• Non lasciare il seggiolino-auto nella vettura sotto
l’esposizione del sole, alcune parti potrebbero essersi
surriscaldate e nuocere alla pelle delicata del bambino,
controllare prima di collocare il bambino.
• Non utilizzare il seggiolino-auto senza il rivestimento di
tessuto, tale rivestimento non puó essere sostituito da
uno non approvato dal costruttore in quanto costituisce
parte integrante del seggiolino e della sicurezza.
• In caso di dubbi, rivolgersi al costruttore o al rivenditore
di questo seggiolino-auto.
• Non staccare le etichette adesive e cucite; potrebbero
rendere il prodotto non conforme ai sensi di norma.
• Non utilizzare il seggiolino-auto se presenta rotture
o pezzi mancanti, se è di seconda mano, o se è stato
sottoposto a sollecitazioni violente in un incidente
perchè potrebbe avere subito dei danni strutturali
estremamente pericolosi.
• Non effettuare modifiche al prodotto.
• Per eventuali riparazioni, sostituzioni di pezzi e
informazioni sul prodotto, contattare il servizio
assistenza post-vendita. Le varie informazioni sono
all’ultima pagina di questo manuale.
• Non utilizzare il seggiolino-auto dopo 7anni dalla data
di produzione indicata sulla scocca; a causa del naturale
invecchiamento dei materiali potrebbe non essere più
conforme ai sensi di norma.
• L’utilizzo del seggiolino-auto per neonati prematuri
con meno di 37 settimane di gestazione, potrebbe
comportare al neonato problemi di respirazione stando
seduti nel seggiolino-auto. É opportuno consultare il
medico prima di lasciare l’ospedale.
• Non utilizzare accessori che non siano approvati dal
costruttore o dalle competenti autorità.

11
AVVERTENZA:
PER L'UTILIZZO COME SDRAIETTA
• Non utilizzare la sdraietta quando il bambino è in
grado di stare seduto da solo.
• Questa sdraietta non è progettata per periodi di
sonno prolungati.
• E 'pericoloso utilizzare la sdraietta su una superficie
elevata, ad esempio un tavolo.
Istruzioni d'uso
1• "Primo Viaggio SL" è dotato di Sistema Ganciomatic, per
essere agganciato e sganciato in auto a "Isofix Base" o
"Belted Base" e fuori dall'auto ai passeggini o ai carrelli
Martinelli.
Per agganciare "Primo Viaggio SL" (a "Isofix Base", o
"Belted Base", ai passeggini o ai carrelli Martinelli)
posizionarlo in corrispondenza degli agganci e
spingerlo verso il basso fino al click.
2• Per sganciare "Primo Viaggio SL" (da "Isofix Base" o
"Belted Base", ai passeggini o ai carrelli Martinelli),
occorre portare il maniglione nella posizione di
trasporto, spingere la leva posta sullo schienale verso
l'alto e contemporaneamente sollevare il seggiolino.
3• Per agganciare il cinturino di sicurezza sovrapporre
le linguette di aggancio e inserirle nella fibbia del
cinturino spartigambe fino al click (fig. a).
Per sganciare il cinturino di sicurezza premere il
pulsante rosso sulla fibbia del cinturino spartigambe
(fig. b) ed estrarre i cinturini.
4• Per allentare la tensione deicinturini, infilare il dito
nell’asola della seduta (fig. a), tenere premuto il tasto
metallico e con l’altra mano tirare i cinturini (fig. b).
Per far aderire le cinture di sicurezza al bambino, tirare
verso di sé il laccetto di regolazione centrale (fig. c).
ATTENZIONE: non stringere troppo le cinture di
sicurezza del bambino, lasciare un minimo di gioco.
5•
Il cinturino di sicurezza e il poggiatesta (Side Impact
Protection)sono regolabili simultaneamente in altezza
in 5 posizioni per adattarsi alla crescita del bambino.
Per regolare l'altezza, premere il pulsante posteriore del
regolatore di altezza (posto sullo schienale del seggiolino)
e contemporaneamente alzare o abbassare nella posizione
desiderata, assicurandosi del giusto posizionamento dal
click. Prima di regolare l'altezza del cinturino di sicurezza e
del poggiatesta allentare la tensione dei cinturini.
6• Regolare l'altezza del poggiatesta in modo che il
cinturino sia appena sotto le spalle del bambino.
7•
Il seggiolino èfornito di un cuscino riduttore anatomico per
il neonato, da togliere quando il bambino è più grande.
8• Il maniglione del seggiolino ha 4regolazioni; per
ruotarlo tener premuto i due pulsanti posti sul
maniglione e posizionarlo nella posizione desiderata,
fino a sentire il click di posizionamento.
• Posizione A: è la posizione del maniglione in auto;
Posizione B: è la posizione del maniglione per il
trasporto a mano e per l’aggancio alla base, ai
passeggini e ai carrelli;
Posizione C: è la posizione che permette al seggiolino
di dondolare;
Posizione D: è la posizione che permette al seggiolino
di non dondolare.

12
9• Per montare la capottina, inserire gli attacchi di questa
nelle sedi del seggiolino e sistemare la parte posteriore
della capottina dietro lo schienale.
Infine agganciare gli elastici dietro al maniglione.
10• La capottina è possibile regolarla in due modi:
tenderla in avanti o chiuderla.
Per togliere la capottina: sganciare gli elastici dietro al
maniglione, sollevarla e sganciarla verso l'alto.
•
IMPORTANTE: La capottina non deve essere usata
per sollevare il seggiolino, pericolo di distacco.
Istruzioni d'uso in auto
11•
Sistemare il seggiolino-auto con il vostro bambino sul sedile,
ricordandovi di assicurarlo con il cinturino di sicurezza.
12• Posizionare il maniglione del seggiolino tutto in avanti,
(punto 8 -posizione A).
Far passare la cintura di sicurezza dell’auto nelle due guide
del maniglione del seggiolino e agganciare la cintura
dell’auto, assicurandosi che sia ben tesa,come in figura.
13• Impugnare nuovamente la cintura di sicurezza dell’auto
e farla passare dietro lo schienale del seggiolino-auto
inserendola nelleguideposterioricome in figura.
Tensionare le cinture dell'auto.
Sfoderabilità
Per rimuovere il rivestimento del seggiolino auto:
• togliere la capottina.
• premere il pulsante rosso sulla fibbia dello spartigambe
per sganciare il cinturino di sicurezza.
14• Rimuovere riduttore se presente (Fig. a),
sganciare gli elastici da sotto al maniglione (Fig. b).
15• Rimuovere gli spallacci (Fig. a);
• sfilare icinturini dallo schienale (Fig. b);
Per estrarre lo spartigambe, farlo passare dall' asola
della sacca, sollevandola come in figura (Fig. c).
16• Sfilare la fodera del poggiatesta, prima dalla parte bassa
e poi con cura, dalle due alette laterali;
ATTENZIONE A NON ROMPERE LE PARTI IN
POLISTIROLO (EPS).
Sfilare l’imbottitura in sequenza, come in figura.
Manutenzione dell'imbottitura
Spazzolare le parti in tessuto per allontanare la polvere;
• Per il lavaggio attenersi all'etichetta cucita sulla sacca
del prodotto.
• non candeggiare al cloro;
• non stirare;
• non lavare a secco;
non smacchiare con solventi;
• non asciugare a mezzo di asciugabiancheria a tamburo
rotativo.
Vestizione
• Per rivestire il seggiolino auto:
17• calzare l’imbottitura, in sequenza come in figura:
- calzare dall'alto la sacca
-
inserire prima le alette laterali del poggiatesta con attenzione
- poi farla passare nella parte bassa del poggiatesta.
• Per calzare la fodera del poggiatesta partire dalle due
alette laterali e infine calzare la parte bassa (Fig. a);

13
• Far passare il cinturino nell' asola della sacca (Fig. b) ed
inserirlo nello spartigambe (Fig. c).
18• Riposizionare il riduttore (Fig. a) e agganciare gli elastici
della capottina dietro al maniglione (Fig. b).
Inserire le cinture nello schienale, come in figura (Fig. c).
Inserire gli spallacci (Fig. d).
Agganciare il cinturino di sicurezza (punto 3a) .
IMPORTANTE: il cinturino non deve essere
attorcigliato.
Accessori
19• Belted Base: Omologata per bambini di peso da 0-13 kg
(0-12/14 mesi), utilizzabile per seggiolini di Gruppo 0+.
Viene fissata in auto con la cintura di sicurezza (Fig. a).
• Isofix Base 0+1 K: Omologata per bambini di peso
da 0-18 kg (0-4 anni circa), utilizzabile per seggiolini di
Gruppo 0+ e successivamente Gruppo 1 (Fig. b).
Viene fissata ai ganci Isofix dell'auto senza l'uso della
cintura di sicurezza .
Numeri di serie
20• Nella parte davanti lateralmente, sotto al tessuto è
presente l'etichetta con le seguenti informazioni:
nome del prodotto, data di produzione e numerazione
seriale dello stesso (Fig. a).
• Dietro lo schienale nella parte alta è presente l'
etichetta di omologazione (Fig. b).
• Data di produzione del cinturino (Fig. c).
Questi elementi sono utili al consumatore nel caso in
cui il prodotto dovesse presentare delle problematiche.
Pulizia del prodotto
• Il vostro prodotto necessita un minimo di
manutenzione. Le operazioni di pulizia e manutenzione
devono essere effettuate solo da adulti.
• Si raccomanda di tenere pulite tutte le parti in movimento.
• Periodicamente pulire le parti in plastica con un panno
umido, non usare solventi o altri prodotti simili.
• Spazzolare le parti in tessuto per allontanare la polvere.
• Non pulire il dispositivo di assorbimento d’urto in
polistirolo con solventi o altri prodotti simili.
• Proteggere il prodotto da agenti atmosferici, acqua,
pioggia o neve; l’esposizione continua e prolungata al sole
potrebbe causare cambiamenti di colore in molti materiali.
• Conservare il prodotto in un posto asciutto.
Come leggere l'etichetta di
omologazione
In questo paragrafo vi spieghiamo come leggere
l’etichetta di omologazione (etichetta arancione).
• L’etichetta è doppia perchè questo seggiolino-auto è
omologato per essere fissato in auto in due modi:
• cintura a tre punti statica o con avvolgitore, (la scritta
UNIVERSAL indica la compatibilità del seggiolino-auto
su veicoli dotati di questo tipo di cintura)
• sistemi di aggancio ISOFIX (la scritta SEMI-UNIVERSAL
classe E indica la compatibilità del seggiolino-auto con
veicoli equipaggiati con questo sistema)
• In alto all’etichetta c’è il marchio dell’azienda
produttrice e il nome del prodotto.

14
• La lettera E in un cerchio: indica il marchio di
omologazione Europea e il numero definisce il paese
che ha rilasciato l’omologazione (1: Germania, 2: Francia,
3: Italia, 4: Paesi Bassi, 11: Gran Bretagna e 24: Irlanda).
• Numero di omologazione: se inizia con 04 vuol dire che
è il quarto emendamento (quello attualmente in vigore)
del regolamento R44.
• Normativa di riferimento: ECE R44/04.
• Numero progressivo di produzione: personalizza ogni
seggiolino, dal rilascio dell’omologazione ognuno è
contraddistinto dal proprio numero.
MARTINELLI È UN MARCHIO PEG-
PÉREGO.
Peg Perego SpA è un' azienda con sistema di gestione
qualità certificato da TÜV Italia Srl, in accordo alla norma
ISO 9001.
Peg Pérego potrà apportare in qualunque momento
modifiche ai modelli descritti in questa pubblicazione,
per ragioni di natura tecnica o commerciale.
SERVIZIO ASSISTENZA
Se fortuitamente parti del modello vengono perse o
danneggiate, usare solo pezzi di ricambio originali.
Per eventuali riparazioni, sostituzioni, informazioni sui
prodotti, la vendita di ricambi originali e accessori,
contatta il Servizio Assistenza:
Tel. 0039/039/60.88.610
Email customer.service@martinellimilano.com

15
Primo Viaggio SL
Primo Viaggio SL
+
Belted Base
Primo Viaggio SL
+
Isofix Base
• “Universal” category.
• The "Primo Viaggio SL" car seat is installed in the
vehicle using the three-point seatbelt.
• “Universal” category.
• The Belted Base is installed in the vehicle using the
three-point seatbelt and remains in the vehicle ready
for use.
• The "Primo Viaggio SL" car seat is installed on the
Belted Base and is secured with the vehicle seatbelt.
• See the Belted Base instruction manual for the vehicle
installation procedure.
• “Semi-Universal” category class E.
• The "Isofix Base" with Isofix attachment system is
installed in the vehicle using the Isofix anchors located
between the vehicle seat and backrest.
• The "Primo Viaggio SL" car seat is installed on the base.
• See the "Isofix Base" instruction manual for the vehicle
installation procedure.
EN_English

16
Thank you for choosing a Martinelli
product.
Product characteristics
• The "Primo Viaggio SL" group 0+ car seat has been
subjected to all safety tests and is type approved under
European standard ECE R44/04, for children weighting
from 0 to 13 kg (0 to 12-14 months).
• IMPORTANT: Primo Viaggio SL must be installed
in a rearward-facing position on seats without
airbags. Do not install it on rearward- or sideways-
facing vehicle seats.
• It comes with an "Adjustable Side Impact Protection
System". This offers improved protection against side
impacts with the “simultaneous system” for headrest-
harness adjustment.
• It is type approved for installation in vehicles without a
base support or with two types of base, as required (the
use of a seat base offers improved safety): "Belted Base"
or "Isofix Base" (check that the vehicle is fitted with the
Isofix system - a list of vehicle models fitted with the
system is provided with the product).
WARNING
• Read the instructions carefully before use and keep
them in the holder provided for future reference.
Failure to closely follow the car seat installation
instructions will put your child at risk.
• Never leave the child unattended.
• Always use the restraint system.
• The assembly and installation operations must be
conducted by adults.
• Avoid inserting fingers into the mechanisms.
• Install this group 0+ car seat in a rearward-facing
position.
• Death or serious injury can result if this car seat is
installed on seats with airbags.
• In the case of swivel or repositionable vehicle seats,
only install this car seat in a rearward-facing position.
• When travelling take special care to make sure that
luggage or other objects do not injure the child in the
car seat in the case of accidents.
• Do not use installation methods different from those
indicated. This would result in the risk of detachment
from the seat.
• Car seat, group 0+, “Universal” category, type approved
under European standard ECE R44/04 for children of
weight from 0 to 13 kg (0 to 12/14 months). Suitable for
installation on the majority of vehicle seats, but not all.
• Group 0+ car seat with class E Semi-Universal Isofix base
(accessory).
• The car seat can be correctly installed if the vehicle’s
use and maintenance manual indicates compatibility
with “Universal” group 0+ restraint systems.
• This car seat is classed as “Universal” in compliance with
stricter type approval criteria than previous models that
do not have type approval labels.
• The car seat can only be used in type approved
vehicles, fitted with static or inertia-reel three-point
seatbelts, approved under regulation UN/ECE no. 16

17
or equivalent standards. It must not be used with two-
point or lap seatbelts.
• To install the car seat, pass the three-point seatbelt
through the car seat’s light blue belt routers. Do not use
installation methods different from those indicated. This
would result in the risk of detachment from the seat.
• Ensure that the vehicle’s three-point seatbelt fixing
the car seat is always taut and not twisted. It should
be replaced in the case of heavy stress as a result of an
accident.
• Never remove the child from the car seat while the
vehicle is in motion.
• Make sure that the car seat is not locked by a movable
part of the vehicle seat or by a door.
• To avoid the risk of falling, always use the car seat
harness even for transport outside the vehicle.
Adjust the height and tension of the shoulder straps
ensuring that they are snug to the child’s body without
constricting him/her too much. Check that the harness
is not twisted and that the child does not release it.
• The car seat is not a substitute for a cot; if the child
needs to sleep it is important to lie him/her down.
• Do not leave the car seat in the vehicle when exposed
to the sun. Some parts might heat up and be harmful
to the delicate skin of the child -check before placing
the child in the seat.
• Do not use the car seat without its fabric cover; this
must not be replaced with one not approved by the
manufacturer since it is an integral part of the car seat
and the safety system.
• If in doubt refer to the manufacturer or retailer of the
car seat.
• Do not remove the adhesive and stitched labels since
this might make the product non compliant with legal
requirements.
• Do not use the car seat if it has signs of breakage
or missing parts, is second hand, or if it has been
subjected to violent stress in an accident, because it
might have suffered extremely dangerous structural
damage.
• Do not modify the product.
• For any repairs, replacement parts and information
about the product, contact the after-sales assistance
service. Contact information is provided on the last
page of this manual.
• Do not use this car seat after 7years from the date
of production indicated on the structure. The natural
ageing of the materials may mean that it is no longer
compliant with standards.
• The use of the car seat for premature infants born at
less than 37 weeks could cause respiration problems
for the newborn. It is advisable to seek medical advice
before leaving the hospital.
• Do not use accessories not approved by the
manufacturer or by the competent authorities.
WARNING: FOR USE AS A RECLINED
CRADLE.
• Do not use the reclined cradle once your child can
sit unaided.
• This reclined cradle is not intended for prolonged

18
periods of sleeping.
• It is dangerous to use this reclined cradle on an
elevated surface, e.g. a table.
Instructions for use
1• "Primo Viaggio SL" is provided with the Ganciomatic
System for attachment to/detachment from an "Isofix
Base" or "Belted Base" in the vehicle and Martinelli
strollers and chassis outside the vehicle.
To install "Primo Viaggio SL" (on an "Isofix Base", "Belted
Base", or Martinelli stroller or chassis) align it with the
attachment points and push down until it clicks into
place.
2• To release "Primo Viaggio SL" (from an "Isofix Base",
"Belted Base", or Martinelli stroller or chassis) raise the
handlebar to the transport position, push the lever on
the backrest upwards and at the same time raise the car
seat.
3• To engage the harness, place the two shoulder strap
tongues in position and insert them into the buckle
of the crotch strap until they click into place (fig. a). To
release the harness, press the red button on the crotch
strap buckle (fig. b) and remove the straps.
4• To slacken the harness, insert a finger through the seat
opening (fig. a), keep the metal button pressed, and with
the other hand pull on the straps (fig. b).
To tighten the straps until they are snug to the child’s
body, pull the central adjustment strap towards you (fig. c).
CAUTION: Do not over-tighten the straps, and
ensure you leave minimum slack.
5• The harness and the “Side Impact Protection” headrest
can be adjusted simultaneously to 5 different heights so
as to follow the growth of the child.
To adjust the height, press the rear height adjustment
button (on the car seat backrest) and at the same time
raise or lower the straps and headrest to the required
position, ensuring that they click into place. Slacken
the shoulder straps before adjusting the height of the
harness and headrest.
6• Adjust the height of the headrest so that the straps are
just below the child's shoulders.
7• The seat is equipped with an anatomic booster cushion
for newborns, to be removed when the child is older.
8• The car seat handlebar has four fixed positions. To
rotate it, press the two buttons on the handlebar and
move this to the required angle. Ensure it clicks into
position.
• Position A: the in-vehicle position;
• Position B: the position for transport by hand and for
installation on a base, stroller or chassis;
• Position C: allows the car seat to rock;
• Position D: stops the car seat from rocking;
9• To fit the hood, insert the hood attachments into the
openings on the car seat and arrange the rear part of
the hood behind the backrest.
Finally, fasten the elastic bands behind the handlebar.
10• The hood has two possible positions, opened or closed.
To remove the hood: release the elastic bands behind
the handle, lift the hood and remove it upwards.
• IMPORTANT: The hood must not be used to lift
the car seat because it might detach.
Instructions for in-vehicle use
11• Fit the car seat with the child seated inside,

19
remembering to secure the child with the harness.
12• Fully lower the handlebar of the car seat (point 8 -
position A).
Slide the vehicle seatbelt into the two guides on the car
seat handlebar and buckle it, ensuring the seatbelt is
taut, as shown in the figure.
13• Take hold of the vehicle seatbelt again and pass it
behind the backrest of the car seat, inserting it into the
rear guides as shown in the figure.
Tighten the seatbelt.
Removing the soft cover
To remove the car seat cover:
• remove the hood:
• press the red button on the crotch strap buckle to
release the harness.
14• Remove the booster cushion, if present (Fig. a), and
unfasten the elastic bands from under the handlebar
(Fig. b).
15• Remove the shoulder pads (Fig. a);
• Remove the straps from the backrest (Fig. b);
To remove the crotch strap, slip it through the opening
in the soft cover, lifting it as shown in the figure (Fig. c).
16• Slide off the headrest cover from the bottom first and
then, carefully, over the two sides;
BE CAREFUL NOT TO BREAK POLYSTYRENE (EPS)
PARTS.
Remove the soft cover in sequence, as shown in the
figure.
Maintenance of the padding
Brush the fabric parts to remove dust.
• When washing, closely follow the instructions stated on
the label sewn into the cover.
• Do not use chlorine bleach.
• Do not iron.
• Do not dry clean.
Do not remove stains with solvents.
• Do not tumble dry.
Replacing the soft cover
• To reposition the car seat cover:
17• slide the soft cover on in sequence, as shown in the
figure:
- slide the cover on from the top
- first carefully insert the sides of the headrest
- then slide the soft cover over the bottom of the
headrest.
• To slide on the headrest cover, start from the two sides
and then slide on the bottom (Fig. a);
• Insert the crotch strap through the opening in the soft
cover (Fig. b) and slip it through the crotch strap cover
(Fig. c).
18• Reposition the booster cushion (Fig. a) and fasten the
hood's elastic bands behind the handlebar (Fig. b).
Insert the shoulder straps into the backrest, as shown
(Fig. c).
Insert the shoulder pads (Fig.d).
Engage the harness (point 3a).
IMPORTANT: The straps must not be twisted.

20
Accessories
19• Belted Base: approved for children weighing 0-13 kg
(0-12/14 months), used with car seats in Group 0+. It is
installed using the vehicle's seat belt (Fig. a).
• Isofix Base 0+1 K: approved for children weighing 0-18
kg (0-4 years approx.), used with car seats in Group 0+
and then Group 1 (Fig. b).
It fastens to the vehicle's Isofix attachments without
using the seat belt.
Serial numbers
20• A label on the front lateral side, under the fabric,
contains the following information: product name,
production date and serial number (Fig. a).
• The type approval label can be found on the rear of the
backrest, at the top (Fig. b).
• Harness production date (Fig. c).
In the event of problems with the product, these
details will be of use to customers.
Product cleaning
• This product requires minimal maintenance. Cleaning
and maintenance must only be carried out by adults.
• It is advisable to keep all the moving parts clean.
• Clean the plastic parts periodically with a damp cloth.
Do not use solvents or similar substances.
• Brush the fabric parts to remove dust.
• Do not clean the polystyrene shock absorbing device
with solvents or other similar products.
• Protect the product from atmospheric agents: humidity,
rain or snow. Extended exposure to sunshine can cause
colour changes in many materials.
• Store the product in a dry environment.
How to read the type approval label
This paragraph explains how to interpret the type
approval label (orange label).
• The label is double because this car seat is type
approved for two types of installation in vehicles:
• With static or inertia-reel three-point seatbelts (the term
UNIVERSAL indicates compatibility of the car seat with
vehicles fitted with this type of seatbelt);
• ISOFIX attachment systems (the term SEMI-UNIVERSAL
class E indicates compatibility of the car seat with
vehicles fitted with this system).
• The top of the label displays the trademark of the
manufacturing company and the name of the product.
• The letter E in a circle indicates the European type
approval mark and the number indicates the country
that issued the type approval (1: Germany, 2: France, 3:
Italy, 4: The Netherlands, 11: Great Britain, and 24: Ireland).
• Type approval number: if it starts with 04 this indicates
the fourth amendment (the one currently in force) of
Regulation R44.
• Reference standard: ECE R44/04.
• Production serial number: on issue of type approval
each car seat is personalized with its own number.
Table of contents
Languages:
Other Martinelli Car Seat manuals