Matica moca espresso User manual

USER GUIDE

Copyright
Matica Technologies
April
2015
All rights reserved
Copyright Notice
Users must respect the copyright regulations applicable in their own respective countries. Photocopying,
translation, reproduction or transmission of this manual, in whole or in part, for any reason and using any
electronic or mechanical means whatsoever, without the prior written permission of the Manufacturer
company is strictly forbidden.
All contents of this manual are subject to change without prior notice.
The Manufacturer accepts no liability for any errors that may be found in this manual, or for any loss or
damage that may arise accidentally or as a result of diffusion or use of this manual.
Trademarks
All other trademarks are the property of their respective owners.
Printer Warranty
Refer to the warranty statement provided with the printer for the warranty terms and conditions, and its
limitations of liability.
Environmental Impact
Matica is committed to reducing the environmental impact of its products through improvements in energy
efficiency.
DIRECTIVE 2002/96/EC ON THE TREATMENT, COLLECTION, RECYCLING AND
DISPOSAL OF ELECTRIC AND ELECTRONIC DEVICES AND THEIR COMPONENTS
1.
FOR
COUNTRIES
IN
THE
EUROPEAN
UNION
(EU)
The disposal of electric and electronic devices as solid urban waste is strictly prohibited: it must be
collected separately. The dumping of these devices at unequipped and unauthorized places may have
hazardous effects on health and the environment. Offenders will be subjected to the penalties and
measures laid down by the law.
TO DISPOSE OF OUR DEVICES CORRECTLY:
a) Contact the Local Authorities, who will give you the practical information you need and the
instructions for handling the waste correctly, for example: location and times of the waste
collection centres, etc.
b) When you purchase a new device of ours, give a used device similar to the one purchased to our
dealer for disposal.
The crossed dustbin symbol on the device means that:
- When it to be disposed of, the device is to be taken to the equipped waste collection
centres and is to be handled separately from urban waste;
-
Matica Technologies
guarantees the activation of the treatment, collection, recycling and
disposal procedures in accordance with Directive 2002/96/EC (and subsequent
amendments).
2.
FOR
OTHER
COUNTRIES
(NOT
IN
THE
EU)
The treatment, collection, recycling and disposal of electric and electronic devices will be carried out
in accordance with the laws in force in the country in question.

For Europe
Warning
“This is a Class A product. In a domestic environment this product may cause radio interference in
which case the user may be required to take adequate measures.”
For US
“This equipment has been tested and found to comply with the limits for a Class A digital device,
pursuant to part 15 of the FCC Rules. These limits are designed to provide reasonable protection
against harmful interference when the equipment is operated in a commercial environment. This
equipment generates, uses, and can radiate radio frequency energy and, if not installed and used in
accordance with the instruction manual, may cause harmful interference to radio communications.
Operation of this equipment in a residential area is likely to cause harmful interference in which case
the user will be required to correct the interference at his own expense”.
Safe for human operation at <20cm usage conditions as SAR exempt under Title 47 CFR Part §2.1093
due to low power transmission.
For Canada
This device complies with Industry Canada’s licence-exempt RSSs. Operation is subject to the
following two conditions:
(1) This device may not cause interference; and
(2) This device must accept any interference, including interference that may cause undesired
operation of the device.
Safe for human operation at <20cm usage conditions as SAR exempt under RSS-102 Section 2.5.1
due to low power transmission.

Table of Contents
PRODUCT OVERVIEW................................................................................................... 1-1
GETTING STARTED ....................................................................................................... 1-1
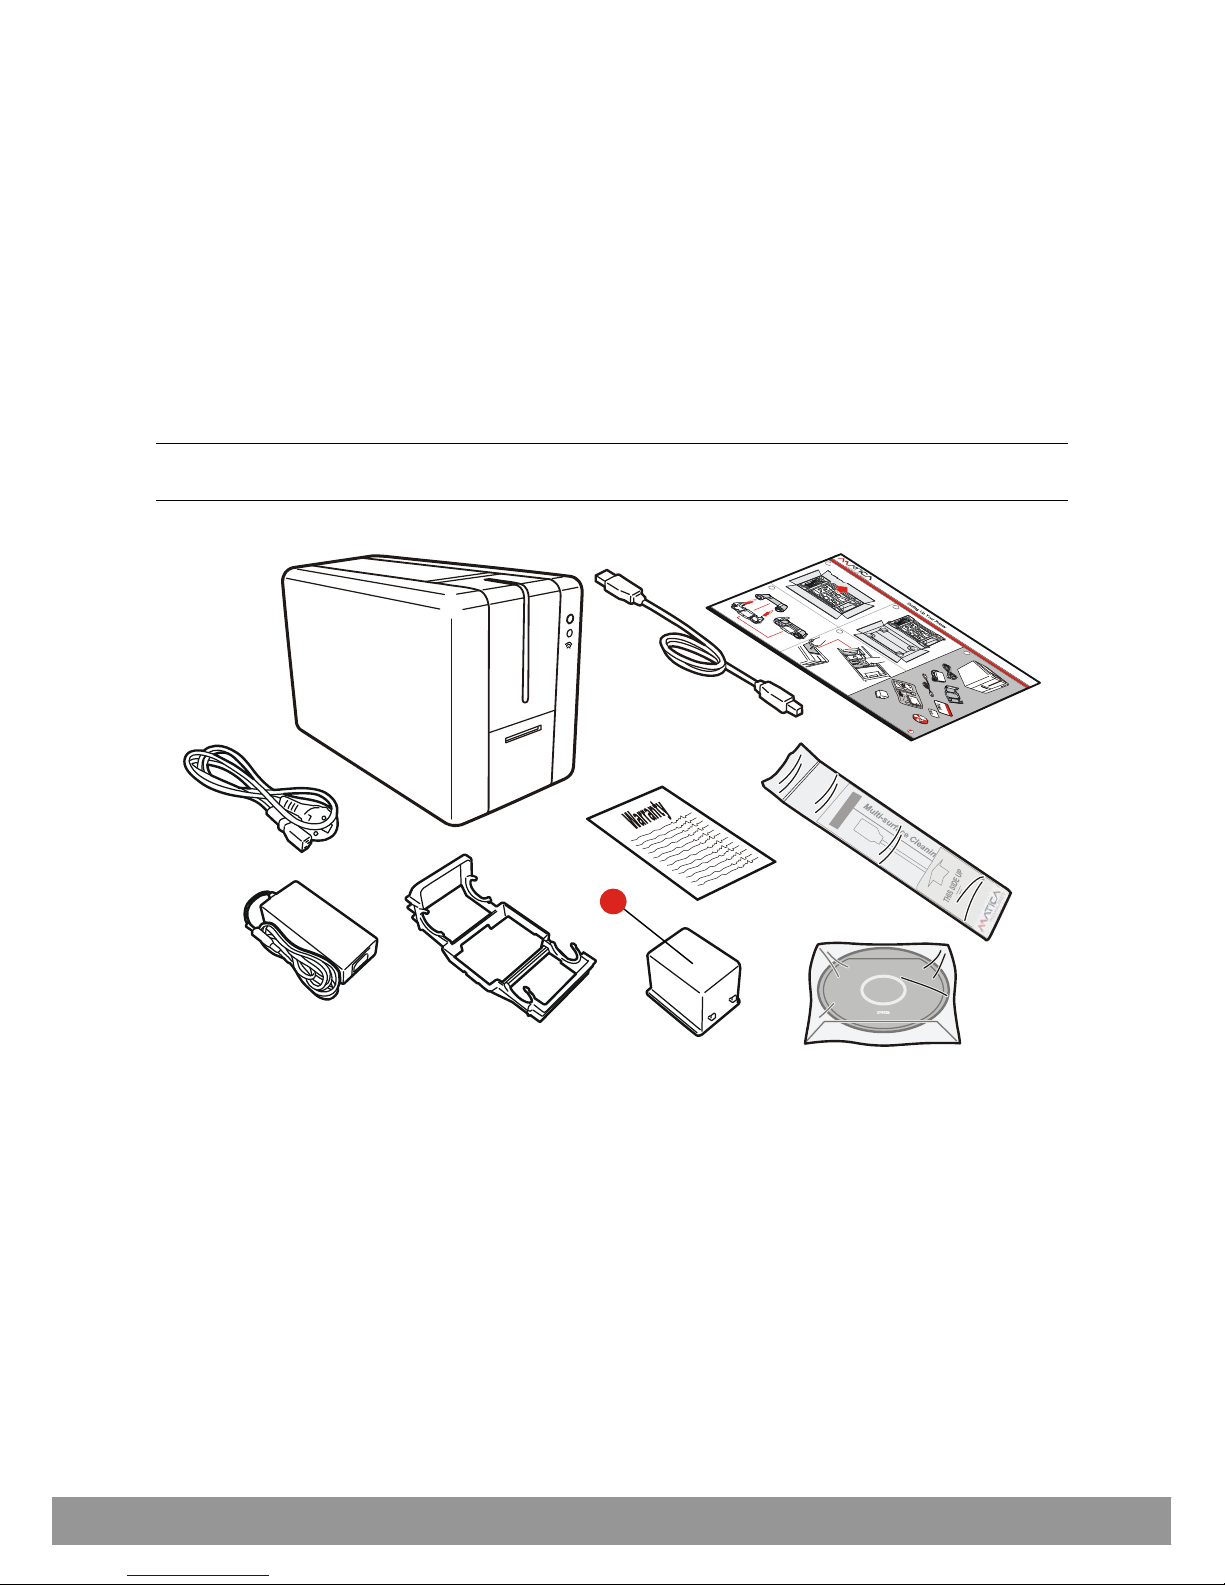
Unpacking the Printer ................................................................................................................ 1-2
Functional Description ............................................................................................................... 1-3
Front View .............................................................................................................................. 1-3
Operator Panel....................................................................................................................... 1-3
Rear View ............................................................................................................................... 1-4
Power Supply......................................................................................................................... 1-4
Plastic Cards.......................................................................................................................... 1-4
INSTALLATION PROCEDURES .................................................................................... 2-1
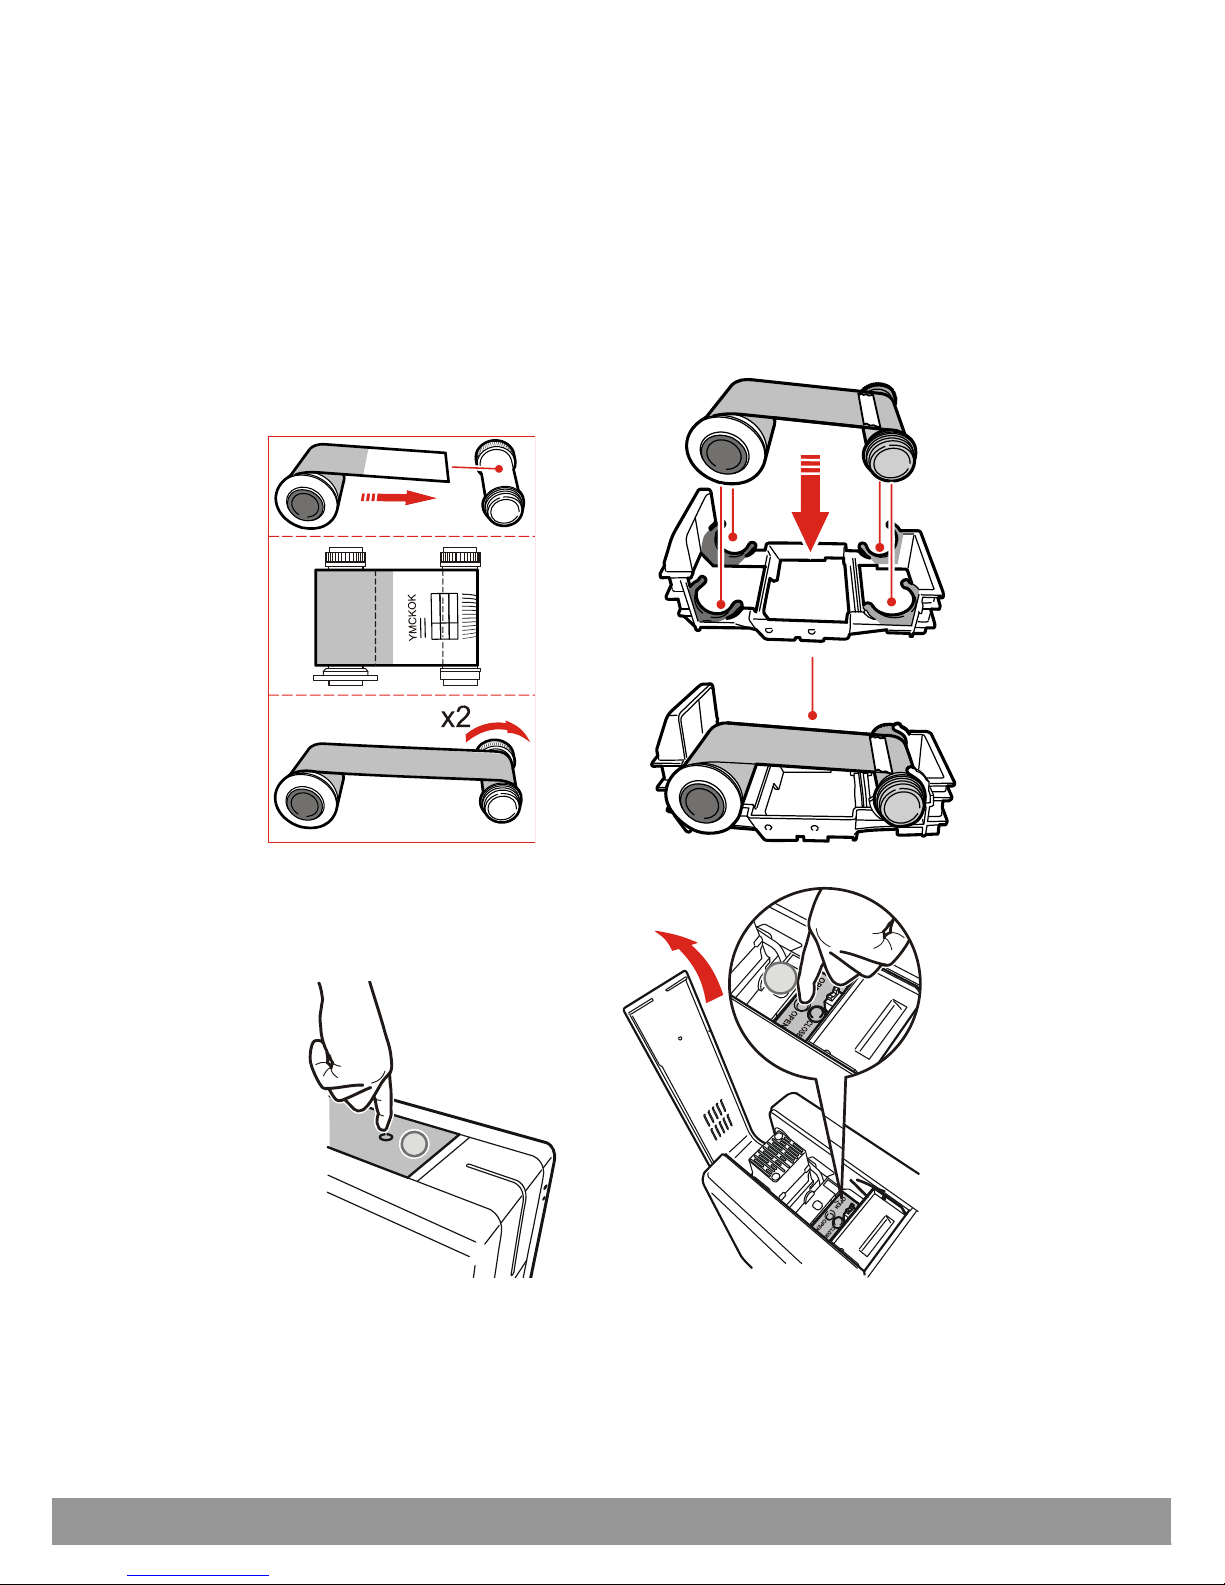
Installing the Ribbon .................................................................................................................. 2-1
Card Feeding ............................................................................................................................. 2-2
Input Hopper (Automatic Card Feeder).................................................................................. 2-2
Front Slot (Manual Card Hopper)........................................................................................... 2-3
Adjusting the Card Thickness .................................................................................................... 2-3
Connecting the Power Supply and Powering ON the Printer .................................................... 2-4
INSTALLING THE SOFTWARE AND CONFIGURING THE PRINTER.......................... 3-1
Connecting the Printer to the Computer and Installing the Software........................................ 3-1
Add Printer Wizard Program Communication............................................................................ 3-3
USB Connection ........................................................................................................................ 3-3
Ethernet (LAN) Connection using DHCP.................................................................................... 3-4
Ethernet (LAN) Connection with Fixed IP................................................................................... 3-5
Wi-Fi Connection using DHCP .................................................................................................. 3-7
Wi-Fi Connection with Fixed IP.................................................................................................. 3-9
Uninstall Program Tabs ........................................................................................................... 3-11
Add a second printer or change the type of connection ......................................................... 3-11
Matica Printer Manager ........................................................................................................... 3-11
Using the Printer Manager Instrument Bar with the Mouse................................................. 3-12
Printers Management............................................................................................................... 3-12
Printer Manager ....................................................................................................................... 3-13
Status Monitor ..................................................................................................................... 3-13
Preferences .......................................................................................................................... 3-15
Maintenance ........................................................................................................................ 3-15
Encoding (optional) .............................................................................................................. 3-16
Settings ................................................................................................................................3-16
Updating the Printer Firmware............................................................................................. 3-17
Duplex activation ................................................................................................................. 3-17
Options ................................................................................................................................3-17
Printer Status Pop-up .............................................................................................................. 3-18
User Guide iii

PRINTING ....................................................................................................................... 4-1
Card Printing .............................................................................................................................. 4-1
Card Printing Using Word ...................................................................................................... 4-1
Double-side Printing .................................................................................................................. 4-2
Color Settings ............................................................................................................................ 4-4
PRINTER MAINTENANCE ............................................................................................. 5-1
Printer Routine Cleaning ............................................................................................................ 5-1
Standard Cleaning ..................................................................................................................... 5-1
Standard Cleaning Procedure................................................................................................ 5-1
Card Path Advanced Cleaning................................................................................................... 5-4
Advanced Cleaning Procedure .............................................................................................. 5-4
Cleaning Roller Advanced Cleaning .......................................................................................... 5-6
Roller Cleaning Procedure ..................................................................................................... 5-6
Printhead Cleaning..................................................................................................................... 5-8
Printhead Cleaning Procedure............................................................................................... 5-8
Printing Test Cards .................................................................................................................... 5-9
Printing a Text Test Card ....................................................................................................... 5-9
Printing Graphic Test Card .................................................................................................... 5-9
Printing a Dual-Side Test Card .............................................................................................. 5-9
ENCODING OPTIONS .................................................................................................... 6-1
Chip Encoding ........................................................................................................................... 6-1
Encoding Test ........................................................................................................................ 6-1
Test ........................................................................................................................................ 6-2
Reading the Chip Encoding ................................................................................................... 6-2
External Encoding...................................................................................................................... 6-3
Magnetic Encoding .................................................................................................................... 6-3
Configuration and Test .......................................................................................................... 6-3
Configuration ......................................................................................................................... 6-4
Test and Encoding ................................................................................................................. 6-4
TROBLESHOOTING ....................................................................................................... 7-1
Printer does not power on ......................................................................................................... 7-1
Printer has printing problems..................................................................................................... 7-1
RIBBONS ........................................................................................................................ 8-1
CLEANING KITS............................................................................................................. 8-1
TECHNICAL CHARACTERISTICS................................................................................. 9-1
iv User Guide
Printer has problem with ribbon ................................................................................................7-2
Chip Encoding problems ...........................................................................................................7-2

Product Overview
The printer described in this User Guide provides full color dye-sublimation or monochrome thermal
transfer printing on standard 54x86 mm plastic cards. PVC, PVC Composite, PET, ABS and PET cards are
supported (accordingly with varnished card product configuration). It is managed from the computer
through the USB port or via Ethernet/WiFi.
The ribbon carrier, that comes with the printer, allows the ribbon to be replaced quickly and easily.
A number of options are available so that the printer can be configured to operate in different types of
environments:
•Magnetic encoder
•Smart Card Encoding Station
•Contact and Contactless Smart Card encoder
•10/100 Ethernet and/or 802-11 Wi-Fi connection
•Single Card Feed Option
•Connection for external smart card encoding
•Locking system for input Hopper, reject bin and ribbons.
Getting Started
The printer comes with a number of accessories; check carefully that they have been all received. This list
may vary depending on the location where the printer will be used.
The printer is shipped in special packaging designed to prevent damage during transportation. If any visible
damage is noticed upon reception, contact the dealer immediately.
Maintain the printer packaging intact and store it in a clean and dry place.
Note: If the printer has to be returned, it must be returned integrally with its full original packaging (box,
inner wedges and protective bags). If it is returned without its original packaging and any
components are damaged during transportation, such components will no longer be covered by the
warranty. Matica will also charge for the new packaging which will be required to ship the printer
back
.
User Guide 1-1

Unpacking the Printer
The following items are included in the box:
•Printer
•Software CD-ROM containing the installer, printer driver and Printer Manager
•The Placemat
•Warranty and Customer Service Information
•Cleaning kit
•Power cord
•Power supply
•USB cable
•Reject bin, optional for Moca (1)
Note: Contact the dealer immediately if any of the items listed above is missing.
Only use the power supply provided with the printer.
Multi-surfaceCleaning
1
1-2 User Guide

User Guide 1-3
Functional Description
Front View
The front of the printer is the operator side and features:
1) Front slot (only when this option has been ordered)
2) Input Hopper
3) Operator panel and printer status indicators: ON/OFF button and a 3-color printer status LED.
Operator Panel
The front operator panel consists of:
1) Soft touch ON/OFF button with a white LED that, when on, indicates when the printer is switched ON:
•Switches the printer ON and OFF; to switch OFF the printer keep this button pressed for a few
seconds.
2) 3-color LED (amber, red and green) indicating the printer’s functional status or an error condition.
•Green
On steady Printer ready
Flashing Printer receiving data or printing
•Amber
On Steady Ribbon almost finished
Flashing Operational error: no ribbon or card detected
•Red
On Steady Mechanical error (cover open, incorrect card insertion or faulty mechanical component)
Flashing Servicing required (during cleaning, heating, cooling or during firmware upgrade)
3) Soft touch WiFi button (for printer models with WiFi module only) with a blue LED:
•Switches the WiFi module ON and OFF
•Blue LED:
On Steady WiFi connection established
Flashing WiFi data reception/transmission underway
4) Backlit blue stripe: illuminates the Card Hopper to simplify card detection.
1
2
3
1
2
3
4

Rear View
1-4 User Guide
The following components are located on the back panel:
1) Power cord socket
2) Two USB connectors (Type A and B)
3) Ethernet connector with traffic LED
4) SD card (option) slot
5) Reject bin attachment slots
6) External smart encoder (option) connector
7) Kensington lock.
Power Supply
The printer comes with an external auto-switching power supply.
Note: Only use the power supply provided with the printer.
Plastic Cards
Listed below are the plastic card specifications:
•Type: Composite PVC, PET, ABS (varnished)
•Dimensions: ISO CR80 - ISO 7810 (53.98 x 85.60)
•Thickness: 0.25 to 1.25 mm (10 to 50 mil) manual gauge adjustment
•Magnetic stripe: ISO 7811
•Smart Card Contact: ISO 7816-1,2,3,4
•Smart Card Contactless: ISO 14443A/B.
6
5
4
7
2
3
12

Installation Procedures
Installing the Ribbon
Original Matica ribbons are to be installed carefully. The ribbon carrier that comes with the printer helps to
install the ribbon quickly, easily and accurately. Once the ribbon is in its carrier, the carrier can then be
easily dropped into the printer using the yellow guides.
1) Installing the ribbon 2) Insert the ribbon (not provided with the printer)
into the ribbon carrier.
3) Open the printing module compartment cover.
a
b
4) Insert the ribbon carrier into the printer, looking for the yellow guides that have the same color as the
take-up core.
User Guide 2-1

5) Close the printing module compartment cover.
a
b
c
e
Note: Keep away from the printhead so as avoid damaging it.
Card Feeding
The input Hopper (automatic card feeder) can hold a maximum of one hundred 0.76 mm thick cards. A label
inside the door gives the instructions for correctly positioning and orienting the card.
When the single card manual feeder option is present, it can be used without needing to empty the input
Hopper.
The card path can be selected via software to speed card processing:
•
Hopper
•
Reject bin.
The output Hopper at the front of the printer can hold a maximum of eighty or thirty 0.76 mm thick cards
depending on whether the manual feeder option is present for the Moca model.
Input Hopper (Automatic Card Feeder)
1) Open the Hopper door on the operator panel by pressing at point (a) indicated in the figure below. Load
the cards in the Hopper (b) and then close the door.
ab
c
b
c
b
c
b
c
b
c
b
c
2-2 User Guide

Front Slot (Manual Card Hopper)
The manual card feeder is always ready for use and is prioritized. It is suggested that it be used when the
job requires a card that different than the ones loaded in the input Hopper.
1) Insert the card into slot (a) indicated in the figure below.
a
Adjusting the Card Thickness
The card thickness can be adjusted using the wheel inside the input Hopper.
Cards with thicknesses ranging between 0.25 mm and 1.25 mm (10 - 50 mil) can be processed by the
printer. Proceed as follows to adjust the card thickness:
1) Open the printing module compartment cover. 2) Rotate the green wheel until the arrow points
to the thickness of the card to be printed.
a
3) Close the printing module compartment cover.
b
User Guide 2-3

Connecting the Power Supply and Powering ON the Printer
Connect the power cord to the power outlet, to the power supply and then connect the power supply to the
printer as shown below. Press the ON/OFF button to power on the printer.
c
b
a
2-4 User Guide

Installing the Software and Configuring the Printer
The CD-ROM that comes with the printer contains the following:
•Windows Vista, Seven, Win8, Win 8.1 (32 and 64 bit) printer driver for USB, Ethernet LAN and
Wireless connections (if supported by the purchased model)
•Printer Manager application
•PDF User Guide.
Connecting the Printer to the Computer and Installing the Software
1) Power on the computer and then insert the CD-ROM into the drive. Follow the instructions displayed by
the setup program.
Note: Do not connect the printer yet; the setup program will instruct when to do so.
2)
The setup program residing on the CD-ROM executes automatically and the following screen is
displayed:
Note: If the setup program does not execute automatically, execute it manually as follows:
•Select System resources
•Select the CD-ROM/DVD drive
•Double click the Setup program.
User Guide 3-1

3) Click “I accept the agreement” to accept the license agreement and then click Next. The following
screen is displayed.
4) Click Next to continue. The setup program will request for the destination folder into which the
installation files will be stored (the amount of disk space required for the installation is indicated on the
bottom of the screen).
5) Click Next to continue. The request for program usage privileges is now displayed. Choose between For
all users and For the current user only and then click Next to continue. A screen summarizing the
settings just made is displayed.
6) Click Install to continue. The following screen is displayed upon completion of the installation
procedure:
7) Click Finish to continue with the installation. The connection mode screen is displayed.
The installation program automatically executes the Launch Add Printer Wizard by means of which the
type of printer connection can be selected. The possible choices are USB, Ethernet/LAN and Wireless
(WiFi).
Note: If Launch Add Printer Wizard check box is deselected, the Add Printer Wizard can still be
executed manually from Start > Programs >Matica.
3-2 User Guide

Add Printer Wizard Program Communication
When the CD-ROM software installation is complete, a help Wizard is displayed for configuring the
connection mode to be used.
Note: Connection setup can be changed at any time by activating the Wizard mode from the Print
Management Program.
Choose the type of connection required and proceed with its installation.
USB Connection
Click the USB radio button on the Printer Wizard Program screen and then click Next. The following screen
is displayed:
Click Next and wait for the configuration software to recognize the printer and display a message indicating
that the installation was completed successfully.
User Guide 3-3

Ethernet (LAN) Connection using DHCP
Click the LAN radio button on the Add Printer Wizard Program screen. The following screen is displayed:
Choose the LAN connection required, selecting either DHCP supplied automatically by the network server
or manual insertion on the basis of specific requirements, then click Next.
Note: For more information regarding a specific company network, ask the network administrator. The
automatic selection DHCP Network Installation is suggested for the more common installation types.
The following screen is displayed:
Attach the network cable to the printer and then click Next.
The following screen is displayed by the configuration software:
If the printer is not found, click Start to search for the network printer and wait until it is found.
3-4 User Guide

Once found, the printer appears in the list of available printers with its related information (IP Address,
Printer name, Mac Address).
Click Next and wait for the configuration software to identify the printer and to display a message indicating
that installation was successful.
Ethernet (LAN) Connection with Fixed IP
Click the LAN radio button on the Add Printer Wizard Program screen. The following screen is displayed:
Click the Fixed IP Network installation radio button for the manual insertion on the basis of specific
requirements, then click Next.
Note: For more information regarding a specific company network, ask the network administrator. The
manual selection Network Installation is suggested for the more common installation types.
User Guide 3-5

The following screen is displayed:
Attach the network cable to the printer and then click Next.
The following screen is displayed by the configuration software:
Enter the data required for the manual configuration of the network (if part of a company network, it may be
necessary to refer to the network administrator for information).
Store the data just entered by clicking Apply Changes and then click Next. The following screen is
displayed:
Follow the instructions displayed:
•Power OFF the printer
•Disconnect the USB Cable
•Connect the printer to the network using the LAN cable
•Power the printer back ON again.
3-6 User Guide

Click Next upon completion. The following configuration software screen is displayed:
If the printer is not found, click Start to search for the network printer and wait until it is found.
Once found, the printer appears in the list of available printers with its related information (IP Address,
Printer name, Mac Address).
Click Next and wait for the configuration software to identify the printer and to display a message indicating
that installation was successful.
Wi-Fi Connection using DHCP
Click the WiFi radio button on the Add Printer Wizard Program screen. The following screen is displayed
for the search of the SSID wireless connection. Choose the wireless connection available by using the
password associated to the WIFI network. The following screen is displayed:
Choose the WIFI connection required, selecting either DHCP supplied automatically by the network server
or manual insertion on the basis of specific requirements, then click Next.
User Guide 3-7
Table of contents
Other Matica Printer manuals