MATOT 100 User manual

Matot, Inc. 2501 Van Buren St. Bellwood, IL 60104 708-547-1888 800-369-1070 www.matot.com
Model 100 Winding Drum Dumbwaiter
Installation Manual
DOC-0100
Version 2.1
July 2020

Matot, Inc. 2501 Van Buren St. Bellwood, IL 60104 708-547-1888 800-369-1070 www.matot.com
Table of Contents
1. Safety Information............................................................................................ 1
2. Introduction...................................................................................................... 2
3. Product Information ......................................................................................... 3
4. Guide Rails...................................................................................................... 4
5. Drive Machine................................................................................................ 14
6. Pre-Wired Duct (Optional).............................................................................. 19
7. Car ................................................................................................................ 20
8. Car Gate........................................................................................................ 22
9. Hoisting Cable Installation (Roping)............................................................... 24
10. Hoistway Doors ............................................................................................. 29
11. Controller and Limit Switches ........................................................................ 37
12. Travel Cable.................................................................................................. 39
13. Completing Electrical Connections ................................................................ 40
14. Power Door with Belt Driven Operator........................................................... 41
15. Power Door with Magnet Clutch Operator...................................................... 45
16. Final Checks.................................................................................................. 49
17. Troubleshooting............................................................................................. 50
18. Support.......................................................................................................... 54
List of Figures
Figure 1 - Drum Below Dumbwaiter ............................................................................... 3
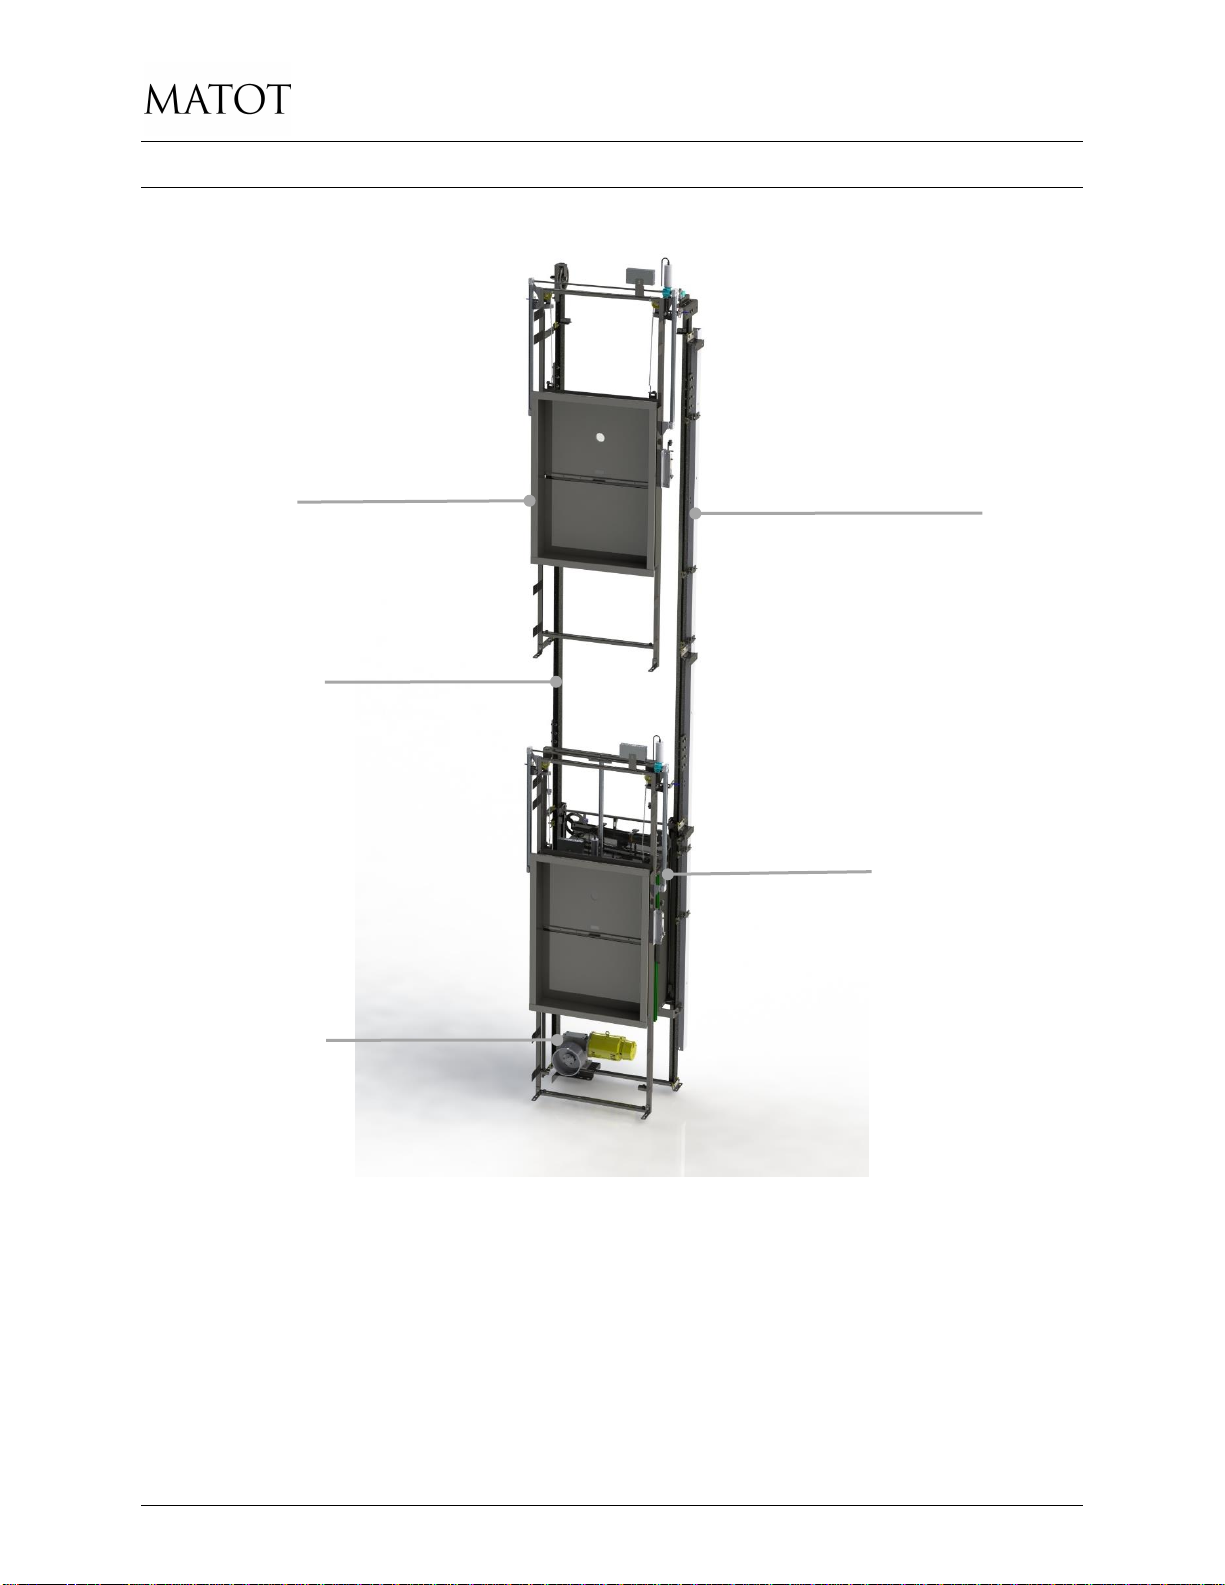
Figure 2 –General Tower Assembly Drawing................................................................ 5
Figure 3 - Tower Assembly Components....................................................................... 6
Figure 4 - Tower Stabilization ........................................................................................ 7
Figure 5 –Rail Bracket Assembly.................................................................................. 9
Figure 6 –Rail Base Mounting....................................................................................... 9
Figure 7 - Drum Below Deflector and Slack Cable Device............................................ 11
Figure 8 - Drum Below Rail Spreader .......................................................................... 12
Figure 9 - Drum Above Machine Mounting Angles....................................................... 13
Figure 10 - Drum Below Machine Placement............................................................... 14
Figure 11 - Machine Mounting Angle ........................................................................... 15
Figure 12 - Drum Above Machine Placement............................................................... 16

List of Figures
INSTALLATION MANUAL iii WINDING DRUM DUMBWAITER
Figure 13 –Solid Stops................................................................................................ 17
Figure 14 - Rail Mounted Spring Buffers...................................................................... 17
Figure 15 - Floor Mounted Spring Buffers.................................................................... 18
Figure 16 –Duct Installation ........................................................................................ 19
Figure 17 –Car before gate installation ....................................................................... 20
Figure 18 –Car with gate installed............................................................................... 21
Figure 19 - Gate Installation......................................................................................... 22
Figure 20 –Gate Switch Installation............................................................................. 23
Figure 21 - Drum Below Rope Termination.................................................................. 25
Figure 22 - Drum Overhead Rope Termination............................................................ 27
Figure 23 - Cable Drop, Drum Below ........................................................................... 28
Figure 24 - Cable Drop, Drum Overhead ..................................................................... 28
Figure 25 - Door Alignment.......................................................................................... 29
Figure 26 - Door Brackets............................................................................................ 30
Figure 27 –Floor Loading Door Sill Detail..................................................................... 31
Figure 28 - Counter Height Loading Door .................................................................... 32
Figure 29 - Floor Loading Door.................................................................................... 33
Figure 30 - Masonry Door Installation Detail ................................................................ 34
Figure 31 - Drywall Door Installation Detail .................................................................. 34
Figure 32 - Emergency Release and Pushbutton Brackets (Optional).......................... 35
Figure 33 - Emergency Release Installation................................................................. 36
Figure 34 - Switch Bracket Installation......................................................................... 37
Figure 35 - Limit Switch Elevation................................................................................ 38
Figure 36 - Travel Cable .............................................................................................. 39
Figure 37 - Remote Wiring Loom................................................................................. 40
Figure 38 - Belt Drive Power Door ............................................................................... 42
Figure 39 - Door Lifter Detail........................................................................................ 42

List of Figures
INSTALLATION MANUAL iv WINDING DRUM DUMBWAITER
Figure 40 - Gearmotor Detail ....................................................................................... 43
Figure 41 - Door Control Signals.................................................................................. 43
Figure 42 - Gripper Adjustment.................................................................................... 45
Figure 43 - MLS Switch Adjustment............................................................................. 46
Figure 44 - Power Door Switch Identification................................................................ 47

Safety Information
INSTALLATION MANUAL 1 WINDING DRUM DUMBWAITER
1. Safety Information
The installation of Matot Drum Dumbwaiters should only be performed by qualified,
experienced, and trained elevator installers. Working in the dumbwaiter hoistway and on
dumbwaiter equipment can be hazardous. All Safety Rules associated with installing elevator
type equipment must be followed at all times. Proper protective equipment must be used at all
times.
Read this manual carefully. Be thoroughly familiar with all parts and procedures before
attempting to install, maintain, or repair this equipment.
There are many design differences with Drum dumbwaiters. This manual does not reference
every possible design scenario but does take you through the general steps of installation. In
addition to this manual you will receive prints that are job specific. Please review all information
included in the Installation package along with these procedures.

Introduction
INSTALLATION MANUAL 2 WINDING DRUM DUMBWAITER
2. Introduction
The following instructions are a guide for installing the Matot Winding Drum Dumbwaiter.
When Details are referenced, they will usually be located on the pages following the
instructions.
If anything is unclear, or you can’t find what you are looking for, please do not hesitate to call us
for assistance.
We appreciate your business, and as always, will do whatever it takes to supply you with the
support needed.
Sincerely,
Scott Holat
Vice President,
Customer Service & Sales
Matot, Inc.

Product Information
INSTALLATION MANUAL 3 WINDING DRUM DUMBWAITER
3. Product Information
A typical Drum Below dumbwaiter is shown below for reference, with key components labeled.
Figure 1 - Drum Below Dumbwaiter
DOOR
RAIL
MACHINE
PRE-WIRE DUCT
CAR

Guide Rails
INSTALLATION MANUAL 4 WINDING DRUM DUMBWAITER
4. Guide Rails
Installation begins with the guide rails. Position of all other equipment is determined from the
rail position.
4.1 Verify hoistway dimensions
If the dumbwaiter travels through more than one floor, the smallest floor opening must be used
in plumbing the hoistway.
4.1.1 Verify door placement
Find out from the Contractor or Builder exactly where the hoistway doors are to be placed. Also
find out if door wall must coordinate with other building walls, as this could affect the entire
hoistway. Contractor or Builder should provide benchmarks to indicate wall location and
finished floor height.
4.1.2 Mark rail location
At the top landing, mark rail centerline that is parallel to the finished wall line. Refer to the
General Layout for proper dimensions. Plumb the hoistway by using these centerlines and
adjust centerlines according to conditions. Drop Plumb lines at rail centerline and mark off rail
center at all floors. After the rail centerlines are determined installation may begin.
4.2 Install supporting tower (optional)
If this unit does not include a supporting tower skip to Section 4.3.
4.2.1 Review Tower Assembly Drawing
Before beginning the tower assembly, see the Tower Assembly and General Layout drawing
included with each unit. If you do not have these drawings contact Matot. A sample tower
assembly drawing, without the job-specific dimensions, is shown in Figure 2 –General Tower
Assembly Drawing.
Matot supporting towers are constructed of tower sections (top, bottom and intermediate).
These sections will be assembled in the field. Refer to the Tower Assembly drawing and
General Layout drawing to determine the correct orientation and length of these sections.
See Figure 3 - Tower Assembly Components which shows how the components should be
assembled in the field.

Guide Rails
INSTALLATION MANUAL 5 WINDING DRUM DUMBWAITER
Figure 2 –General Tower Assembly Drawing

Guide Rails
INSTALLATION MANUAL 6 WINDING DRUM DUMBWAITER
Figure 3 - Tower Assembly Components

Guide Rails
INSTALLATION MANUAL 7 WINDING DRUM DUMBWAITER
4.2.2 Assemble lower section
Start by assembling the lower section of the tower in the hoistway.
Attach the tower side bands to the lower tower angles using the 3/8” hardware provided. Be
sure to orient the tower angles properly so that the lower section angles have the splice plate
mounting holes located at the top of the lower sections (see the splice plate detail on the Tower
Assembly drawing). Also be sure to orient the tower side bands correctly so that the center of
the rail bracket holes matches the rail location as shown on the tower drawing and the General
Layout drawing. Use the Tower Assembly drawing to locate the correct heights of the tower
side bands.
Now attach the tower tie bands to the front and rear of the lower tower sections at the locations
shown on the Tower Assembly drawing to complete the lower tower section.
4.2.3 Install lower section
Move the first section of tower to its appropriate position in the hoistway. This is determined by
the rail centerlines.
4.2.4 Assemble intermediate tower sections
Now assemble and stack the intermediate sections on top of the lower sections using the tower
splice plates to connect the tower sections. Intermediate tower sections should be 10’ long and
have splice mounting holes at each end of the sections. Refer to the Tower Assembly
drawings for side band locations and tie band locations.
4.2.5 Install tower stabilization angles
After a few tower sections are in place it may be necessary to plumb out and stabilize the tower
before any additional sections are added. Tower to wall stabilization angles are provided which
fasten the tower to the floor slabs and the top of the tower to the hoistway wall. See Figure 3 -
Tower Assembly Components and Figure 4 - Tower Stabilization. Depending on the floor to
floor height, some towers must be stabilized by anchoring to the hoistway walls between floors.
Refer to the Tower Assembly drawing for stabilizer positions.
Figure 4 - Tower Stabilization

Guide Rails
INSTALLATION MANUAL 8 WINDING DRUM DUMBWAITER
NOTE: Due to the wide range of construction used, Matot does not supply the fasteners
required to attach the dumbwaiter to the building structure.
4.2.6 Install other tower sections
Continue the stacking and plumbing process until the complete tower including the top section is
installed.
4.2.7 Install tower base angles
After the Tower is plumbed and in the correct position, the Tower base angles should be
fastened to the floor using the appropriate anchors.
Note: The tower is supplied with tie bands on the front and rear sides of the tower. If the tie
bands do not interfere with the installation of the doors, they may remain in place for extra
stability. Otherwise, they can be removed and discarded once the tower stabilizer angles have
been installed.
4.3 Install rail brackets
If you installed a supporting tower in the previous step, install the rail brackets to the tower side
bands as shown in Figure 4 - Tower Stabilization.
For units without a supporting tower, mount each guide rail bracket at each floor, at intermediate
locations if required, and near the top of the rail. Refer to General Layout and or Rail stacking
diagram for bracket elevations. Brackets should be mounted using the appropriate fastener for
the type of construction that is being used. Brackets should be level and center of the bracket
should coincide with the rail centerlines determined in 4.1.2. See Figure 5 –Rail Bracket
Assembly.

Guide Rails
INSTALLATION MANUAL 10 WINDING DRUM DUMBWAITER
4.4 Install guide rail and rail mounted devices
Remove coating from the guide surfaces. Re-coat with rail lubricant after installation.
Install first two sections of rail at the bottom of the hoistway. Attach rails to rail brackets with
bolts and rail clips supplied. The top and bottom rail sections are typically marked, however,
refer to General Layout and/or Rail stacking diagram to determine correct stacking of rail. T-
rail is stacked with the male end up.
Plumb rail and set distance between guide rails (DBG) to the required distance. Refer to
General Layout for DBG.
After installing the first rail sections, proceed to Section 7 for Car installation.
After car is installed, return to this section to continue installing rails.
Continue stacking rails on both sides of the hoistway per General Layout and Rail Stack
drawing.
4.4.1 Drum Below Deflector Sheave Installation
For a Drum Above machine, skip to Section 4.4.2.
Install the Overhead deflector sheave and the Slack Cable assembly to the top of the rails.
Refer to the General Layout to determine which rail each assembly mounts to. The deflector
assembly will bolt to the rail closest to the drum of the machine. On adjacent opening units the
deflector assembly bolts between the rails. See Figure 7 - Drum Below Deflector and Slack
Cable Device.

Guide Rails
INSTALLATION MANUAL 11 WINDING DRUM DUMBWAITER
Figure 7 - Drum Below Deflector and Slack Cable Device
NOTE: Standard rail setup is shown, if you have an adjacent opening car or special rail design,
additional details will be included in the Installation package for reference.
Install the rail spreader angle at the top of the rails. The top sections of rail have been pre-
drilled for this angle. See Figure 8 - Drum Below Rail Spreader.

Guide Rails
INSTALLATION MANUAL 12 WINDING DRUM DUMBWAITER
Figure 8 - Drum Below Rail Spreader
4.4.2 Drum Above Machine Mounting Angle Installation
For a Drum Below machine, skip this step.
If machine is supported by the rails, machine mounting angles will be provided. Some units that
include a supporting tower will have provisions to mount the machine to the tower (channels or
angles at top of tower). Mount the machine mounting angles to the rail with the bolts and rail
clips supplied. See Figure 9 - Drum Above Machine Mounting Angles.

Guide Rails
INSTALLATION MANUAL 13 WINDING DRUM DUMBWAITER
Figure 9 - Drum Above Machine Mounting Angles

Drive Machine
INSTALLATION MANUAL 14 WINDING DRUM DUMBWAITER
5. Drive Machine
Installation instructions for the drive machine are different for Drum Above and Drum Below
machines.
5.1 Drum Below Machine Installation
For a Drum Above machine, skip to Section 5.2.
5.1.1 Anchor machine base
Fasten the machine to each guide rail. Refer to the General Layout for the correct machine
orientation. Standard machines bolt to each guide rail and into the floor. Upright machines only
require bolting to the rail. See Figure 10 - Drum Below Machine Placement.
Figure 10 - Drum Below Machine Placement

Drive Machine
INSTALLATION MANUAL 15 WINDING DRUM DUMBWAITER
5.2 Drum Above Machine Installation
Figure 11 - Machine Mounting Angle
Install the car into the rail before mounting the machine. See Section 7.
Before machine is set in place, you may want to attach the hoist rope to the drum, see Section
9. It will be much easier to attach the hoist rope while the machine is on the floor.
5.2.1 Install machine base
Installer is responsible for providing lifting apparatus to safely lift machine into
place.
If it is not possible to lift the complete machine into place due to lifting or space constraints, it is
acceptable to remove the motor and gearbox from the base and install the components
separately.
Place the machine on top of the machine support angles and bolt into place. Refer to the
General Layout for the correct machine orientation. See Figure 12 - Drum Above Machine
Placement

Drive Machine
INSTALLATION MANUAL 16 WINDING DRUM DUMBWAITER
Figure 12 - Drum Above Machine Placement
5.3 Solid Stop or Spring Buffer Installation
Unit is supplied with lower solid stops or spring buffers. If your unit has solid stops, they can be
mounted at this time. If your unit has spring buffers, they should be mounted after the car is
installed. Using bolts and T-rail clips supplied, mount the solid stops to the rail. Mount the top of
the stops 6 inches below the lower door sill level. Sill level will be indicated on the General
Layout.
See Figure 13 –Solid Stops, Figure 14 - Rail Mounted Spring Buffers, or Figure 15 - Floor
Mounted Spring Buffers.
If your unit has an 8” pit, lower stops are not required.
Table of contents