Matrix Fitness 7xi User manual

Troubleshooting Guide:
7xi Console
Prepared by:
Emilie McWilliams
Date Prepared:
2/20/2015
Effective Date:
2/20/2015
Models Affected:
Matrix 7xi
Original Bulletin:
NB-1407002, Ver. 3
DESCRIPTION
Use this guide to troubleshoot a 7xi console. Tables are organized by symptoms:
Table 1 – Picard/GUI Application Crash or Frozen Screen
Table 2 – Error Message
Table 3 – Issue Running App
REQUIRED TOOLS
CF card reader Keyboard and mouse
COMMON CASES
Locate the symptom on Table 1, Table 2, or Table 3 below and follow the troubleshooting steps outlined across the
row. 1, 2, 3, 4, etc. indicate troubleshooting steps.
Table 1: 7xi Console – Picard/GUI Application Crash or Frozen Screen
Photo Symptom
(P: Persistent;
I: Intermittent)
Reboot
then
update
software
Check coax
connections
Check
internet
settings
Replace
inverter
and wire
Replace
tuner and
collect
Windows
logs
Check LCM. If
stating “Welcome,”
replace LVDS
wire. If not lit,
replace console.
Rewrite or
replace
compact
flash card
Can’t link to
internet 1 2 3
Console
shows black
screen 1 2 3
Console stuck
at loading
screen 1 2
White screen
or blue screen
error
(hcw72ATV.s
ys)
1 2 3 4

Return to Top
2| Revision Date: 11/10/15 | Revised by: Emilie McWilliams
Table 2: 7xi Console - Error Message
Photo Symptom
(P: Persistent;
I: Intermittent)
Reboot
then
update
software
Check
console
cable
connection
at UCB
Check LED6/7/8
status on LCB1.
Does it blink? If yes:
Step 4. If no:
replace console.
Clear
update
history then
reinstall
updates
Reinstall
LCB1
software
Reinstall
TV tuner
drivers Replace
LCB
Rewrite or
replace
compact
flash card
Error code 04B0
(P) 1 2 3 4
5
Error code 04B0
(I) 1
Netpulse
installation fails 1
2
No tuner found
(Hauppauge) 1
2 3 4
No tuner found
(AverMedia) 1 2
Windows Boot
Manager
1
Table 3: 7xi Console – Issue Running App
Photo Symptom
(P: Persistent; I:
Intermittent)
Reboot
then
update
software
Check
internet
settings
Check coax
connections
Check
Netpulse
installation
Clear
update
history
then
reinstall
updates
Delete
All
Channels
Delete
Nelpulse
file
Install
audio
tuner
card
driver
Reinstall
TV tuner
drivers
Rewrite
or
replace
compact
flash
card
Chinese
characters in
channel list 1 2
Netpulse tab
shows white
screen 1 2 3 5
4 6
No audio on live
TV 1 2
3 4
TV application
crash (P) 1 3*2
4 5
TV application
crash (I) 1 2
3
*If the customer does not use On Demand TV, skip this step and move to troubleshooting step 4.

Return to Top
3| Revision Date: 11/10/15 | Revised by: Emilie McWilliams
White screen
when trying to
watch live TV 1
2
TROUBLESHOOTING STEPS
The troubleshooting steps below are arranged alphabetically by title.
Check Coax Connections
1. To check coax connections:
a. Run a channel scan to verify the tuner picks up all
channels.
b. Replace the coax cable if it is pinched or flattened.
c. Replace screw fittings or crimp fittings with
compression fittings <Figure 1>.
d. Examine the cable for bends that are 90 degrees or
more. Install 90 degree coax adaptors or reroute path
if needed.
e. Verify the cable does not cross the generator within
the console. Reroute the cable with zip ties if needed.
2. Measure the coax signals using a cable signal reader:
Note: Normal coax signal strength reads 10dBmV (+ or –
2dBmV).
a. Using a cable signal reader, measure:
i. At the wall outlet
Note: If readings are below the normal range
from wall, assist the customer with contacting
an A/V company to troubleshoot.
ii. Before and after the splitter (if one is present)
iii. Where the coax cable enters the frame
iv. Where the coax cable hooks to the tuner
within the console
b. If readings are below the normal range, evaluate the
coax connections. Once readings at each point in the
coax run are within the normal range, end
troubleshooting and test the console.
c. If the initial readings from all four decibel readings
were within the normal range, refer to the Table 1, 2,
or 3 to review the next troubleshooting step.
Check Console Cable Connection at UCB and MCB/LCB
1. Check the communication connections at the console and
at the MCB/LCB
<Figure 2>
,
<Figure 3>
.
Unclip
connections and reattach if the connection is crooked.
<Figure 2>
<Figure 1>
<Figure 3>

Return to Top
4| Revision Date: 11/10/15 | Revised by: Emilie McWilliams
2.
Examine the cable and replace if it is pinched, flattened, or
broken.
3. Test the console.
Check Internet Settings
1. Press Enter 3 0 0 1 Enter to enter Service Mode.
2. Click Network <Figure 4>.
3. If the Network Setup fields are empty or if the IP Address is
not present, it means the Ethernet cable is not connected or
there is a problem with the network connection.
4. Turn off the console.
5. Plug the Ethernet cable into the console.
6. Turn on the console.
7. Press Enter 3 0 0 1 Enter to enter the Service Mode.
8. Check if a valid IP address is in the Network Setup fields
<Figure 5>.
9. Press Enter 3 0 0 4 Enter to enter Update Manager.
10. Click Settings.
11. Click Set Wireless Defaults for automatic network
configuration. After a few moments, the message
“Successfully connected to wireless network” should display.
Note: If the message shows “Failed to connect to wireless
network!” you will need to diagnose your networking issue.
<Figure 6>.
12. Press Enter 3 0 0 1 Enter to enter 7xi Service Mode. Check if
there is a valid IP address in the Network Setup fields <Figure
5>.
13. If you still have trouble connecting to the network, you have
isolated the issue to the server. Please contact your network
administration for assistance.
Check LCM
1. If LCM screen is lit and showing “Matrix” or “Welcome,”
replace the inverter and inverter wire <Figure 7>.
a. Remove four (4) screws from the back of the console
remove cover.
b. Check the LVDS cable. If the cable crooked or ajar,
reseat and test the console.
<Figure 7>
<Figure 8>
<Figure 6>
<Figure 5>
<Figure 4>

Return to Top
5| Revision Date: 11/10/15 | Revised by: Emilie McWilliams
c. If the issue remains, replace LVDS cable <Figure 8>.
d. Test the console.
2. If LCM screen is not lit, replace the console.
Check LED6/7/8 Status on LCB1
1. Check LED8 on LCB1 <Figure 9>, <Figure 10>:
a. If blinking, turn off the power to the unit, then turn on
power again after 3 seconds.
b. If it is not blinking, check the connection of the console
cable at the UCB and LCB1.
2. If the issue remains, check if LED6/7/8 blink at the same time
<Figure 9>, <Figure 10>:
a. If blinking, reinstall LCB1 software then test. If issue
remains, replace the LCB.
b. If not blinking, replace the console.
Check Netpulse Installation
1. Press Enter 3 0 0 1 Enter to open the 7xi Service Mode.
2. Tap or clickNetpulse.
3. If you see the following message, “This machine has never been
installed on the Netpulse network”, then your machine will need to be
synchronized with the Netpulse system <Figure 11>.
4. Tap or click Test Network.
5. Verify initial connectivity and all network tests passed.
Clear Update History, Then Reinstall Updates
1. Follow these steps to clear the update history:
a. Press Enter 3 0 0 4 Enter to enter Update Manager.
b. Press 2 5 3 2 7 Enter.
Note: This will delete the update history. Wait for a
confirmation message.
2. To reinstall all updates:
a. While still in Update Manager, press the tab Available
Updates.
b. Press Install Available Updates.
3. Test the console.
Delete All Channels
<Figure 9>
<Figure 10>
<Figure 11>
<Figure 12>

Return to Top
6| Revision Date: 11/10/15 | Revised by: Emilie McWilliams
1. Press Enter 3 0 0 1 Enter to enter Service Mode, then press the
TV tab.
2. Press Delete All Channels. This button is located underneath the
Channel List <Figure 12>.
Delete Netpulse File
1.
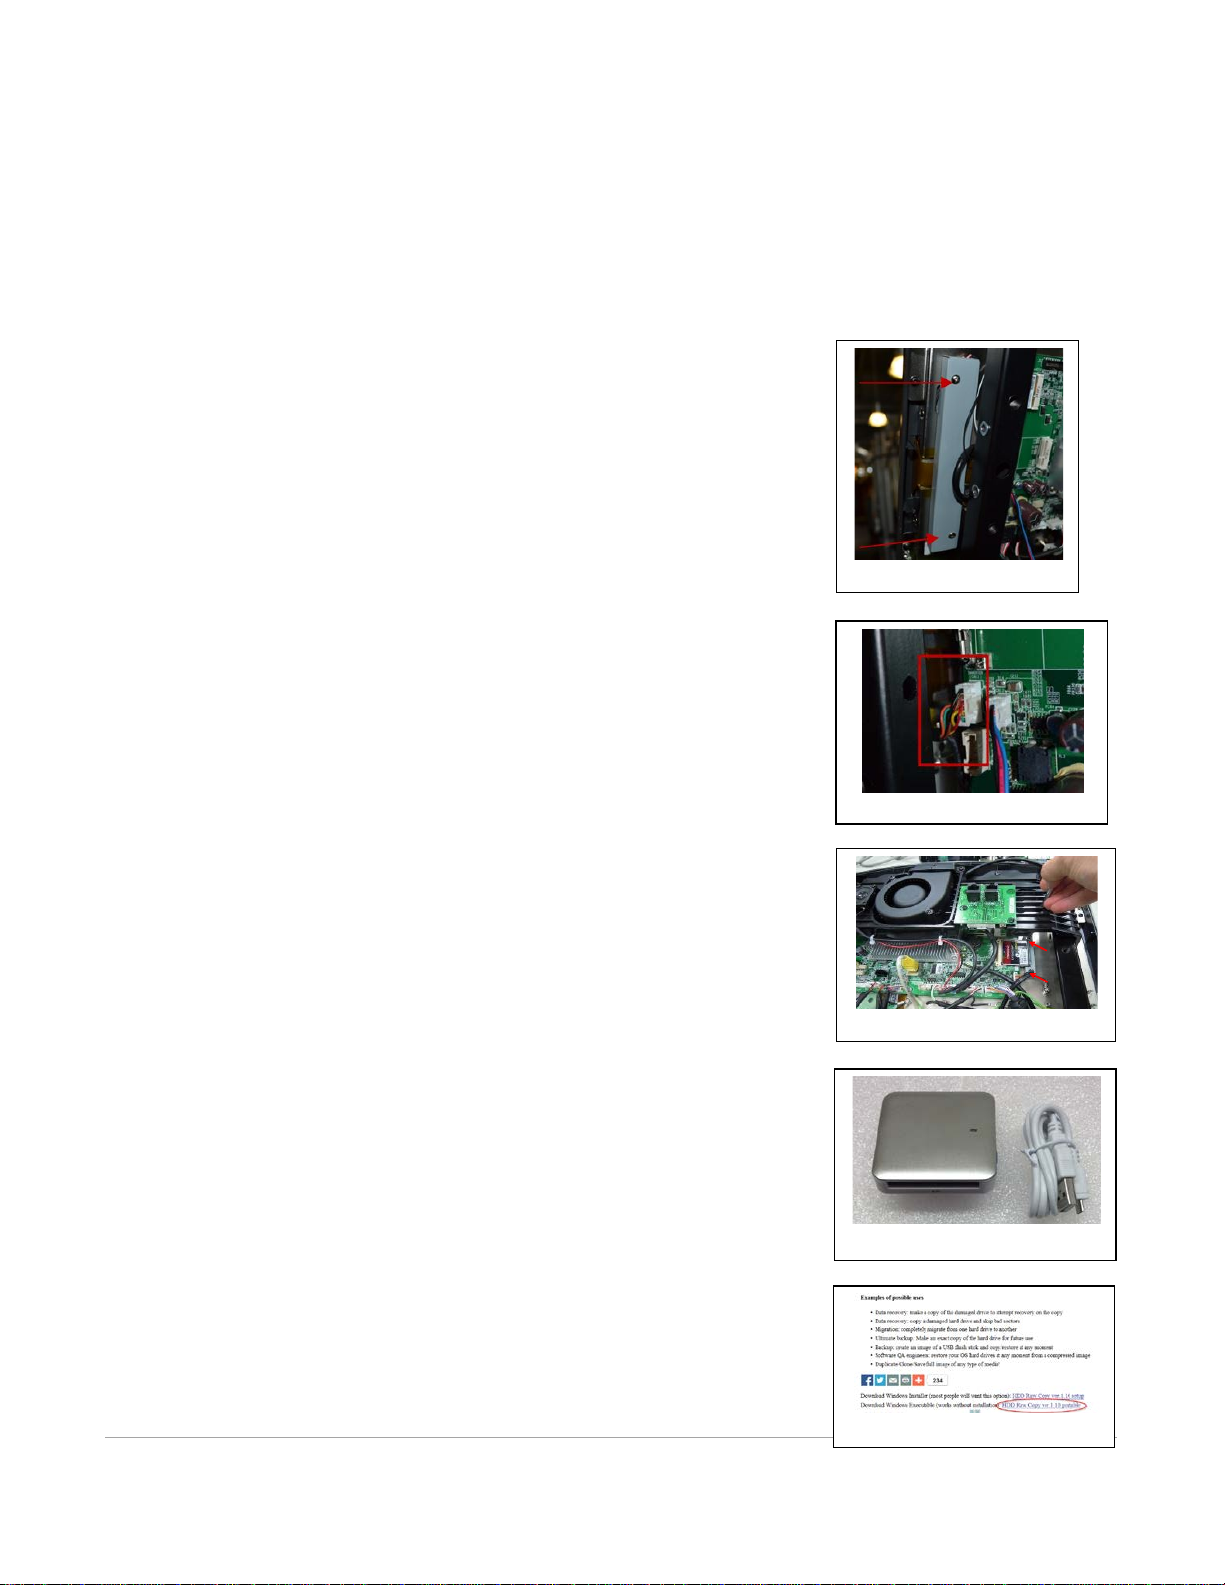
Follow these steps to set up the computer accessories:
a. Plug in USB hub with USB drive, keyboard, and mouse attached.
b. Turn the console off and on again.
c. Verify the console recognizes the devices.
2.
To delete Netpulse:
a. Open Computer.
b. Press CTRL+ALT+DEL on the keyboard.
c. Select Task Manager.
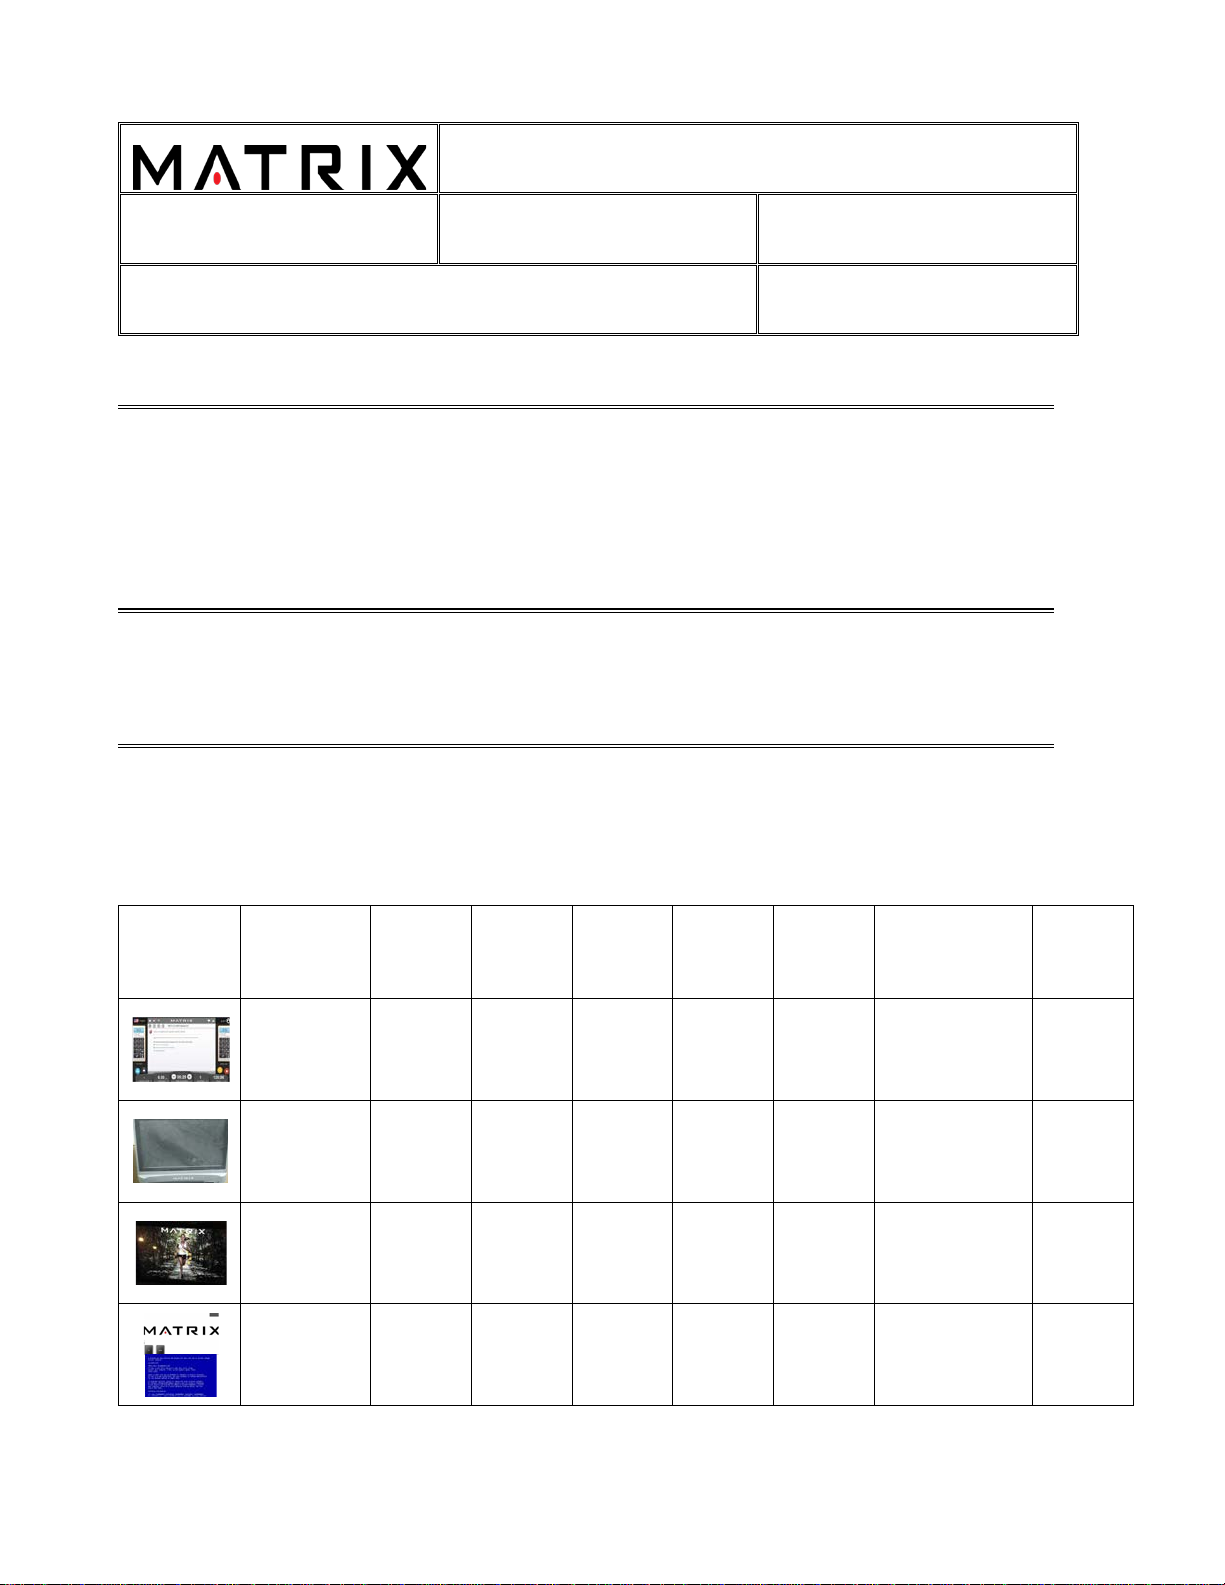
d. Click File > New Task <Figure 13>.
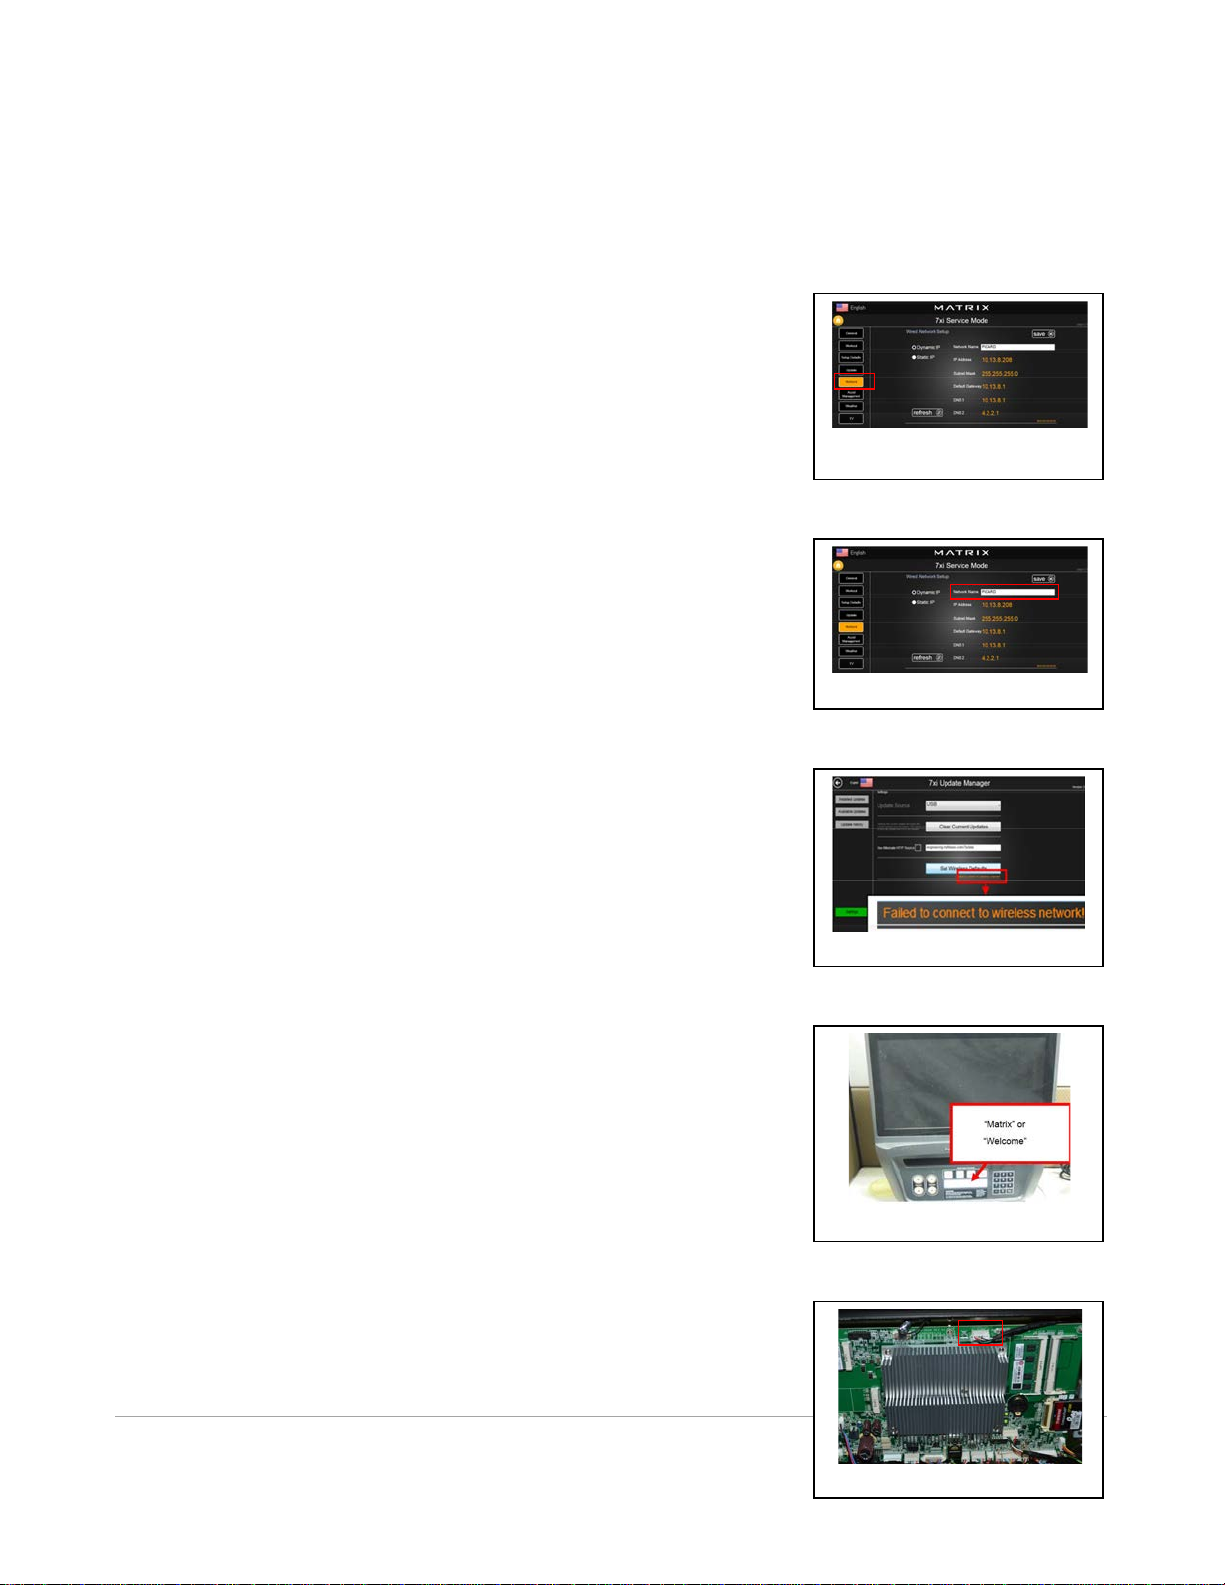
e. Type Explorer then click OK <Figure 14>.
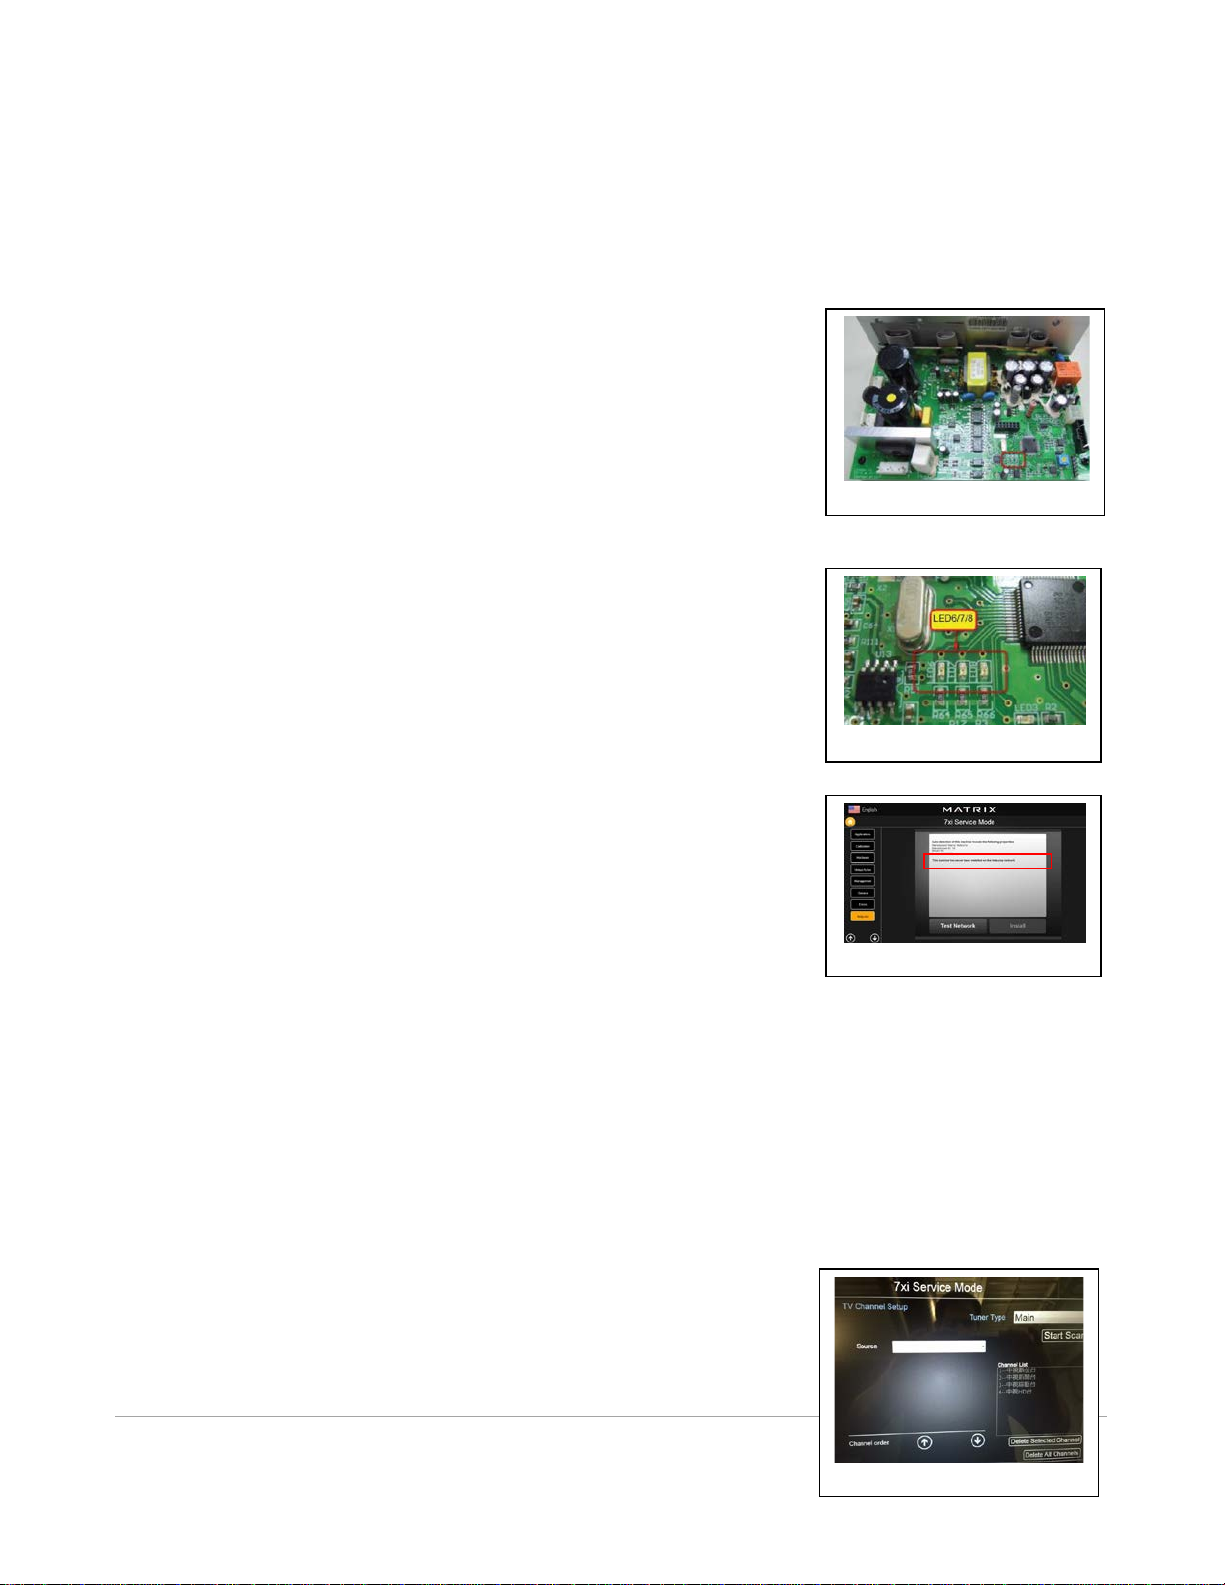
f. Open the location C:/apps/netpulse <Figure 15>.
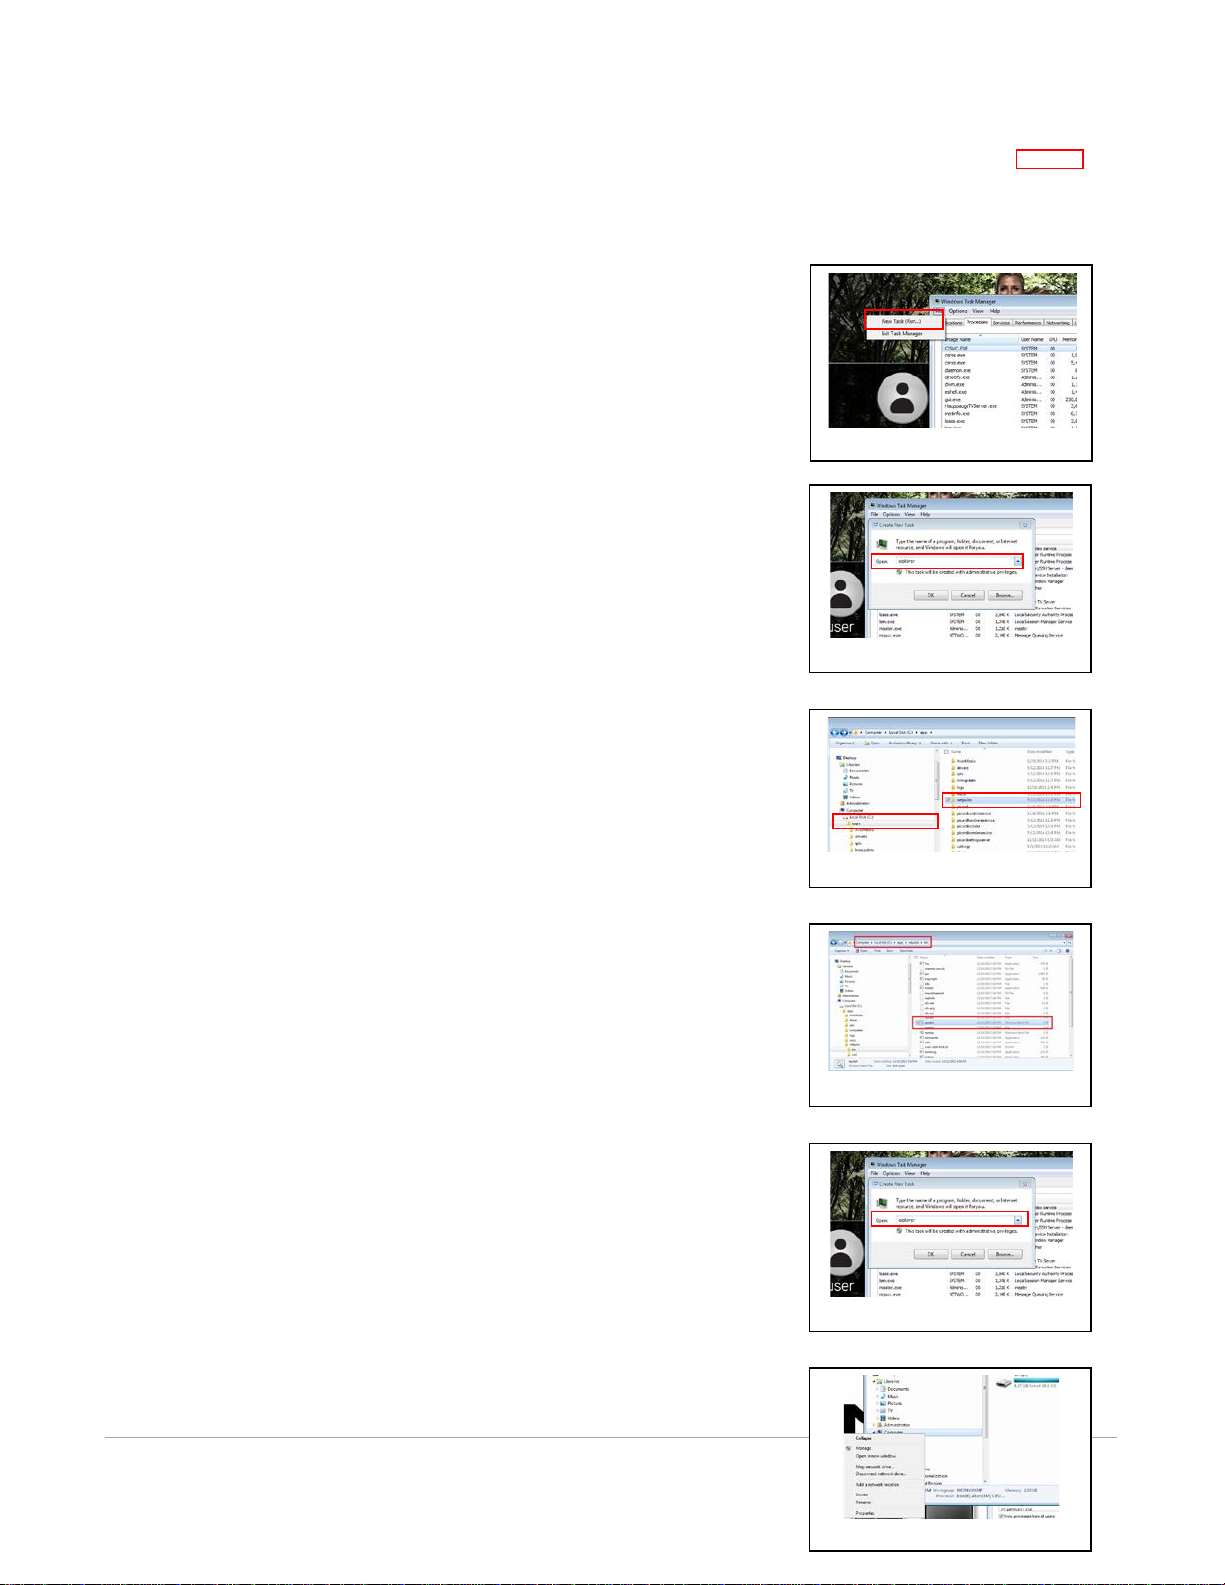
g. Open the BIN folder.
h. Double click to run NPstop <Figure 16>.
i. Wait as a black dialogue box appears and runs.
j. Navigate to the location C:/apps.
k. Click once to highlight Netpulse folder.
l. Press Delete on the keyboard.
m. Remove the computer accessories and reboot the console.
3.
Clear the update history and reinstall all updates.
Install Audio Tuner Card Driver
1.
Set up the computer accessories <Figure 12>.
a. Plug in a USB hub with a USB drive, keyboard, and mouse
attached.
b. Turn the console off and on again.
c. Verify the console recognizes the devices.
2.
Install the Audio Tuner Card Driver:
a. Press CTRL+ALT+DEL on the keyboard.
b. Select Task Manager.
c. Select File > New Task <Figure 13>.
d. Type Explorer then click OK <Figure 17>.
e. Right-click Computer and select Properties <Figure 18>.
f. Select Device Manager from the System page <Figure
19>.
g. Click the arrow to expand Sound, video, and game
controllers <Figure 20>.
h. Right-click WinTV HVR-950-q USB Audio Device and
select Uninstall <Figure 21>.
i. Click Yes to all prompts.
j. After the device has been uninstalled, select the icon to
Scan Computer for Hardware Changes <Figure 22>.
k. Wait as audio device automatically installs.
<Figure 15>
<Figure 16>
<Figure 14>
<Figure 17>
<Figure 18>
<Figure 13>

Return to Top
7| Revision Date: 11/10/15 | Revised by: Emilie McWilliams
l. Close all windows.
3.
Test
a. Relaunch the 7xi application.
b. Test the TV audio.
Reboot, Then Update Current Software Version
Instructions for upgrading to V3.2.6 (all cases)
1.
Press
Enter 7 3 2 6 6 8 Enter
to reboot the system.
2.
Upgrade the software version:
b. Press
Enter 3 0 0 4 Enter
to go to the Update Manager
Mode.
c. Press
Enter 2 5 3 2 7 Enter
to clear all software.
d. Press
Settings
and select
HTTP
or
USB
as update
source
<Figure 23>
.
e. Press
Available Updates
<Figure 24>
.
f. Press
InstallAll Updates
<Figure 25>
.
g. Press
Yes
.
h. Wait until the software update is complete.
i. When the update is complete and the console
automatically returns to the standard display, turn off
the power.
j. Wait 30 seconds before turning on the power.
k. Press
Enter 3 0 0 1 Enter
to go to Service Mode.
l. Press
General
and ensure the software versions are
correct.
m. Press
Enter 7 3 2 6 6 8 Enter
to reboot the system.
n. Test the console:
i. If the issue has been resolved, return to the
Update Manager and set the Update Source to
HTTP
.
ii. If the issue has not been resolved, review
Table 1, 2, or 3 to continue the troubleshooting
steps.
Instructions for upgrading TV database software (case 3 only)
1. Press
Enter 3 0 0 4 Enter
to go to the Update Manager.
<Figure 19>
<Figure 23>
<Fi 24>
<Figure 20>
<Figure 21>
<Figure 22>

Return to Top
8| Revision Date: 11/10/15 | Revised by: Emilie McWilliams
2. Press
Settings
and select
HTTP
as update source
<Figure
23>
.
3. Click
Use Alternate HTTP source
and key in the special route
“db” as shown below in red:
<Figure 26>
engineering.myfitness.com/7xi/db
4. Press
Available Updates
<Figure 24>
.
5. Press
Install All Updates <Figure 25>
.
6. Press
Yes
.
7. Wait until software update is complete
.
8. When the update is complete and machine automatically
returns to the standard display, turn off the machine.
9. Wait 30 seconds before turning on the machine.
10. Perform the 7xi TV channel setup.
11. Test the console.
Reinstall TV Tuner Drivers
If the touchscreen does not respond, begin with step 1. If the
touchscreen responds, begin with step 6.
1. Confirm which type of tuner the unit has (Hauppauge or
AverMedia) by pressing
Enter 5869 Enter
while on the
welcome screen. A ribbon will scroll at the top of the screen.
2. Set up the computer accessories <Figure 27>:
a. Plug in a USB hub with a USB drive, keyboard, and
mouse attached.
b. Turn the console off and on again.
c. Verify the console recognizes the devices.
3. Enter
Device Manager
.
4. Double click to open
AverMedia
.
5. Select the
Details
tab
.
6. Under
Values
, look for the string
USB\VID_07CA&PID_B837
<Figure 28>
:
a. If this string is present, the console identifies the
tuner. Move to the next troubleshooting step: Replace
CF card.
b. If this string is not present, the tuner cannot be
identified. Continue to step 6.
7. On the home page, press the appropriate code below to
reinstall the H837 tuner driver:
a. If Hauppauge tuner:
Enter 884678866 Enter
b. If 2015 AverMedia tuner:
Enter 884678855 Enter
<Figure 28>
<Figure 27>
<Figure 25>
<Figure 26>

Return to Top
9| Revision Date: 11/10/15 | Revised by: Emilie McWilliams
8. Press
Enter 732668 Enter
on
the
start screen to reboot the
console.
9. Test the console.
Replace Inverter and Inverter Wire
1. Remove
four (4)
screws from the back of the console and set
the cover aside.
2. Remove
four (4)
screws holding the iron plate to the console
frame.
3. Unplug the inverter wire
<Figure 29>
.
4. Remove
two (2)
screws holding the inverter to the lower
board
<Figure 30>
.
5. Install the new wire and inverter
.
6. Reassemble and test the console
.
Rewrite or Replace Compact Flash Card
To begin, follow these instructions to reposition the original CF card:
1. Reboot the system.
2. If the error remains, reseat the internal compact flash card:
a. Power off the console and unplug the power cord.
b. Remove the console from the frame and remove the
back cover of the console.
c. Remove the
four (4)
screws holding the iron plate to the
console frame
<Figure 31>
.
d. Carefully remove the CF card.
e. Reattach the CF card and ensure the connection is
straight.
f. Reassemble and test the console.
i. If the issue remains and a CF card reader
<Figure
32>
is available, begin with step 3 below to rewrite
the bad CF card.
ii. If the issue remains and a CF card reader is not
available, begin with step 8 to replace the CF card.
Follow these instructions to rewrite a bad CF card using a CF card
reader:
3. Record the Accumulated Distance, Accumulated Time, and
Serial Number. This data resets when the CF card is rewritten.
4. Connect the CF card reader to your computer
<Figure 32>
.
5. Copy the good CF card.
<Figure 29>
<Figure 30>
<Figure 33>
<Figure 31>
<Figure 32>

Return to Top
10| Revision Date: 11/10/15 | Revised by: Emilie McWilliams
a. Plug the good CF card with the good 7xi OS into the
card reader.
b. Download the HDD Raw Copy tool (portable) from
hddguru.com
<Figure 33>
.
http://hddguru.com/software/HDD-Raw-Copy-Tool/
c. Open “HDDRawCopy1.10Portable.exe”
<Figure 34>
.
d. Select the source CF card from the list
<Figure 35>
.
e. Click
Continue
.
f. Double-click to create the file name
<Figure 35>
.
g. Press
Save
.
h. Press
Continue
.
i. Press
Start
to create a good 7xi image file
<Figure
36>
.
j. Wait for the copy to finish
.
k. Close the application
.
6. Rewrite the bad CF card:
a. Remove the good CF card from reader and plug in bad
CF card.
b. Double-click to open “HDDRawCopy1.10Portable.exe”
<Figure 34>
.
c. Select the image file you copied from good CF card
.
d. Click
Continue
.
e. Select “USB Generic Storage Device” as the destination
disk
.
f. Click
Continue
.
g. Press
Start
to copy the image to your CF card
.
h. If a warning message asks you to confirm, press
Yes
.
7. Test the rewritten CF card in the 7xi console. If the error
remains, replace the CF card.
Follow these instructions to replace a bad CF card:
8. If the error remains, replace the internal compact flash card:
a.
Turn on the power, wait for the welcome screen
<Figure37>
.
b.
Press
Enter 1 0 0 1 Enter
.
c.
RecordtheAccumulated Mileage,Accumulated Time,
and Serial Number.
d.
Press
HOME
button on the screen.
e.
Turn off the power and disconnect the cord.
f.
Remove
four (4)
screws from the back of the console
and set the cover aside.
g.
Remove the
four (4)
screws holding the iron plate to
the console frame
<Figure 38>
.
h. Remove the CF card from the console frame.
i.
Install the replacement CF card.
j. Reattach the iron plate and console cover
.
k.
Turn onthe power.
l.
Wait for the 7xi Setup Wizard to display
<Figure 39>
.
m.
Using the left and right arrow to scroll pages, select
the appropriate settings for the following categories:
i. Model
ii. Language
iii. Date, time, and time zone
<Figure 37>
<Figure 38>
<Figure 36>
<Figure 34>
<Figure 35>
<Figure 35>

Return to Top
11| Revision Date: 11/10/15 | Revised by: Emilie McWilliams
iv. Asset Management
v. Serial number
n.
Reboot the console by pressing
Enter 7 3 2 6 6 8
Enter
, then wait until the welcome screen displays.
Note:
If the display shows 04A0, turn off the machine,
wait 30 seconds, and then turn on the machine.
o.
Press
Enter 3 0 0 1 Enter
to enter Service Mode.
p.
Verify the settings under the following tabs:
i.
General
ii.
Network
iii.
Netpulse
iv.
Weather
v.
TV
q.
Press the
HOME
button on the screen.
r.
Press
Enter 3 0 0 5 Enter
and install all available
software updates.
s.
Test the console.
Replace Tuner & Collect Windows Logs
Note: Prior to the appointment, advise the customer to track the
date and time each error occurs over a period of 3 to 4 days.
Collect customer’s records while onsite.
1.
Install a new tuner if a replacement is available. If you do
not have a replacement tuner on hand, leave the tuner in
place and proceed to collect logs.
2.
Set up the computer accessories:
a. Plug in a USB hub with a USB drive, keyboard,
and mouse attached <Figure 40>
.
b. Turn the console off and on again
.
c. Verify the console recognizes the devices
.
3.
Collect the Windows Application, System, and
Administrative Events Logs
:
a. Press CTRL+ALT+DEL on the keyboard
.
b. Select Task Manager
.
c. Select File > New Task
.
d. Enter explorer.exe in the run dialog box
.
e. Select Control Panel from the left side panel
.
f. Go to Administrative Tools > Event Viewer
.
g. Expand the Windows Logs <Figure 41>
.
h. Right-click on the log labeled Application
.
i. Select Save All Events As
.
j. Navigate to the USB drive
.
k. Save the log file with a name that identifies the
machine and log title. Example: TM01 –
Application
.
l. Click Save
.
m. Repeat (h) through (k) to collect the logs labeled
System and Administrative Events
.
n. Exit all applications
.
o. Return the console to 7xi home screen
.
p. Eject the computer accessories
.
<Figure 41>
<Figure 39>
<Figure 40>

Return to Top
12| Revision Date: 11/10/15 | Revised by: Emilie McWilliams
4.
Email Johnson Health Tech North America - Customer
Tech Support:
a. Attach the customer’s error records
.
b. Attach the Windows logs
.
c. Include the case number in the subject line
.
d. Address the message to the CTS representative
who dispatched your case
.
Other manuals for Fitness 7xi
3
Table of contents
Other Matrix Treadmill manuals

Matrix
Matrix T4x User manual

Matrix
Matrix T7xi User manual

Matrix
Matrix T3xe User manual

Matrix
Matrix T7xe-04 User manual

Matrix
Matrix t3x-03 User manual

Matrix
Matrix T3x User manual

Matrix
Matrix LIVESTRONG T1xLS User manual

Matrix
Matrix MX-T3x User manual

Matrix
Matrix T5 User manual

Matrix
Matrix TOUCH XL User manual

Matrix
Matrix H7XI-01 User manual

Matrix
Matrix T130 XI User manual

Matrix
Matrix T1x Maintenance manual

Matrix
Matrix T7 User manual

Matrix
Matrix TF30 User manual

Matrix
Matrix T3xe User manual

Matrix
Matrix T3xe User manual

Matrix
Matrix T7X-02 User manual

Matrix
Matrix ENDURANCE TOUCH XL User manual

Matrix
Matrix T3x Administrator guide