Maxell MSLEDS-10M User manual

POMANUAL DE USO
HUFELHASZNÁLÓI KÉZIKÖNYV
ESMANUAL DE USUARIO
ENUSER’S MANUAL
MODEL: MSLEDS-10M
SMART
Multicolor Lights

1 FEATURES
2- PARAMETERS
3-WIRING DIAGRAM
2
EN
Wi-Fi Conrtoller
LED Strip
Colour
RGB+CCTr
Input Voltage Output Voltage(Dc)/
Current(Max) Size
AC100-240V 24V/2A 10m
Wi-Fi connect Full range of
RGBWW available
5-100% stepless dimming
Timer switch Remote controllable after
connecting to internet
No Hub required
Grouping

5- ATTENTIONS
4- INSTALLATION INSTRUCTIONS
3
EN
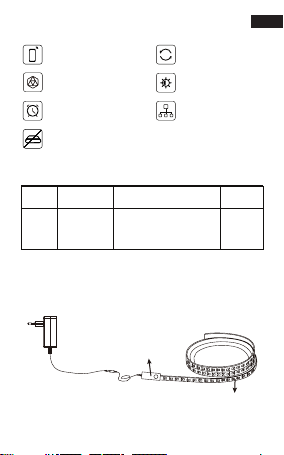
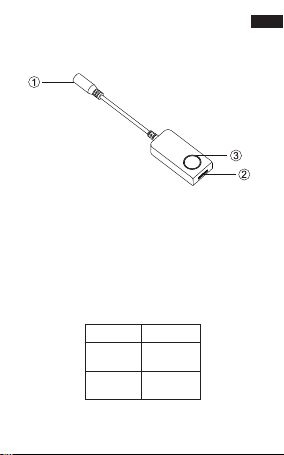
1-Use DC12V power supply.
2-Install the Wi-Fi controller correctly. Use 3M tape to
x it.
3-Please unfold the LED strip to avoid the overheat
issues. Please connect the cables of LED strip with the
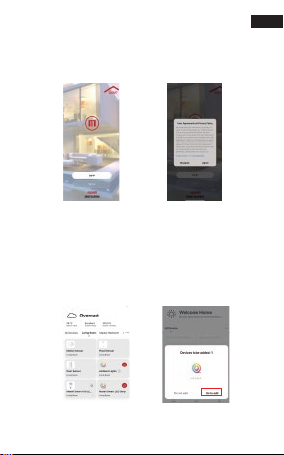
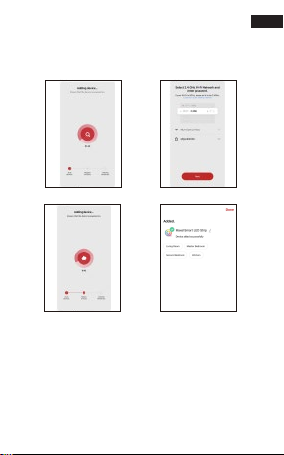
right position on the controller. Test the APP to check
if it can control the LED strip correctly. If everything
goes well, just keep going.
4-Check and ensure the power supply, Wi-Fi controller
and LED strip are connected correctly.
1-Do not put any metal around the WIFI controller,
which could blocked WIFI signal.
2-Ensure power supply and controller are connected
correctly.
3-The power supply output voltage should be same
asLED strip working voltage.
4-Do not cover anything on the surface of power
supply, WIFI controller and LED strip.
5-Ensure the connection is correct before powering.

4
EN
1: DC12V input connection port
2: Output connection port to connect to LED strip
3: Function buttons:
Press the button once: turn on your device.
Press the button twice: turn o your device.
Press the button for 6 seconds: reset your device.
Press the button quickly once: change to your favorite
scenes.
6- PRODUCT FUNCTIONS DIAGRAM
To Pair Initial blue light 50%,
lighting ashes
White light 100%
brightness
Connected
LEDSTRIP RGB+CCT

1: Search “Maxell Smart” from App store or Google play.
2: Scan the QR code from the label or user manual.
The APP is compatible with Android 4,0 and IOS8.1 and
higher version.
7-DOWNLOAD APP
Android 4.0 iOS 8.1
5
EN

9- DEVICE PAIRING-EASY IN
Stay at the Home Page Push Notication
6
EN
1. Turn on the LED strip and enter the home of APP
while ensure Bluetooth on and the WIFI signal is good
and stable.
2. LED strip will ashing when turn on the power
supply. Stay at the home page and found the push
notication, then click Go to add.
8- LOG IN / REGISTER ACCOUNT NUMBER
Open the Maxell Smart App, sign up for a new account
or log in with an existing account.

CONTROL DEVICE
Connecting Pairing Successful
Add DeviceEnter/Conrm Wi-Fi Password
7
EN
3-Select the Wi-Fi connected to the smart device,
input the Wi-Fi password, and then click “Next” to wait
for the matching to succeed. (Make sure smart devices
share the same Wi-Fi)
After the device is connected successfully, tap
"Device" at the bottom. The device name of the smart
lamp shows in the list. Tap it to enter the control panel
of the smart lamp.

8
EN
Adjust brightness and color temperature of white
light.
1. White mode:

9
EN
Adjust color, brightness, saturation of colorful light.
2. Color mode:

10
EN
Choose from a variety of scenes or create your own.
You can create a scene for movie light, a party scene
with colorful light, or even a candlelit scene with
warm, low lighting.
3. Scene mode:

11
EN
Choose music sync to match color changes to the beat
of the music playing on your speakers.
4. Sync with music:

12
EN
Click the “Left time”, you can choose the length of
countdown time from 0 to 23 hours and 59 minutes. If
the Smart Wall Light is on when the countdown starts,
the Smart Flood Light will turn itself o at the end
time.
5. Left time:

13
EN
1. Click "More".
2. Click "Plan".
3. You can select plan type "Sleep plan"
4. First congure the hours (left)
5. Next congure minutes (right)
6. You can customize the repetition time.
7. Click "Save" to save the settings.
6. Sleep Mode

14
EN
1. Click "More".
2. Click "Plan".
3. You can select plan type "Wake up plan"
4. First congure the hours (left)
5. Next congure minutes (right)
6. You can customize the repetition time.
7. Click "Save" to save the settings.
7. Wake Mode

15
EN
This will keep the Strip Light in ON/OFF position for a
specic duration of time.
8. Schedule:

16
EN
If you got two or more light, please tap at the upper
right corner of the control panel and create group. The
smart lamp group will realize synchronous switch,
color changes, the scene mode selection, timer, etc.
9. Grouping:

17
EN
Click the interface to control it according to the
specic mode of the specic LED strip. The following is
public function introduction.
Remote control: The LED strip can be controlled
anywhere after the smart device is successfully
connected.
Timer function: Set the timer to turn on and turn o
the LED strip.
Intelligent scene: The system sets a variety of
intelligent scenes, and dierent scenes correspond to
dierent lighting atmospheres.
Group: Group control is available(only for the same
type of product).Family room management.
Device Sharing: The device is shared with other user
control devices in the home.
APP FUNCTION INTRODUCTION

1 CARACTERÍSTICAS
2- PARAMETROS
3-DIAGRAMA DE CABLEADO
18
ES
Controlador Wifi
Tira llevada
Color
RGB+CCTr
Voltaje de entrada Voltaje de salida (CC) /
Corriente (máx.) Tamaño
AC100-240V 24V/2A 10m
Conexión Wi-Fi Gama completa de
RGBWW disponible
5-100% de atenuación
continua
Interruptor de temporizador Controlable a distancia después
de conectarse a internet
No se requiere Hub
Agrupamiento

5- ATENCIONES
4- INSTRUCCIONES DE INSTALACIÓN
19
ES
1-Utilice fuente de alimentación DC12V.
2-Instale el controlador de Wi-Fi correctamente. Use
cinta de 3M para arreglarlo.
3-Despliegue la tira de LED para evitar problemas de
sobrecalentamiento. Conecte los cables de la tira de
LED con la posición correcta en el controlador. Pruebe
la aplicación para comprobar si puede controlar la tira
de LED correctamente. Si todo va bien, sigue adelante.
4-Verique y asegúrese de que la fuente de
alimentación, el controlador Wi-Fi y la tira de LED
estén conectados correctamente.
1-No coloque ningún metal alrededor del controlador
WIFI, ya que podría bloquear la señal WIFI.
2-Asegúrese de que la fuente de alimentación y el
controlador estén conectados correctamente.
3-El voltaje de salida de la fuente de alimentación
debe ser el mismo que el voltaje de funcionamiento de
la tira de LED.
4-No cubra nada en la supercie de la fuente de
alimentación, el controlador WIFI y la tira de LED.
5-Asegúrese de que la conexión sea correcta antes de
encender.

20
ES
1: puerto de conexión de entrada DC12V
2: puerto de conexión de salida para conectar a la tira
de LED
3: Botones de función:
Presione el botón una vez: encienda su dispositivo.
Presione el botón dos veces: apague su dispositivo.
Presione el botón durante 6 segundos: reinicie su
dispositivo.
Presione el botón rápidamente una vez: cambie a sus
escenas favoritas.
6- DIAGRAMA DE FUNCIONES DEL PRODUCTO
Emparejar Luz azul inicial 50%,
iluminación parpadea
Luz blanca 100%
brillo
Conectado
TIRA DE LED RGB + CCT
Table of contents
Languages:
Popular Lighting Equipment manuals by other brands

ProLights
ProLights LUMIPAR18QTOUR user manual

ExPelec
ExPelec NICOLS STROB 1000 RGB user manual

Blueview
Blueview YD8 Series user manual

Oase
Oase Fountain Ring LED Set operating instructions

BARRON
BARRON EXITRONIX SCL Series installation instructions

RAB Lighting
RAB Lighting VXLED13DG installation instructions