Maxwell MW-1260 ST User manual

Мясорубка
MW-1260 ST
17
11
4
24
30
36
42
48
55


4
РУССКИЙ
Мясорубка
Мясорубка предназначена для переработки
пищевых продуктов и приготовления
домашних полуфабрикатов.
Описание
1. Толкатель
2. Лоток для продуктов
3. Корпус головки мясорубки
4. Место установки головки мясорубки
5. Кнопка фиксатора головки мясорубки
6. Корпус устройства
7. Кнопка обратного вращения шнека
«REV»
8. Кнопка включения/выключения «ON/
OFF»
9. Шнек
10. Крестообразный нож
11. Решётка для крупной рубки
12. Решётка для средней рубки
13. Решётка для мелкой рубки
14. Гайка головки мясорубки
15. Насадка для набивки колбасок
16. Насадка для приготовления «кеббе»
17. Насадка для приготовления «кеббе»
18. Толкатель овощерезки
19. Корпус насадки-овощерезки
20. Крупная тёрка
21. Шинковка
22. Мелкая тёрка
23. Защитный кожух
24. Регулятор выхода отжимок
25. Шнек соковыжималки
26. Сетка
27. Опорное кольцо
28. Корпус насадки-соковыжималки
29. Сливной лоток
МЕРЫ ПРЕДОСТОРОЖНОСТИ
Перед использованием устройства
внимательно прочитайте инструкцию по
эксплуатации и сохраняйте её в течение
всего срока эксплуатации. Неправильное
обращение с устройством может привести
к его поломке, причинению вреда
пользователю или его имуществу.
Для снижения риска пожара, для
недопущения поражения электрическим
током и для защиты от других травм
во время работы с электрической
мясорубкой необходимо соблюдать меры
предосторожности, перечисленные ниже.
• Перед первым включением убедитесь
в том, что напряжение в электрической
сети соответствует рабочему напряже-
нию устройства.
• Используйте только те аксессуары,
которые входят в комплект поставки.
• Во избежание поражения электриче-
ским током НИКОГДА НЕ ПОГРУЖАЙТЕ
устройство, сетевой шнур и вилку сете-
вого шнура в воду или в любые другие
жидкости.
• Для чистки корпуса мясорубки исполь-
зуйте слегка влажную ткань, после чего
вытрите корпус насухо.
• Никогда не оставляйте работающую
мясорубку без присмотра.
• Перед сборкой, разборкой, а также
перед чисткой мясорубки её следу-
ет выключить и вынуть вилку сетевого
шнура из электрической розетки.
• Устанавливайте устройство на ров-
ной устойчивой поверхности, вдали от
источников тепла, открытого пламени,
влаги и прямых солнечных лучей.
• Запрещается устанавливать устройство
на горячей поверхности или в непосред-
ственной близости от неё (например,
рядом с газовой или электрической пли-
той, либо около нагретой духовки или
варочной поверхности).
• Аккуратно обращайтесь с сетевым шну-
ром, не допускайте многократного его
перекручивания, периодически рас-
прямляйте сетевой шнур.
• Запрещается использовать сетевой
шнур в качестве ручки для переноски
мясорубки.
• Не допускайте, чтобы сетевой шнур
свешивался со стола, и следите, чтобы
он не касался острых кромок мебели и
горячих поверхностей.
• Для отсоединения вилки сетевого
шнура от электрической розетки следу-

5
РУССКИЙ
5
ет держаться за вилку сетевого шнура, а
не за сам шнур.
• Не подсоединяйте, не отсоединяйте и
не беритесь за сетевой шнур или вилку
сетевого шнура мокрыми руками, это
может привести к удару электрическим
током.
• Данное устройство не предназначено
для использования детьми младше 8 лет.
• Не разрешайте детям использовать
устройство в качестве игрушки, не раз-
решайте детям прикасаться к корпу-
су устройства и к сетевому шнуру во
время работы.
• Устройство во время работы и в пере-
рывах между рабочими циклами должно
находиться в местах, недоступных для
детей младше 8 лет.
• Данное устройство не предназначено
для использования людьми (включая
детей старше 8 лет) с физическими,
нервными, психическими расстройства-
ми или без достаточного опыта и зна-
ний. Использование устройства такими
лицами возможно лишь в том случае,
если они находятся под присмотром
лица, отвечающего за их безопасность,
при условии, что им были даны соответ-
ствующие и понятные инструкции о без-
опасном пользовании устройством и тех
опасностях, которые могут возникать
при его неправильном использовании.
• Из соображений безопасности детей
не оставляйте полиэтиленовые пакеты,
используемые в качестве упаковки, без
присмотра.
• Внимание! Не разрешайте детям
играть с полиэтиленовыми пакетами
или упаковочной плёнкой. Опасность
удушья!
• Не разбирайте устройство самосто-
ятельно, в случае обнаружения неис-
правности или после падения мясоруб-
ки обратитесь в ближайший авторизо-
ванный (уполномоченный) сервисный
центр.
• Перевозите устройство только в завод-
ской упаковке.
• Храните устройство в местах, недоступ-
ных для детей и людей с ограниченными
возможностями.
УСТРОЙСТВО ПРЕДНАЗНАЧЕНО ТОЛЬКО
ДЛЯ БЫТОВОГО ИСПОЛЬЗОВАНИЯ
ОСОБЕННОСТИ МЯСОРУБКИ
Функция обратного вращения шнека
«REV» (реверс) предназначена для
удаления заторов, образовавшихся в ходе
переработки продуктов.
Лоток для продуктов обеспечивает
удобное расположение продуктов во время
их переработки.
Три решётки с отверстиями разного
размера предназначены для разных
степеней измельчения продуктов.
Специальные принадлежности:
насадка-овощерезка, насадка-
соковыжималка, насадки для набивки
колбасок и приготовления «кеббе».
ВНИМАНИЕ!
• Перед подключением мясорубки к элек-
трической сети убедитесь в том, что
устройство выключено.
• Перед началом рубки мяса обязательно
убедитесь в том, что все кости и излиш-
ки жира удалены.
• Запрещается проталкивать продукты
какими-либо посторонними предмета-
ми или пальцами рук, пользуйтесь толь-
ко толкателем (1), который входит в ком-
плект поставки.
• Ни в коем случае не погружайте корпус
мясорубки в воду или в другие жидкости.
• Во время использования насадок
«кеббе» (16, 17) нельзя устанавливать
решётки (11, 12, 13) и крестообразный
нож (10).
• Не пытайтесь перерабатывать мясо-
рубкой пищевые продукты с твёрды-
ми волокнами (например, имбирь или
хрен).
• Во избежание образования заторов не
прикладывайте чрезмерных усилий,
проталкивая мясо.

6
РУССКИЙ
• Если какой-либо застрявший твёрдый
кусок приводит к остановке вращения
шнека и ножа, немедленно выключи-
те устройство и перед тем как продол-
жить работу, удалите затор, используя
функцию включения обратного враще-
ния шнека (REV).
ПОДГОТОВКА МЯСОРУБКИ
После транспортировки или
хранения устройства при пониженной
температуре необходимо выдержать
его при комнатной температуре не
менее двух часов.
• Извлеките мясорубку и удалите все упа-
ковочные материалы, протрите корпус
влажной тканью.
• Все съёмные детали промойте тёплой
водой с нейтральным моющим сред-
ством, ополосните и перед сборкой
тщательно просушите.
• Перед первым включением убедитесь
в том, что напряжение в электрической
сети соответствует рабочему напряже-
нию устройства.
ОСНОВНЫЕ ПРИНЦИПЫ РАБОТЫ С
МЯСОРУБКОЙ
• Мясорубка предназначена для перера-
ботки продуктов и приготовления полу-
фабрикатов только в домашних усло-
виях.
• Соберите устройство и установите его
на ровной сухой поверхности.
• Убедитесь в том, что вентиляционные
отверстия на корпусе не заблокирова-
ны.
• Вставьте вилку сетевого шнура в элек-
трическую розетку.
• Поставьте под головку мясорубки (3)
подходящую посуду.
• Убедитесь в том, что мясо полностью
оттаяло, удалите излишки жира и все
кости, порежьте мясо на кубики или
полоски такого размера, чтобы они сво-
бодно проходили в отверстие лотка (2).
• Включите устройство, нажав на кнопку
(8) «ON/OFF».
• Не торопясь, проталкивайте мясо в рас-
труб головки мясорубки (3), пользуясь
для этого толкателем (1).
• Во время работы используйте только
тот толкатель (1), который входит в ком-
плект поставки.
• Запрещается для проталкивания про-
дуктов использовать какие-либо пред-
меты, ни в коем случае не проталкивай-
те мясо пальцами.
• Не прилагайте чрезмерных усилий для
проталкивания мяса или других про-
дуктов.
• В ходе рубки мяса может образоваться
затор; для устранения образовавшегося
затора следует воспользоваться функ-
цией обратного вращения шнека (REV).
Для переключения в режим обратного
вращения шнека (REV) выключите мясо-
рубку, нажав на кнопку (8) «ON/OFF»,
затем нажмите и удерживайте кноп-
ку обратного вращения шнека «REV»
(7), шнек будет вращаться в обратном
направлении.
• Продолжительность непрерывной рабо-
ты устройства по переработки продук-
тов не должно превышать 5 минут.
• После 5 минут непрерывной работы
следует выключить мясорубку и дать ей
остыть в течение 10-15 минут, после чего
можно продолжить работу.
• Закончив работу, выключите мясорубку,
нажав на кнопку (8) «ON/OFF», отключи-
те устройство от электрической сети, и
только после этого можно приступать к
разборке мясорубки.
ПЕРЕРАБОТКА МЯСА
1. Вставьте головку мясорубки (3) в место
установки (4), поверните головку мясо-
рубки (3) против часовой стрелки до
фиксации (рис. 1, 2).
2. Вставьте шнек (9) в корпус головки
мясорубки (3) (рис. 3).
3. Установите крестообразный нож (10)
(рис. 4).
4. Выберите одну необходимую решётку
(11, 12 или 13) и установите её поверх

7
РУССКИЙ
ножа, совместив выступы на решётке
с пазами в корпусе головки мясорубки
(3), затяните гайку (14) (рис. 5, 6).
Внимание!
• Устанавливайте нож режущей сто-
роной по направлению к решётке.
Если нож будет установлен непра-
вильно, он не будет выполнять функ-
цию рубки.
• Решётки с более крупными отверсти-
ями (11, 12) подходят для переработ-
ки сырого мяса, овощей, сухофрук-
тов, сыра, рыбы и т.п.
• Решётка с мелкими отверстиями (13)
подходит для переработки как сырого,
так и приготовленного мяса, рыбы и т.п.
5. На корпус головки мясорубки (3) устано-
вите лоток для продуктов (2).
6. Вставьте вилку сетевого шнура в элек-
трическую розетку.
7. Включите устройство, нажав на кнопку
(8) «ON/OFF».
8. Во время работы пользуйтесь только
толкателем (1).
Примечания:
– Для улучшения процесса переработ-
ки мяса нарезайте его полосками или
кубиками. Замороженное мясо необхо-
димо полностью разморозить.
– Во время работы используйте толка-
тель, который входит в комплект постав-
ки; запрещается использовать для про-
талкивания мяса какие-либо предметы,
ни в коем случае не проталкивайте мясо
пальцами.
9. Закончив работу, выключите мясорубку,
нажав на кнопку (8) «ON/OFF», отключи-
те устройство от электрической сети, и
только после этого можно приступать к
разборке мясорубки.
10. Для снятия головки мясорубки нажми-
те на кнопку фиксатора (5), поверните
головку мясорубки (3) по часовой стрел-
ке и снимите головку мясорубки (3).
11. Для разборки головки мясорубки откру-
тите гайку (14) и извлеките из корпу-
са головки мясорубки установленную
решётку (11, 12 или 13), крестообразный
нож (10) и шнек (9).
ФУНКЦИЯ АВТОМАТИЧЕСКОГО
ОТКЛЮЧЕНИЯ
Мясорубка оснащена функцией
автоматического отключения при
перегреве электромотора.
• При перегреве электромотора сработа-
ет автоматический термопредохрани-
тель, мясорубка выключится.
• В этом случае немедленно извлеките
вилку сетевого шнура из электрической
розетки.
• Дайте устройству остыть в течение при-
близительно 50-60 минут, прежде чем
включить мясорубку снова.
• Подключите мясорубку к электрической
сети, и включите её, если она не включа-
ется, это может означать, что в ней име-
ются иные повреждения. В этом слу-
чае необходимо обратиться в автори-
зованный (уполномоченный) сервисный
центр для ремонта мясорубки.
НАБИВКА КОЛБАСОК
1. Приготовьте фарш.
2. Установите головку мясорубки (3) и
поверните её против часовой стрелки
до фиксации.
3. Установите шнек (9) в корпус голов-
ки мясорубки (3), установите кресто-
образный нож (10), возьмите решётку
(13) (для мелкой рубки) и установите
её поверх ножа, совместив выступы на
решётке с пазами в корпусе головки
мясорубки (3), установите насадку для
набивки колбасок (15) и затяните гайку
(14) (рис. 7, 8).
4. Установите лоток для продуктов (2).
5. Выложите готовый фарш на лоток для
продуктов (2).
6. Для приготовления колбасок исполь-
зуйте натуральную оболочку, предва-
рительно поместив её в сосуд с тёплой
водой на 10 минут.
7. Натяните размягчённую оболочку на

8
РУССКИЙ
насадку (15) и завяжите на конце обо-
лочки узел.
8. Включите устройство, нажав на кнопку
(8) «ON/OFF».
9. Для подачи готового фарша используй-
те толкатель (1), по мере заполнения
оболочки сдвигайте её с насадки (15),
по мере высыхания оболочки смачивай-
те её водой.
10. Закончив работу, выключите устрой-
ство, нажав на кнопку (8) «ON/OFF»,
отключите мясорубку от электрической
сети, и только после этого можно при-
ступать к разборке мясорубки.
11. Для снятия головки мясорубки нажми-
те на кнопку фиксатора (5), поверните
головку мясорубки (3) по часовой стрел-
ке и снимите её.
12. Отверните гайку (14) и разберите голов-
ку мясорубки.
ИСПОЛЬЗОВАНИЕ НАСАДКИ «КЕББЕ»
Кеббе - это традиционное ближневосточное
блюдо, которое готовят из мяса ягненка,
пшеничной муки и специй, которые
рубятся вместе, чтобы получить основу для
изготовления полых трубочек. Трубочки
наполняются начинкой и обжариваются во
фритюре.
Экспериментируя с начинкой для трубочек,
можно готовить различные деликатесы.
1. Приготовьте основу для оболочки.
2. Установите головку мясорубки (3) и
поверните её против часовой стрелки
до фиксации.
3. Установите шнек (9) в корпус головки
мясорубки (3), установите на шнек (9)
насадки «кеббе» (16, 17); следите за тем,
чтобы выступы на насадке (17) совпали
с пазами в корпусе головки мясорубки
(3), и заверните гайку (14) (рис. 9, 10).
4. Установите лоток для продуктов (2).
5. На лоток для продуктов (2) выложите
готовую основу для оболочки.
6. Включите устройство, нажав на кнопку
(8) «ON/OFF».
7. Для подачи основы для оболочки
используйте толкатель (1).
8. Отрезайте готовые трубочки необходи-
мой длины.
9. Закончив работу, выключите устрой-
ство, нажав на кнопку (8) «ON/OFF»,
отключите мясорубку от сети, и только
после этого приступайте к разборке
мясорубки.
10. Для снятия головки мясорубки (3)
нажмите на кнопку фиксатора (5),
поверните головку (3) по часовой стрел-
ке и снимите головку (3).
11. Отверните гайку (14) и разберите голов-
ку мясорубки.
РЕЦЕПТ
(Начинка)
Баранина 100 г
Оливковое масло 1, 1/2 столовой
ложки
Репчатый лук (мелко
нашинкованный)
1, 1/2 столовой
ложки
Пряности по вкусу
Соль 1/4 чайной ложки
Мука 1, 1/2 столовой
ложки
• Баранину необходимо измельчить в
мясорубке один или два раза.
• Репчатый лук обжаривают в масле до
золотистого цвета, затем добавляют
рубленую баранину, все пряности, соль
и муку.
(Оболочка)
Постное мясо 450 г
Мука 150-200 г
Пряности по вкусу
Мускатный орех 1 шт.
Красный молотый
перец
по вкусу
Перец по вкусу
• Мясо измельчают в мясорубке два-три
раза, отдельно измельчают мускатный
орех, затем смешивают все компоненты.
• Большее количество мяса и меньшее
количество муки в наружной оболочке

9
РУССКИЙ
обеспечивают лучшую консистенцию и
вкус готового изделия.
• Готовые трубочки наполняют начинкой,
зажимают по краям, трубочкам придают
желаемую форму.
• Готовятся трубочки во фритюре.
Овощерезка
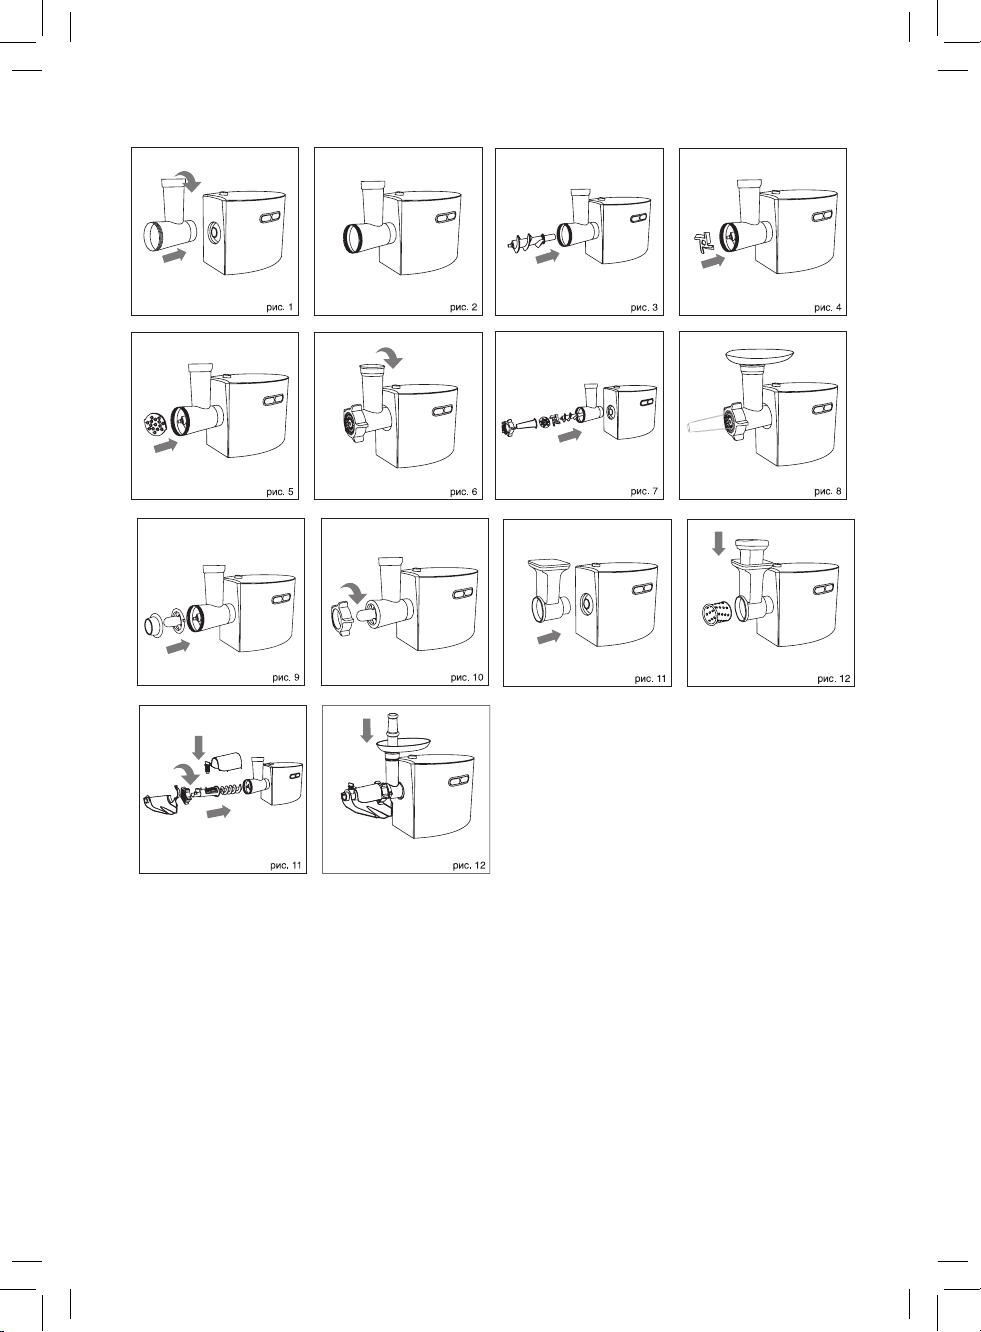
• Вставьте корпус насадки-овощерезки
(19) в место установки головки мясоруб-
ки (4) и поверните его против часовой
стрелки до фиксации (рис. 11).
• Вставьте одну из насадок (20, 21, 22)
в корпус насадки-овощерезки (19) до
упора (рис. 12).
• Вставьте сетевую вилку в электрическую
розетку.
• Включите устройство, нажав на кнопку
(8) «ON/OFF».
• Во время работы пользуйтесь только
толкателем (18), входящим в комплект
поставки; для проталкивания овощей
запрещается использовать посторон-
ние предметы, ни в коем случае не про-
талкивайте овощи пальцами.
• Для снятия насадки-овощерезки (19)
нажмите на кнопку фиксатора (5), повер-
ните её по часовой стрелке и снимите.
• Закончив работу, выключите устрой-
ство, нажав на кнопку (8) «ON/OFF»,
отключите мясорубку от электрической
сети, и только после этого можно при-
ступать к её разборке мясорубки.
Шнековая соковыжималка
Насадка-соковыжималка предназначена
для переработки мягких овощей или
фруктов (в том числе для получения сока/
пюре из томатов или для переработки
«косточковых ягод», например, красной
смородины).
• Вставьте головку мясорубки (3) в место
установки (4), и поверните её против
часовой стрелки до фиксации (рис. 1, 2).
• Вставьте шнек (9) в корпус головки
мясорубки (3) (рис. 3).
• Установите в корпус насадки-соковыжи-
малки (28) опорное кольцо (27) (рис. 13).
• Держите сетку (26) разрезом по направ-
лению вверх, слегка сожмите и вставьте
сетку (26) в корпус насадки-соковыжи-
малки (28) до упора (рис. 14).
• Вставьте шнек соковыжималки (25) в
корпус насадки-соковыжималки (28).
• Установите корпус насадки-соковыжи-
малки (28) на корпус головки мясорубки
(3), следите за тем, чтобы выступы на
насадке (28) совпали с пазами в корпусе
головки мясорубки (3) и заверните гайку
(14) (рис. 15).
• Закрепите сливной лоток (29) на корпу-
се насадки-соковыжималки (28) (рис.
16).
• Установите на корпус насадки-соковы-
жималки защитный кожух (23) и вверни-
те регулятор выхода отжимок (24), пово-
рачивая его по часовой стрелке (рис.
17).
• На корпус головки мясорубки (3) устано-
вите лоток для продуктов (2).
• Поставьте под сливной лоток (29) под-
ходящую ёмкость для сбора сока/пюре.
• Под отверстие выхода отжимок из
насадки-соковыжималки (28) также
установите подходящую ёмкость.
• Вставьте вилку сетевого шнура в элек-
трическую розетку.
• Включите устройство, нажав на кнопку
(8) «ON/OFF».
• Во время работы пользуйтесь только
толкателем (1), входящим в комплект
поставки; для проталкивания овощей
или фруктов запрещается использовать
посторонние предметы, ни в коем слу-
чае не проталкивайте овощи или фрукты
пальцами (рис. 18).
• При вращении регулятора выхода отжи-
мок (24) по часовой стрелке или про-
тив часовой стрелки изменяется размер
отверстия выхода отжимок, подберите
такое положение регулятора (24), при
котором будет достигнуто оптимальное
соотношение количества получаемого
сока/пюре из овощей и фруктов и необ-
ходимая сухость отжимок.

10
РУССКИЙ
• Если во время работы с насадкой-соко-
выжималкой уменьшилось количе-
ство выходящего сока/пюре, то необ-
ходимо выключить мясорубку, вынуть
вилку сетевого шнура из электрической
розетки, разобрать насадку-соковыжи-
малку и промыть сетку (26).
• Закончив работу, выключите устрой-
ство, нажав на кнопку (8) «ON/OFF»,
отключите мясорубку от электрической
сети, и только после этого приступайте
к разборке мясорубки.
• Разберите и промойте все детали шне-
ковой соковыжималки в тёплой мыль-
ной воде с нейтральным моющим сред-
ством, ополосните и перед сборкой
тщательно просушите.
Уход за мясорубкой
• После окончания работы следует
выключить мясорубку, нажав на кнопку
(8) «ON/OFF», и вынуть вилку сетевого
шнура из электрической розетки.
• Нажмите на кнопку фиксатора (5),
поверните головку мясорубки по часо-
вой стрелке и снимите её.
• Отверните гайку (14) и снимите установ-
ленные насадки (15 ,16 или 17), решётки
(11, 12 или 13), крестообразный нож (10)
со шнека (9).
• Извлеките шнек (9) из головки мясоруб-
ки (3).
• Удалите со шнека остатки продуктов.
• Промойте все использованные принад-
лежности мясорубки в тёплой мыльной
воде с нейтральным моющим сред-
ством, ополосните и перед сборкой
тщательно просушите.
• Протрите корпус мясорубки (6) слег-
ка влажной тканью, после чего вытрите
насухо.
• Для чистки корпуса мясорубки (6)
запрещается использовать растворите-
ли или абразивные чистящие средства.
• Не допускайте попадания жидкости
внутрь корпуса мясорубки.
Хранение
• Перед тем как убрать мясорубку на
хранение, убедитесь в том, что кор-
пус устройства и все съёмные детали
чистые и сухие.
• Храните устройство в сухом прохладном
месте, недоступном для детей.
Комплект поставки
Мясорубка – 1 шт.
Толкатель – 2 шт.
Лоток для продуктов – 1 шт.
Решётки – 3 шт.
Комплект насадок для набивки колбасок –
1 шт.
Комплект насадок для приготовления
«кеббе» - 1 шт.
Комплект насадок овощерезки – 1 шт.
Комплект насадок соковыжималки – 1 шт.
Инструкция по эксплуатации – 1 шт.
Технические характеристики
Электропитание: 220-240 В ~ 50/60 Гц
Максимальная мощность: 1500 Вт
Производитель сохраняет за собой
право изменять дизайн и технические
характеристики устройства без
предварительного уведомления.
Срок службы устройства - 3 года
Данное изделие соответствует
всем требуемым европейским и
российским стандартам безопас-
ности и гигиены.
Изготовитель: Стар Плюс Лимитед,
Гонконг
Адрес: оф. 1902-03, Ист Таун Билдинг, 41
Локхарт Роуд, Ванчай, Гонконг
Сделано в КНР

11
ENGLISH
Meat grinder
Meat grinder is intended for processing
food products and making homemade semi-
finished products.
Description
1. Pusher
2. Food tray
3. Meat grinder head body
4. Meat grinder head setting place
5. Meat grinder head lock button
6. Unit body
7. Screw reverse mode button «REV»
8. “ON/OFF” button
9. Screw
10. Crossed blade
11. Coarse cutting plate
12. Medium cutting plate
13. Fine cutting plate
14. Meat grinder head nut
15. Sausage attachment
16. «Kebbe» attachment
17. «Kebbe» attachment
18. Vegetable slicer pusher
19. Vegetable slicer attachment body
20. Coarse grater
21. Shredder
22. Fine grater
23. Protective cover
24. Pulp outlet control knob
25. Juice extractor screw
26. Grid
27. Support ring
28. Juice extractor attachment body
29. Draining tray
PRECAUTIONS
Read this instruction manual carefully before
using the unit and keep it for the whole
operation period. Mishandling the unit can
lead to its breakage and cause harm to the
user or damage to his/her property.
To reduce the risk of fire, to prevent electric
shock and to avoid other injuries, it is
necessary to observe the following safety
measures when using the electric meat
grinder:
• Before switching the unit on for the first
time, make sure that voltage in your mains
corresponds to the operating voltage of
the unit.
• Use only the attachments supplied.
• To avoid electric shock, NEVER IMMERSE
the unit, the power cord and the power
plug into water or any other liquids.
• Use a slightly damp cloth to clean the
meat grinder body and then wipe the unit
body dry.
• Never leave the operating unit unattended.
• Always switch the meat grinder off and
unplug it before assembling, disassem-
bling and cleaning.
• Place the unit on a flat steady surface away
from heat sources, open flame, moisture
and direct sunlight.
• Do not set the unit on a hot surface or
next to it (for instance, near gas or elec-
tric stove, near heated oven or cooking
surface).
• Handle the power cord with care, pre-
vent it from multiple twisting and regularly
straighten the power cord.
• Do not use the power cord for carrying the
meat grinder.
• Do not let the power cord hang from the
edge of a table, and make sure that the
cord does not touch sharp furniture edges
and hot surfaces.
• When unplugging the unit from the mains,
hold the power plug but not the cord.
• Do not connect, disconnect or touch the
power cord or the power plug with wet
hands, this may cause electric shock.
• This unit is not intended for usage by chil-
dren under 8 years of age.
• Do not allow children to use the unit as
a toy and do not allow them to touch the
unit body and the power cord during the
operation.
• Place the unit out of reach of children
under 8 years of age during the operation
and during breaks between operations.
• This unit is not intended for usage by peo-
ple (including children over 8) with physi-

12
ENGLISH
cal, neural, mental deviations or with insuf-
ficient experience or knowledge. Such per-
sons can use this unit only if they are under
supervision of a person who is responsible
for their safety and if they are given all the
necessary and understandable instruc-
tions concerning the safe usage of the unit
and information about danger that can be
caused by its improper usage.
• For children safety reasons, do not leave
polyethylene bags, used as a packaging,
unattended.
• Attention! Do not allow children to play
with polyethylene bags or packaging film.
Danger of suffocation!
• Do not disassemble the unit by yourself, if
any malfunction is detected or after it was
dropped, apply to the nearest authorized
service center.
• Transport the unit in the original package
only.
• Keep the unit out of reach of children and
disabled persons.
THE UNIT IS INTENDED FOR HOUSEHOLD
USAGE ONLY
MEAT GRINDER FEATURES
Screw reverse mode «REV» (reverse)
is used for removing obstructions, which
appeared during food processing.
Food tray provides convenient food layout
during processing.
Three plates with openings of different
size are intended for different degrees of
grinding.
Special accessories: vegetable slicer
attachment, juice extractor attachment,
attachments for sausage filling and «kebbe»
making.
ATTENTION!
• Before connecting the meat grinder to the
mains, make sure that the unit is switched off.
• Before grinding meat, make sure that all
bones and excess fat are removed.
• Do not push the products with any foreign
objects or your fingers, use only the push-
er (1) supplied with the unit.
• Do not immerse the meat grinder body into
water or other liquids.
• When using the «kebbe» attachments (16,
17), do not install the cutting plates (11, 12,
13) and the crossed blade (10).
• Do not try to process food with hard fiber
(for example, ginger or horseradish) in the
meat grinder.
• To avoid obstructions, do not apply exces-
sive force while pushing meat.
• If any hard piece of food stops the screw
and blade rotation, immediately switch the
unit off and use the screw reverse mode
(REV) to remove the obstruction before
starting again.
BEFORE USING THE MEAT GRINDER
After unit transportation or storage at low
temperature it is necessary to keep it for
at least two hours at room temperature
before switching on.
• Unpack the meat grinder and remove all
package materials, wipe the unit body with
a damp cloth.
• Wash all removable parts with warm water
and neutral detergent, then rinse and dry
thoroughly before assembling.
• Before switching the unit on for the first
time, make sure that voltage in your mains
corresponds to the operating voltage of
the unit.
BASIC PRINCIPLES OF USING THE MEAT
GRINDER
• The meat grinder is intended only for
household processing of products and
making homemade semi-finished prod-
ucts.
• Assemble the unit and place it on a flat dry
surface.
• Make sure that the ventilation openings on
the body are not blocked.
• Insert the power plug into the mains socket.
• Place a suitable bowl under the meat
grinder head (3).
• Make sure that the meat is fully defrosted,
remove excess fat and all bones, and cut

ENGLISH
13
the meat into cubes or strips fitting the
opening of the food tray (2).
• Switch the unit on by pressing the «ON/
OFF» button (8).
• Slowly feed the meat pieces into the meat
grinder head body (3) using the pusher (1).
• During operation use only the pusher (1)
supplied with the unit.
• Do not use any other objects to push
products, do not push the meat with your
hands.
• Do not apply excessive effort while push-
ing the meat or other foods.
• Obstructions can appear during meat
grinding, use the screw reverse mode
(REV) to remove the obstruction. To select
the screw reverse mode (REV), switch the
unit off by pressing the «ON/OFF» button
(8), then press and hold the screw reverse
mode button «REV» (7), the screw will
rotate backwards.
• Do not run the unit for more than 5 minutes
continuously.
• After 5 minutes of continuous use, switch the
meat grinder off and let it cool down during
10-15 minutes before further operation.
• After you finish operating, switch the unit
off, pressing the «ON/OFF» button (8),
unplug it and only after that you can disas-
semble the meat grinder.
MEAT PROCESSING
1. Insert the meat grinder head (3) into the
setting place (4) and turn the meat grinder
head (3) counterclockwise until it is fixed
(pic. 1, 2).
2. Install the screw (9) into the meat grinder
head body (3) (pic. 3).
3. Install the crossed blade (10) (pic. 4).
4. Select one of the cutting plates (11, 12 or
13) and set it over the blade, matching the
ledges on the plate with the grooves on the
meat grinder head body (3), tighten the
nut (14) (pic. 5, 6).
Attention!
• Face the blade cutting side to the plate.
If the blade is installed improperly, it
will not grind the food products.
• Coarser (11, 12) plates suit for pro-
cessing raw meat, vegetables, dried
fruit, cheese, fish, etc.
• Fine cutting plate (13) is for processing
raw and cooked meat, fish, etc.
5. Place the food tray (2) on the meat grinder
head body (3).
6. Insert the power plug into the mains socket.
7. Switch the unit on by pressing the «ON/
OFF» button (8).
8. During the operation use only the pusher
(1).
Notes:
– For better meat processing slice it in cubes or
strips. Defrost frozen meat thoroughly.
– During the operation use only the pusher
supplied with the unit; do not use any other
objects for pushing meat, do not push meat
with your hands.
9. After you finish operating, switch the unit
off, pressing the «ON/OFF» button (8),
unplug it and only after that you can disas-
semble the meat grinder.
10. To remove the meat grinder head, press
the lock button (5), turn the meat grinder
head (3) clockwise and remove the meat
grinder head (3).
11. To disassemble the meat grinder head,
unscrew the nut (14) and take out the
installed plate (11, 12 or 13), the crossed
blade (10) and the screw (9) from the meat
grinder head body.
AUTO SWITCH-OFF FUNCTION
The meat grinder is equipped with an auto
switch-off function in case of motor unit
overheating.
• In case of overheating of the motor, the
automatic thermal switch will be on, and
the meat grinder will be switched off.
• In this case remove the power plug from
the mains socket immediately .
• Let the unit cool down for approximate-
ly 50-60 minutes before switching it on
again.
• Plug the meat grinder into the mains, switch
it on, if the meat grinder can not be switched
on, this may mean that it is otherwise dam-

14
ENGLISH
aged. In this case contact an authorized ser-
vice center for meat grinder repair.
SAUSAGE FILLING
1. Prepare minced meat.
2. Install the meat grinder head (3) and turn it
counterclockwise until it is fixed.
3. Install the screw (9) into the meat grinder
head body (3), set the crossed blade (10),
take the plate (13) (for fine cutting) and
set it over the blade, matching the ledges
on the plate with the grooves on the meat
grinder head body (3), install the sausage
attachment (15) and tighten the nut (14)
(pic. 7, 8).
4. Install the food tray (2).
5. Put the minced meat on the food tray (2).
6. For sausage making, use natural sausage
casing, having put it preliminarily into a
bowl with warm water for 10 minutes.
7. Pull the softened casing on the attachment
(15) and tie a knot on the casing end.
8. Switch the unit on by pressing the «ON/
OFF» button (8).
9. Use the pusher (1) to feed the minced
meat, as the casing is filled up, slide it off
the attachment (15) as necessary, and wet
the casing with water if it becomes dry.
10. After you finish operating, switch the unit
off, pressing the «ON/OFF» button (8),
unplug it and only after that you can disas-
semble the meat grinder.
11. To remove the meat grinder head, press
the lock button (5), turn the meat grinder
head (3) clockwise and remove it.
12. Unscrew the nut (14) and disassemble the
meat grinder head.
USING THE «KEBBE» ATTACHMENT
Kebbe is a traditional Middle East dish cooked
of lamb meat, wheat flour and spices cut
together to prepare the base for hollow rolls.
The rolls are filled and deep fried.
You can make different delicacies trying
various fillings.
1. Prepare the casing base.
2. Install the meat grinder head (3) and turn it
counterclockwise until it is fixed.
3. Insert the screw (9) into the meat grinder
head body (3), install the «kebbe» attach-
ments (16, 17) on the screw (9); make sure
that the ledges on the attachment (17)
match the grooves on the meat grinder
head body (3) and tighten the nut (14)
(pic. 9, 10).
4. Install the food tray (2).
5. Put the prepared casing base on the food
tray (2).
6. Switch the unit on by pressing the «ON/
OFF» button (8).
7. Use the pusher (1) to supply the base for
casing.
8. Cut off rolls of the required length.
9. After you finish operating, switch the unit
off, pressing the «ON/OFF» button (8),
unplug it and only after that you can disas-
semble the meat grinder.
10. To remove the meat grinder head (3),
press the lock button (5), turn the meat
grinder head (3) clockwise and remove the
head (3).
11. Unscrew the nut (14) and disassemble the
meat grinder head.
RECIPE
(Filling)
Lamb 100 g
Olive oil 1, 1/2 table spoon
Onion (shred) 1, 1/2 table spoon
Spice to taste
Salt 1/4 tea spoon
Flour 1/4 table spoon
• Mince the lamb meat once or twice.
• Fry onion in oil till it gets gold yellow, and
then add minced lamb meat, spice, salt
and flour.
(Casing)
Lean meat 450 g
Flour 150-200 g

15
ENGLISH
Spice to taste
Nutmeg 1 pc.
Ground chilli pepper to taste
Pepper to taste
• Mince the meat twice or thrice, mince a
nutmeg separately, and mix all the com-
ponents.
• More meat and less flour in the casing pro-
vide better consistency and taste of the
prepared dish.
• Fill the rolls, clamp at edges and shape as
you wish.
• Deep fry the rolls.
Vegetable slicer
• Install the vegetable slicer attachment
body (19) into the meat grinder head set-
ting place (4), and turn it counterclockwise
until it is fixed (pic. 11).
• Insert one of the attachments (20, 21, 22)
into the vegetable slicer attachment body
(19) as far as it will go (pic. 12).
• Insert the power plug into the mains socket.
• Switch the unit on by pressing the «ON/
OFF» button (8).
• During the operation use only the pusher
(18) supplied with the unit; do not use any
other objects to push vegetables, never
push vegetables with your hands.
• To remove the vegetable slicer attachment
(19), press the lock button (5), turn the
attachment clockwise and remove it.
• After you finish operating, switch the unit
off, pressing the «ON/OFF» button (8),
unplug the unit and only after that you can
disassemble the meat grinder.
Slow Juicer
The juice extractor attachment is intended for
processing soft vegetables or fruits (which
includes making tomato juice/squash or
processing «stone berries», for instance, red
currant).
• Install the meat grinder head (3) into the
setting place (4) and turn it counterclock-
wise until it is fixed (pic. 1, 2).
• Install the screw (9) into the meat grinder
head body (3) (pic. 3).
• Insert the support ring (27) into the juice
extractor attachment body (28) (pic. 13).
• Hold the grid (26) with the cut facing up,
slightly squeeze and insert the grid (26)
into the juice extractor attachment body
(28) as far as it will go (pic. 14).
• Insert the juice extractor screw (25) into
the juice extractor attachment body (28).
• Install the juice extractor attachment body
(28) on the meat grinder head body (3),
make sure that the ledges on the attach-
ment (28) match the grooves on the meat
grinder head body (3) and tighten the nut
(14) (pic. 15).
• Fix the draining tray (29) on the juice
extractor attachment body (28) (pic. 16).
• Install the protective cover (23) on the
juice extractor attachment body and screw
in the pulp outlet control knob (24), turning
it clockwise (pic. 17).
• Install the food tray (2) on the meat grinder
head body (3).
• Place a suitable container for collecting
juice/mash under the draining tray (29).
• Also place a suitable container under the
pulp outlet of the juice extractor attach-
ment (28).
• Insert the power plug into the mains sock-
et.
• Switch the unit on by pressing the «ON/
OFF» button (8).
• During the operation use only the pusher
(1) supplied with the unit; do not use any
other objects to push vegetables or fruits,
never push vegetables or fruit with your
hands (pic. 18).
• Turning the pulp outlet control knob (24)
clockwise or counter-clockwise changes
the size of the pulp outlet, select a posi-
tion of the control knob (24) that will pro-
vide the optimum ratio of obtained juice /
vegetable and fruit mash and the required
pulp dryness.
• If during the use of the juice extractor
attachment the amount of the obtained

16
ENGLISH
juice/mash decreases, switch the meat
grinder off, unplug it, disassemble the
juice extractor attachment and wash the
grid (26).
• After you finish operating, switch the unit
off, pressing the «ON/OFF» button (8),
unplug it and only after that you can disas-
semble the meat grinder.
• Disassemble and wash all the parts of the
slow juicer with warm soapy water and
neutral detergent, then rinse and dry thor-
oughly before assembling.
Meat grinder care
• After you finish operating, switch the meat
grinder off, pressing the «ON/OFF» button
(8), and unplug it.
• Press the lock button (5), turn the meat
grinder head clockwise and remove it.
• Unscrew the nut (14), remove the installed
attachments (15, 16 or 17), the plates (11,
12 or 13) and the crossed blade (10) from
the screw (9).
• Remove the screw (9) from the meat
grinder head (3).
• Remove remains of the food products
from the screw.
• Wash all the used parts of the meat grind-
er with warm soapy water and a neutral
detergent, then rinse and dry thoroughly
before assembling.
• Clean the meat grinder body (6) with a
slightly damp cloth and then wipe the
body dry.
• Do not use solvents or abrasives to clean
the meat grinder body (6).
• Provide that no liquid gets inside the meat
grinder body.
Storage
• Before taking the meat grinder away for
storage, make sure that the unit body and
all removable parts are clean and dry.
• Keep the unit away from children in a dry
cool place.
Delivery set
Meat grinder – 1 pc.
Pusher – 2 pc.
Food tray – 1 pc.
Plates – 3 pc.
Sausage attachments set – 1 pc.
«Kebbe» attachments set – 1 pc.
Vegetable slicer attachments set – 1 pc.
Juice extractor attachments set – 1 pc.
Instruction manual – 1 pc.
Technical specifications
Power supply: 220-240 V ~ 50/60Hz
Maximal power: 1500 W
The manufacturer preserves the right to
change design and specifications of the unit
without a preliminary notification.
Unit operating life is 3 years
Guarantee
Details regarding guarantee conditions can
be obtained from the dealer from whom the
appliance was purchased. The bill of sale or
receipt must be produced when making any
claim under the terms of this guarantee.
This product conforms to the EMC-Requirements as
laid down by the Council Directive 2004/108/ЕС and
to the Low Voltage Regulation (2006/95/ЕС)

17
DEUTSCH
17
Fleischwolf
Der Fleischwolf ist für
Nahrungsmittelbearbeitung und Zubereitung
von Haushalbprodukten bestimmt.
Beschreibung
1. Stampfer
2. Schale für Nahrungsmittel
3. Gehäuse des Fleischwolf-Kopfs
4. Aufstellplatz des Fleischwolf-Kopfs
5. Halterungstaste des Fleischwolf-Kopfs
6. Gerätegehäuse
7. Taste der Rücklauffunktion der Schnecke
„REV“
8. Ein-/Ausschalttaste „ON/OFF“
9. Schnecke
10. Kreuzmesser
11. Lochscheibe für grobes Hacken
12. Lochscheibe für mittleres Hacken
13. Lochscheibe für feines Hacken
14. Mutter des Fleischwolf-Kopfs
15. Wurstfülleraufsatz
16. Kebbeaufsatz
17. Kebbeaufsatz
18. Stampfer des Gemüseschneiders
19. Gehäuse des Gemüseschneideraufsatzes
20. Grobreibe
21. Schnitzler
22. Feinreibe
23. Schutzabdeckung
24. Fleischaustrittsregler
25. Entsafterschnecke
26. Sieb
27. Stützring
28. Gehäuse des Entsafteraufsatzes
29. Abflußrinne
VORSICHTSMAßNAHMEN
Vor der Inbetriebnahme des Geräts lesen
Sie die Bedienungsanleitung aufmerksam
durch und bewahren Sie sie während der
ganzen Betriebszeit des Geräts. Nicht
ordnungsgemäße Nutzung des Geräts kann zu
seiner Störung führen, einen gesundheitlichen
oder materiellen Schaden beim Nutzer
hervorrufen.
Um Brand-, Stromschlagrisiko und andere
Verletzungen beim Gebrauch des elektrischen
Fleischwolfs zu vermeiden sind folgende
Sicherheitsmaßnahmen zu beachten.
• Vor dem ersten Einschalten vergewissern
Sie sich, dass die Netzspannung und die
Betriebsspannung des Geräts übereinstim-
men.
• Benutzen Sie nur das mitgelieferte Zubehör.
• TAUCHEN Sie NIE das Gerät, das Netzkabel
und den Netzstecker ins Wasser oder ande-
re Flüssigkeiten, um Stromschlagrisiko zu
vermeiden.
• Benutzen Sie für die Reinigung des
Fleischwolfgehäuses ein leicht ange-
feuchtetes Tuch, danach trocknen Sie das
Gehäuse ab.
• Lassen Sie das eingeschaltete Gerät nie
unbeaufsichtigt.
• Schalten Sie den Fleischwolf aus und tren-
nen Sie ihn vom Stromnetz ab vor dem
Zusammenbau, Ausbau oder Reinigung.
• Stellen Sie das Gerät auf einer gera-
den standfesten Oberfläche fern von
Wärmequellen, offenem Feuer, Feuchtigkeit
und direkten Sonnenstrahlen auf.
• Es ist nicht gestattet, das Gerät auf hei-
ßer Oberfläche oder neben solcher
(zum Beispiel, neben einem Gas- oder
Elektroherd, geheiztem Backofen oder
einer Kochfläche) aufzustellen.
• Gehen Sie mit dem Netzkabel vorsichtig
um, lassen Sie es mehrmalig nicht verdre-
hen, richten Sie das Netzkabel periodisch
auf.
• Es ist nicht gestattet, das Netzkabel als Griff
beim Tragen des Fleischwolfs zu benutzen.
• Achten Sie darauf, dass das Netzkabel
vom Tisch nicht frei hängt und scharfe
Möbelkanten und heiße Oberflächen nicht
berührt.
• Zum Abtrennen des Netzsteckers von der
Steckdose ziehen Sie das Netzkabel nicht,
sondern halten Sie den Netzstecker
• Es ist nicht gestattet, das Gerät anzuschlie-
ßen und abzutrennen und das Netzkabel
oder den Netzstecker anzufassen, wenn
Ihre Hände nass sind, das kann zum
Stromschlag führen.
• Dieses Gerät ist nicht für den Gebrauch von
Kindern unter 8 Jahren geeignet.

18
DEUTSCH
• Es ist nicht gestattet, Kindern das Gerät als
Spielzeug zu geben, lassen Sie Kinder das
Gehäuse des Geräts und das Netzkabel
während des Betriebs nicht berühren.
• Während des Betriebs und der
Betriebspausen stellen Sie das Gerät an
einem für Kinder unter 8 Jahren unzugäng-
lichen Ort auf.
• Dieses Gerät ist nicht für Personen (darun-
ter auch Kinder über 8 Jahren) mit Körper-,
Nerven- und Geistesabweichungen
oder ohne ausreichende Erfahrung oder
Kenntnisse geeignet. Dieses Gerät darf von
solchen Personen nur dann genutzt werden,
wenn Sie sich unter Aufsicht der Person
befinden, die für ihre Sicherheit verantwort-
lich ist, und wenn ihnen entsprechende und
verständliche Anweisungen über sichere
Nutzung des Geräts und die Gefahren bei
seiner falschen Nutzung gegeben wurden.
• AusKindersicherheitsgründenlassenSiedie
Plastiktüten, die als Verpackung verwendet
werden,nieohneAufsicht.
• Achtung! Lassen Sie Kinder mit Plastiktüten
oder Verpackungsfolien nicht spielen.
Erstickungsgefahr!
• Esistnichtgestattet,dasGerätselbständig
auseinanderzunehmen,beiderFeststellung
vonBeschädigungoderimSturzfallwenden
Siesichandennächstliegendenautorisierten
(bevollmächtigten)Kundendienst.
• Transportieren Sie das Gerät nur in der
Fabrikverpackung.
• Bewahren Sie das Gerät an einem für Kinder
und behinderte Personen unzugänglichen
Ort auf.
DAS GERÄT IST NUR FÜR DEN GEBRAUCH IM
HAUSHALT GEEIGNET
BESONDERHEITEN DES FLEISCHWOLFES
Die Rücklauffunktion der Schnecke
„REV“ (Reverse) ist für die Entfernung von
Verstopfungen, die während der Bearbeitung
von Nahrungsmitteln entstehen, bestimmt.
Schale für Nahrungsmittel gewährleistet
eine bequeme Anordnung der Nahrungsmittel
während ihrer Bearbeitung.
Drei Lochscheiben mit Löcher
verschiedener Größe sind für verschiedene
Zerkleinerungsstufen der Nahrungsmittel
bestimmt.
Spezielles Zubehör:
Gemüseschneideraufsatz, Entsafteraufsatz,
Wurstfüller- und Kebbeaufsätze.
ACHTUNG!
• Vergewissern Sie sich vor dem Anschließen
des Fleischwolfs ans Stromnetz, dass das
Gerät ausgeschaltet ist.
• Vergewissern Sie sich vor dem Hacken von
Fleisch, dass alle Knochen und Fettreste
entfernt sind.
• Es ist nicht gestattet, die Nahrungsmittel
mit beliebigen Gegenständen oder mit den
Fingern durchzustoßen, benutzen Sie nur
den mitgelieferten Stampfer (1).
• Tauchen Sie nie das Gehäuse des
Fleischwolfs ins Wasser oder andere
Flüssigkeiten.
• Es ist nicht gestattet, die Lochscheiben (11,
12, 13) und das Kreuzmesser (10) während
der Nutzung von Kebbeaufsätzen (16, 17)
aufzusetzen.
• Es ist nicht gestattet, harte Nahrungsmittel
(z.B. Ingwer oder Meerrettich) mit dem
Fleischwolf zu bearbeiten.
• Um Verstopfungen zu vermeiden, wenden
Sie beim Durchstoßen des Fleisches keine
übermäßige Kraft an.
• Falls ein harter Bissen der Nahrungsmittel
zum Drehungsstop der Schnecke und des
Messers führt, schalten Sie das Gerät sofort
aus und bevor Sie den Betrieb fortsetzen,
entfernen Sie die Verstopfung, indem Sie
die Rücklauffunktion der Schnecke (REV)
benutzen.
VORBEREITUNG DES FLEISCHWOLFES
Falls das Gerät unter niedrigen
Temperaturen transportiert oder
aufbewahrt wurde, lassen Sie es vor der
Nutzung bei der Raumlufttemperatur nicht
weniger als zwei Stunden bleiben.
• Nehmen Sie den Fleischwolf heraus und
entfernen Sie alle Verpackungsmaterialien,
wischen Sie das Gehäuse des Geräts mit
einem feuchten Tuch ab.

19
DEUTSCH
• Waschen Sie alle abnehmbaren Teile
mit Warmwasser und einem neutralen
Waschmittel, spülen und trocknen Sie diese
vor dem Zusammenbau sorgfältig ab.
• Vor dem ersten Einschalten vergewissern
Sie sich, dass die Netzspannung und die
Betriebsspannung des Geräts übereinstim-
men.
GRUNDPRINZIPIEN DES
FLEISCHWOLFBETRIEBS
• Der Fleischwolf ist für die Bearbeitung von
Nahrungsmitteln und für die Zubereitung
von Halbprodukten nur im Haushalt
bestimmt.
• Setzen Sie das Gerät zusammen und stel-
len Sie es auf einer geraden trockenen
Oberfläche auf.
• Vergewissern Sie sich, dass die
Lüftungsöffnungen am Gehäuse nicht blo-
ckiert sind.
• Stecken Sie den Netzstecker in die
Steckdose ein.
• Stellen Sie geeignetes Geschirr unter den
Fleischwolf-Kopf (3).
• Vergewissern Sie sich, dass Fleisch kom-
plett aufgetaut ist, entfernen Sie übri-
ges Fett und alle Knochen, schneiden Sie
Fleisch in passende Würfel oder Streifen,
die in die Öffnung der Schale (2) frei durch-
gehen.
• Schalten Sie das Gerät ein, indem Sie die
„ON/OFF“-Taste (8) drücken.
• Stoßen Sie Fleisch in den Trichter des
Fleischwolf-Kopfs (3) mit dem Stampfer (1)
langsam durch.
• Während des Betriebs benutzen Sie nur den
Stampfer (1), der zum Lieferumfang gehört.
• Es ist nicht gestattet, andere Gegenstände
zum Durchstoßen von Nahrungsmitteln
zu benutzen, stoßen Sie Fleisch mit Ihren
Fingern nicht durch.
• Wenden Sie keine übermäßige Kraft an, um
Fleisch und andere Nahrungsmittel durch-
zustoßen.
• Es kann sich eine Verstopfung während des
Fleischhackens bilden; um die entstandene
Verstopfung zu beseitigen, benutzen Sie
die Rücklauffunktion der Schnecke (REV).
Um den Fleischwolf in den Rücklaufbetrieb
(REV) umzuschalten, schalten Sie den
Fleischwolf aus, indem Sie die „ON/OFF“-
Taste (8) drücken, dann drücken und hal-
ten Sie die Taste der Rücklauffunktion der
Schnecke „REV“ (7), die Schnecke wird
rückwärts laufen.
• Der Dauerbetrieb des Geräts bei der
Nahrungsmittelbearbeitung soll 5 Minuten
nicht übersteigen.
• Schalten Sie den Fleischwolf nach 5
Minuten Dauerbetrieb aus und lassen Sie
ihn sich im Laufe von 10-15 Minuten abküh-
len, danach kann der Betrieb fortgesetzt
werden.
• Nach der Beendigung des Betriebs schal-
ten Sie den Fleischwolf aus, indem Sie
die „ON/OFF“-Taste (8) drücken, tren-
nen Sie das Gerät vom Stromnetz ab, nur
danach beginnen Sie mit dem Ausbau des
Fleischwolfs.
FLEISCHBEARBEITUNG
1. Setzen Sie den Fleischwolf-Kopf (3) auf
den Aufstellplatz (4) auf und drehen Sie
den Fleischwolf-Kopf (3) entgegen dem
Uhrzeigersinn bis zum Einrasten (Abb. 1,
2).
2. Setzen Sie die Schnecke (9) ins Gehäuse
des Fleischwolf-Kopfs (3) ein (Abb. 3).
3. Setzen Sie das Kreuzmesser (10) auf (Abb.
4).
4. Wählen Sie die notwendige Lochscheibe
(11, 12 oder 13) und stellen Sie diese
über das Kreuzmesser auf, indem Sie
die Vorsprünge an der Lochscheibe
mit den Aussparungen im Gehäuse des
Fleischwolf-Kopfs (3) zusammenfallen las-
sen, schrauben Sie die Mutter (14) (Abb.
5, 6).
Achtung!
• Stellen Sie das Messer mit der
Schneidseite gegen Lochscheibe auf.
Falls das Messer falsch aufgesetzt ist,
wird es keine Hackensfunktion erfüllen.
• Die Lochscheiben mit größeren
Löchern (11, 12) sind für Bearbeitung
von Rohfleisch, Gemüse, Trockenobst,
Käse, Fisch usw. geeignet.

20
DEUTSCH
• Die Lochscheibe mit kleinen Löchern
(13) ist für die Bearbeitung sowohl von
Rohfleisch, als auch von schon zuberei-
tetem Fleisch, Fisch usw. geeignet.
1. Setzen Sie die Schale für Nahrungsmittel
(2) aufs Gehäuse des Fleischwolf-Kopfs
(3) auf.
2. Stecken Sie den Netzstecker in die
Steckdose ein.
3. Schalten Sie das Gerät ein, indem Sie die
„ON/OFF“-Taste (8) drücken.
4. Nutzen Sie während des Betriebs nur den
Stampfer (1).
Anmerkungen:
– Um Fleisch besser zu bearbeiten, schnei-
den Sie es in Streifen oder Würfel.
Eingefrorenes Fleisch soll komplett aufge-
taut werden.
– Benutzen Sie während des Betriebs den
mitgelieferten Stampfer; es ist nicht gestat-
tet, andere Gegenstände zum Durchstoßen
des Fleisches zu benutzen, stoßen Sie die
Nahrungsmittel mit Ihren Fingern nicht
durch.
5. Nach der Beendigung des Betriebs schal-
ten Sie den Fleischwolf aus, indem Sie
die „ON/OFF“-Taste (8) drücken, tren-
nen Sie das Gerät vom Stromnetz ab, nur
danach beginnen Sie mit dem Ausbau des
Fleischwolfs.
6. Um den Fleischwolf-Kopf abzuneh-
men, drücken Sie die Halterungstaste
(5), drehen Sie den Fleischwolf-Kopf (3)
im Uhrzeigersinn und nehmen Sie den
Fleischwolf-Kopf (3) ab.
7. Um den Fleischwolf-Kopf auszubauen,
schrauben Sie die Mutter (14) ab und zie-
hen Sie die aufgesetzte Lochscheibe (11,
12 oder 13), das Kreuzmesser (10) und
die Schnecke (9) aus dem Gehäuse des
Fleischwolf-Kopfs heraus.
FUNKTION DER AUTOMATISCHEN
ABSCHALTUNG
Der Fleischwolf ist mit der Funktion der
automatischen Abschaltung bei der
Überhitzung des Elektromotors ausgestattet.
• Bei der Überhitzung des Elektromotors
spricht das Sicherungselement automa-
tisch an, und der Fleischwolf schaltet sich
aus.
• In diesem Fall ziehen Sie den Netzstecker
aus der Steckdose sofort heraus.
• Lassen Sie den Fleischwolf sich im Laufe
von ca. 50-60 Minuten abkühlen, erst
danach können Sie den Fleischwolf wieder
einschalten.
• Schließen Sie den Fleischwolf ans
Stromnetz an und schalten Sie ihn ein;
falls sich der Fleischwolf nicht einschaltet,
kann dies bedeuten, dass der Fleischwolf
andere Beschädigungen hat. In diesem
Fall wenden Sie sich an einen autorisierten
(bevollmächtigten) Kundendienst, um den
Fleischwolf reparierenzulassen.
AUFFÜLLEN VON WÜRSTCHEN
1. Bereiten Sie Füllsel vor.
2. Setzen Sie den Fleischwolf-Kopf (3) auf, und
drehen Sie ihn entgegen dem Uhrzeigersinn
bis zum Einrasten.
3. Setzen Sie die Schnecke (9) ins Gehäuse
des Fleischwolf-Kopfs (3) ein, setzen Sie
das Kreuzmesser (10) auf, nehmen Sie die
Lochscheibe (13) (für feines Hacken) und
stellen Sie diese über das Kreuzmesser
auf, indem Sie die Vorsprünge an der
Lochscheibe und die Aussparungen im
Gehäuse des Fleischwolf-Kopfs (3)
zusammenfallen lassen, stellen Sie den
Würstchenfülleraufsatz (15) auf und schrau-
ben Sie die Mutter (14) zu (Abb. 7, 8).
4. Setzen Sie die Schale für Nahrungsmittel
(2) auf.
5. Legen Sie das fertige Füllsel auf die Schale
für Nahrungsmittel (2).
6. Benutzen Sie eine Naturhülle für die
Zubereitung von Würstchen, legen Sie diese
vorher in den Behälter mit Warmwasser für
10 Minuten ein.
7. Ziehen Sie aufgeweichte Hülle auf den
Aufsatz (15) an und binden Sie einen Knoten
am Ende der Hülle.
8. Schalten Sie das Gerät ein, indem Sie die
Taste „ON/OFF“ (8) drücken.
9. Für die Zufuhr des fertigen Füllsels benut-
zen Sie den Stampfer (1), ziehen Sie die
Hülle während der Auffüllung vom Aufsatz
Table of contents
Languages:
Other Maxwell Meat Grinder manuals