MaxxGarden 21012 User manual

Terrasverwarmer
Model: 21012
GEBRUIKERSHANDLEIDING
INSTRUCTION MANUAL
NL: Terrasverwarmer
EN: Electric heater

INHOUD
Waarschuwing............................................................................................................................................ 3
Stand en locatie terrasverwarmer ........................................................................................................... 5
Gasvereisten............................................................................................................................................... 5
Lekkagetest ................................................................................................................................................ 5
Werking en opslag ..................................................................................................................................... 5
Reiniging en onderhoud ........................................................................................................................... 6
Onderdelen en specicaties .................................................................................................................... 6
Montageonderdelen en procedures...................................................................................................... 7
Checklist voor problemen....................................................................................................................... 10
- 2 - - 3 -

[NL] Gebruikershandleiding
Bewaar de instructies voor toekomstig gebruik
WAARSCHUWING VEILIGHEIDSVOORSCHRIFTEN
LEES DEZE INSTRUCTIES ZORGVULDIG DOOR VOORDAT U UW NIEUWE TERRASVERWARMER GEBRUIKT.
VOOR JOUW VEILIGHEID
Als u gas ruikt:
1. Sluit het gas naar het toestel af.
2. Doof open vuur.
3. Als de geur aanhoudt, bel dan onmiddellijk uw gasleverancier of uw brandweer.
VOOR JOUW VEILIGHEID
1. Bewaar of gebruik geen benzine of andere brandbare dampen en vloeistoffen in de buurt
van dit of enig ander apparaat.
2. Een gases die niet is aangesloten voor gebruik, mag niet in de buurt van dit of enig ander
apparaat worden opgeslagen.
WAARSCHUWING
1. Gebruik het toestel buiten of in goed geventileerde ruimtes.
2. Een goed geventileerde ruimte moet minimaal 25% van de oppervlakte open hebben.
3. De oppervlakte is de som van de oppervlakte van de muren.
WAARSCHUWING
Onjuiste installatie, afstelling, wijziging, service of onderhoud kan letsels of materiële schade
veroorzaken. Lees de installatie-, bedienings- en onderhoudsinstructies grondig voordat u deze
apparatuur installeert of onderhoudt.
WAARSCHUWING
Lees de instructies voor installatie en gebruik.
- Dit apparaat moet worden geïnstalleerd en de gases moet worden opgeslagen in
overeenstemming met de geldende voorschriften.
- Blokkeer de ventilatieopeningen van de cilinderbehuizing niet.
- Verplaats het apparaat niet als het in werking is.
- Sluit de klep bij de gases of de regelaar voordat u het toestel verplaatst.
- De slang of de exibele slang moet binnen de voorgeschreven intervallen worden vervangen.
- Gebruik alleen het type gas en het type cilinder dat door de fabrikant is gespeciceerd.
- Bij harde wind moet bijzondere aandacht worden besteed zodat het apparaat niet kan
kantelen.
- 2 - - 3 -

WAARSCHUWING
LEES DE VOLGENDE VEILIGHEIDSRICHTLIJNEN ZORGVULDIG DOOR VOORDAT U HET TOESTEL
GEBRUIKT
• Gebruik de terrasverwarmer niet binnenshuis, dit kan persoonlijke letsels of materiële schade
veroorzaken.
• Deze terrasverwarmer is niet bedoeld voor installatie op recreatievoertuigen en / of boten.
• Installatie en reparatie moeten worden uitgevoerd door een gekwaliceerde servicemonteur.
• Onjuiste installatie, afstelling, wijziging kan persoonlijke letsels of materiële schade veroorzaken.
• Probeer het apparaat op geen enkele manier te veranderen.
• Vervang de regelaar nooit door een andere regelaar dan de door de fabriek voorgestelde
vervanging.
• Bewaar of gebruik geen benzine of andere brandbare dampen of vloeistoffen in de
verwarmingseenheid.
• Het hele gassysteem, de slang, de regelaar, de waakvlam of de brander moet voor gebruik
worden geïnspecteerd op lekkage of beschadiging, en minimaal jaarlijks door een
gekwaliceerd servicemonteur.
• Alle lektesten moeten worden uitgevoerd met een zeepoplossing. Gebruik nooit een open vlam
om op lekken te controleren.
• Gebruik de terrasverwarmer niet voordat alle aansluitingen op lekkage zijn getest.
• Draai de gasklep onmiddellijk dicht als u een gaslucht ruikt. Draai de cilinderklep UIT. Als er een
lek is bij de slang- / regelaaraansluiting: draai de aansluiting vast en voer nogmaals een lektest
uit. Als er bellen blijven verschijnen, moet u deze terugbrengen naar de plaats van aankoop
van de slang. Als er een lek is bij de aansluiting van de regelaar / cilinderklep: ontkoppel, sluit
opnieuw aan en voer nogmaals een lekcontrole uit. Als u na verschillende pogingen nog steeds
bellen ziet, is de cilinderklep defect en moet deze worden teruggestuurd naar de plaats van
aankoop van de cilinder.
• Vervoer de terrasverwarmer niet terwijl deze in werking is.
• Verplaats de terrasverwarmer niet nadat deze is uitgeschakeld en het toestel is afgekoeld.
• Houd de ventilatieopening van de cilinderbehuizing vrij en vrij van vuil.
• Verf het stralingsscherm, het bedieningspaneel of de reector van de bovenkap niet.
• Regelcompartiment, brander en circulatieluchtkanalen van de terrasverwarmer moeten
zuiver worden gehouden.
Regelmatig reinigen kan nodig zijn.
• De LPG-tank moet worden uitgeschakeld wanneer de verwarming niet in gebruik is.
• Controleer de verwarming onmiddellijk als één van de volgende situaties zich voordoet:
- De kachel komt niet op temperatuur.
- De brander maakt een knallend geluid tijdens het gebruik (een klein geluid is normaal
als de brander uit is).
- Geur van gas in combinatie met extreem kantelen van de brandervlammen.
• De LP-drukregelaar / slangconstructie moet buiten paden worden geplaatst waar mensen
erover kunnen struikelen of in een gebied waar de slang niet per ongeluk beschadigd kan
raken.
• Elke beschermkap of andere beschermingsinrichting die is verwijderd voor onderhoud aan
de kachel, moet worden vervangen voordat de kachel wordt gebruikt. Volwassenen en
kinderen moeten uit de buurt blijven van de oppervlakken met hoge temperaturen om
brandwonden of ontbranding van kleding te voorkomen.
• Kinderen moeten zorgvuldig worden begeleid wanneer ze zich in de buurt van de kachel
bevinden.
• Kleding of andere brandbare materialen mogen niet aan de kachel worden opgehangen
of op of naast de kachel worden geplaatst.
• De gases moet worden vervangen in een goed geventileerde ruimte, uit de buurt van
ontstekingsbronnen (kaars, sigaretten, andere apparaten die vlammen produceren, ...).
• Controleren of de afdichting van de regelaar correct is aangebracht en zijn functie kan
vervullen
• De ventilatieopeningen van de cilinderbehuizing mag niet worden geblokkeerd.
• Bij gaslekkage mag het toestel niet worden gebruikt of bij brand moet de gastoevoer
worden afgesloten en moet het toestel worden onderzocht en gerepareerd worden voordat
het opnieuw wordt gebruikt.
• De aanbevolen frequentie voor het controleren van de slang of de exibele slang (minstens
één keer per maand en elke keer dat de cilinder wordt vervangen). Als het tekenen van
barsten, splijten of andere slijtage vertoont, moet het worden vervangen door een nieuwe
slang van dezelfde lengte en van gelijkwaardige kwaliteit.
- 4 - - 5 -

STAND EN LOCATIE VAN DE TERRASVERWARMER
• De terrasverwarmer is uitsluitend bedoeld voor gebruik buitenshuis.
Zorg er altijd voor dat er voldoende ventilatie met verse lucht is.
• Houd altijd voldoende afstand tot brandbare materialen,
d.w.z. bovenkant 100 cm en zijkanten minimaal 100 cm.
• De terrasverwarmer moet op een vlakke, stevige ondergrond
worden geplaatst.
• Gebruik de terrasverwarmer nooit in een explosieve atmosfeer,
zoals in gebieden waar benzine of andere brandbare vloeistoffen
of dampen worden opgeslagen.
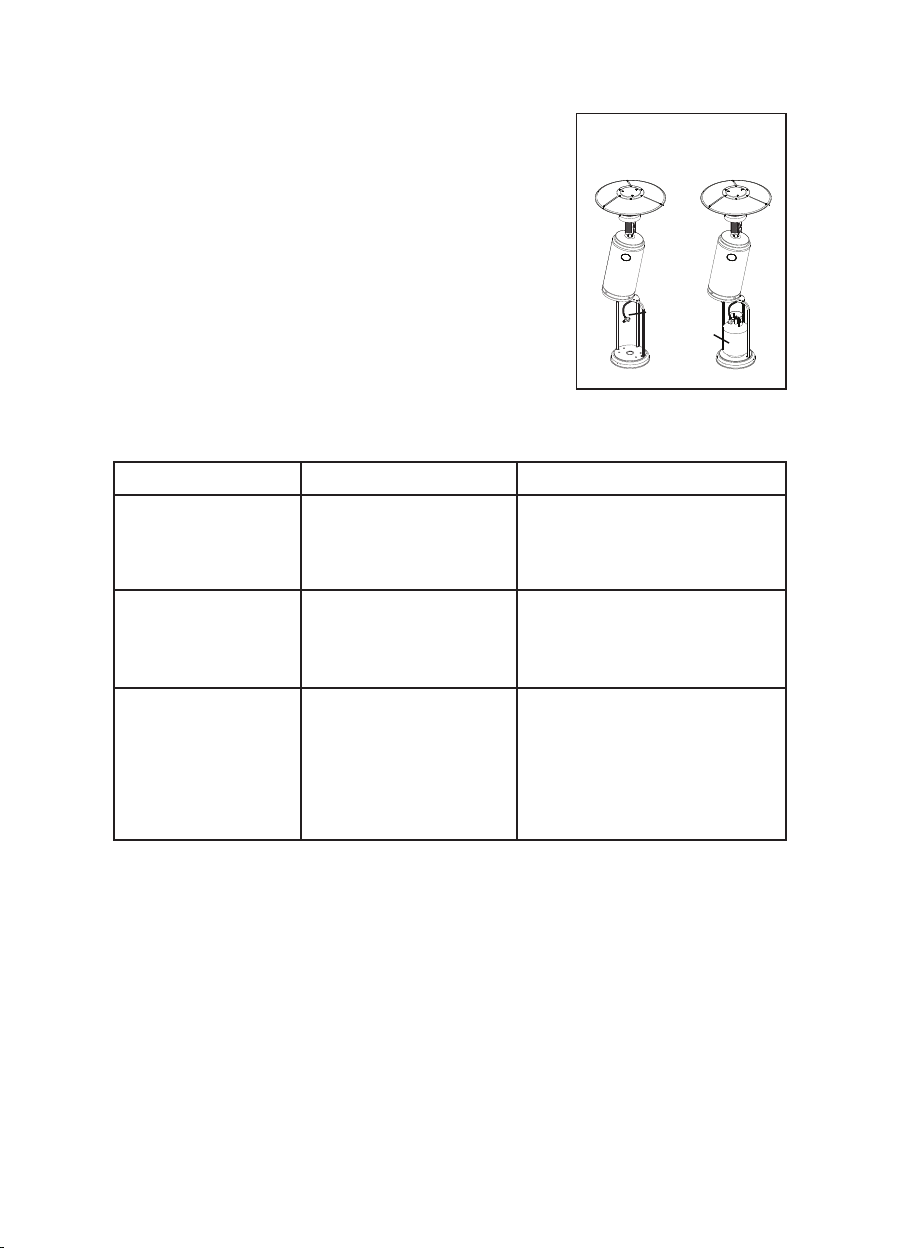
• Om de terrasverwarmer tegen sterke wind te beschermen,
verankert u de basis stevig aan de grond met schroeven.
GASVEREISTEN
• Gebruik alleen propaan- of butaangas.
• De te gebruiken drukregelaar en slang moeten voldoen aan de lokale standaardcodes.
• De installatie moet voldoen aan lokale codes, of bij afwezigheid van lokale codes, aan de norm
voor de opslag en behandeling van vloeibare petroleumgassen.
• Een gedeukte, verroeste of beschadigde propaantank kan gevaarlijk zijn en moet worden
gecontroleerd door uw tankleverancier. Gebruik nooit een propaantank met een beschadigde
klepaansluiting.
• De propaantank moet zo zijn ingericht dat de damp uit de werkende cilinder kan worden
afgevoerd.
• Sluit nooit een ongeregelde propaantank aan op de kachel.
LEKKAGE TEST
De gasaansluitingen op de terrasverwarmer worden voorafgaand aan verzending in de fabriek
op lekkage getest. Op de plaats van installatie moet een volledige gasdichtheidscontrole worden
uitgevoerd vanwege mogelijke verkeerde behandeling tijdens het transport of vanwege
overmatige druk die op de verwarmer wordt uitgeoefend.
• Maak een zeepoplossing van een deel vloeibaar wasmiddel en een deel water. De zeep-
oplossing kan worden aangebracht met een spuites, borstel of doek. Bij een lek ontstaan er
zeepbellen.
• De kachel moet worden gecontroleerd met een volle cilinder.
• Zorg ervoor dat de veiligheidsklep in de UIT-stand staat.
• Zet de gastoevoer AAN.
• In geval van een lek, de gastoevoer afsluiten. Draai eventuele lekkende ttingen vast, draai de
gastoevoer weer aan en controleer opnieuw.
• Test nooit op lekkage tijdens het roken.
WERKING EN OPSLAG
DE KACHEL INSCHAKELEN
1. Draai de klep op de gastoevoeres volledig open.
2. Druk en draai de variabele bedieningsknop naar de PILOT-stand (90º linksom).
3. Druk de variabele bedieningsknop in en houd deze 30 seconden ingedrukt. Terwijl u de
variabele bedieningsknop ingedrukt houdt, drukt u meerdere keren op de ontstekingsknop
totdat de waakvlam gaat branden. Laat de variabele bedieningsknop los nadat de waakvlam
is ontstoken.
Notitie:
• Als er zojuist een nieuwe tank is aangesloten, geef dan minimaal een minuut de tijd om de lucht
in de gasleiding door het geleidegat te laten ontsnappen.
• Zorg er bij het aansteken van de waakvlam voor dat de variabele bedieningsknop continu
wordt ingedrukt terwijl de ontstekingsknop wordt ingedrukt. Variabele bedieningsknop kan
worden losgelaten nadat de waakvlam is ontstoken.
• De waakvlam kan worden bekeken en gecontroleerd vanuit het kleine ronde raampje met
schuifdeksel aan de onderkant van het vlamscherm (links of rechts van de controller).
• Indien de waakvlam niet aangaat of dooft, herhaal stap 3.
4. Nadat de waakvlam is ontstoken, draait u de variabele bedieningsknop naar de maximale
stand en laat u deze daar 5 minuten of langer op staan voordat u de knop naar de gewenste
temperatuurstand draait.
- 2 -
HEATER STAND AND LOCATION
The heater is primarily for outdoor use only. Always ensure that
adequate fresh air ventilation is provided.
Always maintain proper clearance to combustible materials, i.e. top 100 cm
and sides 100 cm minimum.
Heater must be placed on level firm ground.
Never operate heater in an explosive atmosphere like in areaswhere
gasoline or other flammable liquids or vapors are stored.
To protect heater from strong wind, anchor the base securely to the
ground with screws.
GAS REQUIREMENTS
Use propaneor butane gas only.
The pressure regulator and hose assembly to be used must conform to local standard codes.
The installation must conformto local codes, or in the absence of local codes, with the standard for the
storage and handling of liquid petroleum gases.
A dented, rusted or damaged propane tank may be hazardous and should be checked by your tank
supplier. Never use a propane tank with a damaged valve connection.
The propane tank must be arranged to provide for vapor withdrawal from the operating cylinder.
Never connect an unregulated propane tank to the heater.
LEAKAGE TEST
Gas connections on the heater are leaktested at the factory prior to shipment. A complete gas tightness
check must be performed at the installation site due to possible mishandling in shipment or excessive
pressure being applied to the heater.
Make a soap solution of one part liquid detergent and one part water. The soap solution can be applied
with a spray bottle, brush or rag. Soap bubbles will appear in case of a leak.
The heater must be checked with a full cylinder.
Make sure the safety control valve is in the OFF position.
Turn the gas supply ON.
In case of a leak, turn off the gas supply. Tighten any leaking fittings, then turn the gas supply on and re-
check.
Never leak test while smoking.
CEILING
WALL
100 cm
100 cm
Fortification of base to the ground
LO
HI
Off
Igniter
Pilot
PLAFOND
MUUR
Versterking van de basis naar de grond
- 4 - - 5 -

DE KACHEL UITZETTEN
1. Draai de variabele bedieningsknop
naar de PILOT-stand.
2. Druk en draai de variabele bedieningsknop
naar de UIT-stand.
3. Draai de klep op de gastoevoeres volledig dicht.
Oplag
1. Sluit altijd de gaskraan van de gases na gebruik of bij een storing.
2. Verwijder de drukregelaar en de slang.
3. Controleer de dichtheid van de gasklep en controleer deze op beschadigingen.
Als u schade vermoedt, laat deze dan vervangen door uw gasdealer.
4. Bewaar essen met vloeibaar gas nooit op een ondergronds terrein of op plaatsen
zonder voldoende ventilatie.
REINIGING EN ONDERHOUD
• Veeg gepoedercoate oppervlakken af met een zachte, vochtige doek. Reinig de
terrasverwarmer niet met reinigingsmiddelen die brandbaar of bijtend zijn.
• Verwijder vuil van de brander om deze schoon en veilig voor gebruik te houden.
• Dek de branderunit af met de optionele beschermkap als de kachel niet in gebruik is.
ONDERDELEN EN SPECIFICATIES
Variable control knob
Igniter
TO TURN ON THE HEATER
1. Turn on the valve on the gas supply cylinder completely.
2. Press and turn the variable control knob to PILOT position (counter-clockwise 90º).
3. Press down the variable control knob and hold for 30 seconds. While holding down the variable control knob,
press the igniter button several times until the pilot flame lights. Release the variable control knob after the pilot
flame lights.
Note:
If a new tank has just been connected, please allow at least one minute for the air in the gas pipeline to purge out
through the pilot hole.
When lighting the pilot flame make sure that the variable control knob is continuously pressed down while pressing
the igniter button. Variable control knob can be released after the pilot flame lights.
Pilot flame can be watched and checked from the small round window with sliding lid located at the bottom of the
flame screen (to the left or right side of the controller).
If the pilot flame does not light or it goes out, repeat step 3.
4. After the pilot flame lights, turn the variable control knob to maximum position and leave it there for 5 minutes or
more before turning the knob to desired temperature position.
TO TURN OFF THE HEATER
1.Turn the variable control knob to PILOT position.
2.Press and turn the variable control knob to OFF position.
3.Turn off the valve on the gas supply cylinder completely.
Storage
1. Always close the gas valve of the gas cylinder after use or in case of a disturbance.
2. Remove the pressure controller and the hose.
3. Check the tighness of the gas valve and for damage. If you suspect damage, have it changed by your gas dealer.
4. Never store liquid gas cylinder in a sub-terrain, or at places without adequate air ventilation.
lgniter
Hi
Pilot
Off
CLEANING AND CARE
•Wipe off powder coated surfaces with soft, moist rag. Do not clean heater with cleaners that
are combustible or corrosive.
•Remove debris from the burner to keep it clean and safe for use.
•Cover the burner unit with the optional protective cover when the heater is not in use.
PARTS AND SPECIFICATIONS
- 4 -
2180 mm
780 mm
813 mm
445 mm
Reflector
Flame screen
Burner base
Air admittance fence
Gas valve controller
Base of control housing
Post
Tank housing
Post bracket
Stand
LO
HI
Off
Igniter
Pilot
Variabele bedieningsknop
Ontsteker
Reector
Paal
Tankbehuizing
Paal beugel
Voet
Vlamscherm
Brander basis
Luchtinlaatafrastering
Gasklep controller
Basis van besturingsbehuizing
- 6 - - 7 -

A. Constructie en kenmerken
• Verplaatsbare terras- / tuinverwarmer met tankbehuizing
• Behuizing in staal met poedercoating of roestvrij staal
• Warmteafgifte van reector
B. Specicaties
• Gebruik alleen propaan- of butaangas
• Max. wattage: 13000 watt
• Min. wattage: 5000 watt
• Met CE-certicaten
C. Tabel injector
• De combinatie van slang en regelaar moet voldoen aan de lokale standaardcodes.
• De uitlaatdruk van de regelaar moet voldoen aan de overeenkomstige gascategorie in
de tabel van de injector.
• Het apparaat heeft een goedgekeurde slang met een lengte van 1,2 m nodig.
MONTAGE ONDERDELEN EN PROCEDURES
Benodigd gereedschap:
• Steeksleutel 10 & 13 mm
• Verstelbare openingssleutel (2) 20 cm lang
• Schuifverbindingstang 23 cm lang
• Kruiskopschroevendraaier met medium blad
• Spuites zeepoplossing voor lektest
Geleverde onderdelen:
• Statief met LPG-cilinderbehuizing en 3 paalbeugels.
• 9 potmoeren (M6 mm), 9 kleine schroeven (M6 x 8 mm) voor reectormontage.
• 6 grote bouten en ensmoeren (M6) voor steunpoten / hoofdmastmontage.
• 3 middelgrote bouten (M8 x 16 mm) voor steunpoten / standaardmontage.
• 3 reectorafstandhouders en vleugelmoeren, 6 grote platte ringen voor reector en brander.
• 2 medium bouten (M8x16 mm) voor wielen en voet.
• 6 kleine bouten (M6x12) en M6 moeren voor verankeringsarm en basis.
MONTAGEPROCEDURES
Bevestig het wielstel aan de basis
met 2 stuks medium bouten (M8x16mm)
- 6 -
ASSEMBLY PARTS AND PROCEDURES
Tools needed:
Open end wrench 10 & 13 mm
Adjustable opening wrench (2) 20 cm long
Slip joint pliers 23 cm long
Philips screwdriver w/ medium blade
Spray bottle of soap solution for leakage test
Parts supplied:
Stand with LPG cylinder housing and 3 post brackets.
9 Cup Nuts (M6 mm),9 Small Screws (M6 x 8 mm) for Reflector Assembly.
6 Large Bolts and Flange Nuts (M6) for Support Legs/Main Pole Assembly.
3 Medium Bolts (M8 x 16 mm) for Support Legs/Stand Assembly.
3 Reflector Spacers and Wing Nuts, 6 Large Flat Washers for Reflector and burner Assembly.
2 Medium Bolts (M8x16 mm) for wheels and base.
6 Small bolts (M6x12) and M6 nuts for anchoring arm and base.
ASSEMBLY PROCEDURES
Attach wheel assembly to base with 2pcs Medium bolts (M8x16mm)
Attach 1 anchoring arm to base with 2 small bolts M6x12mm and 2pcs M6 nuts as shown
(repeat with the other 2anchoring arms so all 3 are attached to base).
Bevestig 1 verankeringsarm aan de basis met 2 kleine
bouten M6x12mm en 2 stuks M6 moeren, zoals afgebeeld
(herhaal met de andere 2 verankeringsarmen zodat ze
alle 3 zijn bevestigd aan de basis).
GAS CATEGORIE:
SOORTEN GAS:
GAS DRUK:
TOTALE WARMTE
INGANG (Hs): (Qn)
INJECTOR GROOTTE
I
3+(28-30/37)
Butaan
28-30 mbar
1,90 voor hoofdbrander
0,18 mm voor waakvlambrander
1,68 voor hoofd-
brander
0,18 mm voor
waakvlambrander
13kW (870 g/h)
Propaan
37 mbar
LPG Gasmengsel
30 mbar
LPG Gasmengsel
37 mbar
LPG Gasmengsel
50mbar
I
3B/P(30)
I
3B/P(37)
I
3B/P(50)
- 6 - - 7 -

STAP 1
1-1. Plaats de 3 stuks paalbeugels op elke positie op
de basis zoals weergegeven in de afbeelding.
1-2. Gebruik 3 medium bouten (M8x16) om de paalbeugels
en de standaard te verbinden.
STAP 2
2-1. Plaats de paal bovenop 3 stuks paalbeugels.
2-2. Gebruik 6 grote bouten en ensmoeren (M6) om
de paal aan de 3 stuks paalbeugels te bevestigen.
Draai de bouten en moeren vast.
STAP 3
Plaats de tankbehuizing op de standaard.
- 7 -
STEP 1
1-1. Put the 3 pcs post brackets on each position on the base as
shown in the picture.
1-2. Use 3 Medium Bolts(M8x16) to join the post brackets and stand.
STEP 2
2-1. Put the post on the top of 3 pcs post brackets.
2-2. Use 6 Large Bolts and Flange Nuts (M6) to connect the post tothe
3 pcs post brackets. Tighten the bolts and nuts.
STEP 3
Place the tank housing on the stand.
Bolt
Post
STEP 2
Nut
STEP 3
Bolt
Stand
Post bracket
STEP 1
Tank housing
Paalbeugel
Bout
Moer
Bout
tankbehuizing
Standaard
Paal
Moer
Tankbehuizing
STAP 1
STAP 2
STAP 3
- 8 - - 9 -

STAP 4
4-1. Verwijder de 4 bouten van de brander.
4-2. Steek de gasslang door de paal.
4-3. Bevestig de branderunit aan de paal met de 4 bouten.
STAP 5
5-1. Controleer of de verbinding van de verticale paal
en brander volgens de instructies is gemonteerd en
of alle bouten en moeren zijn aangedraaid.
5-2. Plaats 3 stuks grote platte ringen op 3 reectorafstandhouders.
STAP 6
Bevestig de reector met 3 stuks grote platte ringen
en 3 stuks vleugelmoeren.
- 8 -
STEP 4
4-1. Remove the 4 bolts from the burner.
4-2. Put the gas hose through into the post.
4-3. Fix the burner unit to the post by the 4 bolts.
STEP 5
5-1. Check whether the connection of vertical post and burner are
assembled according to instructions, and all bolts and nuts are
tightened.
5-2. Put 3 pcs Large Flat Washers on 3 Reflector Spacers.
STEP 6
Fasten the reflector with 3 pcs Large Flat Washers and 3 pcs Wing Nuts.
STEP 4
Bolt
STEP 5
STEP 6
Reflector
Wing nut
Reflector Spacer
Reector
afstandhouder
Vleugelmoer
Reector
Bout
Moer
Tankbehuizing
STAP 4
STAP 5
STAP 6
- 8 - - 9 -

STAP 7
7-1. Breng de tankbehuizing omhoog en laat deze op
de paalplaat rusten.
7-2. Sluit de regelaar aan op de gastank en draai
deze vast met een verstelbare sleutel.
7-3. Sluit de eindschroefdraad van de inlaatgasslang
aan op de regelaar.
7-4. Zet LPG-gastank op de standaard.
CHECKLIST VOOR PROBLEMEN
- 9 -
STEP 7
7-1. Bring up the tank housing and rest it on the post plate.
7-2. Connect the regulator to the gas tank and tighten it with adjustable
wrench.
7-3. Connect the end thread of inlet gas hose to the regulator.
7-4. Put LPG gas tank on the stand.
PROBLEMS CHECK LIST
PROBLEM PROBABLE CAUSE SOLUTION
Pilot will not light Gas valve may be OFF Turn the gas valve ON
Tank fuel empty Refill LPG tank
Opening blocked Clean or replace opening
Air in supply system Purge air from lines
Loose connections Check all fittings
Pilot will not stay on Debris around pilot Clean dirty area
Loose connections Tighten connections
Thermocouple bad Replace thermocouple
Gas leak in line Check connections
Lack of fuel pressure Tank near empty. Refill LPG tank.
Burner will not light Pressure is low Tank near empty. Refill LPG tank.
Opening blocked Remove and clean
Control not ON Turn valve to ON
Thermocouple bad Replace thermocouple
Pilot light assembly bent Place pilot properly
Not in correct location Position properly and retry
STEP 7
Regulator
Gas tank
PROBLEEM MOGELLIJKE OORZAAK OPLOSSING
Waakvlam blijft
niet branden
Vuil rond de waakvlam
Losse verbindingen
Thermokoppel slecht
Gaslek in gasslang
Gebrek aan brandstofdruk
Maak de vuile plek schoon
Draai de verbindingen vast
Vervang thermokoppel
Controleer aansluitingen
Tank bijna leeg. LPG-tank bijvullen
Waakvlam brand niet De gasklep staat mogelijk UIT
Tank brandstof leeg
Opening geblokkeerd
Lucht in toevoersysteem
Losse verbindingen
Draai de gaskraan op ON
LPG-tank bijvullen
Reinig of vervang de opening
Verwijder lucht uit leidingen
Controleer alle ttingen
Brander gaat niet aan De druk is laag
Opening geblokkeerd
Bediening staat niet AAN
Slechte thermokoppel
Waakvlammontage is
verbogen
Niet op de juiste locatie
Tank bijna leeg. LPG-tank bijvullen
Verwijderen en schoonmaken
Draai op AAN
Vervang thermokoppel
Demonteer en plaats juist
Plaats de juiste positie en probeer
het opnieuw
Regelaar
Gas tank
STAP 7
- 10 - - 11 -

CORRECTE VERWIJDERING VAN DIT PRODUCT
Om te voldoen aan de Europese richtlijn 2002/96 / EG betreffende oude elektrische en elektroni-
sche apparatuur en de implementatie ervan in nationale wetgeving, moeten oude elektrische
apparaten worden gescheiden van ander afval en op een milieuvriendelijke manier worden
afgevoerd, b.v. door naar een recyclingdeport te gaan.
- 10 - - 11 -

TABLE OF CONTENTS
Caution ...................................................................................................................................................... 14
Heater Stand and Location ..................................................................................................................... 15
Gas Requirements ..................................................................................................................................... 15
Leakage Test ............................................................................................................................................. 15
Operation and Storage ............................................................................................................................ 15
Cleaning and Care ................................................................................................................................... 16
Parts and Specications ........................................................................................................................... 16
Assembly Parts and Procedures .............................................................................................................. 17
Problems Check List .................................................................................................................................. 20
- 12 - - 13 -

[EN] Instruction Manual
Please keep this instruction for future reference.
WARNlNG SAFETY RULES
PLEASE READ THE FOLLOWING SAFETY RULES PRlOR TO OPERATION OF THE HEATER
FOR YOUR SAFETY
If you smell gas:
1. Shut off gas to the appliance.
2. Extinguish any open ame.
3. If odor continues, immediately call your gas supplier or your re Department.
FOR YOUR SAFETY
1. Do not store or use gasoline or other ammable vapors
and liquids in the vicinity of this or any other appliance.
2. An LP cylinder not connected for use shall not be stored in the vicinity of this or any other
appliance.
WARNlNG
1. For use outdoors or in amply ventilated areas.
2. An amply ventilated area must have a minimum of 25 % of the surface area open.
3. The surface area is the sum of the walls surface.
WARNING
Improper installation, adjustment, alteration, service or maintenance Can cause injury or property
damage. Read the installation, operating and maintenance instructions thoroughly before instal-
ling or servicing this equipment.
WARNING
Read the instructions before installation and use.
- This appliance must be installed and the gas cylinder stored in accordance with the regulati
ons in force.
- Do not obstruct the ventilation holes of the cylinder housing.
- Do not move the appliance when in operation.
- Shut off the valve at the gas cylinder or the regulator before moving the appliance.
- The tubing or the exible hose must be changed within the prescribed intervals.
- Use only the type of gas and the type of cylinder specied by the manufacturer.
- In case of violent wind particular attention must be taken against tilting of the appliance.
- 12 - - 13 -

CAUTION
PLEASE READ CAREFULLY THE FOLLOWING SAFETY GUIDELINES BEFORE OPERATION.
• Do not use the patio heater for indoors, as it may cause personal injury or property damage.
• This outdoor heater is not intended to be installed on recreational vehicles and/or boats.
• Installation and repair should be done by a qualied service person.
• Improper installation, adjustment, alteration can cause personal injury or property damage.
• Do not attempt to alter the unit in any manner.
• Never replace or substitute the regulator with any regulator other than the factory-suggested
replacement.
• Do not store or use gasoline or other ammable vapors or liquids in the heater unit.
• The whole gas system, hose, regulator, pilot or burner should be inspected for leaks or damage
before use, and at least annually by a qualied service person.
• All leak tests should be done with a soap solution. Never use an open ame to check for leaks.
• Do not use the heater until all connections have been leak tested.
• Turn off the gas valve immediately if smell of gas is detected. Turn Cylinder Valve OFF. If leak
is at Hose/Regulator connection: tighten connection and perform another leak test. If bubbles
continue appearing should be returned to hose’s place of purchase. If leak is at Regulator/
Cylinder Valve connection: disconnect, reconnect, and perform another leak check. If you
continue to see bubbles after several attempts, cylinder valve is defective and should be
returned to cylinder’s place of purchase.
• Do not transport heater while it’s operating.
• Do not move the heater after it has been turned off until the temperature has cooled down.
• Keep the ventilation opening of the cylinder enclosure free and clear of debris.
• Do not paint the radiant screen, control panel or top canopy reector.
• Control compartment, burner and circulation air passageways of the heater must be kept
clean.
Frequent cleaning may be required as necessary.
• The LP tank should be turned off when the heater is not in use.
• Check the heater immediately if any of the following occurs:
- The heater does not reach temperature.
- The burner makes popping noise during use (a slight noise is normal when the burner is
extinguished).
- Smell of gas in conjunction with extreme yellow tipping of the burner ames.
• The LP regulator/hose assembly must be located out of pathways where people may trip over it
or in area where the hose will not be subject to accidental damage.
• Any guard or other protective device removed for servicing the heater must be replaced before
operating the heater. .Adults and children should stay away from high temperature surface to
avoid burns or clothing ignition.
• Children should be carefully supervised when they are in the area of the heater.
• Clothing or other ammable materials should not be hung on the heater or placed on or near
the heater.
• To change the gas cylinder in a amply ventilated area, away from any ignition source (candle,
cigarettes, other ame producing appliances, ...);
• To check that the regulator seal is correctly tted and able to fulll its function
• To not obstruct the ventilation holes of the cylinder housing;
• In the event of gas leakage, the appliance shall not be used or if alight, the gas supply shall be
shut off and the appliance shall be investigated and rectied before it is used again;
• The recommended frequency of checking the tubing or the exible hose (at least once per
month and each time the cylinder is changed). If it shows signs of cracking, splitting or other
deterioration it shall be exchanged for new hose of the same length and of the equivalent
quality.
- 14 - - 15 -

HEATER STAND AND LOCATION
• The heater is primarily for outdoor use only. Always ensure that
adequate fresh air ventilation is provided.
• Always maintain proper clearance to combustible materials,
i.e. top 100 cm and sides 100 cm minimum.
• Heater must be placed on level rm ground.
• Never operate heater in an explosive atmosphere like in areas
where gasoline or other ammable liquids or vapors are stored.
• To protect heater from strong wind, anchor the base securely
to the ground with screws.
GAS REQUIREMENTS
• Use propane or butane gas only.
• The pressure regulator and hose assembly to be used must conform to local standard codes.
• The installation must conform to local codes, or in the absence of local codes, with the standard
for the storage and handling of liquid petroleum gases.
• A dented, rusted or damaged propane tank may be hazardous and should be checked by
your tank supplier. Never use a propane tank with a damaged valve connection.
• The propane tank must be arranged to provide for vapor withdrawal from the operating
cylinder.
• Never connect an unregulated propane tank to the heater.
LEAKAGE TEST
Gas connections on the heater are leak tested at the factory prior to shipment. A complete gas
tightness check must be performed at the installation site due to possible mishandling in shipment
or excessive pressure being applied to the heater.
• Make a soap solution of one part liquid detergent and one part water. The soap solution can be
applied with a spray bottle, brush or rag. Soap bubbles will appear in case of a leak.
• The heater must be checked with a full cylinder.
• Make sure the safety control valve is in the OFF position.
• Turn the gas supply ON.
• In case of a leak, turn off the gas supply. Tighten any leaking ttings, then turn the gas supply on
and re-check.
• Never leak test while smoking.
OPERATION AND STORAGE
TO TURN ON THE HEATER
1. Turn on the valve on the gas supply cylinder completely.
2. Press and turn the variable control knob to PILOT position (counter-clockwise 90º).
3. Press down the variable control knob and hold for 30 seconds. While holding down the variable
control knob, press the igniter button several times until the pilot ame lights. Release the
variable control knob after the pilot ame lights.
Note:
• If a new tank has just been connected, please allow at least one minute for the air in the gas
pipeline to purge out through the pilot hole.
• When lighting the pilot ame make sure that the variable control knob is continuously pressed
down while pressing the igniter button. Variable control knob can be released after the pilot
ame lights.
• Pilot ame can be watched and checked from the small round window with sliding lid located
at the bottom of the ame screen (to the left or right side of the controller).
• If the pilot ame does not light or it goes out, repeat step 3.
4. After the pilot ame lights, turn the variable control knob to maximum position and leave it there
for 5 minutes or more before turning the knob to desired temperature position.
- 2 -
HEATER STAND AND LOCATION
The heater is primarily for outdoor use only. Always ensure that
adequate fresh air ventilation is provided.
Always maintain proper clearance to combustible materials, i.e. top 100 cm
and sides 100 cm minimum.
Heater must be placed on level firm ground.
Never operate heater in an explosive atmosphere like in areaswhere
gasoline or other flammable liquids or vapors are stored.
To protect heater from strong wind, anchor the base securely to the
ground with screws.
GAS REQUIREMENTS
Use propaneor butane gas only.
The pressure regulator and hose assembly to be used must conform to local standard codes.
The installation must conformto local codes, or in the absence of local codes, with the standard for the
storage and handling of liquid petroleum gases.
A dented, rusted or damaged propane tank may be hazardous and should be checked by your tank
supplier. Never use a propane tank with a damaged valve connection.
The propane tank must be arranged to provide for vapor withdrawal from the operating cylinder.
Never connect an unregulated propane tank to the heater.
LEAKAGE TEST
Gas connections on the heater are leaktested at the factory prior to shipment. A complete gas tightness
check must be performed at the installation site due to possible mishandling in shipment or excessive
pressure being applied to the heater.
Make a soap solution of one part liquid detergent and one part water. The soap solution can be applied
with a spray bottle, brush or rag. Soap bubbles will appear in case of a leak.
The heater must be checked with a full cylinder.
Make sure the safety control valve is in the OFF position.
Turn the gas supply ON.
In case of a leak, turn off the gas supply. Tighten any leaking fittings, then turn the gas supply on and re-
check.
Never leak test while smoking.
CEILING
WALL
100 cm
100 cm
Fortification of base to the ground
LO
HI
Off
Igniter
Pilot
- 14 - - 15 -

TO TURN OFF THE HEATER
1. Turn the variable control knob to PILOT position.
2. Press and turn the variable control knob to OFF position.
3.Turn off the valve on the gas supply cylinder completely.
Storage
1. Always close the gas valve of the gas cylinder after use or in case of a disturbance.
2. Remove the pressure controller and the hose.
3. Check the tighness of the gas valve and for damage. If you suspect damage, have it
changed by your gas dealer.
4. Never store liquid gas cylinder in a sub-terrain, or at places without adequate air ventilation.
CLEANING AND CARE
• Wipe off powder coated surfaces with soft, moist rag. Do not clean heater with cleaners that are
combustible or corrosive.
• Remove debris from the burner to keep it clean and safe for use.
• Cover the burner unit with the optional protective cover when the heater is not in use.
PARTS AND SPECIFICATIONS
Variable control knob
Igniter
TO TURN ON THE HEATER
1. Turn on the valve on the gas supply cylinder completely.
2. Press and turn the variable control knob to PILOT position (counter-clockwise 90º).
3. Press down the variable control knob and hold for 30 seconds. While holding down the variable control knob,
press the igniter button several times until the pilot flame lights. Release the variable control knob after the pilot
flame lights.
Note:
If a new tank has just been connected, please allow at least one minute for the air in the gas pipeline to purge out
through the pilot hole.
When lighting the pilot flame make sure that the variable control knob is continuously pressed down while pressing
the igniter button. Variable control knob can be released after the pilot flame lights.
Pilot flame can be watched and checked from the small round window with sliding lid located at the bottom of the
flame screen (to the left or right side of the controller).
If the pilot flame does not light or it goes out, repeat step 3.
4. After the pilot flame lights, turn the variable control knob to maximum position and leave it there for 5 minutes or
more before turning the knob to desired temperature position.
TO TURN OFF THE HEATER
1.Turn the variable control knob to PILOT position.
2.Press and turn the variable control knob to OFF position.
3.Turn off the valve on the gas supply cylinder completely.
Storage
1. Always close the gas valve of the gas cylinder after use or in case of a disturbance.
2. Remove the pressure controller and the hose.
3. Check the tighness of the gas valve and for damage. If you suspect damage, have it changed by your gas dealer.
4. Never store liquid gas cylinder in a sub-terrain, or at places without adequate air ventilation.
lgniter
Hi
Pilot
Off
CLEANING AND CARE
•Wipe off powder coated surfaces with soft, moist rag. Do not clean heater with cleaners that
are combustible or corrosive.
•Remove debris from the burner to keep it clean and safe for use.
•Cover the burner unit with the optional protective cover when the heater is not in use.
PARTS AND SPECIFICATIONS
- 4 -
2180 mm
780 mm
813 mm
445 mm
Reflector
Flame screen
Burner base
Air admittance fence
Gas valve controller
Base of control housing
Post
Tank housing
Post bracket
Stand
LO
HI
Off
Igniter
Pilot
- 16 - - 17 -

A. Construction and characteristics
• Transportable terrace/garden heater with tank housing
• Casing in steel with powder-coating or stainless steel
• Heat emission from reector
B. Specications
• Use propane or butane gas only
• Max. wattage: 13000 watts
• Min. wattage: 5000 watts
• With CE certicates
C. Table of injector
• The hose and regulator assembly must conform to local standard codes.
• Regulator outlet pressure should meet the corresponding gas category in the table of injector.
• The appliance requires approved hose in 1.2m length.
ASSEMBLY PARTS AND PROCEDURES
Tools needed:
• Open end wrench 10 & 13 mm
• Adjustable opening wrench (2) 20 cm long
• Slip joint pliers 23 cm long
• Philips screwdriver w/ medium blade
• Spray bottle of soap solution for leakage test
Parts supplied:
• Stand with LPG cylinder housing and 3 post brackets.
• 9 Cup Nuts (M6 mm),9 Small Screws (M6 x 8 mm) for Reector Assembly.
• 6 Large Bolts and Flange Nuts (M6) for Support Legs/Main Pole Assembly.
• 3 Medium Bolts (M8 x 16 mm) for Support Legs/Stand Assembly.
• 3 Reector Spacers and Wing Nuts, 6 Large Flat Washers for Reector and burner Assembly.
• 2 Medium Bolts (M8x16 mm) for wheels and base.
• 6 Small bolts (M6x12) and M6 nuts for anchoring arm and base.
ASSEMBLY PROCEDURES
Attach wheel assembly to base
with 2pcs Medium bolts (M8x16mm)
- 5 -
A. Construction and characteristics
Transportable terrace/garden heater with tank housing
Casing in steel with powder-coating or stainless steel
Heat emission from reflector
B. Specifications
Use propane or butane gas only
Max. wattage: 13000 watts
Min. wattage: 5000 watts
With CE certificates
C. Table of injector
The hose and regulator assembly must conform to local standard codes.
Regulator outlet pressure should meet the corresponding gas category in the table of injector.
The appliance requires approved hose in 1.2m length.
GAS CATEGORY: 3+(28-30/37) 3B/P(37)
I I 3B/P(50)
II 3B/P(30)
TYPES OF GAS: Butane Propane LPG Gas Mixtures
GAS PRESSURE: 28-30 mbar 37 mbar 30 mbar 37mbar 50mbar
TOTAL HEAT
INPUT (Hs): (Qn)
13kW (870g/h)
INJECTOR SIZE: 1.90 mm for main burner
0.18 mm for pilot burner
1.90 mm for main burner
0.18 mm for pilot burner
1.68 mm for main burner
0.18 mm for pilot burner
LPG LPG Gas MixturesGas Mixtures
- 6 -
ASSEMBLY PARTS AND PROCEDURES
Tools needed:
Open end wrench 10 & 13 mm
Adjustable opening wrench (2) 20 cm long
Slip joint pliers 23 cm long
Philips screwdriver w/ medium blade
Spray bottle of soap solution for leakage test
Parts supplied:
Stand with LPG cylinder housing and 3 post brackets.
9 Cup Nuts (M6 mm),9 Small Screws (M6 x 8 mm) for Reflector Assembly.
6 Large Bolts and Flange Nuts (M6) for Support Legs/Main Pole Assembly.
3 Medium Bolts (M8 x 16 mm) for Support Legs/Stand Assembly.
3 Reflector Spacers and Wing Nuts, 6 Large Flat Washers for Reflector and burner Assembly.
2 Medium Bolts (M8x16 mm) for wheels and base.
6 Small bolts (M6x12) and M6 nuts for anchoring arm and base.
ASSEMBLY PROCEDURES
Attach wheel assembly to base with 2pcs Medium bolts (M8x16mm)
Attach 1 anchoring arm to base with 2 small bolts M6x12mm and 2pcs M6 nuts as shown
(repeat with the other 2anchoring arms so all 3 are attached to base).
Attach 1 anchoring arm to base with 2 small bolts
M6x12mm and 2pcs M6 nuts as shown
(repeat with the other 2anchoring arms so all 3 are
attached to base).
- 16 - - 17 -

STEP 1
1-1. Put the 3 pcs post brackets on each position on the base as
shown in the picture.
1-2. Use 3 Medium Bolts(M8x16) to join the post brackets and stand.
STEP 2
2-1. Put the post on the top of 3 pcs post brackets.
2-2. Use 6 Large Bolts and Flange Nuts (M6) to connect
the post to the 3 pcs post brackets. Tighten the bolts and nuts.
STEP 3
Place the tank housing on the stand.
- 7 -
STEP 1
1-1. Put the 3 pcs post brackets on each position on the base as
shown in the picture.
1-2. Use 3 Medium Bolts(M8x16) to join the post brackets and stand.
STEP 2
2-1. Put the post on the top of 3 pcs post brackets.
2-2. Use 6 Large Bolts and Flange Nuts (M6) to connect the post tothe
3 pcs post brackets. Tighten the bolts and nuts.
STEP 3
Place the tank housing on the stand.
Bolt
Post
STEP 2
Nut
STEP 3
Bolt
Stand
Post bracket
STEP 1
Tank housing
- 18 - - 19 -

STEP 4
4-1. Remove the 4 bolts from the burner.
4-2. Put the gas hose through into the post.
4-3. Fix the burner unit to the post by the 4 bolts.
STEP 5
5-1. Check whether the connection of vertical post and burner
are assembled according to instructions, and all bolts and
nuts are tightened.
5-2. Put 3 pcs Large Flat Washers on 3 Reector Spacers.
STEP 6
Fasten the reector with 3 pcs Large Flat Washers and
3 pcs Wing Nuts.
- 8 -
STEP 4
4-1. Remove the 4 bolts from the burner.
4-2. Put the gas hose through into the post.
4-3. Fix the burner unit to the post by the 4 bolts.
STEP 5
5-1. Check whether the connection of vertical post and burner are
assembled according to instructions, and all bolts and nuts are
tightened.
5-2. Put 3 pcs Large Flat Washers on 3 Reflector Spacers.
STEP 6
Fasten the reflector with 3 pcs Large Flat Washers and 3 pcs Wing Nuts.
STEP 4
Bolt
STEP 5
STEP 6
Reflector
Wing nut
Reflector Spacer
- 18 - - 19 -

STEP 7
7-1. Bring up the tank housing and rest it on the post plate.
7-2. Connect the regulator to the gas tank and tighten it
with adjustable wrench.
7-3. Connect the end thread of inlet gas hose to the regulator.
7-4. Put LPG gas tank on the stand.
PROBLEMS CHECK LIST
- 9 -
STEP 7
7-1. Bring up the tank housing and rest it on the post plate.
7-2. Connect the regulator to the gas tank and tighten it with adjustable
wrench.
7-3. Connect the end thread of inlet gas hose to the regulator.
7-4. Put LPG gas tank on the stand.
PROBLEMS CHECK LIST
PROBLEM PROBABLE CAUSE SOLUTION
Pilot will not light Gas valve may be OFF Turn the gas valve ON
Tank fuel empty Refill LPG tank
Opening blocked Clean or replace opening
Air in supply system Purge air from lines
Loose connections Check all fittings
Pilot will not stay on Debris around pilot Clean dirty area
Loose connections Tighten connections
Thermocouple bad Replace thermocouple
Gas leak in line Check connections
Lack of fuel pressure Tank near empty. Refill LPG tank.
Burner will not light Pressure is low Tank near empty. Refill LPG tank.
Opening blocked Remove and clean
Control not ON Turn valve to ON
Thermocouple bad Replace thermocouple
Pilot light assembly bent Place pilot properly
Not in correct location Position properly and retry
STEP 7
Regulator
Gas tank
PROBLEM PROBABLE CAUSE SOLUTION
Pilot will not stay on Debris around pilot
Loose connections
Thermocouple bad
Gas leak in line
Lack of fuel pressure
Clean dirty area
Tighten connections
Replace thermocouple
Check connections
Tank near empty. Rell LPG tank.
Pilot will not light Gas valve may be OFF
Tank fuel empty
Opening blocked
Air in supply system
Loose connections
Turn the gas valve ON
Rell LPG tank
Clean or replace opening
Purge air from lines
Check all ttings
Burner will not light Pressure is low
Opening blocked
Control not ON
Thermocouple bad
Pilot light assembly bent
Not in correct location
Tank near empty. Rell LPG tank.
Remove and clean
Turn valve to ON
Replace thermocouple
Place pilot properly
Position properly and retry
- 20 - - 21 -
Table of contents
Languages:
Other MaxxGarden Electric Heater manuals
Popular Electric Heater manuals by other brands

Berner
Berner FSA Specifications

Costway
Costway EP25150 user manual

Dirna
Dirna ecodirna SUN User handbook

Omega Altise
Omega Altise OACH1500 Operation, maintenance and safety instructions

Gabarron
Gabarron ECOMBI ECO158 installation manual

Intertec Data Systems
Intertec Data Systems CP MULTITHERM DG.A HI operating instructions

Onix
Onix YS10-RF instruction manual

Kroll
Kroll E8/2 operating instructions

Hunter
Hunter Illumi-Heat installation instructions

GÜDE
GÜDE GEH 3300 F Translation of the original instructions

Bromic Heating
Bromic Heating Tungsten 2000W Installation, instruction and service manual

Dyna-Glo
Dyna-Glo GRAB 'N GO HA10BK User's manual and operating instructions