MaxxOne Kite User manual

USER
MANUAL
KITE ALARM SYSTEM

1
Table of Contents
Introducon
Important Notes for Users
About Safety
Requirements
System Status & User Authories
The Outlook
Quick Seng Up
Operang by App
FAQ
Specicaons
2
2
3
3
4
5
7
9
15
16
●
●
●
●
●
●
●
●
●
●

2
Introduction
• Thank you for purchasing the MaxxOne® Kite Smart Alarm System. Kite will give you complete control over your
home’s security and home automaon via your smartphone, tablets or web clients. This manual will guide you
through the setup procedures and highlight some key features.
• Please note that all contents listed here might be slightly dierent from the contents of the package or in App.
Please check hp://www.maxxone.com to obtain the latest version of the user manual.
Important Notes for Users
• Please connect the power cable before rst using.
• All sensors and devices in the package have already been paired with the main box before shipping. Users can start
using the whole system aer seng the network. For the extra accessories (like sensors or smart devices), you
need to pair them with the system for working normally.
• This system is designed to be easy to set and use. Most users can nish this process within 15 minutes. If there is
any problem with the seng up this device, please contact MaxxOne or the distributor for help.
• All manuals, warranty cards, nameplates and sckers with QR codes or barcodes, should be carefully kept for
future use.

3
About Safety
• This system does not oer any guarantee of protecon against burglary, robbery, the, or any type of emergency.
It is a DIY product and does not come with a tradional monitoring service. However, most of the risks have been
considered in our design to make your home safer.
• The users should connue to act prudently to protect the security of their lives and property. Any alarm system is
subject to compromise or failure for a variety of reasons as follows:
1. An intruder may gain access through unprotected openings.
2. An intruder may have the technical sophiscaon to bypass a sensor or the whole system.
3. Signals sent by the main panel or sensors may be blocked or reected before being received, and a block can
occur if metal objects are moved into the path of the signal.
4. Moon sensors can only detect the intrusion within the specied ranges and unobstructed areas.
5. Malfuncon of routers, limited services by wireless phone carriers or internet service providers, limited
service such as text messages or push nocaon provided by smartphone makers.
6. Component failures or some other errors happen in the electrical system.
Important Notes for Users
• Wired/Wireless Router compable with Wi-Fi IEEE 802.11 b/g/n standard.
• Internet Service Provider
• Mobile Telephone SIM card (only GSM/WCDMA/LTE SIM card, not CDMA one)
• iPhone(iOS v7.0 or higher ) or Android(v4.3 or higher) smartphone

4
System Status & User Authorities
• The Kite system does not support any wired sensors. The main box communicates with all sensors via wireless RF
signal protocols.
• Most of the sensors have a low-baery warning mechanism. Users will receive nocaons via the app before the
baery runs out to allow me to change them.
• The system can change its security status according to the commands given by users or the signals sent from the
triggered sensors.
Arm:
All working sensors can be
triggered. The system will
generate an alarm when
receiving the trigger signal
sent from sensors.
Disarm:
This mode will de-acvate
all sensors and will also turn
o the siren and stop the
alarm process.
Home Arm:
This mode will allow some
selected sensors to keep
working while others are
deacvated. These sensors
could be selected in App.
SOS:
SOS will trigger built-in
siren & send alarm
messages to emergency
contacts. It also triggers
external sirens or other
sensors like smart plugs.
• There are three levels of user authories:
- ADMINISTRATOR:
Who can fully control the system
and invite other users with assigned
levels.
- GUEST:
Who can only operate
ARM / DISARM / HOME ARM / SOS.
- USER:
Who can operate ARM / DISARM
/ HOME ARM / SOS and control
the smart plugs and cameras, also
can invite other people as USER or
GUEST.

5
The Outlook
• Front View • Top View
LED Indicator
5V2A Power Adapter
RJ45 100M Ethernet SIM Slot
Louvre
STATUS LED MEANING
Normal Status Light ON ARM/DISARM/HOME ARM/SOS Etc.
Seng Status Fast Blinking
Networking Congure
Reseng
Updang
Errors Slow Blinking
Low Baery
Networking Errors
Other Errors

6
• Back View
Wall Mounng Bracket
Siren Hole
Baery Cover
Networking Congure
System Reset
Power Switch

7
Quick Setting Up
- Please search My Kite in App Store or Google Play, or scan the QR code printed on the package to visit the download
page directly.
• Install the Latest App
- Please ensure the router you are using has already been connected to the Internet with DHCP mode enabled. Kite
supports IPV4 protocol only.
- The system supports the following networking type:
- LAN: 10/100M ethernet
- WiFi: 2.4GHz, WEP/WPA/WPA2 encrypted
• Prepare the Internet Networking
- If you are using WiFi connecon for the box, try your phone rst to see if it could be connect to that WiFi around the
installing locaon, to ensure the WiFi signal can be received by the main box.
• Put the Main Box to a Suitable Place
- Open the baery cover on the back, turn OFF the power switch.
- Open the SIM slot and insert the SIM card. Standard SIM card is required. If you are using the Nano-SIM or Micro-SIM,
please use card adapter to make sure it could t the slot.
- Close the SIM slot.
• Install the SIM Card (Oponal)
- Connect the power cable.
- Turn ON the power switch.
- Wait a few seconds unl the LED indicator on the front cover light up brightly.
• Power ON

8
- Hold the Networking Seng
Buon in the baery cover unl
the LED indicator starts ashing.
- Launch the App - [Start to add
a main panel] - [Quick Cong
Mode], and follow the guidelines
to nish the networking process.
• Seng Networking
- Make sure your mobile phone has been connected to the Internet via cellular or WiFi.
- Try pressing ARM/DISARM buon in App, to see if the status icon in App would be changed immediately.
- Try using remote control, pressing ARM / DISARM buon to see if the status icon in App would be changed immediately.
• Check Seng
- Put the baery cover back.
- Place your main box on the desktop or using the bracket to mount it on the wall.
• Finishing & Mounng

9
Operating by App
User Sengs
The entry for all account sengs.
- Bind Devices
- Phone/Email/Password etc.
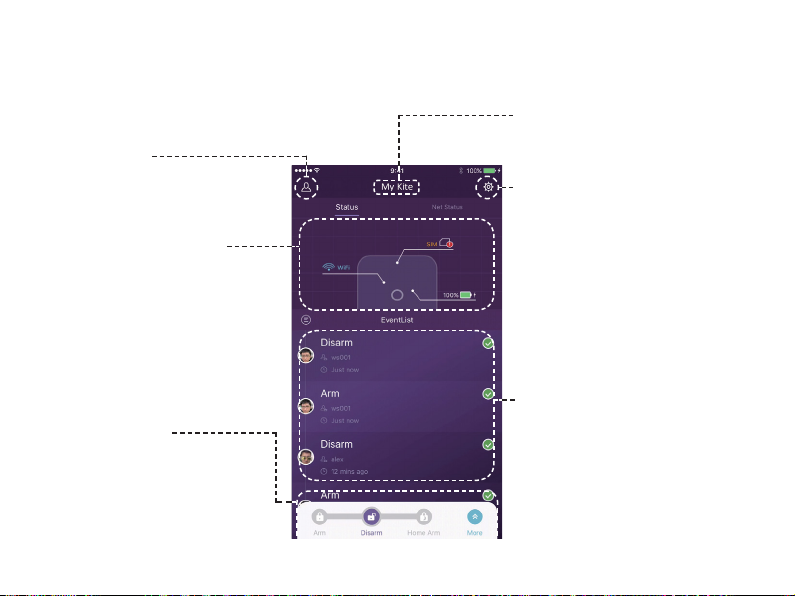
• Introducing the Main User Interface
Real-me Status Diagram
Here shows the real-me status and
the networking connecng quality of
the system, the crucial informaon
for users.
When system status is changed, the
diagram would indicate it immediately.
To be user-friendly, the colour and
icons in the diagram are easy to
understand.
Device List
Switch between all main boxes of
current user. Add/Remove main boxes.
Shortcut Toolbar
Fixed shortcuts: Arm, Disarm.
User customised: Home Arm(default),
SOS, Smart Camera, Smart Plugs, etc.
By using shortcuts, it saves a lot of
me to operate the system.
Event List
An event is one operaon by users or
one status change by accessories.
The events would be sorted by me,
with the latest event on the top.
System & App Sengs
Access the system sengs and App
sengs.
• Manage accessories like pairing
and removing.
• Adjust some other system
parameters like Exit Delay, Entry
Delay, Duress Alarm, etc.
• Firmware update, networking
sengs and other device
advanced sengs.

10
- Press the buons listed on the toolbar.
- You would hear a feedback sound in App when the operaon is complete.
- It is recommended to add SOS buon by customising the toolbar for convenience.
• Arming & Other Operaons

11
• Pairing New Accessories
Scan QR Code Recommended
Tap [Scan QR Code] Code is printed on every accessory. Follow the guideline in App.

12
• Emergency Contacts Sengs
• All App users would be listed in Emergency Contact list automacally.
• Users can add mobile phone numbers in [Other Contacts] list.
• For the App users, the [Push Nocaon] opon would be enabled by default, while
the [SMS Nocaon] would be disabled by default. (SIM card required)
• For other contacts, the [SMS Nocaon] would be enabled by default.
• When emergency cases happen, the App users would get push nocaons, while
other users would get alert SMS message sent from the main box.

13
• Emergency Contacts Sengs
• When users are at home and only want to keep some sensors working, they
could turn to Home Arm status in the App.
• When users tapping [Home Arm] buon at the rst me, the system would
guide you to setup. Users just need to decide which sensor should work by
tapping in the App.
• Only sensors that support Home Arm feature would be listed here.
• Accessories Management
• All accessories would be listed in [Device Seng]-[Accessories Management],
and would be sorted by type.
• Users can add, remove, and modify their sengs in this area.
• Users can also control their cameras and plugs in one App.

14
• App Sengs
In this area, users can adjust the following sengs:
- Change App Language: It supports mul-languages which can be easily switched in the App.
- Passcode Lock: By enabling this feature, you would be asked to enter the passcode every
me when App is acvated from the background. In iPhone, the Touch-ID feature would be
supported so users can use their ngerprints to use this App.
- Help & Feedbacks: Users can watch some tutorials online and also send feedbacks to our
company directly in App.
• Advanced Sengs
In this area, users can adjust the following sengs:
- Entry Delay: Users can decide which sensors’ alarm signal should be held for a preset me
unl the alarm goes o.
- Exit Delay: By enabling it, the system would wait for the preset me before really working
when the ARM or HOME ARM buon is pressed.
- Siren Duraon: It denes how long the built-in siren should keep blaring while alarming.
- Network & Password Sengs: It allows to reset the networking parameters or the system
password.
• Share with Others
The owners can easily share their devices with others, even they have not installed the App yet.
- [Device Sengs]-[Share Device] would generate a unique QR code which is linked to the
current main box and the assigned authories.
- Users can send this QR code to others by Facebook or Whatsapp.
- Scanning the QR code, users could launch the App if it has been installed before, or go to App
Store or Google Play to install the App.
- The shared main box would be added into the App when launched in the invited users’ phone.

15
FAQ
1. The device has LAN/WiFi/Cellular for communicaon. As recommended, LAN is the most reliable tunnel for
Internet connecon. In the event that LAN and WiFi both are o, the cellular network will work as a backup tunnel.
2. In most cases, internet disconnecon is caused by electricity failure, which means the system might have to run
with the backup baery. In this case, we would suggest that you set the cellular network mode only for emergency
cases in order to save power.
3. With backup baery, this system can work perfectly to protect your home even if Internet connecon is not
available.
Q: When the Internet connecon is down, can the system sll protect me?
A:
Please make sure you are using GSM based sim card, this model only supports GSM sim card. For LTE sim card, please
contact your carrier and ask if the sim card can support GSM for phone call and SMS messages, since some cards are
using VoLTE which has not been supported by this model.
Q: Why is the Sim card not recognized?
A:
To reset the system, please hold the reset buon in baery cover for 5 seconds. The system would erase all data
and restarts. If the user has already created an account for this main box, aer reseng the networking in the
inializaon process, all sengs can be recovered.
Q: How do I reset the system? Would all my data be erased?
A:
To beer solving your problem, please do the following before asking for help from MaxxOne or a distributor.
- Use LAN cable instead of WiFi for the main box.
- Try restarng the router used for the main box or your phone.
- Disable any VPN connecon from your phone or router, to directly connect to the Internet.
- In the main page of the App, tap the [Net Status] to see if the networking of the main box is working correctly.
Q: When operang in App, why is it slow to react/lagging?
A:
If you nd a bug or have addional quesons, please visit www.maxxone.com for further support.

16
Core Preferences
CPU ARM Cortex-A7
Electrical
Auxiliary power DC 5V 2A
Backup baeries
Rechargeable Lithium Polymer baery 2200mAh
Stand-by me 8 hours (fully charged)
Radio receiver
Frequency 433.92MHz
Distance 200 m. / 656 .
Networking
LAN 1 X RJ45 10/100M ethernet interface
Wi-Fi Standard Support 802.11b/g/n
GSM frequency GSM850/900/1800/1900MHz
Sounds
Build-in siren 100dB /30cm
Specifications
Environmental
Working Temp. -20°C~60°C
Physical
Installaon Desktop, Wall Mounted
Shell Material ABS/PC
Key Features
Max. Accessories
Unlimited
Keypad Supported Works with wireless keypad
Smart Devices
Works with networking camera and smart plug
Tamper Alarm Supported
Panic Alarm Supported
Low Baery Warning
Supported
Nocaons
Push Nocaon (App) / SMS Messages (Phone)
Quick Pairing Pre-pairing & QR Code pairing
Updatable Firmware
Supported

17
Warranty
Please visit www.maxxone.com for details of the manufacturers' warranty for this product.
Support
If you nd a bug or have addional quesons not covered by this guide, then please visit
www.maxxone.com for further support.

The material in this document is the intellectual property of MaxxOne
• No part of this manual may be reproduced, copied, translated, transmied, or published in any
form or by any means without our prior permission.
• Our products are under connual improvement and we reserve the right to make changes
without noce. No guarantee is given as to accuracy of its contents.
• We do not undertake any responsibility for the harm caused by using our product.
• The product picture may dier from actual product, and is only for your reference. The
accessories contained may dier by region. For details of accessories, please refer to your local
distributor.
COPYRIGHT RESERVED

www.maxxone.com
Table of contents
Popular Security System manuals by other brands

CMR Electrical
CMR Electrical DMWD Installation and operation manual

ProTalk
ProTalk Plus B1290 Installation & operation manual

Matelec
Matelec FPC-12670 Operation manual

Hella
Hella VALUEFIT SLIM Installation instruction

Lorex
Lorex LW2301 Series instruction manual

Scytek electronic
Scytek electronic VEHICLE SECURITY SYSTEM A10 product manual