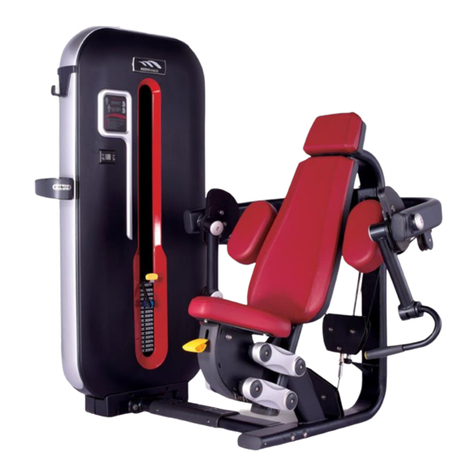
MBH Fitness M5-001 User manual


▲Prior to assembling the machine and having your workout, please
carefully read this manual. We assume that you have read it when you are
using it.
▲Please carefully ll out the warranty card and well retain it after your
purchase. Mail the stub on payment receipt to us so we can offer you more
quality services conveniently.
▲This manual must be modied along with improvement and perfection of
the machine and we’ll not give further notice about it.
▲This manual should be well retained so that you can read it at any time.
Note: Color and structure of the machine are subject to the real object while they may differ
slightly in the gure from the actual ones. The company reserves the right to modify the product
and will not provide further notice.

CONTENTS
SAFE USE NOTICES.......................................................1
DESIGN ILLUSTRATION..................................................4
PRODUCT DESCRIPTION...............................................5
SPECIFICATIONS............................................................6
ASSEMBLY TOOLS..........................................................6
ASSEMBLY INSTRUCTIONS...........................................7
TARGET MUSCLES..........................................…………11
HUMAN MUSCLE DIAGRAM..........................................11
USAGE GUIDANCE........................................................12
EXERCISE NOTICES......................................................13
MAINTENANCE&TROUBLE SHOOTING.......................14
PREVENTIVE MAINTENANCE.......................................15
WARRANTY.....................................................................20

Thank you for purchasing our product! It is the responsibility of the owner
of the machine to ensure that all users have read this manual and gotten
acquainted with warnings and safety precautions before using it.
1.This manual must be carefully read before usage of the machine. The
machine can only be used strictly as described in this manual. It must be
retained during the whole service life of the machine. (CAUTION)
2.The owner of the machine must ensure that all the users get acquainted
with all the use notices.
3.Keep air fresh and ventilation good during usage of the machine. Also
an adequate activity space must be ensured.
4.This machine is only intended for use in organizations with training
areas, sport associations, clubs and educational establishments.
5.The maximum user weight is 150kg (330 pounds). (CAUTION)
6.It must be used under the supervision of a coach in case of any safety
1
SAFE USE NOTICES
Important Notices
Before using the machine, please carefully read this manual and get
acquainted with operation process.
Keep this in mind: Please have an adequate warm-up prior
to any workout in case of injuries. The manufacture and dealer
assume no liability for any human injury or property damage caused by
any disease or improper operation during usage.
If you take medicine when you are about to use the machine or start
your workout, please consult your physician about whether it will affect
your heart rate during workout. If you are suffering cardiac disease or over
35, you cannot use this machine unless consulting a physician and getting
his permission.

accident or damage to the machine. (WARNING)
7.Children under 14 must avoid using the machine in case of severe
injuries or even physical disability while cardiac patients are prohibited
from using the machine. (DANGER)
8.If at any time during exercise you feel dizziness, nausea or any other
discomfort, stop immediately and consult your physician. (WARNING)
9.It must be located stably on an even floor in case of slips during the
usage. Enough clearance must be kept for safe operation. Generally, a
distance of 4 feet (1.2m) should be kept between the user and the centre
of the surrounding space.
10.Select appropriate weight resistance and adjust position prior to
exercise.
11.Check if all set screws are tightened and whether handgrips are well
fastened prior to use. Otherwise, using it is prohibited in case of any
accident. (WARNING)
12.Adjust steel cable to proper length, make sure it’s solidly, securely
connected and moves smoothly without any twist. Regular inspection
must be implemented to avoid any error. If any problem, it must be solved
by professionals instantly. For any fault with weight plate, guide rod or
any other part, please contact professional to x it immediately in case of
accident as weight plates may fall off suddenly. (WARNING)
13.During exercise, please wear suitable sport dress and sport shoes,
without dress or ornament and with hair tied up, in case of any interference
to workout. (CAUTION)
14.5-10 minutes of warm-up exercise must be taken prior to exercising
on the machine.
15.Injury to health may result from incorrect or excessive training, so
please have workout in correct way, select appropriate weight resistance
and exercise duration. Consult a coach if necessary. (CAUTION)
16.No touching steel cable or any moving parts during exercise in case of
2

3
injury to ngers. (DANGER)
17.Do not return to the starting position too quickly in case of any damage
to the weight plates, instead, you must slow down when it gets closed to
the weight plate below. (WARNING)
18.The machine must be used in dry room in case of any damage.
19.Do not have movements beyond the machine’s functions. (WARNING)
20.No adjustment to the machine which may interfere with users’
exercises is allowed to be made. (DANGER)
21.Please exercise on the machine in correct way; incorrect method or
exercise beyond the machine’s function may bring damage to your health.
(WARNING)
22.It’s recommended that the machine is used in an supervised area.
23.Product Standards: EN ISO 20957-1 & EN 957-2
Warning: Violation of the safety rules above will result in personal
injury and equipment damage.
●It must be ensured that the SELECTOR PIN works normally prior to
using the machine.
●If you feel chest pain, nausea, dizziness or tachypnea during workout,
stop immediately and consult the professional.
●Do not wear clothing that can be easily caught in the machine.
●Wear suitable sportswear and sport shoes during exercise.
●Touching steel cable or machine parts in operation is prohibited.
●Movements beyond the machine’s function are prohibited.
●Do not make any adjustment to any device which may interfere with
user’s exercises.
●Do not throw or tuck any foreign object into gaps.
●The machine is for one person at a time; never allow more than one
person to use it at the same time.
In order to reduce the risk of burn, fire, electric shock and
injury to other people, please obey the following regulations:
Warning

Weight Cage
Assembly
Water Bottle
Holder
Connecting
Assembly
(lower)
Seat
Cushion
Seat Frame
Assembly Main Frame
Assembly
Press Arm
Assembly
Headrest
Back Cushion
Connecting
Assembly
(upper)
Exercise Placard
4
DESIGN ILLUSTRATION

Target muscles: Pectoralis major, Biceps Brachii, Triceps brachii and
Deltoid muscle.
The unit has a scientic, reasonable structure, and simplied, elegant look.
Due to the movement trajectory that complies with the principle of human
engineering, the exercise is safe and comfortable.
Tower Frame: It is constituted of well welded flat oval tubes and quality
steel which bring excellent solidity and durability.
Weight Cage: It perfectly protects users from weight stacks and enhances
usage safety.
Links: High-end bearings used for links bring smoother movements.
Handgrips: Reasonably designed handgrips with high degrees of
comfort make it easier for users to exert themselves and bring smoother
movements.
Shroud: Made of quality steel plate.
Frame: Quality flat oval tubes (50*120*(≥2.5T)/Q195) are solidly welded
and never deform.
Cushion: Cushion made of PU foam with one-step forming technology is in
compliance with the principle of human engineering and has a moderate
softness.
Pulley: Safe and reliable pulleys are made of engineering plastics with
injection molding technology.
Steel cables: 6x19+1 strand construction; quality stainless steel; durable,
safe, reliable; maximum load: 1000KG.
5
PRODUCT DESCRIPTION

Unit Dimensions: 1435mm(L)×1445mm(W)×1535mm(H)
Weight Stack: 100kg (standard); 100 ~ 120kg (optional)
User Weight ≤ 150kg
6
SPECIFICATIONS
ASSEMBLY TOOLS
NO. NAME SPECIFICATION QUANTITY
1 Screwdriver Philips 1
2 Open-ended Spanner 17-19 2
3 Socket Wrench 19 1
4 Allen Wrench 8mm 1
5 Allen Wrench 6mm 1
6 Allen Wrench 5mm 1
7 Allen Wrench 4mm 1
8Allen Wrench 3mm 1

7
ASSEMBLY INSTRUCTIONS
1.As the unit has a large size, please assemble it in a space which is big
enough.
2.Open the packing box, take out the parts and remove packing
materials. Classify all parts and tidily put them on vacant oor.
3.Ensure that it's correctly assembled and the parts are complete
according to assembly steps.
4.It requires at least two persons.
I.Assemble Weight Cage
1.Attach front shroud, decorative strip and upper cap to tower frame.
2.Assemble weight plates. Insert two guide rods into the corresponding
mounting holes on the lower part of weight cage; pass them through shock
pads; pass them through weight plates successively.
3.Assemble head plate. Now the weight plates are assembled.
4.Assemble circlips on the upper parts of two guide rods; x guide rods.
5.Pass steel cable through cord lock; fasten steel cable with screws.
①Tighten the 3 screws as much as possible.
②The bolt must make at least 10 turns towards the selector bar.
③Tighten hexagon nut.
6.Assemble steel cable as the diagram shows; check whether all the
pulleys move smoothly.
7.Assemble rear shroud; fasten it to tower frame with designated screws.
8.Assemble water bottle holder; fasten it to tower frame with designated
screws.
9.Now the weight cage is assembled.

(1)
(4)
(7) (8) (9)
(5) (6)
(2) (3)
①
②
③
8

9
(1) (2)
II.Assemble User Frame
(1)Put the assembled Weight Cage in the area where the machine will be used.
Make an inventory of the other parts according to the diagrams below; remove
packing materials and place the parts tidily. Assemble the main frame; firmly
attach the Connecting Assemblies (upper and lower) (AE1; AE2) and Main Frame
Assembly (AC3) to Weight Cage as the diagram shows. (Diagram 1)
(2) Attach Press Arm Assembly (AD1) to both ends of the main frame. Tighten all
the set bolts. (Diagram 2)
(3) Assemble steel cables as the diagram shows; make sure that they move
along the trajectory as the arrow shows. Fix and adjust them, ensuring that they
move smoothly without any twist or slack. (Diagram 3)
(4) Assemble Seat Cushion (M264), Headrest (M216) and Back cushion (M262).
(Diagram 4)
(5) Recheck all links and tighten all loose screws in case of slack.
(6) Finally, before the machine is put into use, a trial must be taken by
professional to assure that it’s correctly assembled.
REF# DESCRIPTION SPEC. QTY.
AB1 Weight Cage Assembly 1
AC1 Main Frame Assembly 1
AE1 Connecting Assembly (upper) 1
AE2 Connecting Assembly (lower) 1
E05 Junction Plate 2
B586 Hexagon Socket Head Cap Screw M10*145 4
B565 Hexagon Socket Head Cap Screw M10*25 2
B83 Check Nut M10 6
B90 Washer 10 12
C218 Reinforcing Plate 1
B274 Hexagon Socket Head Cap Screw M10*80 2
REF# DESCRIPTION SPEC. QTY.
AD1 Press Arm Assembly 1
D07 Axle, Press Arm Ø25*200 1
C226 Spacing Washer Ø26*Ø35*3 2
M263 Bearing Cap Ø60 2
B48 Hexagon Socket Button Head Screw M8*15L 4
D08 Spacing Sleeve Ø20*10 2
B240 Hexagon Socket Button Head Screw M8*50 1
B82 Check Nut M8 1

10
(3)
(4)
6-B50
M261
M262
6-B89
AG1
REF# DESCRIPTION SPEC. QTY.
M261 Headrest 55*205*250 1
M262 Back Cushion 92*360*655 1
B50 Hexagon Socket Button Head
Screw M8*25 6
B89 Washer 86
AG1 Seat Frame Assembly 1

Pectoralis Major
Deltoid
Triceps Brachii
Deltoid
Biceps Brachii
11
TARGET MUSCLES
HUMAN MUSCLE DIAGRAM
Primarily
Secondarily

Instructions
Select an appropriate weight resistance according to personal condition.
Adjust the seat height by pulling the yellow adjustment lever beneath seat
cushion. Sit with your back rmly against the back cushion. Please consult
a coach if you are unsure.
Exercise Movement
Grasp handgrips with both hands; push them forward till both arms are
fully straightened. Then return to the starting position slowly, ensuring
that the moving weight plates do not touch the static ones. Repeat the
movements. Please consult a coach if you experience any pain when you
stop suddenly.
START FINISH
12
USAGE GUIDANCE

1.5~10 minutes of warm-up must be taken prior to having exercise on
this machine. Record the time while having free exercise which aims to
activate the joints in case of injury to them during training.
2.Inspection must be carried out prior to using the machine. For any
potential problem, please contact the coach or maintenance staff
immediately. Do not use it before it’s assured that it can operate correctly.
3.Do not use the machine if there’s a sign on it that tells it malfunctions.
4.Please take high-protein foods, vegetables and fruits. Have a meal 40
min prior to the exercise and another meal no sooner than 30 min after it.
A small amount of water can be taken during exercise.
5.Inhale when you exert yourself; exhale when you relax. Adjust breath
according to movements.
6.The next workout for same muscle must be taken after at least 48
hours of rest.
Weight resistance should be selected according to personal condition.
Excessive weight must not be taken in case of injury to muscles. The
training must be proceeded in an orderly way and step by step. It is normal
to feel slight pain in the muscles during the rst workout.
13
EXERCISE NOTICES

14
Fault Reason Solution Remarks
Unstable Frame
A.Uneven oor or foreign object
B.Unadjusted leveling feet after
assembling frame
Remove foreign object,
Loose main frame bolts,
adjust leveling feet,
tighten the bolts
Owner
Idle running
during operation Steel cable is too loose Tighten steel cable Owner
Impact on steel
cable during
resetting
Steel cable is too tight; weight plates
are suspended Loosen steel cable Owner
Pulleys cannot
rotate
Steel cable is stuck between pulley
and pulley case
Dismantle pulley and
reassemble it Owner
Abnormal sound
at rotating part of
pulley
A. Abraded or damaged pulley
B. Abraded or damaged pulley cover
C. Abraded or damaged bearing
D. Abraded or damaged steel cable
Replace pulley
Replace pulley cover
Replace bearing for pulley
Replace steel cabl
After-sales Service
Abnormal sound
at other rotating
part
A. Abraded or damaged bearing
B. Loose bolt
C. Incompletely engaged pin
Replace bearing
Tighten bolt
Get pin fully engaged
After-sales Service
Owner
Owner
If the machine malfunction is not referred in the text above, please contact
the customer service centre or call us, you’ll receive satisfactory service.
1.Inspect bolts at all mechanical parts frequently for tightness; rotating
parts should rotate smoothly without producing any abnormal sound.
2.When the machine is static, steel cable should be tightened while
weight plates should not be suspended.
3.The machine should be kept clean but not wiped with strong cleaning
solvents.
4.Bolts at all the adjustment parts should be tightened after adjustment in
case of slack.
5.If any loading part, e.g., steel cable, pulley, pulley case, weight plate, is
abraded or damaged, it must be replaced immediately; the machine can
only be put into use after repair.
MAINTENANCE AND TROUBLESHOOTING
Basic Troubleshooting

1.Daily Inspection
Clean and inspect machine frame every day; clean upholsteries;
inspect steel cable and the terminals for abrasion.
Clean upholsteries and machine frame with neutral soapy water, remove
dirt, oil stain and perspiration on the surfaces and air dry them completely.
Inspect the frame for rupture, rustiness and other damage. Make sure that
soldering points and fastening parts are correctly xed.
Fastening parts may get loose during normal use; therefore, please
inspect all the nuts, bolts, screws and other fastening parts, make sure
they are well tightened and correctly assembled. The machine can only be
put into use when no problem is found.
Regular inspections of steel cable, pulleys, fastening parts and other
accessories must be carried out. Frequently used cable may be damaged
and broken due to abrasion; sudden damage or rupture may cause severe
injuries to users. Hence, daily inspection of cable and connections at the
terminals must be implemented. Check whether there’s kink or abrasion,
whether sheath and terminals are damaged. Special attention must be
paid to the terminals and the parts of cable which are in contact with
pulleys. Damaged cable must be replaced immediately in case of
injury to users.
Characteristics of Obvious Steel Cable Damages (Picture 1)
(1)A tear or crack in the cable sheath that exposes the cable; or the part
of sheath which pulley contacts is cracked.
(2)Z-type twist or a curled sheath.
(3)Kinks which indicate that internal of cable may be damaged.
(4)Necking-A stretched cable sheath.
15
EXERCISE NOTICES

(5)Cable sheath gets inated.
In addition, the following inspections must be carried out.
(1)Make sure that steel cable is correctly adjusted and securely fastened
to the top of weight plates. Make sure that cable is securely connected to
pulleys and all assemblies are well xed, all the seven cable strands pass
through the selector bar and screws are well tightened.
(2)Wipe and clean all warning/instruction stickers. (Picture 2)
(3)After some time of use, steel cable may get loose due to stretches.
It can be solved by adjusting the hexagon nut on the head plate in time;
tighten hexagon nut in case of slack. If it fails, cut a small section of the
cable and refasten it. (For adjustment and assembly of steel cable, please
check Assemble Weight Cage, ASSEMBLY INSTRUCTIONS.)
2.Weekly Inspection
Clean upholsteries; clean and lubricate cable rod end; clean and lubricate
guide rods; inspect cable, connecting parts, and cable tension; inspect
cable accessories; inspect pulleys; inspect each weight plate and selector
pin; inspect and lubricate bearings and bushings; inspect seat adjustment
system; test the pop pin.
(1)Clean upholsteries with special detergent. Note: It must be neutral
detergent. Never use detergent which contains solvent, ethanol,
ammonia or petroleum.
(2)Inspect heim joint and assure that the shoulder screw is well tightened.
If there's noise inside the heim joint, lubricate it with silicone oil as shown
16
Picture 1: Picture 2:
Table of contents
Other MBH Fitness Fitness Equipment manuals
Popular Fitness Equipment manuals by other brands

CAPITAL SPORTS
CAPITAL SPORTS Amazor M Rack Assembly instructions

JMQ Fitness
JMQ Fitness RB3012 Installation and operation manual

Power Systems
Power Systems POWER GRIP-BALL Important information

BH FITNESS
BH FITNESS G6473iRF manual

Vantly
Vantly E-6600 owner's manual

PRCTZ
PRCTZ 7861LB-2 Assembly and use instructions