mcmurdo G5 User manual

SMARTFIND
E5 and G5 EPIRB
User
M
anual


Safety notices
CAUTION: The EPIRB is an Emergency Position Indicating Radio Beacon.
Use only in situations of grave and imminent danger to life.
CAUTION: False alerts endanger lives and cause disruption to Search and
Rescue services. Deliberate misuse of the EPIRB could result in penalty.
WARNING: Spring action antenna deployment; tilt the EPIRB away from
your face when deploying the antenna.
CAUTION: Do not dismantle the EPIRB. Contains no user-serviceable parts.
CAUTION: Contains lithium batteries. Do not incinerate, puncture, deform,
short-circuit or recharge.
CAUTION: Dispose of aused EPIRB in accordance with local waste
disposal regulations. Refer to End of Life Statement.
CAUTION: Avoid using chemical solvents to clean the EPIRB as some
solvents can damage the case material.
CAUTION: An EPIRB is aradio transmitter. Some administrations may
require that the user holds avalid radio licence to cover its ownership and
use.
WARNING: the high intensity flashing strobe light may cause discomfort if
viewed for prolonged periods.
Radio Frequency Exposure Warning
WARNING: The EPIRB emits low levels of radio frequency radiation; avoid
handling the antenna once activated.
Registration
The EPIRB must be promptly registered with the appropriate National Authority. Failure
to register the EPIRB could delay aSearch and Rescue (SAR) response and may be
unlawful.
Ownership details
Vessel Name:
Owner details:
EPIRB Unique HEX ID;

Contents
1OVERVIEW............................................................................5
2DESCRIPTION.......................................................................6
3CONTROLS AND INDICATORS ...........................................7
4EPIRB STOWAGE.................................................................8
5EPIRB OPERATING PROCEDURE
.....................................10
6GETTING THE BEST FROM THE EPIRB...........................12
7FALSE ALERTS ..................................................................15
8INSTALLATION...................................................................16
9SELF TEST..........................................................................20
10 MAINTENANCE ................................................................21
11 SPECIFICATION...............................................................25
12 WARRANTY STATEMENT...............................................26
13 END OF LIFE STATEMENT .............................................27
14 ANNEX 1. REGISTRATION INFORMATION....................28
Disclaimer
The information and illustrations contained in this publication are to the best of our knowledge correct at the
time of going to print. We reserve the right to change specifications, equipment, installation and
maintenance instructions without notice as part of our policy of continuous product development and
improvement. No part of this publication may be reproduced, stored in aretrieval system or transmitted in
any form, electronic or otherwise without permission in writing from Orolia Ltd. No liability can be accepted
for any inaccuracies or omissions in the publication, although every care has been taken to make it as
complete and accurate as possible. This manual is applicable for McMurdo Smartfind E5 and G5 version 2
EPIRBs manufactured after January 2013.

5
1OVERVIEW
This Emergency Position Indicating Radio Beacon (EPIRB) is intended for carriage on
SOLAS and non-SOLAS vessels. When carrying an EPIRB on board you enjoy the
reassurance of alast resort safeguard against any life threatening incidents that may
occur anywhere in the world. Only operate the EPIRB in situations of grave and imminent
danger to life. False alerts endanger lives. Help prevent them by understanding how to
look after the EPIRB.
Cospas Sarsat system
EPIRBs transmit aunique emergency message identifier via the Cospas-Sarsat satellite
system which can determine your location anywhere on the earth’ssurface. In most cases
the first emergency alert is received within 5minutes of activation, depending on satellite
coverage at the time this can sometimes extend to around 45 minutes. When the
emergency alert message is received at aRescue Co-ordination Centre (RCC) it is cross
referenced by the Unique Identifier Number (UIN) against user registration information.
Details of the alert will be forwarded to the appropriate local Search and Rescue (SAR)
teams. Keeping your vessels registration details up to date is critical to ensuring aquick
SAR response. If you have purchased the GPS version, it has abuilt-in GPS receiver
which can reduce the time for Search and Rescue teams to arrive on scene, as your
precise coordinates are transmitted within the first few minutes. Non-GPS versions are
pinpointed using Doppler Shift from the over-flying satellites.
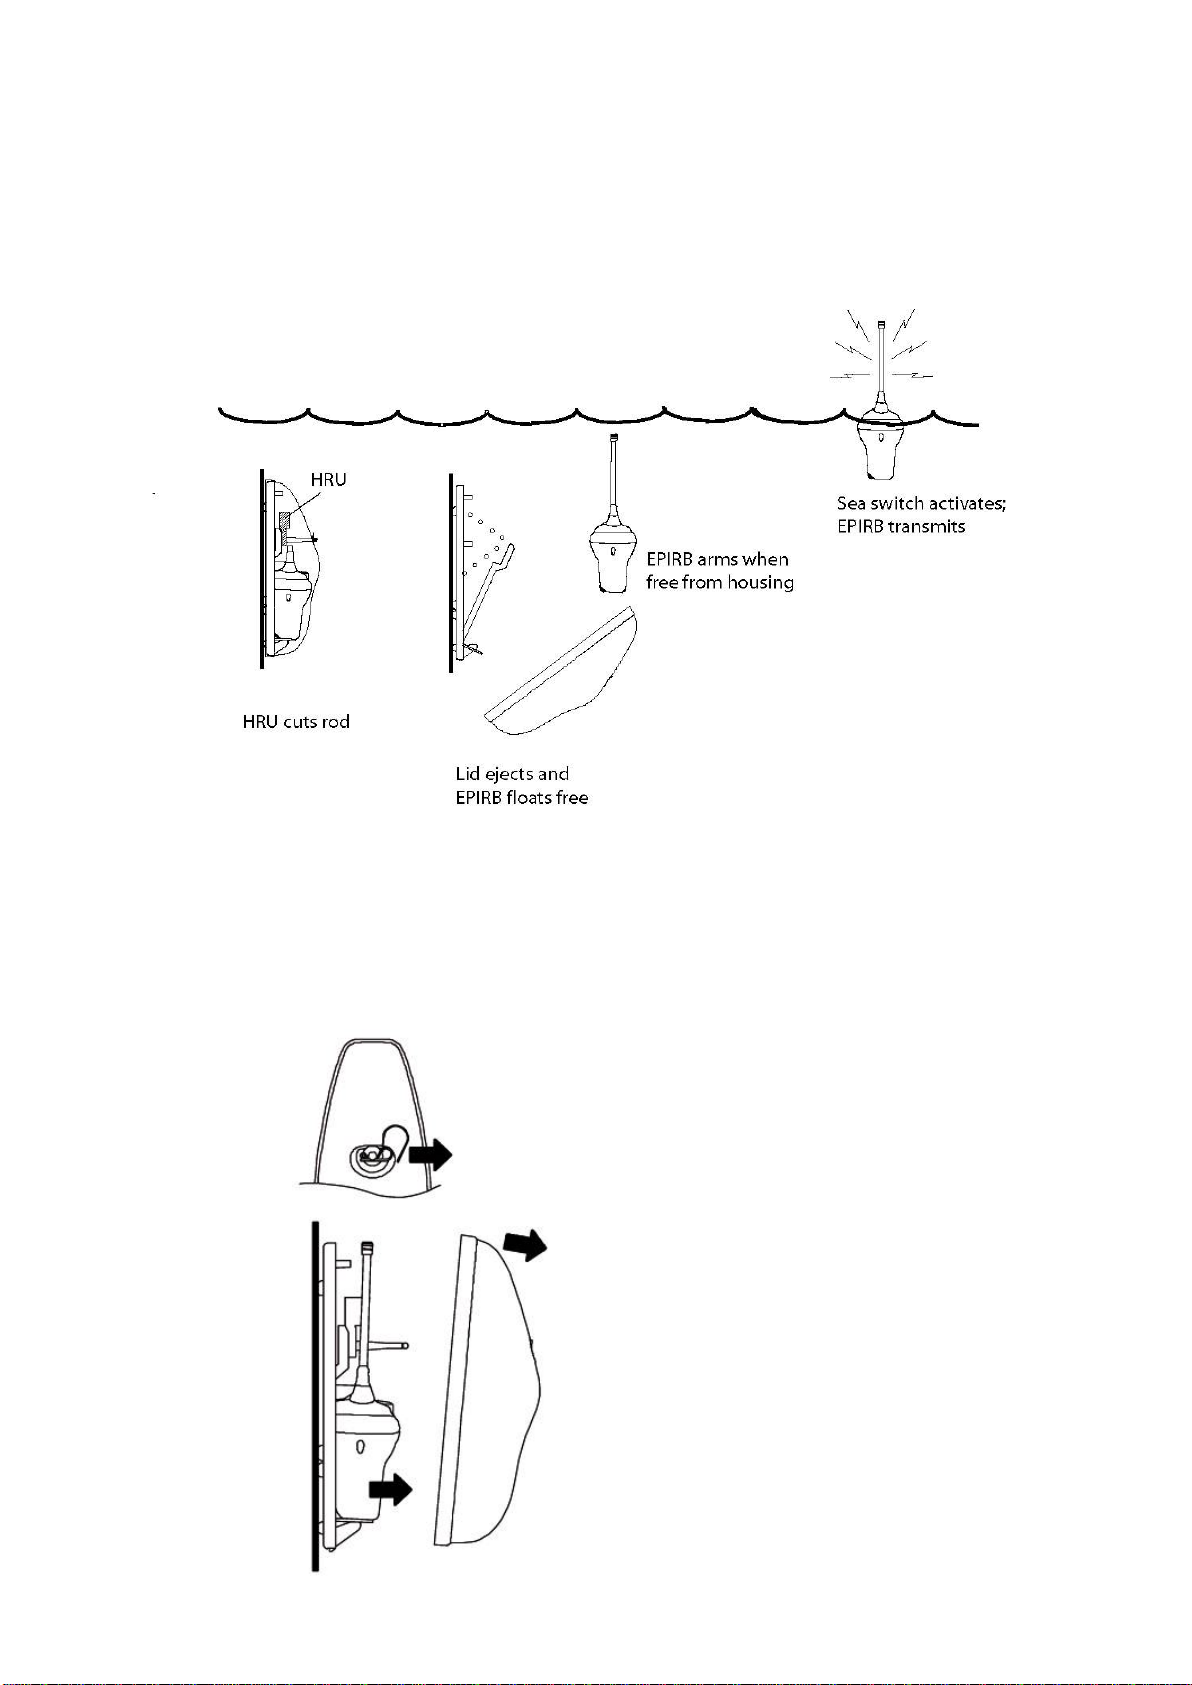
EPIRBs have asecondary or ‘homing’transmitter which allows SAR teams to direction
find or ‘home in’on the EPIRB once they arrive on the scene. Once activated the EPIRB
will continue to transmit emergency alerts for aminimum of 48 hours.
For further information visit Cospas-Sarsat on line at www.cospas-sarsat.org
You must register your EPIRB with the appropriate authorities.
Failure to file avalid user register may slow the rescue and lead to loss of life.
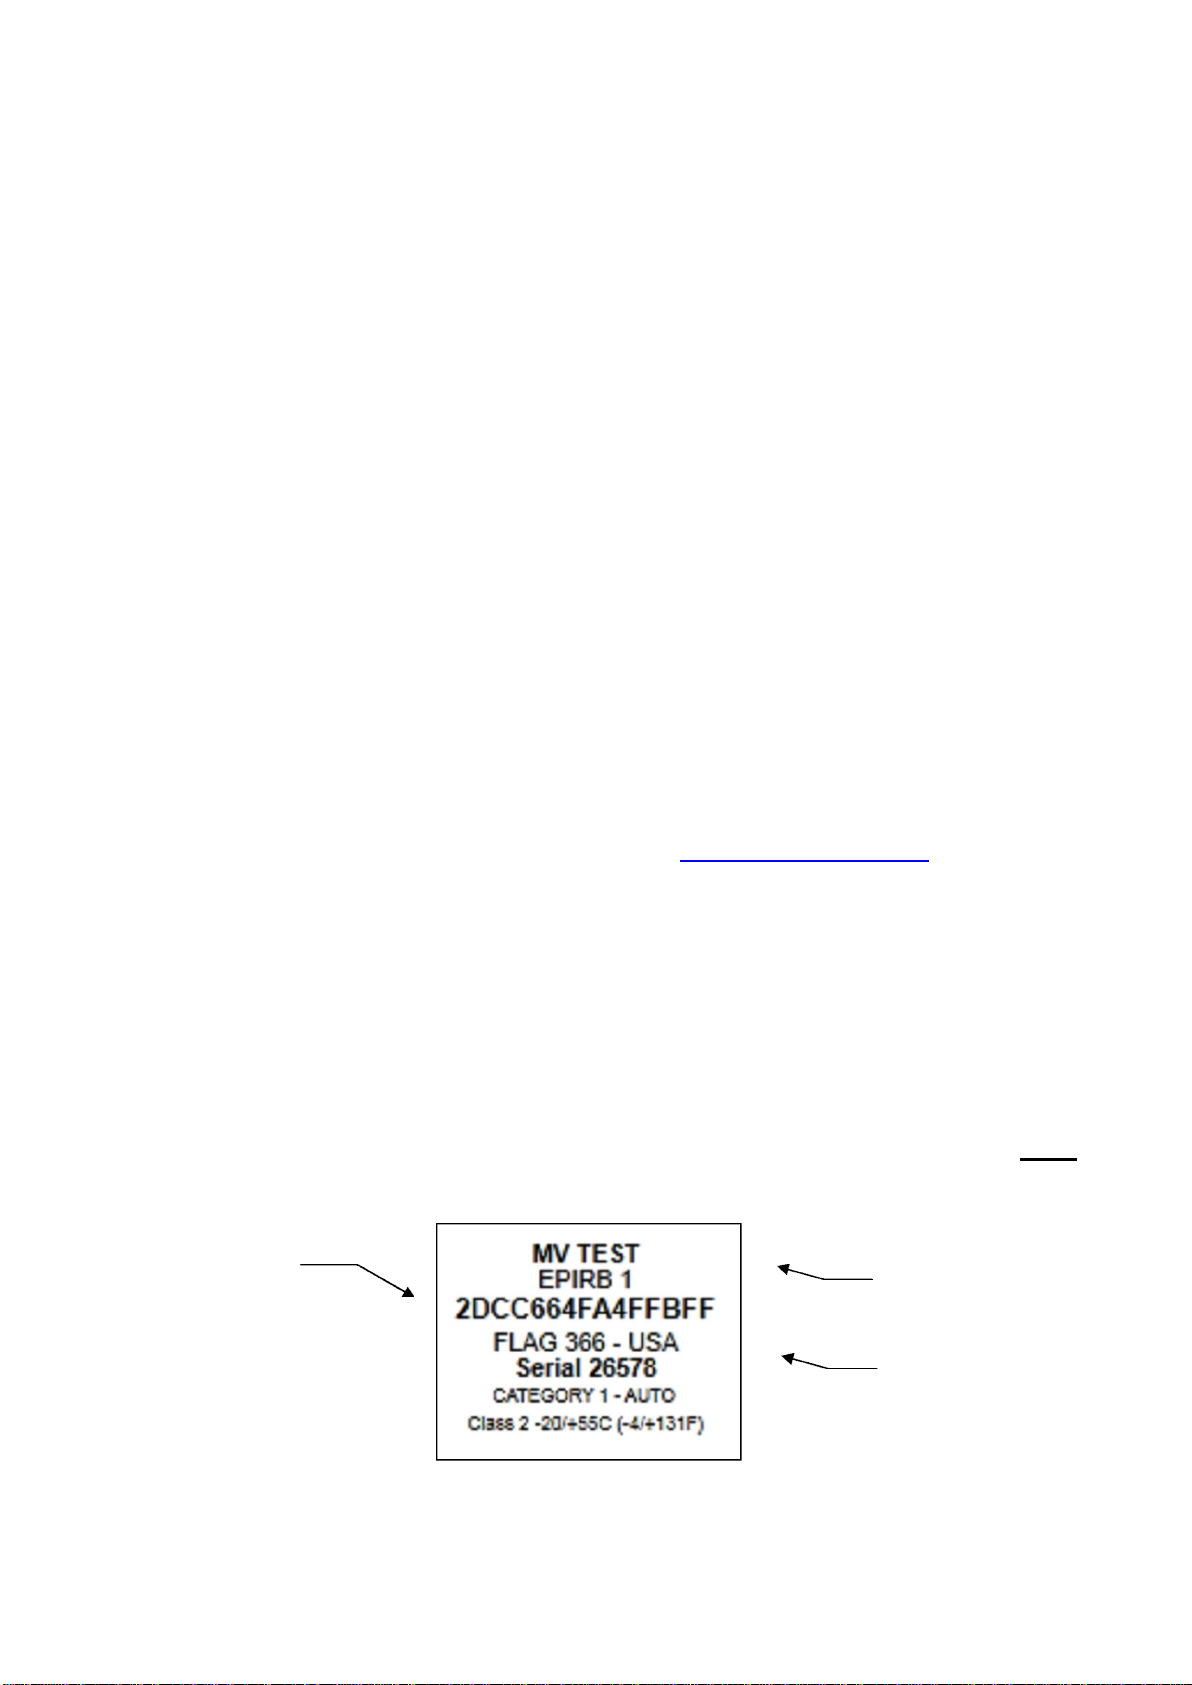
The EPIRB is pre-programmed with aUnique Identity Number (UIN) before it reaches the
end customer. The UIN must be registered with the national authority indicated in the
white area of the label on the rear of the EPIRB. Complete the included user registration
form and return it to the address indicated. As some authorities may require online
registration always check for any guidance notes printed on the registration form. The
country code programmed into your EPIRB is shown on the rear identity label. You must
register your vessel and contact details with the authorities in that country.
Example only
How to register
Refer to Annex 1. for details of specific national user registration requirements.
Always ensure that any changes of registration or contact details are promptly notified.
Country code
Unique
Identity
Number
(UIN)
Vessel name

6
2DESCRIPTION
An EPIRB is intended to be aone-shot device. Once activated it will transmit emergency
alerts for at least 48 hours. The EPIRB will work best while floating in water, but can also
be operated while on board avessel, in aliferaft or on land (when placed on the ground).
The key components of your EPIRB are:
Antenna Flexible whip, should be near vertical when operating.
Strobe Flashing signal light, visible through the clear lens dome when the EPIRB is
Light switched on.
LED Indicates the current operating status, visible through the clear lens dome.
Activation Protected by atear-off anti-tamper tab. Break the tab upwards, push the
switch switch in and move it fully left to activate the EPIRB.
Sea switch The two studs on the sides of the EPIRB are sea switch contacts. Submerge
these in water to activate the EPIRB automatically.
Test button Self test verifies the readiness of the EPIRB.
Lanyard Pull the lanyard spool down to free it. Use the cord to tether the EPIRB to a
PFD (Personal Flotation Device) or survival craft.
Strobe light
zone
Lanyard
Antenna
EPIRB activation switch.
Break off the anti-tamper
tab to gain access to the
activation switch beneath.
Test button Red LED
Green LED
(GPS model
only)
Sea switch contact
(one each side)

7
3CONTROLS AND INDICATORS
Manual actvation (switch)
The EPIRB is manually activated break off the anti-tamper tab to gain access to the
manual activation switch beneath.
Automatic Sea switch (contacts)
When the EPIRB is released from its bracket amagnetic switch activates and places the
EPIRB into a“ready”state. It will turn on automatically if the sea switch contacts on either
side of the EPIRB body are immersed in water regardless of the status of the manual
activation switch. The Automatic sea water switch has abuilt-in time delay to ensure that
it operates correctly in rough seas. The EPIRB must be in the water for at least 2seconds
before it will automatically activate and it has to be dry for at least 8seconds before it will
stop transmitting.
TEST button
The test button is used to verify the readiness of the EPIRB.
Strobe light
Four high visibility LEDs flash simultaneously to produce the strobe light zone, this
provides avisual means of locating the EPIRB.
It will start flashing immediately after the EPIRB is switched ON. Its flashing
will pause for ashort time when each 406 MHz alert transmission is sent,
which is once every 50 seconds.
Strobe light (EPIRB ON)
1flash every 3seconds, pause every 50 seconds
Red LED (indicator)
The red LED illuminates when the EPIRB is first switched ON and will start to flash slowly
once the first transmissions are made.
121.5 MHz transmission is taking place whenever the Red LED is flashing alternately with
the strobe light.
Every 50 seconds, the red LED will flash rapidly followed by asingle long flash to indicate
each 406 MHz transmission.
Green LED (GPS version only)
The green LED flashes alternately with the strobe, to indicate that avalid position has
been obtained by the GPS receiver. Every 50 seconds it illuminates for 2seconds to
indicate that the position is being transmitted on 406MHz. Every 20 minutes the GPS
receiver updates its position information. If afix is not obtained, the green LED stops
flashing, and illuminates only every 50 seconds, when the previous position information is
transmitted.

8
4EPIRB STOWAGE
Bulkhead bracket (category 2)
The bulkhead bracket has two parts.
Releasing EPIRB from the bulkhead bracket
Pull the R-clip out of the bracket to release the retaining strap. Hold the antenna to
prevent it springing loose and lift the EPIRB out of the mounting points.
The EPIRB can be quickly unclipped from
the bulkhead mount for easy stowage.
Always transport the EPIRB in the Carrysafe
collar.
The Carrysafe collar keeps the EPIRB
protected against accidental activation even
when wet.
Press catch
and lift the
Carrysafe
2. Pull the R-clip out of
the bracket and
release the retaining
strap
1. Release the antenna tip
3. Lift the EPIRB out of
the collar
1
2
3

9
Float-free enclosure (category1)
The float-free version EPIRB has aplastic enclosure. It contains aspring-loaded lever
which automatically pushes the enclosure lid off and releases the EPIRB if the vessel
sinks. Automatic ejection is controlled by aHydrostatic Release Unit (HRU) before it
reaches 4metres (13 feet) depth.
As the EPIRB floats away it automatically activates.
iNever tie the EPIRB lanyard to the vessel because doing so would prevent the
EPIRB from floating free.
Manually releasing EPIRB from the enclosure
Remove the R-clip from the retaining rod, then pull off the enclosure cover and remove
the EPIRB.

10
5EPIRB OPERATING PROCEDURE
Vessel Sinking
If abandoning ship and there is time to fetch the EPIRB, release the EPIRB from its
mounting bracket and carry it with you to the liferaft.
Category 1float-free enclosure
Automatic activation
If the vessel sinks, the EPIRB will automatically release itself from its enclosure before it
reaches adepth of 4metres. The EPIRB will float to the surface and automatically start to
operate.
Category 2bulkhead bracket
Manual activation
Remove the EPIRB completely from the Carrysafe collar to gain access to the rear facing
activation switch.
1. Break off the anti-tamper tab by pulling it upwards
2. Push the switch catch in and move the switch fully to the left “ON”position
When the EPIRB is first activated the strobe light will start to flash immediately and the
Red LED will light. After 50 seconds has passed the Red LED will start to flash indicating
that the distress transmissions have started.
The 50 second delay before the first transmission is made allows the user to turn the
EPIRB off if it was activated in error.
The antenna should be positioned as upright as possible with aclear view of the sky.
Avoid handling the antenna, as this may impair performance.

11
Turning the EPIRB off
Should the EPIRB be activated by mistake or if the emergency ends then the EPIRB can
be turned OFF by sliding the activation switch fully to the right.
After water activation, dry the sea switch contacts and wait about 8seconds for the
automatic sea switch to de-activate.
The strobe light will stop flashing and the red LED will go out.
Important
After EPIRB activation and as soon as practical the EPIRB should be taken to aservice
agent, who will fit anew switch anti-tamper tab, and check the battery condition. If the
EPIRB has been used for more than 6hours in total, aset of fresh battery packs should
be fitted to ensure the full 48 hour operational life is still available. This is necessary to
ensure that in an emergency it will operate for the full 48 hours required by international
regulations.

12
6GETTING THE BEST FROM THE EPIRB
The EPIRB is designed and optimised to be used floating in the sea. But it can also be
used in other situations.
Aboard ship:
DO:
iPlace the EPIRB in the open, clear of overhangs
iKeep the EPIRB upright (hold it if necessary)
DO NOT:
iPlace the EPIRB close to large structures
iLay the EPIRB on its side
iPlace the EPIRB under cover
iSecure the EPIRB lanyard to the vessel
In aliferaft:
iDeploy the EPIRB so that it is visible outside of the liferaft canopy.
Uncoil the lanyard and tie it to the liferaft, then throw the EPIRB overboard so that it floats
close by.
NO
YES
NO

13
Stowing the EPIRB
Manual bracket
Hold the bracket collar open and drop the EPIRB into the bracket. The slots in the EPIRB
fit over the locating lugs in the bracket.
Hold the collar shut and fit the R-clip to secure the EPIRB. Fold over the antenna and
locate the end moulding in the retaining slot.
BEST
Align slot with lug
Locate end of antenna in slot
Fit R-clip
1
23

14
Re-fitting into enclosure
1. Place the EPIRB on its side in the enclosure with the TEST button in view.
2. Engage base of EPIRB into the recess in the lever arm.
3. Bend the antenna and retain it in the recess.
4. Refit cover squarely, engaging the guides at the top end and the rod through hole
in cover.
5. Locate cover onto back plate and snap the lower end down over locating lug
6. Refit R-clip into groove at end of release rod. (Do not fit through hole)
CAUTION: Failure to fit EPIRB correctly may impair its ability to float free in an
emergency.
6
4
3
2
1
Cover correctly
snapped in place
5

15
7FALSE ALERTS
If the EPIRB has been accidentally activated, or if rescue is affected before arrival of the
rescue services:
iSwitch off the EPIRB and notify the appropriate rescue services or authorities at
the earliest possible time.
iContact the rescue services, coastguard, or police by radio or telephone to advise
them of the false alert.
You may be asked to provide the UIN (15 digit Hex ID number) of the EPIRB, date, time,
duration, cause of activation and geographic location at the time you switched off the
EPIRB.
Dealing with atransmitting EPIRB
In the unlikely event that the EPIRB develops afault and will not turn off, transmissions
can be prevented from reaching the satellite by cutting off the antenna close to its base.
The EPIRB should then be wrapped in metal foil or placed in asealed metal container or
steel locker.
Take care when dealing with the antenna, refer to product safety warnings.
Do contact the authorities to notify them of the false alert.
Leave the EPIRB for 3days or until the battery has fully run down before having it
serviced.
Fully disabling an EPIRB
If it is necessary to fully disable an EPIRB by unplugging the battery pack, proceed as
follows:
Locate amedium size cross-headed
screwdriver.
Unscrew and retain the 3sealing screws
that hold the top dome onto the base
section.
Lift the lens dome off and circuit board
away from the base section.
Avoid touching the circuit board if
possible.
Carefully unplug each of the three white
battery connectors.

16
8INSTALLATION
Bulkhead bracket
When selecting asuitable mounting position consider:
iEase of access in an emergency.
iPosition at least 1metre from compass equipment and 50 cm from powerful
magnets e.g. magnets found in loud speakers and radio equipment.
iAllow sufficient clearance above the EPIRB to allow for easy removal from the
bulkhead bracket.
Mounting procedure
The bulkhead bracket is designed to mount on aflat surface using four fixing points.
Four stainless steel screws 25mm in length are included. Check that the rear side of the
mounting surface is clear and that the fixing screws will not penetrate through into any
other objects.
Offer the bracket into the chosen position and mark through the mounting slots using the
bracket as atemplate.
Drill four 3mm (1/8”)holes and securely screw the bracket in place.

17
Category 1automatic release installation
The enclosure should be mounted upright against avertical bulkhead. Alternately, it may
be mounted horizontally on aflat surface, such as acabin roof. No other orientations are
recommended.
It is critical to locate the enclosure in aposition where the released EPIRB will not get
trapped by overhangs, rigging, antennas etc, should the vessel ever sink. An expanse of
flat surface is required to allow the enclosure lid to eject.
iMount it were it can easily be accessed without use of aladder
iMount it close to the vessel’snavigation position
iConsider ease of access in an emergency
AVOID:
iPositions with insufficient space for lid ejection and maintenance.
iPositions within 1m (3') of any compass equipment.
iMounting within 2m (6') of any Radar antenna.
iDirect impact from waves
iLocations where damage is possible when operating other equipment
iExhaust fumes, chemical and oil sources and areas of high vibration
Mounting procedure
Locate enclosure base against aflat surface using the 4fixing points. The base plate of
the enclosure can be used as adrilling guide.
1. Pull out the R-shaped clip and remove the enclosure lid. Note how the EPIRB fits
then remove it to somewhere dry (its sea switch is now armed).
2. Offer the base plate into the chosen position and mark through the mounting holes.
3. The enclosure is supplied with x4 25mm (1”)stainless steel wood screw fixings.
6mm (1/4”)nuts and bolts can also be used (not supplied).

18
Category 1enclosure installation outline
Marking Hydrostatic Release Unit (HRU) expiry (Category 1enclosure)
The HRU has atwo year in-service life starting from the date of installation of the EPIRB.
The installer must mark off the month date of two years into the future on the body of the
HRU and put the same month date onto the label on the outside of the enclosure.
Mark the HRU by cutting out the corresponding month and year label date.
The outside of the enclosure should be marked using the alpha-numeric stickers provided
and then covered with the clear adhesive label provided. Use date format, month and
year, for example: JUN 2006.

19
Marking vessel name
The vessel name should be marked on the EPIRB body and on the Category 1enclosure
if fitted. Alpha-numeric stickers are provided to do this, protect the markings with asection
of the clear adhesive label provided.
Instruction plate
The EPIRB is supplied with aself-adhesive instruction plate, which has basic visual
instructions showing how to operate the EPIRB in an emergency.
Mount the instruction plate next to the EPIRB so that it is easily visible in an emergency.
During vessel maintenance, ensure the plate does not get painted over or cleaned down
with strong degreasing solvents.
Lift off required letter
(a small knife blade
works well)
Apply name letters to
EPIRB rear label and
enclosure cover
Cover name letters
with clear label
123

20
9SELF TEST
The EPIRB has abuilt-in self test capability that will confirm whether the battery is
healthy, both distress transmitters are functional and that the high intensity strobe light is
operational. It is recommended to self test the EPIRB monthly,more frequent self testing
can put unnecessary drain on the battery. During the EPIRB self test, aspecially coded
test transmission is sent that will not alert the authorities. Aself test can be made while
the Category 2EPIRB is held in the Carrysafe bracket, aCategory1 EPIRB should be
removed from the enclosure first. The self test should be carried out during the first 5
minutes of the hour so as to minimise any disturbance of the emergency channels.
1. Push and hold the TEST button down until the red LED indicator lights.
2. Asuccessful self test will result in the red LED and strobe light flashing together a
number of times.
3. The number of strobe light flashes indicates past battery usage;
Accumulated Battery Use
(hours) Number of strobe light
flashes
0to 43
4to 62
More than 61
Once the self test has completed the EPIRB will switch off automatically.
Aself test failure will result in NO strobe light flash and the red LED turning OFF.
Important
Each self test draws small amounts of energy from the battery pack. Unnecessary testing
of the EPIRB will reduce the run time of the EPIRB in an emergency. On average, the
EPIRB should only be self tested 12 times per year, or atotal of 72 times during the 6
year battery lifetime.
If the EPIRB has been activated for acumulative period in excess of 6hours (self testing
and operation), then the battery must be replaced to ensure that in an emergency it will
still operate for aminimum of 48 hours at -20 pCas required by International regulations.
If the EPIRB fails self test it should be immediately removed from service.
Long self test (GPS version only)
The GPS model can also be put through aGPS long self test which includes allowing the
GPS to acquire afix. As this test consumes significant amounts of power it is restricted to
amaximum of 10 tests in total.
Self test button
This manual suits for next models
1
Table of contents
Other mcmurdo Marine Equipment manuals