MedComp SPLIT-STREAM User manual

SPLIT-STREAM®
LONG-TERM HEMODIALYSIS
INSTRUCTIONS FOR USE

INSTRUCTIONS FOR USE
INDICATIONS FOR USE:
•The Medcomp®Split-Stream®is indicated for use in attaining
Long-Term vascular access for Hemodialysis and Apheresis.
•It may be inserted percutaneously and is primarily placed in the
internal jugular vein.
•Alternate insertion sites include the subclavian vein.
•Catheters greater than 40cm are intended for femoral vein insertion.
CONTRAINDICATIONS:
•This catheter is intended for Long-Term vascular access only and
should NOT be used for any purpose other than indicated in these
instructions.
•To maintain peak performance of the Split-Stream®extension set, it
is recommended that the extension set be replaced every 6 months.
WARNINGS:
•In the rare event that a hub or connector separates from any
component during insertion or use, take all necessary steps and
precautions to prevent blood loss or air embolism and remove
catheter.
•Do not advance the guidewire or catheter if unusual resistance is
encountered.
•Do not insert or withdraw the guidewire forcibly from any
component. The wire may break or unravel. If the guidewire
becomes damaged, the introducer needle or Vascu-Sheath®
introducer and guidewire must be removed together.
•Federal Law (USA) restricts this device to sale by or on the order of
a physician.
•This catheter is for Single Use Only.
•Re-use may lead to infection or illness/injury.
•Do not resterilize the catheter or accessories by any method.
•The manufacturer shall not be liable for any damages caused by re-
use or resterilization of this catheter or accessories.
•Contents sterile and non-pyrogenic in unopened, undamaged
package. STERILIZED BY ETHYLENE OXIDE
•Do not use catheter or accessories if package is opened or damaged.
•Do not use catheter or accessories if any sign of product damage is
visible.
DESCRIPTION:
•The versatility of the Split-Stream®allows the lumens to be split to
form two free oating lumens to help eliminate catheter occlusion by
the vessel.
•The Split-Stream®is manufactured from soft radiopaque
polyurethane material which provides increased patient comfort
while providing excellent biocompatibility.
-1-
2
STERILE EO

POTENTIAL COMPLICATIONS:
• Air Embolus
• Bactermia
• Brachial Plexus Injury
• Cardiac Arrhythmia
• Cardiac Tamponade
• Central Venous Thrombosis
• Endocarditis
• Exit Site Infection
• Exsanguination
• Femoral Artery Bleed
• Femoral Nerve Damage
• Hematoma
• Hemorrhage
• Hydrothorax
• Inferior Vena Cava Puncture
• Laceration of the Vessel
• Lumen Thrombosis
• Mediastinal Injury
• Perforation of the Vessel
• Pleural Injury
• Pneumothorax
• Retroperitoneal Bleed
• Right Atrial Puncture
• Septicemia
• Subclavian Artery Puncture
• Subcutaneous Hematoma
• Superior Vena Cava Puncture
• Thoracic Duct Laceration
• Tunnel Infection
• Vascular Thrombosis
• Venous Stenosis
•Before attempting the insertion, ensure that you are familiar with
the potential complications and their emergency treatment should
any of them occur.
CAUTIONS:
•Use only Medcomp®Split-Stream®extension sets with this
catheter.
•Catheter will be damaged if clamps other than what is provided with
this kit are used.
•Clamping of the tubing repeatedly in the same location may weaken
tubing. Avoid clamping near the luer and adapter of the
Split-Stream®extension set.
•Examine catheter lumen and extension set before and after each
treatment for damage.
•To prevent accidents, assure the security of all caps and bloodline
connections prior to and between treatments.
•Use only Luer Lock (threaded) Connectors with this catheter.
•Repeated over tightening of bloodlines, syringes, and caps will
reduce connector life and could lead to potential connector failure.
•When cutting catheter to desired length, assure the lumen is cut
square and that the remaining catheter lumen is not damaged.
INSERTION SITES:
Warning: Physician discretion is strongly advised when inserting this
catheter in patients who are unable to take or hold a deep breath.
•The patient should be in a modied Trendelenburg position, with
the upper chest exposed and the head turned slightly to the side
opposite the insertion area. A small rolled towel may be inserted
between the shoulder blades to facilitate the extension of the chest
area.
-2-

Internal Jugular Vein
•Have patient lift his/her head from the bed to dene the
sternomastoid muscle. Catheterization will be performed at the apex
of a triangle formed between the two heads of the sternomastoid
muscle. The apex should be approximately three nger breadths
above the clavicle. The carotid artery should be palpated medial to
the point of catheter insertion.
Subclavian Vein
•Note the position of the subclavian vein, which is posterior to the
clavicle, superior to the rst rib, and anterior to the subclavian
artery. (At a point just lateral to the angle made by the clavicle and
the rst rib.)
Warning: Patients requiring ventilator support are at increased risk of
pneumothorax during subclavian vein cannulation, which may cause
complications.
Warning: Extended use of the subclavian vein may be associated with
subclavian vein stenosis.
Tip Placement
-3-

Femoral Vein
•The patient should lie completely on his/her back. Both femoral
arteries should be palpated for site selection and consequence
assessment. The knee on the same side of the insertion site should
be exed and the thigh abducted. Place the foot across the opposite
leg. The femoral vein is then posterior/medial to the artery.
Caution: The incidence of infection may be increased with femoral vein
insertion.
•Conrm nal position of catheter with chest x-ray. Routine x-ray
should always follow the initial insertion of this catheter to conrm
proper tip placement prior to use.
•Femoral catheter tip placement is recommended at the junction of
the iliac vein and the inferior vena cava.1
DIRECTIONS FOR SELDINGER INSERTION
•Read instructions carefully before using this device. The catheter
should be inserted, manipulated, and removed by a qualied,
licensed physician or other qualied health care professional under
the direction of a physician.
•The medical techniques and procedures described in these
instructions for use do not represent all medically acceptable
protocols, nor are they intended as a substitute for the physician’s
experience and judgment in treating any specic patient.
•Use standard hospital protocols when applicable.
1. Strict aseptic technique must be used during insertion,
maintenance, and catheter removal procedures. Provide a sterile
operative eld. The Operating Room is the preferred location for
catheter placement. Use sterile drapes, instruments, and
accessories. Shave the skin above and below the insertion site.
Perform surgical scrub. Wear gown, cap, gloves, and mask. Have
patient wear mask.
2. The selection of the appropriate catheter length is at the sole
discretion of the physician. To achieve proper tip placement, proper
catheter length selection is important. Routine x-ray should always
follow the initial insertion of this catheter to conrm proper
placement prior to use.
INSTALLATION OF Split-Stream®EXTENSION SET:
Caution: Use only Medcomp®Split-Stream®extension sets with this
catheter.
Caution: Do not attempt to split priming volume end of lumens.
3. Using aseptic technique, remove tunneling adaptor by cutting
catheter lumen squarely at the designated priming volume lines,
and in such a manner that produces a clean, smooth surface. Cut
at priming line furthest from cuff. Cut only at designated priming
volume lines.
4. Attach white secondary clamps.
Warning: Do NOT soak catheter end or adapter in any antiseptic (i.e.
alcohol, PVP, etc.) before or during adapter installation.
-4-

Caution: Arterial extension is to be attached to lumen with red printing
and the venous extension is to be attached to the lumen with blue
printing.
5. Take apart female adapter by twisting parts (A) and (C) apart. The
compression ring (B) should be found in part (A).
Warning: Do NOT attempt to separate the extension from the adapter.
These parts are bonded together.
6. Slide adapter part (A) over catheter lumen (D). Slide compression
ring (B) over catheter lumen (D). Insert metal cannula of the adapter
part (C) into catheter lumen with a twisting motion, making sure the
tubing is FULLY seated (until no metal is visible).
7. Slide compression ring (B) toward end of catheter lumen/adapter
assembly (C) until seated as shown.
Caution: Compression ring MUST be fully seated.
8. Slide adapter part (A) toward end of catheter lumen/adapter
assembly (C) and twist adapter together rmly. A gentle tug will
assure proper assembly.
Caution: Assembly threads MUST be fully engaged.
TUNNELIZATION & CUFF PLACEMENT:
9. Position catheter over anticipated tunnel path.
10. Note the desired location at which the cuff will be positioned.
11. Administer sufcient local anesthetic to completely anesthetize the
exit and insertion sites and length of tunnel path.
12. Make a small incision at the exit site on the chest wall
approximately 8-10cm below the clavicle. Make a second
incision above and parallel to the rst, at the insertion site. Make
the incision at the exit site wide enough to accommodate the cuff,
approximately 1cm.
13. Use blunt dissection to create the subcutaneous tunnel opening.
Attach the tunneler with tunneling sleeve to the distal tip of the
catheter. Do not attempt to push lumen over barb on tunneler.
Slide the catheter tunneling sleeve over the catheter making certain
that the sleeve covers the arterial holes of the catheter. Insert the
tunneler into the exit site and create a short subcutaneous tunnel.
Tunnel in the direction of the catheter insertion site incision. Do
not tunnel through muscle. The tunnel should be made with care in
order to prevent damage to surrounding vessels.
13a. For Femoral Vein Insertion: Create subcutaneous tunnel with the
catheter exit site in the pelvic region.
Warning: Do NOT over-expand subcutaneous tissue during tunneling.
Over-expansion may delay/prevent cuff in-growth.
14. Lead catheter into the tunnel gently. Do not pull or tug the catheter
tubing. If resistance is encountered, further blunt dissection may
facilitate insertion. Remove the catheter from the tunneler with a
slight twisting motion to avoid damage to the catheter.
Warning: Do NOT pull tunneler out at an angle. Keep tunneler straight
to prevent damage to catheter tip.
15. Split the arterial and venous lumens by grasping the distal ends
and gently pull apart the lumens to the point printed “DO NOT
SPLIT BEYOND THIS POINT”.
CBA
A
D
CB
CB
CA
-5-

Warning: Splitting the lumens beyond this point may result in
excess tunnel bleeding, infection, or damage to the catheter
lumens.
Note: A tunnel with a wide gentle arc lessens the risk of kinking. The
tunnel should be short enough to keep the extension set of the catheter
from entering the exit site, yet long enough to keep the cuff 2cm
(minimum) from the skin opening.
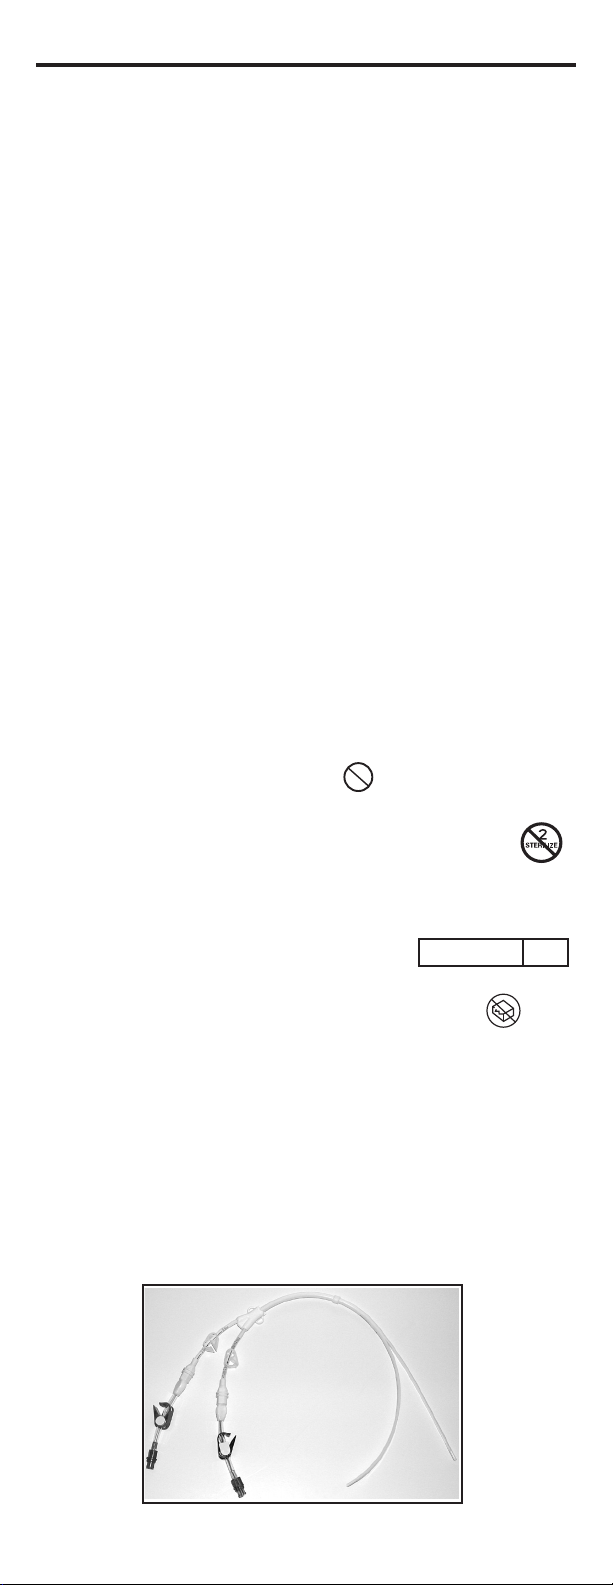
16. Irrigate catheter with saline, then clamp catheter extensions and
white secondary clamps to assure that saline is not inadvertently
drained from lumens. Use clamps provided.
INSERTION:
17. Insert the introducer needle with attached syringe, or into the
target vein. Aspirate to insure proper placement.
18. Remove the syringe, and place thumb over the end of the needle to
prevent blood loss or air embolism. Draw exible end of guidewire
back into advancer so that only the end of the guidewire is visible.
Insert advancer’s distal end into the needle hub. Advance guidewire
with forward motion into and past the needle hub into the target
vein.
Caution: The length of the wire inserted is determined by the size of the
patient. Monitor patient for arrhythmia throughout this procedure. The
patient should be placed on a cardiac monitor during this procedure.
Cardiac arrhythmias may result if guidewire is allowed to pass into the
right atrium. The guidewire should be held securely during this
procedure.
19. Remove needle, leaving guidewire in the target vein. Enlarge
cutaneous puncture site with scalpel.
20. Thread dilator(s) over guidewire into the vessel (a slight twisting
motion may be used). Remove dilator(s) when vessel is sufciently
dilated, leaving guidewire in place.
Caution: Insufcient tissue dilation can cause compression of the
catheter lumen against the guidewire causing difculty in the insertion
and removal of the guidewire from the catheter. This can lead to
bending of the guidewire.
21. Thread Vascu-Sheath®Introducer over the proximal end of the
guidewire. Once the Vascu-Sheath®Introducer is in the target vein,
remove the guidewire leaving the sheath and dilator in position.
Warning: Do NOT bend the sheath/dilator during insertion as bending
will cause the sheath to prematurely tear. Hold sheath/dilator close to
the tip (approximately 3cm from tip) when initially inserting through the
skin surface. To progress the sheath/dilator towards the vein, regrasp
the sheath/dilator a few centimeters (approximately 5cm) above the
original grasp location and push down on the sheath/dilator. Repeat
procedure until sheath/dilator is fully inserted.
Warning: Never leave sheath in place as an indwelling catheter. Damage
to the vein will occur.
22. Install end cap over dilator opening to prevent blood loss or air
embolism.
23. Remove dilator and end cap from sheath.
24. Insert distal tips of catheter into and through the sheath until
catheter tips are correctly positioned in the target vein.
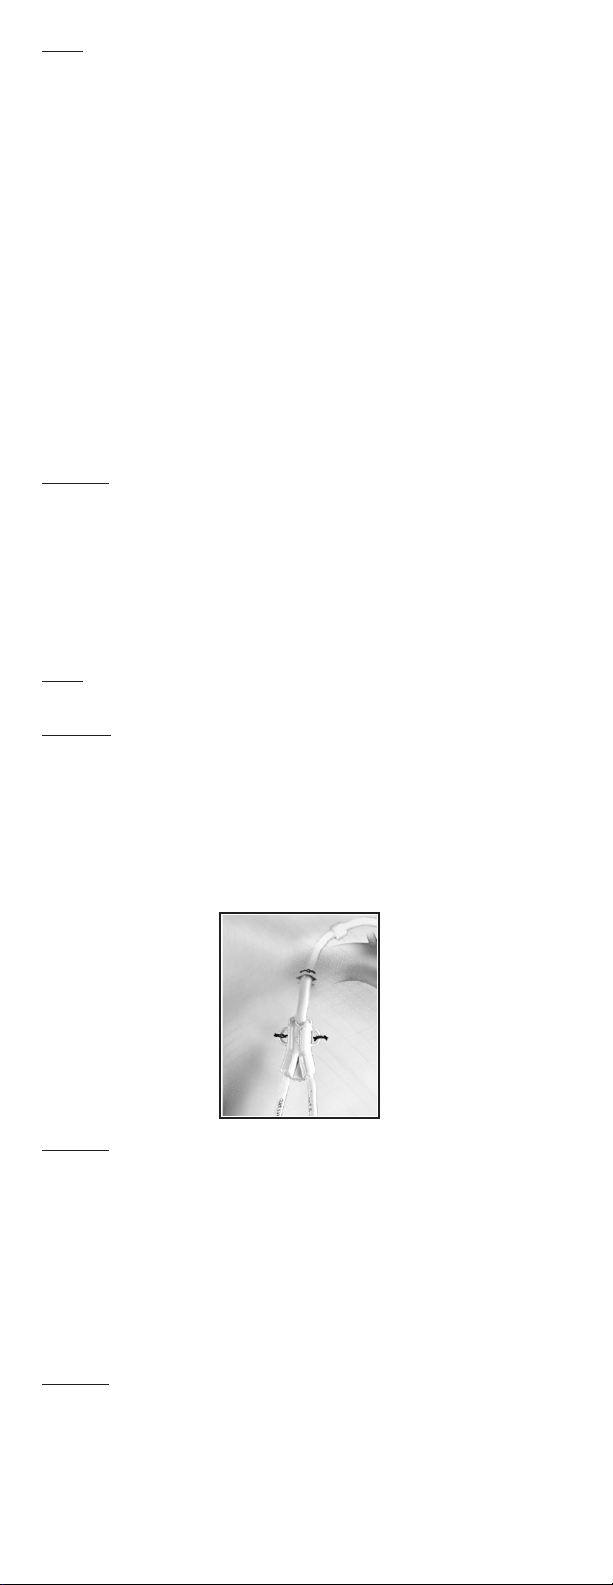
25. Remove the tear-away sheath by slowly pulling it out of the vessel
while simultaneously splitting the sheath by grasping the tabs and
pulling them apart (a slight twisting motion may be helpful).
Warning: Do NOT pull apart the portion of the sheath that remains in
the vessel. To avoid vessel damage, pull back the sheath as far as
possible and tear the sheath only a few centimeters at a time.
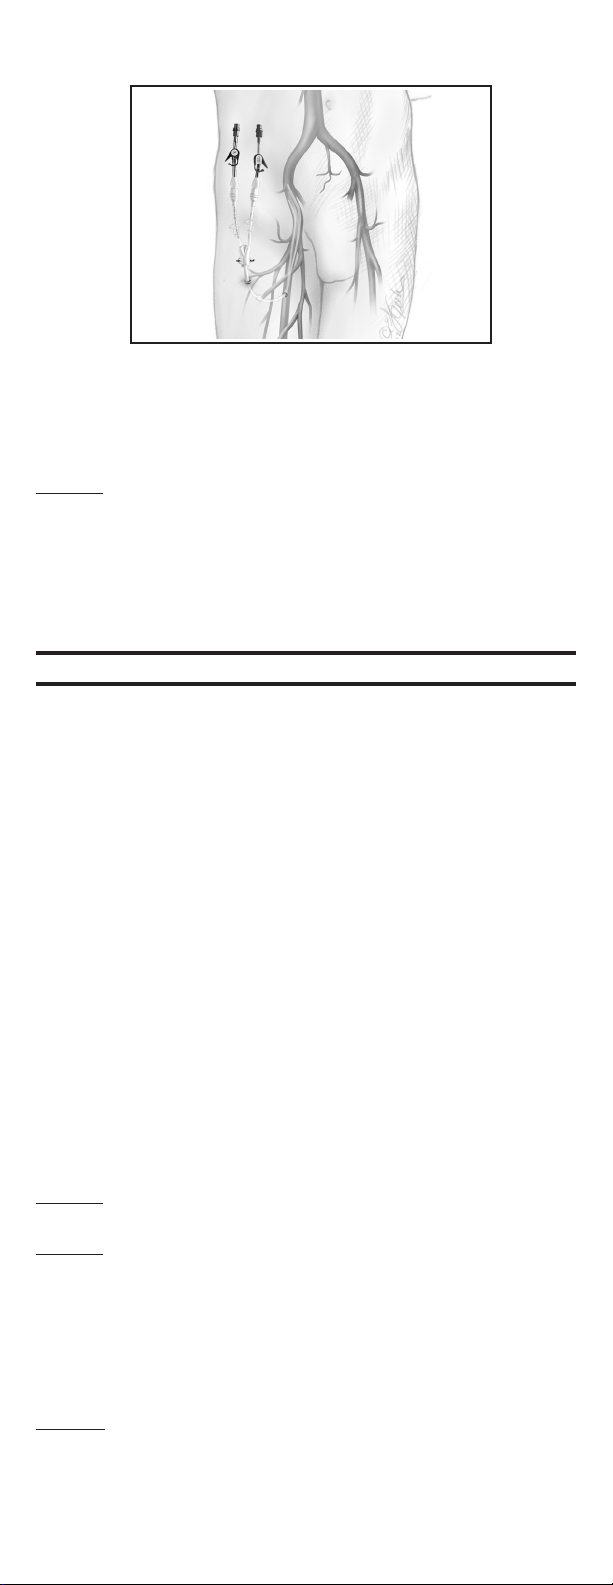
26. Make any adjustments to catheter under uoroscopy. The distal
venous tip should be positioned at the level of the caval atrial
junction or into the right atrium to ensure optimal blood ow.
-6-

Note: Femoral catheter tip placement is recommended at the junction
of the iliac vein and the inferior vena cava.1
27. Attach syringes to both extensions and open clamps. Blood should
aspirate easily from both arterial and venous sides. If either side
exhibits excessive resistance to blood aspiration, the catheter may
need to be rotated or repositioned to obtain adequate blood ows.
28. Once adequate aspiration has been achieved, both lumens should
be irrigated with saline lled syringes using quick bolus technique.
Assure that extension clamps and white secondary clamps are
open during irrigation procedure.
29. Close the extension clamps and white secondary clamps, remove
the syringes, and place an end cap on each luer lock
connector. Avoid air embolism by keeping extension tubing
clamped at all times, when not in use, and by aspirating then
irrigating the catheter with saline prior to each use. With each
change in tubing connections, purge air from the catheter and all
connecting tubing and caps.
30. To maintain patency, a heparin lock must be created in both
lumens. Refer to hospital heparinization guidelines.
Caution: Assure that all air has been aspirated from the catheter and
extensions. Failure to do so may result in air embolism.
31. Once the catheter is locked with heparin, close the clamps and
install end caps onto the extension sets’ female luers.
32. Conrm proper tip placement with uoroscopy. The distal venous
tip should be positioned at the level of the caval atrial junction or
into the right atrium to ensure optimal blood ow (as
recommended in current NKF DOQI Guidelines).
Note: Femoral catheter tip placement is recommended at the junction
of the iliac vein and the inferior vena cava.1
Warning: Failure to verify catheter placement may result in serious
trauma or fatal complications.
CATHETER SECUREMENT AND WOUND DRESSING:
33. Suture insertion site closed. Suture the catheter to the skin using
the detachable suture wing hub. Second detachable suture wing
may be applied on lumen between exit site and detachable hub at
physician’s discretion. Do not suture the catheter tubing. Suture
wing hub(s) should be ush against patient’s skin.
Caution: Detachable hub(s) should be removed and discarded once
catheter is secured by cuff and sutures are removed. Remove by
depressing tabs at base of hub.
34. To prevent catheter migration, use StatLock®for catheter
securement. Clean the area where the Split-Stream®extension
set will lie on the patient with alcohol. Push the collar section of
the Split-Stream®extension set into the receiving grooves of the
StatLock®pad. Remove the backing of one side of the StatLock®
pad and position on patient. Once positioned, remove the
remaining protective backing. Apply slight pressure on the pad to
assure adherence.
Caution: Care must be taken when using sharp objects or needles in
close proximity to catheter lumen. Contact from sharp objects may
cause catheter failure.
35. Cover the insertion and exit site with an occlusive dressings.
36. Catheter must be secured/sutured for entire duration of
implantation.
-7-

37. Record catheter length and catheter lot number on patient’s chart.
HEMODIALYSIS TREATMENT
•The heparin solution must be removed from each lumen prior to
treatment to prevent systemic heparinization of the patient.
Aspiration should be based on dialysis unit protocol.
•Before dialysis begins all connections to catheter and
extracorporeal circuits should be examined carefully.
•Frequent visual inspection should be conducted to detect leaks to
prevent blood loss or air embolism.
•If a leak is found, the catheter should be clamped immediately.
Caution: Only clamp catheter with in-line clamps provided.
•Necessary remedial action must be taken prior to the continuation
of the dialysis treatment.
Caution: Excessive blood loss may lead to patient shock.
•Hemodialysis should be performed under physician’s instructions.
HEPARINIZATION
•If the catheter is not to be used immediately for treatment, follow
the suggested catheter patency guidelines.
•To maintain patency between treatments, a heparin lock must be
created in each lumen of the catheter.
•Follow hospital protocol for heparin concentration.
1. Draw heparin into two syringes, corresponding to the amount
indicated on catheter lumen. Assure that the syringes are free of
air.
Note: Priming volume values printed on lumen include extension set.
2. Remove end caps from the extensions.
3. Attach a syringe containing heparin solution to the female luer of
each extension.
4. Open extension clamps and white secondary clamps.
5. Aspirate to insure that no air will be forced into the patient.
6. Inject heparin into each lumen using quick bolus technique.
Note: Each lumen should be completely lled with heparin to ensure
effectiveness.
7. Close extension clamps and white secondary clamps.
Caution: Clamps should only be open for aspiration, ushing, and
dialysis treatment.
8. Remove syringes.
9. Attach a sterile end cap onto the female luers of the extensions.
•In most instances, no further heparin is necessary for 48-72 hours,
provided the lumens have not been aspirated or ushed.
SITE CARE
•Clean skin around catheter. Chlorhexidine gluconate solutions are
recommended. Cover the exit site with occlusive dressing and leave
extensions, clamps, and caps exposed for access by staff.
•Wound dressings must be kept clean and dry.
Caution: Patients must not swim, shower, or soak dressing while
bathing.
•If profuse perspiration or accidental wetting compromises adhesion
of dressing, the medical or nursing staff must change the dressing
under sterile conditions.
-8-

CATHETER PERFORMANCE
Caution: Always review hospital or unit protocol, potential complications
and their treatment, warnings, and precautions prior to undertaking
any type of mechanical or chemical intervention in response to catheter
performance problems.
Warning: Only a physician familiar with the appropriate techniques
should attempt the following procedures.
INSUFFICIENT FLOWS:
The following may cause insufcient blood ows:
•Occluded arterial holes due to clotting or brin sheath.
•Occlusion of the arterial side holes due to contact with vein wall.
Solutions include:
•Chemical intervention utilizing a thrombolytic agent.
MANAGEMENT OF ONE-WAY OBSTRUCTIONS:
One-way obstructions exist when a lumen can be ushed easily but
blood cannot be aspirated. This is usually caused by tip malposition.
One of the following adjustments may resolve the obstruction:
•Reposition catheter.
•Reposition patient.
•Have patient cough.
•Provided there is no resistance, ush the catheter vigorously with
sterile normal saline to try to move the tip away from the vessel wall.
INFECTION:
Caution: Due to the risk of exposure to HIV (Human Immunodeciency
Virus) or other blood borne pathogens, health care professionals should
always use Universal Blood and Body Fluid Precautions in the care of all
patients.
•Sterile technique should always be strictly adhered to.
•Clinically recognized infection at a catheter exit site should be
treated promptly with the appropriate antibiotic therapy.
•If a fever occurs in a patient with a catheter in place, take a
minimum of two blood cultures from a site distant from catheter
exit site. If blood culture is positive, the catheter must be removed
immediately and the appropriate antibiotic therapy initiated. Wait
48 hours before catheter replacement. Insertion should be made on
opposite side of original catheter exit site, if possible.
CATHETER REMOVAL
Warning: Only a physician familiar with the appropriate techniques
should attempt the following procedures.
Caution: Always review hospital or unit protocol, potential
complications and their treatment, warnings, and precautions prior to
catheter removal.
1. Palpate the catheter exit tunnel to locate the cuff.
2. Administer sufcient local anesthetic to exit site and cuff location to
completely anesthetize the area.
3. Cut sutures from suture wing. Follow hospital protocol for removal
of skin sutures.
4. Make a 2 cm incision over the cuff, parallel to the catheter.
-9-

5. Dissect down to the cuff using blunt and sharp dissection as
indicated.
6. When visible, grasp cuff with clamp.
7. Clamp catheter between the cuff and the insertion site.
8. Cut catheter between cuff and exit site. Withdraw internal portion of
catheter through the incision in the tunnel.
9. Remove remaining section of catheter (i.e. portion in tunnel) through
the exit site.
Warning: Do NOT pull distal end of catheter through incision as
contamination of wound may occur.
10. Apply pressure to proximal tunnel for approximately 10-15 minutes
or until bleeding stops.
11. Suture incision and apply dressing in a manner to promote optimal
healing.
12. Check catheter for integrity when removed
Flow Rate (ml/min)
14F x 28cm 200 300 350 400
Pressure
(mmHg)
Venous 31 62 83 104
Arterial -38 -39 -75 -110
Flow Rate (ml/min)
16F x 28cm 200 300 350 400
Pressure
(mmHg)
Venous 28 50 64 77
Arterial -27 -44 -57 -70.7
FLOW RATE TESTING REPRESENTS OPTIMUM
LABORATORY CONDITIONS.
WARRANTY
Medcomp®WARRANTS THAT THIS PRODUCT WAS MANUFACTURED
ACCORDING TO APPLICABLE STANDARDS AND SPECIFICATIONS.
PATIENT CONDITION, CLINICAL TREATMENT, AND PRODUCT
MAINTENANCE MAY EFFECT THE PERFORMANCE OF THIS PRODUCT. USE
OF THIS PRODUCT SHOULD BE IN ACCORDANCE WITH THE
INSTRUCTIONS PROVIDED AND AS DIRECTED BY THE PRESCRIBING
PHYSICIAN.
Because of continuing product improvement, prices, specications, and model
availability are subject to change without notice. Medcomp®reserves the right
to modify its products or contents without notice.
Medcomp®and Vascu-Sheath®are registered trademarks of Medical
Components, Inc.
Split-Stream® is a registered trademark of Medical Components, Inc.
StatLock® is a registered trademark of C.R. Bard, Inc. or an afliate
References:
1. Zaleski GX, Funaki B, Lorenz JM, Garofalo RS, Moscatel MA,
Rosenblum JD, Leef JA. Experience with tunneled femoral
hemodialysis catheters. Am J Roentgenol. 1999 Feb;172(2):493-6.
-10-

INSTRUCTIONS FOR USE
RETROGRADE INSERTION
INDICATIONS FOR USE:
•The Medcomp®Split-Stream®is indicated for use in attaining
Long-Term vascular access for Hemodialysis and Apheresis.
•It may be inserted percutaneously and is primarily placed in the
internal jugular vein.
•Alternate insertion sites include the subclavian vein.
• Catheters greater than 40cm are intended for femoral vein insertion.
CONTRAINDICATIONS:
•This catheter is intended for Long-Term vascular access only and
should NOT be used for any purpose other than indicated in these
instructions.
•To maintain peak performance of the Split-Stream®extension set, it
is recommended that the extension set be replaced every 6 months.
WARNINGS:
•In the rare event that a hub or connector separates from any
component during insertion or use, take all necessary steps and
precautions to prevent blood loss or air embolism and remove
catheter.
•Do not advance the guidewire or catheter if unusual resistance is
encountered.
•Do not insert or withdraw the guidewire forcibly from any
component. The wire may break or unravel. If the guidewire
becomes damaged, the introducer needle or Vascu-Sheath®
introducer and guidewire must be removed together.
•Federal Law (USA) restricts this device to sale by or on the order of
a physician.
•This catheter is for Single Use Only.
•Re-use may lead to infection or illness/injury.
•Do not resterilize the catheter or accessories by any method.
•The manufacturer shall not be liable for any damages caused by re-
use or resterilization of this catheter or accessories.
•Contents sterile and non-pyrogenic in unopened, undamaged
package. STERILIZED BY ETHYLENE OXIDE
•Do not use catheter or accessories if package is opened or damaged.
•Do not use catheter or accessories if any sign of product damage is
visible.
DESCRIPTION:
• The versatility of the Split-Stream®allows the lumens to be split to
form two free oating lumens to help eliminate catheter occlusion by
the vessel.
• The Split-Stream®is manufactured from soft radiopaque
polyurethane material which provides increased patient comfort
while providing excellent biocompatibility.
-11-
2
STERILE EO

POTENTIAL COMPLICATIONS:
• Air Embolus
• Bactermia
• Brachial Plexus Injury
• Cardiac Arrhythmia
• Cardiac Tamponade
• Central Venous Thrombosis
• Endocarditis
• Exit Site Infection
• Exsanguination
• Femoral Artery Bleed
• Femoral Nerve Damage
• Hematoma
• Hemorrhage
• Hydrothorax
• Inferior Vena Cava Puncture
• Laceration of the Vessel
• Lumen Thrombosis
• Mediastinal Injury
• Perforation of the Vessel
• Pleural Injury
• Pneumothorax
• Retroperitoneal Bleed
• Right Atrial Puncture
• Septicemia
• Subclavian Artery Puncture
• Subcutaneous Hematoma
• Superior Vena Cava Puncture
• Thoracic Duct Laceration
• Tunnel Infection
• Vascular Thrombosis
• Venous Stenosis
• Before attempting the insertion, ensure that you are familiar with
the potential complications and their emergency treatment should
any of them occur.
CAUTIONS:
• Use only Medcomp®Split-Stream®extension sets with this
catheter.
• Catheter will be damaged if clamps other than what is provided with
this kit are used.
• Clamping of the tubing repeatedly in the same location may weaken
tubing. Avoid clamping near the luer and adapter of the
Split-Stream®extension set.
• Examine catheter lumen and extension set before and after each
treatment for damage.
• To prevent accidents, assure the security of all caps and bloodline
connections prior to and between treatments.
• Use only Luer Lock (threaded) Connectors with this catheter.
• Repeated over tightening of bloodlines, syringes, and caps will
reduce connector life and could lead to potential connector failure.
• When cutting catheter to desired length, assure the lumen is cut
square and that the remaining catheter lumen is not damaged.
INSERTION SITES:
Warning: Physician discretion is strongly advised when inserting this
catheter in patients who are unable to take or hold a deep breath.
• The patient should be in a modied Trendelenburg position, with
the upper chest exposed and the head turned slightly to the side
opposite the insertion area. A small rolled towel may be inserted
between the shoulder blades to facilitate the extension of the chest
area.
-12-

Internal Jugular Vein
• Have patient lift his/her head from the bed to dene the
sternomastoid muscle. Catheterization will be performed at the apex
of a triangle formed between the two heads of the sternomastoid
muscle. The apex should be approximately three nger breadths
above the clavicle. The carotid artery should be palpated medial to
the point of catheter insertion.
Subclavian Vein
• Note the position of the subclavian vein, which is posterior to the
clavicle, superior to the rst rib, and anterior to the subclavian
artery. (At a point just lateral to the angle made by the clavicle and
the rst rib.)
Warning: Patients requiring ventilator support are at increased risk of
pneumothorax during subclavian vein cannulation, which may cause
complications.
Warning: Extended use of the subclavian vein may be associated with
subclavian vein stenosis.
Tip Placement
-13-

DIRECTIONS FOR SELDINGER INSERTION
• Read instructions carefully before using this device. The catheter
should be inserted, manipulated, and removed by a qualied,
licensed physician or other qualied health care professional under
the direction of a physician.
• The medical techniques and procedures described in these
instructions for use do not represent all medically acceptable
protocols, nor are they intended as a substitute for the physician’s
experience and judgment in treating any specic patient.
• Use standard hospital protocols when applicable.
1. Strict aseptic technique must be used during insertion,
maintenance, and catheter removal procedures. Provide a sterile
operative eld. The Operating Room is the preferred location for
catheter placement. Use sterile drapes, instruments, and
accessories. Shave the skin above and below the insertion site.
Perform surgical scrub. Wear gown, cap, gloves, and mask. Have
patient wear mask.
2. The selection of the appropriate catheter length is at the sole
discretion of the physician. To achieve proper tip placement, proper
catheter length selection is important. Routine x-ray should
always follow the initial insertion of this catheter to conrm proper
placement prior to use.
3. Administer sufcient local anesthetic to completely anesthetize the
insertion site.
4. Split the arterial and venous lumens by grasping the distal ends
and gently pull apart the lumens to the point printed “DO NOT
SPLIT BEYOND THIS POINT”.
Warning: Splitting the lumens beyond this point may result in
excess tunnel bleeding, infection, or damage to the catheter
lumens.
Caution: Do not attempt to split priming volume end of lumens.
5. Attach syringe to tunneling adaptor and prime lumens. Ensure
saline exits both arterial and venous distal tips.
Femoral Vein
• The patient should lie completely on his/her back. Both femoral
arteries should be palpated for site selection and consequence
assessment. The knee on the same side of the insertion site should
be exed and the thigh abducted. Place the foot across the opposite
leg. The femoral vein is then posterior/medial to the artery.
Caution: The incidence of infection may be increased with femoral vein
insertion.
• Conrm nal position of catheter with chest x-ray. Routine x-ray
should always follow the initial insertion of this catheter to conrm
proper tip placement prior to use.
• Femoral catheter tip placement is recommended at the junction of
the iliac vein and the inferior vena cava.1
-14-

6. Attach temporary lumen clamp between extensions and reference
line (dots) as shown in picture.
7. Remove syringe.
INSERTION:
8. Insert the introducer needle with attached syringe, or into the
target vein. Aspriate to insure proper placement.
9. Remove the syringe, and place thumb over the end of the needle to
prevent blood loss or air embolism. Draw exible end of guidewire
back into advancer so that only the end of the guidewire is visible.
Insert advancer’s distal end into the needle hub. Advance guidewire
with forward motion into and past the needle hub into the target
vein.
Caution: The length of the wire inserted is determined by the size of
the patient. Monitor patient for signs of arrhythmia throughout this
procedure. The patient should be placed on a cardiac monitor during
this procedure. Cardiac arrhythmias may result if guidewire is allowed to
pass into the right atrium. The guidewire should be held securely during
this procedure.
10. Remove needle, leaving guidewire in the target vein. Enlarge
puncture site with scalpel.
11. Thread dilator(s) over guidewire into the vessel (a slight twisting
motion may be used). Remove dilator(s) when vessel is sufciently
dilated, leaving guidewire in place.
Caution: Insufcient tissue dilation can cause compression of the
catheter lumen against the guidewire causing difculty in the insertion
and removal of the guidewire from the catheter. This can lead to
bending of the guidewire.
12. Thread Vascu-Sheath®introducer over the proximal end of the
guidewire. Once the Vascu-Sheath®introducer is in target vein,
remove the guidewire leaving the sheath and dilator in position.
Warning: DO NOT bend the sheath/dilator during insertion as bending
will cause the sheath to prematurely tear. Hold sheath/dilator close to
the tip (approximately 3cm from tip) when initially inserting through the
skin surface. To progress the sheath/dilator towards the vein, regrasp
the sheath/dilator a few centimeters (approximately 5cm) above the
original grasp location and push down on the sheath/dilator. Repeat
procedure until sheath/dilator is fully inserted.
Warning: Never leave sheaths in place as indwelling catheters. Damage
to the vein will occur.
13. Install end cap over dilator openings to prevent blood loss or air
embolism.
14. Remove dilator and end cap from sheath.
15. Insert catheter tip into and through the sheath until tip is correctly
positioned in the target vein.
16. Remove the tear-away sheath by slowly pulling the sheath out of the
vessel while splitting the sheath by grasping the tabs and pulling
them apart.
Warning: Do NOT pull apart the portion of the sheath that remains in
the vessel. To avoid vessel damage, pull back the sheath as far as
possible and tear the sheath only a few centimeters at a time.
17. Make any adjustments to catheter position under uoroscopy. The
distal venous tip should be positioned at the level of the caval atrial
junction or into the right atrium to ensure optimal blood ow.
Note: Femoral catheter tip placement is recommended at the junction
of the iliac vein and the inferior vena cava.1
this area only.
Locate lumen in
-15-

TUNNELIZATION & CUFF PLACEMENT:
18. Position catheter over anticipated tunnel path.
19. Note the desired location at which the cuff will be positioned.
20. Administer sufcient anesthetic to the entire length of tunnel path
and exit site.
21. Perform retrograde tunnel two possible ways.
21a. Using straight blunt tunneler (remove tunneling sleeve).
Attach tunneler to tunneler adaptor at priming end of lumen.
Tunnel down chest wall.
21b. Using ring handled tunneler. Insert ring handled tunneler
through exit site up to the catheter through tunnel. Attach
catheter to the tunneler and pull lumen back through to the
exit site.
21a. 21b.
22. Remove and retain temporary lumen clamp for subsequent
instructions.
23. Make an incision at the tunnel exit site. Make the incision at the
exit site wide enough to accommodate the cuff, approximately 1cm.
24. Use blunt dissection to create the subcutaneous tunnel opening.
Insert the tunneler into the insertion site and create a short
subcutaneous tunnel. Tunnel in the direction of the tunnel exit site
incision. Do not tunnel through muscle. The tunnel should be made
with care in order to prevent damage to surrounding vessels.
24a. For Femoral Vein Insertion: Create subcutaneous tunnel with the
catheter exit site in the pelvic region.
Warning: Do NOT over-expand subcutaneous tissue during tunneling.
Over-expansion may delay/prevent cuff in-growth.
25. Lead catheter into the tunnel gently. Do not pull or tug the catheter
tubing. If resistance is encountered, further blunt dissection may
facilitate insertion.
Warning: Do NOT pull tunneler out at an angle. Keep tunneler straight
to prevent damage to catheter tip.
Note: A tunnel with a wide gentle arc lessens the risk of kinking. The
tunnel should be short enough to keep the extension set of the catheter
from entering the exit site, yet long enough to keep the cuff 2cm
(minimum) from the skin opening.
26. Reattach temporary lumen clamp in same location as previously
noted in #6.
INSTALLATION OF Split-Stream®EXTENSION SET:
27. Remove tunneling adaptor by cutting catheter lumen squarely at
the designated priming volume lines, and in such a manner that
produces a clean, smooth surface. Cut at priming volume line
furthest from cuff. Cut only at designated priming volume lines.
28. Attach white secondary clamps. Close clamps.
Caution: Use only Medcomp®Split-Stream®extension sets with this
catheter.
•Clamp using catheter clamp provided to prevent blood loss or air
embolism.
Warning: Do NOT soak catheter end or adapter in any antiseptic (i.e.
alcohol, PVP, etc.) before or during adapter installation.
-16-

Caution: Arterial extension is to be attached to lumen with red printing
and the venous extension is to be attached to the lumen with blue
printing.
29. Take apart female adapter by twising parts (A) and (C) apart. The
compression ring (B) should be found in part (A).
Warning: Do NOT attempt to separate the extension from the adapter.
These parts are bonded together.
30. Slide adapter part (A) over catheter lumen (D). Slide compression
ring (B) over catheter lumen (D). Insert metal cannula of the adapter
part (C) into catheter lumen with a twisting motion, making sure the
tubing is FULLY seated (until no metal is visible).
31. Slide compression ring (B) toward end of catheter lumen/adapter
assembly (C) until seated as shown.
Caution: Compression ring MUST be fully seated.
32. Slide adapter part (A) toward end of catheter lumen/adapter
assembly (C) and twist adapter together rmly. A gentle tug will
assure proper assembly.
Caution: Assembly threads MUST be fully engaged.
33. Attach syringes on both Split-Stream®extension sets, and open
clamps. Remove the temporary lumen clamp from the catheter.
Blood should aspirate easily from both catheters. If either catheter
exhibits excessive resistance to blood aspiration, the catheter may
need to be rotated or repositioned to sustain adequate blood ow.
34. Once adequate aspiration has been achieved, both lumens should
be irrigated with heparin lled syringes using quick bolus
technique. Assure that extension clamps and white secondary
clamps are open for irrigation procedure.
Caution: Assure that all air has been aspirated from catheter and the
Split-Stream®extension sets. Failure to do so may result in air
embolism.
35. Once the catheters are locked with heparin, close the extension
clamps and white secondary clamps, remove the syringes, and
install the end caps onto the SC4 extension sets female luers.
36. Conrm proper tip placement with uoroscopy. The distal venous
tip should be positioned at the level of the caval atrial junction or
into the right atrium to ensure optimal blood ow (as
recommended in current NKF DOQI Guidelines).
Note: Femoral catheter tip placement is recommended at the junction
of the iliac vein and the inferior vena cava.1
Warning: Failure to verify catheter placement may result in serious
trauma or fatal complications.
CATHETER SECUREMENT AND WOUND DRESSING:
37. Suture insertion site closed. Suture the catheter to the skin using
the detachable suture wing hub. Second detachable suture wing
may be applied on lumen between exit site and detachable hub at
physician’s discretion. Do not suture the catheter tubing. Suture
wing hub(s) should be ush against patient’s skin.
CA
CB
A
D
CB
CBA
-17-

HEMODIALYSIS TREATMENT
• The heparin solution must be removed from each lumen prior to
treatment to prevent systemic heparinization of the patient.
Aspiration should be based on dialysis unit protocol.
• Before dialysis begins all connections to catheter and
extracorporeal circuits should be examined carefully.
• Frequent visual inspection should be conducted to detect leaks to
prevent blood loss or air embolism.
• If a leak is found, the catheter should be clamped immediately.
Caution: Only clamp catheter with in-line clamps provided.
• Necessary remedial action must be taken prior to the continuation
of the dialysis treatment.
Caution: Excessive blood loss may lead to patient shock.
• Hemodialysis should be performed under physician’s instructions.
HEPARINIZATION
• If the catheter is not to be used immediately for treatment, follow
the suggested catheter patency guidelines.
• To maintain patency between treatments, a heparin lock must be
created in each lumen of the catheter.
• Follow hospital protocol for heparin concentration.
1. Draw heparin into two syringes, corresponding to the amount
indicated on catheter lumen. Assure that the syringes are free of
air.
Note: Priming volume values printed on lumen include extension set.
2. Remove end caps from the extensions.
3. Attach a syringe containing heparin solution to the female luer of
each extension.
Caution: Detachable hub(s) should be removed and discarded once
catheter is secured by cuff and sutures are removed. Remove by
depressing tabs at base of hub.
38. To prevent catheter migration, use StatLock®for catheter
securement. Clean the area where the Split-Stream®extension
set will lie on the patient with alcohol. Push the collar section of
the Split-Stream®extension set into the receiving grooves of the
StatLock®pad. Remove the backing of one side of the StatLock®pad
and position on patient. Once positioned, remove the remaining
protective backing. Apply slight pressure on the pad to assure
adherence.
Caution: Care must be taken when using sharp objects or needles in
close proximity to catheter lumen. Contact from sharp objects may
cause catheter failure.
39. Cover the insertion and exit site with an occlusive dressings.
40. Catheter must be secured/sutured for entire duration of
implantation.
41. Record catheter length and catheter lot number on patient’s chart.
-18-

CATHETER PERFORMANCE
Caution: Always review hospital or unit protocol, potential
complications and their treatment, warnings, and precautions prior to
undertaking any type of mechanical or chemical intervention in response
to catheter performance problems.
Warning: Only a physician familiar with the appropriate techniques
should attempt the following procedures.
INSUFFICIENT FLOWS:
The following may cause insufcient blood ows:
• Occluded arterial holes due to clotting or brin sheath.
• Occlusion of the arterial side holes due to contact with vein wall.
Solutions include:
• Chemical intervention utilizing a thrombolytic agent.
MANAGEMENT OF ONE-WAY OBSTRUCTIONS:
One-way obstructions exist when a lumen can be ushed easily but
blood cannot be aspirated. This is usually caused by tip malposition.
One of the following adjustments may resolve the obstruction:
• Reposition catheter.
• Reposition patient.
• Have patient cough.
• Provided there is no resistance, ush the catheter vigorously with
sterile normal saline to try to move the tip away from the vessel wall.
INFECTION:
Caution: Due to the risk of exposure to HIV (Human Immunodeciency
Virus) or other blood borne pathogens, health care professionals should
always use Universal Blood and Body Fluid Precautions in the care of all
patients.
4. Open extension clamps and white secondary clamps.
5. Aspirate to insure that no air will be forced into the patient.
6. Inject heparin into each lumen using quick bolus technique.
Note: Each lumen should be completely lled with heparin to ensure
effectiveness.
7. Close extension clamps and white secondary clamps.
Caution: Clamps should only be open for aspiration, ushing, and
dialysis treatment.
8. Remove syringes.
9. Attach a sterile end cap onto the female luers of the extensions.
• In most instances, no further heparin is necessary for 48-72 hours,
provided the lumens have not been aspirated or ushed.
SITE CARE
• Clean skin around catheter. Chlorhexidine gluconate solutions are
recommended. Cover the exit site with occlusive dressing and leave
extensions, clamps, and caps exposed for access by staff.
• Wound dressings must be kept clean and dry.
Caution: Patients must not swim, shower, or soak dressing while
bathing.
• If profuse perspiration or accidental wetting compromises adhesion
of dressing, the medical or nursing staff must change the dressing
under sterile conditions.
-19-
Other manuals for SPLIT-STREAM
1
Table of contents
Other MedComp Medical Equipment manuals