Medela Waterless Milk Warmer Instruction Manual

WATERLESS MILK WARMER
Policy NN.07.23 Neonatal Program Policy & Procedure Manual Effective Date: 29-Oct-2015
Page 1 of 5
Refer to online version –Print copy may not be current –Discard after us
GUIDELINE FOR USE OF WATERLESS MILK WARMERS
The use of the waterless milk warmer is a method to gently warm milk to keep living, bioactive, and essential
components of stored human milk intact so that it remains as similar to fresh milk as possible.
Using a controlled method of warming/thawing is the best practice for preserving nutrient content and
preventing adverse effects on human milk and milk additives
Applicability:occurs within the Neonatal Intensive Care Unit (NICU).
PROCEDURE
Initial Set-up
Notes
1. Obtain warmer and locate on IV pole or clean
area of counter at bedside
2. Get a new insert
3. Write date and time on the insert. Inserts to be
changed every 12 hours.
4. Install insert into warmer cavity and spread out
uniformly along warmer walls
5. When using a milk storage container, open lid of
warmer and centre container in the chamber.
6. When using a syringe close lid of warmer and
insert tip of syringe into the round grommet
portion located on the face of the insert until
flange of syringe is flat against the face of the
insert face
Note: syringes must have a cap on at all times
when using milk warmer
7. Turn warmer on

WATERLESS MILK WARMER
Policy NN.07.23 Neonatal Program Policy & Procedure Manual Effective Date: 29-Oct-2015
Page 2 of 5
Refer to online version –Print copy may not be current –Discard after us
Warming Procedure
Notes
1. Obtain milk from fridge and initiate warming
procedure as soon as possible
Fresh milk can be fed immediately to infant as it
is at body temperature
Prevention of additive degradation and to
secure nutrition viability ideal milk temperature
is 32-370
To ensure final temperature of milk after
warming remains between 32-370:
oTake milk from fridge and put
immediately into warmer
oMinimally handle milk after taking it out
of the fridge (e.g. do not leave on
counter or hold in hand)
o*NB –if left at room temperature or held
in hand this will quickly change the
starting temperature of the milk resulting
in warmer final temperature which may
be above 37 degrees.*
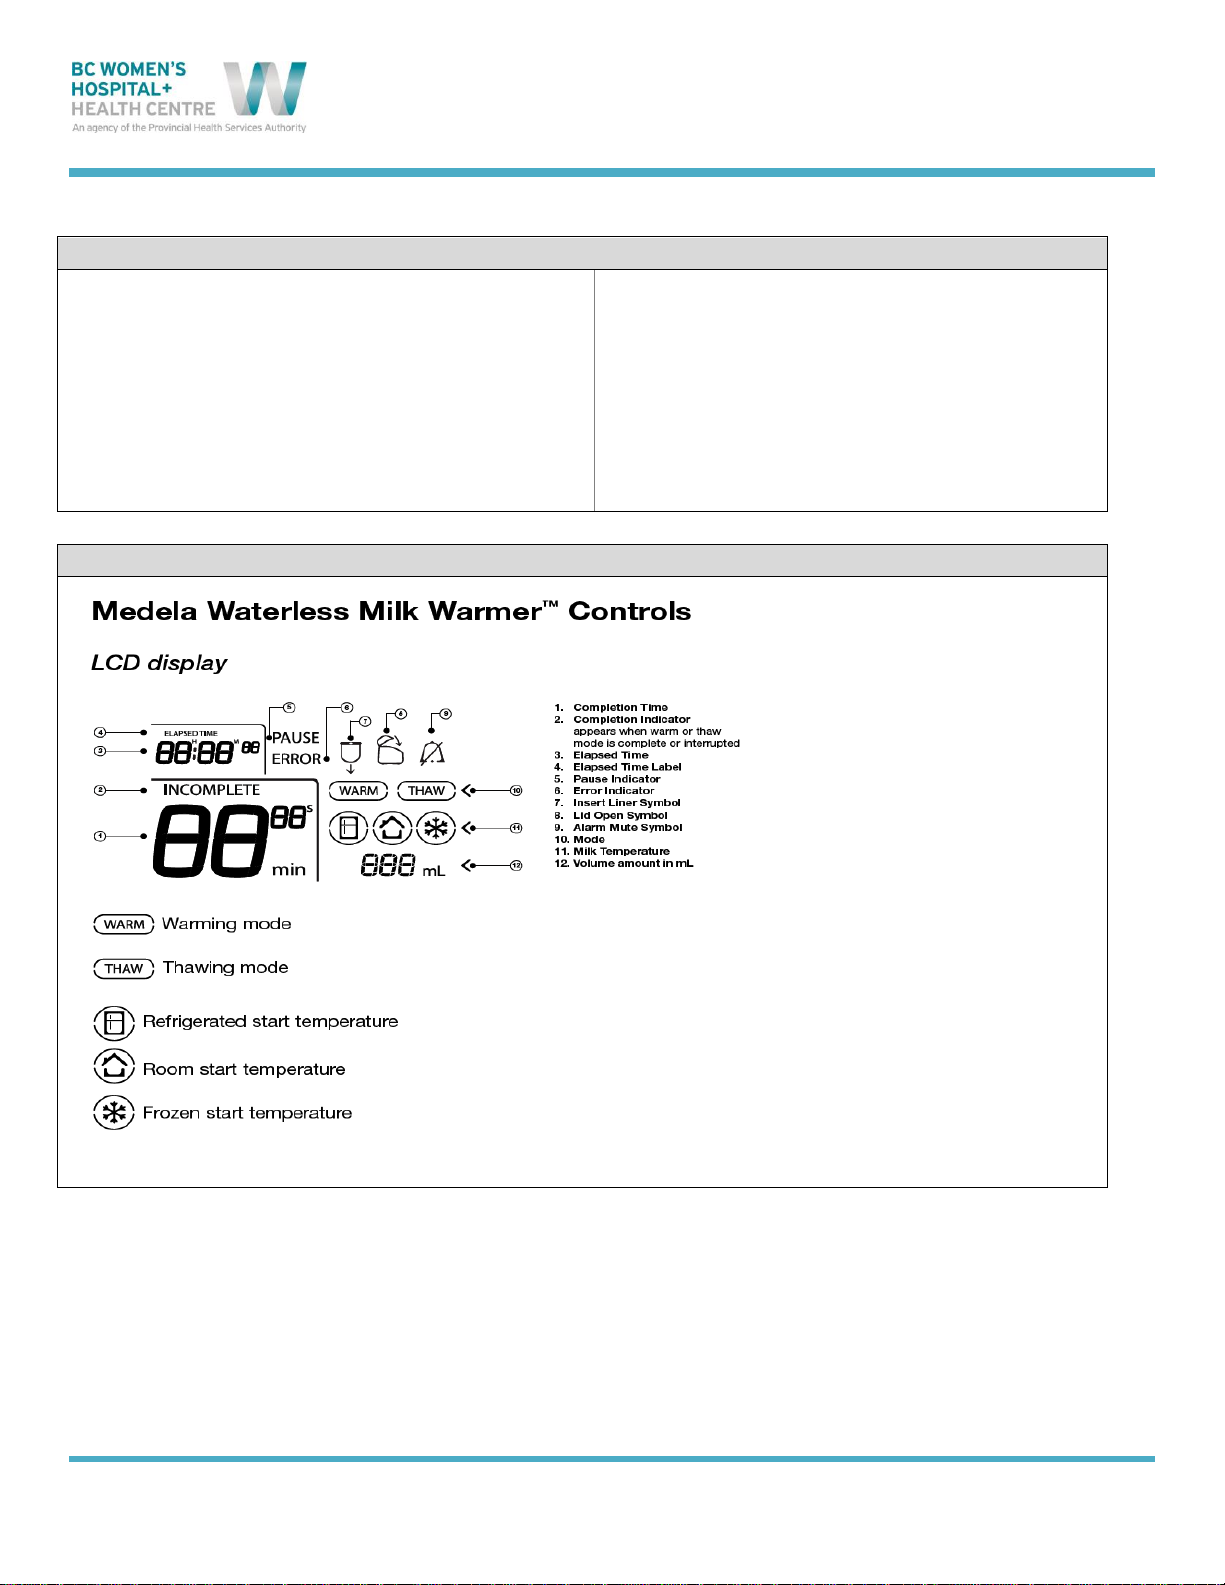
2. Press enter to confirm “warm” mode
The warmer is set to default to warm mode when
turned on and displayed in screen
3. Select the milk starting temperature:
Refrigerated, Room or Frozen and press
enter
If milk starting temperature is not chosen the
warmer defaults to refrigerate start temperature
4. Select volume of milk by using arrow keys and
press enter
5. Press start to confirm flashing information on
screen is correct for completion time
If information is incorrect press the stop button and
go back to step 2 to correctly program the warmer
6. Note cycle time and total elapsed time on the
display screen
7. When warming is complete the warmer will
make an audible noise and visual indicator will
flash green
Visual indictor will flash green continuously
Audible noise will chime every 5 minutes if not
muted
8. When warming cycle is completed the
automatic holding cycle starts for up to 30
minutes
30 minute holding cycle allows milk remain at
desired temperature prior to feeding
If lid or syringe is removed during the holding
cycle the unit will pause for 60 seconds and the
visual indicator will flash orange
Before 60 seconds syringe or lid can be placed
back but start button must be pressed
If 60 seconds is exceeded the unit will stop and
reset
9. At end of 30 minute holding cycle the warmer
will turn off automatically

WATERLESS MILK WARMER
Policy NN.07.23 Neonatal Program Policy & Procedure Manual Effective Date: 29-Oct-2015
Page 3 of 5
Refer to online version –Print copy may not be current –Discard after us
10. Gently mix milk, feel container/syringe to check
temperature before feeding
If milk contains any ice at beginning of cycle the
final temperature at the end of warming cycle
may fall below the designed range of the
device.
Ensure milk that is warmed to feed is at fridge
temperature to start.
Warmed product should be gently shaken to
avoid any hot spots before feeding infant
(direction of warm air blowing in device may
create temperature differences between top
and bottom of syringes)
Thawing Procedure
Notes
1. The warmer is set to default to warm mode
when turned on and displayed in screen
2. Press arrow keys to highlight the thaw mode
and press enter
Warmer will automatically chose the milk starting
temperature of frozen when thaw mode is chosen
3. Select volume of milk by using arrow keys and
press enter
4. Press start to confirm flashing information on
screen is correct for completion time
If information is incorrect press the stop button and
go back to step 2 to correctly program the warmer
5. Note cycle time and total elapsed time on the
display screen
If lid or syringe is removed during the
thawing cycle the unit will pause for 60
seconds and the visual indicator will flash
orange
Before 60 seconds syringe or lid can be
placed back but start button must be
pressed
If 60 seconds is exceeded the unit will stop
and reset.
6. When thawing cycle is complete the warmer will
make an audible noise, visual indicator will
flash green, and warming action will shut off.
If not muted the audible indictor will chime every 15
minutes.
7. Immediately remove thawed milk and prepare
for feeds or put in fridge
The Enfamil Human milk fortifier powder can be
mixed with:
ofreshly expressed breast milk
orefrigerated breast milk
opreviously frozen breast milk that has
been thawed.
8. If using thawed milk right away for a feed must
run the milk through the warming cycle to get
milk to correct temperature to feed infant.

WATERLESS MILK WARMER
Policy NN.07.23 Neonatal Program Policy & Procedure Manual Effective Date: 29-Oct-2015
Page 4 of 5
Refer to online version –Print copy may not be current –Discard after us
Cleaning Instructions
1. The warmer will be used one per bedside for the
duration of the infant’s need to have feeds
warmed.
2. The warmer can be cleaned with a Cavicide®
solution using wipes or a lint-free cloth between
patients. When cleaning, warmer should be
turned off and unplugged. Do not spray or pour
liquid directly onto the warmer.
Unit Display Controls

WATERLESS MILK WARMER
Policy NN.07.23 Neonatal Program Policy & Procedure Manual Effective Date: 29-Oct-2015
Page 5 of 5
Refer to online version –Print copy may not be current –Discard after us
Unit Front Panel Operation Controls
REFERENCES
1. Medela Waterless Milk Warmer: Instructions and assembly (2009). Medela, Inc. Retrieved from:
http://www.medelabreastfeedingus.com/products/516/waterless-milk-warmer
2. Calesca: Gentle, safe and waterless warming of human milk. Medela Retrieved from:
file:///C:/Documents%20and%20Settings/vhait/My%20Documents/Downloads/study_abstract_calesca_200
_5844_en_low%20(2).pdf
3. Mead Johnson Nutritionals. Health Professional Enfamil Product Handbook (2014). Retrieved from
http://medical.enfamil.ca/productHandbook-en/files/assets/common/downloads/publication.pdf
Other manuals for Waterless Milk Warmer
2
Table of contents
Other Medela Food Warmer manuals