Medeli MZ928 User manual

VOLUME
SONG PLAYER / DRUM KIT
KITS D SONG
SD CARD
CURSOR
EXT 2
EXT 1
KICK SNARE TOM 4TOM 3TOM 2TOM 1 HI-HAT HH CTRL CRASH 2CRASH 1 RIDE
PHONES CLICK AUX IN
OUTPUT
SAVE
ENTER
EXIT
MIXER
EFFECTMIXER
SONGCLICK
KITINST
EXT REVTOMSNAREKICK RIDECRASHHI-HAT
F1 F2 F3 F4
SD CAR DC OACH
SETUPT RIGGER
TRIG LOCK

2
THE FCC REGULATION WARNING (for USA)
This equipment has been tested and found to comply with
the limits for a Class B digital device, pursuant to Part 15 of
the FCC Rules.
These limits are designed to provide reasonable protection
against harmful interference in a residential installation.
This equipment generates, uses, and can radiate radio fre-
quency energy and, if not installed and used in accordance
with the instructions, may cause harmful interference to
radio communications. However, there is no guarantee that
interference will not occur in a particular installation.
If this equipment does cause harmful interference to radio
or television reception, which can be determined by turning
the equipment o and on, the user is encouraged to try
to correct the interference by one or more of the following
measures:
●Reorient or relocate the receiving antenna.
●Increase the separation between the equipment and
receiver.
●Connect the equipment into an outlet on a circuit dier-
ent from that to which the receiver is connected.
●Consult the dealer or an experienced radio/TV techni-
cian for help.
Unauthorized changes or modication to this system can
void the user’s authority to operate this equipment.
PRECAUTIONS
PLEASE READ CAREFULLY BEFORE PROCEEDING
Please keep this manual in a safe place for future refer-
ence.
Power Supply
Please connect the designated AC adaptor to an AC outlet
of the correct voltage.
Do not connect it to an AC outlet of voltage other than that
for which your instrument is intended.
Unplug the AC power adaptor when not using the instru-
ment, or during electrical storms.
Connections
Before connecting the instrument to other devices, turn o
the power to all units. This will help prevent malfunction
and / or damage to other devices.
Location
Do not expose the instrument to the following conditions to
avoid deformation, discoloration, or more serious damage:
●Direct sunlight
●Extreme temperature or humidity
●Excessive dusty or dirty location
●Strong vibrations or shocks
●Close to magnetic elds
Interference with other electrical devices
Radios and televisions placed nearby may experience
reception interference. Operate this unit at a suitable dis-
tance from radios and televisions.
Cleaning
Clean only with a soft, dry cloth.Do not use paint thinners,
solvents, cleaning uids, or chemical-impregnated wiping
cloths.
Handling
Do not apply excessive force to the switches or controls.
Do not let paper, metallic, or other objects into the instru-
ment. If this happens, remove the electric plug from the
outlet. Then have the instrument inspected by qualie
dservice personnel.
Disconnect all cables before moving the instrument.
INFORMATION FOR YOUR SAFETY!
CAUTION
The normal function of the product may be disturbed
by Strong Electro Magnetic Interference. If so, simply
reset the product to resume normal operation by fol-
lowing the owner’s manual. In case the function could
not resume, please use the product in other location.

3
Contents
Main Features ................................................................. 4
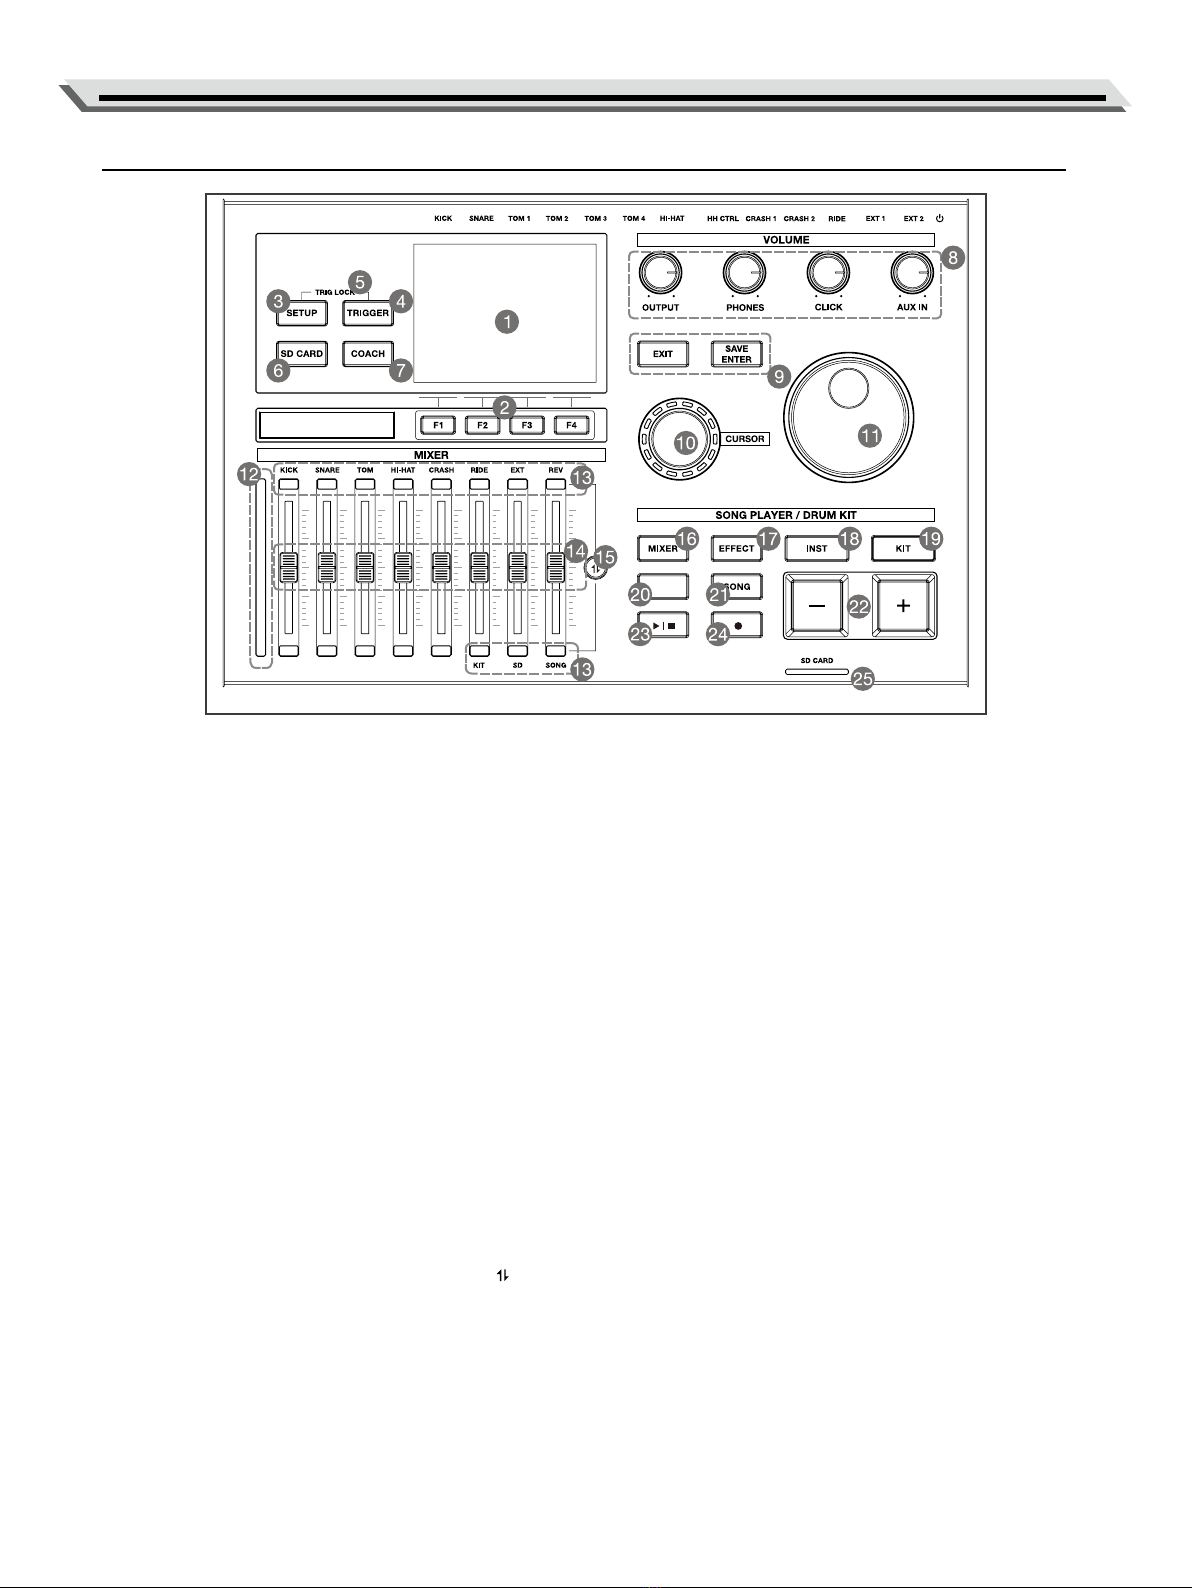
Panel & Display Description........................................ 5
Front Panel .......................................................................... 5
Rear Panel........................................................................... 6
Display................................................................................ 6
Setup ................................................................................. 7
Getting Ready to Play .................................................. 8
Setting Up Power Supply ...................................................... 8
Turning the Power On/O ...................................................... 8
Quick Play ........................................................................ 9
Drum Kits and instrument...................................................... 9
Selecting a Drum Kit ............................................................. 9
Selecting an Instrument ........................................................ 9
Playing Techniques............................................................... 9
Drum Kit ........................................................................ 11
Preset Drum Kit and User Kit ............................................... 11
Selecting a Drum Kit ........................................................... 11
Fast Selecting a Drum Kit.................................................... 11
Kit Volume and Kit Color ..................................................... 12
Kit Chain ........................................................................... 12
Instrument...................................................................... 13
Selecting an Instrument ...................................................... 13
Fast Selecting an Instrument ............................................... 13
Editing an Instrument.......................................................... 14
Pad MIDI Setting ................................................................ 15
Saving a Drum Kit............................................................... 16
Sub Instrument .................................................................. 16
Fast Selecting a Sub Instrument........................................... 17
Editing a Sub Instrument ..................................................... 18
Layer Type......................................................................... 19
Mixer................................................................................ 20
Adjusting the Volume of Each Pad........................................ 20
Adjusting the Pan of Each Pad............................................. 20
Adjusting the Min Volume of Each Pad.................................. 20
Eect ............................................................................... 21
Selecting an Eect ............................................................. 21
Pad Compressor ................................................................ 21
Pad EQ ............................................................................. 21
Kit Reverb ......................................................................... 22
Trigger Reverb ................................................................... 22
Kit IFX ............................................................................... 22
Kit EQ ............................................................................... 25
Kit Compressor .................................................................. 26
Click................................................................................. 26
Trigger Settings ............................................................ 28
Common Trigger Settings.................................................... 28
Special Trigger Settings ...................................................... 29
Hi-hat Trigger Settings ........................................................ 30
Trigger Check .................................................................... 31
Song................................................................................. 32
Fast Selecting a Song ......................................................... 32
Playing Songs from SD Card ............................................... 32
Playing Preset Songs.......................................................... 33
Playing User Songs ............................................................ 33
Recording....................................................................... 34
Start Recording.................................................................. 34
Stop Recording.................................................................. 34
SD Card Function......................................................... 35
Copy and Load One User Kit ............................................... 35
Copy and Load All User Kits ................................................ 35
Copy and Load Trigger Setting............................................. 36
Copy and Load Kit Chain .................................................... 36
User Samples .................................................................... 36
Setting the Song Folder ...................................................... 37
Formatting the SD Card ..................................................... 37
Setup ............................................................................... 38
Individual Output................................................................ 38
User Sound ....................................................................... 38
Kit Copy & Exchange .......................................................... 38
USB Audio......................................................................... 39
Factory Reset .................................................................... 39
Option............................................................................... 39
MIDI Settings ..................................................................... 41
Coach Mode .................................................................. 42
Quiet Count ....................................................................... 42
Beat Check........................................................................ 42
Change Up ........................................................................ 43
Specications ............................................................... 44
Appendices
Drum Kit List...................................................................... 45
Drum Instrument List .......................................................... 46
Song List........................................................................... 54
GM Drum Kit List................................................................ 55
GM Backing Sound List ...................................................... 57
MIDI Implementation Chart.................................................. 58
Prompt Messages .............................................................. 59

4
PURE DRUM Technology
No matter playing the pads with soft strikes or forceful passion grooves, this new
technology can achieve extremely wide range of velocity dynamics in the perfor-
mance, perfectly reproducing the subtle changes of an acoustic drum. Let’s enjoy
the real delicate nuances and unique characteristics of acoustic drum from the
PURE DRUM technology!
Supreme Sound Quality
The latest PURE DRUM 2.0 technology, equipped with top-quality sound samples, innovative algorithms
and powerful computing capability, can precisely capture the striking position, and perfectly simulate
various sound effects of an acoustic drum such as adjusting the pad size and snare resonance. Strike the
pads and cymbals to enjoy the supreme dynamics and nuances of an acoustic drum.
Breathtaking Craftsmanship
When traditional craftsmanship perfectly merges with the elegant wood shell and solid chrome-plated
stand, plus the attractive module design, it brings breathtaking beauty to your visual enjoyment.
Authentic Touch and Response
Equipped with highly-sensitive sensors, precise position-sensing technology and groundbreaking mesh
head, it aims to deliver the authentic touch and response of an acoustic drum, to faithfully reproduce in
each strike the ex-pression and nuance of dierent playing techniques such as snappy snare, cross stick
and resonance.
Limitless Sounds Creation
It supports loading your favorite wave samples and editing them via the onboard sound parameters, let-
ting you create your own sounds and have unlimited possibilities in your sounds creation.
Wireless Connectivity
By using the powerful Bluetooth Audio and MIDI function, you can establish wireless connection with
your smart devices to expand the potential in your music life.
Individual Output and Control
The 8 individual outputs will satisfy your performance needs on the stage.
Main Features

55
1. LCD Display
Display images, names and param-
eters.
2. [F1] - [F4] Buttons
Execute the corresponding on-
screen functions.
3. [SETUP] Button
Enter the Setup menu.
4. [TRIGGER] Button
Enter the Trigger menu.
5. [TRIG LOCK]
Press [SETUP] + [TRIGGER] but-
tons to lock or unlock the current
pad.
6. [SD CARD] Button
Enter the SD Card menu.
7. [COACH] Button
Enter the Coach mode.
8. [VOLUME] Knobs
OUTPUT: adjust the output volume.
PHONES: adjust the headphones
volume.
CLICK: adjust the click volume.
AUX IN: adjust the Aux input volume.
9. [EXIT]/[SAVE/ENTER] Buttons
EXIT: return to the previous menu.
SAVE/ENTER: to save or to conrm.
10. [CURSOR] Dial
Move the cursor to select a param-
eter.
11. [DATA] Dial
Adjust the parameter value.
12. Level Indicator
Indicate the level of striking ve-
locity.
13. Upper/Lower Indicators
Upper indicators: the faders will
adjust the upper items.
Lower indicators: the faders will
adjust the lower items.
14. Volume faders
Adjust the volume level of the
upper/lower items.
15. [ ] Button
Toggle the faders between the
upper and lower items.
16. [MIXER] Button
Enter the Mixer menu.
17. [EFFECT] Button
Enter the Instrument menu.
18. [INST] Button
Enter the Sound menu.
19. [KIT] Button
Enter the Kit menu.
20. [CLICK] Button
Enter the Click menu.
21. [SONG] Button
Enter the Song menu.
22. [+]/[-] Buttons
Increase/decrease the value.
23. [START/STOP] Button
Start or stop song playback.
24. [RECORD] Button
Enter the Record mode.
25. SD Card Indicator
It turns on when an SD card
is inserted.
CLICK
Front Panel
Panel & Display Description

6
Panel & Display Description
Rear Panel
Display
1. Name of the menu
This area displays the current menu, for example, Inst, Kit or
Song.
2. Image
This area displays an image related to the current menu.
3. Parameter
This area displays parameters related to the current menu.
You can select and edit these parameters.
4. Important parameter name
This area displays the important parameter name, for exam-
ple, instrument name, kit name, and song name.
5. [F1] - [F4] functions
This area displays the functions of the [F1] - [F4] buttons.
26. [POWER] Button
Turn the power on or o.
27. POWER Jack
For connecting the specied power adapter.
28. USB MIDI/AUDIO Port
For connecting to a computer to transmit/receive
MIDI and digital audio data.
29. MIDI Jacks (OUT/THRU, IN)
For connecting external MIDI device to transmit/
receive MIDI data.
30. OUTPUT Jacks (L, R) (Balanced)
For connecting an audio system or amplier that
has balanced jacks.
31. OUTPUT Jacks (L/MONO, R) (2 x1/4”)
For connecting an audio system or amplier.
Use both the L/MONO and R jacks for stereo
output, or just the L/MONO jack for mono output.
32. AUX IN Jack (1/4”)
For connecting an external audio player, such as an
MP3.
Music from the external player will be transmitted to the
module, and you can play along.
33. INDIVIDUAL OUTPUT Jacks (8 x1/4”)
Connecting these jacks to a mixer.
In the SETUP menu, you can specify the jack from
which the pad sound is output.
34. TRIGGER IN Jacks
For connecting cymbals, kick and other pads.
35. PHONES Jacks (1/8” + 1/4”)
For connecting headphones to listen to the sound out-
put from the module.
36. SD CARD Port
For inserting an SD card.
With the SD card function, you can play back or record
audio songs, or load wave samples.
26 27 28
29
32 33
30
31
SD CARD
12
PHONES
35
1
2
3
4
5

7
Setup
Caution!
To prevent electric shock and damage to the drum module or other devices, always turn o the power of
all devices before making any connection.
Connecting the Pads and Pedals
Standard conguration:
Kick Pad, Kick Pedal, Snare (2-zone), Tom 1~3 (2-zone), Crash 1~2 (2-zone with choke), Ride (3-zone with choke), Real Hi-
hat (2-zone with hi-hat stand).
Notes:
1. Make sure each pad is connected to the corresponding trigger input jack.
2. Refer to the Setup Manual for details on assembling the drum stand, attaching the drum pads and module.
Drum Module
Real Hi-Hat
Crash 1
Snare
Kick Pedal
Tom 1
Tom 2
Tom 3
Kick Pad
Ride
Crash 2

8
Getting Ready to Play
Setting Up Power Supply
1. Connect the AC adapter to the POWER jack on the rear panel.
2. Connect the other end of the power cord to an appropriate AC
outlet.
Notes:
1. Use only the specied AC adapter.
2. Even when the module is turned o, electricity is still owing to the
module at minimum level. Unplug the module when it is not used for a
long time.
Turning the Power On/O
Turning On the Power
Before turning on the power, make sure you have completed all neces-
sary connections (pads and audio devices etc.). Make sure the volume
levels of all devices are set to minimum.
1. Press the [POWER] button to turn on the module. The display will be
lit.
2. Turn on the connected audio devices or use the headphones to
listen.
3. Adjust the [OUTPUT] or [PHONES] volume knob while striking the
pads until you get an appropriate volume level.
Turning Off the Power
1. Set the volume level of the module and the connected audio device
to minimum.
2. Turn o the connected audio device.
3. Hold the [POWER] button until the module is turned o.
Auto Power Off
In order to save energy, the module will automatically turn o after 30
minutes if it is not in use (playing, striking, pressing any button, etc.).
You can enable or disable this function in Setup -> Option.
POWER
PHONES
OUTPUT

9
Quick Play
Drum Kits and Instruments
A drum kit is the combination of all pads and cymbals. An acoustic
drum has only one xed kit and it’s unchangeable. A digital drum is
preset with various Instruments of dierent styles. You can combine
dierent Instruments and make as many drum kits as you like. Refer to
Drum Kit List and Drum Instruments List.
Selecting a Drum Kit
1. Press the [KIT] button to enter the Kit menu.
2. Use the [+]/[-] button, the [DATA] dial or the [CURSOR] dial to select
a drum kit.
Selecting an Instrument
You can strike the pad to hear the sound. You can change the Instru-
ment of each pad as desired.
1. Press the [INST] button to enter the Inst menu.
2. Strike the pad that you want to edit. The LCD displays the current
pad name and the instrument name.
You can also use the [CURSOR] dial to move the cursor to the trigger
name, then use the [DATA] dial to select a trigger.
3. Use the [CURSOR] dial to move the cursor to the instrument name,
then use the [+]/[-] button or [DATA] dial to select an instrument.
Playing Techniques
This section introduces various drumming techniques. Similar to an
acoustic drum kit, the digital drum responds dierently to various play-
ing techniques and dynamics. All the pads are velocity-sensitive. The
timbre of some sound may change depending on the striking force.
Pad
The snare and the tom pads can detect head shot and rim shot. The
snare also supports position sensing and cross stick.
Head Shot
Strike only the head of the pad. When you strike the snare, the sound
will change as you move the strike position from the center of the head
to the rim.
Rim Shot
Strike the head and the rim of the pad simultaneously. Or strike only the
rim of the pad.
Cross Stick (X-Stick)
When X-STICK is in use, it will produce a cross stick sound when strik-
ing softly the rim of the snare, or it will produce a rim shot sound when
striking forcefully the rim of the snare.
Head
Rim
Head
Rim
KIT

10
Quick Play
Cymbal
Cymbal Bow Shot
Strike the middle area of the cymbal (between the bow and the edge).
Cymbal Edge Shot
Strike the edge area of the cymbal.
Cymbal Bell Shot
Strike the bell area of the cymbal.
Choke Play
The crash and the ride support choke play. Just after hitting the crash/
ride, immediately choke the edge with your hand to mute the crash/ride
sound.
Hi-hat
Hi-hat Pedal Change
Press the pedal down to dierent positions, the sound of striking the
hi-hat cymbal will change. This is similar to an acoustic drum.
Open Hi-hat
Strike the hi-hat cymbal without pressing the pedal.
Closed Hi-hat
Strike the hi-hat cymbal when the pedal is fully pressed.
Hi-hat Pedal
Press the hi-hat pedal (without striking the hi-hat cymbal) to create a
foot-close sound.
Splash
Play the hi-hat cymbal with the pedal fully pressed and then instantly
releasing it.
Edge
Bell
Bow
Choke

11
Preset Drum Kit and User Kit
The module provides a variety of preset drum kits and user kits. You can
select your favorite drum kit, edit the pa-rameters as desired, then save
it to a user kit. Please refer to the Drum Kit List.
Selecting a Drum Kit
1. Press the [KIT] button to enter the Kit menu.
2. Use the [+]/[-] button, the [DATA] dial or the [CURSOR] dial to select a
desired drum kit.
Kit description:
Drum Kit Kit Number Description
Preset 1 ~ 55 Preset drum kits.
User 56 ~ 100 User kits. Parameters can be edited and
saved.
Functions of the [F1] ~ [F4] buttons in this menu:
Buttons Function Description
F1 List Enter the Kit List menu to select a kit.
F2 Vol/Color Set the volume and the color of the kit.
F3 Chain Enter the Kit Chain menu to select a kit.
F4 XStick Turn cross stick on or o. When cross stick
is ON, strike softly the snare rim to produce
cross stick sound. When cross stick is OFF,
strike the snare rim to produce rim shot sound.
Note:
Save your settings to a user kit after editing. Otherwise, all edited data
will be lost.
Fast Selecting a Drum Kit
You can fast selecting a drum kit in the Kit List menu.
1. Press the [KIT] button, then press the [F1] button to enter the Kit List menu.
Functions of the [F1] ~ [F4] buttons in this menu:
Buttons Button Name Function
F1 Exit Return to the Kit menu.
F2 Page- Go to the previous page.
F3 Page+ Go to the next page.
F4 Preset / User Toggle between preset kits and user kits.
2. Use the [+]/[-] button, the [DATA] dial or the [CURSOR] dial to select a
kit.
Note:
When the cursor is on the last kit of the current page, if you continue go-
ing forward, it will jump to the rst kit in the next page. When the cursor
is on the rst kit of the current page, going backward will jump to the last
kit in the previous page.
EXT2
EXT1
KIT xx
KICK SNARE TOM1 TOM2 TOM3
TOM4 Hi-HAT CRASH1 CRASH2 RIDE
Head Head Head Head Head
Head
Head Head
Pad EQ/ Compressor
Kit Reverb/ Compressor
Kit IFX
Head Head Head Head
Bell
Rim Rim Rim Rim
Rim
Rim Rim
Edge Edge Edge Edge
KIT
F1 F2 F3 F4
Quick Play

12
Drum Kit
Kit Volume and Kit Color
In the kit volume section, you can adjust the kit volume, hi-hat control volume
and cross stick volume.
Kit color means the light color round the [DATA] dial and the [CURSOR] dial.
When you change a kit, the light color will change along.
1. Press the [KIT] button, then press the [F2] button to enter the Kit Vol /
Color menu.
2. Use the [F2]/[F3] button or the [CURSOR] dial to select a parameter, then
use the [+]/[-] button or the [DATA] dial to change the volume / color.
Parameter Range Description
Kit Volume 0 ~ 127 Adjust the entire drum kit volume.
HH-Ctrl Volume 0 ~ 127 Adjust the hi-hat control volume.
X-Stick Volume 0 ~ 127 Adjust the cross stick volume.
Kit Color Red, Green, Blue, Pink,
Cyan, Yellow, Orange,
Violet, Fuchsia, Sky-
blue, White
Select the kit color and save it to
a user kit.
Notes:
1. When you edit a kit parameter, the “*” indicator will appear in the upper
menu, prompting you to save the edited data. If there’s user instrument in
this kit, the “+” indicator will appear in the upper menu.
2. After editing the kit parameters, press the [F4] button or the [SAVE/
ENTER] button to save the edited data. Otherwise, the edited data will be
lost when you change the kit.
Kit Chain
You can arrange your favorite drum kits in the desired order in a kit chain for
easy recall. The module provides 8 kit chains. You can have up to 32 drum
kits in each kit chain.
1. Press the [KIT] button, then press the [F3] button to enter the Kit Chain
menu.
Functions of the [F1] ~ [F4] buttons in this menu:
Buttons Function Description
F1 C-Edit Edit the kit chain.
F2 Chain- Go to the previous kit chain.
F3 Chain+ Go to the next kit chain.
F4 XStick Turn cross stick on or o.
2. Press the [F1] button to enter the Chain Edit menu.
Functions of the [F1] ~ [F4] buttons in this menu:
Buttons Function Description
F1 Delete Delete a drum kit from the kit chain.
F2 Chain- Go to the previous kit chain.
F3 Chain+ Go to the next kit chain.
F4 Insert Insert a drum kit to the kit chain.
3. After editing a kit chain, press the [SAVE/ENTER] button to save it. Other-
wise, the edited data will be lost when you go to other menus. When you
edit a parameter in the kit chain, the “*” indicator will appear in the upper
menu, prompting you to save the edited data.
4. When you press the [SAVE/ENTER] button, it will go to the Chain Rename
menu. You can edit the chain name. Then press the [SAVE/ENTER] button
again to save the kit chain. It will then go back to the Kit Chain menu.
Note:
In the Chain Rename menu, you can enter a name of up to 12 characters.

13
Instrument
Drum Instrument is an essential part of a drum kit. You can edit the In-
strument parameters of each pad and save the edited settings to a user
kit. Refer to the Drum Instrument List.
Selecting an Instrument
1. Press the [INST] button to enter the Inst menu.
2. Strike the pad that you want to edit. The LCD displays the current pad
name and instrument name.
You can also use the [CURSOR] dial to move the cursor to the trigger
name, then use the [DATA] dial to select a trigger.
3. Use the [CURSOR] dial to move the cursor to the group name, then
use the [DATA] dial to select an instrument group. Or use the [CUR-
SOR] dial to move the cursor to the instrument name, the use the
[DATA] dial to select an instrument. Press the [F4] button to preview
the selected sound.
Note:
After selecting the instrument, press the [SAVE/ENTER] button to save it
to a user kit. Otherwise, the edited data will be lost when you change the
kit or turn o the power.
Functions of the [F1] ~ [F4] buttons in this menu:
Buttons Function Description
F1 List Enter the Instrument List menu to select an
instrument.
F2 Edit Edit instrument parameters.
F3 Sub Inst Enter the Sub Inst menu.
F4 Preview Preview the selected instrument.
Instrument menu description:
Parameter Range Description
Trigger KICK, SNARE HEAD, SNARE RIM, TOM1 HEAD, TOM1 RIM, TOM2
HEAD, TOM2 RIM, TOM3 HEAD, TOM3 RIM, TOM4 HEAD, TOM4 RIM,
HI-HAT BOW, HI-HAT EDGE, CRASH1 BOW, CRASH1 EDGE, CRASH2
BOW, CRASH2 EDGE, RIDE BOW, RIDE EDGE, RIDE BELL, EXT1
HEAD, EXT1 RIM, EXT2 HEAD, EXT2 RIM
Trigger name
Group KICK_A, KICK_E, SNARE_A, SNARE_E, TOM_A, TOM_E, RIDE_A,
RIDE_E, CRASH_A, CRASH_E, HIHAT_A, HIHAT_E, PERCUSSION,
CHINESE, FX, USER
Instrument group name
Instrument No. 1 ~ 999 Instrument number
Note:
When you change instrument of the Hi-hat bow, the Hi-hat pedal and
Foot Splash will change along.
When you change the instrument of the Snare Rim, the snare XStick will
change along.
Fast Selecting an Instrument
You can fast selecting an instrument in the Instrument List menu.
1. Press the [INST] button, then press the [F1] button to enter the Main
List menu.
Functions of the [F1] ~ [F4] buttons in this menu:
Buttons Function Description
F1 Exit Return to the Inst menu.
F2 Group- Jump to the previous instrument group.
F3 Group+ Jump to the next instrument group.
F4 Preview Preview the selected instrument.
F1 F2 F3 F4

14
2. Use the [DATA] dial or the [CURSOR] dial to select an instrument.
3. Strike the pad or press the [F4] button to preview the selected instrument.
Editing an instrument
1. Press the [INST] button, then press the [F2] button to enter the Main
Edit menu.
2. Strike the pad that you want to edit. Or use the [CURSOR] dial to move
the cursor to the trigger name, then use the [DATA] dial to select a
trigger.
3. Use the [CURSOR] dial to select a parameter, then use the [+]/[-] button
or the [DATA] dial to change the setting.
Functions of the [F1]/[F3]/[F4] buttons in this menu:
Buttons Function Description
F1 MIDI Edit the MIDI setting.
F2 Sub Edit Edit the sub instrument.
F3 Save Save the edited settings.
F4 Preview Preview the instrument.
Note:
The instrument parameters will change when you select a dierent instru-
ment.
Instrument parameters description:
KICK_A:
Parameter Range Description
Pitch -63 ~ +63 Adjust the pitch.
Decay -63 ~ 0 Adjust the instrument decay.
Snare Buzz OFF, 1 ~ 6 Adjust the snare buzz of the kick pad.
Kit Resonance OFF, 1, 2, 3, 4 Adjust the kit resonance level.
Volume 0 ~ 127 Adjust the volume level.
SNARE_A:
Parameter Range Description
Pitch -63 ~ +63 Adjust the pitch.
Decay -63 ~ 0 Adjust the instrument decay.
Snare Strainer OFF, ON Turn snare strainer on or o.
Volume 0 ~ 127 Adjust the volume level.
TOM_A:
Parameter Range Description
Pitch -63 ~ +63 Adjust the pitch.
Decay -63 ~ 0 Adjust the instrument decay.
Snare Buzz OFF, 1 ~ 6 Adjust the snare buzz of the tom.
Volume 0 ~ 127 Adjust the volume level.
HI-HAT / CRASH / RIDE:
Parameter Range Description
Size -24 ~ +24 Adjust the cymbal size.
Sustain -63 ~ 0 Adjust the cymbal sustain.
Volume 0 ~ 127 Adjust the volume level.
Instrument

15
Other instrument:
Parameter Range Description
Pitch -63 ~ +63 Adjust the pitch.
Decay -63 ~ 0 Adjust the instrument decay.
Volume 0 ~ 127 Adjust the volume level.
Pad MIDI Setting
1. In the Main Edit menu, press the [F1] button to enter the Pad MIDI
menu.
Functions of the [F1] ~ [F4] buttons in this menu:
Buttons Function Description
F1 Exit Return to the instrument menu.
F2 Note Set the pad note value.
F3 Gate Set the gate time.
F4 Channel Set the pad channel.
2. Press the [F2] button to enter the Pad Note menu, use the [CURSOR]
dial to select a trigger, then use the [+]/[-] button or the [DATA] dial to
change the note value.
Parameter Range Description
Trigger KICK, SNARE HEAD, SNARE RIM,
SNARE XSTICK, TOM1 HEAD, TOM1
RIM, TOM2 HEAD, TOM2 RIM, TOM3
HEAD, TOM3 RIM, TOM4 HEAD, TOM4
RIM, HI-HAT OPEN BOW, HI-HAT
CLOSE BOW, HI-HAT OPEN EDGE, HI-
HAT CLOSE EDGE, HH PEDAL, FOOT
SPLASH, CRASH1 BOW, CRASH1
EDGE, CRASH2 BOW, CRASH2 EDGE,
RIDE BOW, RIDE EDGE, RIDE BELL,
EXT1 HEAD, EXT1 RIM, EXT2 HEAD,
EXT2 RIM
Select a trigger.
Note No. OFF, 0(C -1) ~ 127(G 9) Set the note value.
3. Press the [F3] button to enter Pad Gate menu, use the [CURSOR]
dial to select a trigger, then use the [+]/[-] button or the [DATA] dial to
change the gate time. Gate time means the interval between the Note
ON and the Note OFF sent from the MIDI jack.
Parameter Range Description
Trigger Same as the “Pad Note” menu. Select a trigger.
Gate Time 0.1 ~ 4.0 s Set the gate time.
4. Press the [F4] button to enter the Pad Channel menu, use the [CUR-
SOR] dial to select a trigger, then use the [+]/[-] button or the [DATA]
dial to change the channel number. Pad channel means the channel
through which the pad sends and receives MIDI messages.
Parameter Range Description
Trigger Same as the “Pad
Note” menu.
Select a trigger.
Pad Channel CH1 ~ 16, Global Global: the MIDI channel is deter-
mined by the channel selected in Set-
up. CH1~ 16: set the MIDI channel
for each pad.
Instrument

16
Saving a Drum Kit
When you nish editing the instrument parameters, save it to a user kit.
Otherwise, the edited data will be lost when you change the kit or turn
o the power.
1. When in the Kit / Inst / Mixer / Eect menu, you can press the [SAVE/
ENTER] button to enter the Save menu.
2. Use the [+]/[-] button, the [DATA] dial or the [CURSOR] dial to select a
user kit number.
3. You can press the [F2] button to enter the Rename menu. Or you can
simply press the [F4] or [SAVE/ENTER] button to save the kit, using
the current user kit name.
Renaming a user kit:
In the Rename menu, use the [F1] ~ [F4] buttons to change the user kit name.
When you nish entering a name, press the [SAVE/ENTER] to save it.
Buttons Function Description
F1 Insert Insert a space before the cursor location.
F2 Delete Delete the character at the cursor location.
F3 Space Replace the selected character with a space.
F4 A-a-0 Change the on-screen keyboard between capi-
tal letters, small letters, and digits.
Notes:
1. In the Rename menu, you can enter a name of up to 12 characters.
2. If there’s user sound in the kit, the “+” indicator will appear in the
upper menu.
Sub Instrument
By editing the sub instruments, you can layer the instruments and
eects.
1. Press the [INST] button, then press the [F3] button to enter the Sub
Inst menu.
2. Strike the pad that you want to edit. Or use the [CURSOR] dial to
move the cursor to the trigger name, then use the [DATA] dial to select
a trigger.
3. Use the [CURSOR] dial to move the cursor to the group name, then
use the [DATA] dial to select an instrument group. Or use the [CUR-
SOR] dial to move the cursor to the instrument name, then use the
[DATA] dial to select an instrument.
4. Press the [F4] button to preview the selected instrument.
Notes:
After selecting the instrument, press the [SAVE/ENTER] button to save it
to a user kit. Otherwise, the edited data will be lost when you change the
kit or turn o the power.
Instrument

17
Functions of the [F1] ~ [F4] buttons in this menu:
Buttons Function Description
F1 Sub List Enter the Sub List menu to select a sub instru-
ment.
F2 Sub Edit Edit the instrument parameters.
F3 Sub Layer Turn the layer function on or o.
F4 Preview Preview the selected instrument.
Sub Instrument menu description:
Parameter Range Description
Trigger KICK, SNARE HEAD, SNARE RIM,
TOM1 HEAD, TOM1 RIM, TOM2
HEAD, TOM2 RIM, TOM3 HEAD,
TOM3 RIM, TOM4 HEAD, TOM4 RIM,
HI-HAT BOW, HI-HAT EDGE, CRASH1
BOW, CRASH1 EDGE, CRASH2 BOW,
CRASH2 EDGE, RIDE BOW, RIDE
EDGE, RIDE BELL, EXT1 HEAD, EXT1
RIM, EXT2 HEAD, EXT2 RIM
Trigger name
Group KICK_A, KICK_E, SNARE_A,
SNARE_E, TOM_A, TOM_E, RIDE_A,
RIDE_E, CRASH_A, CRASH_E,
HIHAT_A, HIHAT_E, PERCUSSION,
CHINESE, FX, USER
Instrument
group name
Instrument No. 1 ~ 999 Instrument
number
Notes:
When you change the instrument of Hi-hat bow, the Hi-hat pedal and
Foot Splash will change along.
Fast Selecting a Sub Instrument
You can fast selecting an instrument in the Sub List menu.
1. In the Sub Inst menu, press the [F1] button to enter the Sub List
menu.
Functions of the [F1] ~ [F4] buttons in this menu:
Buttons Function Description
F1 Exit Return to the Sub Inst menu.
F2 Group- Jump to the previous instrument group.
F3 Group+ Jump to the next instrument group.
F4 Preview Preview the selected instrument.
2. Use the [DATA] dial or the [CURSOR] dial to select an instrument.
3. Strike the pad or press the [F4] button to preview the selected instru-
ment.
Instrument

18
SNARE_A:
Parameter Range Description
Layer Type MIX, ADD, FADE, SW Select a layer
type.
Layer Point 1~127 Set the layer
point.
Pitch -63 ~ +63 Adjust the pitch.
Decay -63 ~ 0 Adjust the sound
decay.
Snare Strainer OFF, ON Turn snare strain-
er on or o.
Volume 0~127 Adjust the vol-
ume level.
HI-HAT / CRASH / RIDE:
Parameter Range Description
Layer Type MIX, ADD, FADE, SW Select a layer
type.
Layer Point 1~127 Set the layer
point.
Size -24 ~ +24 Adjust the cym-
bal size.
Sustain -63 ~ 0 Adjust the cym-
bal sustain.
Volume 0~127 Adjust the vol-
ume level.
Other instruments:
Parameter Range Description
Layer Type MIX, ADD, FADE, SW Select a layer
type.
Layer Point 1~127 Set the layer
point.
Pitch -63 ~ +63 Adjust the pitch.
Decay -63 ~ 0 Adjust the sound
decay.
Volume 0~127 Adjust the vol-
ume level.
Editing a Sub Instrument
1. In the Sub Inst menu, press the [F2] button to enter the
Sub Edit menu.
2. Strike the pad that you want to edit. Or use the [CURSOR]
dial to move the cursor to the trigger name, then use the
[DATA] dial to select a trigger.
3. Use the [CURSOR] dial to select a parameter, then use
the [+]/[-] button or the [DATA] dial to change the setting.
4. Strike the pad or press the [F4] button to preview the
instrument.
Functions of the [F1] ~ [F4] buttons in this menu:
Buttons Function Description
F1 Exit Return to the Sub Inst menu.
F2 Main Edit Go to the Main Edit menu.
F3 Sub Layer Turn the layer function on or o.
F4 Preview Preview the instrument.
Notes:
Parameter settings will change when you select a dierent
instrument.
Instrument parameters description:
KICK_A
Parameter Range Description
Layer Type MIX, ADD, FADE, SW Select a layer
type.
Layer Point 1~127 Set the layer
point.
Pitch -63 ~ +63 Adjust the pitch.
Decay -63 ~ 0 Adjust the sound
decay.
Snare Buzz OFF,1~6 Adjust the snare
buzz of the kick
pad.
Kit Resonance OFF,1,2,3,4 Adjust the kit
resonance level.
Volume 0~127 Adjust the vol-
ume level.
TOM_A
Parameter Range Description
Layer Type MIX, ADD, FADE, SW Select a layer
type.
Layer Point 1~127 Set the layer
point.
Pitch -63 ~ +63 Adjust the pitch.
Decay -63 ~ 0 Adjust the sound
decay.
Snare Buzz OFF,1~6 Adjust the snare
buzz of the tom.
Volume 0~127 Adjust the vol-
ume level.
Instrument

19
[MIX]
[FADE]
[ADD]
[SWITCH]
Layer Type
You can set the type on how to layer the main and sub instruments.
There are 4 layer types.
1. In the Sub Edit menu, press the [F3] button to turn on the Sub Layer
function.
2. Use the [CURSOR] dial to select Layer Type, then use the [+]/[-] but-
ton or the [DATA] dial to change the setting.
3. Strike the pad or press the [F4] button to preview the layer eect.
Layer type description:
Parameter Description
MIX The main and sub instruments are mixed
equally.
ADD Layer the sub instrument at the specied layer
point.
FADE The sub instrument will fade in at the specied
layer point.
SW (Switch) The main and sub instruments are switched at
the specied layer point.
DYNAM = striking velocity
VOL = response volume
M = main instrument
S = sub instrument
Instrument

20
Mixer
In the Mixer menu, you can adjust the volume and the pan of each pad
and cymbal. These settings are part of the kit parameters. Don’t forget to
save the settings after editing.
Adjusting the Volume of Each Pad
1. Press the [MIXER] button to enter the Mixer menu.
Functions of the [F1] ~ [F4] buttons in this menu:
Function Range Description
Volume 0 ~ 127 Adjust the volume of each pad, including the
head and rim.
Pan L15 ~ CTR ~ R15 Adjust the pan (stereo position) of each pad.
Min Vol 0 ~ 15 Set the minimum volume of each pad.
For example, if you set the snare to “14” (max.
is 15), even the softest hit will produce a rela-
tively big sound.
Note: Setting it to a high value will reduce the
dynamics of the sound.
Preview / Preview the sound volume.
The abbreviation of each pad name:
Abbr. 1 2 3 4 S K R
Pad name Tom1 Tom2 Tom3 Tom4 Snare Kick Ride
Abbr. C C H E E
Pad name Crash1 Crash2 Hi-Hat Ext1 Ext2
2. Strike the pad that you want to edit. Or use the [CURSOR] dial to
select a pad name.
3. Use the [DATA] dial to adjust the volume level.
Note:
The volumes in the Mixer menu are separate from the volume faders
on the front panel. The sound you hear is the result of the mixer setting
multiplying the fader setting.
Adjusting the Pan of Each Pad
1. Press the [MIXER] button, then press the [F2] button to enter the Pan
menu.
2. Strike the pad that you want to edit. Or use the [CURSOR] dial to
select a pad name.
3. Use the [DATA] dial to adjust the pan setting. You can press the [F4]
button to preview it.
Adjusting the Min Volume of Each Pad
1. Press the [MIXER] button, then press the [F3] button to enter the Min
Vol menu.
2. Strike the pad that you want to edit. Or use the [CURSOR] dial to
select a pad name.
3. Use the [DATA] dial to adjust the volume setting. You can press the
[F4] button to preview it.
MIXER
F1 F2 F3 F4
Table of contents
Other Medeli Drum manuals

Medeli
Medeli DD638 User manual

Medeli
Medeli DD403 User manual

Medeli
Medeli DD518DX User manual

Medeli
Medeli MZ528 User manual

Medeli
Medeli MZ520 User manual

Medeli
Medeli DD6 User manual

Medeli
Medeli DD638DX User manual

Medeli
Medeli DD610S User manual

Medeli
Medeli Portable digital drum DD305 User manual

Medeli
Medeli DD518DX User manual

Medeli
Medeli DD400 User manual

Medeli
Medeli DD315 User manual

Medeli
Medeli DD522 User manual

Medeli
Medeli DD402 User manual

Medeli
Medeli DD516 User manual

Medeli
Medeli DD630 User manual

Medeli
Medeli DD602 User manual

Medeli
Medeli YoDrum G1 User manual

Medeli
Medeli DD302 User manual

Medeli
Medeli DIGITAL DRUM User manual