Medeli YoDrum G1 User manual


2
INFORMATION FOR YOUR SAFETY!
THE FCC REGULATION WARNING (for USA)
This equipment has been tested and found to comply with
the limits for a Class B digital device, pursuant to Part 15 of
the FCC Rules.
These limits are designed to provide reasonable protection
against harmful interference in a residential installation. This
equipment generates, uses, and can radiate radio frequency
energy and, if not installed and used in accordance with the
instructions, may cause harmful interference to radio
communications. However, there is no guarantee that
interference will not occur in a particular installation.
If this equipment does cause harmful interference to radio or
television reception, which can be determined by turning the
equipment off and on, the user is encouraged to try to
correct the interference by one or more of the following
measures:
Reorient or relocate the receiving antenna.
Increase the separation between the equipment and
receiver.
Connect the equipment into an outlet on a circuit different
from that to which the receiver is connected.
Consult the dealer or an experienced radio/TV technician
for help.
Unauthorized changes or modification to this system can
void the user's authority to operate this equipment.
PRECAUTIONS
PLEASE READ CAREFULLY BEFORE PROCEEDING
Please keep this manual in a safe place for future reference.
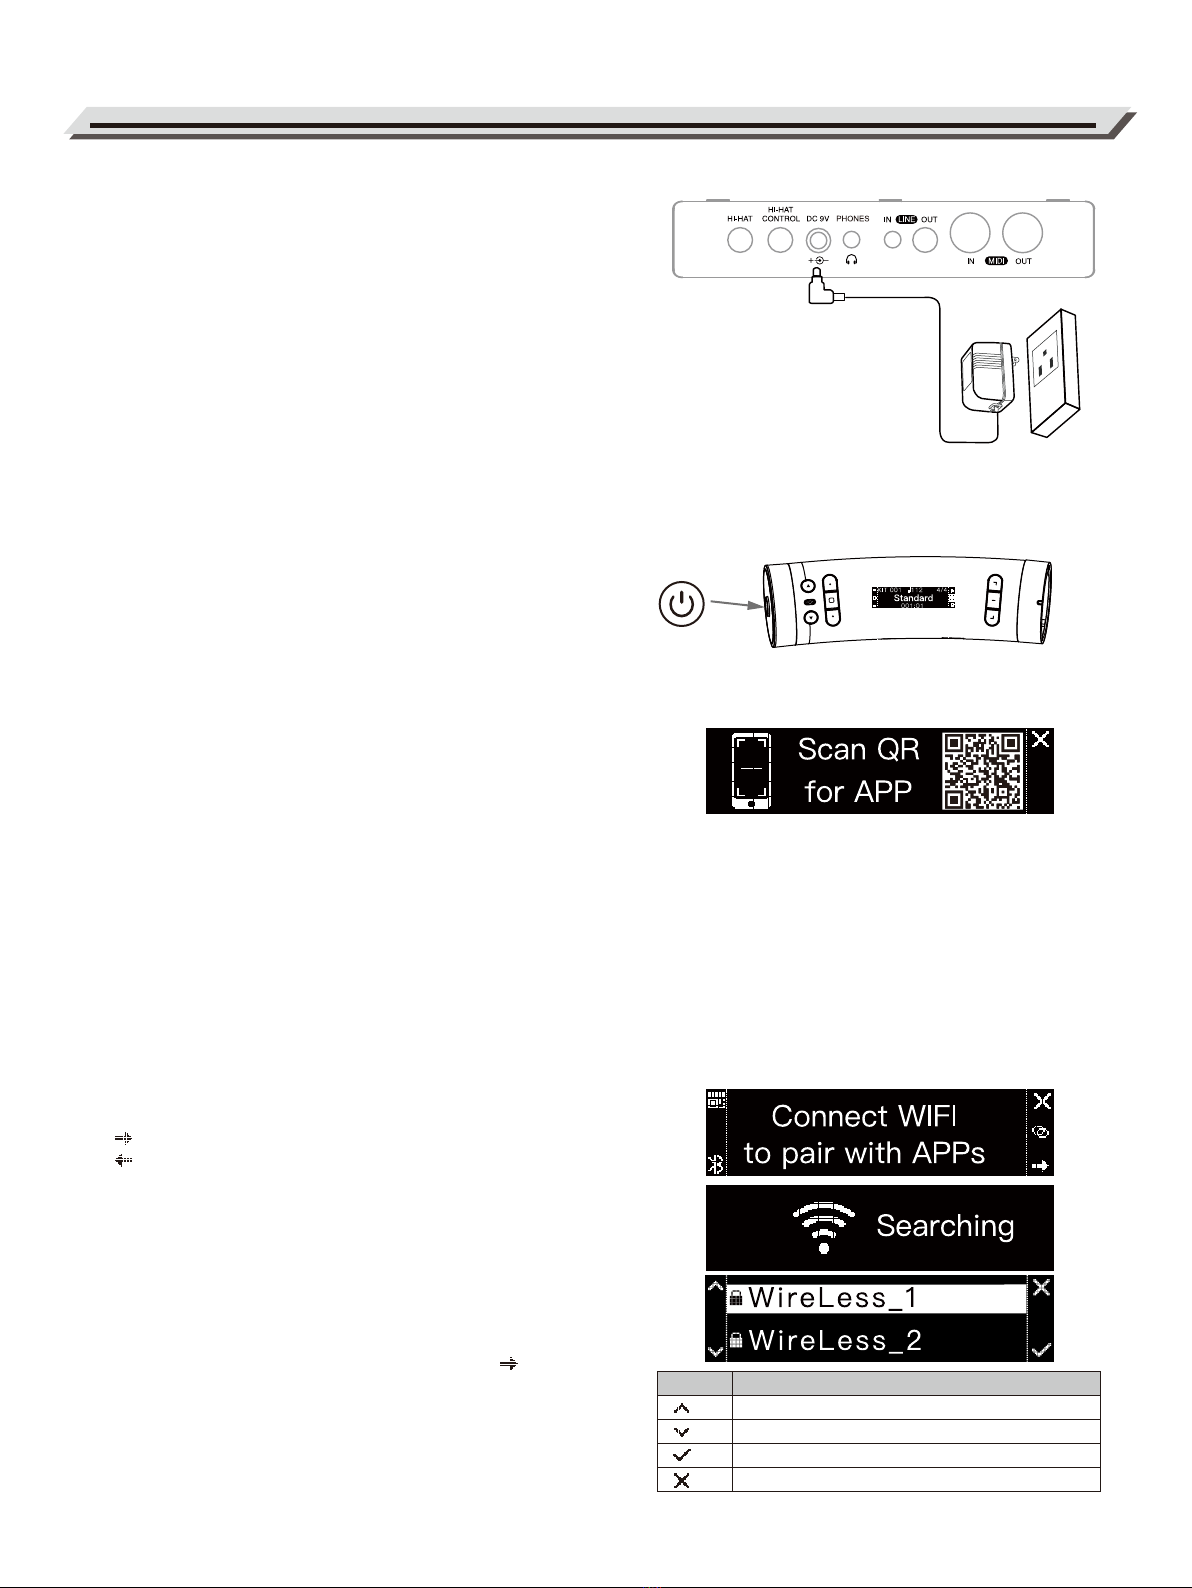
Power Supply
Connect the designated AC adaptor to an AC outlet of the
correct voltage.
Do not connect it to an AC outlet of voltage other than that
for which your instrument is intended.
Unplug the AC power adaptor when not using YoDrum, and
during electrical storms.
Connections
Before connecting YoDrum to other devices, first turn off the
power to all other units. This will help prevent malfunction
and / or damage to other devices.
Location
In order to prevent deformation, discoloration, or more
serious damage to your YoDrum, avoid exposing YoDrum to
the following conditions:
Direct sunlight
Extreme temperature or humidity
Excessive dust or dirt
Strong vibrations or shocks
Strong magnetic fields
Interference with other electrical devices
Radios and televisions placed nearby may experience
reception interference. Operate YoDrum at a suitable
distance from radios and televisions.
Cleaning
Clean only with a soft, dry cloth. Do not use paint thinners,
solvents, cleaning fluids, or chemical-soaked wiping cloths.
Always keep YoDrum clean and dry. Never perform in
the rain or places of heavy moisture.
CAUTION
Strong electro magnetic interference may disturb the
normal function of YoDrum. If this occurs, simply reset
the product to resume normal operation by following
the directions in the owner's manual. If normal
function does not resume, you may need to move
YoDrum to other location.
Welcome to YoDrum!
Please read this manual carefully so you can get the most out of this smart digital drum.

Drum Stand
Be careful not to strain the components during assembly. The
buttons are designed to snap in, and the pipes should fit
snugly without excessive force.
Drum module
Take care to keep the drum module from being hit, which may
cause serious damage.
Install and remove the module correctly according to the
directions in the Set Up manual.
Disconnect all cables before moving YoDrum. Do not lift
YoDrum by the module.
Drum pads and cymbals
Use standard drum sticks to play your YoDrum. Do not use
any sharp or heavy objects on the pads or cymbals.
Hi-Hat pedal
To prevent scratching or other damage to the hi-hat pedal, do
not use with shoes that have hard or sharp soles.
Cables
Plug the cables to the corresponding jacks correctly.
Hold the U bend steady, then take the cables out gently.
Normal operation
3
Head
Rim
U bend
Standpipe
Drum module
Pad Cymbal

Contents
4
Panel Description
Front panel...................................................................................................................................................................6
Rear panel....................................................................................................................................................................7
Connectors..................................................................................................................................................................7
Getting Ready to Play
Setting up the Power Supply........................................................................................................................................8
Turning the Power On/Off.............................................................................................................................................8
WIFI connection...........................................................................................................................................................8
Hotspot connection.......................................................................................................................................................8
Playing the drums
Selecting a Drum Kit...................................................................................................................................................11
Adjusting the Volume..................................................................................................................................................11
Creating Your Own Kit.................................................................................................................................................11
Playing Techniques.....................................................................................................................................................11
Song
Selecting a Song.........................................................................................................................................................12
Playing Along with a Song..........................................................................................................................................12
Tempo
Adjusting the Tempo...................................................................................................................................................13
Beat...........................................................................................................................................................................13
USB Disk...................................................................................................................................................................14
Factory Reset............................................................................................................................................................14
Firmware Updates
With USB Disk............................................................................................................................................................15
Smart Applications...................................................................................................................................................16
Specifications..........................................................................................................................................................17
Appendix
Song List....................................................................................................................................................................18
Drum Kit List...............................................................................................................................................................18
Error Code Message..................................................................................................................................................19
Troubleshooting.........................................................................................................................................................19

Intuitive Structure
YoDrum features an intuitive streamlined design. The central U bend is supported by 4 legs for
a stable structure that also makes the most use of space.
User-friendly Interface
The drum module features 4 user presets so you can jump right to your favorite kit or metro-
nome settings. With just 8 buttons and 1 data dial, it’s easy to set up different kits and beats,
all without having to dig through menus.
Wireless connection APP
YoDrum connects wirelessly with our customized APP. Whether you’re a beginner or a master,
there is lifetime’s worth of useful content to use with your YoDrum in your own way.
Boundless Voice Expand
YoDrum comes with 6 great sounding drum kits; you can download more kits on the APP. You
can even record your own samples and set up a custom kit!
Main Features
5

1
3
45
6
9
10
11
2
7
8
Panel Description
Front panel
6
No.
1
2
3
4
5
6
7
8
9
10
11
Component
Power
Data dial
[VOL -]
[VOL+]
Function button(L)
○Top
□ Middle
○ Bottom
Display
Function button(R)
Power on/off
Main menu
[L1]: To previous menu
[L2]: To drum menu
[L3]: To next menu
Shows the detailed information of drum kit, song, tempo, beat. And also other related
information when editing in other modes.
[R1] Play/Stop the accompanied song
[R2] WIFI and hotspot connection
[R3] Switch metronome on/off
Song
Select song
Song volume
Kit
Select kit
Master volume
Tempo
Adjust tempo
Metronome
volume
Beat
Select beat
Metronome
volume
USB
Select USB song
Song volume
NOTICE:
1. For energy conservation, please keep the volume at a relatively low level.
2. To prevent electric shock or damage to the module, switch off the power before connecting the cables.
3. Press the power button to turn off the unit before unplugging the AC adaptor.
*WIFI symbol guide:
No connection with WIFI or hotspot
Connected with WIFI, but no APP connection
Connected with mobile APP via hotspot
Connected with mobile APP

Panel Description
Rear panel
Connectors
7
1. USB-C: USB To Host jack
To connect to computers or mobile devices, then YoDrum will
function as a USB MIDI or USB audio device. When connected,
you can set YoDrum as an output to play MIDI or audio files.
2. USB-A: USB To Device jack
To connect to USB storage devices, such as USB flash memory,
and play songs stored on them.
This port can also charge devices (such as phones) connected to
it (5V/500mA).
YoDrum features four groups of connectors located on the U bend.
Plug the cables into the corresponding jacks as labeled:
NOTICE:
The last connected MIDI will be the default MIDI I/O. If the currently
selected MIDI is disconnected, then the MIDI will be rearranged
according to its priority. If Bluetooth and USB MIDI are all disconnected,
then it will select the standard MIDI I/O.
B:
NOTICE:
If your YoDrum is a standard model (with three cymbals and five pads),
then we recommend plugging in the RIDE cable here. If your YoDrum
has a CRASH2 then you should plug in the CRASH2 cable here and
plug in your RIDE cymbal to Group D.
C:
A:
D:
Jack
CHINA
●
RIDE
TOM4
Function
Connect CHINA
Reserved
Connect RIDE cymbal
Connect extra TOM4 pad
12
ABCD
Jack
Hi-Hat
Hi-Hat Control
DC 9V
PHONES
LINE IN
LINE OUT
MIDI IN
MIDI OUT
Jack
CRASH 1
SNARE
TOM1
SPLASH
Jack
KICK
TOM2/3
CRASH2/RIDE
Function
Connect KICK pad
Connect TOM 2/3 pad
Connect CRASH2 or RIDE cymbal
Function
Connect CRASH1 cymbal
Connect SNARE pad
Connect TOM1 pad
Connect extra SPLASH cymbal
Function
Connect Hi-Hat cymbal
Connect Hi-Hat Control
Connect the adaptor
Connect stereo phones to hear sound from all
connected equipment
Connect external audio device
Connect to audio system or amplifier
Receive YoDrum MIDI data or receive MIDI data from
an external MIDI device or computer
Send YoDrum MIDI data or send MIDI data to an
external MIDI device or computer
USB-C USB-A

Setting up the Power Supply
1. Plug the power adaptor into an appropriate AC outlet.
2. Connect the DC plug to the DC 9V jack in Group A.
NOTICE:
1. Please use the specified AC adaptor.
2. To prevent damage to the hardware, first use the power
button to power off the unit before unplugging the AC adaptor.
3. Even when the module is turned off, electricity is still flowing
in the module at a minimum level. Please unplug the module
when it is not in use for a long time.
Turning the Power On/Off
Make sure you have completed all necessary connections
(triggers, audio, etc.).
1. Press the power button on the left side of the module to
power on.
Press and hold the power button again to power off.
2. It might take a few minutes to complete the WIFI connection
the first time you boot up.
3. Scan the QR code to download the APP and then press the
R3 button to continue.
NOTICE:
About the Auto Power Off Function
For energy conservation and environmental protection, this
function automatically turns the power off if there isn't any
operation (eg. playing, striking, button pressing) within 30
minutes.
Press and hold the L1 button and then press the power button
to disable this function. The screen will show you “Auto Power
Off Disabled!”
You can adjust more settings on the YoDrum Pro APP.
WIFI connection
1. WIFI connection guide
: Press the R3 button to start WIFI search.
: Press the R1 button to go back to previous page to the
QR code.
NOTICE:
This page only appears the first time you boot up.
The next time you load this page, you go directly to the QR
code page.
2. WIFI search
Start WIFI search when you press the R3 button .
3. Selecting a WIFI connection
Rotate the data dial and select a WIFI host.
8
Getting Ready to Play
Display Function description
1. Rotate direction; 2. Back to previous page
1. Rotate direction; 2. Enter the next page
Connect to the WIFI selected
Exit the current menu

9
4. Inputting password and connecting to WIFI
When you finish inputting the password, press “ ” to connect.
When successfully connected, the screen will display “OK”.
5. Unsuccessful connection
Connection failed
If the WIFI signal is too weak to be used, the screen will
display “Connection failed” and go back to the WIFI list so you
can select another WIFI.
Invalid password
If you input a wrong or invalid code, the screen will display
“Invalid password” and return to the password input interface.
Hotspot connection
If there is no WIFI or all the listed WIFI are unavailable, you can
use the YoDrum hotspot connection.
You can also enter the hotspot connection interface before
searching WIFI.
1. Enter hotspot connection
When you failed to connect to WIFI, press the R2 button “ ”
to enter the hotspot connection interface.
2. SSID
When you enter this page, the screen will display the SSID
and password.
Select the SSID and then input the password to connect.
3. Connected
When you finish connecting, the screen will display
“Connected”.
NOTICE:
For more advanced settings, please connect YoDrum with the
APP.
See more in Smart Applications. We recommend you select a
steady WIFI and download the APP on your first boot.
Display Function description
Caps lock
Shift to numerals
Shift to alphabet
Input the selected character
Connect
Delete character. When you delete all the
characters, it will return to the WIFI list.
Getting Ready to Play

10
4. Changing WIFI
If you need to change networks, press the R2 button and follow
the instructions below.
Already Connected to WIFI
Displayed icon:
1) After pressing the R3 button, the screen will display the
currently connected WIFI.
2) Press the R1 button to disconnect.
3) Press the L1 button to open the APP download QR code
interface.
Not connected to WIFI
Displayed icon:
Press the R2 button, which will remind you to connect to WIFI.
1) Press the R1 button to exit the current page.
2) Press the L1 button to open the APP download QR code
interface.
NOTICE:
When YoDrum has connected to WIFI, your smart device can
simultaneously connect with YoDrum via hotspot. If you are connect-
ed to both, there will be two different working statuses displayed
when you press the R2 button.
5. BlueTooth device names
You may need to know the BlueTooth device name of your
YoDrum, please refer to the following steps:
1. Press the R2 button at the main screen.
2. Press the L3 button at the new screen.
“BT Audio” is the A2DP device name of your YoDrum. If you need
to play back music from a mobile smart device on YoDrum via
BlueTooth, you can select the device accordingly on your smart
device.
“BLE MIDI” is the BlueTooth BLE MIDI device name of your
YoDrum. If you need to output the MIDI message from YoDrum to
other applications software that support BlueTooth BLE MIDI
devices, you can choose the name accordingly in the MIDI device
list of the software.
Getting Ready to Play
BT Audio:YoDrum_ABCD
BLEMIDI:YoBLE_ABCD

Playing the drums
Creating Your Own Kit
In addition to the 6 preset drum kits, you can also download “YoDrum
Pro” to record your own kit voice and do more detailed editing.
Different icons in kit interface:
YoDrum is loaded with 6 drum kits, each featuring a different style.
Selecting a Drum Kit
1. Press the L2 button to directly enter the drum kit menu from
any menu.
You can also press the L1 or L3 buttons to scroll between menus.
2. Rotate the data dial to select a desired kit.
Adjusting the Volume
Press “ ”or “ ” to enter the volume interface.
Use the left three function buttons to select the parameter you want
to adjust. Press “ ” to increase, press “ ” to decrease the
volume. Or, rotate the data dial for faster control.
Preset kits have no specified icon.
Playing Techniques
Just like an acoustic drum kit, YoDrum responds differently to various
playing techniques and dynamics. All the pads are velocity sensitive, and
some voices change timbre depending on the strike force.
Pad
The snare and tom drum pads can both detect head shots and rim shots.
Head Shot
Strike only the head of the pad.
Rim Shot
Strike the head and the rim of the pad simultaneously.
Or strike only the rim of the pad.
Cymbal
Cymbal Bow Shot
Strike the middle area of the cymbal.
Cymbal Edge Shot
Strike the edge area of the cymbal.
11
Head
Bow
Edge
Head
Rim
Purchased kit
User created kit
Master Volume
Song Volume
Metronome Volume

Playing the drums
Song
YoDrum comes with 20 preset songs.
You can also download user songs from a USB flash drive to the
module (please refer to USB chapter). Select your favorite songs and
play along with them.
Selecting a Song
1. Press the L1 button to enter the song interface.
2. Rotate the data dial to select songs.
Adjust the song volume by pressing “+” and “-” buttons.
3. Press the R3 button to start/stop song playback.
4. Icons displayed in song menu:
Cymbal Bell Shot
Strike the bell area of the Ride cymbal.
Choke Play
Choking the crash/ride edge with the hand immediately after hitting
the crash/ride mutes the crash/ride sound.
Both Ride and Crash cymbals have cymbal choke. Hi-hat has no
cymbal choke function.
Hi-Hat
Hi-Hat Pedal Change
The voice of the Hi-Hat cymbal will vary as you hit it when the foot
pedal is pressed down in different positions. It responds similarly to
the way an acoustic hi-hat does.
Open Hi-Hat
Strike the Hi-Hat pad without pressing the pedal.
Closed Hi-Hat
Strike the Hi-Hat pad with the pedal pressed completely down.
Hi-Hat Pedal
Press down the Hi-Hat controller pedal to create a foot-close sound
without striking the Hi-Hat pad.
Playing Along with a Song
1. Select a song from the preset list or from your USB disk, then
press the R1 button to start playing along with the song.
2. Press the R3 button to start or stop the metronome.
12
Bell
Choke
Tempo
Time signature
MIDI measure: beat

Beat
The tempo value shows how many times the song beat or
metronome track is played per minute (BPM).
Changing the tempo will change the song MIDI or USB MIDI file
play back speed. Adjust the tempo to your desired speed and play
along with it.
Adjusting the Tempo
1. Press the L3 button to switch to the tempo menu.
2. Rotate the data dial and adjust the value to your desired level.
Tempo range: 30-280 BPM.
3. Press the “ ” and “ ” button at the same time to return to
the default value of the current song.
NOTICE:
1. You can switch the metronome on/off in any menu but you can
only adjust the BPM value in the tempo menu.
2. For beginners, we recommend a relatively slow tempo for
steady progress.
YoDrum comes with 5 commonly used beats: 2/4, 3/4, 4/4, 6/8, 3/8.
You can select a beat and start your practice or performance.
1. Press the L3 button to enter the beat menu.
2. Select a beat as needed.
3. Press the R3 button to switch on/off the metronome.
NOTICE:
1. For more beats and metronome voices, please download
“YoDrum Pro”.
2. The metronome sound will only be heard from the headphones
and muted in the AUX OUT.
13
Tempo

USB Disk
Factory Reset
Play along with your favorite songs with USB function.
1. Insert a USB disk. The USB menu will appear on the display.
2. Songs in the root directory will be displayed.
Rotate the data dial and select a song.
3. Press the R1 button to start/stop playing.
Supported song files: MIDI (SMF 0, 1) or MP3.
4. When you insert an empty USB or if the USB song file is not
supported, song play will not available.
NOTICE:
1. Make sure your USB disk is correctly inserted into the module
port.
2. Supported USB format: 4G-128G FAT32.
In the factory reset menu, you can restore either user settings or
user data. You can also select to reset them both.
1. Press and hold volume “ ” and “ ” buttons, and then press
The power button to enter the factory reset menu.
2. Press the R3 button “ ” to enter.
If you choose to exit, it will return to the drum kit menu.
3. Rotate the data dial and select an item:
4. Press the R3 button “ ” to begin the reset.
5. YoDrum will return to the kit menu when the reset is complete.
NOTICE:
1. To prevent damage to the hardware, always keep the power
on during a reset process.
2. All deleted data cannot be recovered.
3. Backup all important files before performing a reset.
14
Item
User Setting
User Data
All
Description
Trigger, voice and other parameter settings
User songs, kits and voices
All of the above

15
Firmware Updates
Updating YoDrum’s firmware will optimize the instrument and
improve your playing experience.
Firmware updates will be released through the official website, so
remember to check it regularly.
With USB Disk
If you are using a USB disk to make the update, make sure the drive
has been formatted to FAT32 and that all the update files have been
loaded onto it.
1. Insert the USB disk into the USB-A jack on the rear panel.
2. Press and hold the three right function buttons, and then press
the power button to enter the firmware update menu.
3. The screen will display information about the current and new
firmware versions.
4. Press the R3 button “ ” to continue.
Make sure you are connected to a stable power supply.
5. The firmware update installation may take a few minutes.
6. Reboot YoDrum after the installation is complete.
7. If unsuccessful, please restart from the first step.

Smart Applications
16
With the APP download, you can greatly enhance your YoDrum
experience.
YoDrum Pro is made for the professional drummer with more
specialized needs.
You get access to more beat types, voice parameter settings,
wireless audio and MIDI recording options.
You can scan the QR code to download the APP for YoDrum.

17
Specifications
Trigger
Kick
Snare
Tom1-3
Tom4
Hi-Hat
Crash
Ride
Expansion
Smart Controller
Polyphony
Preset kits
User sample memory
Preset instruments
DSP
Tempo
Display
WIFI
Bluetooth
Other
Connectors
Power supply
Dimentions
Gross weight
G1
n/a
12", choke, edge & bow multi-sensor
1210 x 650 x 1060mm (adjustable)
29 Kg
G1 Pro
10", mesh, head & rim multi-sensor
12", choke, edge & bow multi-sensor (x2)
1290 x 760 x 1060mm (adjustable)
31 Kg
12", mesh
10", mesh, head & rim multi-sensor
8", mesh, head & rim multi-sensor (x3)
10", choke & bow multi-sensor
12", choke, bell, edge & bow multi-sensor
Splash cymbal, China cymbal
256
6 preset drum kits
approx 63Gb (share with other user contents)
178 perset drum voices, 128 GM voices
Reverb, Chorus, Compressor, EQ
30 ~ 280 BPM
Dot-matrix OLED display
2.4G WLAN 802.11b/g/n, with AP hotspot function
BlueTooth 4.0, A2DP & BLE MIDI profile
USB to host (USB type C, USB MIDI & Audio interface), USB to device (USB type A, MSD)
Line Out (6.5mm Stereo), Line In (3.5mm Stereo), Phones (3.5mm Stereo)
MIDI IN & OUT (DIN)
DC 9V, 800mA
* All specifications and appearances are subject to change without notice.

Appendix
18
Song List
Drum Kit List
NO.
1
2
3
4
5
6
Name
Standard
Rock
Brush
Dubstep 2
R&B
Percussion
NO.
1
2
3
4
5
6
7
8
9
10
11
12
13
14
15
16
17
18
19
20
Name
Ballad 1
Funk Shuffle
Groove
Pop
Bossa Nova
Samba
Fusion
Downtempo
Pop Shuffle
Latin
Salsa
6/8Soul
Blues Funk
Cool Jazz
Ballad 2
Big Band
Jazzy Funk
Hard Rock
Reggae
Country Pop

Appendix
19
Error Code Message
Troubleshooting
Error code
255
254
253
1
2
Problem
No sound
No sound from Pads
No sound from Metronome or
Song Playback
The Pad volume doesn’t match
the Songplayback volume.
Cannot connect to the computer
Unrecognized USB disk
Cannot connect toAPP
No sound from either Phones or
Line Out
Possible Cause and Solution
To be sure that the volume is not set too low.
To be sure that the pad is connected correctly.
To be sure that the volume of Metronome or music is not set too low.
Adjust the song playback volume to match the pad volume.
1. Make sure that the USB has been correctly connected.
2. Re-connect. Keep the computer on, and then turn the module on, then
connect the USB cable.
1. Make sure that the USB has been correctly connected.
2. Make sure that the USB is in FAT32 format.
1. Make sure that your smart device is connected to the same WIFI as YoDrum.
2. Checkif the WIFI signal is strong enough.
To be sure that the corresponding output volume in YoDrum Pro is not set too
low.
Solution
Re-download update files
Change or reformat USB, supports only FAT32
Check the hardware or get maintenance
Message information
Invalid update files
Reading USB disk failure
Internal flash failure
Error response
Writing SD card failure

YoDrum_G04
20/F. Cheung Lee Industrial Building,
9 Cheung Lee Steet, Chai Wan, Hong Kong
Tel: +852 2898 8831
www. yodrum. com
This manual suits for next models
1
Table of contents
Other Medeli Drum manuals

Medeli
Medeli DD508DX User manual

Medeli
Medeli DD638DX User guide

Medeli
Medeli DD630 User manual

Medeli
Medeli DD6 User manual

Medeli
Medeli DD401 User manual

Medeli
Medeli AW DD60 User manual

Medeli
Medeli DD508 User manual

Medeli
Medeli MZ528 User manual

Medeli
Medeli DD506 User manual

Medeli
Medeli DD508 User manual

Medeli
Medeli DD610S User manual

Medeli
Medeli Dd635d User manual

Medeli
Medeli DIGITAL DRUM User manual

Medeli
Medeli DD602 User manual

Medeli
Medeli DD518DX User manual

Medeli
Medeli DD400 User manual

Medeli
Medeli DD506 User manual

Medeli
Medeli DD600 User manual

Medeli
Medeli DD315 User manual

Medeli
Medeli DD635 User manual