MedKlinn PRO Series User manual
PRO AS1 PRO AS2

CONTENTS
SAFETY PRECAUTIONS
•Warnings
1
•Cautions during operation
2
DEVICE IDENTIFICATION 3
GETTING STARTED
•Installation and placement of unit
4
OPERATION
•To turn the unit on
4
•To select various modes
4
•To turn the unit o
5
iKLINN FUNCTION
•To select duration of iKlinn function
5
MAINTENANCE AND SERVICING
•Regular cleaning of cartridge 6
•Cartridge replacement
6
TROUBLESHOOTING GUIDE 7
INSTALLATION GUIDE
8
SPECIFICATIONS 11
...................................................................................................................
..........................................................................................................................................
..................................................................................................................
..........................................................................................................
..............................................................................................................................
............................................................................................................
..............................................................................................................................
.......................................................................................................................
.......................................................................................................
......................................................................................................................
...............................................................................................................................
.........................................................................................................................
................................................................................................................

1
Congratulations on your purchase of the MedKlinn PRO AS1/AS2 Air Sterilizer! It incorporates the
most innovative and latest air cleaning technology, the CerafusionTM Technology. Please read the
following instructions carefully before using the unit. With a little care, it will provide you with many years
of clean, fresh and healthy air in any indoor environment.
1. Do not use the MedKlinn PRO AS1/AS2 if the connector is damaged.
2. Do not insert any sharp or pointed object through the ventilation holes of the unit, as well as the bracket socket.
3. Do not let children play with the unit.
4. Do not immerse the unit in water, or allow water or any uids to enter through the ventilation holes.
5. Do not press the on/o button or remove the unit when your hands are wet.
6. Switch o the unit before cleaning the unit.
7. Do not modify, disassemble or repair the unit by yourself.
8. Do not wipe this unit with alcohol-based cleaner which may damage the surface.
9. To prevent potential electrical shock/re hazard, ensure there are no oily, chemical or foreign residues.
10. Ensure the unit is properly grounded to avoid electrical shock.
11. Switch o the unit before changing or removing the catridge.
12. Opening the unit or tampering with it in any way will cause the Warranty to become VOID.
13. If you encounter any problems with the unit, please read the Troubleshooting Guide rst, and if the problem
persists, please contact the nearest authorised MedKlinn Service Centre.
SAFETY PRECAUTIONS
WARNINGS - To reduce the risk of electrical shock, re or injury:

2
READ AND SAVE THESE INSTRUCTIONS.
FOR FURTHER ASSISTANCE, PLEASE CONTACT OUR CUSTOMER SERVICE (WWW.MEDKLINN.COM)
1. Place the unit at least 6 feet from radio, television or electronic equipment. This is to minimize the possibility of
interference with the equipment or the remote controller.
2. Do not cover the unit in any way at all, particularly the ventilation holes or air outlet. Doing so will cause excessive
heat build-up and may result in a re and irreparable damage to the unit.
3. Avoid placing the unit where curtains or other furnishings may cover the ventilation holes.
4. Ensure that there is free ow of air around the unit.
5. Avoid locations where the unit is exposed to condensation due to rapid and drastic temperature uctuations.
The unit should only be used in temperatures between 5-35º C.
6. Avoid locations where the unit is exposed to water droplet/basin area.
7. Do not use in small enclosed spaces where there is no or poor air circulation e.g. in wardrobes, closets or pantries.
8. It is NOT recommended to place the unit directly too close to pets.
CAUTIONS DURING OPERATION
If the unit should cause interference to radio or television reception, try to correct the interference by one or more of
the following measures:
1. Reorient or relocate the receiving antenna.
2. Increase the distance between the unit and radio/TV receiver.
3. Connect the equipment into an outlet on a circuit dierent from that to which the receiver is connected.
4. Consult the dealer or an experienced radio/TV technician for help.
NOTE: Radio or TV Interference:
3
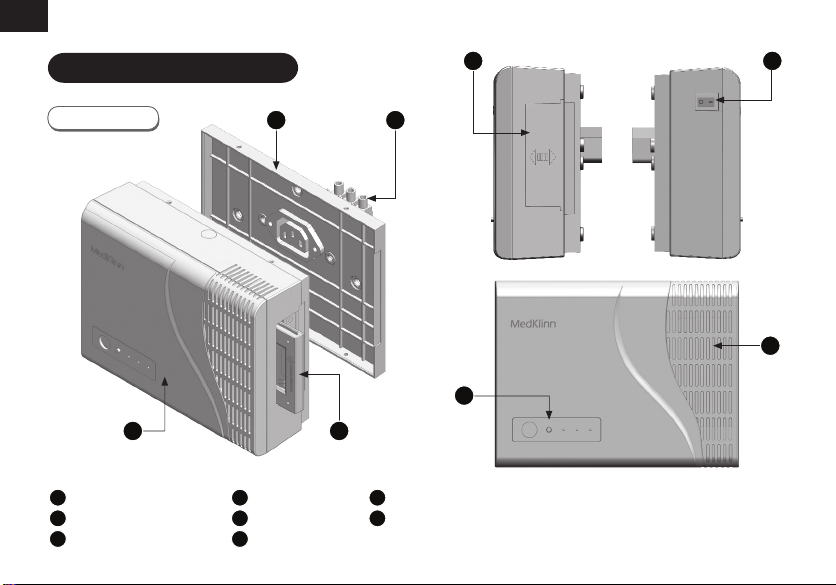
DEVICE IDENTIFICATION
PRO AS1/AS2
12
34
PRO AS1/AS2 unit
Cerafusion™ Cartridge
Mounting bracket
Connector
Cartridge cover
On/O switch
Control panel
Ventilation holes
1
2
3
4
5
6
7
8
56
8
7
4
INSTALLATION AND PLACEMENT OF UNIT:
For best performance, install the unit near a source of air circulation such as an air conditioner or near the incoming
air ventilation outlet. This will enable the activated oxygen produced by the unit to be quickly distributed throughout
the room. It is highly recommended to install the unit at least 2 feet from your normal sitting or sleeping position.
GETTING STARTED
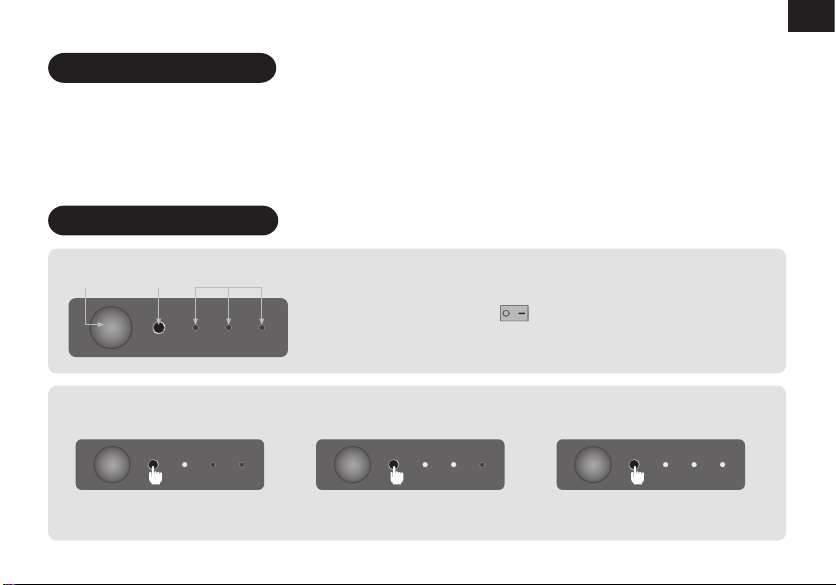
OPERATION
Control button LED lightsInfrared TO TURN THE UNIT ON:
1. Once the unit is tted into an existing electric socket, it is automatically
connected to the power. Press to turn the unit on (“ - ”) .
2. By default, the three LED lights will light up in blue. This indicates that the unit
is operating at HIGH mode.
All LED lights turn on
Unit is operating at HIGH mode
First and Second LED lights turn on
Unit is operating at MEDIUM mode
TO SELECT VARIOUS MODES:
1. Press the Control button once to advance it to the next mode.
First LED light turns on
Unit is operating at LOW mode

5
iKLINN FUNCTION
All LED lights blink
iKlinn will run for THREE (3) hours.
First and Second LED lights blink
iKlinn will run for TWO (2) hours.
TO SELECT DURATION OF THE iKLINN FUNCTION:
1. Press the Control button once to advance it to the next mode.
First LED light blinks
iKlinn will run for ONE (1) hour.
The iKlinn function is specially designed to initiate instant cleaning as required. To activate iKlinn, press the Control
button for ve (5) seconds. Once activated, the LED lights will start blinking.
Select ONE (1) hour, TWO (2) hours or THREE (3) hours as follows:
TO TURN THE UNIT OFF:
1. Press to turn the unit o (“ O ”) . All LED lights will become unlit.
When the iKlinn function is complete, the prior setting will resume.
To revert to prior setting during iKlinn mode, press the Control button again for ve (5) seconds.

6
1. To prevent dust/stain on the main unit, clean the unit with a
slightly damp cloth as often as necessary.
2. If water stains appear on the surface, gently wipe and clean it.
3. Ensure that the ventilation holes are not clogged with dust or dirt.
4. DO NOT use alcohol-based cleaner on plastic material (PRO AS1).
5. Avoid water from dropping onto the unit.
6. Switch o the unit prior to removing or changing the cartridge.
7. To remove the cartridge, please refer to the Installation Guide (page 8).
MAINTENANCE &SERVICING
• Minimal maintenance is required for the CerafusionTM cartridge. It is
recommended to clean the cartridge periodically by using the nail
provided or equivalent to clean the edges of the metal area.
• In a normal environment, cleaning every three (3) to six (6) months
is recommended to maintain optimum performance.
REGULAR CLEANING OF CARTRIDGE:
To maintain optimal performance, it is strongly recommended that the cartridge be replaced with a new cartridge
every twelve(12) months for a normal environment. In more polluted environments, the cartridge may have to be
replaced more frequently.
CARTRIDGE REPLACEMENT:
Wipe the unit as often as necessary
Clean the cartridge periodically
metal area

7
TROUBLESHOOTING GUIDE
1. I have pressed to turn on, but the LED light is not lit.
First, check that the unit is properly installed to the existing power outlet, and that the switch is turned on.
If the LED light is still unlit, contact your authorized MedKlinn Service Centre to have the unit serviced.
2. I have dropped the PRO AS1/AS2. Is it safe to continue using it?
First, carefully check the whole unit casing to make sure there are no cracks or breaks. Then, gently shake the unit
to make sure nothing has broken or detached inside the unit. If the casing has cracked or something sounds
broken inside, contact your authorized MedKlinn Service Centre to have the unit serviced.
3. There is no hissing sound after I changed the cartridge.
First, switch o the unit and take out the cartridge. Then, check if the cartridge is broken. Brush o any dust or
grease on the surface of the cartridge. If the cartridge is in its perfect condition, reinstall it and check if the hissing
sound is apparent. If there is no hissing sound, contact your nearest MedKlinn Service Centre.
4. I detect a hissing sound from the unit, but the LED light is not lit. What happen?
The LED light of the unit has fused. Even though the LED light is fused, the unit is still functioning properly.
Please contact your authorized MedKlinn Service Centre to have the LED light replaced.
5. I hear an abnormal sound from the unit and it is not the normal hissing sound that I usually detect.
Please contact your authorized MedKlinn Service Centre to have the unit serviced.
8
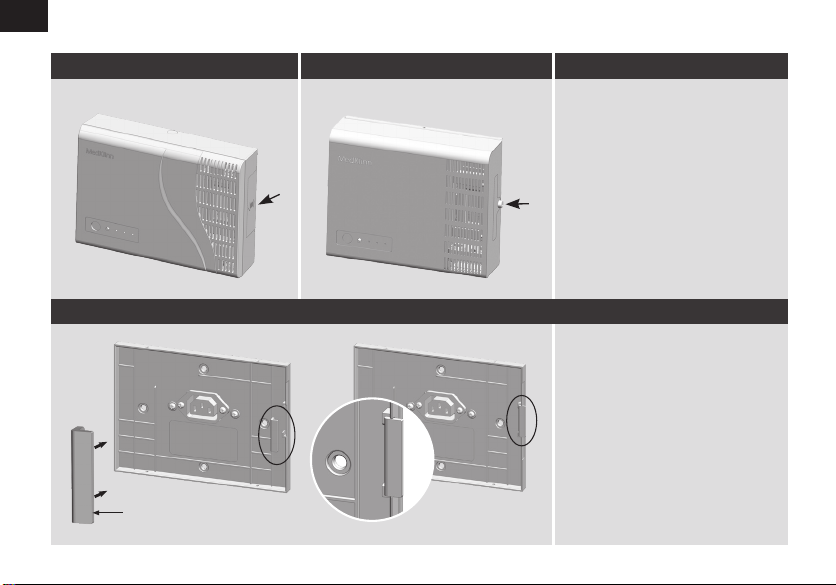
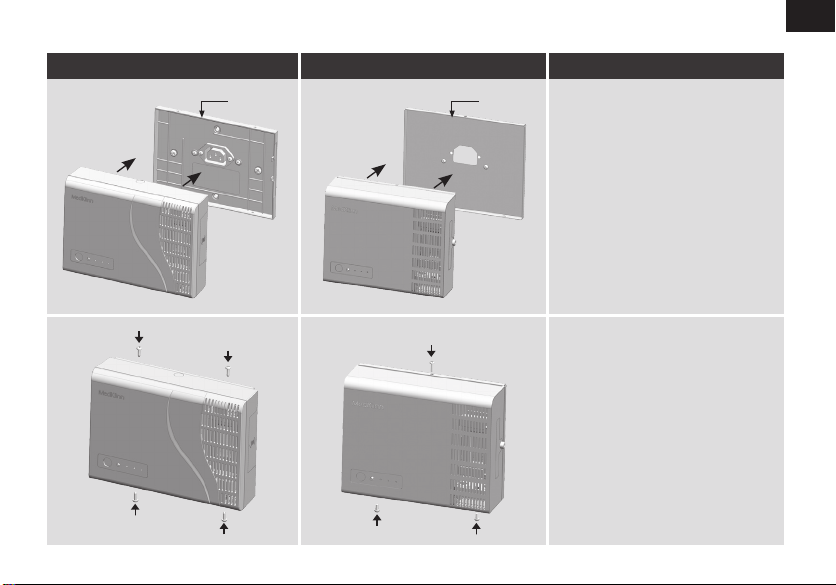
INSTALLATION GUIDE
PRO AS1 PRO AS2 DESCRIPTION
1. Connect wires using the
connector provided.
2. Use the two (2) screws provided
to secure the mounting plate to
the wall.
(Installation to be performed ONLY by a Certied Electrician)
1. Remove cartridge cover.
2. Insert the cartridge into the
opening ensuring that the
white and metalic surface is
facing the ventilation holes.
Wall/surface
Mounting plate
Wall/surface
Mounting plate
Cartridge cover
Ventilation holes White & metalic
surface
Cartridge cover
Ventilation holes White & metalic
surface
STEP 2
STEP 1
9
1. To lock the cartridge cover,
insert the catridge lock as
shown after Step 3.
PRO AS1 PRO AS2 DESCRIPTION
(PRO AS1)
1. Push the plastic cover securely
into place.
(PRO AS2)
1. Insert the stainless steel cover
and fasten screw into place.
Cartridge lock
OPTIONAL CARTRIDGE LOCK (Only applicable for PRO AS1)
STEP 3
10
PRO AS1 PRO AS2 DESCRIPTION
1. To secure the unit to the wall
mounting, insert the screws
provided and fasten.
1. Attach PRO AS1/AS2 to the
mounted bracket.
Bracket Bracket
STEP 4
STEP 5

11
SPECIFICATIONS
* 1. Depending on the pollution level
2. Ceiling height of 9 feet
For more information, please log on to www.medklinn.com
Stainless Steel
Yes
Ion, Hybrid, Ozone
Wall mounted
110~240 VAC
1.5 Amp @ 12 VDC
< 7 W
Low/ Mid/ Hi/ iKlinn
172mm (W) x 54mm (D) x 137mm (H)
Temperature: 10º - 35ºC
300 ft2/ 28m2
1,100 gram
1 year limited
Remote control
PRO AS1
Casing
Interchangeable Cartridge
Cartridge Option
Installation
Input Voltage
Output Current (max)
Power Consumption
Functions
Dimensions
Operating Environment
Commercial Coverage Area*
Weight
Warranty
Optional Items
Polycarbonate
Yes
Ion, Hybrid
Wall mounted
110~240 VAC
1.5 Amp @ 12 VDC
< 6 W
Low/ Mid/ Hi/ iKlinn
182mm (W) x 56mm (D) x 131mm (H)
Temperature: 10º - 35ºC
300 ft2/ 28m2
700 gram
1 year limited
Remote control
DESCRIPTION
MODEL
PRO AS2
This manual suits for next models
2
Table of contents
Other MedKlinn Laboratory Equipment manuals


Popular Laboratory Equipment manuals by other brands

Thermo Scientific
Thermo Scientific MaxQ 2000 operating manual

DIGISYSTEM
DIGISYSTEM DSB-500D instruction manual

Showa Denko
Showa Denko Shodex Asahipak NH2P-50 10E Operation manual

V&P Scientific
V&P Scientific VP 741D Operation manual

Memmert
Memmert CTC 256 operating manual

Beckman Coulter
Beckman Coulter COULTER EPICS XL Service manual


