MedKlinn PRO AS3 User manual

OPERATING MANUAL
Business Solutions l Air+Surface Sterilizers
PRO AS3
使用说明书
使用說明書
(繁體中文請參閱第14頁) (简体中文请参阅第28页)

1
3
6
8
12
13
CONTENTS
SAFETY PRECAUTIONS ................................................................................................................................................................................
DEVICE IDENTIFICATION ..........................................................................................................................................................................
GETTING STARTED ............................................................................................................................................................................................
MAINTENANCE & SERVICE ...................................................................................................................................................................
TROUBLESHOOTING GUIDE ..................................................................................................................................................................
SPECIFICATIONS ..............................................................................................................................................................................................

Congratulations on your purchase of the Medklinn PRO AS3 Air+Suface Sterilizer! It incorporates the most innovative and latest
air+surface cleaning technology, the CerafusionTM Technology. Please read the following instructions carefully before using the unit.
With a little care, it will help you create a clean, fresh and healthy living space for many years.
1. Do not use the unit if the power cable or plug is damaged.
2. Do not detach front lid when the unit is turned on.
3. Do not insert any sharp or pointed object through the ventilation holes of the unit.
4. Do not let children play with the unit.
5. Do not immerse the unit in water, or allow water or any fluids to enter through the ventilation holes.
6. When removing the power plug, always hold the plug and never pull the cable.
7. Do not remove the power plug when your hands are wet.
8. Remove the power plug from the wall socket before cleaning the unit.
9. Do not modify, disassemble or repair this unit by yourself.
10.Do not replace the electric plug or cut the power cable. Replacing the plug or cutting the power cable in any way will
immediately cause the Warranty to become void. Any subsequent fault in the operation of the unit will not be covered
by the Warranty, and repair and servicing will be chargeable.
11.If the power cable is damaged, it must be sent to an authorized Medkinn Service Centre for repair.
12.Do not attempt to open the unit. The unit requires minimal maintenance, and no servicing or repairs are to be carried out
by the User. Opening the device or tampering with it in any way will cause the Warranty to become void. If you
encounter any problems with the unit, please read the Troubleshooting Guide first, and if the problem persists, please
contact the nearest authorized Medklinn Service Centre.
13.Do not wipe the unit with benzene or paint thinner.
WARNINGS - TO REDUCE THE RISK OF ELECTRICAL SHOCK, FIRE OR INJURY:
READ AND SAVE THESE INSTRUCTIONS.
FOR FURTHER ASSISTANCE, PLEASE CALL OUR CUSTOMER SERVICE.
1

If the unit should cause interference to radio or television reception, try to correct the interference by one or more of the following
measures:
•Reorient or relocate the receiving antenna.
• Increase the distance between the unit and radio/TV receiver.
• Connect the equipment into an outlet on a circuit different from that to which the receiver is connected.
• Consult the dealer or an experienced radio/TV technician for help.
NOTE - RADIO OR TV INTERFERENCE:
1. Place the unit at least 6 feet away from any radio, television or electronic equipment. This is to minimize the possibility of
interference with the equipment or the remote controller.
2. Do not cover the unit in any way at all, particularly the ventilation holes. Doing so will cause excessive heat build-up and may
result in a fire and irreparable damage to the unit.
3. Avoid placing the unit where curtains or other furnishings may cover the ventilation holes.
4. Avoid placing the unit in oily environments as it may cause the cartridge to be coated with a thicker layer of grease/debris.
Hence, affecting its performance.
5. Ensure that there is free flow of air around the unit.
6. Avoid locations where the unit is exposed to condensation due to rapid and drastic temperature fluctuations. The unit should
only be used in temperatures between 5º-35ºC.
7. Effective cleaning by Active Oxygen requires adequate air exchange as they are created from oxygen. Regular air exchange
will take place if the door or window is opened occasionally.
8. Do not use in small enclosed spaces where there is no or poor air circulation e.g. in wardrobes, closets or pantries.
9. Active Oxygen is very reactive, and there may be some loss of paint from poorly painted surfaces. To minimize this,
do not place the unit directly against walls or other painted surfaces, and leave a space of at least one (1) foot from these
surfaces.
10. It is NOT recommended to place the unit directly too close to pets.
CAUTIONS DURING OPERATION
2
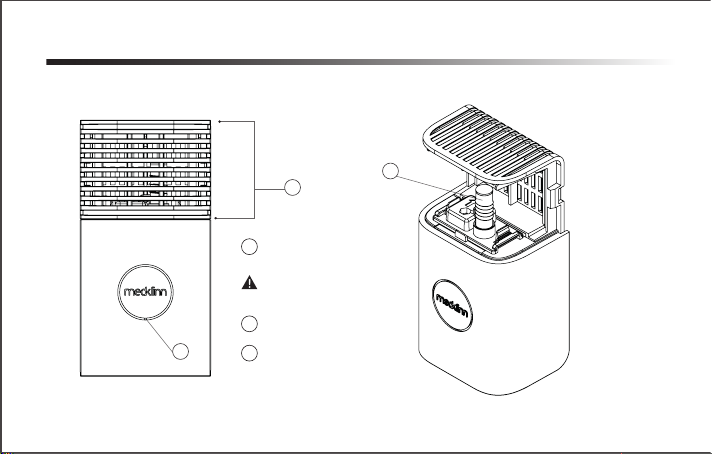
DEVICE IDENTIFICATION
FRONT VIEW
1
2
3
Detachable Front Lid
1
CerafusionTM Cartridge
3
LED light2
Caution:
Do not detach front lid
when the unit is turned on.
3
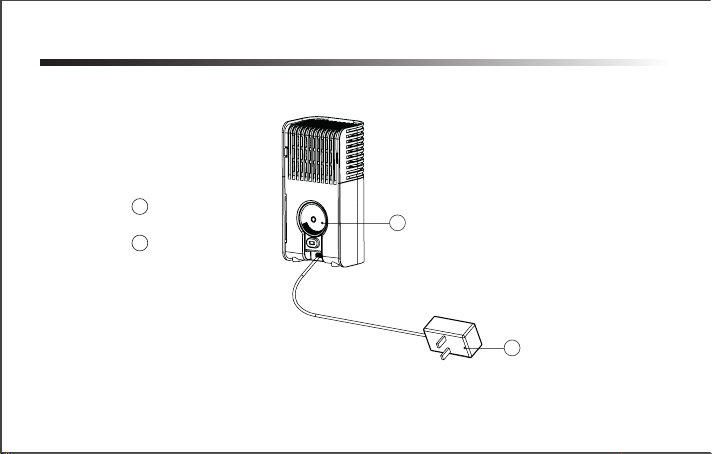
BACK VIEW
DEVICE IDENTIFICATION
Plug 2 pin / 3 pin power adaptor into AC Outlet
(AC 110V ~ 240V, 50/60Hz)
Control Dial
1
2 pin / 3 pin
Power Adaptor
2
2
1
4

DEVICE IDENTIFICATION
CERAFUSION™ CARTRIDGE
Glass Tube
Direction Arrow for
Cartridge Replacement
Top View Bottom View
Contact Point
5

GETTING STARTED
TO TURN THE UNIT ON:
To AC Outlet
(AC 110V ~ 240V, 50/60Hz)
Plug 2 pin / 3 pin power adaptor into AC power outlet.
TO ADJUST TO LOW/HIGH SETTING:
To adjust to HIGH mode,
turn the Control Dial
clockwise.
To adjust to LOW mode,
turn the Control Dial
anti-clockwise.
TO SWITCH OFF THE DEVICE:
1. Turn the Control Dial anti-clockwise until
you hear a “click” sound.
HIGH HIGH
6
For best performance, place the unit under a source of air circulation such as an air conditioner or a ceiling fan.
This will enable the Active Oxygen produced by the unit to be quickly distributed throughout the room. It is highly
recommended to place the unit at least 2 feet from your normal sitting or sleeping position. Do not cover the unit in
any way at all, particularly the ventilation holes. Doing so will cause excessive heat build-up and may result in a fire
and irreparable damage to the unit.
PLACEMENT OF UNIT:
GETTING STARTED
7
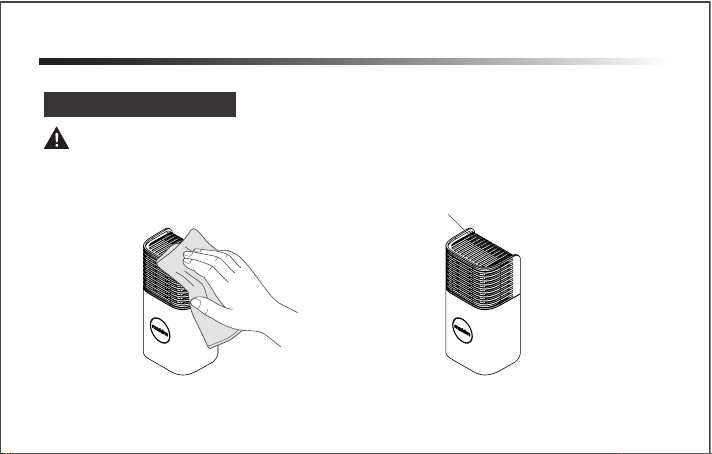
MAINTENANCE & SERVICE
Ventilation holes
CLEANING OF DEVICE
Due to water evaporation and accumulation of fine dust or other pollutants, there may be some stains around the ventilation holes.
CAUTION: SWITCH OFF AND UNPLUG THE UNIT BEFORE CLEANING
Wipe the device gently with a slightly damp cloth.
CLEANING THE EXTERNAL PART OF DEVICE:
Ensure ventilation holes are not clogged
with dust or dirt.
8

CAUTION: SWITCH OFF AND UNPLUG THE UNIT BEFORE CLEANING
Step 2: Pull out the front lid.
CLEANING THE INTERNAL PART OF DEVICE:
Step 1: Push the latch outward slightly to open the front lid.
Latch
Latch
MAINTENANCE & SERVICE
9

MAINTENANCE & SERVICE
Step 3: Remove the Cerafusion™ Cartridge by
holding both end and pulling it upwards.
Step 4: Clean the front lid and internal surfaces
with a slightly damp cloth and/or toothbrush.
THE CERAFUSION™ CARTRIDGE COULD BE HOT. BE CAREFUL WHEN REMOVING IT.
CAUTION:
10

WHEN SHOULD THE CERAFUSIONTM CARTRIDGE BE CHANGED?
1. ENSURE THAT THE UNIT IS SWITCHED OFF BEFORE REPLACING CARTRIDGE TO AVOID
ELECTRICAL SHOCK.
2. DO NOT HOLD THE GLASS TUBE WHEN HANDLING THE CARTRIDGE.
3. DO NOT TURN OR TWIST THE GLASS TUBE AS IT WILL DAMAGE OR CRACK THE GLASS.
CAUTION:
When there is no purple glow
or “hissing” sound from the cartridge
, it is time to replace it.
*Replace new
Cerafusion™ Cartridge
** Make sure to follow
the direction arrow on cartridge
MAINTENANCE & SERVICE
11

TROUBLESHOOTING GUIDE
1. I have dropped the unit. Is it safe to continue using it?
First, carefully check the whole unit to make sure there are no cracks or breaks externally and internally.
Next, check the glass tube of the cartridge to make sure it is not cracked or broken.
If there is any component damage, contact your authorized Medklinn Service Centre.
2. There is a “hissing” sound coming from the unit. Is this normal?
Yes. It is normal. The “hissing” sound indicates that the Cerafusion™ Cartridge is generating Active Oxygen.
3. I have switched on the unit, but there is no “hissing” sound coming from the unit.
First, check if the Cerafusion™ Cartridge is properly inserted into the cartridge holder. If there is still no “hissing” sound after
replacing a new cartridge, contact your authorized Medklinn Service Centre to have the unit serviced.
12

SPECIFICATIONS
* 1) Depending on the pollution level.
2) Ceiling height of 9 ft / 3 m.
MODEL
Input Voltage 110-240 VAC
0.45A
2 pin / 3 pin power adaptor
< 5.5 watts
75(W) x 55(D) x 145(H)
Temperature 5º-35ºC
300-350 ft2/ 28-32 m2
400 grams
1 year limited
Input Current (max)
Power Consumption
Power Plug Type
Dimensions (mm)
Operating Environment
Coverage Area*
Weight
Warranty
PRO AS3
13

15
17
20
22
26
27
目錄
安全注意事項..................................................................................................................................................................
產品標識 .........................................................................................................................................................................
使用入門 .........................................................................................................................................................................
維修與保養 .....................................................................................................................................................................
故障排解指南 ................................................................................................................................................................
規格 ...................................................................................................................................................................................
14

恭喜您購買了Medklinn PRO AS3!本機採有最創新空氣+表層淨化技術-Cerafusion™技術,在使用此產品之前,請仔細閱讀以下說明。只需稍
加保養,此器即可在任何室內環境中為您長年提供乾淨,清新及健康的空氣。
1. 如果電源線或插頭破損,切勿使用此器。
2. 當此器開著時,請勿拆下前蓋。
3. 切勿使用尖銳物體穿刺此機的前蓋通風槽。
4. 切勿讓兒童玩弄此機。
5. 切勿將此機浸入水中,或者讓水或其它液體流入通風槽。
6. 拔下電源插頭時,請用手緊握插頭並拔下,切勿拽拉電源線。
7. 切勿用濕手拔下電源插頭。
8. 在清潔此機前,必須先從牆上的電源插座拔下電源插頭。
9. 切勿擅自改裝,拆卸或修理此機。
10. 切勿更換電源插頭或切斷電源線。一旦以任何方式更換插頭或切斷電源線,將導致“保修”即時失效。此後,在此機操作的過程中出現的任何
故障均不在保修範圍內,並將收取檢修及修理費用。
11. 如果電源線出現破損,必須將此機送往授權的Medklinn維修中心修理。
12. 切勿嘗試打開此機外殼. 此機只需要極少程度的保修,無須用戶自行檢修或修理工作。一旦以任何方式打開此器外殼或胡亂接駁此器,將導
致“保修服務“失效。如果此機出現問題,請首先閱讀故障排解指南,如果問題仍然無法解決,請聯絡最近的授權Medklinn維修中心。
13. 切勿使用苯或油漆稀釋劑擦拭此器。
警告 - 為了減少觸電,火災或受傷等危險
請仔細閱讀並妥善保存以上說明。
如果需要更多幫助,請致電我們的客戶服務中心。
15

如果此機對收音機或電視接收造成乾擾,請嘗試以下的操作:
• 重新調整或重新定位接收天線
• 將此機遠離收音機或電視機。
• 將此機與收音機或電視機連接到不同的電源插座上。
• 請諮詢零售商或有經驗的收音機/電視技術人員以獲取幫助。
注意-收音機或電視干擾
1. 將此機遠離收音機、電視機或電子設備至少6英尺的地方,這樣可以將乾擾此器或遙控裝置的可能性降到最低。
2. 切勿以任何方式遮蓋此機,尤其是通風槽。否則會積聚過多的熱量,從而可能會引發火災或對此器造成無法彌補的損壞。
3. 請避免將此機放置在窗簾或其他家具陳設/裝飾可能遮蓋通風槽的地方例如窗簾或其他家具裝飾等。
4. 請避免在非常油膩或多煙的環境下使用此器,此器的芯塊就會被一層油污或煙漬覆蓋,使其性能效率迅速下降。
5. 請確保此機周圍空氣流通。
6. 切勿將此機放置在溫度劇烈變化的地方這將會導致冷凝作用並損壞此機。此機僅可在溫度為5至35攝氏度的環境下使用。
7. 由活氧產生的有效淨化作用需要適當的空氣轉換,因為活氧是通過氧氣產生的。開門或開窗數次,即已經完成定期的空氣轉換。
8. 切勿在空氣不流通或不暢順的狹小密閉空間內使用此器,例如衣櫥、儲藏室或餐具室。
9. 活氧非常活躍,會在一定程度上引起油漆不良的表面出現掉漆。為了減少掉漆,切勿將此機直接靠牆或其他塗裝表面放置,並且與這些表面
之間至少留有1英尺的距離。
10. 建議不要將此機過於靠近寵物位置。
操作過程中的注意事項
16

產品標識
正面圖
1
可拆卸前蓋
1
LED燈
2
CerafusionTM 芯塊
3
警告:
當此機通著電源時,
請勿拆下前蓋。
2
3
17

後視圖
產品標識
連接2針/ 3針電源適配器與交流輸出插座
(交流電壓110伏特~240伏特,50/60赫)
控制轉盤
1
2針/ 3針電源適配器
1
2
1
18
Table of contents
Other MedKlinn Laboratory Equipment manuals


