MedKlinn Home Asens+ Series User manual

OPERATING
MANUAL

CONTENTS
SAFETY PRECAUTIONS ............................................................................................................................................................................... 1
DEVICE IDENTIFICATION ......................................................................................................................................................................... 3
GETTING STARTED .......................................................................................................................................................................................... 6
OPERATION ........................................................................................................................................................................................................... 7
SAFETY FEATURE .............................................................................................................................................................................................. 8
MAINTENANCE & SERVICE .................................................................................................................................................................. 9
TROUBLESHOOTING GUIDE .................................................................................................................................................................. 13
SPECIFICATIONS ..............................................................................................................................................................................................14

Congratulations on your purchase of the Medklinn Asens+Air+Surface Sterilizer! It incorporates the most innovative and latest
air+surface cleaning technology, the CerafusionTM Technology. Please read the following instructions carefully before using the unit.
With a little care, it will provide you with many years of clean, fresh and healthy living spaces.
1. Do not use the unit if the power cable or plug is damaged.
2. Do not insert any sharp or pointed object through the ventilation holes of the unit.
3. Do not let children play with the unit.
4. Do not immerse the unit in water, or allow water or any fluids to enter through the ventilation holes.
5. When removing the power plug, always hold the plug and never pull the cable.
6. Do not remove the power plug when your hands are wet.
7. Remove the power plug from the wall socket before cleaning the unit.
8. Do not modify, disassemble or repair this unit by yourself.
9. Do not replace the electric plug or cut the power cable. Replacing the plug or cutting the power cable in any way will
immediately cause the Warranty to become void. Any subsequent fault in the operation of the unit will not be covered
by the Warranty, and repair and servicing will be chargeable.
10.If the power cable is damaged, it must be sent to Medklinn Service Centre for repair.
11.Do not attempt to open the unit. The unit requires minimal maintenance, and no servicing or repairs are to be carried out
by the User. Opening the device or tampering with it in any way will cause the Warranty to become void. If you
encounter any problems with the unit, please read the Troubleshooting Guide first, and if the problem persists, please
contact Medklinn Service Centre.
12.Do not wipe the unit with benzene or paint thinner.
WARNINGS - TO REDUCE THE RISK OF ELECTRICAL SHOCK, FIRE OR INJURY:
READ AND SAVE THESE INSTRUCTIONS.
FOR FURTHER ASSISTANCE, PLEASE CALL OUR CUSTOMER SERVICE.
1

2
If the unit should cause interference to radio or television reception, try to correct the interference by one or more of the following
measures:
•Reorient or relocate the receiving antenna.
• Increase the distance between the unit and radio/TV receiver.
• Connect the equipment into an outlet on a circuit different from that to which the receiver is connected.
• Consult the dealer or an experienced radio/TV technician for help.
NOTE - RADIO OR TV INTERFERENCE:
1. Place the unit at least 6 feet from radio, television or electronic equipment. This is to minimize the possibility of interference with
the equipment or the remote controller.
2. Do not cover the unit in any way at all, particularly the ventilation holes. Doing so will cause excessive heat build-up and may
result in a fire and irreparable damage to the unit.
3. Avoid placing the unit where curtains or other furnishings may cover the ventilation holes.
4. Avoid placing the unit in oily environments as it may cause the cartridge to be coated with a thicker layer of grease/debris.
Hence, affecting its performance.
5. Ensure that there is free flow of air around the unit.
6. Avoid locations where the unit is exposed to condensation due to rapid and drastic temperature fluctuations. The unit should
only be used in temperatures between 5º-35ºC.
7. Effective cleaning by active oxygen requires adequate air exchange as they are created from oxygen. Regular air exchange
will take place if the door or window is opened occasionally.
8. Do not use in small enclosed spaces where there is no or poor air circulation e.g. in wardrobes, closets or pantries.
9. Active oxygen is very reactive, and there may be some loss of paint from poorly painted surfaces. To minimize this,
do not place the unit directly against walls or other painted surfaces, and leave a space of at least one (1) foot from these
surfaces.
10. It is NOT recommended to place the unit directly too close to pets.
CAUTIONS DURING OPERATION
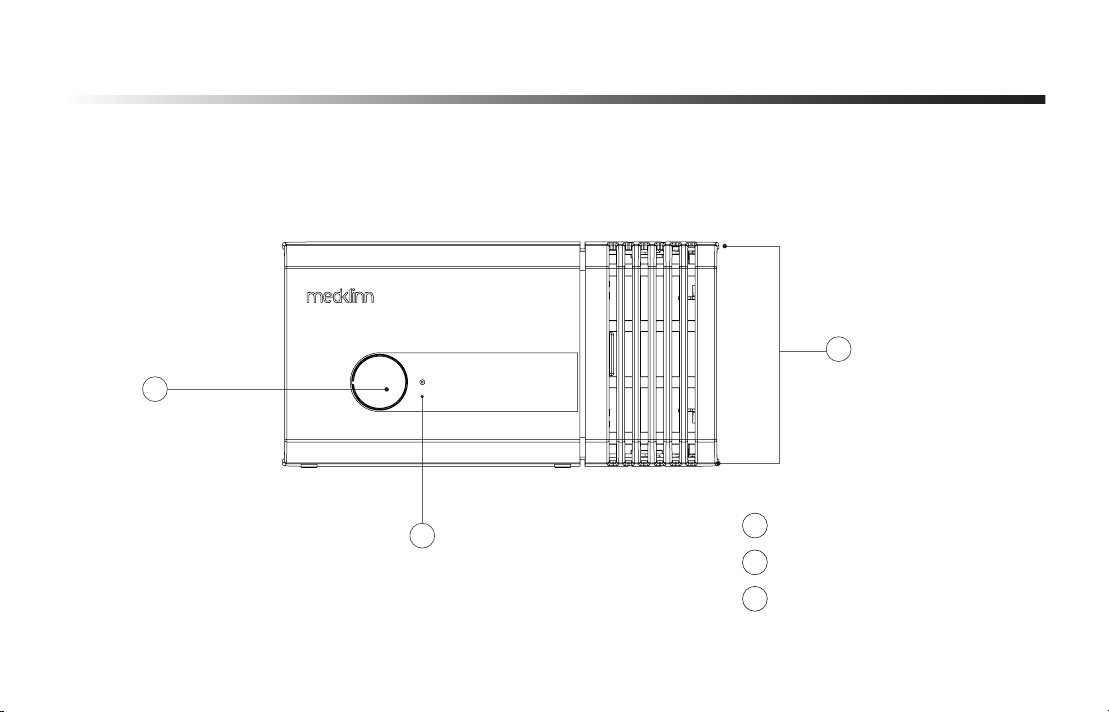
DEVICE IDENTIFICATION
ASENS+20 & 40
(Front View)
1
3
2Control button
1
2
Removable front lid
3
LED light indicator
3

4
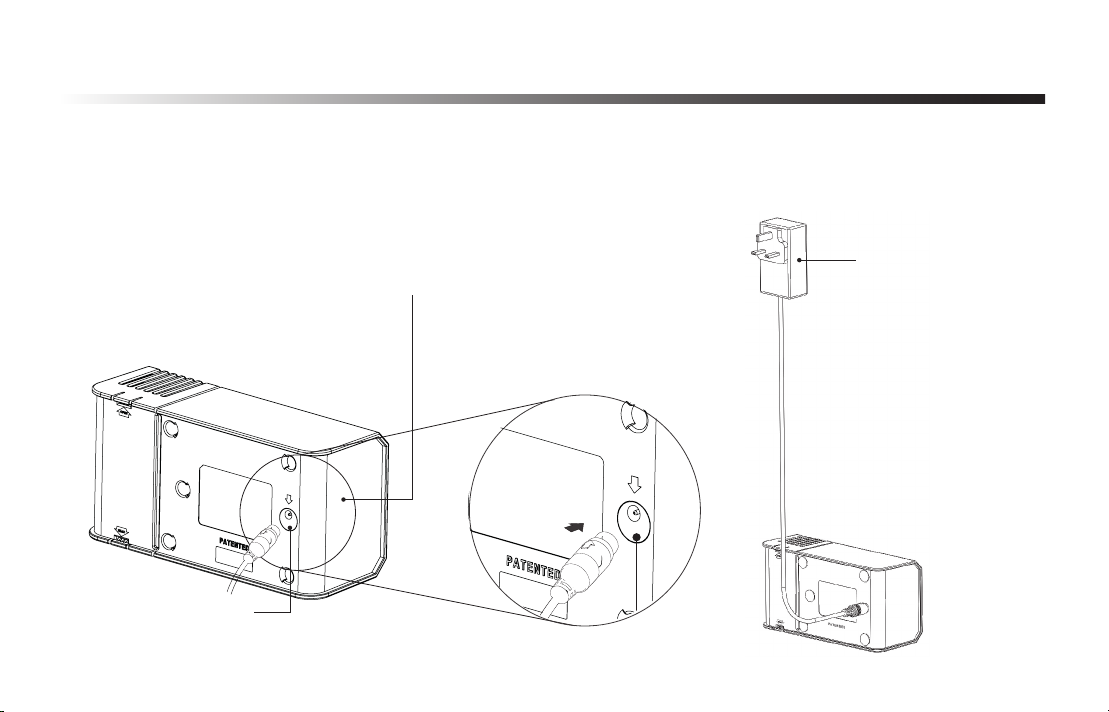
DEVICE IDENTIFICATION
ASENS+20 & 40
(Back View)
Power inlet
1
Adaptor
2
1
2
Plug into AC Outlet
(AC 110V ~ 240V, 50/60Hz)

5
DEVICE IDENTIFICATION
CERAFUSION™ CARTRIDGE
Outer electrode
Glass tube
Metal contact points
6
GETTING STARTED
TO TURN THE UNIT ON:
To AC Outlet
(AC 110V ~ 240V,
50/60Hz)
2. Plug in the adaptor into 110V~240V AC power outlet.1. Plug in the power supply jack into the power inlet.
Power inlet
Power supply jack
Plug into AC Outlet
(AC 110V ~ 240V, 50/60Hz)
Power inlet
Power supply jack
7
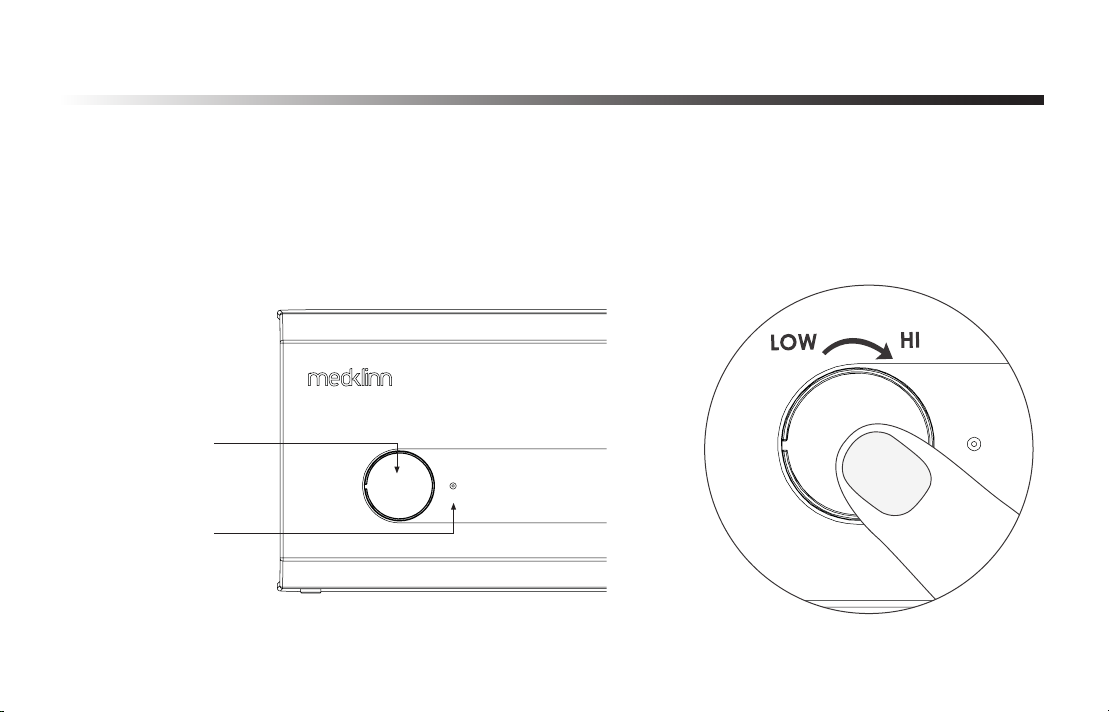
OPERATION
TO ADJUST TO HIGH:
Turn the knob clockwise until it stops.
Knob
LED light indicator
TO ADJUST TO LOW:
Turn the knob counter clockwise until it stops.

8
SAFETY FEATURE
When the front lid is closed, the unit will restore to its previous setting.
A safety feature is incorporated to
prevent electrical shock.
In the event the front lid is
detached while the unit is still
operating, the LED light will
become unlit. This indicates the
power to the Cerafusion™
Cartridge has been cut off.
CAUTION
9
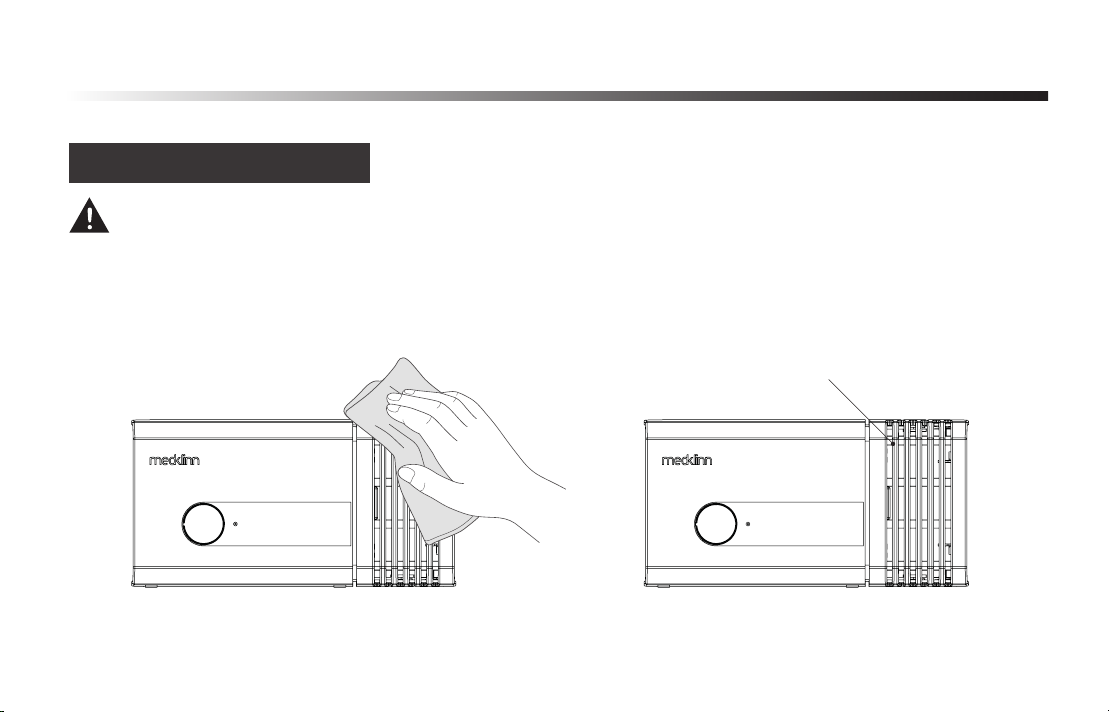
MAINTENANCE & SERVICE
Ventilation holes
CLEANING OF DEVICE
Due to water evaporation and accumulation of fine dust or other pollutants, there may be some stains around the ventilation holes.
CAUTION: SWITCH OFF AND UNPLUG THE UNIT BEFORE CLEANING
Wipe the device gently with a slightly damp cloth.
CLEANING THE EXTERNAL PART OF DEVICE:
Ensure ventilation holes are not clogged
with dust or dirt.

10
MAINTENANCE & SERVICE
Step 2: Pull out the front lid.
CLEANING THE INTERNAL PART OF DEVICE:
Step 1: Push the latch outward slightly to open the front lid.
Front lid
Front lid

11
MAINTENANCE & SERVICE
Step 3: Remove the Cerafusion™ Cartridge. Step 4: Clean the front lid and internal surfaces
with a slightly damp cloth.
THE CERAFUSION™ CARTRIDGE COULD BE HOT. BE CAREFUL WHEN REMOVING IT.
CAUTION:

12
MAINTENANCE & SERVICE
REPLACING CERAFUSION™ CARTRIDGE (recommended every 12 months)
1. ENSURE THAT THE UNIT IS SWITCHED OFF BEFORE REPLACING CARTRIDGE TO AVOID
ELECTRICAL SHOCK.
2. DO NOT HOLD THE GLASS TUBE WHEN HANDLING THE CARTRIDGE.
3. DO NOT TURN OR TWIST THE GLASS TUBE AS IT WILL DAMAGE OR CRACK THE GLASS.
CAUTION:
IMPORTANT NOTE:
If the living space is more dusty or dirty, you
may need to change the cartridge more often.
*NEW
Cerafusion™ Cartridge
Cartridge Holder
Contact point of
the cartridge
holder
Outer electrode
must face out

TROUBLESHOOTING GUIDE
1. I have switched on the unit, but the LED light is not lit and there is no hissing sound.
First, check that the power supply jack is properly inserted to the unit and that the adaptor is connected to the power
outlet and switched on. Second, make sure the front lit is properly closed. If the LED light is still unlit, contact
Medklinn Service Centre to have the unit serviced.
2. I have dropped the unit. Is it safe to continue using it?
First, carefully check the whole unit to make sure there are no cracks or breaks externally and internally.
Next, check the glass tube of the cartridge to make sure it is not cracked or broken.
If there is any component damage, contact Medklinn Service Centre.
3. There is a “hissing” sound coming from the unit. Is this normal?
Yes. It is normal. The “hissing” sound indicates that the Cerafusion™ Cartridge is generating active oxygen.
4. I have switched on the unit, the LED lights are lit, but there is no “hissing” sound coming from the unit.
First, check if the Cerafusion™ Cartridge is properly inserted into the cartridge holder. If there is still no “hissing” sound after
cleaning, replace a new cartridge or contact Medklinn Service Centre to have the unit serviced.
13

14
SPECIFICATIONS
* 1) Depending on the pollution level. 2) Ceiling height of 9 feet. 3) Refer to the recommended setting for different coverage area.
MODEL ASENS+40
Input Voltage to adapter 110 ~ 240v AC, 50/60 Hz
1.5 Amp @ 12 VDC
Low / Mid / High
< 5.5 watts
195(W) x 101(H) x 76(D)
Temperature 5º - 35ºC
Up to 400 square feet
750 grams
1 year limited
ASENS+20
Up to 200 square feet
Output Current (max) from adapter
Power Consumption
Functions
Dimensions (mm)
Operating Environment
Coverage Area*
Weight (unit + power supply)
Warranty
This manual suits for next models
2
Table of contents
Other MedKlinn Laboratory Equipment manuals


