MedRx AVANT Stealth A2D User manual
TRAINING MANUAL

This Page Left Intentionally Blank
ADP-I-MADPT-2 MedRx Avant Stealth Training Manual
Effective Date: 10/14/2013
2

Contents
Introduction…………………………………………………………………………………………....
4
AVANT™ Stealth Audiometer Software Overview ………………………………………………
5
AVANT™ Stealth Audiometer Software Options ..………………………………………………
6
Preparing for Testing ………………………………………………………………………………..
9
Placing The Earphones On The Patient ………………………………………………………….
10
Placing the Bone Conductor ….……………………………………………………………………
11
Performing Audiometric Testing ……………………………………………………………………
12
Pure Tone Audiometry……………………………………………………………………………....
13
Speech Audiometry ………………………………………………………………………………….
15
Hearing Loss Simulator ……………………………………………………………………………..
18
Master Hearing Aid ………………………………………………………………………………….
18
Printing ……………………………………………………………………………………………….
20
Limited Warranty …………………………………………………………………………………….
21
#0086
www.medrx-usa.com
1200 Starkey Rd., #105, Largo FL 33771 U.S.A.
Toll Free: (888) 392-1234 • (727) 584-9600
Fax: (727) 584-9602 • Email: medrx@medrx-usa.com
MedRx's Authorized Representative in Europe
(Regulatory affairs only)
Emergo Europe, Molenstraat 15
2513 BH The Hague, The Netherlands
ADP-I-MADPT-2 MedRx Avant Stealth Training Manual
Effective Date: 10/14/2013
3

Introduction
The AVANT Stealth Audiometer represents a new era of PC-based diagnostic audiometry for your office.
This PC-Based system supports current ANSI and IEC audiometric tests. This manual assumes that the
system hardware and software are installed and working properly. Please refer to the MedRx AVANT
Stealth Audiometer Installation Manual for assistance. The AVANT Stealth Audiometer Installation
Manual is included in the original AVANT Stealth Audiometer packaging in both printed and PDF
formats.
The scope of this manual is to get you “up and running” with the AVANT Stealth Audiometer System.
Please consult the interactive Help System within the software for more detailed information of features
and functionality. To access this tool, press the F1 key at any time, or click the Help icon or the menu bar
with your mouse.
ADP-I-MADPT-2 MedRx AVANT Stealth Training Manual Page 4
Effective Date: 10/14/2013

The AVANT Stealth
Audiometer Software
General Overview
The AVANT Stealth Audiometer software can run stand-alone or through the NOAH™ System or the
TIMS®Office System.
Launching the Software
Stand Alone
NOAH and TIMS
1. Launch NOAH.
2. In NOAH 4:
•Click AVANT STEALTH icon on the
toolbar.
3. In NOAH 3:
•Open the Module Selection screen.
•Click the Measurement Tab.
•Double click the AVANT Stealth icon.
1. Double click the AVANT Stealth
shortcut on your Windows Desktop.
ADP-I-MADPT-2 MedRx AVANT Stealth Training Manual Page 5
Effective Date: 10/14/2013

Software Options
Basic Options
Several option screens are available which allow the user to customize the AVANT Stealth Audiometer
Software to meet their needs.
Access these options from the File Menu on
the AVANT Audiometer Main Screen as
shown below.
The Options may also be accessed from
the Audio screen by clicking Options on
the menu as shown below.
The screen shots below detail the Basic Options available in the AVANT Stealth Audiometer software.
The View tab allows you to set the
default appearance of the test screen.
The Audiometry tab sets the look and
behavior of the AVANT Stealth Audiometer.
ADP-I-MADPT-2 MedRx AVANT Stealth Training Manual Page 6
Effective Date: 10/14/2013
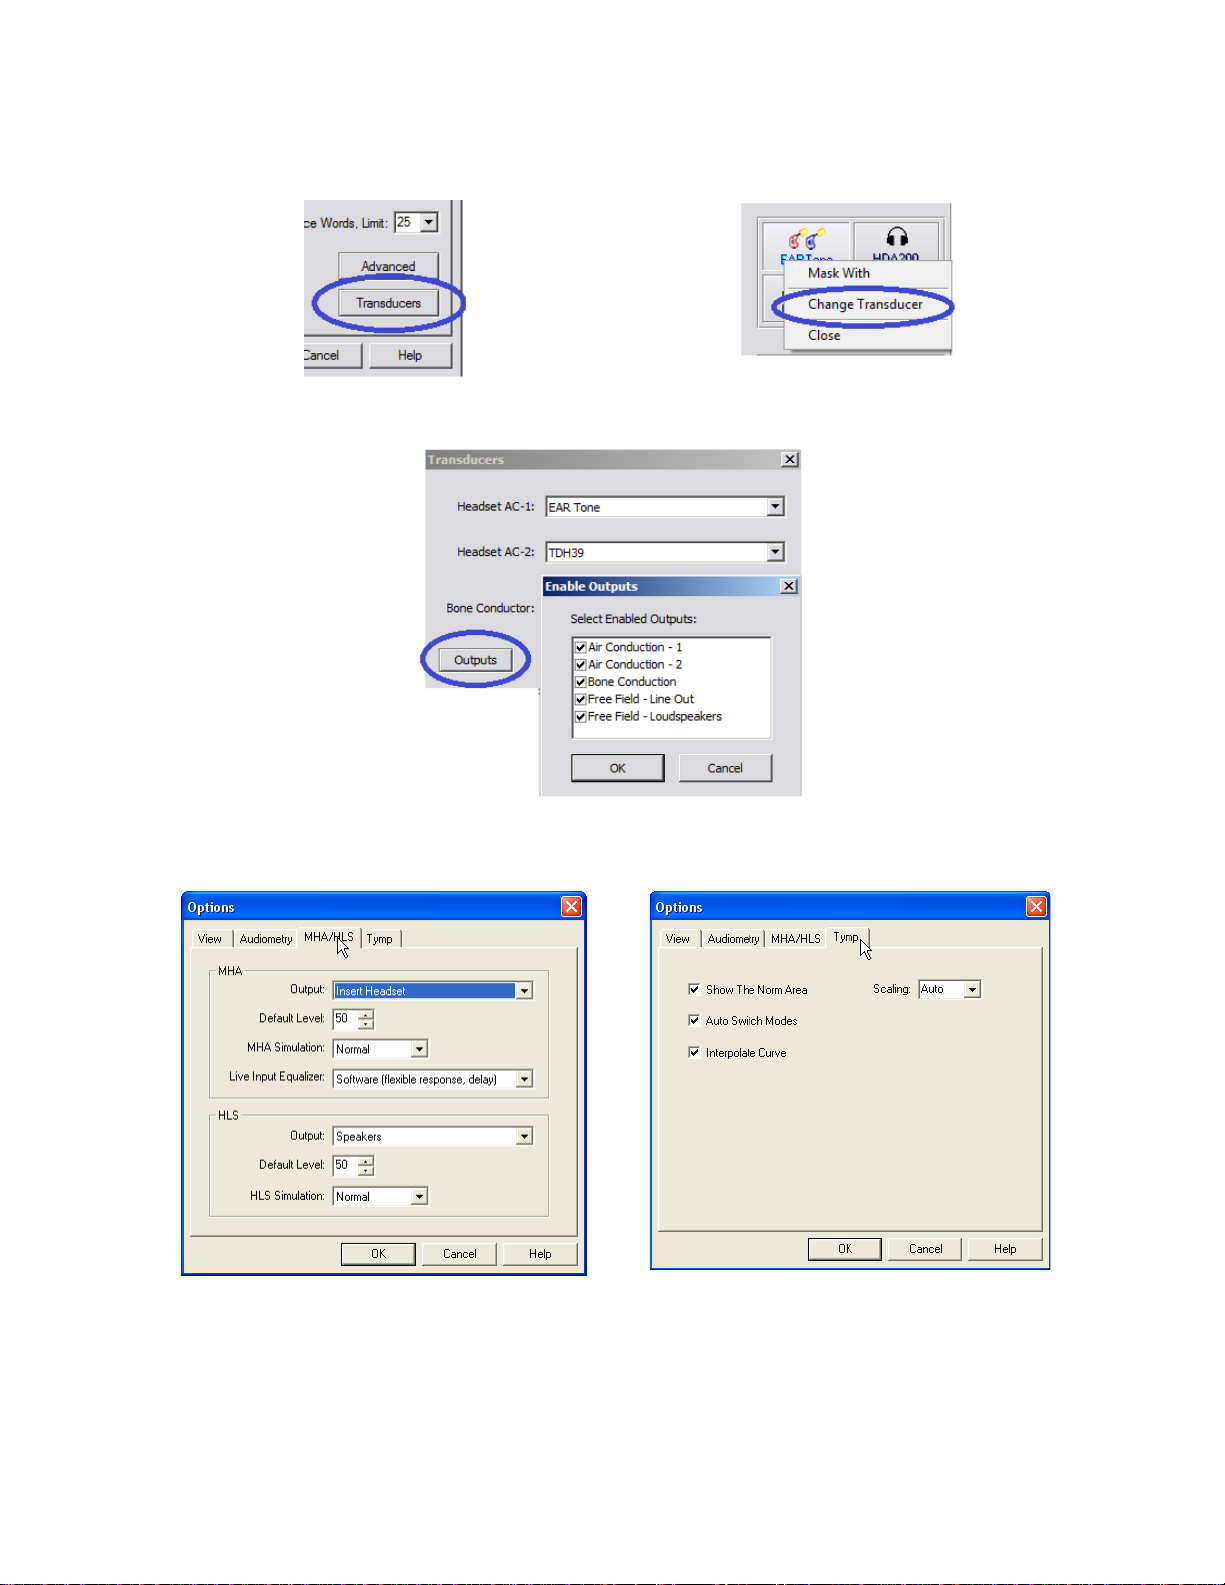
Option 1: On the Audiometry Options screen
click Transducers to assign specific
transducers to the audiometer outputs.
Option 2: You can change transducers by
Right-Clicking on any transducer icon on the
Audiometry screen.
The Transducers dialog box will then appear. Select the appropriate transducer for each output.
To add or remove outputs, click Outputs to enable or disable transducer buttons on the
Audiometry screen
The MHA/HLS tab sets the default look and
behavior of the Master Hearing Aid and
Hearing Loss Simulator.
If your system has a Tympanometer
connected, this tab will assist in
configuring the look of the display.
NOTE: Remember, that more information is always available in the Interactive Help System by clicking
the Help Icon or pressing the F1 key.
ADP-I-MADPT-2 MedRx AVANT Stealth Training Manual Page 7
Effective Date: 10/14/2013
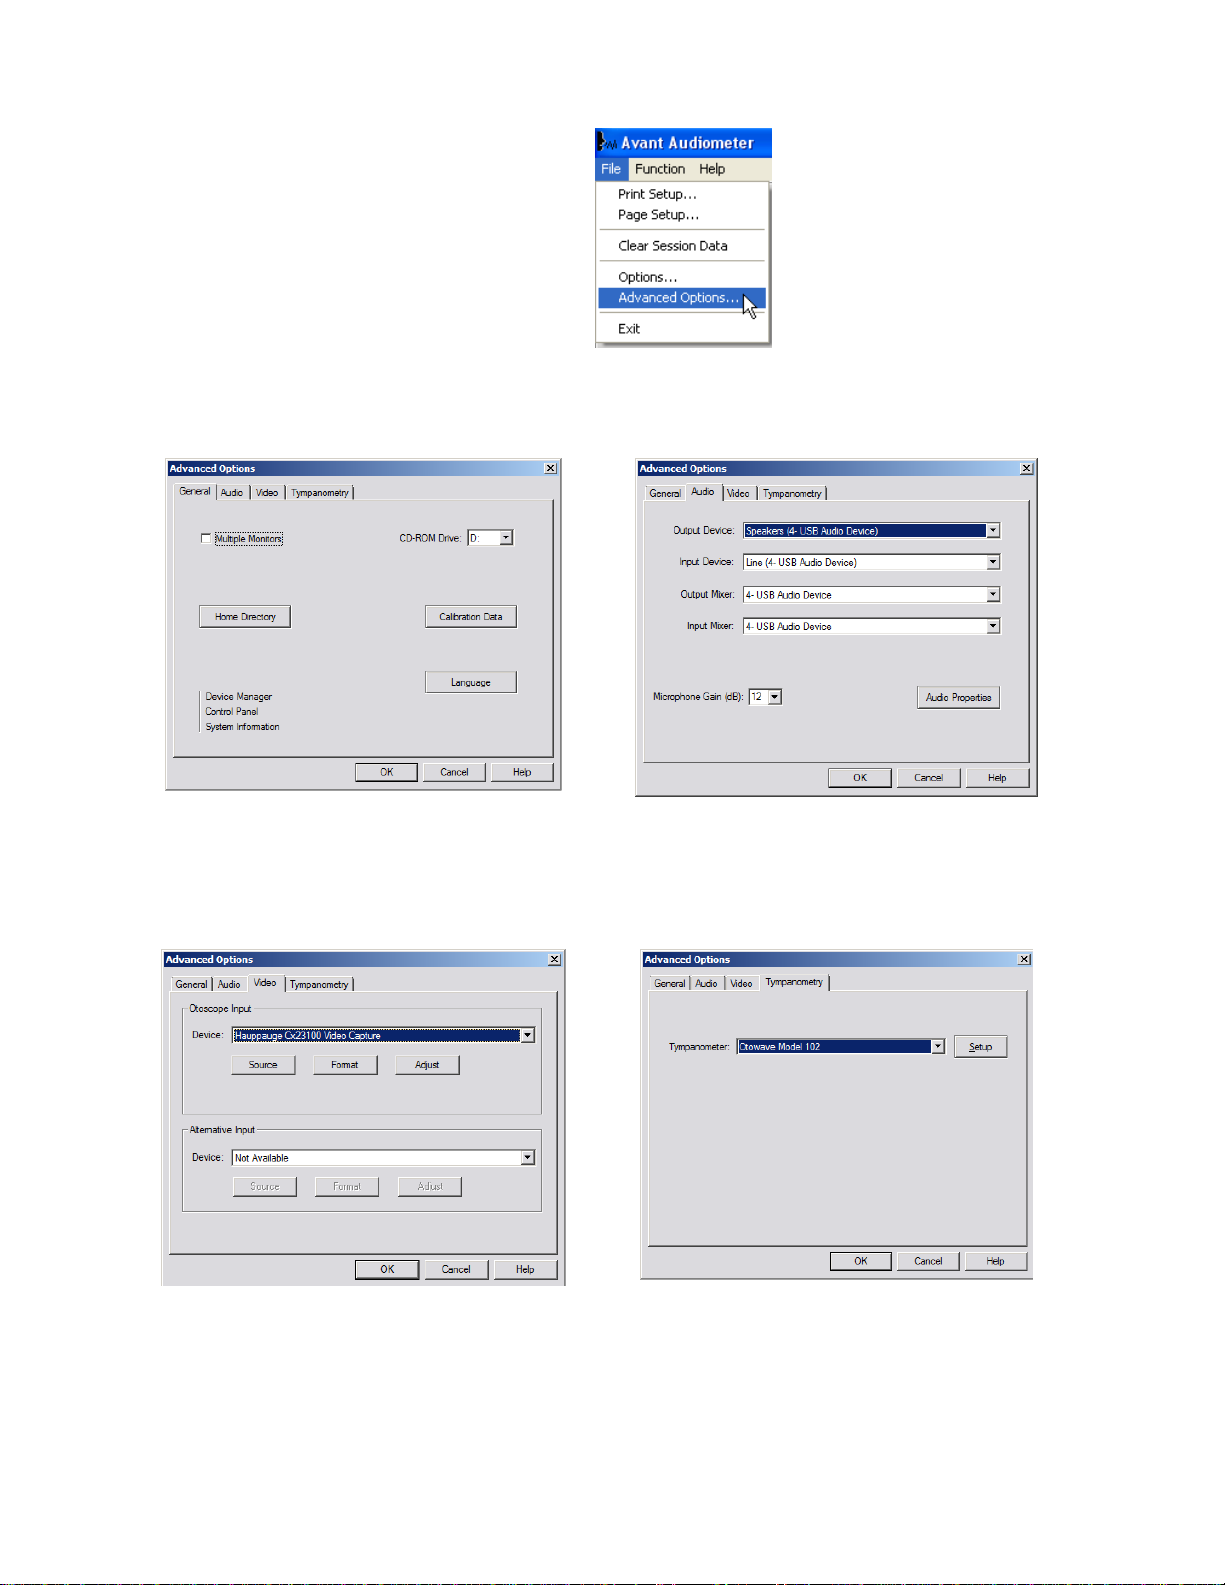
Advanced Options
The Advanced Options screen allows you to
configure your system to meet your individual
clinical needs. It also provides MedRx
Technical Support with tools for helping you
troubleshoot technical issues. Access this
screen from the File Menu on the AVANT
Stealth Main Screen as shown to the right.
The key features of each tab are described below. For more in-depth information, consult the interactive
Help system within the software by pressing the F1 key or clicking the Help icon.
The General Tab configures the overall AVANT
Stealth Audiometer behavior with respect to
other Windows programs, specifically NOAH.
Use the Audio Tab to select the proper audio device
for your AVANT Stealth Audiometer. This tab also
provides access to the Windows Audio controls. Note:
The device settings may vary with different computers. Consult
technical support before changing.
If your system has a Video Otoscope, the
Video Tab allows you to select the appropriate
device driver.
If your system has a Tympanometer connected, use
this tab to identify it and ensure the driver and
software that control it are correctly installed.
ADP-I-MADPT-2 MedRx AVANT Stealth Training Manual Page 8
Effective Date: 10/14/2013
Preparing for Testing
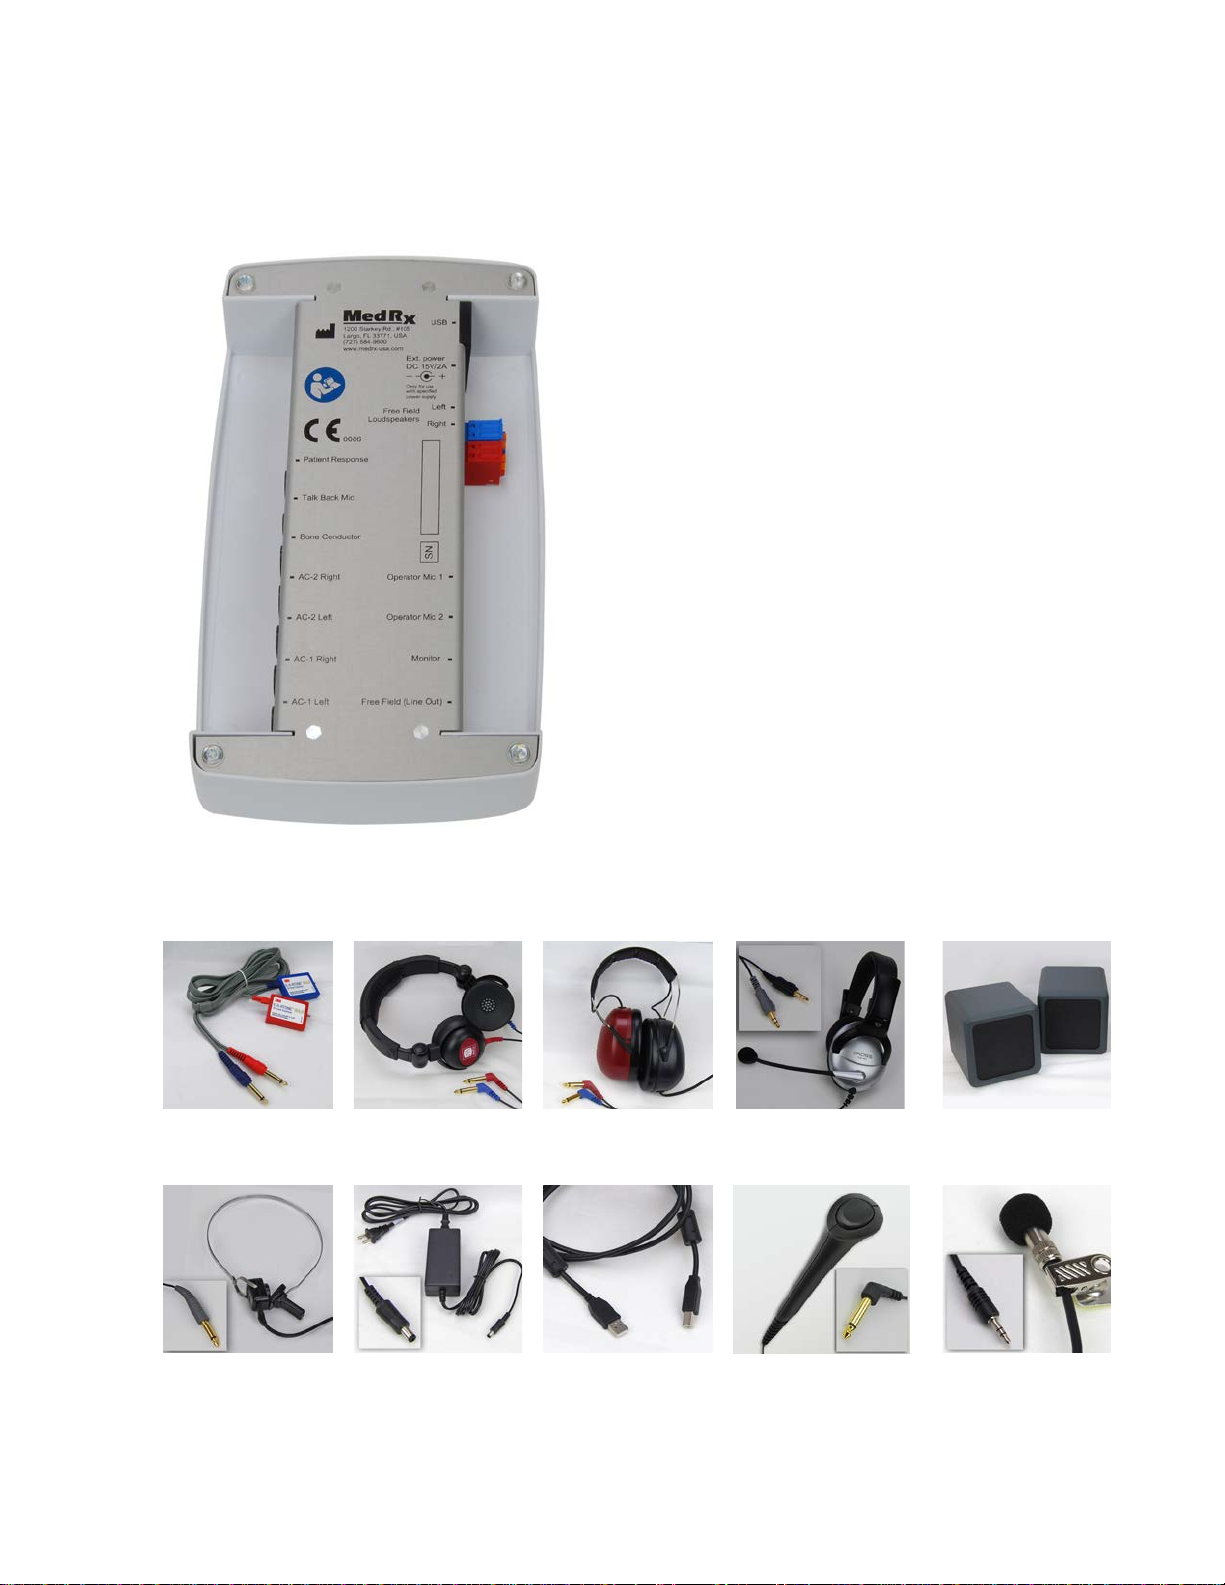
Connecting the Peripherals
After you install the software for your AVANT Stealth
Audiometer you need to connect the rest of the
peripherals before testing a patient. (See the AVANT
Stealth Audiometer Installation Manual).
Using the pictures below, locate each of the
accessories and plug them into the labeled jacks on
your Stealth.
The External Power Supply is required to utilize the
built-in 2x20 Watt Amplifiers and the High Frequency
Option.
Insert Earphones TDH-39 or DD45
Earphones HDA 200 (Optional)
High Frequency Operator Mic &
Monitor Speakers (Optional)
Bone Conductor Power Supply USB Cable Patient Response
Switch Talkback Mic
ADP-I-MADPT-2 MedRx AVANT Stealth Training Manual Page 9
Effective Date: 10/14/2013
Placing the Earphones on the Patient
The AVANT Stealth Audiometer standard configuration includes Eartone 3A Insert Earphones. TDH 39
earphones are also available by request. The figures below illustrate how to properly place these
earphones on the patient.
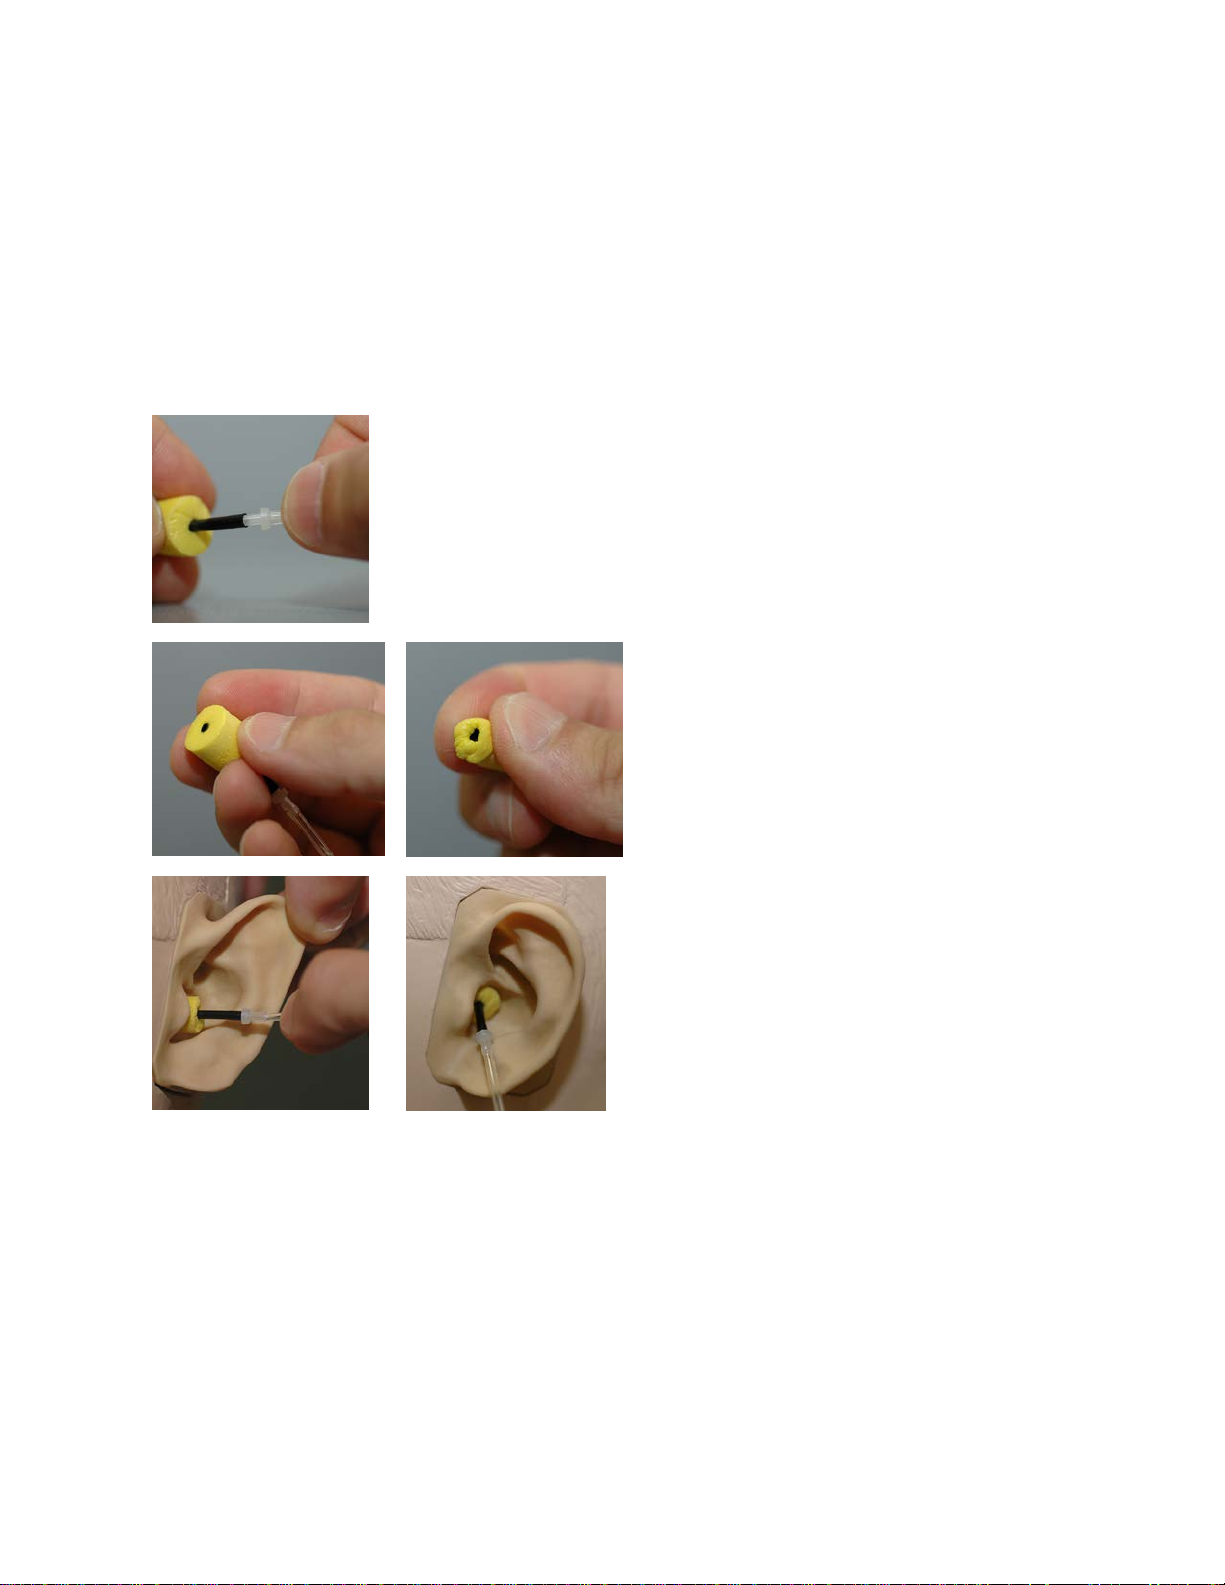
Eartone 3A Insert Earphones
IMPORTANT: The foam tips used for the Eartone 3A earphones are for SINGLE PATIENT USE ONLY.
Do not attempt to wash and re-use them.
1. Place a new set of foam tips on the earphone tubes as shown.
•NOTE: When removing foam tips after use, be sure the clear
plastic tubing nipple remains attached to the long earphone
tube.
2. Carefully compress the tip between your
fingers to allow it to fit into the patient’s
ear canal as shown. Do not roll the tip
between your fingers.
3. Pull up and back on the patient’s pinna to
straighten the ear canal.
4. Place the compressed foam tip deep
within the ear canal.
5. When properly placed, the outer surface
of the insert tip will be flush with the
opening of the ear canal as shown.
ADP-I-MADPT-2 MedRx AVANT Stealth Training Manual Page 10
Effective Date: 10/14/2013

TDH 39 Earphones
1. Place the earphones on the patient’s
head so the center of the earphone
is directly over the opening of the ear
canal.
2. Adjust the headband so the
earphones remain in place, but be
careful not to make it so tight as to
cause patient discomfort.
Optional Extended High Frequency Earphones (HDA 200)
Note: The HDA 200
Earphones are part of an
upgrade option for the AVANT
Stealth Audiometer. If you
need to test frequencies
beyond 8000 Hz, you must
notify MedRx. This option
carries a price differential
which will be detailed at the
time of order.
1. Place the earphones on the patient’s
head so the center of the earphone
is directly over the opening of the ear
canal.
2. Adjust the headband so the
earphones remain in place, but be
careful not to make it so tight as to
cause patient discomfort.
Placing the Bone Conductor
1. Locate the mastoid process behind the pinna. This is
a bony shelf just behind where the ear meets the
head.
2. Carefully place the bone conductor on the mastoid
process and hold it in place.
3. Place the headband over the head to the opposite
temple.
4. Carefully and slowly loosen your grip to check if the
bone vibrator and headband will stay in place.
5. If either moves, reposition until both the headband and
bone vibrator are secure.
ADP-I-MADPT-2 MedRx AVANT Stealth Training Manual Page 11
Effective Date: 10/14/2013

Performing Audiometric
Testing
From the AVANT Stealth home screen, click on the “Audiometry” tab to access the audiometry function. The
screen shot below shows the controls which are available from the AVANT Stealth Audiometer main window.
The sections of the manual that follow explain how to use these tools to perform hearing evaluations using
your AVANT Stealth Audiometer.
1. Test selection tool bar
2. Ear selection
3. Output selectors
4. Test Type Selectors
5. Tone Type Selectors
6. Output Level Potentiometers
7. Masking interrupter and routing selector
8. No Response button
9. Patient Response Indicator
10. Test Interrupter
11. Back To The Main Screen
12. Help
13. Discard Current Measurement
14. Talk Over
15. Legend
To exit the program, click on the “Back” button then click “Exit”.
1
2
3
4
5
6
7
11
12
13
14
15
8
9
10
ADP-I-MADPT-2 MedRx AVANT Stealth Training Manual Page 12
Effective Date: 10/14/2013
Pure Tone Audiometry
Pure Tone Audiometry measures the patient’s peripheral hearing sensitivity, or the softest levels they
can hear pure tones at a variety of frequencies. These thresholds are plotted on a standard graph called
an audiogram. The AVANT Stealth Audiometer software controls the hardware, stores the data (if
running within NOAH or TIMS) and prints a standard audiogram report. Pure tone Audiometry can be
performed via earphones, free field speakers (Air Conduction) or a Bone Conductor (Bone Conduction).
Warble settings are adjustable by the Operator. The Sound Field must be calibrated on-site, using 4 ohm
speakers connected to the Free Field connectors.
Pretesting Procedures/Recommendations:
•Before performing audiometry, careful inspection of the ear canal should be performed. This is
best done with Video Otoscopy. After ensuring the ear canal is clear, place the appropriate
transducer on the patient as shown on pages 10 & 11.
Pure Tone Audiometry via Earphones (3A Inserts or TDH 39)
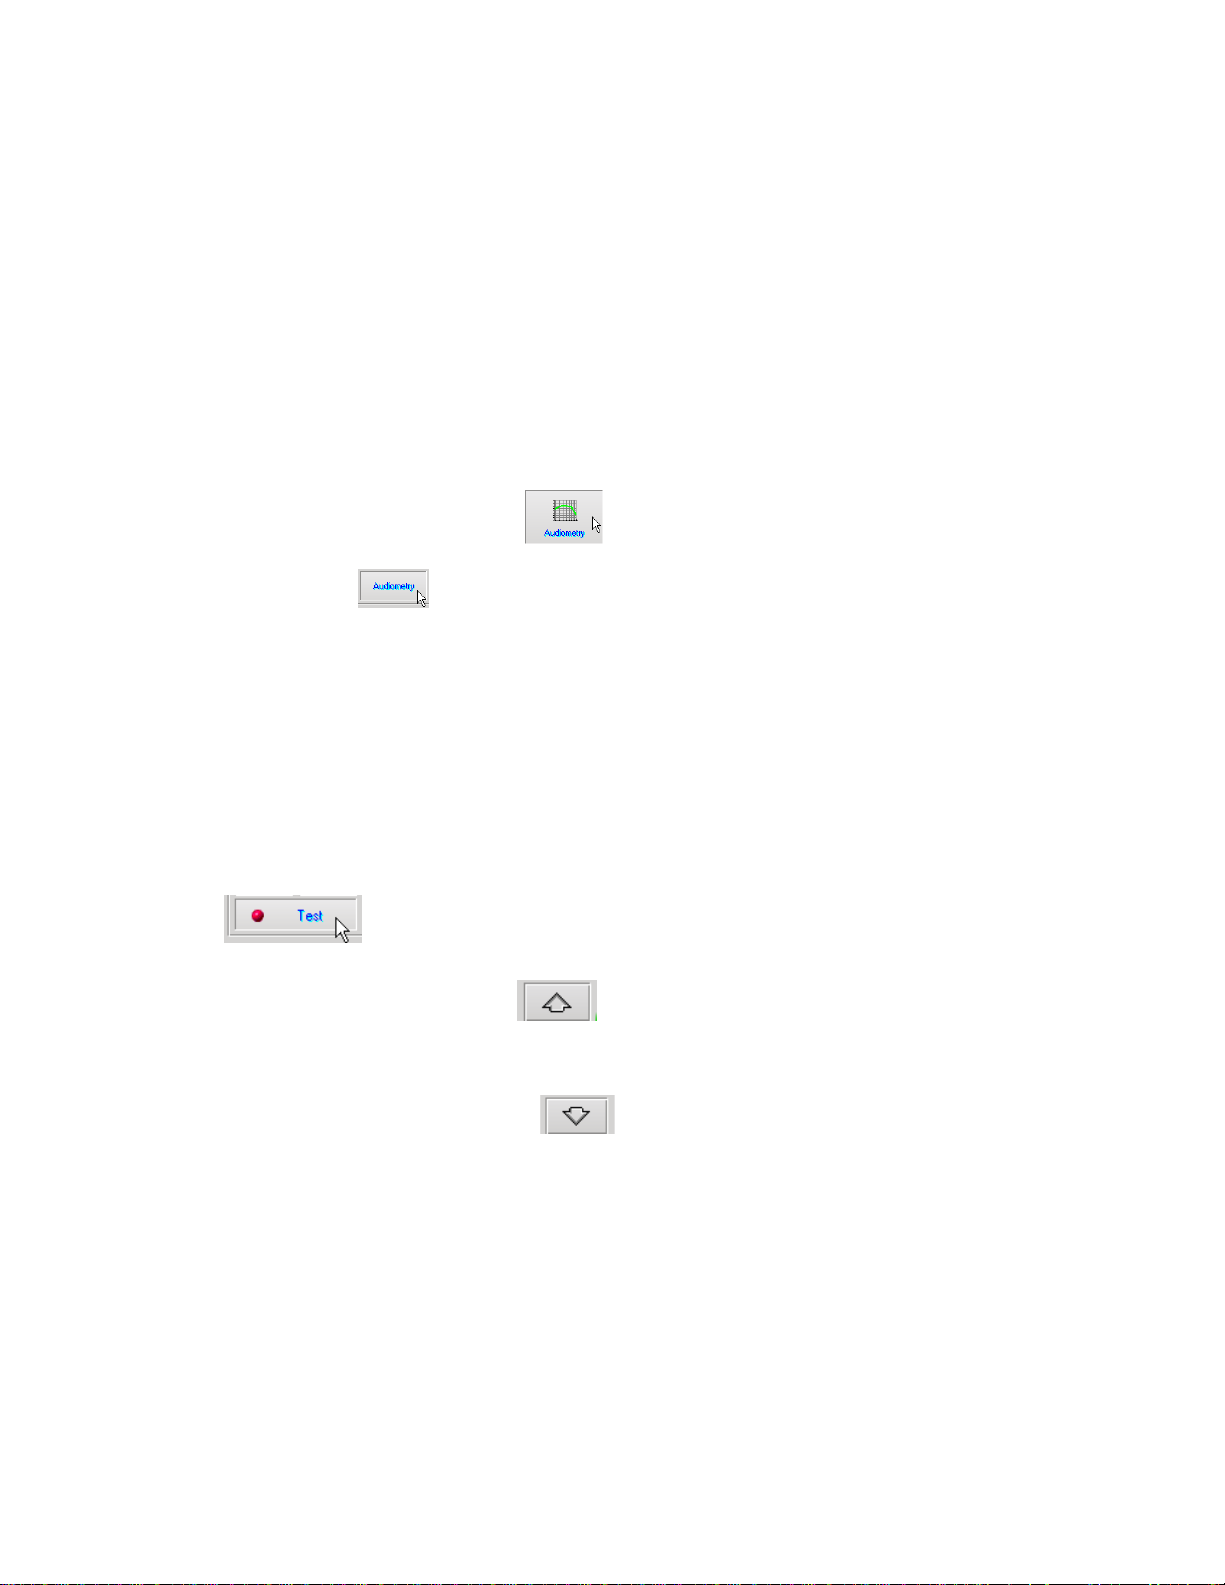
1. From the Main Window, click the button on the right side menu bar.
2. By default, the button will be selected once you enter the main Audiometry Screen.
Other default settings (based on typical clinical practice and procedures) are:
•Right Ear
•AC (Air Conduction)
•Tone Stimulus
•Continuous Tone
3. Instruct the patient that they will hear several very quiet (soft) tones (beeps) and that they should
signal (raise their hand, press the patient response button, etc.) as soon as they hear it. It is
helpful to also say “even if it seems very far away”.
4. Begin at 1000 Hz in the Right ear (unless the patient reports better hearing in the left ear).
5. Present a tone at 60 dB by pressing and holding the space bar or clicking and holding the
button.
6. If the patient does not hear the tone (does not signal), raise the level 5 dB using the up arrow on
your keyboard or by clicking the button and present again.
7. Repeat step 6 until the patient signals that they hear the tone.
8. When the patient signals they hear the tone, decrease the level by 10 dB using the down arrow
on your keyboard or by clicking the button and present the tone again.
9. Repeat steps 6 through 8 until the patient responds to a tone at the same level 2 times with the
level ascending and establishing a threshold.
10. Using the right arrow key, change the test frequency to 2000 Hz and repeat steps 5 through 9 to
establish the threshold at 2000 Hz. The threshold at the previous frequency is recorded when
the test frequency is changed.
•NOTE: If the threshold at 2000 Hz is more than 20 dB different (less than or greater
than) the threshold at 1000 Hz, repeat steps 5 through 9 at 1500 Hz (the “half octave”
between 1000 Hz and 2000 Hz).
11. Repeat steps 5 through 9 for 4000 Hz, 8000 Hz, 500 Hz and 250 Hz. Testing half octaves as
needed.
12. Repeat steps 4 through 11 in the opposite ear.
ADP-I-MADPT-2 MedRx AVANT Stealth Training Manual Page 13
Effective Date: 10/14/2013
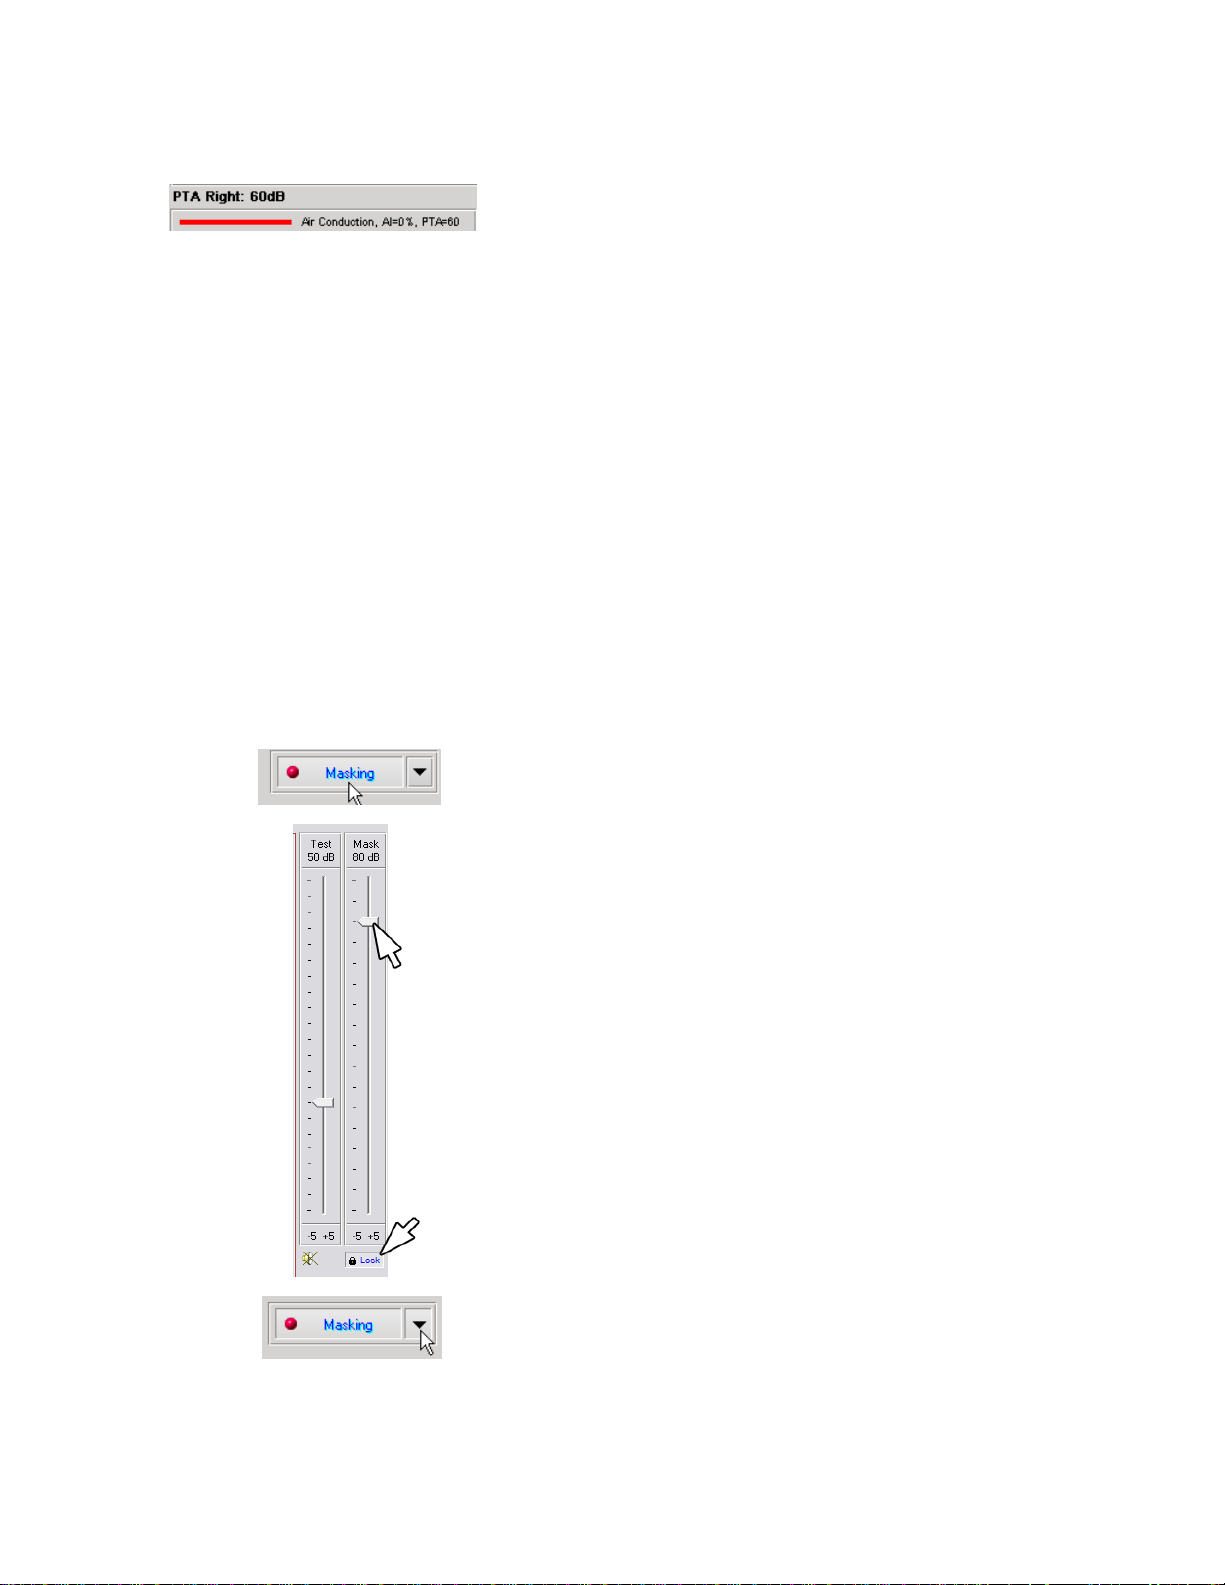
NOTE: The software automatically calculates the 3-frequency Pure Tone Average (PTA) which is
displayed above and inside the legend as follows:
Pure Tone Audiometry via the Bone Conductor
1. Following the instructions on page 11, place the Bone Conductor on the mastoid process behind
the ear with better air conduction thresholds as measured above. If the thresholds are equal,
place the Bone Conductor on the mastoid process behind the right ear.
2. Establish pure tone bone conduction thresholds as described above for 1000 Hz, 2000 Hz, 4000
Hz, 500 Hz and 250 Hz.
3. If the Bone Conduction (BC) threshold at a given frequency is less (better) than the Air
Conduction (AC) threshold by 15 dB or more, you must confirm the threshold by performing
masking. Masking is always recommended for frequencies above 2000 Hz to achieve valid
results.
4. Repeat steps 1-3 for opposite ear.
Masking for Pure Tone Audiometry
There are several accepted methods for masking. This manual will not promote one over another,
however, to use the masking function on the AVANT Stealth Audiometer, follow the steps below.
1. Click the Masking button. The red light will appear indicating that
the masking is on.
2. Use your mouse to adjust the Masking Level slider shown on the
left to the appropriate level based on your preferred method of
masking.
3. If you wish to maintain the balance of signal and masking (for
example, masking always 30 dB above the signal), click the Lock
button after setting the masking and signal levels.
4. The default for pure tone audiometry is to deliver narrow band
masking to the ear opposite the test ear. If you wish to use a
different stimulus, or route the masking to the same or both ears,
click on the arrow to the right of the Masking On button.
5. Use your mouse to select the new masking type and routing for
ADP-I-MADPT-2 MedRx AVANT Stealth Training Manual Page 14
Effective Date: 10/14/2013

your specific application.
6. When you are finished making changes to the Masking, click
Close.
Optional High Frequency Audiometry
The AVANT Stealth Audiometer is available with the option to perform extended range high frequency
pure tone audiometry. This is used clinically to evaluate noise induced hearing loss, ototoxicity and
tinnitus. High frequency testing uses the same procedure as described on page 13 for pure tone
audiometry.
To start High Frequency audiometry, select a transducer that
supports high frequencies, such as the HDA 200.
The High Frequency control will appear on the right panel and will
allow choosing frequency ranges to be shown on the plot. The
power supply must be connected to activate the high frequency
control or when using the free field amplifier.
NOTE: Extended High Frequency Audiometry is an upgrade option for the AVANT Stealth Audiometer.
If the high frequency control selectors do not appear on the right panel and if you need to test
frequencies beyond 8000 Hz, you must notify MedRx. This option carries a price differential which will be
detailed at the time of order.
Speech Audiometry
Speech audiometry evaluates how well the patient can hear and understand speech. The typical test
battery includes tests of speech thresholds and tests of speech discrimination.
The sections below detail how to perform these tests on the AVANT Stealth Audiometer.
Speech Reception Threshold (SRT)
The Speech Reception Threshold (SRT) is defined as the lowest dB level at which the patient can repeat
Spondee words with at least 50% accuracy. Spondee words are two syllable words with equal vocal
emphasis on each syllable such as “baseball” or “hotdog”.
Instruct the patient that they will hear a series of two-syllable words that will get quieter as the test
progresses. They are to repeat the words as best they can, even if they sound very far away. If they are
not sure of a word, they should take a guess.
SRT is typically within +/- 5 dB of the patient’s PTA which is displayed on the lower left corner of the
screen. Set the level of the test signal to “a level of familiarization”, done typically 20 dB above the PTA.
1. From the AVANT Audiometer main screen,
click the Audiometry button.
ADP-I-MADPT-2 MedRx AVANT Stealth Training Manual Page 15
Effective Date: 10/14/2013

2. Click the SRT button located on the toolbar on
the top of the screen.
3. Select the appropriate test ear icon.
4. Click the Word List button.
5. Select Spondee Word Lists A&B from the
list.
6. Click Start Test.
7. Click the Play button or press the F9 key to
present a word. The word will play through
the chosen transducer as well as display on
the screen.
8. If the patient correctly repeats the word, click
the Correct icon or press F7.
9. If the patient incorrectly repeats the word, click
the Incorrect icon or press F8.
Note that the score is calculated and displayed automatically in the bottom right corner of the screen.
If the patient exceeds a 50% score at a given presentation level, stop the test and decrease the level by
10 dB and repeat the steps above.
If the patient fails to achieve a 50% score after 6 words at a given level, stop the test, raise the level 5 dB
and repeat the steps above.
When the patient scores 50% at a given level, the test is complete. The software automatically plots the
score on the SRT graph.
Repeat test on opposite ear.
Word Recognition (WR)
Speech Discrimination or Word Recognition (WR) is a discrimination, type test using speech as the
stimulus. WR testing measures the percentage of mono-syllable words repeated correctly from a list.
Unlike the SRT test, the WR test is performed at a fixed intensity (dB) level. WR is typically performed at
a patient’s speech MCL. If MCL is not performed, system default options include, PTA, PTA+20, PTA+30
and PTA+40.
Before beginning the test, instruct the patient that they will hear a series of one-syllable words. They are
to repeat the words as best they can. If they are not sure of a word, they should take a guess.
ADP-I-MADPT-2 MedRx AVANT Stealth Training Manual Page 16
Effective Date: 10/14/2013

1. From the AVANT Audiometer main screen, click the
Audiometry button.
2. Click the WR button located on the toolbar on the top
of the screen.
3. Select the appropriate test ear icon.
4. Click the Word List button.
5. Select the desired Word List from the list. The W-22
or NU-6 lists are good choices for most adult
patients. When testing children, the PBK lists should
be used.
6. Click Start Test.
7. Click the Play button or press the F9 key to present a
word. The word will play through the chosen
transducer as well as display on the screen.
8. If the patient correctly repeats the word, click the
Correct icon or press F7.
9. If the patient incorrectly repeats the word, click the
Incorrect icon or press F8.
Note that the score is calculated and displayed automatically. The test is complete when all words in the
list have been presented. The software automatically plots the score on the WR graph.
Repeat test on opposite ear.
ADP-I-MADPT-2 MedRx AVANT Stealth Training Manual Page 17
Effective Date: 10/14/2013

Hearing Loss Simulator
The Hearing Loss Simulator (HLS) demonstrates the effect of the client’s hearing loss for the
significant third party. The program attenuates an input signal to simulate the audiogram. The
third party listens to the free field speakers. The third party can hear how their own voice is
distorted by the hearing loss when the Record input option is used.
The Hearing Loss Simulator requires the client’s Audiogram data. This data can be manually entered in
the Audio screen of this or any other task.
How to perform the Hearing Loss Simulator task
•Select the HLS tab on the toolbar.
•Enter the Audiogram values manually if the data is not automatically imported to this screen.
•Select the input signal type: Mic, File or Record. Select the track and the Play button on the
control panel. See below for instructions on how to use the Record option.
•The HLS output is directed to the free field loudspeakers.
•Select Normal to play the input signal as a person with normal hearing would perceive it. Select
Simulated to turn on the simulation of the client's hearing loss. Toggle between these selections
as necessary.
•The Reset option restores the audiogram to the original state. Use this option if you have
modified the audiogram but want to undo the changes. The changes to the Audiogram that are
made on the HLS screen are temporary and will not affect the client's original audiometry record.
•A volume control adjustment bar allows for manual adjustment of the output level of the free field
speakers.
•To stop the playback, select the Stop button on the player.
Note: It is recommended you use a variety of tracks from the list to demonstrate the hearing loss.
Record Input Option
This option allows recording and playing back of the voice of the third party.
Master Hearing Aid
Master Hearing Aid (MHA) is an alternative to using a stock hearing aid to demonstrate the benefits of
amplification to an inexperienced user. The system applies the fitting rules by default to the patient's
audiogram and simulates a hearing aid. The patient listens to this signal through the headphones.
Options for editing the gain applied to the audiogram are provided.
About the Master Hearing Aid Display
The Master Hearing Aid screen displays a graph with dB Gain on the vertical axis and Frequency in Hz
on the horizontal axis. The plot on the graph represents the gain applied to the patient’s Audiogram. The
NAL-RP is applied by default. A new rule can be selected from the list on the right side of the display. A
volume adjustment bar allows for manual adjustment of the output level. The control panel on the right of
the display provides options for input signal source and the task icons for Normal and Simulate.
ADP-I-MADPT-2 MedRx AVANT Stealth Training Manual Page 18
Effective Date: 10/14/2013

The Master Hearing Aid applies gain separately for each ear.If audiogram values are entered for the
left and right ear, the selected fitting rules will be applied to each ear separately. Different rules may be
entered for different ears (i.e. NAL-RP for left ear and BERGER for right ear). If an audiogram is entered
only for one ear, the gain will not be adjusted for the opposite ear and the sound for that ear will be
normal.
If Binaural mode is selected, the sound will be heard from both channels (left and right). If Monaural
mode is selected, the sound will be heard only from the channel corresponding to the active ear when
the channel for the opposite ear will be muted.
Input signal
Live voice (microphone) allows you to use the talk-over microphone for live speech input to the
inserts. The clinician or significant third party can speak into the microphone for this activity. Note: there
is a processing delay between the input and playback. Make sure that the client cannot hear the voice
directly but only through the headset. If this is not possible, use the Recorder (describer below) to
simulate speech input.
File allows the user to play sound files. The program supports MP3 and WAV files and comes with pre-
set MedRx Sounds Sensations sound files. After the option is activated, use the player panel to control
the playback.
CD allows the user to play music CDs. After the option is activated, use the player panel to control the
playback.
Record input mode allows the clinician or third party to record a sample of their speech which can then
be replayed for repeat comparisons under different amplification conditions for the patient. Refer to the
interactive Help system by pressing F1 or clicking the Help icon to learn more about the recorder.
How to use the Master Hearing Aid:
1. Select the Master Hearing Aid (MHA) icon from the main screen.
2. Enter the Audiogram values manually if the data is not automatically imported to this screen.
3. Select the input signal type: File, CD, Mic, or Record.
4. Select Monaural or Binaural.
5. Select the Normal icon, which will send the input signal through to the inserts without
modification. The patient is listening to the signal without any amplification benefit. Select the
Simulate icon to modify the input signal according to the selected rule. This selection allows the
patient to hear the benefits of amplification. Toggle between these two selections as necessary.
6. If the simulated frequency response needs to be adjusted, based on feedback from the patient,
manually edit the response by clicking on the gain curve at the desired frequency and new gain
level. The gain curve of the selected test ear on the control panel can be edited. To edit the
other ear, click the appropriate test ear icon on the control panel first.
Hint: Use the track return icon on the player control panel to replay one track continuously.
The Reset option restores the rule to the original state. Use this option if you have modified the rule but
want to undo the changes.
ADP-I-MADPT-2 MedRx AVANT Stealth Training Manual Page 19
Effective Date: 10/14/2013

Printing
Printing within the AVANT Stealth Audiometer software is very simple.
From the File menu, click one of the following options:
Page Setup – Allows you to set margin sizes and the
default text header for your reports.
Print Setup – selects the printer you want the report to be
sent to.
Print Preview – Shows you what your report will look like
before you print it.
Print – Sends the report to the printer. This option opens
the Windows Print dialog which allows the user to select
any installed printer and modify the properties (quality,
number of copies, etc.) for the print job.
ADP-I-MADPT-2 MedRx AVANT Stealth Training Manual Page 20
Effective Date: 10/14/2013
Table of contents
Other MedRx Measuring Instrument manuals


