Meiko M-iClean Series Quick start guide

MEIKO • 1349 Heil Quaker Blvd. • La Vergne, TN 37086 • Phone: (615) 399-6600 • (800) 55-MEIKO • Fax: (615) 399-6620 Revised 3/17
Undercounter High Temperature Sanitizing Dishwasher
(USA Version)
OWNER’SINSTALLATION, OPERATION AND
MAINTENANCE MANUAL
M-iClean
Models UM, UM+, US

Page2
TABLE OF CONTENTS
4. OPERATION......................................... 7
4.1 Location and Description of Controls........ 7
4.2 Startup ....................................................... 8
4.3 Loading Guidelines................................... 8
4.4 Operation................................................... 9
4.5 Interrupting a Wash Cycle ......................... 9
4.6 Between Cycles........................................ 9
4.7 Shutdown................................................... 9
4.8 Low Detergent Indicator .......................... 10
4.9 ManualWaterChange............................. 10
5. CLEANING .......................................... 11
5.1 Daily Cleaning (or as required)................11
5.2 Exterior Cleaning (as required)................11
5.3 Deliming (as required) ............................ 12
6. TROUBLESHOOTING ......................... 13
6.1 Operating Issues (no messages) ........... 13
6.2 Display Messages.................................. 13
1. INTRODUCTION ................................... 3
1.1 Overview of Equipment ............................ 3
1.2 GeneralSafetyInformation........................ 3
2. TRANSPORTANDSHIPPING.............. 3
3. INSTALLATION ..................................... 4
3.1 Overview of Installation ............................. 4
3.2 Requirements Before Installation.............. 4
3.3 Uncrating, Positioning and Leveling ............ 5
3.4 Accessing the Utility Connections ............ 5
3.5 Priming the Detergent and
Rinse Aid Lines ......................................... 6
3.6 Checking for Correct Chemical
Concentration ............................................ 6
MEIKOreservestherightto change any specifications withoutnoticeatanytime.
©2017MEIKO USA, Inc.Allrightsreserved.
MEIKO • 1349 Heil Quaker Blvd. • La Vergne, TN 37086
Phone: (615) 399-6600 • (800) 55-MEIKO • Fax: (615) 399-6620
www.meiko.us
MEIKO M-iCLEAN DISHWASHERS HAVEBEEN DESIGNED
EXCLUSIVELYFORTHE WASHINGOF DISHES, GLASSWARE, CUTLERY
ANDKITCHENUTENSILSINACOMMERCIALORINSTITUTIONALSETTING
AND MUST NOTBE USED FORANY OTHER PURPOSE.
MEIKOACCEPTSNORESPONSIBILITYFOR DAMAGETOTHEAPPLIANCE, SURROUNDING
EQUIPMENTORENVIRONMENTTHATIS CAUSEDBY INAPPROPRIATE INSTALLATIONOR
OPERATION,OR FROMANYSERVICETHATISUNDERTAKENBYNON-AUTHORIZED PERSONNEL,
OR FROM THE USE OFANY PARTS EXCEPTTHOSE THATAREAPPROVED BY THE
MANUFACTURER.ANYSUCHINSTALLATION, USEOR SERVICE WILLIMMEDIATELYVOIDTHE
MANUFACTURER’SWARRANTY.
ANYMODIFICATIONSTOTHEAPPLIANCETHATAREPERFORMED WITHOUTTHEWRITTEN
PERMISSIONOF MEIKOWILLIMMEDIATELYVOIDTHEMANUFACTURER’S WARRANTY.
ANELECTRICALWIRINGDIAGRAM IS LOCATEDINSIDETHE
LOWER-FRONTCOMPARTMENTOFTHIS MACHINE.

Page3
2TRANSPORT AND SHIPPING
CAUTION
Somewater mayremainin thelines after pre-shipping
testing.Duringshippingandinstallation,thedishwasher
should ONLY be positioned upright.
IMPORTANT
• Observe any notices on the crating material that
pertainto shipping.
• Usecare whentransporting theequipment.
• As you unpack the equipment, check that all
components shown on the shipping invoice are
present and intact. Be sure to check for shipping
damage.Ifshippingdamageispresent,callMEIKO
CustomerServiceat1-800-868-3840,providingfull
details on the customer, serial number and extent
of damage present. MEIKO will file a freight claim
based on this information.
WARNING!
In NO EVENT should a damaged appliance
be installed or operated!
SECTION 1 - INTRODUCTION
1.2 General Safety Information
Thefollowingsymbolsandheadingsareusedthroughout
thismanual toindicate possiblehazards topersons or
tothe equipment. The symbols and headingsareshown
in order of importance. The descriptive text following
these headings is italicized for easy recognition.
WARNING! Possible hazard to persons,
such as from electrical shock,
crushing, or hot surfaces.
CAUTION Possible hazard to the dish-
washeror toother equipment.
IMPORTANT Vital information or tips for the
installeror operator.
NOTE Information or tips for the
installeror operator.
1INTRODUCTION
1.1 Overview of Equipment
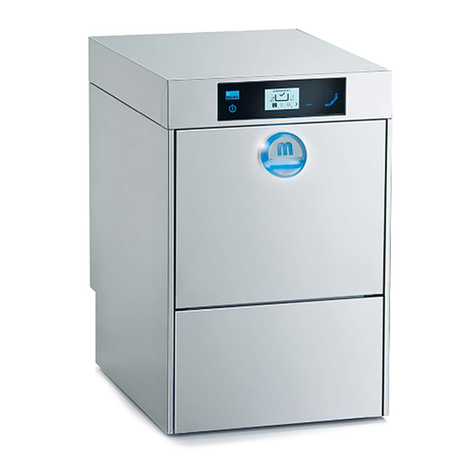
The MEIKO M-iClean is a commercial dishwasher
designed for cleaning dishes, glassware, cutlery and
kitchen utensils with a minimum of employee
interventionorsupervision.
Featuresof thedishwasher include:
Illuminated door handle - Visible from across the
room, the color of the handle provides visual cues to
theoperator aboutthemachine operatingstate(ready
foroperation, washing,importantmessages).
Glass touchscreen display - Provides a range of
informationin plaintext,including washandrinse tank
temperatures, selection of different cycle times, a
graphical progress bar, operating state, and service
information.
M-iClean Filter - During operation, food soil is
continually strained from the wash water by the two-
stageM-iClean Filter. Soilis automaticallydrained out
ofthe machineat theendof eachcycle.This improves
washingresults,andminimizes bothdetergentuse and
manualcleaning.
Color coded components - Componentsthat require
manualcleaningare coloredblue for intuitiveoperation
andeasier stafftraining.
AutoSafe - Theinternalbooster heater isautomatically
regulated to ensure proper sanitizing temperatures,
regardlessof theincomingwater temperature.
Soft Start - The wash water is pumped at a reduced
pressure for the first few seconds of the wash cycle,
protectingthe warefrombeingmovedbyasuddenburst
ofpressure.
Pumped Final Rinse - Aninternalrinse pump ensures
that the final rinse pressure is constant, for efficient
operation and consistent results.
Pumped Drain - Accommodates wall or floor drains.
Leak Detection System - Stops machine operation if
an internal leak is detected.
Forefficient andSAFEoperation, besure to followthe
installation and operating instructions provided in this
manual. In particular, all safety symbols and notices
on the equipment and in the supplied documentation
mustbe followed.
IMPORTANT
The MEIKO M-iClean dishwasher has been designed
exclusivelyforthewashingofdishes,glassware,cutlery
and kitchen utensils in a commercial or institutional
setting and must not be used for any other purpose.
Page4
SECTION 3 - INSTALLATION
3INSTALLATION
3.1 Overview of Installation
The owner should contract with qualified personnel to
movethe applianceto theinstallation location, unpack
it, and prepare it for final utility connections. In most
cases,local codesprevent thefinalutility connections
from being made by any party other than a licensed
electricianand/or plumber.
IMPORTANT
It is the responsibility of the owner to ensure that all
aspects of the installation comply with all applicable
local and national codes.
IMPORTANT
The appliance’s warranty is not valid until a MEIKO
Authorized Service Agent performs a Startup and
Demonstration on the appliance. This Demonstration
should be scheduled after installation.
Installation of the dishwasher involves the following
steps:
• Verifying that the utility connections are present,
areappropriate forthe appliance,andcomply with
all applicable local and national codes.
• Unwrappingtheappliance(leavingtheshippingskid
in place for easier movement) and checking for
shippingdamage.
• Moving the appliance to the installation location,
removingthe skid,and leveling thefeet.
• Connecting the electrical supply.
• Connectingthe freshwater supply.
• Positioning the drain hose.
• Connectingthe warewasher’sdetergent andrinse
aidtubes toappropriate dispensers.
• Priming the detergent and rinse aid pumps.
• Contactingyour MEIKOAuthorized ServiceAgent
to perform a Startup and Demonstration on the
appliance.This stepalso validatesthe appliance’s
warranty.
3.2 Requirements Before Installation
Beforetheinstallercanuncrateandmovetheappliance
to the installation location, the following conditions
MUST be met:
• INSTALLATIONAREAREQUIREMENTS
- The area MUST be frost-free. Freezing
temperatures(32°F/0°Corlower)inhibitproper
operation and can damage internal
components.
- The area MUST have a firm floor surface. It is
possibleto compensatefor unevenflooring by
adjustingthe feet.
- The area should be away from appliances,
furniture or surfaces that can be damaged by
steam. If this is not possible, these items
should be protected from the small quantities
of steam that are released during normal
operationof thedishwasher.
• UTILTITYCONNECTIONREQUIREMENTS
- Connections must be present and ready for
hookupto the appliance.Allutilitysuppliesmust
comply with the electrical information labels,
withtheinformation onthe dataplate, and with
all applicable local and national codes.
- Electrical leads and the water supply hose
(supplied by the customer) must be present.
- Appropriate chemical dispensing containers
should be installed and ready for connection
to the appliance.
• GENERALREQUIREMENTS
Authorizedpersonnelshouldbeavailabletoperform
the actual utility connections.

Page5
SECTION 3 - INSTALLATION
3.3 Uncrating, Positioning and Leveling
CAUTION
Somewater mayremainin thelines after pre-shipping
testing.Duringshippingandinstallation,thedishwasher
should ONLY be positioned upright.
1. Removeall shippingandpackaging materialfrom
the appliance, including supports and wrappings.
Leave the shipping skid in place at this time to
allow for easier movement to the installation
location.
2. Checkforshippingdamageasdescribed in Section
2,“Transport andShipping.”If damageis present,
call MEIKO Customer Service at
1-800-868-3840, providing full details on the
customer, serial number and extent of damage
present. MEIKO will file a freight claim based on
thisinformation.
3. Move the appliance to the installation area and
remove the skid. Use caution to avoid damaging
the appliance or any of its components.
4. Check that the plastic feet are attached to each of
the four adjustable leg bolts. If necessary, attach
them by pressing them firmly onto the end of the
bolts.
5. Using a spirit level, check that the appliance is
levelin bothdirections (front-to-backANDside-to-
side). If necessary, rotate the leg bolts to level the
appliance.
CAUTION
ThedishwasherMUSTbelevelforproperoperation.
3.4 Accessing the Utility Connections
Utility connections are accessible on the lower rear of
the dishwasher. See Figure 3-1. In most cases, local
codes prevent the final utility connections from being
made by any party other than a licensed electrician
and/orplumber.
Figure 3-1: Utility connection locations

Page6
SECTION 3 - INSTALLATION
3.5 Priming the Detergent and Rinse Aid Lines
After the machine has been connected to appropriate
detergent and rinse aid containers, the supply lines
must be primed to remove air from the lines. To prime
thelines, usethe following procedure.
3.6 Checkingfor Correct Chemical Concentration
The normal settings for chemical injection are:
• Detergent- 0.192 oz.per gallonof washwater (1.5
ml per liter).
• Rinseaid -0.038 oz.per gallon ofrinse water(0.3
ml per liter).
To check if the normal settings are correct for your
chemicals,RUNTHREEEMPTYLOADSto completely
cyclethe water supplyand obtainaccurate testresults.
This will only take a few minutes. Then, run a sample
load with soiled ware and examine the results.
• If the detergent setting is too low, the ware will not
be adequately cleaned. In some cases, this can
be corrected by simply selecting a longer cycle
time (using the Cycle Select II, Extended or Cycle
Select III, Heavy buttons), but the detergent
concentration may also need to be adjusted.
• If the rinse aid setting is too low, spotting or
streaking may occur on the ware.
• If too much of either chemical is added, the extra
chemicals will be wasted. This is often difficult to
detect except by determining how long your
chemical supplies last. If the chemicals are being
exhausted quickly, you may need to have the
chemicalconcentration adjusted.
IN ALL CASES, ANY ADJUSTMENTS OF THE
FACTORYCHEMICAL INJECTION SETTINGSARE
TOBEPERFORMEDONLYBYAMEIKOAUTHORIZED
SERVICEAGENT.CHANGES BYUNAUTHORIZED
PERSONNELWILL VOIDYOUR WARRANTY.
If you need to contact yourAuthorized Service
Agency, please contact MEIKOTechnical Support at
1-800-868-3840.
To turn the machine on, press and hold or
open the door. The display will turn on.
Press the key next to the action symbol on
the display.
The initial choice on the Action menu is PRIME
DETERGENT SUPPLY.Press the key nextto the
check mark to prime the detergent pump.Atimer
willcount downthe remainingtime forthe procedure.
At the end of the procedure, the display will return to
the Action menu. Press next to the
arrow to select PRIME RINSEAID SUPPLY.
Press the key next to the check mark to
prime the rinse aid pump.A timer will count down the
remainingtime forthe procedure.
At the end of the procedure, the display will return to
the Action menu. Press the (back) key to return to
the startup menu.
Press and hold for 2 seconds, until the display
readsSHUTDOWNMACHINE?Thenpressthe next
to the check mark to turn the machine off.

Page7
SECTION 4 - OPERATION
4OPERATION
4.1 Location and Description of Controls
Figure 4-1: Dishwasher controls
A - Wakeup key
Activates the machine from being turned off,
activating the display and other controls.
This key is also used to enter the service and
programminglevels.
B - Display
Shows various information about the operating
status of the dishwasher, including:
• Operatingstate
• Washtank temperature
• Finalrinse temperature
• Selected cycle
C - Start key
Pressing the key once begins a wash cycle. The
color of the start key also provides information on
thedishwasher’s operatingstate:
•Blue(steady) -Readyfor operation
•Blue(flashing)-Initialfilling/heatinginprogress
•Green (steady) - Dish wash cycle in progress
•Green(flashing)-Memory-timed filling/heating
inprogress
D - On/Off key
Thiskey isdisabledwithnthemachineisfullyturned
off,and appears whenthe Wakeupkey ispressed.
Pressing the key when the machine is off begins
thenormal heating/fillingprocess.
Pressingthe keywhen themachineis onturns the
machineoff.
E - Select/Confirm key
Cyclesthroughvariousmenuoptionswhena or
(arrow) is shown on the display next to the key.
Thecurrent optionchoice ishighlighted.
Confirmsamenuselectionwhena (checkmark)
is shown on the display next to the key.
Cancelsamenuselectionwhena (backsymbol)
is shown on the display next to the key.
F - Door handle (illuminated)
The color of the door handle provides information
onthe dishwasher’soperating state:
•Blue(steady) -Readyfor operation
•Blue(flashing)-Initialfilling/heatinginprogress
•Green (pulsating slowly) - Dish wash cycle in
progress
•Green(flashing) -Wash cycle pending,filling/
heatingin progress
•Red- Checkdisplay for animportant message

Page8
SECTION 4 - OPERATION
4.2 Startup
Checkthe levelof the externaldetergent andrinse aid
dispensers.If necessary,replaceorrefillthedispensers.
To turn the machine on, press and hold or
open the door. The display will turn on.
Pressand hold for2 seconds,or untilthedisplay
readsFILLING.
Wait for the machine to finish filling. will flash
blue as the machine fills, and the display will read
FILLING.
When the machine has filled, will stop flashing,
andthe displaywill readREADY FOR OPERATION.
4.3 Loading Guidelines
The loading guidelines shown here will lead to faster,
moreefficient cleaningof yourware.
Load hollow or concave
dishware (glasses, large
bowls,etc.)upside-down.
Thisallowswater todrain
more quickly, preventing
stains.
Forbest results, glasses,
mugsandcupsshouldbe
loaded into compart-
menteddishracks.
For greater efficiency in
loading cutlery, you can
use cutlery holders.
Whenloading them:
• Do not overload the
holders.
• Always load knives,
forksandspoonswith
thehandle DOWN.
Load plates, flat trays,
etc. at an angle with the
inside face pointing up.
Ensurethat water cannot
pool in hollow spaces in
theware(trayedges,etc.)
Do not stack items in the
dishwasher, or overload
the dishracks. This
prevents the wash water
from reaching the food
residue.Itismoreefficient
to load the dishwasher
with fewer items and run
multiple, shorter cycle
times.
• Do not load identical ware into any given holder.
Instead, load an assortment of knives, forks and
spoonsinto each holder. Identicalware isoftentoo
closelyspaced foreffective cleaning.

Page9
4.4 Operation
Select a cycle length and wash pressure by pressing
(next to the or arrows on the display).
Press to begin the wash cycle.
During the wash cycle, is lit in green, and the
display will read OPERATION. A blue progress bar
moves across the display to show the remaining time.
Fastest cycle,
lowest water
pressure
Medium cycle,
medium water
pressure
Long cycle,
highest water
pressure
4.6 Between Cycles
Betweencycles, leavethe doorof themachine closed
toconserve heating energyand shortenrecovery time.
During extended idle periods, the display may show
ECO-MODE as the machine enters an energy-saving
standby mode. When a new cycle is started, the
machinewill returnto normaloperation automatically.
4.7 Shutdown
At the end of the shift, press and hold for 2
seconds, until the display shows the options ACTION
andSHUTDOWNMACHINE?
Whenprompted to SHUTDOWNMACHINE?,pressthe
next to the check mark. The machine will
performa shutdown cycle,andthen automatically shut
itselfoff.
4.5 Interrupting a Wash Cycle
If it is necessary to stop the cycle before it completes,
press the key once, or slowly open the door.
WARNING!
If the door is opened suddenly, hot water can
spray out of the dishwasher. Open the door
slowlyuntil thedishwasher stopsoperating.
If the cycle is stopped before it completes, Cycle
interrupted will appear on the display. To clear the
message, press the key next to the check
mark.
At the end of the cycle, will change back from
green to blue. Open the door to unload the dishrack.
Steammayescapewhenthedoorisopened;thisisnormal.
WARNING!
Usecaution whenhandling hotdishes, glass-
wareand otheritems.
SECTION 4 - OPERATION

Page10
SECTION 4 - OPERATION
4.9 Manual Water Change
Duringregular operation,the M-iCleanFilter removes
the majority of food soil particles from the water in the
wash tank. However, liquids can dissolve in the wash
tank,soiling thewater andaffectingfirst-time washing
results.
If the wash tank water becomes heavily soiled, it is
possibletomanuallyemptyandrefillthetankwithclean,
freshwater withoutshutting downthemachine.
With the machine turned on, press and hold for
2 seconds, until the display shows the options ACTION
andSHUTDOWNMACHINE?
Press the next to the action symbol on the
display.
At the Action menu, press next to the
or arrows on the display to select MANUAL/
AUTOMATICWATER CHANGE.
Press the key next to the check mark to
begin the process.
The display will show a rotating wheel to indicate the
machine is working. The caption at the bottom of the
screen will first show SELF CLEANING CYCLE,
followedbyFILLING/HEATING.
At the end of the procedure, the display will return to
the Action menu. Press the (back) key to return to
the normal display screen. The machine is now ready
toresume regularoperation.
4.8 Low Detergent Indicator
The liquid detergent supply line ends in a detergent
leveldetectionsensor.Ifthesensordetectsalowsupply
of detergent in the container, a message will be
displayedto informtheoperator.
Ifthe messagecontinues tobe displayedafter refilling
the detergent container, press the keynext tothe
check mark to clear the message.
Itisnormallynot necessary to prime the detergent pump
ifthe containeris refilledpromptly. However, ifthe con-
taineris completelyempty, aircan enterthe detergent
line,affecting the amountof detergentdelivered during
the cycle. To prime the pump during operation:
Press and hold for 2 seconds, until the display
provides the options ACTION and SHUTDOWN
MACHINE?
Press the next to the action symbol on the
display.
The initial choice on the Action menu is PRIME
DETERGENT SUPPLY.Press the key nextto the
check mark to prime the detergent pump.Atimer
willcount downthe remainingtime forthe procedure.
At the end of the procedure, the display will return to
the Action menu. Press the (back) key to return to
the normal display screen. The machine is now ready
toresume regularoperation.

Page11
SECTION 5 - CLEANING
Figure 5-1: Wash arm removal
Figure 5-2: Scrap screen removal
Figure 5-3: M-iClean Filter removal
Figure 5-4: Pump filter removal
5CLEANING
WARNING!
Before ANY cleaning, check that the circuit
breaker/fuseddisconnectisintheOFFposition
and that the unit is switched off.
IMPORTANT
TheheadingDailyCleaningisageneralrecommendation
based on typical soiling. If soil beings to accumulate,
theunit shouldbe cleanedmore frequently. Extensive
food soil deposits inside the machine work against
optimalperformance. Someitems maynot be cleaned
as effectively, resulting in the need for either a longer
cycle or repeat washing. In addition, heavy soiling in
thewash waterincreases detergentconsumption.
5.1 Daily Cleaning (or as required)
1. The dishwasher automatically enters a shutdown
cycle when it is turned off. The interior will be
sprayed with hot, fresh water as the booster tank
empties.
2. AFTER this cycle ends and the machine shuts
down, open the door. Remove any food particles,
scraps or bones from the scrap screen.
3. Removethe upperand lowerwasharms. Turnthe
retaining screw counter-clockwise until it is loose,
then lift out the arm. See Figure 5-1.
4. Lift out the scrap screen assembly out of the
machine.See Figure5-2.
5. Removetheblue M-iClean Filterfromthebottom of
the scrap screen. See Figure 5-3.
6. Inspect the pump filter at the bottom of the tank. If
it is soiled, remove it by depressing the gray latch
asshown inFigure 5-4.
7. Cleanthewasharms,scrapscreen,M-iCleanFilter,
and(if necessary)the pumpfilter at thesink using
a soft brush and warm water.
8. Wipe down the interior of the machine, and the
insideof thedoor,using a softclothandwarmwater.
9. MEIKOrecommendsthatthedoorofthedishwasher
be left open overnight to allow it to air thoroughly.
10. Reassembleallcomponentsback into themachine
before operation. Note that the upper and lower
washarms areidentical and interchangeable.
5.2 Exterior cleaning (as required)
CAUTION
Whencleaning theexterior ofthe dishwasher, besure
tofollow theseguidelines:
• MEIKOstronglyrecommendsusingdetergentwhen
cleaning the exterior of the unit, instead of
commercial stainless steel cleaners.
• Neveruse abrasive cleanersorpadswhencleaning
the dishwasher. These can scratch the surface of
the unit, as well as damage the control panel.
WARNING!
Ensure that detergents and cleaners are kept
out of the interior of the dishwasher. If the
interior of the unit has extensive soil or lime
scale deposits, refer to Deliming (Section 5.3).

Page12
SECTION 5 - CLEANING
5.3 Deliming (as required)
WARNING!
After deliming, ensure that ALL residue is
removed.Residue from thedelimingagentcan:
• Pose a health hazard;
• Damage seals and plastic components
insidethe dishwasher.
CAUTION
When deliming the interior, use deliming agents
designed for use with commercial dishwashers, and
followthe manufacturer’sinstructions.
Limescale depositswill occur overtime ontheinterior
of the dishwasher. Deposits can be minimized by
avoiding the use of a hard water supply. MEIKO
recommendsa hardnessof 1-3grains per U.S.gallon.
To begin the deliming process, first ensure that the
machine is turned off and fully drained. This is critical
toensure that nodetergent ispresent inthe washtank,
whichcan interferewith thedeliming agent.
To turn the machine on, press and hold or
open the door. The display will turn on.
Press the key next to the check mark to
begin the deliming process.
Press the key next to the action symbol on
the display.
At the Action menu, press next to the
or arrows on the display to select DELIMING.
The display will show a rotating wheel to indicate the
machine is working. The caption at the bottom of the
displaywill indicateFILLING/HEATING.
After the tank has filled, the display will prompt for the
deliming agent to be added. Follow the instructions of
the deliming agent used to determine the correct
amount.The tankcapacityis 2.1U.S. gals. (8.0liters).
The display will show a rotating wheel to indicate the
machine is working. The caption at the bottom of the
screen will first show DELIMING (along with the
remainingdelimingtime),followedby SELF CLEANING
CYCLEtorinsetheinteriorofremainingdelimingagent.
At the end of the procedure, the display will return to
the Action menu. Press the (back) key to return to
the normal display screen.
Openthedoorandinspecttheinteriorfor any remaining
delimingagent residue.If residueis present, removeit
usinga softcloth and hotwater; then, runthe machine
through one empty cycle.
Press and hold for 2 seconds, until the display
readsSHUTDOWNMACHINE?Thenpressthe next
to the check mark to turn the machine off.

Page13
6TROUBLESHOOTING
Ifthe dishwasherencountersa problem,a message willgenerally appearin thedisplay. Dependingon the issue,
the illuminated door handle may also change to red to notify the operator.
Not all problems require a service agent’s assistance. If you use this troubleshooting guide to resolve simple
problems, you can often return the appliance to operation faster than by placing a service call.
You should contact your MEIKOAuthorized ServiceAgent IF:
• A message is displayed that is not shown here, OR
• And error message is displayed repeatedly after taking the listed action to correct it, OR
• The listed action fails to correct the problem.
An Authorized Service Agency Listing was supplied with your dishwasher. If you do not have the listing, call
1-800-868-3840 forassistance, orvisit MEIKO’swebsiteat www.meiko.us.
SECTION 6 - TROUBLESHOOTING
Problem Action
MachinedoesnotfillOR • Checkthatthewatershutoffvalvetothemachineisopen.
finalrinsedoesnotactivate • CheckthattheY-strainer/dirttrapisnotclogged.
• Checkthatthemachinedoorisclosed.
Stripesorsmearsoncleanware • Checkforappropriatedetergentorrinseaid.
• Checkforcorrectrinseaidconcentration
Significantfoaminginwashtank • Checkforappropriatedetergent.Foamingdetergentsshouldnotbeusedwiththemachine.
Wareisnotsufficientlycleaned • Choosealongercycletimeforheavilysoiledware.
• Ifthemachinehasbeeninoperationforanextendedtime,thewashtankwatermaybe
heavilysoiled.FollowtheprocedureforManualWater Change inSection4.9.
# Message(in display) Problem Action
6 Cycleinterrupted Thewashcyclewasinterrupted • Clearthemessage(seeabove).
7 Doornotclosed Doornotclosed • Clearthemessage(seeabove).
14 Dooris open. Doornotclosed • Clearthemessage(seeabove).
Heatenergyisescaping.
50 Rinseaidlow. Rinseaiddispenserisloworempty. • Refillrinseaid(andprimeifnecessary).
51 Detergentlow. Detergentdispenserisloworempty. • Refilldetergent(andprimeifnecessary).
54 Checkexternalchemical Rinseaidand/ordetergentdispensing • Checkdispensingsystems.
dosingunit. systemisnotfunctioningproperly.
100 Referencelevelinwashtank Watersupplytomachineisnot • Checkthatthewatershutoffvalvetothemachineis
notreachedintimeduringfill. flowingproperly open.
Watersupplyinadequate. • CheckthattheY-strainer/dirttrapisnotclogged.
101 Machinenotdraining. Machineisnotdrainingproperly • Checkthatthepumpfilterisnotclogged.See
Section5.1,DailyCleaning.
102 Machinenotdrainingintime. Machineisnotdrainingquicklyenough. • Clearthemessage(seeabove).
6.1 Operating Issues (no messages)
The issues shown below generally will NOT result in an error message. It may not be necessary to contact your
MEIKOAuthorized ServiceAgent if the listed action corrects the problem.
6.2 Display Messages
Theissues shownbelow will generatea messageand
matching number code. It may not be necessary to
contact your MEIKO Authorized Service Agent if the
listed action corrects the problem.
If the display shows a message even after correcting
theproblem, pressthe key nextto the check
mark to clear the message. If the handle continues to
be illuminated in red, open and close the door.

Page14
# Message(in display) Problem Action
111 Waterlossinwashtank • Clearthemessage(seeabove).
112 Dailywaterchange,dueto Themachinehadnotbeendrained • Attheendoftheday,alwaysshutdownthe
washtankbeingfullfortoo insometime,andautomatically machineusingtheautomaticdrain/shutdowncycle.
long. activatedadrain/shutdowncycle.
113 Washtankwaterleveltoohigh.
114 Pumpintakescreenmissing Thescrapscreen,M-iQFilterand/ • Checkforcorrectinstallationofthecomponents.
orinsertedincorrectly. orpumpfilterarenotpresent,or SeeSection5.1,DailyCleaning.
havebeenreinstalledincorrectly.
115 Washtankoverfill. • Clearthemessage(seeabove).
Drainpumpactivated.
116 Wash/rinsearmsblocked/ Oneorbothwasharmsarenot • Checkforcorrectinstallationofthecomponents.
missing. present,orhavebeenreinstalled SeeSection5.1,DailyCleaning.
incorrectly.
117 Checktopwash/rinsearm. Theupperwasharmisnotpresent, • Checkforcorrectinstallationofthecomponents.
wasreinstalledincorrectly,orwater SeeSection5.1,DailyCleaning.
isnotflowingthroughitproperly. • Checkthatthepumpfilterisnotclogged.See
Section5.1,DailyCleaning.
118 Checkbottomwash/rinsearm. Thelowerwasharmisnotpresent, • Checkforcorrectinstallationofthecomponents.
wasreinstalledincorrectly,orwater SeeSection5.1,DailyCleaning.
isnotflowingthroughitproperly. • Checkthatthepumpfilterisnotclogged.See
Section5.1,DailyCleaning.
200 Boostertanklevelduringfill Watersupplytomachineisnot • Checkthatthewatershutoffvalvetothemachineis
notreachedearlyenough flowingproperly open.
• CheckthattheY-strainer/dirttrapisnotclogged.
205 Finalrinselevellow.Check Watermaybeaccumulatinginware, • Checkthathollowitemsareloadedproperlyand
forinvertedware. orfailingtodrainoutofthemachine donotretainwater.SeeSection4.3,Loading
properly. Guidelines.
• Checkthatthepumpfilterisnotclogged.See
Section5.1,DailyCleaning.
206 Washtimeextended.Final • Clearthemessage(seeabove).
rinsetemperaturetoolow.
211 Finalrinseboosterwaterloss • Clearthemessage(seeabove).
212 Forceddrainduetobooster Themachinehadnotbeendrained • Attheendoftheday,alwaysshutdownthe
tankbeingfullfortoolong. insometime,andautomatically machineusingtheautomaticdrain/shutdowncycle.
activatedadrain/shutdowncycle.
301 Lowrinseaid. Rinseaiddispenserisloworempty. • Refillrinseaid(andprimeifnecessary).
311 Lowdetergent. Detergentdispenserisloworempty. • Refilldetergent(andprimeifnecessary).
961 Realtimeclockerror. • Clearthemessage(seeabove).
962 Ethernetaccessfault. LossofEthernetconnectivity • IfaLANconnectionisusedwiththemachine,and
isnecessary,checktheconnectionandrestart
themachine.
964 USBaccessfault. LossofUSBconnectivity • IfaLANconnectionisusedwiththemachine,and
isnecessary,checktheconnectionandrestart
themachine.
965 Audio-Codecaccessfault. • Clearthemessage(seeabove).
967 Emergencyfactoryparameters • Clearthemessage(seeabove).
reset
968 Displaycommunicationfault. • Clearthemessage(seeabove).
969 Lowbattery . • Clearthemessage(seeabove).
972 Languagememoryfault. • Clearthemessage(seeabove).
SECTION 6 - TROUBLESHOOTING

Page15
NOTES
________________________________________________________________________________________________________________________________________________________________
__________________________________________
______________________________________________________________________________________________________________________
________________________________________________________________________________________________________________________________________________________________
________________________________________________________________________________________________________________________________________________________________
________________________________________________________________________________________________________________________________________________________________
________
________________________________________________________________________________________________________________________________________________________
__________________________________________________
______________________________________________________________________________________________________________
________________________________________________________________________________________________________________________________________________________________
________________________________________________________________________________________________________________________________________________________________
________________________________________________________________________________________________________________________________________________________________
________________________________________________________________________________________________________________________________________________________________
________________________________________________________________________________________________________________________________________________________________
________________________________________________________________________________________________________________________________________________________________
________________________________________________________________________________________________________________________________________________________________
________________________________________________________________________________________________________________________________________________________________
________________________________________________________________________________________________________________________________________________________________
________________________________________________________________________________________________________________________________________________________________
________________________________________________________________________________________________________________________________________________________________
________________________________________________________________________________________________________________________________________________________________
________________________________________________________________________________________________________________________________________________________________
________________________________________________________________________________________________________________________________________________________________
________________________________________________________________________________________________________________________________________________________________
________________________________________________________________________________________________________________________________________________________________

If you need service...
MEIKO dishwashers are designed for solid reliability as much as for
outstanding cleaning ability. With proper care, your dishwasher should
provide years of trouble-free operation.
If service is necessary, contact your local MEIKO Authorized Service
Agent.Withfactorytraining,OEMpartsanddirectsupportfromthefactory,
MEIKO’snationwideservicenetworkishighlyqualifiedtoquicklyrestore
your dishwasher to regular operation.
An Authorized Service Agency Listing was supplied with your
dishwasher. If you do not have the listing, visit MEIKO’s website at
www.meiko.us, or call 1-800-868-3840 for assistance.
MEIKO • 1349 Heil Quaker Blvd. • La Vergne, TN 37086 • Phone: (615) 399-6600 • (800) 55-MEIKO • Fax: (615) 399-6620 Revised 3/17
This manual suits for next models
2
Table of contents
Other Meiko Dishwasher manuals

Meiko
Meiko DV 200.2 Quick start guide

Meiko
Meiko UPster U 500 M2 User manual

Meiko
Meiko b-tronic User manual

Meiko
Meiko M-iClean H series User manual

Meiko
Meiko K-44E Quick start guide

Meiko
Meiko UPster K User manual

Meiko
Meiko EcoStar 545D-M User manual

Meiko
Meiko FV 28 GiO User manual

Meiko
Meiko FV 40.2 User manual

Meiko
Meiko M-iClean U User manual

Meiko
Meiko M-iQ User manual

Meiko
Meiko EcoStar 545D-M User manual

Meiko
Meiko FV 40.2 User manual

Meiko
Meiko M-iClean UM User manual

Meiko
Meiko KA 15 User manual

Meiko
Meiko UPster U 400 User manual

Meiko
Meiko FV 40.2 Quick start guide

Meiko
Meiko K-200 User manual

Meiko
Meiko TopClean 60 User manual

Meiko
Meiko M-iClean U User manual