Melissa & Doug AnimalCare ActivityCenter User manual

AnimalCare ActivityCenter
ASSEMBLY INSTRUCTIONS
Have a
question
or need help?
Give us a call!
1-800-284-3948
Assembly Instructional Video Available at MelissaAndDoug.com/animalcenter
Item #31700
Ages 3+
DO NOT use power tools to assemble.
Using power tools will cause product to crack!
DO NOT OVER-TIGHTEN!
Over-tightening will cause product to crack!
MADE IN CHINA

THANK YOU!
Thank you for choosing the Melissa & Doug Animal Care Activity Center! It’s a terrific way to help spark a
child’s creativity and imagination, and to inspire animal lovers for years to come.
NOW IT’S TIME TO PUT IT TOGETHER!
Don’t worry, assembling your new activity center is simple, and we’re here to help. It may go a little faster
with a partner to lend a hand, but we’ve made it so one person can assemble the center. Here are a few tips
before you begin:
• Read through all the instructions first.
• Clear a flat, covered space (carpeted is best) to lay out all the materials so everything is close at hand.
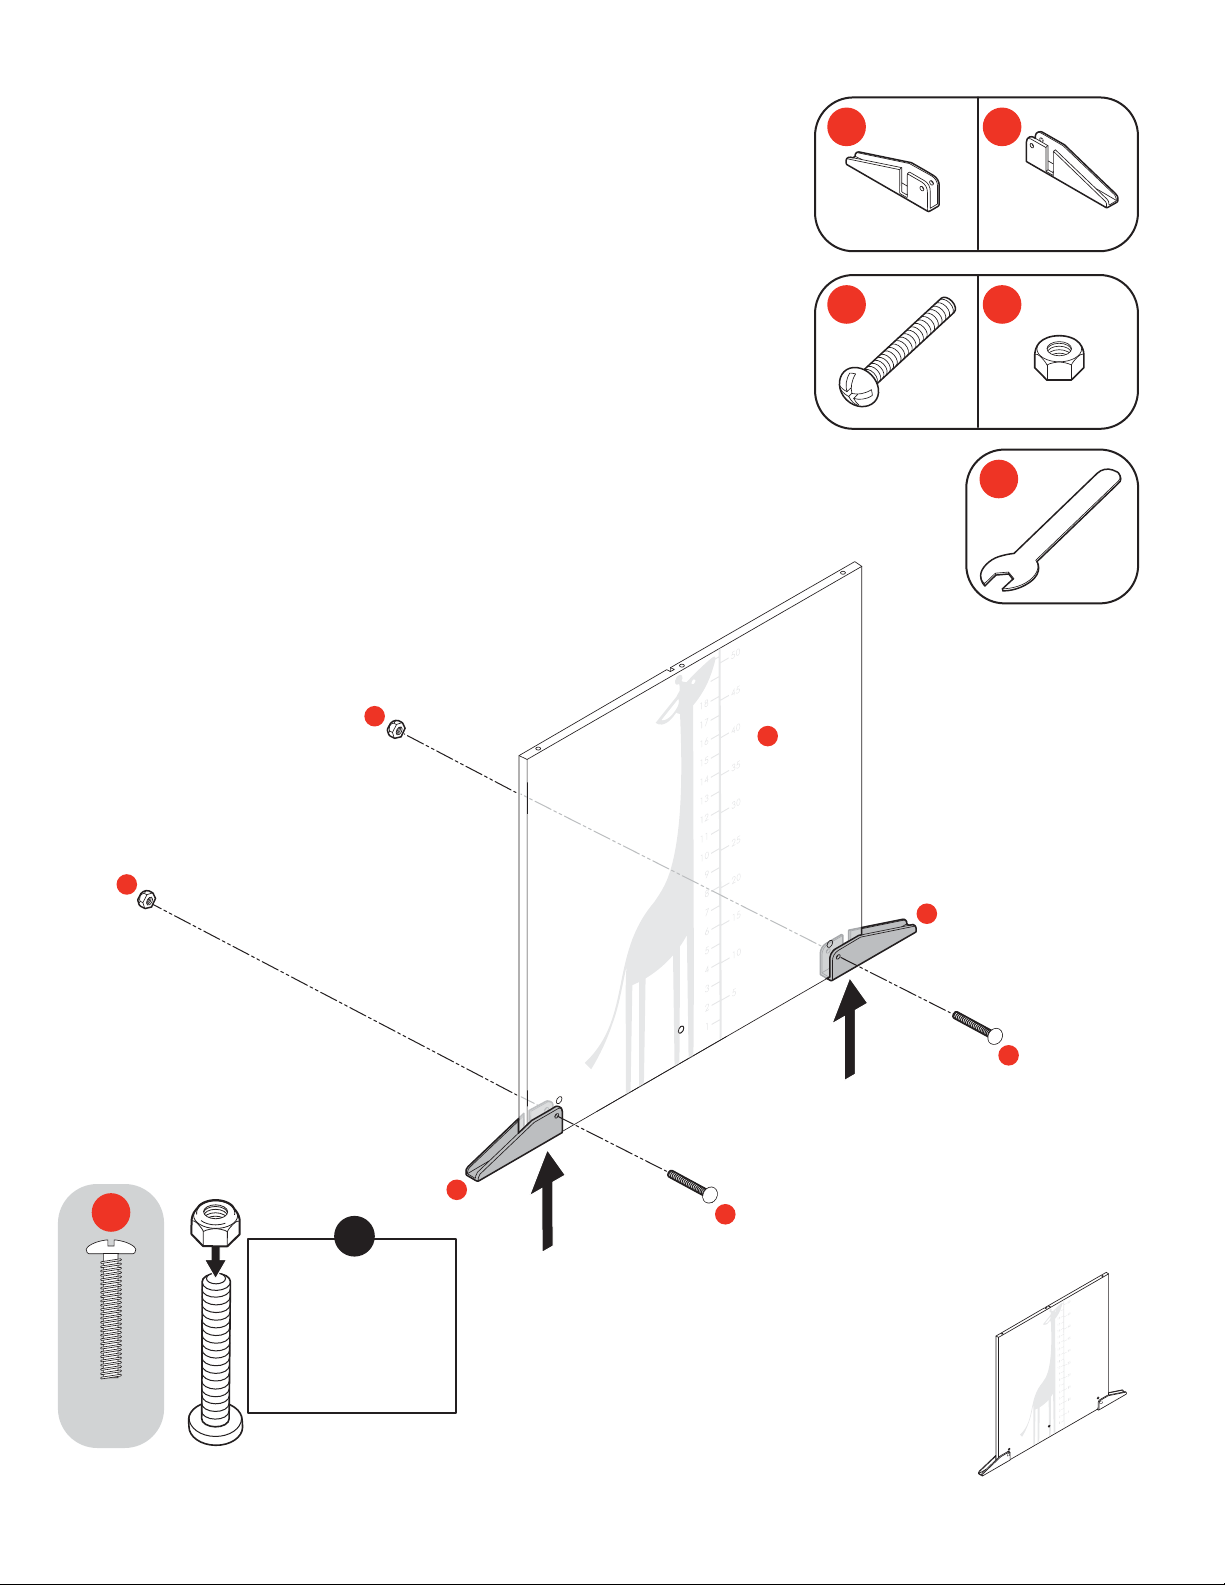
• You will need a Phillips head screwdriver and the included wrench to assemble the center.
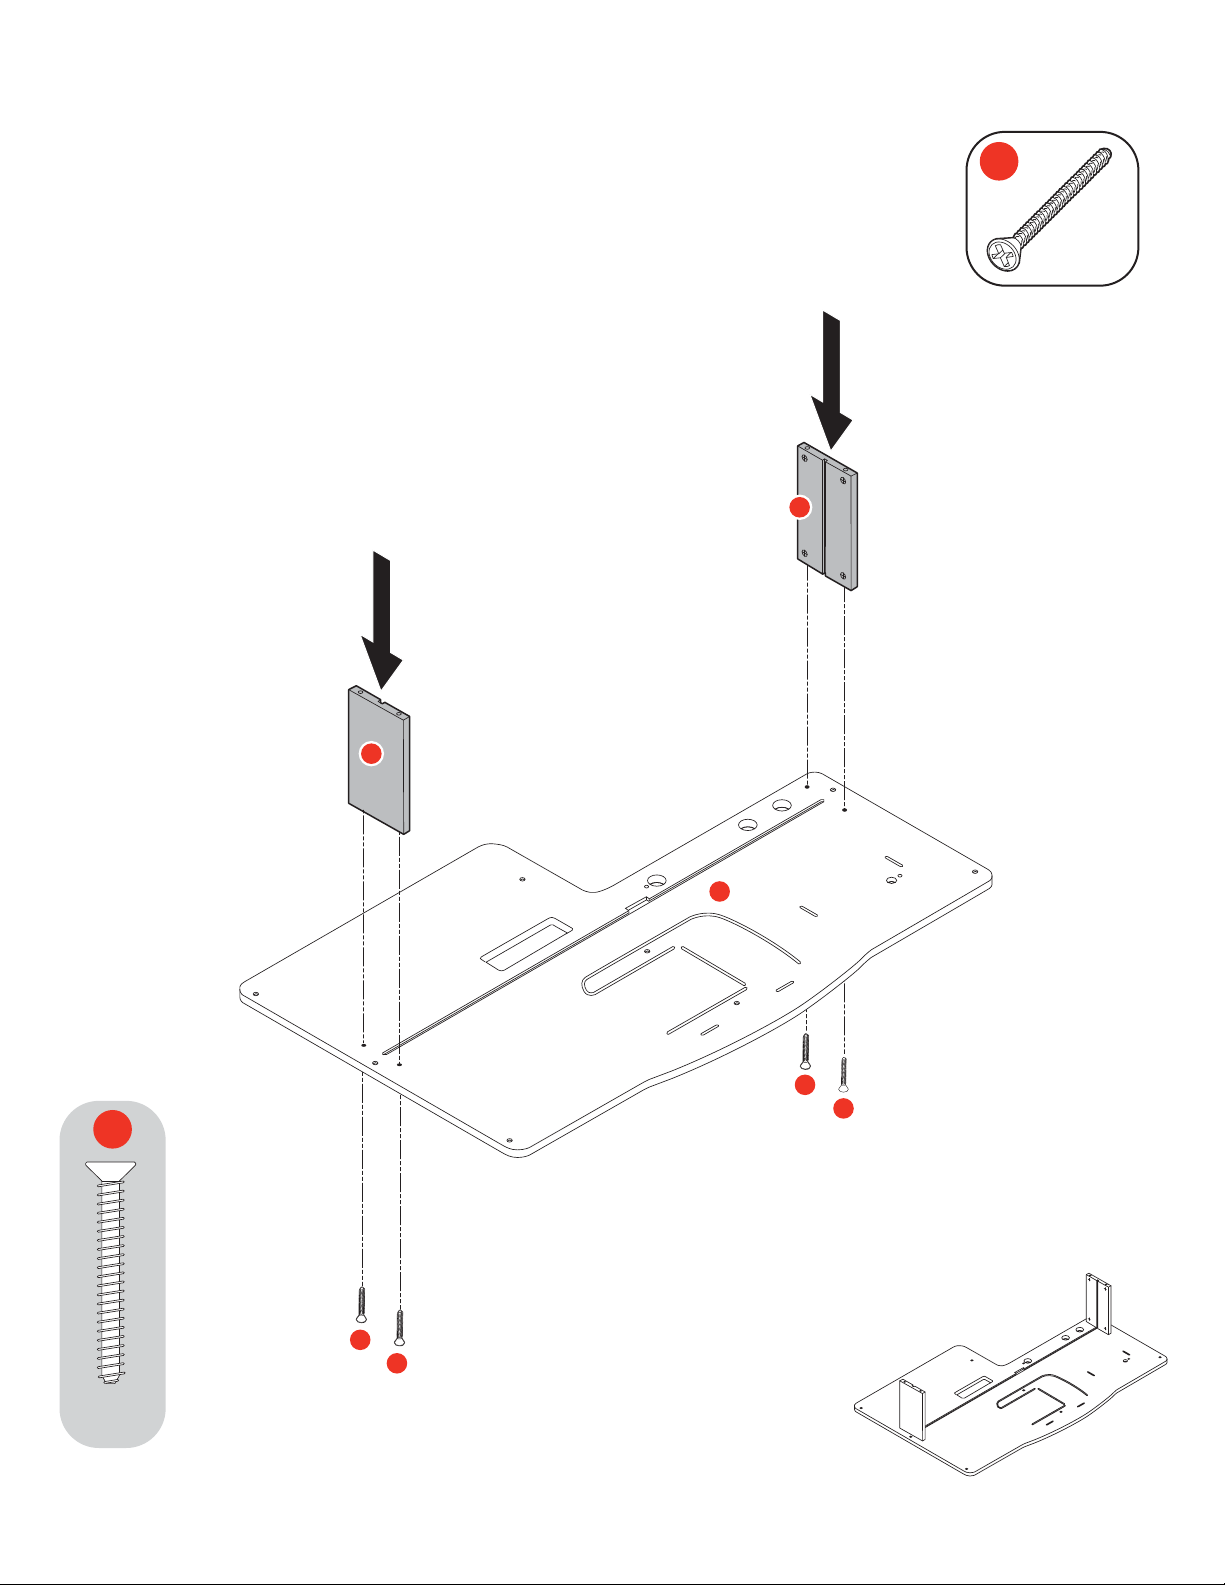
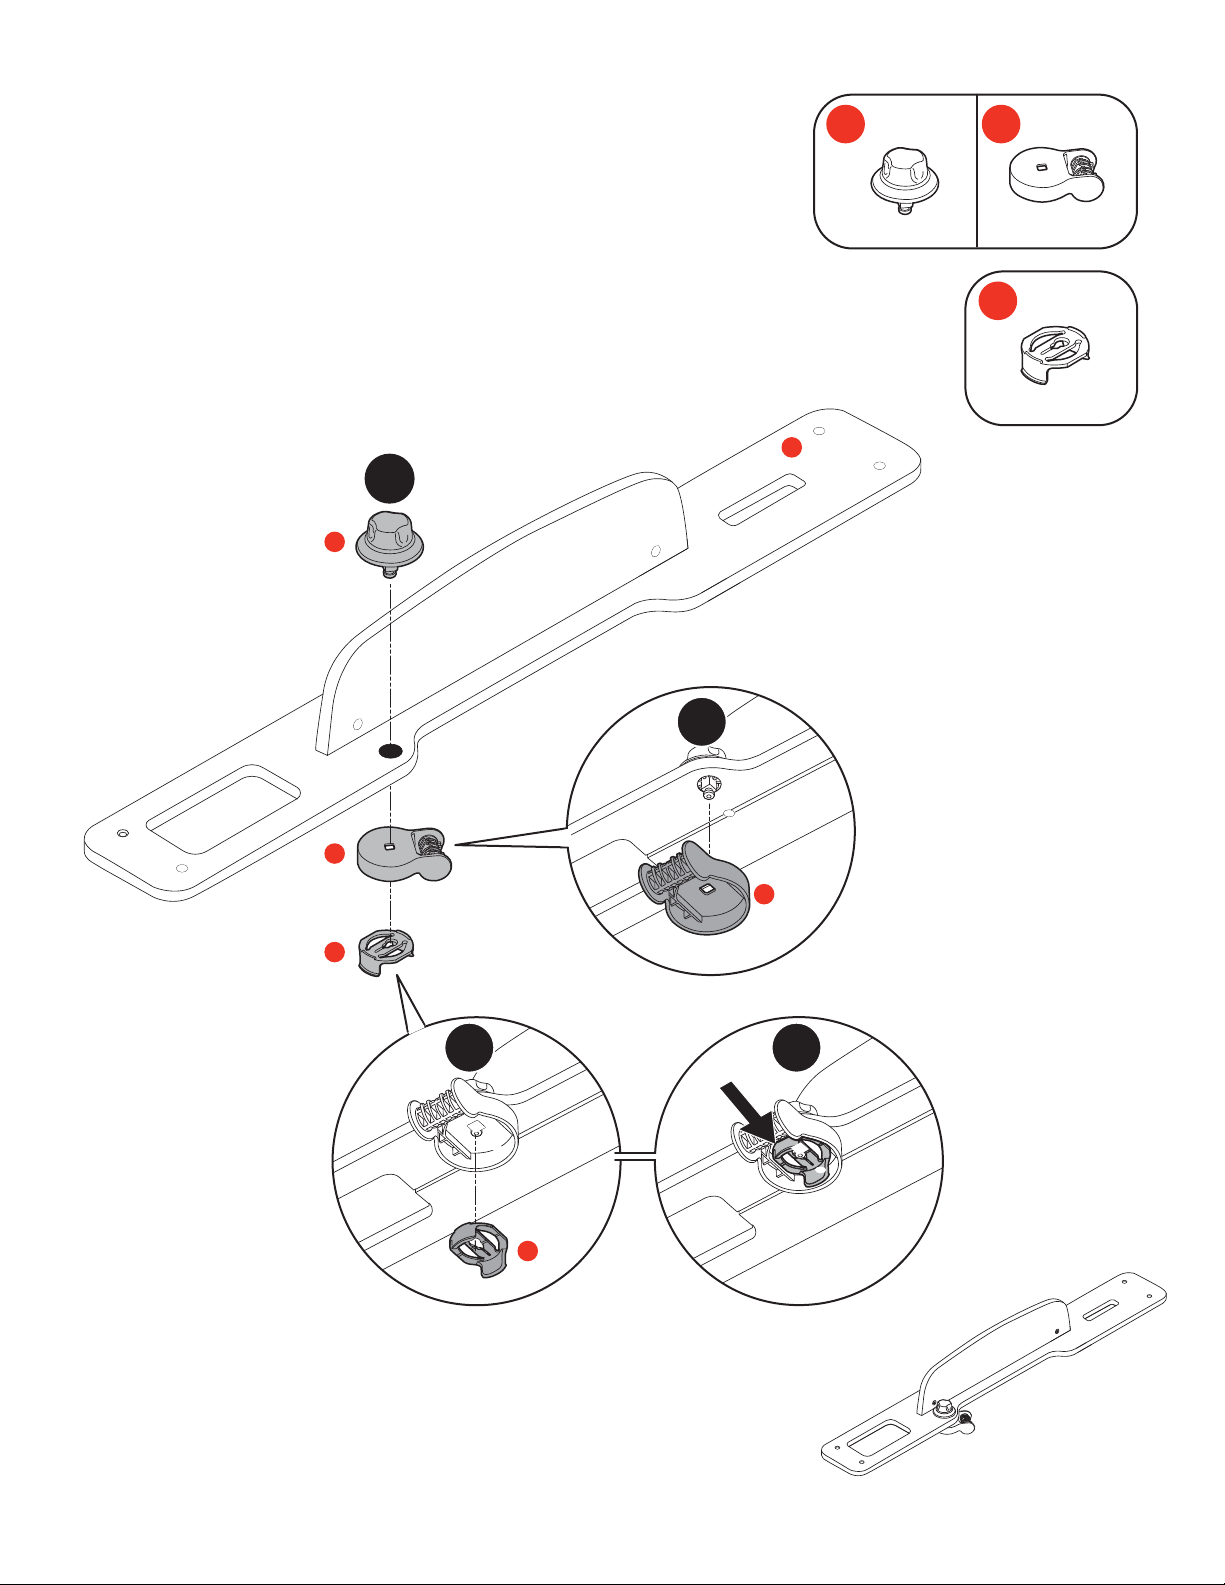
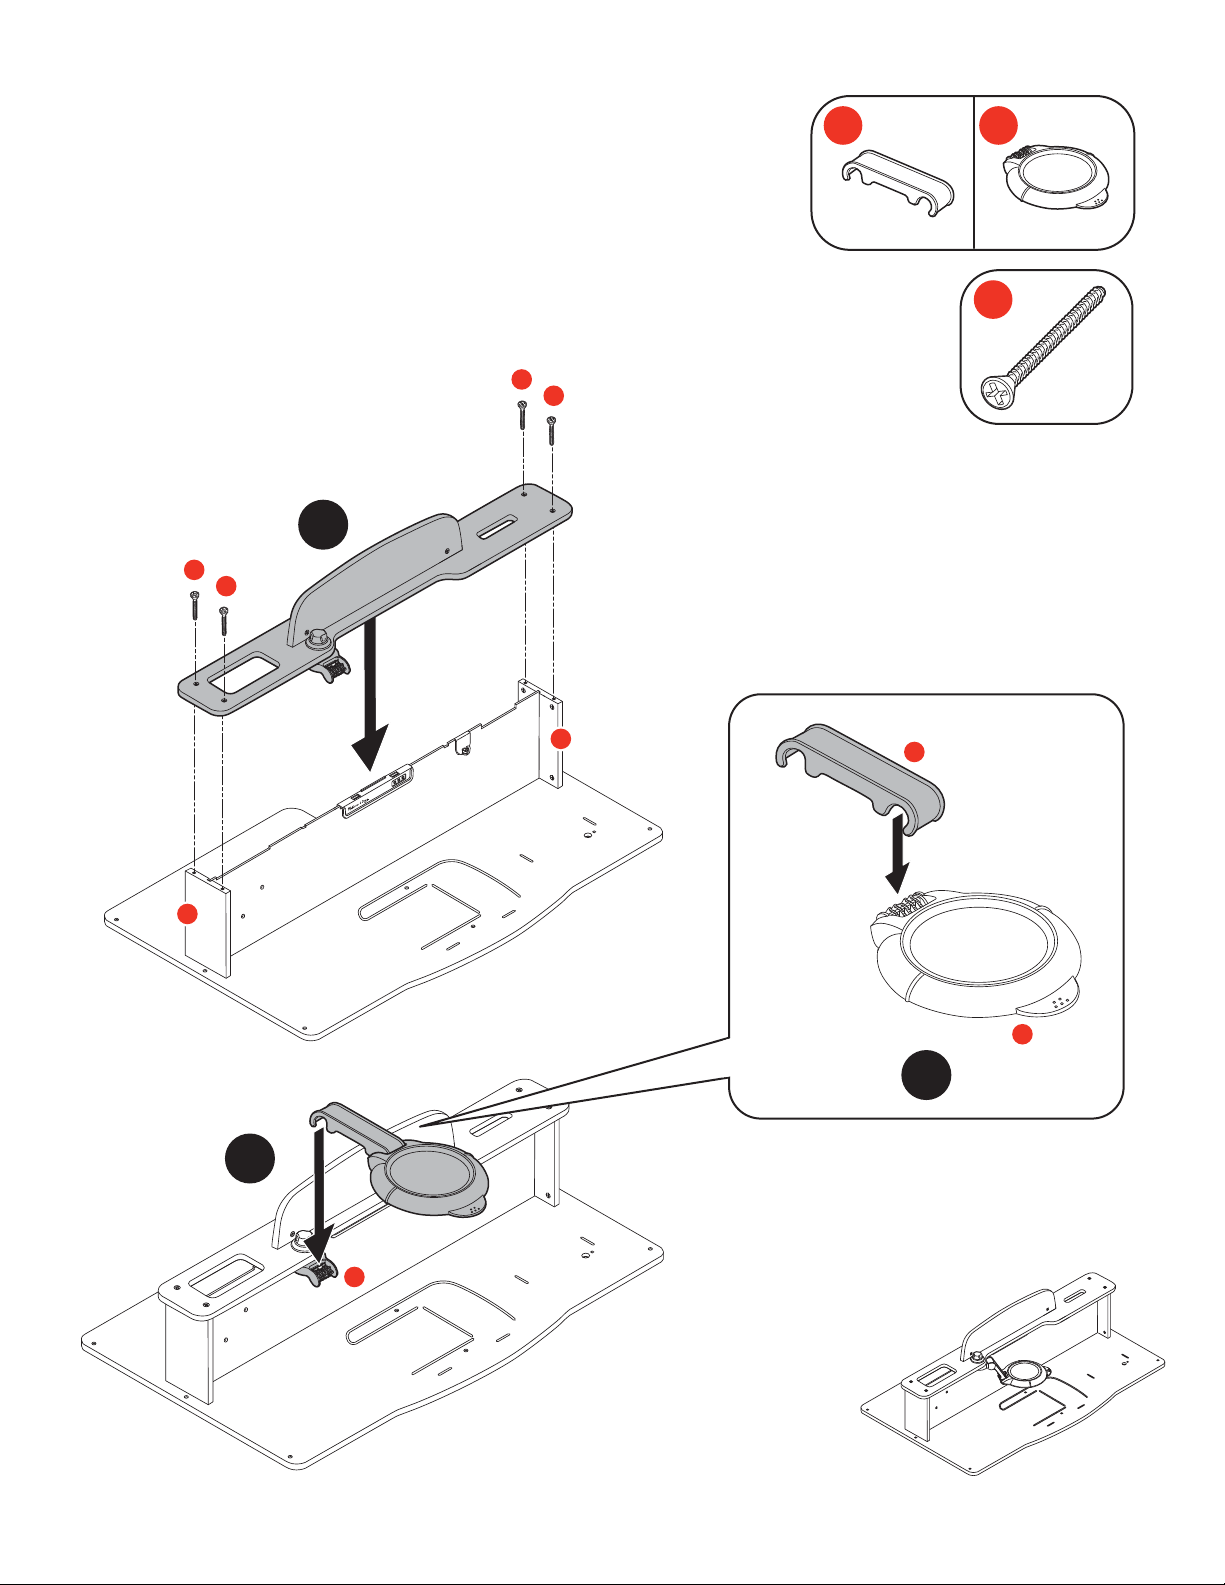
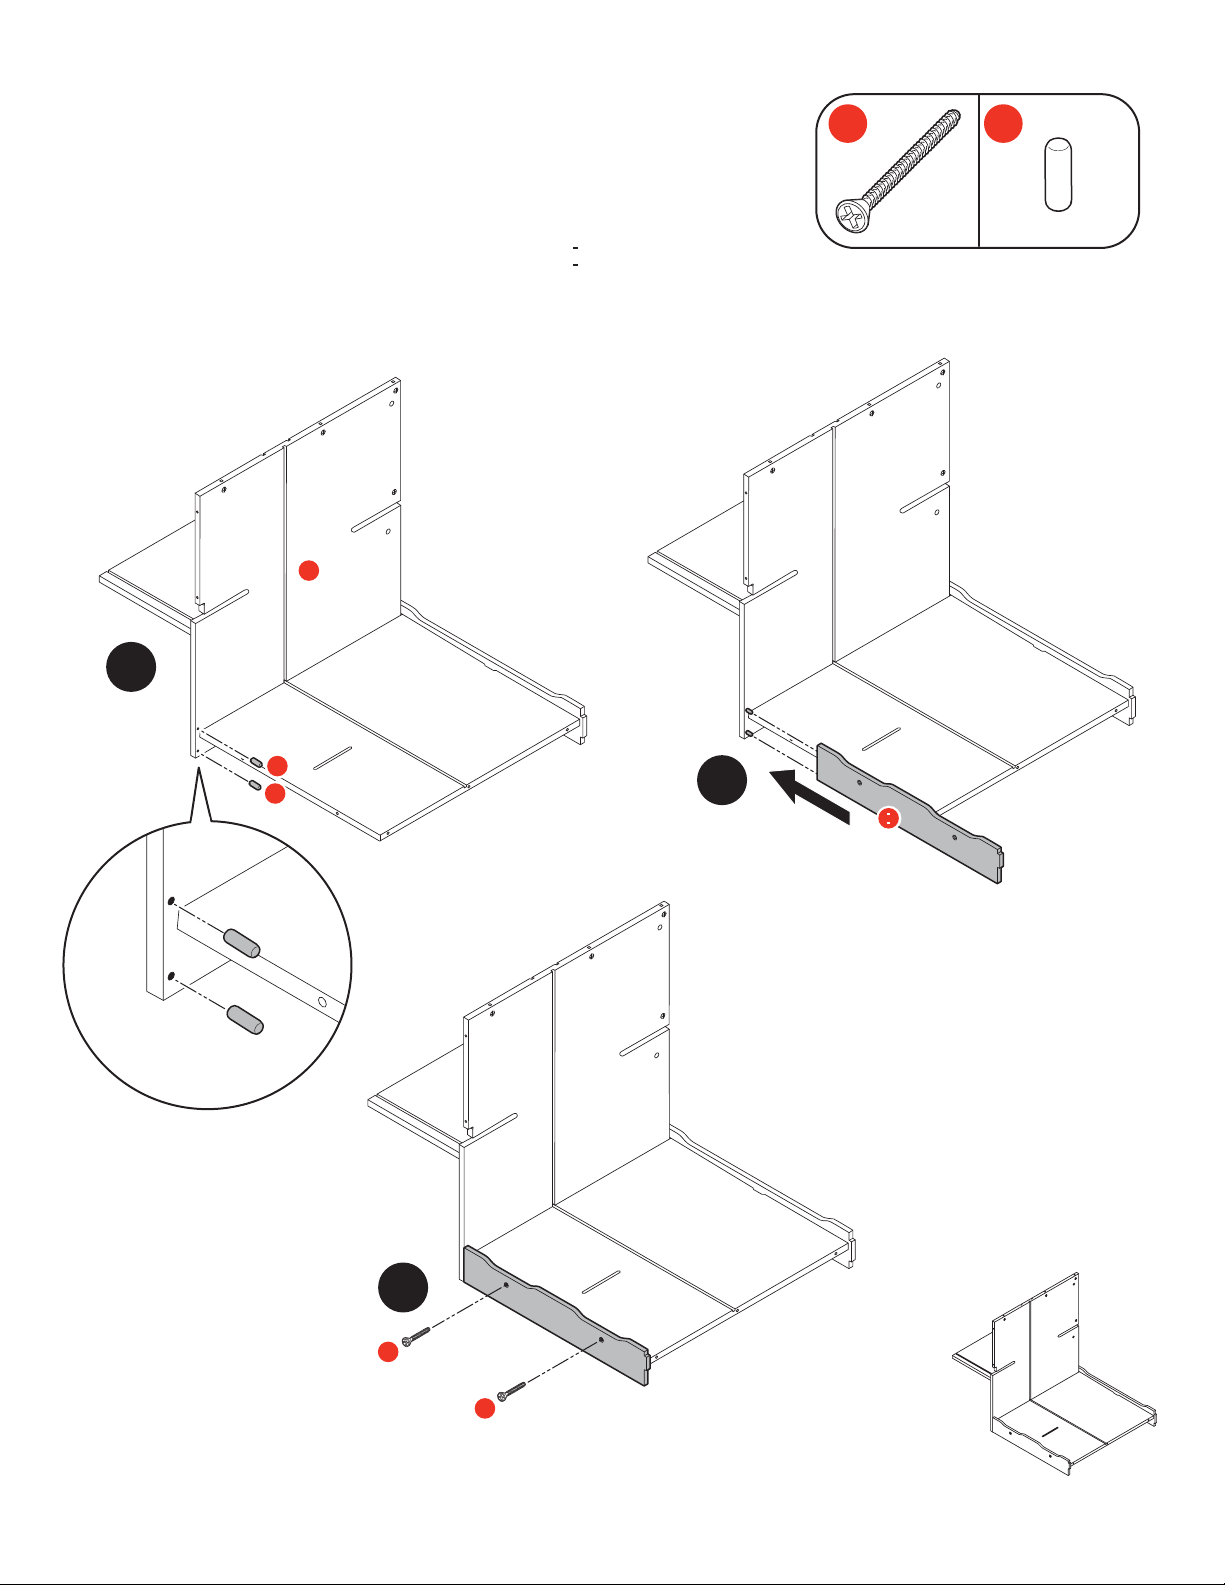
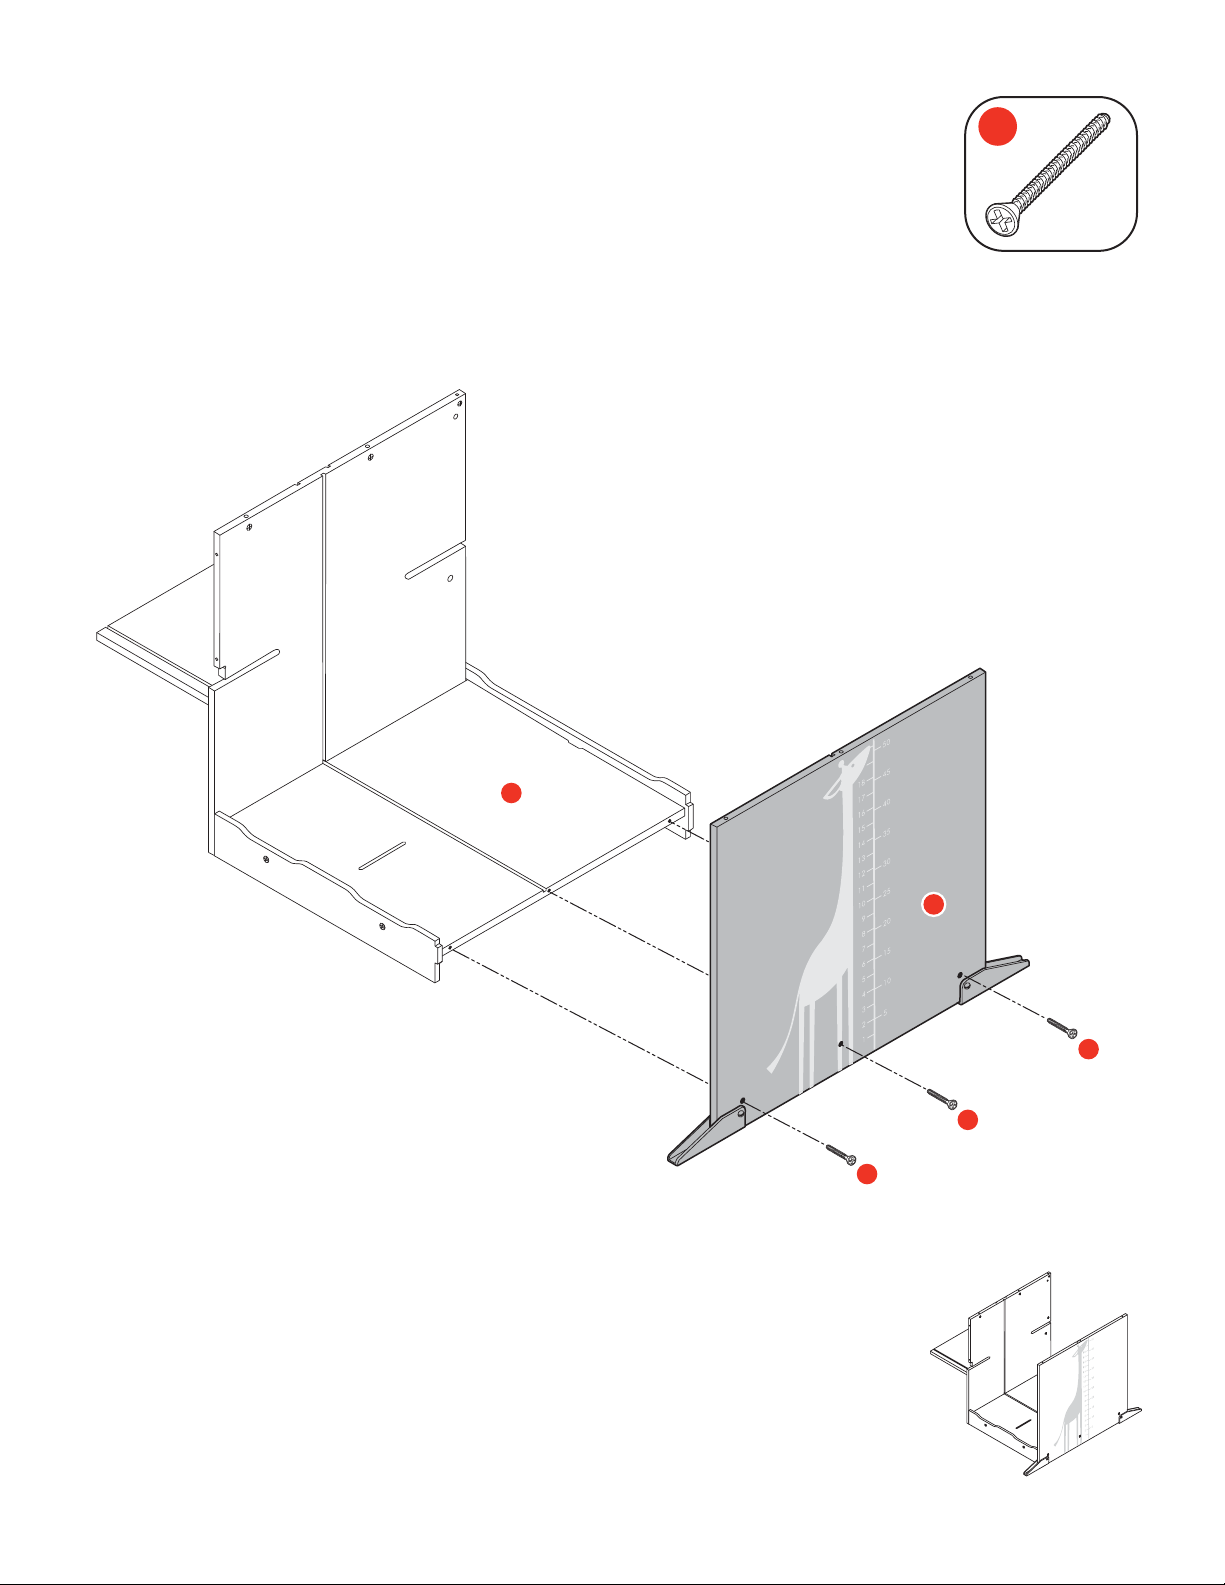
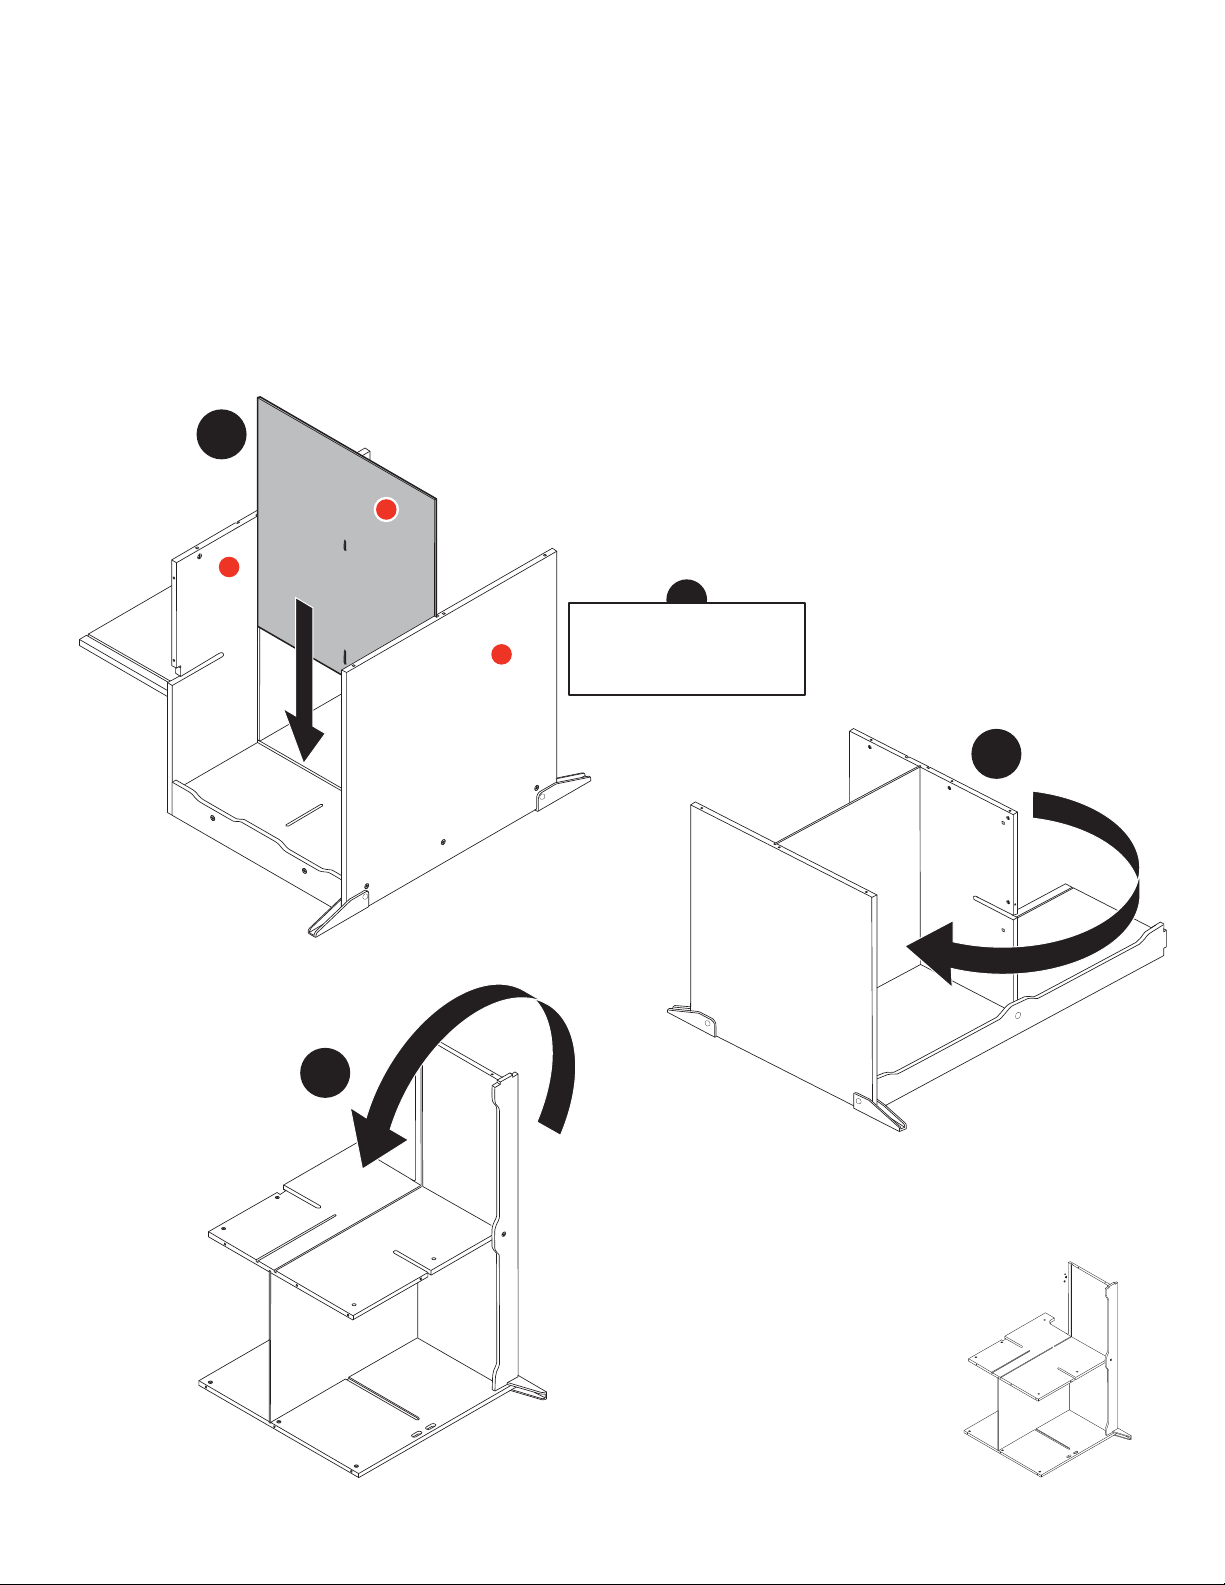
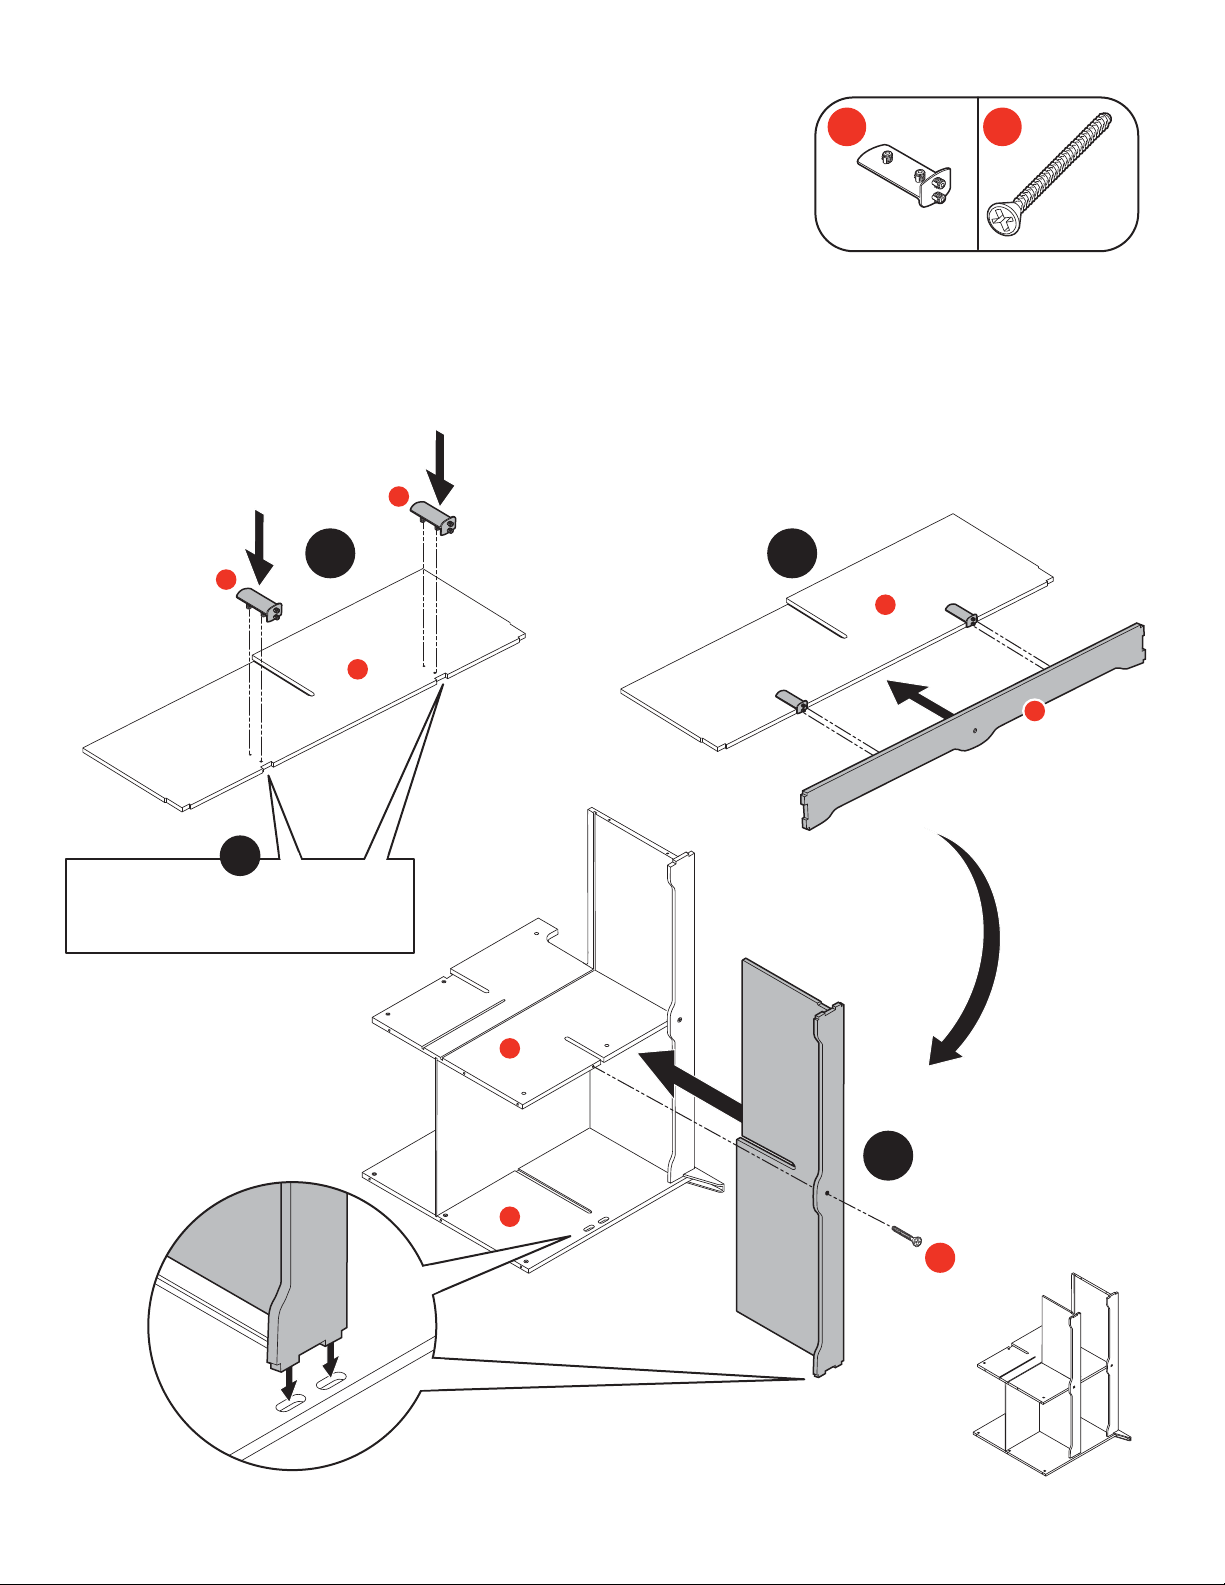
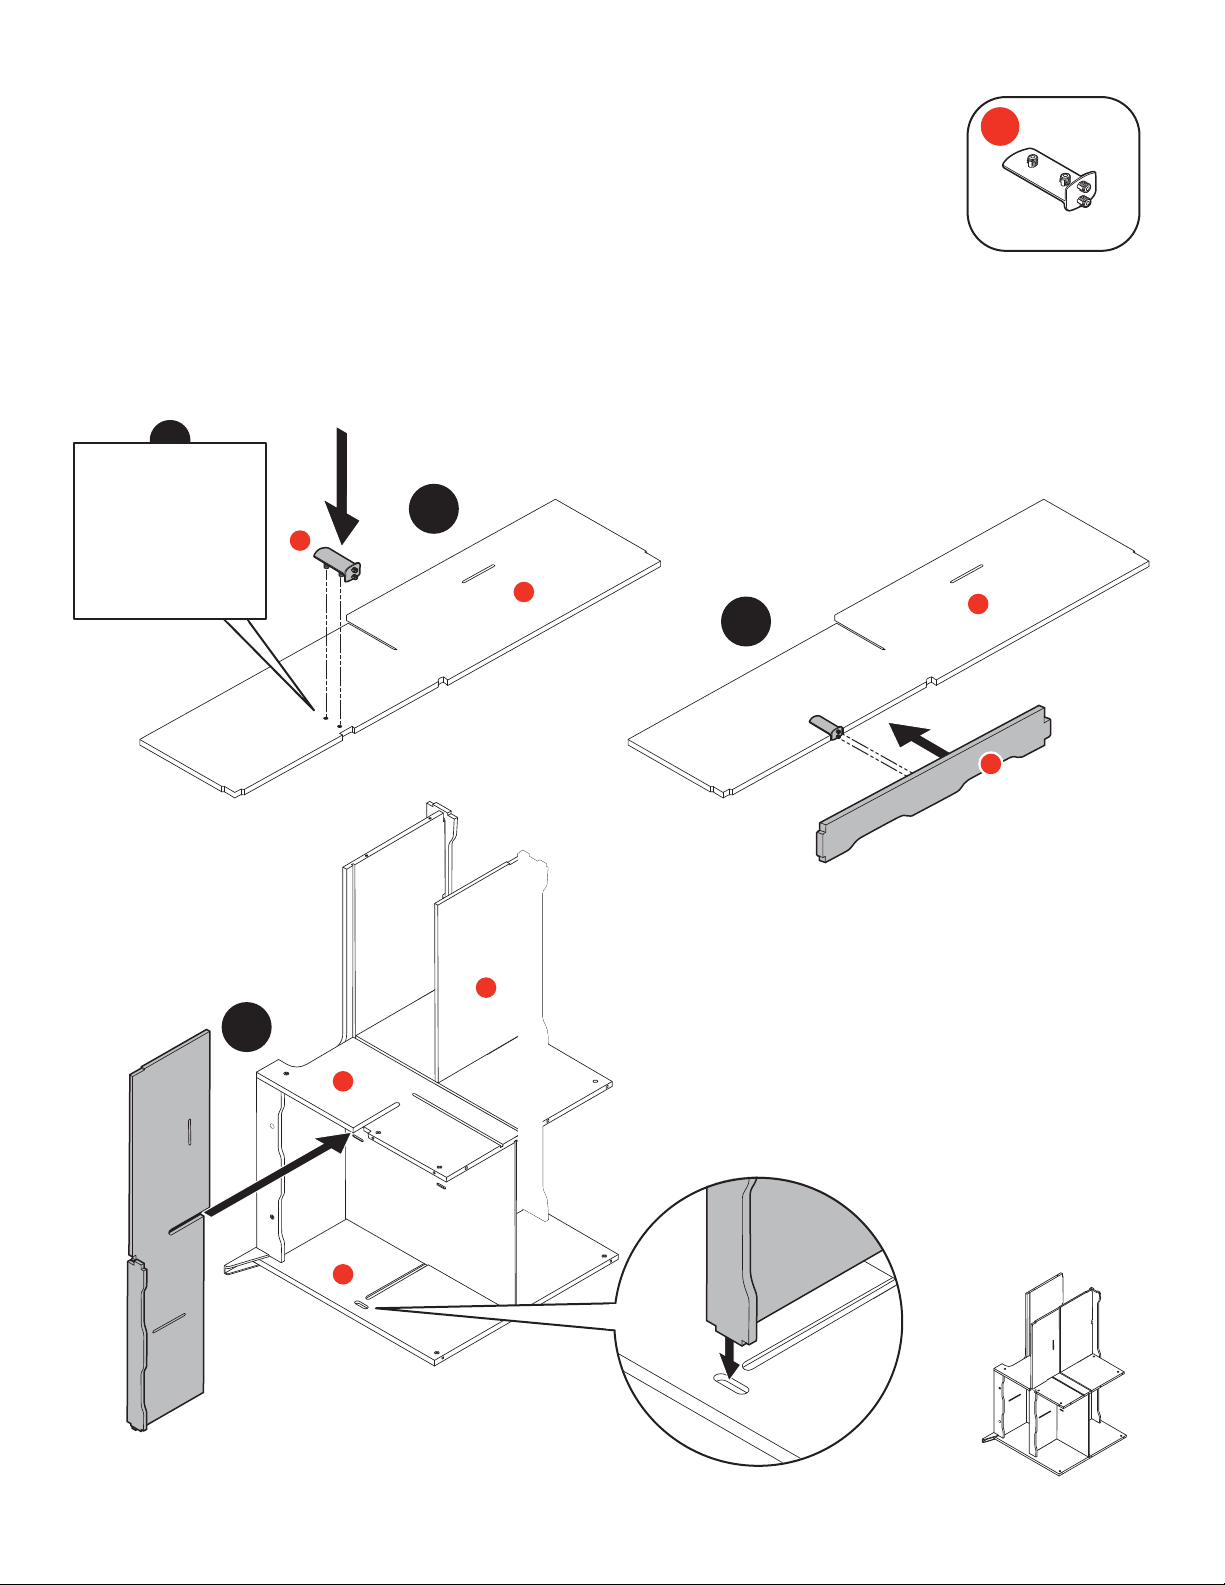
• The instructions include lots of helpful pictures—we show you, step-by-step, exactly how to align pieces
and parts for speedy and accurate assembly. Note that hardware needed for each step is shown in the
upper right corner of the page, each piece being added in a given step is highlighted in gray, and the
“assembled view” (what it looks like in the finished center when the step is completed) is included in the
lower right corner of every page.
• In the instructions, the name of a part is followed by a letter or number in parenthesis. This letter or
number corresponds to the sticker on the part, as well as the picture of the part shown on pages 2-3.
• Helpful hints are highlighted with a large exclamation point.
!
IMPORTANT: Helpful hints are found here.
• If you have any questions, we’re here for you! Give our customer service folks a call at 1-800-284-3948!
! WARNINGS!
Retain these instructions for future reference.
Warning: Prevent Tip Overs!
• Do not allow children to pull, climb, sit, or stand on any part of the activity center.
• Never place computers, televisions, or other heavy objects on any part of the activity center.
• The activity center must be placed on a hard, flat, and level surface.
• For more information on how to prevent furniture tip-overs in your home, visit AnchorIt.gov.
• The activity center must be assembled as instructed.
MAINTENANCE:
Ensure the activity center continues to function properly and safely by regularly checking the hardware and
tightening when necessary.
Melissa & Doug Customer Service: 1-800-284-3948
1

WOOD PANELS - Be Smart—Sort Your Parts
B
counter
C
upper center divider
D
top sign
A
right & left
upper sides (2)
F
floor
G
vertical divider
E
top counter
K
right center divider
H
kennel front bottom
J
right side panelstore front bottom
I
N
grooming shelf
L
vet shelf
M
kennel front top
O
store front top
P
left side panel
Q
left center divider
R
sink front
S
sink back
2

OTHER PARTS
1
double-sided
2
x-ray wall
3
x-ray knob
4
x-ray knob
5
x-ray
6
x-ray arm
7
x-ray frame
hook clip base clip
8
shelf
9
right rear
10
right front
11
left rear
12
left front
13
bath
14
nozzle
15
nozzle with
retainer (5) stabilizer stabilizer stabilizer stabilizer knob attachment hose
foot foot foot foot
16
hose
17
treat
18
treat
19
top
20
bottom
21
pump
22
grooming
stopper tray A tray B shelf shelf dispenser tool
divider divider holder
(short) (long)
23
treat
24
phone
25
shelf clip (4)
26
shelf clip
27
phone
28
x-ray
29
tool
chute cradle label (4) bed clip (2)
30
kennel
31
pet ID
32
bpm card
33
bpm base
34
bpm
35
bpm knob
36
x-ray card (2)
hook (2) card (4) knob back
HARDWARE
(shown actual size)
37
long screw (32)
38
wood dowel (2)
39
bolt (4)
40
nut (4)
41
wrench
42
short screw
Melissa & Doug Customer Service: 1-800-284-3948
3

Helpful Hints and Tips
• Note: Some packages of hardware may have extra pieces
• You will need a Phillips head screwdriver and wrench to assemble
the activity center.
!
IMPORTANT: Barrel nuts and screws are
used to join the main wood panels together.
The barrel nuts have been properly aligned
at the factory to allow the screws to easily
join the panels. If any barrel nuts have
shifted during shipping, use a flat
screwdriver to realign them.
4

IMPORTANT
Be smart—sort your parts!
Be sure you have all required parts BEFORE beginning assembly!
DO NOT use power tools to assemble.
Using power tools will cause product to crack!
When assembling,
DO NOT FULLY TIGHTEN SCREWS UNTIL ALL PANELS ARE CONNECTED.
To complete assembly, use hand-held screwdriver to fully tighten all screws until they’re snug.
DO NOT OVER-TIGHTEN!
Over-tightening will cause product to crack!
5

STEP 1 - Every Journey Begins with the First Step
Using 4 long screws (part 37), attach the right
and left upper sides (part A) to the counter
(part B). Grooves in the upper sides face
inward.
37
x4
37
ACTUAL
SIZE
37
Assembled View
B
37
37
37
A
B
B
A
6

1st
C
STEP 2 - Center Yourself
• First, slide the upper center divider (part C) into
the grooves in the upper sides.
• Second, clip the double-sided hook (part 1) and
the x-ray wall clip (part 2) onto the upper center
divider (part C).
1 2
1
Melissa & Doug Customer Service: 1-800-284-3948
2
2nd
x1 x1
Assembled View
7

STEP 3 - Sign Up Now
Using 2 long screws (part 37), attach the top sign (part D)
to the top counter (part E).
37
x2
37
37
E
D
Assembled View
8

STEP 4 - X Marks the Spot
• First, insert x-ray knob (part 3) into the large hole on the top
counter (part E).
• Second, on the underside of the top counter, fit the x-ray
knob base (part 4) over the x-ray knob pin until it is flush
3 4
1st
with the counter.
• Third, attach the x-ray clip (part 5) to the x-ray knob.
• Fourth, slide the x-ray clip to “click lock” it to the counter.
2nd
3rd 4th
5
E
3
4
4
5
5
x1
Melissa & Doug Customer Service: 1-800-284-3948 Assembled View
9

STEP 5 - Top it O
• First, using 4 long screws (part 37), attach the top shelf
assembly to the right and left upper sides (parts A).
• Second, connect the x-ray arm (part 6) to the x-ray
frame (part 7).
• Third, attach the x-ray arm/frame assembly to the x-ray
knob base (part 4).
37
37
6 7
37
x4
37
37
1st
A 6
A
2nd
7
3rd
4
Assembled View
10

flush with floor.
STEP 6 - The Great Divide
• First, firmly press 2 shelf retainers (part 8) into the holes and
notches on the floor (part F). Blue side of floor faces up.
• Second, flip floor over (white side up).
• Third, slide the vertical divider (part G) into the slot in the floor.
• Fourth, using 1 long screw (part 37), attach the vertical
divider to the floor.
x2 x1
8 37
1st
2nd
F
7
7
!
IMPORTANT:
Press firmly until
retainers snap
IMPORTANT:
Press firmly until
retainers snap
flush with floor.
4th
3rd
G
F
37
Melissa & Doug Customer Service: 1-800-284-3948 Assembled View
11

2nd
• First, press the kennel front bottom (part H)
onto the shelf retainers.
• Second, using 1 long screw (part 37) in the
center, attach the kennel front bottom (part H)
to the long edge of the floor.
STEP 7 - Get to the Bottom of It
37
x1
1st
H
37
Assembled View
12

13
STEP 8 - Don’t Forget the Dowels
• First, on the opposite side of the assembly, insert 2 wood
dowels (part 38) into the holes at the bottom of the vertical
divider (part G).
• Second, slide the store front bottom (part I) onto the dowels.
• Third, using 2 long screws (part 37), attach the front bottom
panel to the floor.
x2 x2
37 38
2nd
3rd
37
37
1st
G
38
38
I
Melissa & Doug Customer Service: 1-800-284-3948 Assembled View
13

STEP 9 - Can’t Beat These Feet
Using 2 bolts (part 39), 2 nuts (part 40), and the
wrench (part 41), attach the right rear and right
front stabilizer feet (parts 9 & 10) to the right
side panel (part J).
9 10
x2 x2
39 40
41
IMPORTANT:
Make sure lock
nuts are properly
oriented with flat
side toward bolt.
!
39
ACTUAL
SIZE
40
40
J
9
39
39
10
x1 x1
Assembled View
14

STEP 10 - That’s Right
With the height chart facing out, use 3 long
screws (part 37) to attach the right side panel
(part J) to the floor (part F).
37
x3
J
37
37
37
F
Melissa & Doug Customer Service: 1-800-284-3948 Assembled View
15

K
J
G
1st
2nd
3rd
!
IMPORTANT: Fully
tighten all screws.
STEP 11 - Feeling Groovy
• First, slide the right center divider (part K) into the grooves in the vertical
divider (part G) and the right side panel (part J).
• IMPORTANT: Fully tighten all screws until snug now.
• Second, rotate assembly.
• Third, flip up assembly so it rests on the right side panel (part J).
Assembled View
16

STEP 12 - Topsy-Turvy
• First, firmly press two shelf retainers (part 8) into the holes
and notches on the vet shelf (part L).
• Second, press the kennel front top (part M) onto the shelf
retainers.
• Third, slide the vet shelf assembly into the slot on the vertical divider (part G). Slightly
angle vet shelf assembly so tabs fit into the holes on the right side panel (part J), then
lower into groove. Using 1 long screw (part 37), attach the vet shelf assembly to the
vertical divider.
x2 x1
8 37
1st
8
8
2nd
3rd
L
L
J
G
37
M
!
IMPORTANT: Press firmly until
retainers snap flush with shelf.
Melissa & Doug Customer Service: 1-800-284-3948 Assembled View
17

STEP 13 - There’s Always Room to Groom
• First, firmly press a shelf retainer (part 8) into the holes and notch on the
grooming shelf (part N).
• Second, press the store front top (part O) onto the shelf retainer.
• Third, with the store front top near the floor, slide the grooming shelf
assembly into the slot on the vertical divider (part G), opposite the vet
shelf (part L). Slightly angle the shelf assembly so tab fits into the holes on
the right side panel (part J) then lower into groove.
8
x1
1st
L
G
J
N N
8
2nd
3rd
!
IMPORTANT:
Press firmly
until retainers
snap flush with
shelf.
O
Assembled View
18

STEP 14 - Two Left Feet
Using 2 bolts (part 39), 2 nuts (part 40), and
the wrench (part 41), attach the left rear and
left front stabilizer feet (parts 11 & 12) to the
left side panel (part P).
x1 x1
11 12
IMPORTANT:
Make sure lock
nuts are properly
oriented with flat
side toward bolt.
!
x2 x2
39 40
41
11
P
12
39
39
40
40
39
ACTUAL
SIZE
x1
Melissa & Doug Customer Service: 1-800-284-3948 Assembled View
19
This manual suits for next models
1
Table of contents
Other Melissa & Doug Toy manuals

Melissa & Doug
Melissa & Doug Mine To Love User manual

Melissa & Doug
Melissa & Doug 5509 User manual

Melissa & Doug
Melissa & Doug 9385 User manual

Melissa & Doug
Melissa & Doug Victorian Dollhouse User manual

Melissa & Doug
Melissa & Doug Deluxe Puppet Theater User manual

Melissa & Doug
Melissa & Doug 9383 User manual

Melissa & Doug
Melissa & Doug 2462 User manual

Melissa & Doug
Melissa & Doug Beach Memories User manual

Melissa & Doug
Melissa & Doug Multi-Activity Play Table User manual

Melissa & Doug
Melissa & Doug WOODEN PROJECT WORKBENCH User manual