Mellerware GRANDE PRESS 2000W User manual

Model:
28560
complies with
INTERNATIONAL
IEC60335
SAFETY SPECIFICATIONS 2000W
GRANDE PRESS 2000W
Panini press
IM_Template.indd 1 2019-05-14 10:49:21 AM

Dear customer,
Thank you for choosing to purchase a Mellerware
brand product. Thanks to its technology, design and
operation and the fact that it exceeds the strictest qual-
ity standards, a fully satisfactory use and long product
life can be assured.
1. Parts description
1. Upper housing
2. Handle
3. Upper plate
4. Hinge release lever
5. Bottom housing
6. Ready light (Green)
7. Power light (Red)
8. Thermostat knob
9. Drip tray
10. Bottom plate
2. Safety advice and warnings!
Read these instructions carefully before switching on
the appliance and keep them for future reference. Fail-
ure to follow and observe these instructions could lead
to an accident. Clean all the parts of the product that
will be in contact with food, as indicated in the cleaning
section, before use.
2.1. Use or working environment:
2.1.1. Keep the working area clean and well lit. Clut-
tered and dark areas invite accidents.
2.1.2. Use the appliance in a well ventilated area.
2.1.3. Do not place the appliance on hot surfaces, such
as cooking plates, gas burners, ovens or similar items.
2.1.4. Keep children and bystanders away when using
this appliance.
surface suitable for withstanding high temperatures
and away from other heat sources and contact with
water.
-
rial such as textiles, curtains, cardboard or paper, etc.
-
ance.
2.1.8. Do not use the appliance in association with a
programmer, timer or other device that automatically
switches it on.
2.1.9. Do not use the appliance if the cable or plug is
damaged.
2.1.10. Ensure that the voltage indicated on the rating
label matches the mains power supply voltage before
plugging in the
appliance.
2.2.11. Connect the appliance to the mains power sup-
ply with an earth socket withstanding a minimum of 10
amperes.
power supply socket properly. Do not alter the plug.
2.1.13. If using a multi plug check ratings carefully as
the current used by several appliances could easily
exceed the rating of the multi plug.
2.1.14. If any of the appliance casings breaks, imme-
diately disconnect the appliance from the mains power
supply to prevent the possibility of an electric shock.
2.1.15. Do not use the appliance if it has fallen on the
2.1.16. Do not force the power cord. Never use the
power cord to lift up, carry or unplug the appliance.
2.1.17. Do not wrap the power cord around the appli-
ance.
2.1.18. Do not clip or crease the power cord.
2.1.19. Do not allow the power cord to hang or to
come into contact with the hot surfaces of the appli-
ance.
2.1.20. Check the state of the power cord. Damaged or
tangled cables increase the risk of electric shock.
2.1.21. The appliance is not suitable for outdoor use.
2.1.22. Power cord should be regularly examined for
signs of damage, and if the cord is damaged, the appli-
ance must not be used.
2.1.23. Do not touch the plug with wet hands.
2.2. Personal safety:
2.2.1. CAUTION: Do not leave the appliance unattended
during use as there is a risk of an accident.
2.2.2. Do not touch the heated parts of the appliance,
1
2
3
4
10
9
8
76
5
28560_IM.indd 2 05-Jul-17 4:00:02 PM

as it may cause serious burns.
2.2.3. This appliance is only for domestic use, not for
industrial or professional use. It is not intended to be
used by guests in hospitality environments such as
bed and breakfast, hotels, motels, and other types of
residential environments, even in farm houses, areas
environments.
2.2.4. This appliance is not intended for use by
persons (including children) with reduced physical,
sensory or mental capabilities, or lack of experience
and knowledge, unless they have been given supervi-
sion or instruction concerning use of the appliance by
a person responsible for their safety.
2.2.5. This appliance is not a toy. Children should be
supervised to ensure that they do not play with the
appliance.
2.3. Use and care:
2.3.1. Fully unroll the appliance’s power cable before
each use.
2.3.2. Do not use the appliance if the parts or acces-
2.3.3. Do not use the appliance when empty.
2.3.4. Do not turn the appliance over while it is in use
or connected to the mains power supply.
2.3.5. Do not cover the cooking surface or food with
aluminium foil and other similar materials.
2.3.6. Unplug the appliance from the mains power
supply when not
in use and before undertaking any cleaning task.
2.3.7. This appliance should be stored out of reach
of children.
2.3.8. Do not store the appliance if it is still hot.
2.3.9. Never leave the appliance unattended when in
use and keep out of the reach of children.
2.3.10. If, for some reason, the appliance were to catch
supply and DO NOT USE WATER TO PUT THE FIRE
OUT.
2.4. Service:
2.4.1. Make sure that the appliance is serviced only
spare parts or accessories are used to replace existing
parts/accessories.
2.4.2. If the power cord is damaged, the manufacturer
replace it in order to avoid a hazard.
2.4.3. Any misuse or failure to follow the instructions
for use renders the guarantee and the manufacturer’s
liability null and void.
3. Instructions for use
3.1. Before use:
-
plicable).
the parts that will come into contact with food in the
manner described in the cleaning section.
3.1.3. For best results, lightly coat the cooking plates
with a little cooking oil or cooking spray.
3.2. Use and care:
3.2.1. Connect the appliance to the wall socket.
3.2.2. The power indicator comes on.
3.2.3. Set the grill Temperature Control to your desired
setting.
3.2.4. Close the grill
3.3.5. As the thermostat cycles during using the ready
light will go on and off.
3.2.6. Open the grill, put the sandwich, meat or other
food on the bottom cooking plate.
3.2.7. When the food is cooked to your liking, remove it
from the appliance with the help of a wooden spatula or
similar heat resistant implement. Never use metal tongs
or a knife as these can cause damage to the non-stick
coating of the cooking plates.
plug from the wall outlet and leave unit open to cool.
3.3. Open Grill FUNCTION
3.3.2. Press the hinge release lever.
3.3.3. Lift the handle on the upper housing, bringing it
to 180° so that the lid and handle lies on the table, and
the 2 plates are in line with each other
3.3.4. Use the appliance as an open grill to cook your
desired food.
28560_IM.indd 3 05-Jul-17 4:00:02 PM

3.4.1. Select the minimum position “MIN” using the
thermostat control.
3.4.2. Allow appliance to cool down.
3.4.3. Unplug the appliance from the mains power
supply.
3.4.4. Clean the appliance as described in the cleaning
section.
4. Cleaning
4.1. Disconnect the appliance from the mains power
supply and allow it to cool completely before undertak-
ing any cleaning task.
4.2. Clean the drip tray with a damp cloth and dry.
4.3. Clean the outer parts of the appliance with a damp
cloth with a few drops of washing-up liquid and then
dry. CAUTION! Do not immerse electrical parts of the
appliance in any liquid.
4.4. Do not use solvents, or products with an acid
or base pH such as bleach, or abrasive products, for
cleaning the appliance.
4.5. Never submerge the appliance in water or any
other liquid or place it under running water.
5. Anomalies and repair
5.1. Take the appliance to an authorised support centre
if product is damaged or other problems arise.
5.2. If the connection to the mains has been damaged,
it must be replaced and you should proceed as you
would in the case of damage.
28560_IM.indd 4 05-Jul-17 4:00:02 PM

Geagte Klient
Baie dankie vir u keuse om `n Mellerware handelsmerk
produk te koop. Danksy die tegnologie,ontwerp en
werking en die feit dat dit voldoen aan die strengste
gehalte standaarde, is u verseker van `n volle bevredi-
gende gebruik en lang produklewe.
1. Parte beskrywing
1. Boonste dekking
2. Handvatsel
3. Boonste plaatte
4. Vrylating hefboom
5. Onderste dekking
6. Gereed lig (Groen)
7. Krag lig (Rooi)
8. Thermostaat knop
9. Lekbak
10. Onderste plaat
2. Belangrike veiligheids voorsorg:
Voor die toestel vir die eerste keer gebruik word maak
alle parte skoon wat met kos in aanraking kom soos
voorgeskryf in skoonmaak artikel. Lees die instruksies
deeglik en bewaar
2.1. Gebruik en werksomgewing:
2.1.1. Hou die werk oppervlak skoon en helder verlig.
Ongelukke gebeur in donker areas
2.1.2. Gebruik die produk in n goed geventileerde area
2.1.3. Moenie die toestel naby `n warm gas of elektri-
ese brander of qn warm oond plaas nie.
2.1.4. Streng toesig is nodig as die toestel naby of deur
kinders gebruik word
2.1.5. Plaas toestel op `n stabiele area en weg van
water
2.1.6. `n Brand mag ontstaan as die rooster bedek is
of aan vlambare material raak, insluitende gordyne as
dit in werking is
2.1.7.
2.1.8. Die toestel is nie geskik om op aan `n tydsbe-
heer toestel te Koppel nie
2.1.9. Moenie die toestel gebruik as die koord of prop
beskadig is.
2.1.10. Maak seker die spanning soos aangedui op die
gradering etiket kom ooreen met die hoofspanning
2.2.11. Prop in elektriese uitlaat
2.1.12. Die toestel prop moet in die hoof prop pas en
moenie die prop verander
2.1.13. Indien `n multi prop gebruik word maak seker
die toestel se strome oorskry nie die gradering van die
multi prop
2.1.14. Moenie die toestel gebruik as die prop of koord
beskadig isnie of enige sigbare skade aan die omhulsel
is nie
2.1.15. Moenie die toestel gebruik as dit op die vloer
geval het en daar is sigbare skade.
2.1.16. Moenie die koord gebruik om die toestel te dra,
op te tel of van diemuurprop te ontkoppel nie
2.1.17. Die koord mag nooit om die toestel gedraai
word nie.
2.1.18. moenie die koord plooi nie
2.1.19. Die koord Moenie oor die kant van die tafel of
toonbank hang of aan warm oppervlaktes raak nie.
2.1.20. Maak seker die koord is nie beskadig of
verstrengel nie.
2.1.21. Die toestel moet nie buite gebruik word nie
2.1.22. Moenie die prop met nat hande hande hanteer
nie.
2.2. Persoonlike veiligheid
2.2.1. LET WEL: Moenie die toestel sonder toesig laat
nie
2.2.2. Moenie warm oppervlaktes aanraak nie gebruik
handvatsels of knoppe want dit kan lei tot ernstige
brandwonde
2.2.3. Die toestel is nie geskik vir industriele gebruik
soos kantore,hotelle motelle en gastehuise
2.2.4. Die toestel is nie geskik vir gebruik deur vermin-
ervaring of kennis tensy hulle opleiding gehad het
2.2.5. Die toestel is nie `n speelding and kinders moet
altyd toesig he om te verhoed dat hulle met die toestel
speel
1
2
3
4
10
9
8
76
5
28560_IM.indd 5 05-Jul-17 4:00:02 PM

2.3. Gebruik en sorg:
2.3.1. Die kabel moet ten volle afgewikkel word voor
gebruik
2.3.2. Die toestel moet nie gebruik word as die parte of
bykomstighede nie behoorlik pas
2.3.3. Die toestel moet nooit leeg gebruik word nie.
2.3.4. Die Toestel moet nooit gedraai word terwyl dit in
werking is of in die muurprop gekoppel is
2.3.6. Ontkoppel die toestel van die hooftoevoer as dit
nie in gebruik is nie en laat dit heeltemal afkoel voordat
dit skoongemaak word. As dele afgehaal word of toe-
gevoeg word,moet die toestel nie in werking wees nie.
2.3.7.Die toestel moet buite bereik van kinders gestoor
word
2.3.8. Die toestel moet heeltemal afkoel voor dit
gestoor word
2.3.9. Die toestel moet altyd onder toesig wees wan-
neer in gebruik en moet buite bereik van kinders gehou
word.
2.4. Diens:
gediens word
2.4.2 As die koord beskadig word moet dit deur die
om brandgevaar te verhoed
2.4.3.Enige misbruik en mislukking om instruksies te
volg lewer die waarborg nul en van gener waarde
3. Instruksies vir gebruik
3.1. Voor gebruik:
3.1.1. Verwyder alle verpakking material voor gebruik
3.1.2. Voor die toestel vir die eerste keer gebruik word
maak alle parte skoon wat met kos in aanraking kom
soos voorgeskryf in skoonmaak artikel
3.1.3. Vir Goeie resultate smeer kookolie liggies op
plate of sproei met (Spray en Cook).
3.2. Gebruik en sorg:
3.2.1. Prop die toestel in muurprop
3.2.2. Die krag indikasie liggie sal aankom.
3.2.3. Stel die temperatuur .
3.2.4. Maak die toestel toe
3.2.5. Tydens gebruik sal die gereed liggie aan en af
skael
3.2.6. Maak die toestel oop en plaas toebroodjie, vleis
of ander kosse op die onderste plaat
3.2.7. Wanner kos gekook is na wense verwyder met
die hulp van `n houtspaan of soortgelyke gereedskap
3.2.8. Wanner klaar gekook het, onkoppel van muur-
prop en laat toe om af te koel
3.3. Oop braai funksie:
3.3.1. Plaas die toestel op `n skoon , gelyke opperv-
lakte
3.3.3. Druk die vrylating hefboom
3.3.4. Lig die handvatels van die boonste kant en bring
na 180° sodat die deksel en handvatsels op die tafel le
en die plate is in lyn met mekaar.
3.3.5. Gebruik soos `n oop braai om te kook
3.4. Na gebruik:
3.4.1. Kies die minimum posisie “MIN” met behulp van
die termostaat beheer.
3.4.2. Laat toestel om af te koel.
3.4.4. Maak die apparaat skoon soos beskryf in die
skoonmaak afdeling
4. Skoonmaak:
-
evoer en laat dit heeltemal afkoel voor die onderneming
van enige skoonmaak taak.
4.2. Maak die lekbak met ‘n klam lap skoon en droog.
4.3. Maak die buitenste dele van die apparaat met ‘n
klam lap met ‘n paar druppels van wasgoed vloeistof
skoon en dan droog af. VERSIGTIG! Moenie elektriese
dele van die toestel in enige vloeistof dompel nie.
4.4. Moenie oplosmiddels, of produkte gebruik met ‘n
suur of basis pH soos bleikmiddel, of skuur produkte,
vir die toestel skoonmaak.
4.5. Dompel nooit die toestel in water of enige ander
vloeistof of plaas dit onder lopende water.
28560_IM.indd 6 05-Jul-17 4:00:03 PM

5. Anomlies en herstel
5.1. Neem die toestel na `n gemagtigde tegniese diens
sentrum as die toestel beskadig is of probleme onstaan
5.2. As konneksie na die muurprop beskadig is, moet
die toestel vervang of herstel word volgens waarborg
28560_IM.indd 7 05-Jul-17 4:00:03 PM

Estimado cliente,
Gracias por elegir comprar un producto de la marca
Mellerware. Gracias a su tecnología, diseño y funcio-
namiento, y al hecho de que supera los más estrictos
estándares de calidad, puede garantizarse un uso
totalmente satisfactorio y una larga vida del producto.
1. Descripción de piezas
1. Carcasa superior
2. Mango
3. Placa superior
4. Palanca de liberación de la bisagra
5. Carcasa inferior
6. Luz de preparación (verde)
7. Luz de alimentación (Rojo)
8. Botón del termostato
9. Bandeja de goteo
10. Placa inferior
2. Consejos y advertencias de seguridad!
Lea atentamente estas instrucciones antes de encender
el aparato y guárdelas para futuras consultas. El in-
cumplimiento de estas instrucciones podría dar lugar a
un accidente. Limpie todas las partes del producto que
estarán en contacto con los alimentos, como se indica
en la sección de limpieza, antes de usarlas.
2.1. Uso o ambiente de trabajo:
2.1.1. Mantenga el área de trabajo limpia y bien
iluminada. Las áreas desordenadas y oscuras invitan a
accidentes.
2.1.2. Utilice el aparato en un lugar bien ventilado.
-
entes, tales como placas de cocción, quemadores de
gas, hornos o artículos similares.
2.1.4. Mantenga alejados a los niños y transeúntes
cuando utilice este aparato.
-
zontal, plana y estable, adecuada para soportar altas
temperaturas y lejos de otras fuentes de calor y en
contacto con el agua.
2.1.6. Mantenga el aparato alejado de materiales
papel, etc.
aparato.
2.1.8. No utilice el aparato en combinación con un
programador, temporizador u otro dispositivo que lo
encienda automáticamente.
2.1.9. No utilice el aparato si el cable o el enchufe
están dañados.
2.1.10. Asegúrese de que la tensión indicada en la
etiqueta de características coincide con la tensión de
red antes de enchufar el aparato.
2.1.11. Conecte el aparato a la red de alimentación
con una toma de tierra soportando un mínimo de 10
amperios.
2.1.12. El enchufe del aparato debe encajar correcta-
mente en la toma de corriente. No altere el enchufe.
2.1.13. Si se utiliza un multi enchufe comprobar las
-
cación de la multi-enchufe.
2.1.14. Si se rompe alguna de las cubiertas del
aparato, desconecte inmediatamente el aparato de la
red eléctrica para evitar la posibilidad de una descarga
eléctrica.
2.1.15. No utilice el aparato si ha caído en el suelo o si
hay signos visibles de daños.
2.1.16. No fuerce el cable de alimentación. Nunca uti-
lice el cable de alimentación para levantar, transportar
o desenchufar el aparato.
2.1.17. No envuelva el cable de alimentación alrededor
del aparato.
2.1.18. No sujete ni doble el cable de alimentación.
2.1.19. No permita que el cable de alimentación cuel-
del aparato.
2.1.20. Compruebe el estado del cable de aliment-
ación. Los cables dañados o enredados aumentan el
riesgo de descarga eléctrica.
2.1.21. El aparato no es adecuado para uso en exteri-
ores.
2.1.22. El cable de alimentación debe ser examinado
regularmente para detectar signos de daño, y si el
cable está dañado, el aparato no debe usarse.
2.1.23. No toque el enchufe con las manos mojadas.
1
2
3
4
10
9
8
76
5
28560_IM.indd 8 05-Jul-17 4:00:03 PM

2.2. Seguridad personal:
2.2.1. PRECAUCIÓN: No deje el aparato desatendido
durante el uso ya que existe el riesgo de un accidente.
2.2.2. No toque las partes calientes del aparato, ya que
puede causar quemaduras graves.
2.2.3. Este aparato es sólo para uso doméstico, no
para uso industrial o profesional. No está destinada
a ser utilizada por los huéspedes en ambientes de
hospitalidad como bed and breakfast, hoteles, moteles
y otros tipos de ambientes residenciales, incluso en
casas de granja, áreas del personal de cocina en
2.2.4. Este aparato no está diseñado para ser usado
por personas (incluyendo niños) con capacidades
físicas, sensoriales o mentales reducidas, o por falta
de experiencia y conocimiento, a menos que hayan
recibido supervisión o instrucciones sobre el uso del
aparato por parte de una persona responsable de su
seguridad.
2.2.5. Este aparato no es un juguete. Los niños deben
ser supervisados para asegurarse de que no juegan
con el aparato.
2.3. Uso y cuidado:
2.3.1. Desenrolle completamente el cable de aliment-
ación del aparato antes de cada uso.
2.3.2. No utilice el aparato si las piezas o accesorios
no están correctamente instalados.
2.3.3. No utilice el aparato cuando esté vacío.
2.3.4. No encienda el aparato mientras esté en uso o
conectado a la red eléctrica.
de aluminio y otros materiales similares.
2.3.6. Desconecte el aparato de la red eléctrica cuando
no esté en uso y antes de realizar cualquier tarea de
limpieza.
2.3.7. Este aparato debe guardarse fuera del alcance
de los niños.
2.3.8. No guarde el aparato si todavía está caliente.
2.3.9. Nunca deje el aparato desatendido cuando esté
en uso y manténgalo fuera del alcance de los niños.
2.3.10. Si, por alguna razón, el aparato se incendia,
desconecte el aparato de la red eléctrica y NO USE
AGUA PARA DESCONECTAR EL FUEGO.
2.4. Servicio:
2.4.1. Asegúrese de que el aparato sea reparado
utilicen piezas de repuesto o accesorios originales para
sustituir las piezas / accesorios existentes.
2.4.2. Si el cable de alimentación está dañado, el fabri-
debe reemplazarlo para evitar un peligro.
2.4.3. Cualquier mal uso o incumplimiento de las
instrucciones de uso hace nula la garantía y la respon-
sabilidad del fabricante.
3. Instrucciones de uso
3.1. Antes de usar:
3.1.1. Retire la película protectora del aparato (si cor-
responde).
3.1.2. Antes de utilizar el producto por primera vez,
limpie las piezas que entrarán en contacto con los
alimentos de la manera descrita en la sección de
limpieza.
3.1.3. Para obtener los mejores resultados, cubra lig-
eramente las placas de cocción con un poco de aceite
de cocina o de aerosol para cocinar.
3.2. Uso y cuidado:
3.2.1. Conecte el aparato a la toma de corriente.
3.2.2. El indicador de alimentación se enciende.
3.2.3. Ajuste el control de temperatura de la parrilla al
ajuste deseado.
3.2.4. Cierra la parrilla
3.3.5. A medida que el termostato se enciende durante
el uso, la luz de preparación se encenderá y apagará.
3.2.6. Abra la parrilla poner el sándwich, carne u otros
alimentos en la placa de cocción inferior.
3.2.7. Cuando los alimentos se cocinen a su gusto,
quítelo del aparato con la ayuda de una espátula de
madera o un instrumento similar resistente al calor.
Nunca utilice pinzas metálicas o un cuchillo ya que
pueden dañar el revestimiento antiadherente de las
placas de cocción.
3.2.8. Una vez que haya terminado de cocinar,
desconecte el enchufe de la toma de corriente y deje la
unidad abierta para que se enfríe.
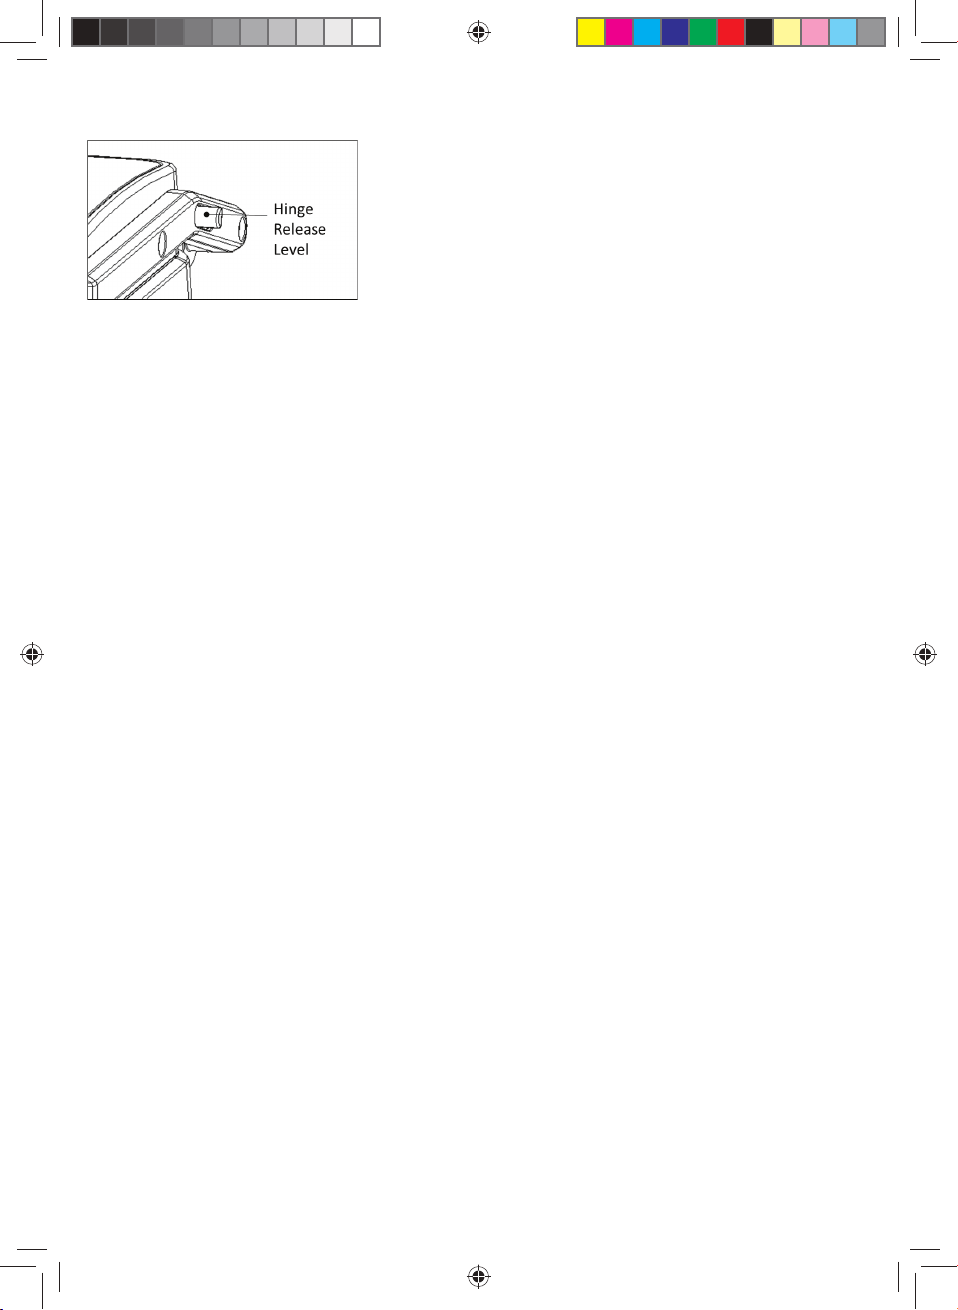
3.3. Función de abrir parrilla
limpia. El Grill se puede colocar en una posición plana.
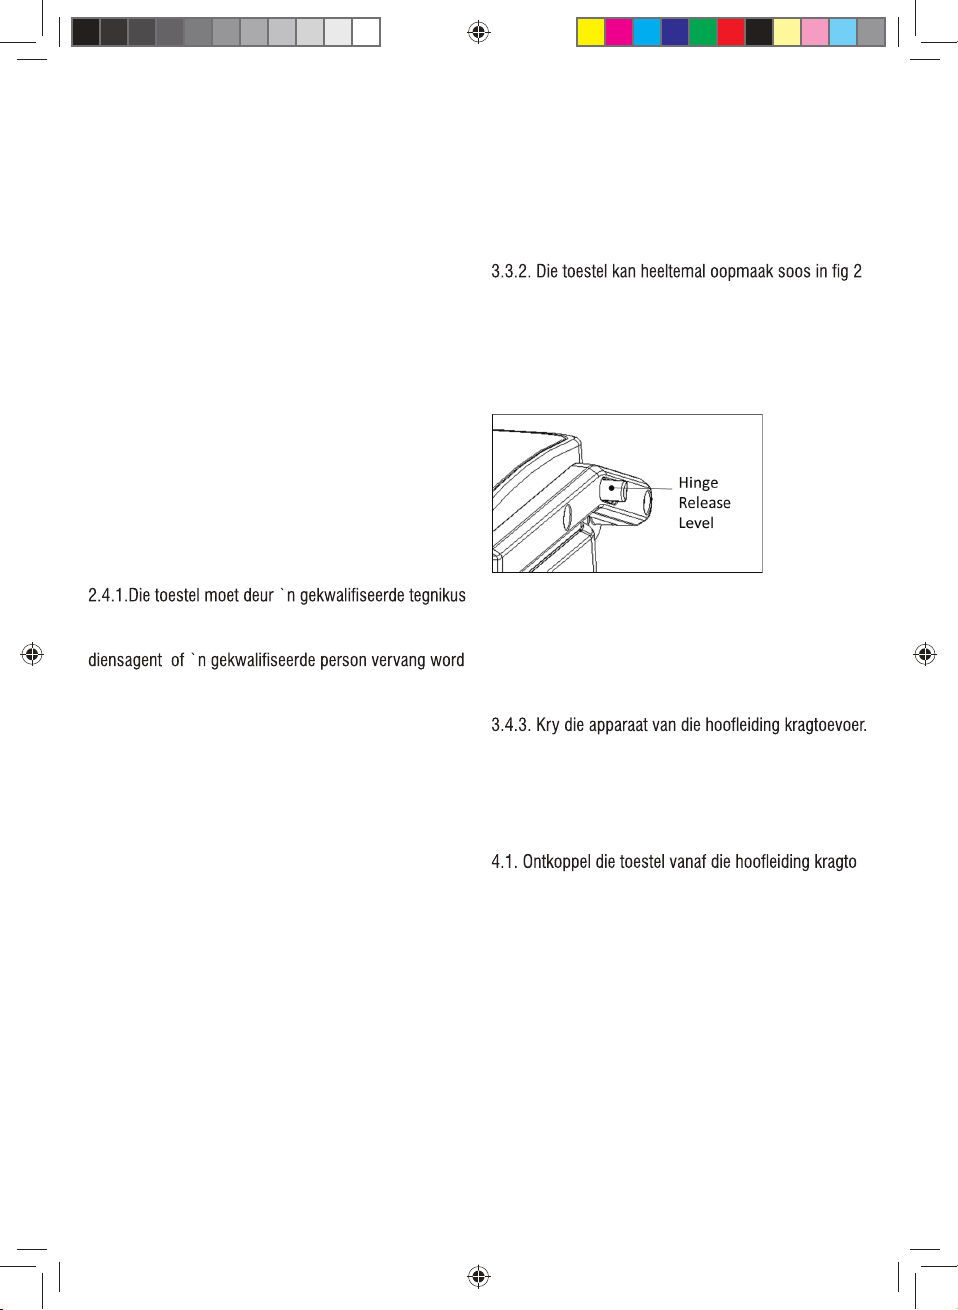
3.3.2. Presione la palanca de liberación de la bisagra.
3.3.3. Levante la empuñadura de la carcasa superior,
llevándola a 180 ° de modo que la tapa y el mango
descansen sobre la mesa, y las 2 placas estén alin-
eadas entre sí
3.3.4. Utilice el aparato como una parrilla abierta para
28560_IM.indd 9 05-Jul-17 4:00:03 PM

cocinar los alimentos que desee.
3.4. Una vez que haya terminado de utilizar el
aparato:
3.4.1. Seleccione la posición mínima “MIN” utilizando
el control del termostato.
3.4.2. Permita que el aparato se enfríe.
3.4.3. Desconecte el aparato de la red eléctrica.
3.4.4. Limpie el aparato como se describe en la sec-
ción de limpieza.
4. Limpieza
4.1. Desconecte el aparato de la red eléctrica y deje
que se enfríe completamente antes de realizar cualquier
tarea de limpieza.
4.2. Limpie la bandeja de goteo con un paño húmedo
y seque.
4.3. Limpie las partes exteriores del aparato con un
paño húmedo con unas gotas de detergente y luego
seque. ¡PRECAUCIÓN! No sumerja las partes eléctri-
cas del aparato en ningún líquido.
4.4. No utilice disolventes, ni productos con un pH
ácido o base, tales como lejía, o productos abrasivos,
para limpiar el aparato.
4.5. Nunca sumerja el aparato en agua o cualquier otro
líquido o colóquelo bajo agua corriente.
5. Anomalías y reparación
5.1. Lleve el aparato a un centro de asistencia autor-
izado si el producto está dañado o si surgen otros
problemas.
5.2. Si la conexión a la red eléctrica se ha dañado,
debe ser sustituida y debe proceder como lo haría en
caso de daños.
28560_IM.indd 10 05-Jul-17 4:00:04 PM

Cher client,
Merci d’avoir choisi d’acheter un produit de marque
Mellerware. Grâce à sa technologie, sa conception
et son fonctionnement et le fait qu’elle dépasse les
normes de qualité les plus strictes, une utilisation
parfaitement satisfaisante et une longue durée de vie
du produit peuvent être assurées.
1. Description des pièces
1. Le boîtier supérieur
2. Poignée
3. Plaque supérieure
4. Levier de dégagement de la charnière
5. Le boîtier inférieur
6. Voyant prêt (vert)
7. Voyant d’alimentation (rouge)
8. Bouton de thermostat
9. Bac d’égouttage
10. Plaque inférieure
2. Conseils et avertissements de sécurité!
Lisez attentivement ces instructions avant d’allumer
l’appareil et conservez-les pour référence ultérieure.
Le non-respect et l’observation de ces instructions
peuvent entraîner un accident. Nettoyez toutes les par-
ties du produit qui seront en contact avec les aliments,
comme indiqué dans la section de nettoyage, avant
utilisation.
2.1. Environnement d’utilisation ou de travail:
2.1.1. Gardez la zone de travail propre et bien éclairée.
Les zones obsolètes et obscures provoquent des ac-
cidents.
2.1.2. Utilisez l’appareil dans un endroit bien ventilé.
2.1.3. Ne placez pas l’appareil sur des surfaces
chaudes, telles que des plaques de cuisson, des
brûleurs à gaz, des fours ou des articles similaires.
2.1.4. Gardez à l’écart les enfants et les personnes
présentes lorsque vous utilisez cet appareil.
2.1.5. Placez l’appareil sur une surface horizontale,
plate et stable, apte à supporter des températures
élevées et à l’écart des autres sources de chaleur et au
contact de l’eau.
-
mables tels que les textiles, les rideaux, le carton ou le
papier, etc.
l’appareil.
2.1.8. N’utilisez pas l’appareil en association avec un
programmeur, une minuterie ou un autre appareil qui
l’allume automatiquement.
endommagé.
2.1.10. Assurez-vous que la tension indiquée sur
l’étiquette d’évaluation correspond à la tension
d’alimentation secteur avant de brancher l’appareil.
2.2.11. Connectez l’appareil à l’alimentation secteur
avec une prise de terre résistant à un minimum de 10
ampères.
-
les notes car le courant utilisé par plusieurs appar-
eils pourrait facilement dépasser la note de la prise
multiple.
2.1.14. Si l’une des enveloppes de l’appareil est
en panne, débranchez immédiatement l’appareil de
choc électrique.
2.1.15. N’utilisez pas l’appareil s’il tombe sur le sol ou
s’il y a des signes visibles de dégâts.
2.1.16. Ne forcez pas le cordon d’alimentation.
N’utilisez jamais le cordon d’alimentation pour soulever,
transporter ou débrancher l’appareil.
2.1.17. Ne pas enrouler le cordon d’alimentation autour
de l’appareil.
2.1.18. Ne pas couper ni plier le cordon d’alimentation.
2.1.19. Ne laissez pas le cordon d’alimentation
s’accrocher ou entrer en contact avec les surfaces
chaudes de l’appareil.
câbles endommagés ou enchevous augmentent le
risque de choc électrique.
2.1.21. L’appareil ne convient pas pour une utilisation
en extérieur.
2.1.22. Le cordon d’alimentation doit être examiné
régulièrement pour détecter les signes de dommages
1
2
3
4
10
9
8
76
5
28560_IM.indd 11 05-Jul-17 4:00:04 PM

et si le cordon est endommagé, l’appareil ne doit pas
être utilisé.
-
lées.
2.2. Sécurité personnelle:
2.2.1. ATTENTION: Ne laissez pas l’appareil sans sur-
veillance lors de l’utilisation car il y a risque d’accident.
2.2.2. Ne pas toucher les parties chauffantes de
l’appareil,
Car cela peut causer des brûlures graves.
2.2.3. Cet appareil n’est utilisé qu’à usage domestique
et non à usage industriel ou professionnel. Il n’est
pas destiné à être utilisé par des invités dans des
environnements d’hôtellerie tels que des chambres
d’hôtes, des hôtels, des motels et d’autres types
d’environnements résidentiels, même dans les maisons
de ferme, les domaines du personnel de cuisine dans
les magasins, les bureaux et autres environnements de
travail.
2.2.4. Cet appareil n’est pas destiné à être utilisé par
des personnes (y compris des enfants) avec des ca-
pacités physiques, sensorielles ou mentales réduites,
ou un manque d’expérience et de connaissances, à
moins d’avoir reçu une supervision ou des instructions
concernant l’utilisation de l’appareil par une personne
responsable de leur sécurité.
2.2.5. Cet appareil n’est pas un jouet. Les enfants
devraient être surveillés pour s’assurer qu’ils ne jouent
pas avec l’appareil.
2.3. Utilisation et soin:
2.3.1. Déroulez entièrement le câble d’alimentation de
l’appareil avant chaque utilisation.
2.3.2. N’utilisez pas l’appareil si les pièces ou les ac-
cessoires ne sont pas correctement installés.
2.3.3. N’utilisez pas l’appareil lorsqu’il est vide.
2.3.4. Ne tournez pas l’appareil lorsqu’il est utilisé ou
connecté à l’alimentation secteur.
2.3.5. Ne couvrez pas la surface de cuisson ou les
aliments avec du papier d’aluminium et d’autres matéri-
aux similaires.
2.3.6. Débranchez l’appareil de l’alimentation secteur
lorsqu’il n’est pas utilisé et avant toute tâche de net-
toyage.
2.3.7. Cet appareil doit être stocké hors de portée des
enfants.
2.3.8. Ne rangez pas l’appareil s’il est encore chaud.
2.3.9. Ne laissez jamais l’appareil sans surveillance
lorsque vous l’utilisez et gardez-vous hors de portée
des enfants.
2.3.10. Si, pour une raison ou pour une autre,
l’appareil devait prendre feu, débrancher l’appareil de
l’alimentation secteur et NE PAS UTILISER D’EAU
POUR ETEINDRE LE FEU.
2.4. Entretien:
2.4.1. Assurez-vous que l’appareil n’est entretenu que
rechange d’origine ou les accessoires sont utilisés
pour remplacer les pièces / accessoires existants.
2.4.2. Si le cordon d’alimentation est endommagé, le
fabricant ou son agent d’entretien ou une personne
2.4.3. Toute utilisation abusive ou le non-respect des
instructions d’utilisation, rend la garantie et la respon-
sabilité du fabricant nulle et non avenue.
3. Instructions d’utilisation
3.1. Avant utilisation:
échéant).
3.1.2. Avant d’utiliser le produit pour la première fois,
nettoyez les pièces qui entreront en contact avec les
aliments de la manière décrite dans la section de net-
toyage.
3.1.3. Pour de meilleurs résultats, enduire légèrement
les plaques de cuisson avec une petite huile de cuisson
ou un spray de cuisson.
3.2. Utilisation et soin:
3.2.1. Connectez l’appareil à la prise murale.
3.2.2. L’indicateur d’alimentation s’allume.
3.2.3. Réglez la commande de température du gril dans
le réglage souhaité.
3.2.4. Fermer la grille
3.3.5. Au fur et à mesure que le thermostat fonctionne
pendant l’utilisation du voyant prêt, il s’allume ou
s’éteint.
3.2.6. Ouvrez la grille, mettez le sandwich, la viande ou
d’autres aliments sur la plaque de cuisson inférieure.
3.2.7. Lorsque la nourriture est cuite à votre goût,
retirez-la de l’appareil à l’aide d’une spatule en bois
ou d’un outil résistant à la chaleur similaire. N’utilisez
jamais de pinces métalliques ou de couteaux car
cela peut endommager le revêtement antiadhésif des
plaques de cuisson.
28560_IM.indd 12 05-Jul-17 4:00:04 PM

refroidir.
3.3. La FONCTION de Grille ouverte.
3.3.1. Placez la Grille sur une surface propre et plate.
La grille peut être positionné à plat.
3.3.2. Appuyez sur le levier de dégagement de la
charnière.
3.3.3. Soulevez la poignée sur le carter supérieur, en
se trouvent sur la table et que les 2 plaques soient
alignées
3.3.4. Utilisez l’appareil comme grille ouverte pour
cuire vos aliments souhaités.
3.4. Une fois que vous avez terminé l’utilisation de
l’appareil:
3.4.1. Sélectionnez la position minimum “MIN” en
utilisant la commande du thermostat.
3.4.2. Laisser refroidir l’appareil.
3.4.3. Débranchez l’appareil de l’alimentation secteur.
3.4.4. Nettoyez l’appareil comme décrit dans la section
de nettoyage.
4. Nettoyage
4.1. Débranchez l’appareil de l’alimentation secteur et
laissez-le refroidir complètement avant d’entreprendre
une tâche de nettoyage.
4.2. Nettoyez le bac d’égouttage avec un chiffon
humide et séchez-le.
4.3. Nettoyez les parties extérieures de l’appareil avec
un chiffon humide avec quelques gouttes de liquide
vaisselle puis séchez. MISE EN GARDE! Ne pas im-
merger les pièces électriques de l’appareil dans un
liquide quelconque.
4.4. N’utilisez pas de solvants ou de produits avec
acide ou à base de pH tel que l’eau de javel ou des
produits abrasifs pour nettoyer l’appareil.
4.5. Ne jamais immerger l’appareil dans de l’eau ou
tout autre liquide ou le placer sous l’eau courante.
5. Anomalies et réparation
5.1. Prenez l’appareil dans un centre d’assistance
autorisé si le produit est endommagé ou d’autres
problèmes apparaissent.
5.2. Si la connexion au secteur a été endommagée,
elle doit être remplacée et vous devez procéder comme
vous le feriez en cas de dommage.
28560_IM.indd 13 05-Jul-17 4:00:05 PM

Estimado cliente,
Obrigado por escolher comprar um produto da marca
Mellerware. Graças à sua tecnologia, design e opera-
ção e ao facto de exceder os padrões de qualidade
mais rigorosos, pode ser assegurado um uso total-
mente satisfatório e uma longa vida útil do produto.
1. Descrição das peças
1. Parte superior.
2. Alça
3. Prato superior
4. Alavanca de liberação da dobradiça
5. Carcaça inferior
6. Luz pronta (verde)
7. Luz de alimentação (vermelho)
8. Botão do termostato
9. Bandeja de gotejamento
10. Placa inferior
2. Conselhos de segurança e avisos!
Leia atentamente estas instruções antes de ligar
o aparelho e mantê-las para futuras referências. A
não observância destas instruções pode levar a um
acidente. Limpe todas as peças do produto que estarão
em contato com os alimentos, conforme indicado na
seção de limpeza, antes de usar.
2.1. Utilização ou ambiente de trabalho:
2.1.1. Mantenha a área de trabalho limpa e bem
iluminada. Áreas desorganizadas e escuras convidam
acidentes.
2.1.2. Use o aparelho em uma área bem ventilada.
2.1.3. Não coloque o aparelho sobre superfícies quen-
tes, tais como placas de cozinhar, queimadores a gás,
fornos ou artigos semelhantes.
2.1.4. Mantenha as crianças e os espectadores afasta-
dos quando utilizar este aparelho.
2.1.5. Coloque o aparelho numa superfície horizontal,
plana e estável, adequada para suportar altas temper-
aturas e longe de outras fontes de calor e contacto
com a água.
2.1.6. Mantenha o aparelho afastado de materiais
etc.
aparelho.
2.1.8. Não utilize o aparelho em associação com um
programador, temporizador ou outro dispositivo que o
ligue automaticamente.
antes de ligar o aparelho.
2.2.11. Ligue o aparelho à rede eléctrica com uma
tomada de terra com um mínimo de 10 amperes.
-
avaliações cuidadosamente como a corrente utilizada
por vários aparelhos poderia facilmente exceder a clas-
2.1.14. Se qualquer um dos invólucros do aparelho
quebrar, desligue imediatamente o aparelho da rede
eléctrica para evitar a possibilidade de choque eléc-
trico.
2.1.15. Não utilize o aparelho se cair no chão ou se
houver sinais visíveis de danos.
2.1.16. Não force o cabo de alimentação. Nunca utilize
o cabo de alimentação para levantar, transportar ou
desligar o aparelho.
2.1.17. Não enrole o cabo de alimentação ao redor do
aparelho.
2.1.18. Não prenda nem dobre o cabo de alimentação.
pendurado ou entre em contacto com as superfícies
quentes do aparelho.
de choque elétrico.
2.1.21. O aparelho não é adequado para utilização no
exterior.
2.1.22. O cabo de alimentação deve ser examinado
regularmente para detectar sinais de danos e, se
utilizado.
1
2
3
4
10
9
8
76
5
28560_IM.indd 14 05-Jul-17 4:00:05 PM

2.2. Segurança pessoal:
2.2.1. CUIDADO: Não deixe o aparelho sem vigilância
durante o uso, pois existe o risco de acidente.
2.2.2. Não toque nas partes aquecidas do aparelho,
pois pode provocar queimaduras graves.
2.2.3. Este aparelho é apenas para uso doméstico, não
utilizado por hóspedes em ambientes de hospitalidade,
tais como bed and breakfast, hotéis, motéis e outros
tipos de ambientes residenciais, mesmo em casas
de fazenda, áreas do pessoal de cozinha em lojas,
escritórios e outros ambientes de trabalho.
2.2.4. Este aparelho não deve ser utilizado por pessoas
(incluindo crianças) com capacidades físicas, sensori-
ais ou mentais reduzidas, ou com falta de experiência
e conhecimento, a menos que tenham sido supervisio-
nados ou instruídos sobre o uso do aparelho por uma
pessoa responsável pela sua segurança.
2.2.5. Este aparelho não é um brinquedo. As crianças
devem ser supervisionadas para garantir que não
brincam com o aparelho.
2.3. Uso e cuidado:
2.3.1. Desenrolar completamente o cabo de alimenta-
ção do aparelho antes de cada utilização.
2.3.2. Não utilize o aparelho se as peças ou acessórios
não estiverem adequadamente montados.
2.3.3. Não utilize o aparelho quando estiver vazio.
2.3.4. Não ligue o aparelho enquanto estiver a ser
utilizado ou ligado à rede eléctrica.
2.3.5. Não cubra a superfície de cozedura ou alimentos
com folha de alumínio e outros materiais semelhantes.
2.3.6. Desconecte o aparelho da rede de alimentação
quando não estiver em uso e antes de realizar qualquer
tarefa de limpeza.
2.3.7. Este aparelho deve ser guardado fora do alcance
das crianças.
2.3.8. Não guarde o aparelho se ainda estiver quente.
2.3.9. Nunca deixe o aparelho sem vigilância quando
estiver a ser utilizado e mantenha-os fora do alcance
das crianças.
2.3.10. Se, por algum motivo, o aparelho pegasse
fogo, desconecte o aparelho da fonte de alimentação e
NÃO USE ÁGUA PARA PONER O INCÊNDIO.
2.4. Serviço:
peças sobressalentes originais ou acessórios são
usados para substituir peças / acessórios existentes.
fabricante ou o seu agente de assistência ou uma pes-
para evitar um perigo.
2.4.3. Qualquer uso indevido ou falha em seguir as
instruções de uso torna a garantia e a responsabilidade
do fabricante nula e sem efeito.
3. Instruções de uso
3.1. Antes de usar:
3.1.1. Remova a película protetora do aparelho (se
aplicável).
3.1.2. Antes de utilizar o produto pela primeira vez,
limpe as peças que entrarão em contacto com os
alimentos da forma descrita na secção de limpeza.
3.1.3. Para melhores resultados, leve as placas de
cozedura com um pouco de óleo de cozinha ou spray
de cozinha.
3.2. Uso e cuidado:
3.2.1. Ligue o aparelho à tomada de parede.
3.2.2. O indicador de energia acende-se.
3.2.4. Feche a grelha
3.3.5. À medida que o termostato cicla durante o uso
da luz pronta, será ligado e desligado.
3.2.6. Abra a grelha coloque o sanduíche, a carne ou
outro alimento na placa de cozinha inferior.
3.2.7. Quando o alimento é cozinhado ao seu gosto,
retire-o do aparelho com a ajuda de uma espátula
de madeira ou dispositivo resistente ao calor similar.
Nunca use pinças metálicas ou uma faca, pois podem
causar danos ao revestimento antiaderente das placas
de cozedura.
3.2.8. Depois de terminar a cozedura, desconecte a
para esfriar.
3.3. Abrir a função da Grelha
3.3.1. Coloque a grelha numa superfície plana e limpa.
Esta pode ser posicionado em uma posição plana.
3.3.2. Pressione a alavanca de liberação da dobradiça.
3.3.3. Levante a alça na carcaça superior, levando-a
mesa e as 2 placas estejam em linha com as outras
3.3.4. Use o aparelho como uma grelha aberta para
cozinhar o alimento desejado.
28560_IM.indd 15 05-Jul-17 4:00:05 PM

3.4. Depois de terminar o uso do aparelho:
3.4.1. Selecione a posição mínima “MIN” usando o
controle do termostato.
3.4.2. Deixe o aparelho arrefecer.
3.4.3. Desligue o aparelho da rede eléctrica.
3.4.4. Limpe o aparelho conforme descrito na secção
de limpeza.
4. Limpeza
4.1. Desligue o aparelho da corrente eléctrica e deixe-o
arrefecer completamente antes de efectuar qualquer
tarefa de limpeza.
4.2. Limpe a bandeja de gotejamento com um pano
úmido e seque.
4.3. Limpe as partes exteriores do aparelho com um
pano húmido com algumas gotas de detergente e
depois seque. CUIDADO! Não mergulhe as partes
eléctricas do aparelho em qualquer líquido.
4.4. Não utilize solventes, nem produtos com pH ácido
ou básico, tais como lixívia ou produtos abrasivos,
para a limpeza do aparelho.
4.5. Nunca submergir o aparelho em água ou qualquer
outro líquido ou colocá - lo sob água corrente.
5. Anomalias e reparos
5.1. Pegue o aparelho para um centro de suporte
outros problemas.
ela deve ser substituída e você deve proceder como
faria em caso de danos.
28560_IM.indd 16 05-Jul-17 4:00:06 PM

Thank you for purchasing a Mellerware product. Mellerware guarantees that your
product has been thoroughly inspected and tested before being dispatched and is
free from mechanical and electrical defects and complies with the applicable safety
standards. With every Mellerware product purchased you get a 2 year warranty as detailed
in the terms and conditions below.
First Year – 1 Year Retail Warranty:
Should defects due to faulty parts or workmanship devel-
op, under normal use, within 12 months from the original
purchase date, please return the product to the store from
where it was purchased for repair free of charge. However,
for the custormer’s convenience we will replace products
where the purchase price is equal to or less than R750
incl. VAT
Second Year – 1 Year Extended Warranty
Mellerware takes pride in their product quality and there-
fore offer an extended 12 month warranty over and above
the 1 Year Retail Warranty. Should defects due to faulty
material or workmanship develop, under normal domestic
use, after the 12 month period and within 24 months from
the original date of purchase, please return the product
postage pre-paid to Mellerware for repair. Mellerware
will repair the product free of charge and return it to you
directly. Mellerware will replace a product with a similar
product in the same or better condition, if the repair can-
not be conducted for whatever reason.
NB: The 1 Year Extended Warranty is only valid for cus-
tomers who have registered their warranty online at www.
mellerware.co.za within the first year after making their
purchase. See overleaf for details and instructions.
Before returning your product, check the
following:
• Your household mains supply socket is in good condi-
tion, working and switched on.
• The mains supply circuit is not overloaded (White trip
switch on your DB board is off).
• You have read the trouble shooting guide in your
Instructions for Use.
• All accessories and parts are present.
The following conditions apply:
1. Please ensure you retain your original receipt asthis
must be presented when making a claim under the
terms of the warranty. It is impossible to determine
the warranty period without your original proof of pur-
chase, so please keepthis in a safe place. (NB. Your
warranty can be scanned ontothe Mellerware web
site for safe storage – see reverse side for details.)
2. If a refund or exchange is required the product must
be complete with all accessories, parts and packag-
ing. Missing parts will render the warranty void.
3. Upon receipt of your appliance, check it for any
transport damage toensure it is safe for use. Return it
to the store as soon as possible for exchange if dam-
aged. The warranty is void if productsare damaged
afteruse, so please do not use the damaged product.
4. Your product is designed for normal domestic
household use. Failure to read and comply with the
instructions for use, cleaning and maintenance will
render your warranty void, so please read these
instructions carefully to ensure your safety, and to
get the most effective use from the product. (e.g. not
removing lime scale; water deposits; insect infesta-
tion, and/or burnt products)
5. Any abuse, negligent, improper or accidental use
or care will render the warranty void and Creative
Housewares (Pty) Ltd will not be liable for any loss
or damage.
6. Any attempted repair, or replacement of unauthor-
ised parts will render the warranty void, so please
contact an authorised service centre or service
agent for any service or repair requirements.
7. NB: The warranty on replaced products will be from
the original date of purchase and not from when the
date replacement was made.
8. All repairs carry a 3 month warranty even if this falls
outside of the 2 year warranty period.
9. Mellerware will attempt to conduct repairs within
reasonable time in line with industry standards but
cannot be held responsible or liable for any circum-
stances not under our control.
10. Terms and Conditions are subject to change without
prior notice.
Repairs Out of the Warranty Period
If service or repair becomes necessary outside the
warranty period, this service is still available however all
transport/postage, spares and labour costs will be for the
customers’ account. All chargeable repairs will require
the customers’ written acceptance of the quote. Once the
go-ahead has been received Mellerware will undertake to
conduct the repair within a reasonable time and maintain
the condition of the product as received. All repairs are
warranteed for 3 months from the date of the repair.
For any service, enquiries and complaints please contact
our Customer Care on 086 111 5006 or e-mail help@
chwsa.co.za from 08h00 to 15h00 Monday to Friday
excluding public holidays. Please also note that the com-
pany is normally closed for 2 weeks around Christmas
and New Year.
Please send all products for repair postage pre-paid to
one of the service centres listed on the back of this page.
IM_Template.indd 3 2019-05-14 10:49:22 AM

Why register your warranty?
We at Mellerware pride ourselves on bringing premium quality appliancestomarket, andasa commitment tothis
level of quality we offer a 2 year warranty (1 Year Retail + 1 Year Extended) on all of our products. We often hear
that our customers lose their receipts andcan therefore no longer claim if they have a problem. To take advantage
of the 1 Year Extended Warranty you will needto registeryour warranty online within the first year of purchase in
order tomake a valid claim. Now you can registeryour product, upload your warranty online, neverhave to worry
about losing your receipt again andenjoy the benefit of your 2 year warranty.
Added Benefits
In addition to providing you with an online profile of your registered
products we will also provide a host of value added benefits:
•IncentivesandCompetitions for registered users
•New recipes or ideas for your products
•New product developments– be the first to get the latest appliances
•Special offers on promotional items
How to Register your Online Warranty?
STEP1
DESKTOP/
LAPTOP
SMART
PHONE/
TABLET
FAX
STEP2 Pick a registration method:
ONLINE WARRANTY REGISTRATION
Notes:
1. The online warranty system is a safe storage facility for your
receipt.
2. You will be required to register on the Mellerware website.
You will receive a username and password once registered.
This will give you access toyour profile.
3. From your profile you will be able to load productsthat you
have purchased. In order to successfully registeryour warranty
you will needtoeither scan andupload, or fax through your
receipt tous.
4. All instructions on how to load your productsare available
inside your profile.
5. Please note that you must checkthat your receipt has been
uploaded correctly. Creative Housewares cannot be held
responsible for faxes or files not received.
6. For assistance with registration please email: marketing@
chwsa.co.za
NB: Your 1 yearextended warranty is only valid if your
product is registered online within the first yearafter purchasing
your Mellerware product. Failure to registeryour product on-line
within the first year will render the extended warranty asvoid.
•Fax the following to021 931 4058
•First Name and Surname
•Contact telephone and fax number.
•Product Model number and Type.
•Traceability Code (found on a label
on the product)
•A clearand legible copy
of your receipt.
•Scan the QRcode above or visit
www.mellerware.co.za
•Click on the “Registration” link
and login using your user
name and password.
•Click on “Registeryour products
andupload receipts” and follow
the easy instructions.
•Scan or take a photo and
upload your receipt.
•Open your internet browser andvisit
www.mellerware.co.za
•Click on the “Registration” link and
login using your user name
and password.
•Click on “Registeryour products
andupload receipts” and follow the
easy instructions.
•Scan andupload your receipt
If you haven’t done so already, simply visit www.mellerware.co.za, click on the
“Product Registration” link and follow the easy instructions. You will receive a user-
name and password once registered. This will give you access toyour user profile.
Cape Town
20 Tekstiel Street, Parow, Cape Town, 7493,
South Africa •P.O. Box 6156 Parow East, 7501,
South Africa Tel: +27 21 931 8117
Fax: +27 21 931 4058
Durban
35 Adrain Road, Windermere,
Durban, South Africa, 4001
Tel: +27 31 303 3465
Fax: +27 31 303 8259
Johannesburg
Unit 25 &26 San Croy Office Park
Die Agora Road, Croydon, 1619
Tel:+27 11 392 5652
Fax:+27 11 392 1694
National Service Centre: 086 111 5006
e-mail: [email protected]
www.creativehousewares.co.za
IM_Template.indd 4 2019-05-14 10:49:23 AM

Dankie vir die aankoop van ‘n Mellerware produk. Mellerware waarborg
dat u produk deeglik geïnspekteer en getoets word voordat dit versend
word en is vry van meganiese en elektriese gebreke en voldoen aan die
toepaslike
veiligheidstandaarde. Met elke Mellerware produk wat gekoop word kry u 'n 2 jaar
waarborg soos uiteengesit in die terme en voorwaardes hieronder.
Eerste Jaar - 1 JaarKleinhandelswaarborg:
Indien defekte as gevolg van foutiewe onderdele of
vakmanskap binne 12 maande onder normale huis-
houdelike gebruik ontwikkel, binne die 12
maande vanaf die oorspronklike datum van aankoop,
neem asseblief die produk na die winkel van waar dit
gekoop is vir 'n terugbetaling of vervanging.
Tweede Jaar-1Jaar Uitgebreide Waarborg
Mellerware is trots op die kwaliteit van die produk en
bied dus 'n uitgebreide 12 maande waarborg bo en
behalwe die 1 Jaar kleinhandelswaarborg. Indien de-
fekte as gevolg van foutiewe materiaal of vakmanskap
ontwikkel, onder normale huishoudelike gebruik, na
die 12 maande tydperk en binne 24 maande vanaf die
oorspronklike datum van aankoop, stuur die produk
terug met posgeld betaalna Mellerware vir herstel.
Mellerware sal die produk gratis herstelen dit direk
aan u terugstuur. Mellerware sal die produk vervang
met 'n soortgelyke produk in dieselfde of betertoes-
tand, as die herstelnie uitgevoer kan word vir watter
rede ookal nie.
NB: Die 1 JaarUitgebreide waarborg is slegs geldig
vir kliënte wat hul waarborg geregistreerhet op ons
webtuiste by www.mellerware.co.za binne die eerste
jaarnadat hulle dit aangekoop het
Sien keersy vir besonderhede en instruksies.
Voordatu die produk terug stuur, maak seker
van die volgende:
•U huishoudelike geleidingsok is in 'n goeie toestand,
werk en aangeskakel is,
•Die geleidingsok is nie oorlaainie (Wit uitskop
skakelaar op u DB bord af is),
•U het die moeilikheid steuringsgids gelees in u
instruksies vir gebruik,
•Alle bykomstighede en dele teenwoordig is.
Die volgende voorwaardes geld:
1. Maak seker dat jou oorspronklike kwitansie behoue is, dit
moet aangebied word wanneer'n eis gemaak word onder
die voorwaardes van die waarborg. Dit is onmoontlik om
die waarborg tydperk te bepaal sonder die bewys van
aankoop, so hou dit asseblief in 'n veilige plek. (NB. Jou
oorspronklike waarborg kan opgeskandeer word na die
Mellerware webtuiste vir veilige bewaring - sien keersy vir
meer inligting.)
2. Indien 'n terugbetaling of omruiling van die produk nodig is
moet die produk volledig weesmet al die bykomstighede,
onderdele en verpakking. Toebehore wat weg is sal die
waarborg nietig maak.
3. Met ontvangs van u toestel, gaan dit na vir enige vervoer
skade om te verseker dat dit veilig is vir gebruik. Stuur dit
so gou asmoontlik terug na die winkel om die beska-
digde toestel te vervang. Die waarborg is nietig indien
die beskadigde produk gebruik word na die tyd, so
moet asseblief nie die beskadigde produk gebruik nie.
4. U produk is ontwerp vir normale huishoudelike
gebruik. Deur te versuim om die instruksies te lees en
te voldoen aan die terme van gebruik, die skoonmaak
en instandhouding van die produk maak u waarborg
ongeldig, so lees asseblief hierdie instruksies versigtig
om u veiligheid te verseker, en om die beste uit die
gebruik van die produk te kry. (bv nie die verwydering
van kalk skaal; water neerslag; insek besmetting, en /
of verbrande produkte)
5. Enige misbruik, nalatige, onbehoorlike of toevallige
beskadiging of sorg van die produk word die waarborg
nietig en Creative Housewears (Pty) Ltd, sal nie
aanspreeklik wees vir enige verlies of skade nie.
6. Enige poging tot herstel, of vervanging met
ongemagtigde onderdele sal die waarborg nietig maak,
so kontak 'n gemagtigde dienssentrum of diensagent
vir enige diens of herstelwerk.
7. NB: Die waarborg op die vervangingsproduk sal by die
oorspronklike datum van aankoop bly en nie van die
datum wanneer dit vervang is nie.
8. Alle herstelwerk dra 'n 3 maande waarborg selfs al val
dit buite die 2-jaar waarborg tydperk.
9. Mellerware sal probeer om die herstelwerk te doen
binne 'n redelike tyd in lyn met die industrie stan-
daarde, maar kan nie verantwoordelik gehou word of
aanspreeklik wees vir enige omstandighede nie onder
ons beheer nie.
Herstelwerk buite die waarborg tydperk
As diens of herstelwerk benodig word buite die waar-
borg tydperk, is hierdie diens steeds beskikbaar, maar
is alle vervoer / posgeld, onderdele en arbeidskoste op
die kliënte se onkoste. Alle betaalbare herstelwerk sal
skriftelike aanvaarding van die kwotasie vereis van die
kliënt. Sodra Mellerware die groen lig ontvang sal ons
onderneem om die herstel binne 'n redelike tyd en in die-
selfde toestand te hou as wat die produk ontvang is. Alle
herstelwerk is gewaarborg vir 3 maande vanaf die datum
van die herstel.
Vir enige diens, navrae en klagtes kontak ons kliënte diens
op 086 111 5006 of e-pos help@chwsa.co.za vanaf 08h00
tot 15h00, Maandag tot Vrydag, openbare vakansiedae
uitgesluit. Let asseblief ook daarop
dat die maatskappy gewoonlik gesluit is vir 2 weke ge-
durende Kersfees en Nuwejaar.
Stuur asseblief alle produkte vir herstel met posgeld
vooruit betaal aan een van die dienssentrums wat op die
agterkant van hierdie bladsy verskyn.
IM_Template.indd 5 2019-05-14 10:49:23 AM

Hoekom moet u die waarborg moet registreer?
Ons by Mellerware is trots om premium gehalte toestelle op die mark te bring, en as'n verbintenis tot die vlak
van gehalte bied ons 'n 2 jaar waarborg (1 Jaar Kleinhandel + 1 JaarUitgebreide) op al ons produkte. Onshoor
dikwels dat ons kliënte hul kwitansies verloor en kan dus nie meereis ashulle 'n probleem het nie. Om voordeelte
trek van die 1 JaarUitgebreide waarborg sal u nodig hê om u waarborg aanlyn te registreer binne die eerste jaar
van aankoop om 'n geldige eis te maak. Nou kan u die produk aanlyn registreer, laaiu waarborg en hoef u nooit te
bekommer dat u die kwitansie sal verloor nie en die voordeelvan u 2-jaar waarborg geniet.
Bygevoegde Voordele
Bykomendtot die verskaffing van ‘n aanlyn profiel van u geregistreerde produkte bied ons ook vele ander toege-
voegde waarde voordele:
•aansporings en kompetisies vir geregistreerde gebruikers
•nuwe resepte of ideesvir u produkte
•nuwe produk ontwikkelings - die eerste wees om die nuutste toestelle te kry
•spesiale aanbiedings op promosie-items
Hoe om u Aanlyn Waarborg te Registreer?
STAP 1
REKENAAR/
SKOOTREK-
ENAAR
SMART-
FOON /
TABLET
FAKS
STAP 2 Kies 'n registrasie metode:
AANLYN WAARBORG REGISTRASIE
Notas:
1. Die aanlyn waarborg stelsel is 'n veilige stoor fasiliteit vir u
strokies.
2. U sal gevra word om op die Mellerware webtuiste te regis-
treer. U sal 'n gebruikersnaam en wagwoord ontvang. Dit sal u
toegang gee tot u profiel.
3. Van u profiel u sal in staat wees om produkte te laai wat u
gekoop het. Om u waarborg suksesvol te registreer sal u nodig
hê om of te skandeeren oplaai, of faks u strokie deurna ons.
4. Alle instruksies oor hoe om u produkte te laai is beskikbaar
binne in u profiel.
5. Let daarop dat u moet seker maak dat u kwitansie korrek op-
gelaai is. Creative Housewares kan nie verantwoordelik gehou
word vir fakse of lêers nie ontvangnie.
6. Vir hulp met registrasie e-pos asseblief: marketing@chwsa.
co.za
NB: U 1 jaarverlengde waarborg is slegs geldig indien u
produk aanlyn geregistreer is binne die eerste jaarna die
aankoop van u Mellerware produk. Indien u produk nie aanlyn
geregistreer word binne die eerste jaarnie sal dit die verlengde
waarborg nietig maak.
•Faks die volgende na 021 931 4058
•Naam en Van
•Kontaktelefoon en faksnommer.
•Produk model nommeren tipe.
•Traceability Code (wat op die
•Waarborgkaart of op 'n etiket op die
produk gevind kan word)
•'n Duidelike en leesbare afskrif van
u ontvangs.
•Skandeer die QR-kode bo of besoek
www.mellerware.co.za
•Klik op die "Registration" skakel en
teken aan met u verbruikersnaam en
wagwoord.
•Klik op "Registeryour products” en
laaiu kwitansie en volg die maklike
instruksies.
•Skandeer of neem 'n foto en laai u
strokie.
•Maaku internet snuffelgids oop en
besoek
www.mellerware.co.za
•Klik op die "Registrasie" skakel en
teken in met u gebruikersnaam en
wagwoord.
•Klik op "Registeryour products” en
laai kwitansies en volg die maklike
instruksies.
•Skandeeren laaiu strokie
As u dit nie reeds gedoen het nie, besoek www.mellerware.co.za, kliek op
die "Product Registration" skakel en volg die maklike instruksies. U sal 'n gebrui-
kersnaam en wagwoord ontvang sodra u geregistreerhet. Dit sal u toegangtot u
profiel gee.
Cape Town
20 Tekstiel Street, Parow, Cape Town, 7493,
South Africa •P.O. Box 6156 Parow East, 7501,
South Africa Tel: +27 21 931 8117
Fax: +27 21 931 4058
Durban
35 Adrian Road, Windermere,
Durban, South Africa, 4001
Tel: +27 31 303 3465
Fax: +27 31 303 8259
Johannesburg
Unit 25 &26 San Croy Office park
Die Agora Road, Croydon, 1619
Tel: +27 11 392 5652
Fax: +27 11 392 1694
National Service Centre: 086 111 5006
e-mail: [email protected]
ativehousewares.co.za
IM_Template.indd 6 2019-05-14 10:49:24 AM
Table of contents
Languages:
Other Mellerware Grill manuals

Mellerware
Mellerware GRILL MASTER 2000W User manual

Mellerware
Mellerware 27010 User manual

Mellerware
Mellerware Hotty! User manual

Mellerware
Mellerware 28500 User manual

Mellerware
Mellerware Bbq grill master User manual

Mellerware
Mellerware VITTORIA User manual

Mellerware
Mellerware 27005 User manual

Mellerware
Mellerware Hotty! User manual

Mellerware
Mellerware Eryx Grill User manual

Mellerware
Mellerware Yummy! User manual