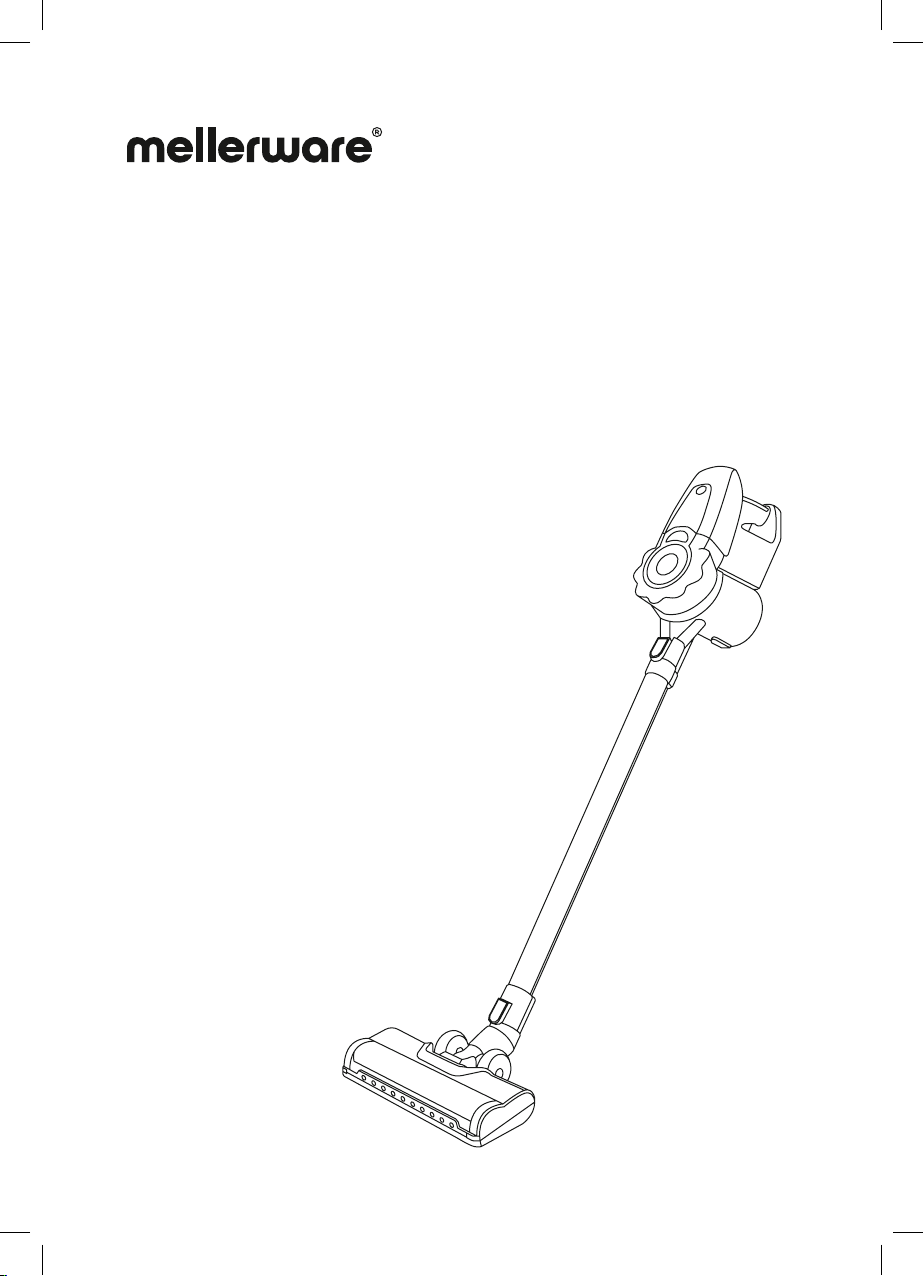
Mellerware Broomy User manual

Broomy!
Broomy! Brushless
Handy&Stick vacuum cleaner
Aspirador escoba
Aspirateur balai
Aspirador vertical
Standstaubsauger
Scopa elettrica

A
B
C
D
E
G
H
I
J
M
PO
N
K
L
F

Fig. 1
Fig. 3
Fig. 5
Fig. 2
Fig. 4
Fig. 6

ENENGLISH
Dear customer,
Many thanks for choosing to purchase
a Mellerware brand product.
Thanks to its technology, design and
operation and the fact that it exceeds
the strictest quality standards, a fully
satisfactory use and long product life
can be assured.
Read these instructions
carefully before
switching on the
appliance and keep
them for future
reference. Failure to
follow and observe
these instructions could
lead to an accident.
This appliance can
be used by children
aged from 8 years and
above and persons
with reduced physical,
sensory or mental
capabilities or lack
of experience and
knowledge if they have
been given supervision
or instruction
concerning use of the
appliance in a safe way
and understand the
hazards involved.
Safety advice
and warnings
Cleaning and user
maintenance shall not
be made by children
without supervision
This appliance is not a
toy. Children should be
supervised to ensure
that they do not play
with the appliance.
Disconnect the battery
charger from the mains
when not in use and
before undertaking any
cleaning task.
The battery must be
removed from the
appliance before it is
scrapped
The appliance must
be disconnected from
the supply mains when
removing the battery
The battery is to be
disposed of safely
If the connection to
the mains has been
damaged, it must
be replaced, take
the appliance to an
authorised technical
support service. Do not
attempt to disassemble
or repair the appliance
1.
3.
4.
5.
6.
7.
2.
8.
9.
by yourself in order to
avoid a hazard.
This appliance is for
household use only, not
10.

professional, industrial
use.
This appliance contains
accessories with rotary
parts. Loose clothes,
jewellery or long hair
can be caught in
moving parts. Dress
properly. Do not wear
baggy or loose-
hanging clothes or
accessories. Keep
your hair, clothing
and gloves away from
moving parts.
appliance to a very low
Only connect the
safety voltage that
corresponds to the
13.
Only use the appliance
charger, provided with
the appliance.
CAUTION: In order to
avoid a hazard due to
inadvertent resetting of
the thermal protector,
this appliance must not
be supplied through
an external switching
device, such as a timer,
or connected to a
circuit that is regularly
the utility.
11.
12.
14.
EN
Ensure that the voltage indicated
on the charger rating label
matches the mains voltage before
plugging in the charger.
Connect the appliance to a socket
that can supply a minimum of 10
amperes.
correctly into the mains socket.
Do not alter the plug. Do not use
plug adaptors.
Do not force the power cord. Never
use the power cord to lift up, carry
or unplug the battery charger.
Do not wrap the power cord
around the appliance.
Do not clip or crease the
power cord.
Check the state of the power
cord. Damaged or tangled cables
increase the risk of electric shock.
Do not touch the plug with
wet hands.
Do not use the appliance if the
cable or plug is damaged.
If any of the appliance casings
breaks, immediately disconnect
the appliance from the mains
to prevent the possibility of an
electric shock.
Do not use the appliance if it has
visible signs of damage or if it has
a leak.
Avoid all contact with the liquid
that could be released from the
battery. In case of contact with
eyes, wash them thoroughly and
seek medical advice. The liquid
–
–
–
–
–
–
–
–
–
–
–
marking on the
appliance.

ESPAÑOL ES
EN
Recharge the battery/ies only
with the charger supplied by the
manufacturer. A charger that is
suitable for one type of battery
may cause explosion or re hazard
when used with other battery/ies.
Use the device only with the
battery/ies for which has been
specically designed. The use of
any other battery/ies s can cause
an explosion or re hazard.
Service
Any misuse or failure to follow the
instructions for use renders the
guarantee and the manufacturer’s
liability null and void.
Description
A - On/o button
B - Speed control
C - Dust tank release button
D - Battery
E - Dust tank
F - Filter
G - Dust tank open button
H - Extension tube release button
I - Extension tube
J - Brush release button
K - Motorized brush
L - LED light
M - Power supply
N - Support
O - 2in1 upholstery nozzle
P - Crevice tool
If the model of your appliance does
not have the accessories described
spilled from the battery may cause
irritation or burns.
USE AND CARE:
Do not use the appliance without
its lter(s) correctly in place.
Do not use the appliance if its
accessories are not properly tted.
Do not use the appliance to gather
up water or any other liquid.
Do not use the appliance if the on/
o switch does not work.
Store this appliance out of reach
of children and/or persons with
physical, sensory or reduced
mental or lack of experience
and knowledge.
Do not work on areas where there
are metal objects, such as nails
and/or screws.
Never vacuum hot or sharp objects
(cigarette butts, ashes, nails, etc.).
Do not open the battery/ies under
any circumstances whatsoever.
When the battery/ies is not in use,
keep it away from other metal
objects like paper clips, coins, keys,
screws ... that could connect a
terminal to another.
Do not short-circuit the battery
terminals as this may cause an
explosion or re.
The battery/ies should be stored at
a temperature of below 40°C.
Only use the appliance for carrying
out dry tasks.
Never leave the appliance
connected and unattended if is
not in use. This saves energy and
prolongs the life of the appliance.
–
–
–
–
–
–
–
–
–
–
–
–
–
–
–
–

ES
EN
–
–
–
–
–
–
–
–
–
–
–
–
–
–
–
–
–
above, they can also be bought
separately from the Technical
Assistance Service.
INSTALLATION
Be sure to remove all packaging
material from inside the appliance.
ASSEMBLING THE APPLIANCE
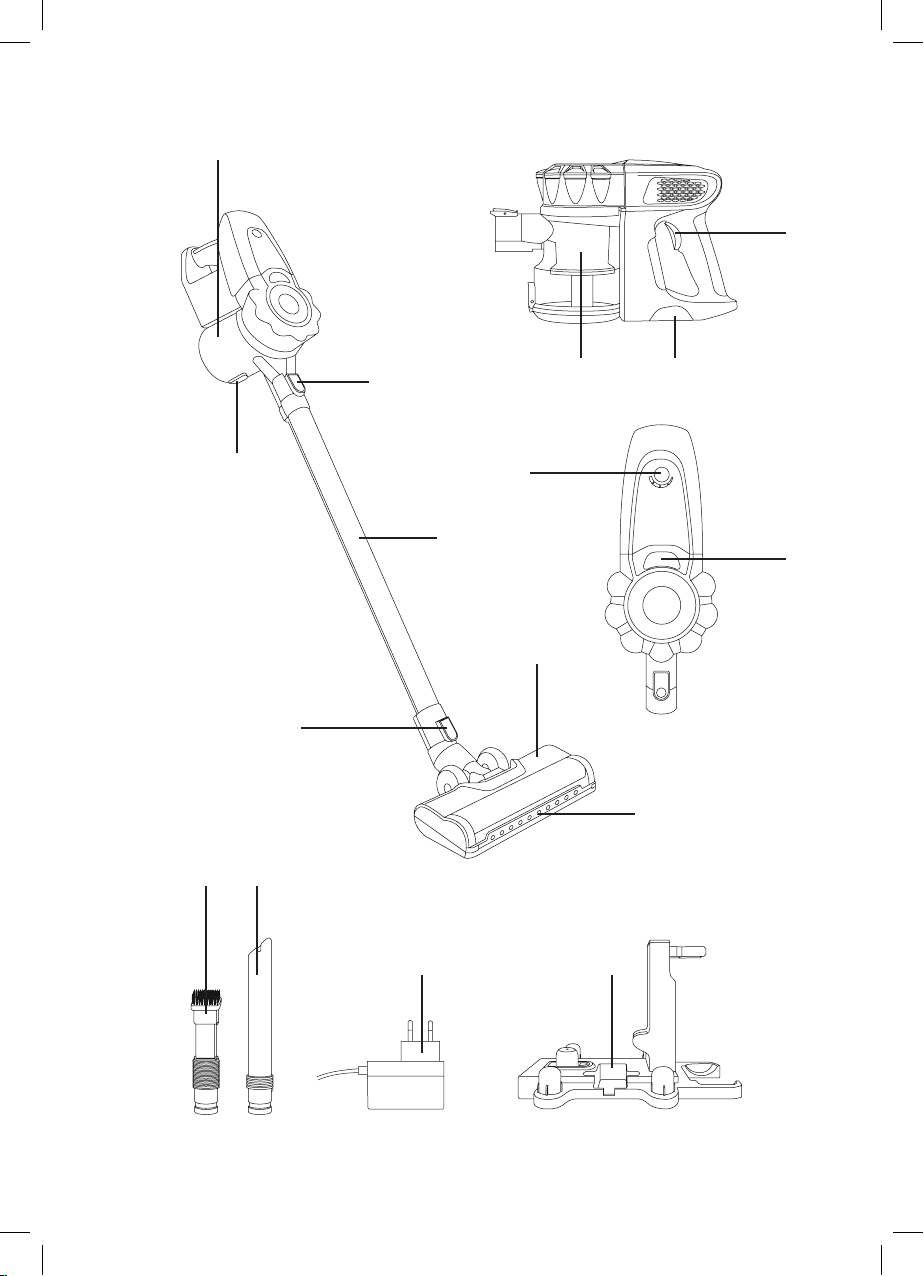
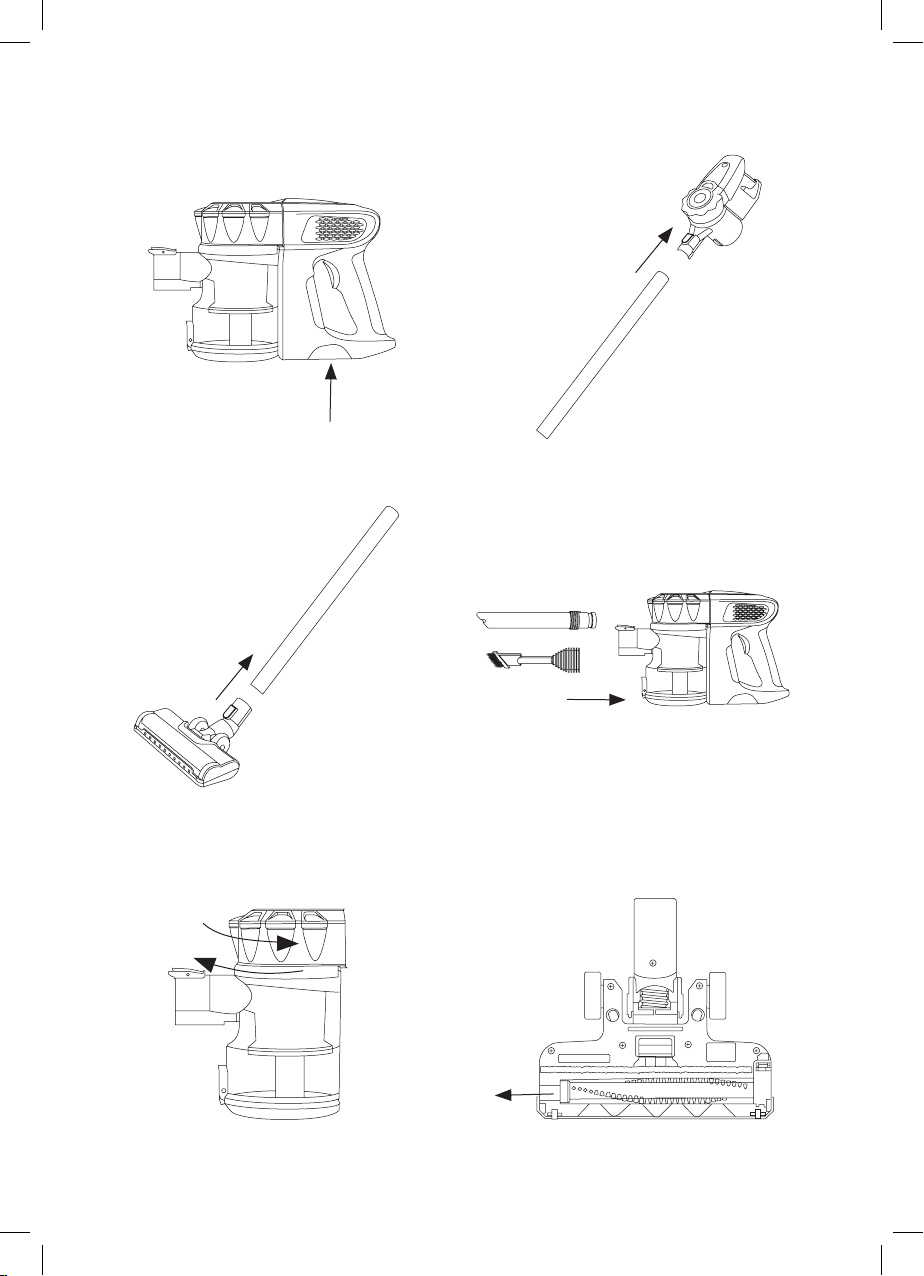
Insert the battery at the bottom of
the handle until you hear a “click”.
To release the battery from the
body, press the side buttons and
stretch out (Fig.1).
Insert the extension tube (I) to the
motor body until you hear a “click”.
To release the extension tube from
the motor body, press the release
button (H) and pull out (Fig.2).
Insert the motorized brush (K) to
the extension tube until you hear
a “click”. To release the motorized
brush, press the release button (J)
and pull out (Fig.3).
ASSEMBLING HAND VACUUM
CLEANER
Insert the 2in1 accesory (O) or the
crevice tool (P) to the motor body
until you hear a “click”. To release
the accesories, press the release
button and pull out (Fig.4).
CHARGING THE BATTERY
Caution: A new battery is not fully
charged and must therefore be
charged before the appliance is
used for the rst time.
Charge the battery at an
atmospheric temperature of
between 4 and 40°C.
Plug the charger (M) into the mains.
A pilot light will come on to indicate
that the charger is ready to begin
charging the battery.
Approximately 3 to 4 hours are
needed for a complete charge
of the battery. Never attempt to
over-charge the battery (although
it is recommended that the rst
charge of the battery be of 5 hours
in duration).
Connect the charger to the jack
using the socket on the appliance.
The socket is located at the lower/
back part of the appliance.
The pilot light will come on to
indicate that the charger is
charging the battery.
At the end of the time period
specied above, remove the
battery from the charger.
When the battery is charged
disconnect the charger from the
mains supply.
NB: Do not use the appliance while
it is connected to the charger.
Instructions for use
BEFORE USE
Before using this product for the
rst time, it is important to make a
full charge of batteries.
USE
Turn the appliance on, by pressing
and holding the on/o button (A).

–
–
–
–
–
–
–
–
–
–
–
–
–
–
–
–
–
–
–
–
–
–
–
EN
Open the dust tank cover (E)
and pour its contents into an
appropriate waste container.
Close the dust tank cover.
CLEANING THE FILTERS
Press button (C) to release the dust
tank from the appliance handle.
Open the dust container (Fig.5).
Take out the HEPA lter and then
the air entry lter.
Wash the lters and dry.
Once the lters are dry, put all the
parts back together. Close the dust
tank and join it to the handle of
the device.
For the air entry lter, it is advisable
to be changed at least once a year
or every 50 hours of the appliance’s
use.
For the air outlet HEPA lter (high
eciency air lter that eciently
retains spores, ash, sawdust,
pollen…), it is advisable to change
it a least once a year or after every
50 hours of use.
BRUSH CLEANING
Rotate the motorized brush to
access to the brush. Push the tab
on the left side of the brush to the
left (Fig.6).
Lift the brush from the housing
and clean.
Place the brush back on the
motorized brush by rst aligning
the end of the hexagon on the right
end of the brush. Then insert the
other end into place and press the
tab to lock the brush.
The button can be locked to avoid
having to hold it during the entire
use of the appliance (slide up).
The battery indicator light will
illuminate.
Select the power using the MAX
button (B).
ONCE YOU HAVE FINISHED USING
THE APPLIANCE
Stop the appliance by releasing
the on/o button or by unlocking
the button (slide down).
Clean the appliance.
Cleaning
Disconnect the battery charger
from the mains and allow it to
cool before undertaking any
cleaning task.
Clean the equipment with a damp
cloth with a few drops of washing-
up liquid and then dry.
Do not use solvents, or products
with an acid or base pH such as
bleach, or abrasive products, for
cleaning the appliance.
Never submerge the appliance in
water or any other liquid or place it
under running water.
EMPTYING THE DUST TANK
Empty the dust box when it is
full (observation facilitated by
transparent windows), or when
vacuuming power is notably
reduced.
Release the extension tube from
the motor body.

EN
Anomalies and repair
Take the appliance to an
authorised technical support
service if product is damaged
or other problems arise. Do not
attempt to disassemble or repair
the appliance yourself as this may
be dangerous.
For EU products versions
and/or in case that
it is requested in your
country:
ECOLOGY AND RECYCLABILITY OF
THE PRODUCT
The materials of which the
packaging of this appliance
consists are included in a
collection, classi cation and
recycling system. Should you
wish to dispose of them, use the
appropriate public recycling bins
for each type of material.
The product does not contain
concentrations of substances that
could be considered harmful to the
environment.
- This symbol means that in
case you wish to dispose of
the product once its working
life has ended; take it to an
authorised waste agent for
the selective collection of Waste
from Electric and Electronic
Equipment (WEEE).
- This symbol means that
product may include a
battery or batteries; user
must to remove them
before disposing of the product.
Remember that batteries must
be disposed of in duly authorised
containers. Do not dispose of them
in re.
This appliance complies with
Directive 2014/35/EU on Low
Voltage, Directive 2014/30/EU on
Electromagnetic Compatibility,
Directive 2011/65/EU on the
restrictions of the use of certain
hazardous substances in electrical
and electronic equipment and
Directive 2009/125/EC on the
ecodesign requirements for
energy-related products
Warranty and technical
assistance
This product enjoys the recognition
and protection bof the legal
guarantee in accordance with
current legislation. To enforce
your rights or interests you must
go to any of our o cial technical
assistance services.
You can nd the closest one by
accessing the following web link:
www.mellerware-home.com.
You can also request related
information by contacting us.
You can download this instruction
manual and its updates at www.
mellerware-home.com
–
–
–

ES
EN
Trademark
and address
Model
Input Voltage
Input AC
Frequency
Output Voltage
Output Current
Output Power
Average Active
Eciency
Eciency at low
load (10%)
No-load power
consumption
ENGINEERING AND TECHNOLOGY
FOR LIFE, S.L. Av. Barcelona, s/n,
25790 Oliana, Lleida, Spain
BROOMY!
BROOMY! Brushless
100-240 V
50/60 Hz
31,0VDC
0,5 A
15,5 W
86,31% supplied at 115V 60Hz.
85,59% supplied at 230V 50Hz
80,73 % supplied at 115V 60Hz
73,81% supplied at 230V 50Hz
0,043 W supplied at 115V 60Hz
0,067W supplied at 230V 50Hz
The following information is regarding to energy labelling and ecodesign:
To establish compliance with the ecodesign requirements and for calculation of
energy labelling parameters the appliance the European standard EN 50563 is
used as reference.

ES
Distinguido cliente:
Le agradecemos que se haya
decidido por la compra de un
producto de la marca Mellerware.
Su tecnología, diseño y funcionalidad,
junto con el hecho de superar las
más estrictas normas de calidad
le comportarán total satisfacción
durante mucho tiempo.
Leer atentamente este
folleto de instrucciones
antes de poner el
aparato en marcha
y guardarlo para
posteriores consultas.
La no observación y
cumplimiento de estas
instrucciones pueden
comportar como
resultado un accidente.
Este aparato pueden
utilizarlo niños con
edad de 8 años y
superior y personas
con capacidades
físicas, sensoriales o
mentales reducidas o
falta de experiencia y
conocimiento, si se les
ha dado la supervisión
o formación apropiadas
respecto al uso del
aparato de una manera
segura y comprenden
los peligros que implica.
Consejos y advertencias
de seguridad
La limpieza y el
mantenimiento a
realizar por el usuario
no deben realizarlos los
niños sin supervisión.
Este aparato no
es un juguete. Los
niños deben estar
bajo vigilancia para
asegurar que no
jueguen con el aparato.
Desenchufar el
cargador de baterías
de la red cuando no se
use y antes de realizar
cualquier operación de
limpieza.
La batería debe ser
retirada del aparato
antes de que se
deseche.
El aparato debe estar
desconectado de la
red de alimentación al
quitar la batería.
La batería debe ser
eliminada de manera
segura.
Si el cable de
alimentación está
dañado, debe ser
substituido por el
fabricante, por su
servicio postventa o por
1.
3.
4.
5.
6.
2. 7.
9.
8.
ESPAÑOL

ES
personal cualicado
similar con el n de
evitar un peligro.
Este aparato está
pensado únicamente
para un uso doméstico,
no para uso profesional
o industrial
Este aparato contiene
accesorios con partes
rotatorias. Ropas
colgantes, joyas o
cabellos largos pueden
ser atrapados por las
piezas en movimiento.
Vestir de forma
adecuada. No llevar
prendas amplias ni
elementos colgantes.
Mantener los cabellos,
ropa y guantes
alejados de las partes
móviles.
Usar el aparato
solamente con la
fuente de alimentación
especíca, suministrada
con el aparato.
Conectar el aparato
solamente a una
muy baja tensión
de seguridad que
corresponda con el
marcado del aparato.
PRECAUCIÓN: Con
objeto de evitar un
peligro debido al
rearme no deseado del
protector térmico, no se
tiene que alimentar al
aparato a través de un
dispositivo interruptor
externo, tal como
un programador, o
conectarlo a un circuito
que se encienda y
apague regularmente a
través de la compañía
de distribución de
energía eléctrica.
9.
10.
11.
12.
13.
14.
–
–
–
–
–
–
–
Antes de conectar el cargador de
baterías a la red, vericar que el
voltaje indicado en la placa de
características coincide con el
voltaje de red.
Conectar el aparato a una base
de toma de corriente que soporte
como mínimo 10 amperios.
La clavija del cargador de baterías
debe coincidir con la base
eléctrica de la toma de corriente.
Nunca modicar la clavija. No usar
adaptadores de clavija.
No forzar el cable eléctrico de
conexión. Nunca usar el cable
eléctrico para levantar, transportar
o desenchufar el cargador de
baterías.
No enrollar el cable eléctrico de
conexión alrededor del aparato.
No dejar que el cable eléctrico
de conexión quede atrapado o
arrugado.

ES
–
–
–
–
–
–
–
–
–
–
–
–
–
–
–
–
–
–
–
–
–
–
Vericar el estado del cable
eléctrico de conexión. Los cables
dañados o enredados aumentan el
riesgo de choque eléctrico.
No tocar la clavija de conexión con
las manos mojadas.
No utilizar el aparato con el cable
eléctrico o la clavija dañada.
Si alguna de las envolventes del
aparato se rompe, desconectar
inmediatamente el aparato de la
red para evitar la posibilidad de
sufrir un choque eléctrico.
No utilizar el aparato si ha caído, si
hay señales visibles de daños, o si
existe fuga.
Evite cualquier contacto con el
líquido que pueda desprender
la batería. Caso de contacto
accidental con los ojos lávelos
y acuda a un médico. El líquido
derramado por la batería puede
provocar irritación o quemaduras.
UTILIZACIÓN Y CUIDADOS:
No usar el aparato sin su/s ltro/s
correctamente colocados.
No usar el aparato si sus
accesorios no están debidamente
acoplados.
No usar el aparato para recoger
agua ni cualquier otro líquido.
No usar el aparato si su dispositivo
de puesta en marcha/paro no
funciona.
Guardar este aparato fuera
del alcance de los niños y/o
personas con capacidades físicas,
sensoriales o mentales reducidas o
falta de experiencia
y conocimiento
No actuar sobre áreas que
contengan objetos metálicos tales
como clavos y/o tornillos.
No aspirar nunca objetos
incandescentes o cortantes
(colillas, cenizas, clavos…).
No abrir la/s batería/s bajo
ningún motivo.
Cuando la/s batería/s no estén
en uso, éstas deben mantenerse
alejadas de otros objetos
metálicos como clips para papeles,
monedas, llaves, tornillos... que
pudieran establecer conexión de
un terminal a otro.
Evite provocar un cortocircuito
entre los terminales de la batería,
ya que existe riesgo de explosión
o incendio.
Guardar la/s batería/s en lugares
donde la temperatura no supere
los 40°C.
Usar el aparato solamente en
tareas de trabajo en seco.
No dejar nunca el aparato
conectado y sin vigilancia.
Además, ahorrará energía y
prolongará la vida del aparato.
Recargue la/s batería/s solamente
con el cargador suministrado
por el fabricante. Un cargador
que es adecuado para un tipo
de baterías, puede ocasionar un
peligro de explosión o incendio
cuando es usado con otra/s
batería/s.
Use el aparato solamente con la/s
batería/s por las que ha estado

ES
–
–
–
–
–
–
diseñado especícamente. El
uso de cualquier otra/s batería/s
puede ocasionar un peligro de
explosión o incendio.
Servicio
Toda utilización inadecuada, o en
desacuerdo con las instrucciones
de uso, puede comportar
peligro, anulando la garantía y la
responsabilidad del fabricante.
Descripción
A - Botón on/o
B - Control velocidad
C - Botón para extraer el depósito
D - Batería
E - Depósito de polvo
F - Filtro
G - Botón para abrir el depósito
H - Botón de liberación del tubo
I - Tubo de extensión
J - Botón liberación zapata
K - Cepillo motorizado
L - Luz LED
M - Fuente de alimentación
N - Soporte
O - Cepillo 2en1 para muebles y
tapicerías
P - Lanza
En caso de que su modelo de
aparato no disponga de los
accesorios descritos anteriormente,
éstos también pueden adquirirse
por separado en los Servicios de
Asistencia Técnica.
Instalación
Asegurarse de retirar todo material
de embalaje del interior del
aparato.
MONTAJE DEL APARATO
Insertar la batería a la parte inferior
del mango hasta oír un “click”. Para
desacoplar la batería del cuerpo,
presione los botones laterales y
estirar hacia fuera (Fig.1).
Insertar el tubo de extensión
(I) al cuerpo motor hasta oír un
“click”. Para desacoplar el tubo de
extensión del aspirador, presione
el botón de liberación (H) y estire
hacia fuera (Fig.2).
Insertar la zapata (K) al tubo de
extensión hasta oír un “click”. Para
desacoplar la zapata del tubo de
extensión, presione el botón de
liberación (J) y estire hacia fuera
(Fig.3).
MONTAJE ASPIRADOR DE MANO
Insertar el accesorio 2en1 (O) o la
lanza (P) al cuerpo motor hasta
oír un “click”. Para desacoplar
los accesorios, presione el botón
de liberación y estire hacia fuera
(Fig.4).
CARGA DE LA BATERÍA
Advertencia: Una batería nueva no
viene con carga completa y debe
ser cargada al máximo antes de
usar el aparato por primera vez.
Cargar la batería a temperatura
ambiente entre 4 y 40°C.

ES
Enchufar el cargador (M) a la red
eléctrica.
El tiempo necesario para una
carga completa es de 3 a 4 horas
aproximadamente. Nunca intente
sobrecargar las baterías (aunque
es recomendable que la primera
carga se realice durante 5 horas de
carga).
Enchufar el conector del cargador
en la toma de corriente del
aparato, situada en la parte
superior del mango del aparato.
Mientras la batería se esté
cargando, se iluminará una luz
azul del aparato que indica que
el cargador está cargando la
batería.
Cuando la batería esté
completamente cargada, todas
las luces del aparato estarán de
color azul.
Una vez nalizada la carga,
desenchufar el cargador de la red
eléctrica.
Nota: No utilizar el aparato
mientras esté conectado al
cargador.
Modo de empleo
NOTAS PREVIAS AL USO
Antes de usar el producto por
primera vez, es importante hacer
una carga completa de las
baterías.
USO
Para poner el aparato en marcha,
mantener pulsado el botón on/o
(A).
Se puede bloquear el botón para
no tener que aguantarlo durante
todo el uso del aparato (deslizar
hacia arriba).
El piloto luminoso de la batería se
iluminará.
Seleccionar la potencia mediante
el botón MAX (B).
UNA VEZ FINALIZADO EL USO DEL
APARATO
Parar el aparato, dejando de
pulsar el botón on/o o bien
desbloqueando el botón (deslizar
hacia abajo).
Limpiar el aparato.
Limpieza
Desenchufar el cargador eléctrico
de la red y dejarlo enfriar antes
de iniciar cualquier operación
de limpieza.
Limpiar el aparato con un paño
húmedo impregnado con unas
gotas de detergente y secarlo
después.
No utilizar disolventes, ni productos
con un factor pH ácido o básico
como la lejía, ni productos
abrasivos, para la limpieza
del aparato.
No sumergir el aparato en agua u
otro líquido, ni ponerlo bajo el grifo.
–
–
–
–
–
–
–
–
–
–
–
–
–
–
–
–

ES
–
–
–
–
–
–
–
–
–
–
–
–
–
–
–
–
VACIADO DEL DEPÓSITO DE
POLVO
Vaciar el depósito de polvo
cuando se aprecie a través de sus
paredes transparentes que esté
lleno o bien cuando se produzca
una reducción importante de
la potencia de aspiración del
aparato.
Desacoplar el tubo de extensión
del cuerpo motor.
Abrir la tapa de vaciado del
depósito (E) y verter su contenido
en un contenedor de basura
apropiado.
Cerrar la tapa de vaciado del
depósito.
LIMPIEZA DE FILTROS
Pulsar el botón (C) para desacoplar
el depósito de polvo del mango del
aparato.
Abrir el depósito de polvo (Fig.5).
Sacar el ltro HEPA y luego el ltro
de entrada de aire.
Lavar los ltros y secar.
Una vez los ltros están secos,
volver a colocar todas las partes
juntas. Cerrar el depósito de
polvo y juntarlo con el mango del
aparato.
Para el ltro de entrada de
aire, se recomienda revisar
periódicamente el estado del ltro,
este debe ser limpiado / sustituido
cada 50 horas de uso.
Para el ltro de salida de aire
tipo HEPA (ltro de aire de alta
eciencia que retiene ecazmente
ES
esporas, ceniza, ácaros, polen…), se
recomienda revisar periódicamente
el estado del ltro, este debe
ser limpiado / sustituido cada
50 horas de uso, o si se observa
una disminución importante de
aspiración del aparato.
LIMPIEZA DE LA ZAPATA
Girar la zapata para acceder al
cepillo. Empujar la pestaña del
lado izquierdo de la zapata hacia
la izquierda (Fig.6).
Levantar el cepillo del alojamiento
y limpiar.
Colocar el cepillo de nuevo en
la zapata alineando primero
el extremo del hexágono en el
extremo derecho de la zapata.
Luego insertar el otro extremo en
su lugar y presionar la pestaña
para bloquear el cepillo.
Anomalías y reparación
En caso de avería llevar el aparato
a un Servicio de Asistencia Técnica
autorizado. No intente desmontarlo
o repararlo ya que puede existir
peligro.
Para las versiones EU del
producto y/o en caso de
que en su país aplique:
ECOLOGÍA Y RECICLABILIDAD DEL
PRODUCTO
Los materiales que constituyen
el envase de este aparato,
están integrados en un sistema

–
–
de recogida, clasi cación y
reciclado de los mismos. Si desea
deshacerse de ellos, puede
utilizar los contenedores públicos
apropiados para cada tipo de
material.
El producto está exento de
concentraciones de sustancias
que se puedan considerar dañinas
para el medio ambiente.
- Este símbolo signi ca
que, si desea deshacerse
del producto, una vez
transcurrida la vida del
mismo, debe depositarlo
por los medios adecuados a
manos de un gestor de residuos
autorizado para la recogida
selectiva de Residuos de Aparatos
Eléctricos y Electrónicos (RAEE).
- Este símbolo signi ca que el
producto puede disponer de
pilas o baterías en su interior,
las cuales deben ser retiradas
previamente antes de deshacerse
del producto. Recuerde que las
pilas/baterías deben depositarse
en contenedores especiales
autorizados. Y que nunca deben
tirarse al fuego.
Este aparato cumple con
la Directiva 2014/35/EU de
Baja Tensión, con la Directiva
2014/30/EU de Compatibilidad
Electromagnética, con la Directiva
2011/65/EU sobre restricciones a
la utilización de determinadas
sustancias peligrosas en aparatos
eléctricos y electrónicos y con la
Directiva 2009/125/EC sobre los
requisitos de diseño ecológico
aplicable a los productos
relacionados con la energía.
Garantía y asistencia
técnica
Este producto goza del
reconocimiento y protección de la
garantía legal de conformidad con
la legislaciónvigente. Para hacer
valer sus derechos o intereses
debe acudir a cualquiera de
nuestros servicios de asistencia
técnica o ciales. Podrá encontrar
el más cercano accediendo al
siguiente enlace web:
www.mellerware-home.com
También puede solicitar
información relacionada
poniéndose en contacto con
nosotros por el teléfono que
aparece al nal de este manual.
Puede descargar este manual de
instrucciones y sus actualizaciones
en www.mellerware-home.com
ES

ES
Marca y dirección
Modelo
Tensión de
entrada
Frecuencia de la
CA de entrada
Tensión de salida
Intensidad de
salida
Potencia de
salida
Eciencia media
en activo
Eciencia a baja
carga (10%)
Consumo eléctri-
co en vacío
ENGINEERING AND TECHNOLOGY
FOR LIFE, S.L. Av. Barcelona, s/n,
25790 Oliana, Lleida, Spain
BROOMY!
BROOMY! Brushless
100-240 V
50/60 Hz
31,0VDC
0,5 A
15,5 W
86,31% suministrado a 115V 60Hz.
85,59% suministrado a 230V 50Hz
80,73 % suministrado a 115V 60Hz
73,81% suministrado a 230V 50Hz
0,043 W suministrado a 115V 60Hz
0,067W suministrado a 230V 50Hz
La siguiente información es con respecto al etiquetado energético
y el diseño ecológico:
Para determinar el cumplimiento con los requisitos de diseño ecológico y para
el cálculo de los parámetros de etiquetado energético la normativa Europea
EN 50563 es tomada como referencia.

ES
FRFRANÇAIS
Cher client,
Nous vous remercions d’avoir
acheté un produit Mellerware.
Sa technologie, son design et sa
fonctionnalité, outre sa parfaite
conformité aux normes de qualité
les plus strictes, vous permettront
d’en tirer une longue et
durable satisfaction.
Lire attentivement cette
notice d’instructions
avant de mettre
l’appareil en marche,
et la conserver
pour la consulter
ultérieurement. Le
non-respect de ces
instructions peut être
source d’accident.
Cet appareil peut
être utilisé par des
personnes non
familiarisées avec
son fonctionnement,
des personnes
handicapées ou des
enfants âgés de plus
de 8 ans, et ce, sous
la surveillance d’une
personne responsable
ou après avoir reçu la
formation nécessaire
sur le fonctionnement
sûr de l’appareil et
Conseils et avertissements
de sécurité
en comprenant les
dangers qu’il comporte.
Les enfants ne
doivent pas réaliser
les opérations de
nettoyage ou de
maintenance de
l’appareil sans la
supervision d’un adulte.
Cet appareil n’est pas
un jouet. Les enfants
doivent être surveillés
pour s’assurer qu’ils
ne jouent pas avec
l’appareil.
Débrancher l’appareil
du réseau électrique si
vous ne l’utilisez pas et
avant toute opération
de nettoyage.
La batterie doit être
retirée de l’appareil
avant la mise au rebut.
Pour retirer la batterie,
l’appareil doit être
débranché de
l’alimentation secteur.
La batterie doit être
éliminée en toute
sécurité.
Si le cordon
d’alimentation est
endommagé, il devra
1.
3.
4.
5.
6.
7.
9.
8.
2.

ESPAÑOL ES
FR
être remplacé par le
fabricant, par un service
après-vente ou par tout
professionnel agréé an
d’écarter tout danger.
Cet appareil est
uniquement destiné à
un usage domestique
et non à un usage
professionnel ou
industriel.
Cet appareil contient
des accessoires avec
des parties rotatives.
Les vêtements
suspendus, les bijoux
ou les cheveux longs
peuvent s’accrocher
aux pièces en
mouvement. Habillez-
vous à cet eet. Éviter
les vêtements amples et
les éléments suspendus.
Éviter que vos cheveux,
vos vêtements et vos
gants ne touchent les
parties mobiles de
l’appareil.
Utiliser l’appareil
uniquement avec la
source d’alimentation
spécique, livrée avec
l’appareil.
Brancher l’appareil
uniquement à très
basse tension de
sécurité, laquelle
devant correspondre au
marquage du dispositif.
AVERTISSEMENT : An
d’éviter tout danger
dû au réarmement
accidentel de la
sécurité thermique, cet
appareil ne doit pas
être alimenté par un
dispositif interrupteur
externe, comme un
minuteur, ni branché sur
un circuit régulièrement
allumé et éteint par le
fournisseur d’énergie
électrique.
Avant de brancher le chargeur de
batteries au réseau électrique,
vérier que la tension indiquée sur
la plaque signalétique correspond
à celle du réseau.
Raccorder l’appareil à une prise
pourvue d’une che de terre et
supportant au moins 10 ampères.
La prise de courant du chargeur
de batterie doit coïncider avec la
base de la prise de courant. Ne
jamais modier la prise de courant.
Ne pas utiliser d’adaptateur de
prise de courant.
Ne pas forcer le câble électrique
de connexion. Ne jamais utiliser
le câble électrique pour lever,
transporter ou débrancher
l’appareil.
Ne pas enrouler le câble électrique
autour de l’appareil.
10.
14.
11.
12.
13.
–
–
–
–
–
–
This manual suits for next models
1
Table of contents
Languages:
Other Mellerware Vacuum Cleaner manuals

Mellerware
Mellerware Handy! User manual

Mellerware
Mellerware VORTEX User manual

Mellerware
Mellerware Whooshy! Wireless User manual

Mellerware
Mellerware EXECUTIVE VAC18001800W User manual

Mellerware
Mellerware INNOVAC 31120RD User manual

Mellerware
Mellerware VAC14001400W User manual

Mellerware
Mellerware Whooshy! Wireless User manual

Mellerware
Mellerware Rider Pro User manual

Mellerware
Mellerware VAC20002000W User manual

Mellerware
Mellerware Tidy! Random User manual