Mercado Medic REAL 8200 PLUS SERIES Assembly instructions
20-07316-01
Created: 200505
Changed: 200609
Doc.no: 20-07316
Revision: 01
PDF versions of our operating and maintenance instructions with magnification options can be found on the website
mercado.se. There you will also find information about accessories that can be mounted on Mercado Medic's chairs as
well as any safety messages to the market, prescription support or recalls of products and accessories.
We reserve the right to make changes to this manual and its contents.
ASSEMBLY INSTRUCTIONS, INSTRUCTIONS FOR
USE AND CARE REAL 8200 PLUS
REAL®8200 PLUS SERIES
REAL 8200 PLUS EL 24V SCREENING
REAL 8200 PLUS EL 24V CLINICAL
YOUR REAL® 8200 PLUS EL 24V
Sufficient competence to use this product safely is obtained by carefully
reading these instructions for use and care before using the chair.
TABLE OF CONTENTS
Assembly for use ..................2
Familiarise yourself with your
REAL8200PLUS EL ................2
Important safety information ........2
Cleaning & maintenance ............3
Instructions for disposal ............4
Symbols ..........................4
Warranty .........................4
User manual ......................5
Brake ............................ 5
Seat height. . . . . . . . . . . . . . . . . . . . . . . . 5
Seat tilt........................... 5
Backrest mechanism ............... 5
Armrest .......................... 6
Charging.......................... 6
20-07316-01
2
FAMILIARISE YOURSELF WITH YOUR REAL8200PLUS EL
IMPORTANT SAFETY INFORMATION
The REAL 8200 PLUS EL chair has replaceable components, accessories and functions with setting options for
individual customisation. The chair must only be used by the person for whom, and for the purpose for which, it is
intended. The chair is intended for indoor use only and must not be used outdoors. The chair must not be exposed to
extreme cold or heat, prolonged sunlight or other radiation. The chair must not be exposed to water, other fluids or
chemicals.
Warning! Metal surfaces may become very hot if they are exposed to direct sunshine.
Read this manual carefully before using the chair for the first time.
1. Adjust the armrests to a suitable height and lock the
armrest by turning the adjustment knob clockwise.
2. Fit the backrest tube in the intended bracket and
lock the adjustment knobs for the height adjustment
of the backrest.
3. Fit the brake lever in the intended bracket (left or
right side). Does not apply to electric brakes.
4. All adjustment knobs must be tightened before
sitting in the chair.
5. The brake on the chair must always be applied when
getting in and out of the chair. The brake must be
checked on a regular basis.
6. Charge the chair according to the enclosed
instructions before using it for the first time (applies
to electrical chairs).
7. The chair must not be used with the back and/or
armrests removed.
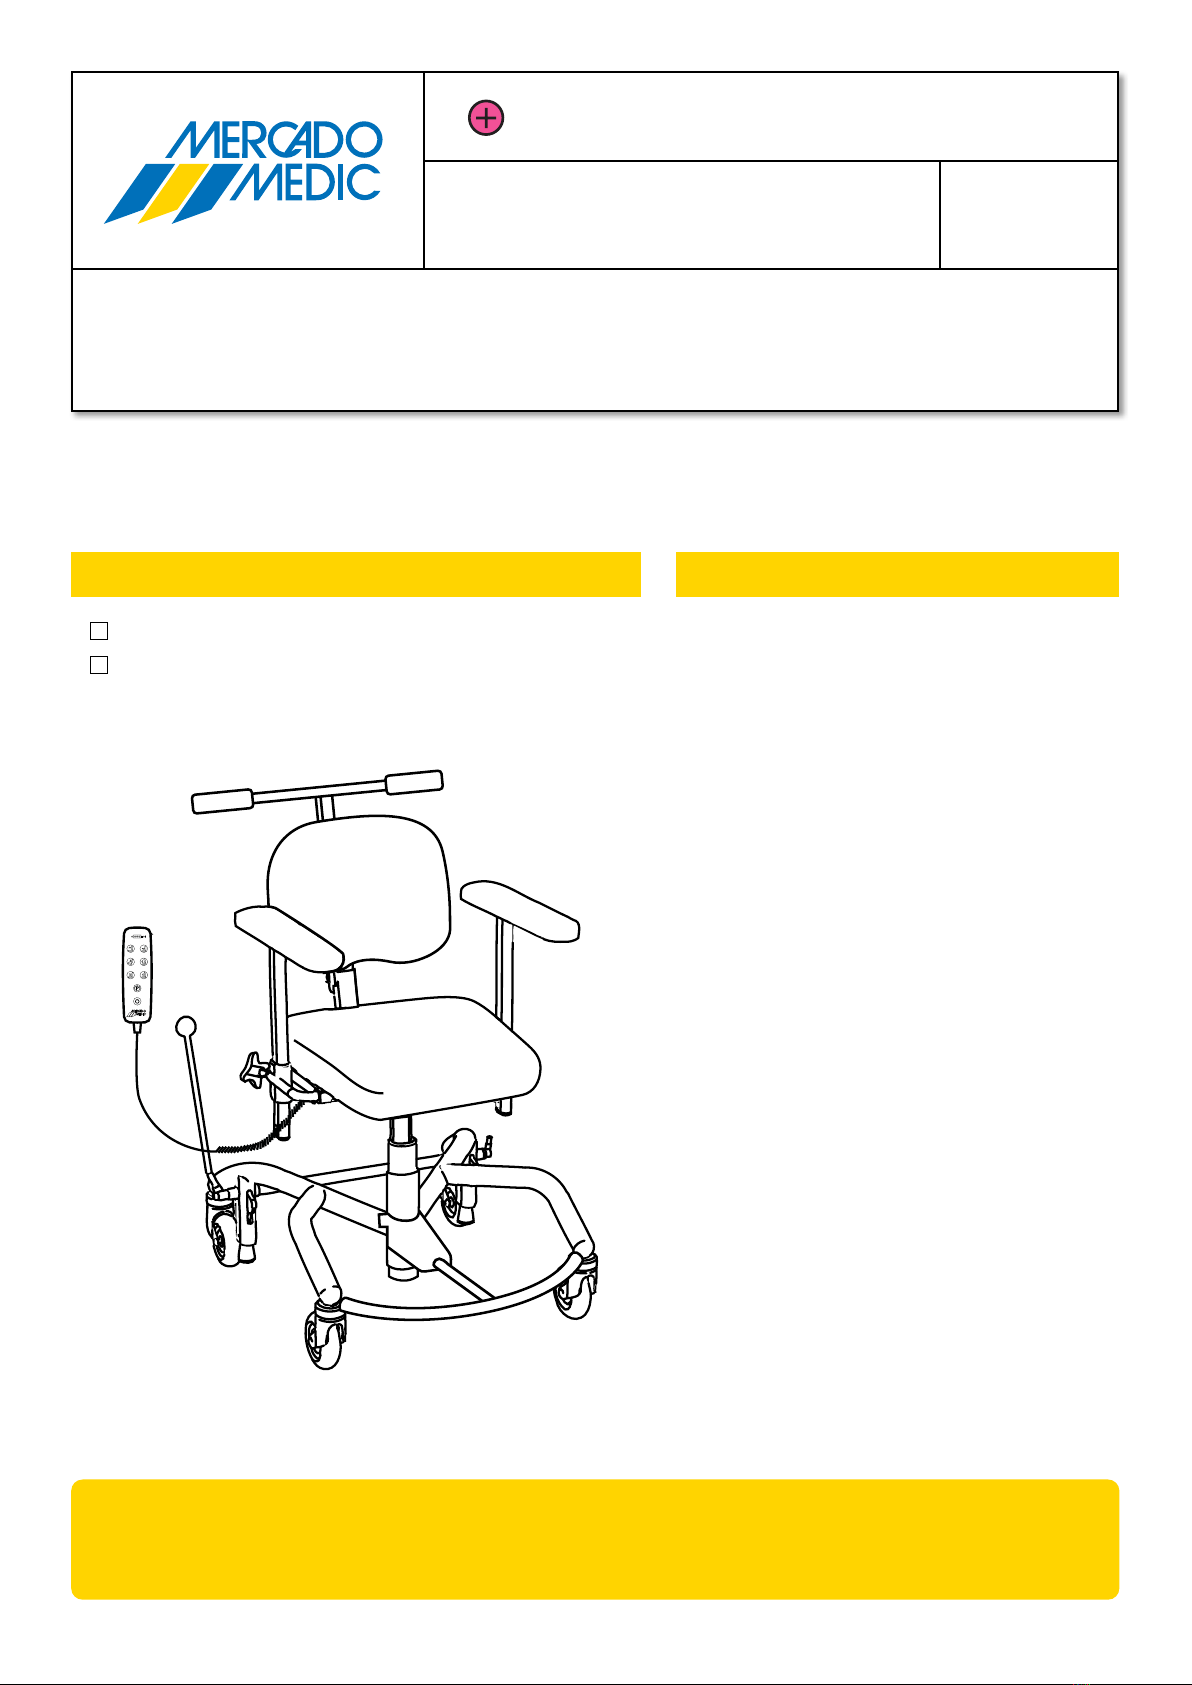
Checkpoints before use
For manual brake, remove the chair
from the cardboard box. Remove the
brake lever that is held in place with
plastic wrap along the brake shaft at
the back of the chair. Place the brake
lever in the brake lever bracket (1)
on the right or left side. Does not
apply to electric brake.
ASSEMBLY FOR USE USER GUIDE
Loosen the adjustment knobs for the height (2) and for
the width (3) of the armrest. Set the desired level in
height and width. Tighten all adjustment knobs (2 & 3).
1
Install the backrest mechanism by inserting the back
pole into the back recliner (4) to the desired level. Then
tighten all adjustment knobs (5).
If the chair comes with a headrest, place the headrest
mechanism in its bracket as illustrated. Then tighten all
adjustment knobs (6).
3
6
6
2
Brake lever Armrest
Backrest mechanism Headrest
For information on adjustments of all the parts of the
chair, see the chapter User manual on page 5-7. The chair is now ready for use! >>
4
5

20-07316-01
3
CLEANING & MAINTENANCE
• REAL8200PLUS EL can affect and be affected by
equipment in its immediate vicinity that generates
electromagnetic fields; e.g alarm systems, power
generators. Mobile phones and similar equipment
can also interfere with the control system. Mercado
Medic AB recommends that such equipment should
not be stored any closer than 3.3 m(~10 ft) from the
chair.
• REAL8200PLUSEL has an electric lifting
mechanism that can lift a person high enough to
cause a risk of falling. If a person cannot get out
of the chair from its highest position, then the
seat height should never be set to higher than
the position at which your feet touch the ground.
The only exception to this is cases where you can
summon help via alarm or telephone.
• NOTE! The electrical functions on
REAL8200PLUSEL chairs may be used for
maximum 10% of the time, maximum 2 minutes
every 20 minutes. The electronics in the chair
measure the activity and shut down the electrical
functions if this limit is exceeded.
• Only electrical equipment from Mercado Medic AB
may be used on the REAL8200PLUSEL.
• Warning! Do not plug any accessory, other than
those supplied by Mercado Medic AB, into the
control system’s contacts.
• The chair must be operated with care. Before
moving off or operating the chair, consideration
must be given to the surroundings. Any pets or
children in the area could be easily run into. The
chair must only be used to sit on and should not be
regarded as a toy by either children or adults.
• REAL8200PLUSEL is approved for transportation/
storage at temperatures of between -25°C and
+60°C(-13°F and 140°F) and up to 90% non-
condensing relative humidity.
• Max user weight, REAL8200PLUSEL 150 kg
(330lbs).
• The REAL 8200 PLUS EL should not be used on any
incline greater than 5 degrees. If the chair is used or
the brake is applied at steeper inclines, it may begin
to slide which may cause the chair to fall over.
• If shipped, the chair must be transported in the
intended cardboard box on a pallet.
• If the chair is transported by car, it must be strapped
in place using straps over both the frame and the
seat, and it should be set to the lowest possible seat
height.
• The chair is tested and approved for use between
+5°C and +40°C(41°F and 104°F) and 15 to 90%,
non-condensing humidity. If the chair has been
stored in an environment outside these limits, the
chair must be left to acclimatise before use in order
to ensure that it can be used safely.
• Repairs and other technical measures may only be
carried out by personnel authorised by EMP Living
LLC.
• Maximum height 2000m(~6500 ft) above sea level.
• The REAL8200PLUSEL must not be moved when
the seat is in the raised position.
• Expected service-life ten (10) years.
• REAL8200PLUSEL can be supplemented with a
variety of accessories. Only accessories supplied
by Mercado Medic should be used. All accessories
must be fitted so that there is no risk of small parts
coming loose. All the cables must be secured with
cable ties to minimise the risk for strangulation.
• Mercado Medic armrests, seats, backrests
and other parts intended for skin contact are
in compliance with the EU Regulation (EC) No
1907/2006 concerning the Registration, Evaluation,
Authorisation and Restriction of Chemicals (REACH).
IMPORTANT SAFETY INFORMATION CONTINUED
• The chair should be wiped down and kept clean
from dust and dirt.
• The chair should be washed using a disinfectant
with PH 7–12 (concentrated), with the exception of
the padding.
• Artificial leather has to be washed with soapy water
or alternatively wiped off with an alcohol solution;
e.g. disinfectant.
• Leather upholstery requires a little extra
maintenance;
- Spills must be wiped up immediately with a
damp cloth, never use strong cleaning agents.
- Prevent upholstery from coming into contact
with personal care products, such as make-up,
hair gel etc.
- Do not allow pets on leather furniture, their
claws may scratch the leather.
- Avoid direct and prolonged exposure to sunlight,
it may fade the leather in the long run.
• Seat, backrest and other upholstery are not
manufactured in sealed materials for functional
reasons. When reconditioning, upholstery should be
replaced for hygienic reasons.
• The electric lift mechanism should be checked
regularly for dust, dirt and stability: Raise the seat
to its highest position. Clean with a cloth. Do not use
any water or solvents. Then lubricate the cylinder
using a thin layer of Teflon or silicone-based grease.
20-07316-01
4
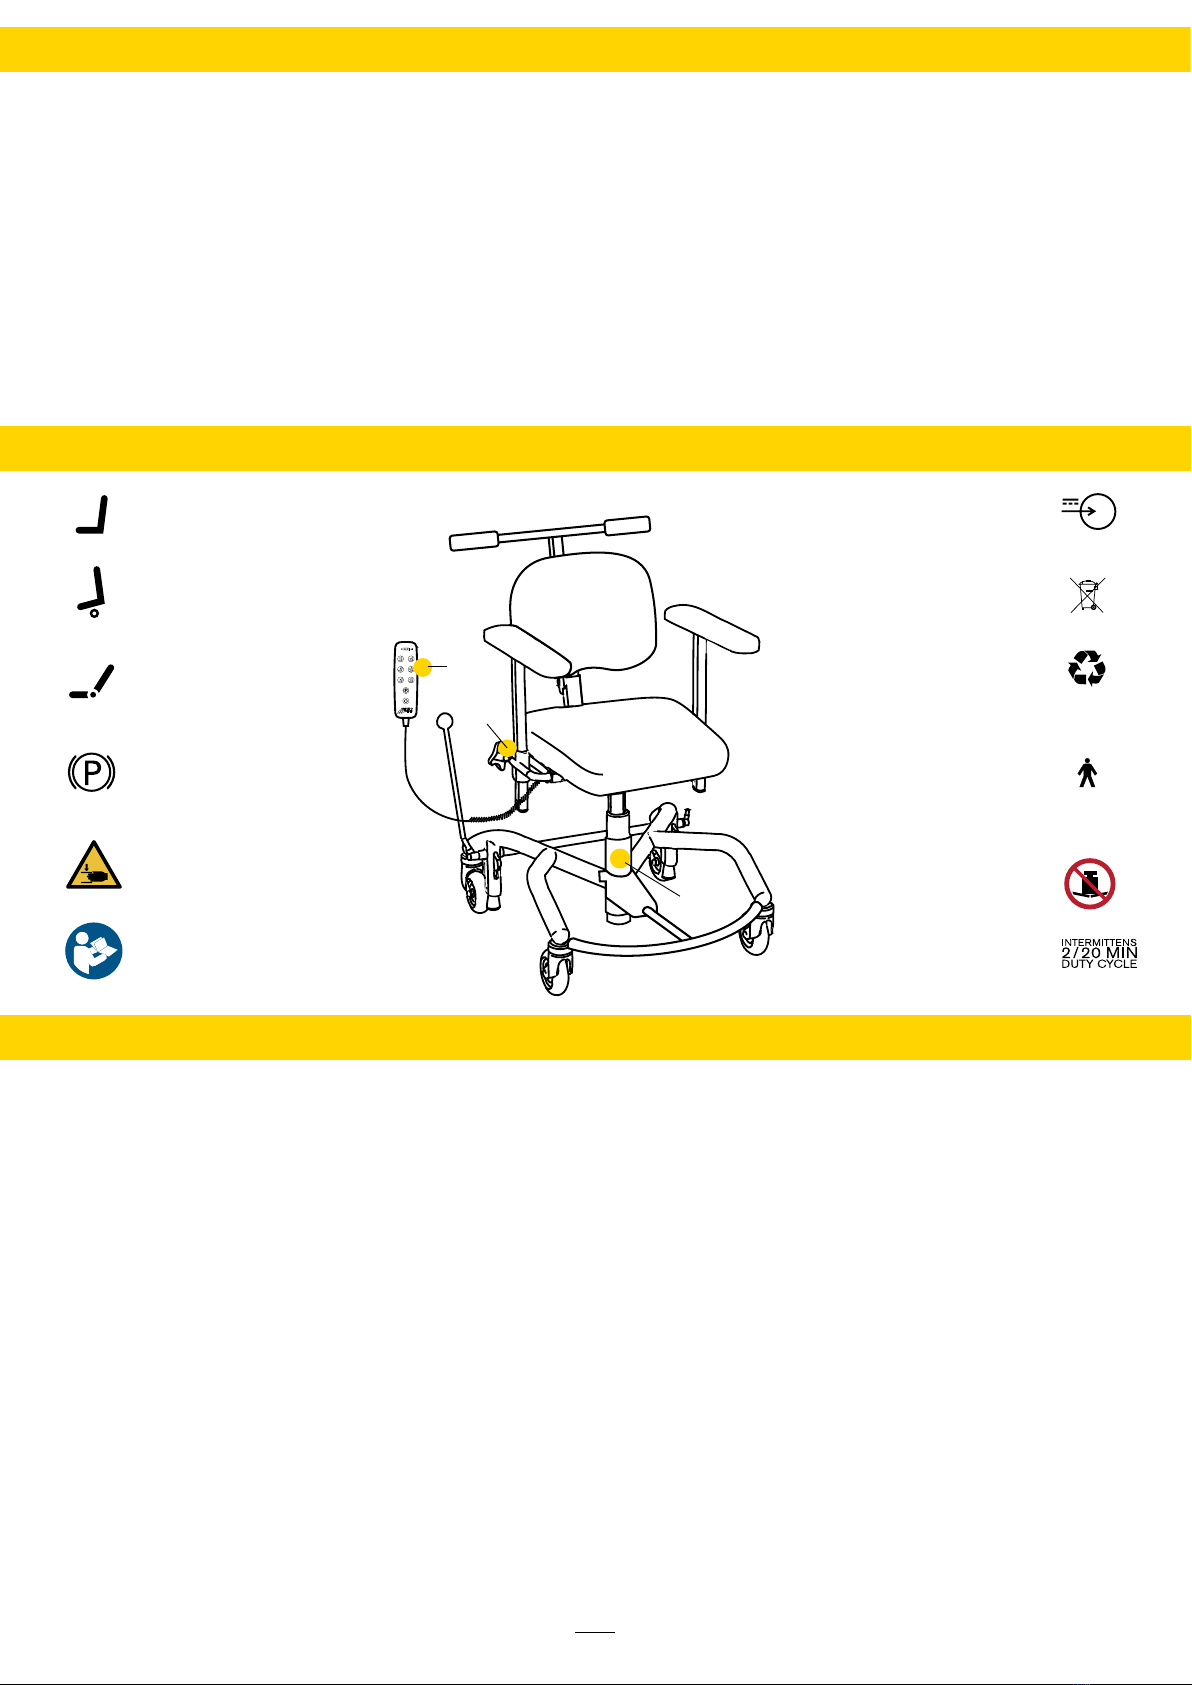
SYMBOLS
INSTRUCTIONS FOR DISPOSAL
8-12
6-7
1-4
WARRANTY
Combustible:
• Seat
• Back
• Armrest
• Headrest
• Other padded parts sold by Mercado Medic AB
Electronic waste:
• Motors
• Cables
• Control system
Metal:
• Frame
• Electric lifting mechanism
• Gas pistons
• Gas springs
• Seat frame
• Back recliner
• U-bars and armrest mechanism
• Other metal parts in products sold by Mercado
Medic AB
Note! The battery has to be sorted separately.
This warranty applies only to products purchased in
the United States through our authorized partner EMP
Living LLC. Mercado Medic AB warrants this product to
be free from any defects in workmanship or material.
The warranty only applies to the original purchase and
terminates if you transfer, modify or sell the product.
Warranty period:
• Welded metal parts – 10 years
• Gas springs and electric actuators – 2 years
• Other parts – 1 year
The warranty does not apply to:
• Normal wear and tear.
• Damage caused by neglect, misuse, accident or
improper installation or operation.
• Use of non-original spare parts and accessories.
• Adjustments carried out by unauthorized service
technicians.
• Fading, discoloration or natural variations occurring
in skai/leatherette, leather and fabrics.
The warranty does not cover damage caused by a carrier
of transportation of the product, alterations made by
owner, or customer’s own material.
If there is a defect within the warranty period you shall
send a written notice of the defect to Mercado Medic's
US partner EMP Living, LLC. EMP Living LLC and Mercado
will decide if the defect is to be repaired or replaced by a
new product.
It is mandatory to read the Instructions for use and
care carefully for information on correct use and
maintenance of the product before beginning using the
chair.
EMP Living, LLC. | 14941 NE 147th CT. | Woodinville,
WA 98072 | United States | info@empliving.com
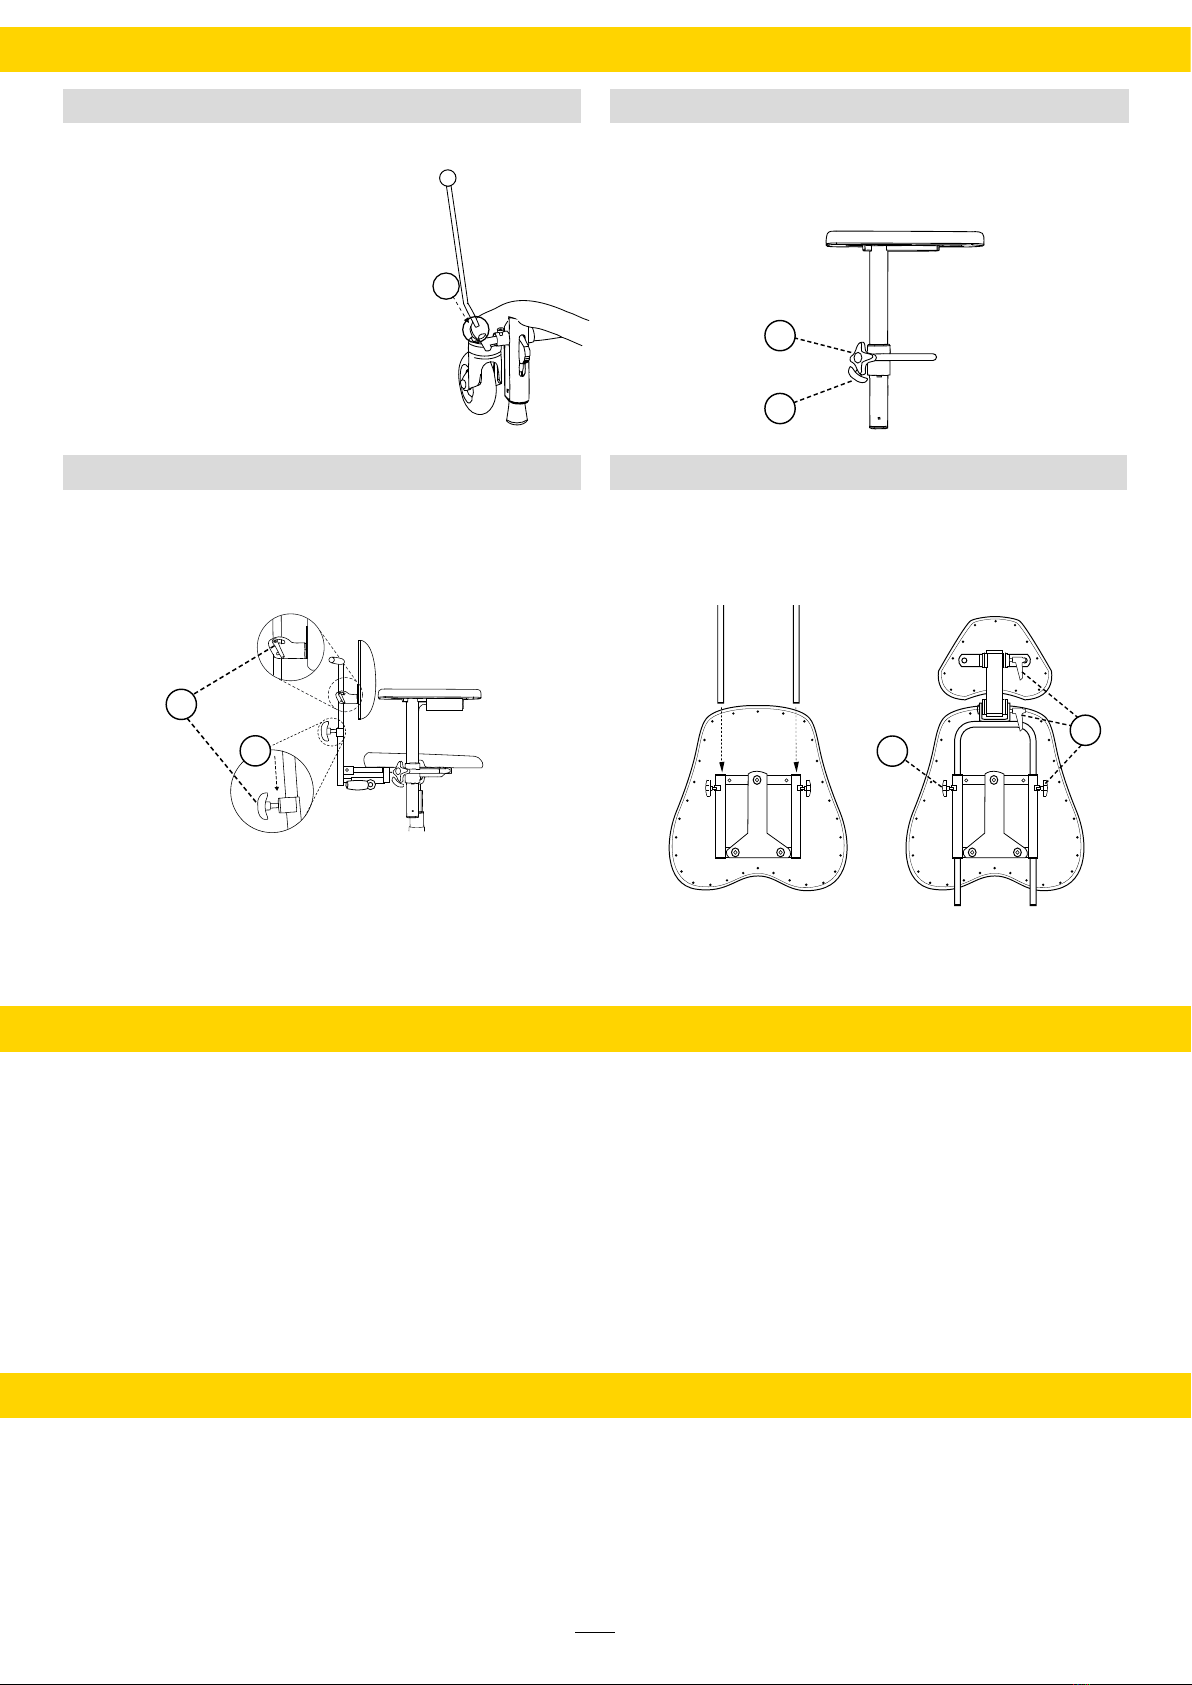
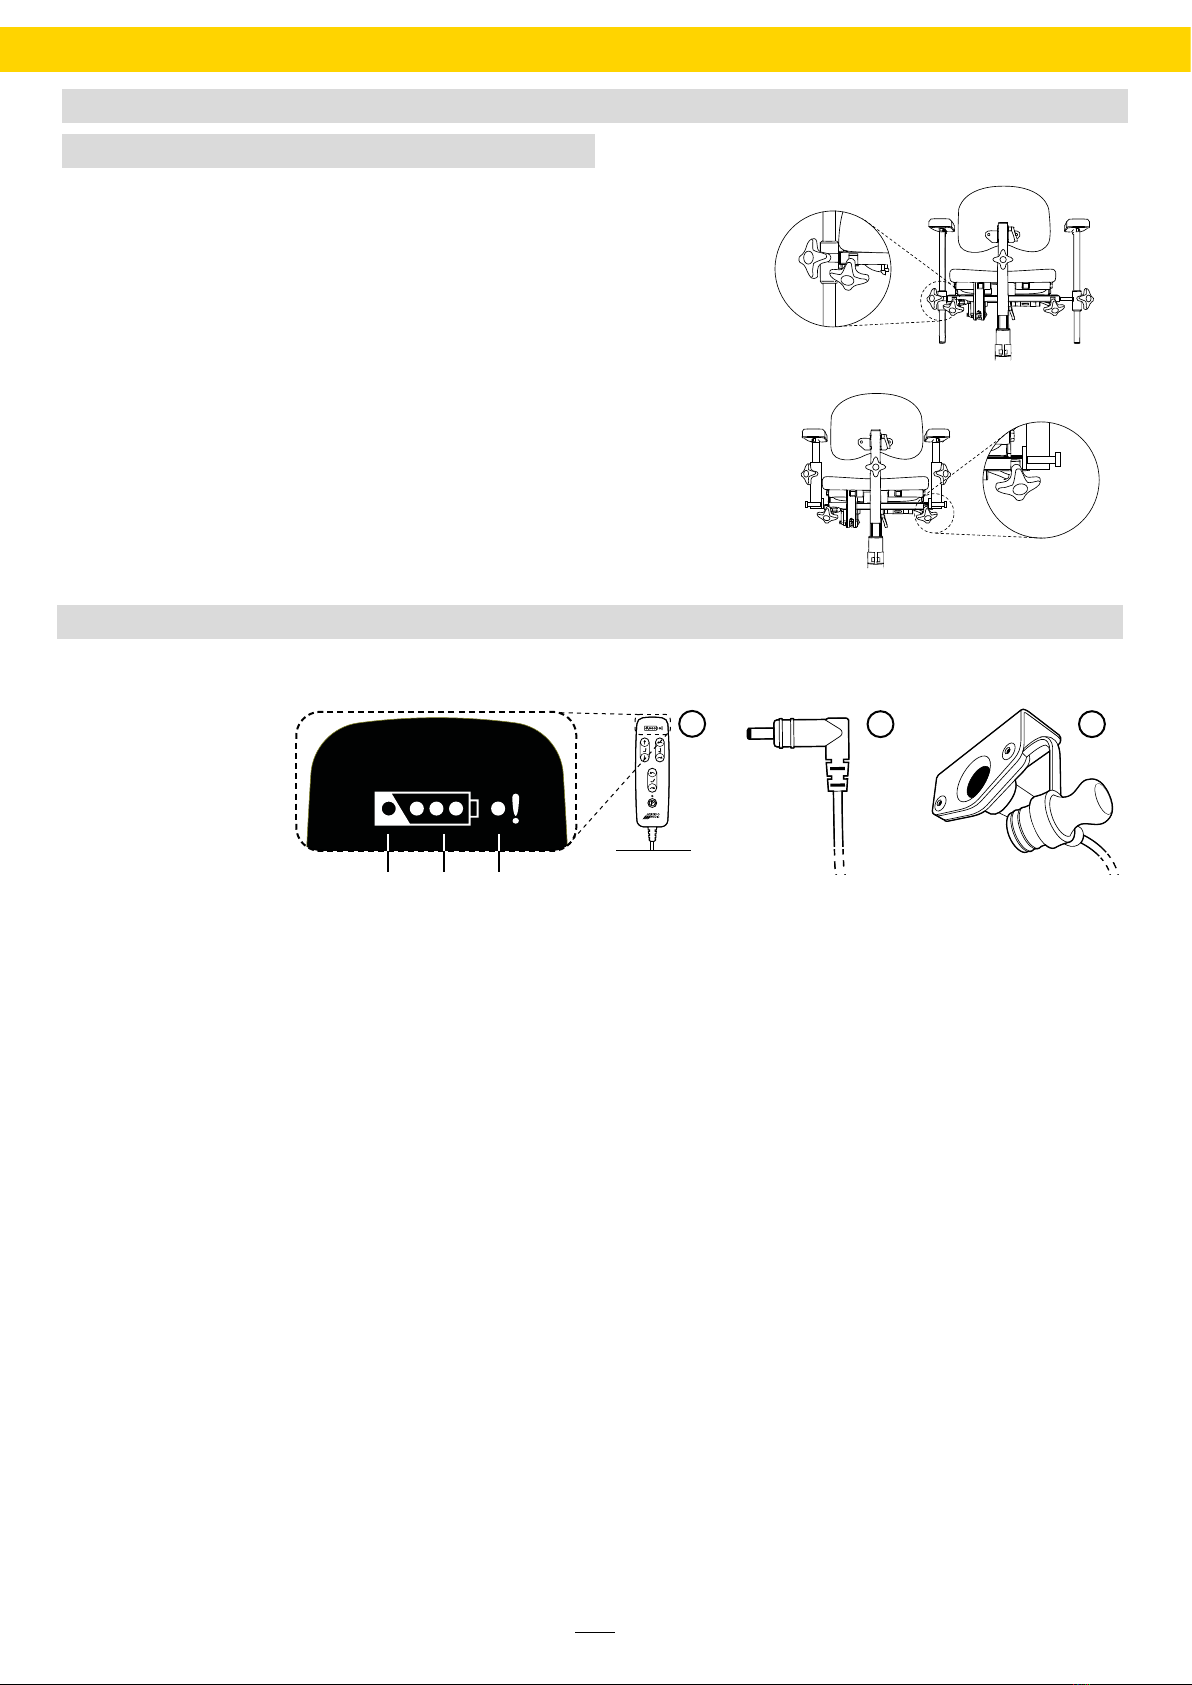
1. Seat height up/down.
2. Back tilt forwards/
backwards.
3. Back recliner
forwards/
backwards.
4. Activate/release
brake
5. Risk of crushing.
Any risks marked.
6. Warning: Read the
manual before use.
7. Charge connector.
8. Separation of
source materials
9. The product is part
of a recycling rocess.
10. Product classified as
type B applied part
in accordance with
IEC60601-1.
11. Max user weight
12. Time in use for
electrical functions
24VDC

20-07316-01
5
SEAT HEIGHT
BRAKE
Control
1. Seat height, electric control for up/down.
2. Seat height, electric hand control with cord.
Left button = up.
Right button = down.
Control
1-2. Brake, PLUS-frame 48
move lever backwards, pedal down
3. Electric brake, press button
4. Electric brake, press button
5. Brake lever bracket – to brake the chair even when
the armrest is extended in width: loosen the screw
on brake lever bracket using a 6 mm Hex key, pull
out the bracket, fasten the screw in the next hole
and tighten the screw hard using the Hex key.
Note! The brake on the chair must always be applied
when getting in and out of the chair. The brake must be
checked on a regular basis. In case of wear, change the
brake rubber (part no. 801264). The braking function
may be reduced on uneven surfaces.
There are three types of brake:
Brake lever, foot brake and electric brake.
1
1
2
4
SEAT TILT
Control
1. Seat tilt, electric control for tilting forwards/
backwards.
2. Seat tilt, electric hand control with cord.
Left button = forwards
Right button = backwards.
Electric control,
under the armrest
Handbrake Hand control
with cord
Foot brake
5
USER MANUAL
2
Hand control
with cord
2
Hand control
with cord
Electric brake (option)
3
Electric control
1
Control
1. Height
2. Backrest mechanism angle
3. Backrest plate angle.
4. Backrest angle electric hand control with cord.
Left button = forwards.
Right button = backwards
All backrest mechanisms has separate controls for
height, depth and angle.
4
1
3
2
Electrical Hand control
with cord
Note! Standard for REAL 8200 PLUS EL 24V CLINICAL
Note! Standard for REAL 8200 PLUS EL 24V CLINICAL
BACKREST MECHANISM
20-07316-01
6
USER MANUAL
Battery charger 2240-24V (part no. 805021) must be used to charge the chair. If using a different charger or
different batteries to those which are provided alongside the product by Mercado Medic AB, the warranty and
Mercado Medic AB’s product liability will cease to be valid for any cases regarding the battery, charging or other
electronic aspects of the chair. The battery should be charged on a daily basis. Fully charging the battery on a
daily basis will take between 2–6 hours. In order to preserve the battery’s service life, it is important that it never
becomes fully discharged as this can damage the battery cells. If the chair is equipped with a hand control with cord,
the battery level can be identified by checking the indication lights (1). On a full charge with a high electrical lifting
mechanism, you can raise the chair fully up/down up to 120 times with a load of
80 kg(176 lbs), or up to 90 times with a load of 150 kg(330 lbs).
How to charge the chair
Connect the contact plug (2) on the charger to the charging outlet (3) (the charging outlet is placed under the seat at
the rear on the right side). Then plug the charger into a wall socket. The LED on the charger will indicate that charging
is underway. When the LED changes colour from orange to green, the battery is fully charged. None of the electrical
functions will work while the chair is charging. The chair must be charged in a safe manner. For this reason, choose a
wall socket that is easily accessible to plug the charger into. The charger’s cable is 1.8 m and must not be extended.
In case of emergency, disconnect the chair by unplugging the charger from the wall socket. Do not sit on the chair
when it is charging.
Automatic battery deactivation
During longer periods of storage, the battery will automatically be deactivated after seven days. When the battery
is deactivated, it must be charged every four months in order to retain its functionality. To reconnect the battery
to the system again, connect the battery charger to the charging outlet and wall socket. Wait at least five seconds
before disconnecting the battery charger. The battery is now activated again and the system is ready for use. It is
recommended to leave the charger in place and fully charge the battery after the product has been stored with the
battery in its deactivated state.
ARMREST
1
1
2
2
Armrests PLUS
13
2
Foldable armrest
(Standard)
32
1
A B C
Control
1. To raise or lower armrest, loosen adjustment knob (1),
adjust the height of the armrest, and retighten (1).
2. The armrest width may be adjusted in or out from the
chair. To adjust, loosen adjustment knob (2), pull or
push armrests in or out, and retighten (2).
3. Only for foldable armrest: To fold back the armrest
pull out the adjustment sprint (3) and fold armrest
back. To raise it again, fold up the armrest to an
upright position and lock it with the adjustment
sprint(3). Make sure the armrests are locked in
position before use.
A. Charging is
required
B. Battery Level
C. Warning light
(internal error/
button lock)
1. Indication lights 2. Contact plug 3. Charging outlet
CHARGING

20-07316-01
7
USER MANUAL
Before using for first time
This product is delivered by Mercado Medic AB with the battery in its deactivated state. The battery must be
activated before using for the first time. This is done by connecting the battery charger. Keep the battery charger
connected until the battery is fully charged. This will be indicated by a green light on the charger’s LED. If you are
using the hand control with cord, this will also be indicated by the three green battery LEDs, which will start to flash
at the same time. The battery may also need to be charged when it has been inactive as a certain degree of self-
discharge always occurs for batteries.
Note!
Charging the battery is particularly important on chairs with electric brakes, electric seat tilting and electrical
back functions because these functions require a high battery capacity in order to work properly. Guarantee these
functions by recharging the battery once a day. The battery may only be changed by personnel authorised by
Mercado Medic AB. See assembly instructions, Battery Replacement.
Troubleshooting for electrical functions on your chair
There are no movements at all:
• The battery might need to be charged. See the instructions above.
• An internal error may have been detected by the system, which then shuts down one or all of the function
channels and switches on a warning light on the hand control with cord. The system will be reset automatically
after 10 seconds. If the error has been resolved, then all channels will be unlocked and the warning light will be
switched off.
• The button lock may be enabled. To enable or disable the button lock for a certain function, hold in both of the
directional arrows on the relevant button for at least three seconds.
The electric functions on the chair are slow:
• The battery needs to be charged. See the instructions above.
If none of the above measures are able to resolve the problem, servicing may be required. Please contact your dealer
or get in touch with Mercado Medic AB. You will find our contact details on the last page of this manual.
Emergency stop
If, for whatever reason, the system does not interrupt a movement after the corresponding function button has been
released, the movement can be interrupted by pressing down any of the other buttons on the hand control with cord.
If a fixed control unit is being used instead of a hand control with cord, the same emergency stop function can be
initiated by pressing down the button for movement in another direction.
*If the chair’s battery has reached a critical level and the electronic functions do not work after six hours of charging,
charge the chair for a further 24 hours. If the problem persists, please contact the distributor of your chair.
CHARGING CONTINUED

20-07316-01
[Room for product label with serial number.]
Dealer in North America
EMP Living, LLC.
14941 NE 147th CT.
Woodinville, WA 98072
Phone: 425-949-7195
Email: [email protected]
Web: www.empliving.com
Mercado Medic AB Phone +46(0)8 555 143 00
14 Tryffelslingan Email info@mercado.se
SE-181 57 Lidingö Web www.mercado.se
This manual suits for next models
2
Table of contents
Other Mercado Medic Wheelchair manuals

Mercado Medic
Mercado Medic 805192 Assembly instructions

Mercado Medic
Mercado Medic REAL 9000 PLUS Series Assembly instructions

Mercado Medic
Mercado Medic REAL 6100 PLUS User manual

Mercado Medic
Mercado Medic REAL 6100 PLUS Manual

Mercado Medic
Mercado Medic REAL 6100 PLUS Specification sheet

Mercado Medic
Mercado Medic REAL 9200 TWIN Use and care manual

Mercado Medic
Mercado Medic REAL 6100 PLUS User manual

Mercado Medic
Mercado Medic REAL 6100 PLUS User manual


