Merkava VoltArt400 User manual

voltArt400
User Manual

1. Carefully remove contents of box out ofthe packaging.
. 1x VoltArt4oo
. 1 x 110V Charger + basic tools
. 1x Cha.ging dock for chargingthe battery outside ofthe eBike
. 2 x Remote Starters to activate eBike
. 2 x Keys to open battery compartment
Place handle bar in place and tighten allen screws
lnflate tires to about 30-35PSl3.
4. Place your VoltArt4oo on a clean flat surface while securing one ofthe wheels so it stays in
place then proceed to visually checkthe VoltArt4oo components and ensure that all screws
and bolts are tightened and thattires are correctly inflated. Check and adiust break leverto
your preference and check that the single speed derailleur functions properly. This is usually
already done once at the factory and once before shipping but as a precautionary measure
we recommend you do this as well before riding.
5. Open the battery case and insert the battery into its socket. Charge your voltArt4oo in a
clean environment at ambient temperature until light on the charger turns from red to
green. Note: You may also charge the battery outside the bike by using the supplied
charging dock. Hook up the charger to the dock on one side and to the wall outlet on the
other. Then place the battery on the dock into the socket,
6. To activate the eBike you must use the remote and press the POWER button TwlCE.
7. To turn offthe egike you must use the remote and press the L,NLOCK button ONCE. You can
also turn off the eBike by pressing the CIRCLE on the ri8ht hand side of the handle bar
TWICE. lPressing the power button on remote will not turn off the eBike.)
L To activate the optional a,arm on the eBike (while it is Off) you hust use the remote and
press the LOCK button ONCE. ln this armed state the siren willEo offand the back wheel
will lock if the eBike is moved. To stop the siren press the UNLOC( button ONCE.
9. To deactivate optional armed mode on the eBike you must use the remote and press the
UNTOCK button ONCE. Or press the POWER button TWICE to deactivate the armed mode
and simultaneously turn on the eBike.
10. To open the battery case you can use the black key provided or LONG PRESS the MOTOR
button on the right hand side ofthe remote. Place your hands on both sides of the battery
case as both doors will spring open.
11. once you've familiarized yourself with the digital display you will be ready to ride. Please
ride carefullyl (see attached instruction forthe display)

Before shipdng, each and every transporter is checked for overa ll quality control and condition of
battery pack. Battery is tested and fully charged before shipping.
The lithium ion technology is intended to last for several years while being charged and discharged many
times. However, the battery's life span will depend on your care ofthe battery.
Battery life willdepend on your maintenance and care ofthe battery. VoltArt4oo uses advanced
Lithium-lon batteries made with high capacity cells and they should be charged at least once a month
(when not in uselto ensure the longevity ofyour battery. Make sure to onlv use our supplied 48V
charger on your 48V battery.
Allow your batteryto rest for 10 minutes after charging before riding and for 10 min after riding before
charging. lJnplug your battery charger after the light turns green indicating your battery is fully charged.
Always unplug the chargerfrom the walioutlet belore pluggin9 ot unplugging the otherend into your
VoltArt400.
Typical char8ing time afterthe battery has reached the 10% critical low level is between 5 to 6 hours.
Cdutiori Do not expose your battery to extremely low or high temperatures to avoid potentialdamage
to Your battery.>>
IMPORTANT NOTE: To AVorD DAMAGTNG youR BATTERY pAcx wE srRoNGLY REcoMMENo
USER SHUTS DOWN AND RECHARGE THE VOIIATI/OO ONCE BATTERY I.EVEL REACHES 1O%. YOU wlLI.
ENTER THIS CRITICAL IEVEL SHORTTY AFTER YOUR OISPLAY SHOWS 1 BAR.

Merkava stands behind its products. All our transporters bellelit from a 2 year limited
warranty.
The COMPANY warrants that the frame will be fiee from defects in the materials and
workmanship for a period of2 years.
The COMPANY wanants that the motor and battery pack will be f.ee from defects in the
mate als and workmanship for a period of 1 year*.
The COMPANY warrants that the electrical components itrcluding the controller and
charger will be free fiom defects in the matedals and workinanship for a period of6 months.
Before shipping, we conduct spot checks on our transporters to validate overall quality and
condition ofelecrical components including motor and battery pack. These checked units have
their battery tested and fully charged before shipping.
The lithium ion technology we use is intended to last for several years while being charged and
discharged many times. However, the battery's Iife spa[ will depend on your care ofthe battery.
Ifthe PRODUCT proves defective AND a claim is filled during the warranty period, the
COMPANY at its oplion, will:
Repair the PRODUCT by means oftelephone suppofi, email support, or by providing the
necessary parts at no charge.
Wananty claims must be filed with Merkava by email; info rimerkara.ca
*Wananty on battery vrill be limited to 6 monfis if it is determined that our guidelines for proper
hatterv care have not been followed.
The followitrg are not covered by the warranty:
r Wear and tear on frame, grip tape, levers, tubes, tires, brake discs, brake pads. cables,
seats, plastic fairings and any other component which wears out naturally during usage-
. Minor scratches and stress marks that may occur during shipping and handling.
. water dahage caused by exposing sensitive elect cal parts to water such as washing
transporter with hose or pressue washet.
. Accidents. misuse, abuse. human erro$ or lack ofmaintenance.
. Acts-of-god such as fire, flood, earthquake, freezing, etc

Warranty information continued:
The fottowing Fill void the wsrranty:
. The modification ofyour tansporter or r.tse outside those specified on this site'
o The serial number ofthe product has been alteted or removed.
. The product has been dismantled and repaired/reassembled improperly or with
aftemarket parts.
o Overloading your trzmsporter.
. storing your tansporter outdoors.
IMPORTANT NOTE: To AVoID DAMAGING YouR BAT'GRY PACK wE STRoNGLY f,EcoMMEND
USER SHUTS OOWN ANO RECHARGE THE VoltArt4OO ONCE BATTERY IEVEL REACHES 10% YOU WlLL
ENTERTHIS CRITICAI LEVEL SHORTLY AFTER YOUR OISPLAY SHOWS 18AR.

. A,wrys Start in the eco mode (display does not show "S")
. Grip both hand grips
. Check brake levelfor positive braking action
. Press power button twice on the remote to activate the eBike
. Start pedaling and turning the throttle gently simultaneously.
. Once your comfortable riding the eBike you can start using the throttle instead of
pedaling. Please note, throttle only riding will lower the max range on a charge
considerably.
. For added speed press the "S" button which will deliver the full available power to the
rear wheel.
. ALWAYS follow your local laws regarding eBikes and be respectful of other riders on the
road and on trails.
Always wear an ASTM and CPSC certified helmet when riding. Make sure that chin strap is
attached before your ride and follow the helmet manufactures instructions for proper user and
fit.
Make sure to always wear shoes that have good traction on the pedals ahd will stay on your
feet.
Squeeze the hand brake levers to ensure there is positive braking action before starting you.
ride.
IMPORTANT NOTE: To AvorD DAMAGTNG youR BATTERY PAcx wE STRoNGLY REcoMMENo
USER SHUTS DOWN AND RECHARGE THE VoltArt4oo ONCE BATTERY IEVEL REACHES 10%. YOU wlLL
E TER THIS CRITICAL LEVEL SHORTI.Y AFTER YOUR DISPLAY SHOWS 1 BAR.

1. H+e{+filEi,.o,.Eu
STRUCTURE OF THE VEHICIE
1. lis 2. ii*+lH 3, BiH)EE 4. ixr 5. Bi|a(t6)
6, itrftf 7, $ra,] ( EE ) L ti, l+re(E) e, BijE
10, Efl€ ( tfi ) 11. E+I+E(E) 12, +Effi 13. E*
14. €)b6 15. +,Jlbtu 16, +{ 17, +*
1s, HE(EE) 1s, +g 20, Efr,ltEA) 21. Rlr
22, d{t 23. tr+s 24. E*trlA 25. Elt
26- EI$EF.
l.FrontWheel 2.Front Brake Rotor 3.Front Splash Guard 4.Headllght
5.Front Fork (LefdRight)6.Front Calipers 7.Turn Lighl (LetuRight)
S.Front Brake Lever (Right) 9.Front Suspension
lO.ReaNiew lvliror (LelvRight) 11.Rear Brake Lever (Lefl)
l2.Electrical Conkol unit 1 3.Electrical components
14.Battery Compartmenl
1 5.Baitery Compartment Lock l6.Kickstand 1 T.Frame

18.Pedal (Left/Righi) 19.Saddle Seal20.RearSuspension (LefuRight)
21.Iail Lighl 22.Eloctronic lvotor 23.Rear Calip€rs 24.Rear Brake Roto.
25.Rear Wheel 26.Rear SPlash Guard
2. i*#*8*
MAIN TECHNICAL PARAMETERS
r&a8
196ifr qt oualif ed
IftTE n6 66 lle ce
tFRiJ +& Lengrh 1850mm
+ ( 6*tr&fi )
Heiqht(Rea iew Miror nol
+E I h+fl. trEt$r4 )
Widlh (Hand bar and pedal not
1125mm
ts&eE E*El culb Weigh: 42kg
&E€E Ral6d Voltag€ 48v
fr,! 16l Martmum Axle Load 100KG11%
+*Qit F6m6 Design €AAAuminium Alloy
tEui++it
Maxim'rm Designed Speed 16A Lowspeed:2okn h ,
ilit High Speed <50km/h

ffl4Ei ( +t )
BGk ns Distance {Ory Su.fac€) <lm ( 20km/h )
daEE { [r )
Brakins Dislan@ (Wel Sudac€) <1.5m ( 20km/h )
itd iE Fronl suspenson qlE+ *Int:E
Adtuslable c€nt6r spr ng
.6Hf:; Rear Suspension nri,ati{ldt#
Adjustable Spdng Bumper
€AA Alumin um Alloy
EA* Alumin ufl Alloy
ii*rariit Frcnl B€l(e l\,4ode SBXEt**l
Slandard Ooubl€-Pision
,.=dAr$ Rear Brake Mode hga .E=*tll
Standard Double-Pislon
ESfiE saddle Seal Heisht
,ift16rFJi
Maximum Angle of Sleedng
4.tu^h
Sysr€m
€itt*4 Barlen, Type 18650 tg+,it!
14650 L lhlum Bzltery
€E Voltage 48V
Sl Capadty
6tsig€i[
Siandad Charcing C'r,renl 2A
Ii&€€m
lvlaximum oischaqe Cunenl
t;,.Ei€EilBl
Slandaid Chargrng Time 6h
f,is&.sa
Maximum Didance Per Charge 5OKM
€itxs
+fi€ *I Sinqle cellcaoaciiy 2900mAh
€itII Bateryweighl 3.1k9
€rttfi€,lfr
Charg€ and Discha€e Times ollhe 2000x (80%Doo)
€idFf x&
Batlery Prot€clion syslem 13Sr174 lEl tr
€;&6*&i,,E
Battery Covsr Mate al Bfi\ ABS
-4h*R €dl*4 Motor Type E6tF)ftE&€in
Brushbss oc High
€l]lrE6];* Motor controller Foc *t*Blll
FOC Vsclor conlroller

€iltnE4+ l"lolor Rated Power
€fllle*Ee*it
Motor Rat€d Torque and Rotating
,psrt€E* t €,ii
Maximum Curent of the Conholler
EAE€*
1 00 Kilometer El€ctricity 1,2KWH
€rr{r Motor mEeE Raled Voltase 48V
EF]'E 4E4tsfr
Low-Voltage Prclsction Value 42V
iiifi*f,tr
Ovetscurent Prol€ciion Value
lT)t €E
Lighting and
El*lic
lirRiT. ^rT Headllsht LED ilT LED Headlight
E6If ORL LEo ll LEO lighl
ft6iT ruh Lishr LED *?littf
USB ftEtr USB Charse lnledace
GPS
iEE*Sl Remole cont'ol
E69&t lntelligenl Ddhboard LED lE..B IED Display
fi*E8l
E6fiE color Palelte nJ&ffiHF*:EEfiltfi€
e*r't, Batsry Extension 1 tE One SsI
,ifrBtsE
Accessory Upgade Mad<eting
E)'qE
Psipheral Prcducts Ma&eting
3. rail[9fEHf[{*#E'*

+fr'B Sinsle Click +ffit,\1aB)ui^0tlt*q-F, E$)ut^T, +ffi i$E'lilnBEtEEE
once fortified, the electric bicycle will beep once, any operalion ofthe eleckic bicycle will be alarmed after
fortification.
-f ffE Sinste Click +ffiB,^ffiFr{ 6r.leA qt}I+EF, ffiFr{i*T , r't+trfrlEf"lnrg6e}6EE
Once fo(ification is cancelled, the electric bicycle will beep twice, there will be no alarm against any
operation afl er cancelling.
+fi Single Click +fiBts*T+frfrfl , €D6ft4&flft
Single click this button under any circumstance, the battery compaltment will be unlocked.
X# O Double Click xE*E , +ffiffipf,*rTfran
Double click this button, fortification oI the vehicle will be cancelled and the switch turned on.
E#AEI'EE
Rernote Sensing iEEiEEt+ffii.I , +ffiHa#lr&lr*d iEBEEI[)E+mfi , +fiEAu,\ffiFrl 6
Suppose the remote control is at a far distance from the electric bicycle, the electric bicycle willfortify
automatically, and will be cancel fortification automatically once the remole conlrol is near.
f EJEE A&Df,E
Turn on Remote
Sensing
keB *O 66pg 3 p . Efi!+eEE LED HF 3 i4Esffi6ld&8ft{!46EEJEHffE
Long press the combination of B + O for 3 seconds, then the LED will light for 3 seconds which
indicates the remote sensing function is available.

1, )EE)ts,EAiT : lL,.tLtrlBlj&6E)ttTBiE)Ell6tfr E H)t,, E1[ iTrt
E)Efr . EIlltTEiE)tf .
1.Low-high/ high beam indicaton indicate separately whether the high beam or the low-high beam is on, lndicator
on the left lights up means high beam is on, indicalor on the right lights up means low.high beam is on.
2, dilt,n^ : F*ffiE 6$rit]n{i+E , 1)(84'r.raEfit+{n , *+Et+iii 15bn/h.
2.Speed: The number on the screen indicates vehicle s speed, calculated as kilometer per hour. Safety
riding speed is 1skm/h.
s, *rAHdiT:*Tf *ErX , E/tFHHEiTaEi!ffi86"
3.Signal light lum on the sieering switch, the lofr/righl signal light will twinkle.
a. H{tli.frt;f,6;ttE'{n , sE{ttfi)Xf{, s 4fttlEJEH.
4.Riding Mode: indicates vehicle's riding mode , 'S'indicates full speed and performance potentials,
'S off indicates comfort mode with limited speed and smoother ride acceleration.
5. €lE6t;€lEm*&zr€tfi+fi)E , ttf;i€.
6. +IBIDBEfi3f,ffiI
BUTTONS ON THE HANDLEBAR
rTRrm
66
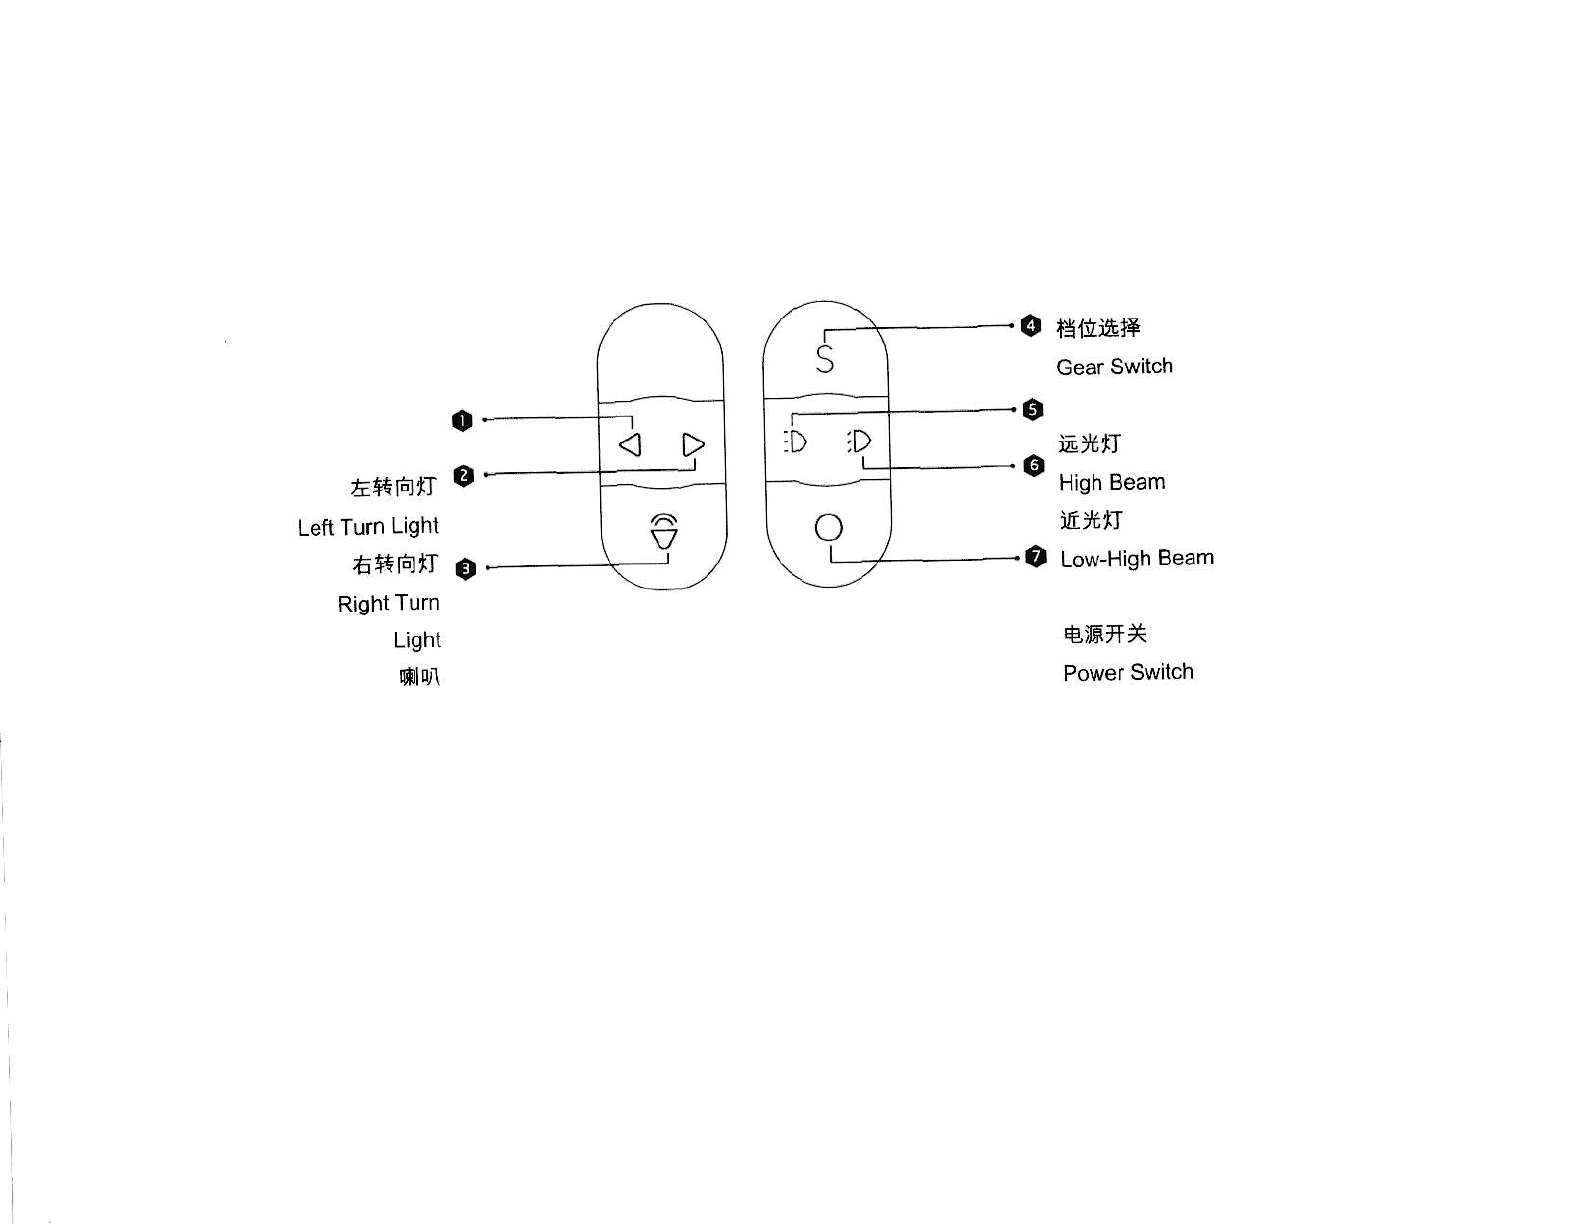
E*TF)\T
Len lurn Llgnl
ts4tr.liT
Right TLlrn
Light
mrrl
i*{n)&}+
Gear Switch
iE )t xI
H gh Beam
)AYLIJ
Low-High Beam
€ffiff+
Power Switch
Other manuals for VoltArt400
1
Other Merkava Bicycle manuals


