META Smartact User manual

JA
DE
NL
ZH
IT
HR
PT
EN
EL
DA
SV
ES
FR
AR
LT
CS
RU
KO
SL
NO
RO
BG
LV
HU
PL
TR
Smartact
SEPT. 2016 - REV 01
Posizionatore chiodini per membrana
Membrane tacks positioner
C.G.M. S.p.A.
DIVISIONE MEDICALE META
Via E. Villa, 7 - 42124 Reggio Emilia - ITALY
Tel.: +39 0522.50.23.11 - Fax: +39 0522.50.23.33
www.metahosp.com

2
Smartact
Smartact
IT ISTRUZIONI PER L’USO
Destinazione d’uso
Lo Smartact è un sistema pneumatico che permette il posizionamento dei
chiodini per ssare e stabilizzare la membrana nella rigenerazione ossea
in chirurgia orale. Può essere impiegato per stabilizzare sia le membrane
riassorbibili sia le membrane non riassorbibili.
Lo Smartact è dotato di un pedale pneumatico che consente di imprime-
re una forza (regolabile nelle diverse indicazioni di utilizzo, correlata alla
tipologia di osso), la quale inserisce istantaneamente il chiodino, ssando
così in modo stabile la membrana all’osso. Il manipolo è stato progettato
con dimensioni ridotte al minimo, di forma affusolata e con punta incurvata
per consentire di raggiungere agevolmente anche le aree meno accessibili
del cavo orale. Lo Smartact è realizzato con materiale privo di sostanze
pericolose e resistenti alla corrosione.
Smartact è fornito non sterile. Deve essere lavato e sterilizza-
to prima di ogni utilizzo.
Il dispositivo Smartact deve essere utilizzato esclusivamente
da personale medico competente.
Il chirurgo deve stabilire l’idoneità del paziente agli interventi
di rigenerazione ossea e la sequenza chirurgica opportuna.
Non utilizzare mai lo Smartact senza essersi assicurati che
tutti i suoi componenti siano stati assemblati correttamente
(vedere istruzioni di montaggio).
Per evitare un azionamento accidentale, assemblare prima il
manipolo e solo dopo agganciare lo strumento al pedale. Il
personale medico ed il paziente devono indossare appositi
occhiali di protezione. Assicurarsi di rispettare la corretta
sequenza di montaggio (vedi istruzioni montaggio).
Non azionare mai lo Smartact senza avere inserito la pinza
battente monouso ed il chiodino.
Assicurarsi di inserire correttamente la pinza battente mo-
nouso (si veda Foto 17 e 18) per evitare il rischio di ingestio-
ne accidentale da parte del paziente.
Assicurarsi di agganciare correttamente il chiodino alla pin-
za battente monouso (si veda Foto 19,20 e 21) per evitare il
rischio di ingestione accidentale da parte del paziente.
Quando lo strumento non è in uso inserire la regolazione soft
per sicurezza.
Prima dell’uso assicurarsi che la confezione dello strumento
sia integra.
Non utilizzare il prodotto se la confezione è danneggiata.
Durante la manipolazione del dispositivo Smartact utilizzare
di garantire la sterilità.
in conformità ai decreti vigenti che ne regolano la materia.
Meta non risponde dell’uso improprio del prodotto.
Come montare lo strumento prima dell’uso
Seguire scrupolosamente la sequenza di montaggio, il mancato, parziale o
errato montaggio di un componente può comportare:
• mancato o cattivo funzionamento;
• rottura dello strumento.
La sequenza di montaggio è riportata nello schema allegato 1.
Dopo aver assemblato lo strumento, consigliamo di coprire il cavo ed even-
tualmente anche il manipolo con apposite guaine protettive monouso, in
modo da agevolare la successiva fase di lavaggio e sterilizzazione dello
strumento.
Come montare i chiodini Smartact Pin sullo strumento
Seguire scrupolosamente la sequenza per armare il dispositivo. Il mancato,
parziale o errato montaggio di un elemento può comportare:
rischio di ingestione accidentale da parte del paziente, del chio-
dino della pinza battente;
• mancato o cattivo funzionamento;
• rottura dello strumento.
La sequenza di montaggio è riportata nello schema allegato 2.
L’utilizzo di chiodini di altri fabbricanti è altamente sconsigliato. Meta
non risponde di questo uso improprio dello strumento che potrebbe causare
rischi per il paziente e danneggiare seriamente il dispositivo.
Regolazione ed uso dello strumento
Dopo aver posizionato il chiodino sul battente monouso come spiegato
nell’allegato 2, posizionare lo strumento in asse con il piano ricevente sulla
zona d’innesto ed azionare il pedale. Se necessario ripetere l’azionamento
del pedale no al completo inserimento del chiodino. Il medico in base al
caso clinico e con riferimento alla densità ossea ed anatomia della cresta
(spessore, inclinazione, ecc.) dovrà stabilire il numero di ripetizioni necessa-
rie. Lo strumento ha una regolazione che permette all’utilizzatore di scegliere
la forza idonea (soft- medium – hard) per l’innesto.
La regolazione SOFT è consigliata per le zone del pavimento laterale del
seno. La regolazione MEDIUM è consigliata per le zone della mascella con
corticale di spessore variabile e densità ossea Tipo II o III.
La regolazione HARD è consigliata per le zone della mandibola con corticale
avente densità ossea Tipo I.
Prima di procedere alla regolazione dello Smartact si raccomanda la preven-
tiva perforazione della corticale per saggiare la consistenza ossea.
Durante l’utilizzo la traiettoria del cavo non deve essere in condizioni estre-
me di curvatura per non provocare il malfunzionamento del sistema.
Come smontare lo strumento per riporlo
Dopo aver utilizzato lo strumento smontarlo seguendo a ritroso le istruzioni
di montaggio illustrate nell’allegato 1. Provvedere successivamente ad un
accurato lavaggio e pulizia dello strumento prima di riporlo.
Come lavare e sterilizzare lo strumento
Lo strumento è fornito non sterile. Deve essere disinfettato, lavato e steri-
lizzato prima di ogni uso. Staccare il cavo dal pedale (senza svitare il ma-
nipolo) avendo cura di non piegarlo eccessivamente per non danneggiarlo.
Provvedere al lavaggio con appositi detergenti germicidi immediatamente
dopo la procedura chirurgica. Per i lavaggi utilizzare detergenti idonei, non
utilizzare perossido di idrogeno (H2O2) e detergenti a base di cloro. Riporlo in
apposita busta per la successiva fase di sterilizzazione.
Attenzione la pedaliera può essere lavata con gli appositi detergenti germici-
di, sopra detti, ma non può essere sterilizzata in autoclave.
La sterilizzazione del cavo e manipolo deve essere eseguita in autoclave
a vapore a 121°C per 30 minuti, utilizzando sempre cicli di sterilizzazione
validati in conformità alle vigenti normative. Il mantenimento della sterilità è
garantito dall’integrità della busta, vericarla sempre prima dell’utilizzo.
Manutenzione
La manutenzione ordinaria consiste nel corretto lavaggio e pulizia dello stru-
mento secondo le modalità indicate nel punto precedente.
Collegamento dello strumento all’aria compressa
Lo strumento deve essere collegato all’impianto di aria compressa regolato
a 2 bar.
Cosa succede se la pressione è:
• meno di 2 bar: funzionamento insufciente;
• più di 2 bar: la maggiore pressione incide sulla velocità dell’aziona-
mento del pedale ma non sulla forza impressa alla molla del mani-
polo.
Il funzionamento consigliato è tra 2 e 6 bar di pressione.
Optional aggancio aria
Il kit aggancio aria è fornito come optional su richiesta al momento dell’ac-
quisto.
Per il corretto assemblaggio dei componenti riportiamo in allegato 3 la se-
quenza. Il kit contiene gli accessori per innesto rapido al pedale e un tubo
passaggio aria a cui l’utilizzatore dovrà agganciarsi con gli opportuni attacchi
a seconda del tipo di uscita aria compressa, installata nello studio medico.
Garanzia commerciale dello strumento
La garanzia commerciale offerta da Meta è una garanzia di buon funziona-
mento contro i difetti per effetto dell’uso protratto nel tempo.
Il dispositivo Smartact è garantito secondo le disposizioni di legge per 12
mesi dalla data di vendita presente in fattura.
La garanzia non copre nel caso di utilizzo non conforme del dispositivo. Si
deniscono non conformi ad esempio le seguenti azioni: riparazioni o inter-
venti eseguiti da parte di persone non autorizzate dal produttore, difetti o
danni provocati da caduta, rottura, fulmine o inltrazioni di liquidi, difetti o
danni provocati da inussi di tipo meccanico, chimico e termico, dispositivi
3
Smartact
Smartact
ANO
B
dotati di integrazioni o accessori non autorizzati dal produttore. Il cliente
per esercitare i suoi diritti, ha l’onere di denunciare il difetto di conformità
entro il termine di due mesi dalla data in cui ha constatato siffatto difetto. Nel
caso di sostituzione del prodotto o di un componente, i prodotti o le singole
parti rese, a fronte della sostituzione, diventano di proprietà del produttore.
La prestazione eseguita in garanzia non prolunga il periodo della garanzia.
Pertanto, in caso di sostituzione del prodotto o di un suo componente, sul
bene o sul singolo componente fornito in sostituzione non decorre un nuovo
periodo di garanzia ma si deve tener conto della data dell’acquisto del bene
originario. Si escludono ulteriori diritti, di qualsiasi tipo.
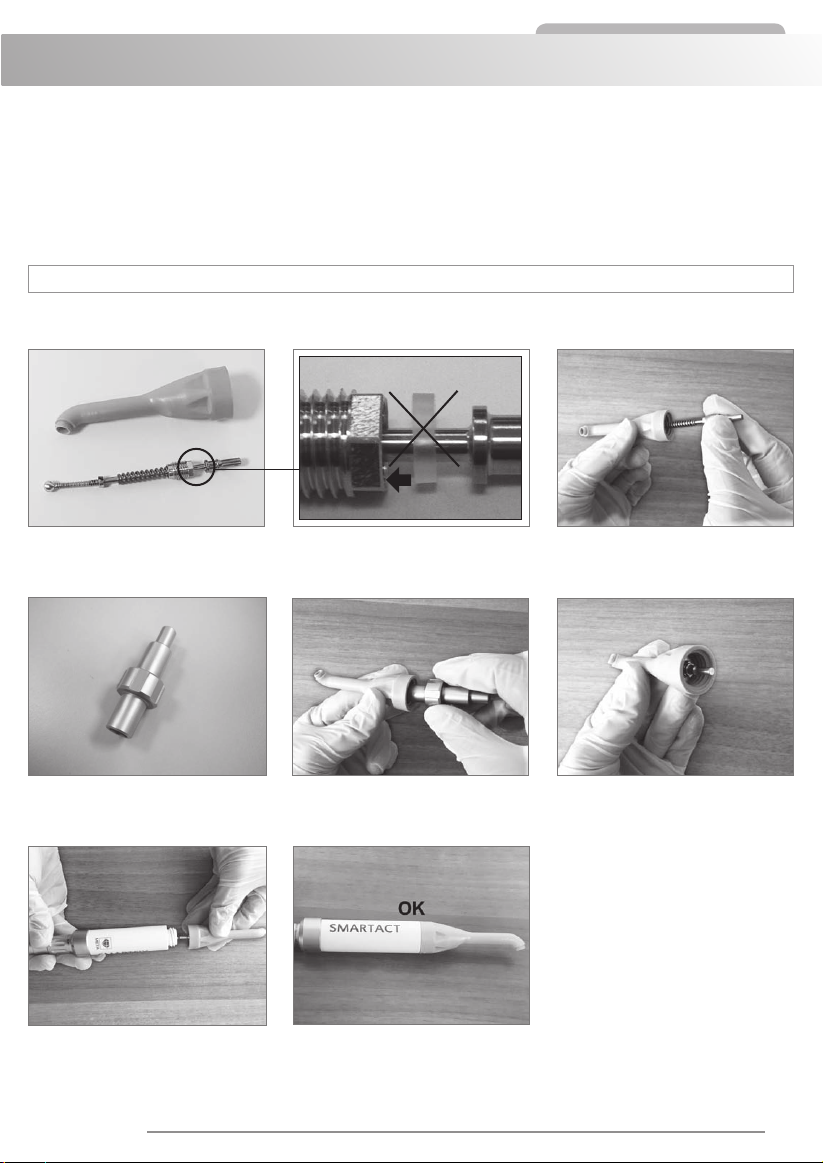
Corpo curvo (a) e dispositivo battente (b).
Con apposita chiave in dotazione (foto 3), avvi-
tare no a ne corsa.
Avvitare no a ne corsa (foto 6). Il corpo curvo
deve essere rivolto verso il basso come mostra-
to in fotograa.
Inserire il dispositivo battente all’interno del cor-
po curvo (foto 1-2).
Assieme corpo curvo.
Chiave per avvitare.
Inserire l’assieme corpo curvo (foto 5) sul ma-
nico.
Allegato 1 - Montaggio dello strumento
ASSEMBLAGGIO MANIPOLO
Le presenti istruzioni d’uso, unitamente ad ulteriori informazioni sullo stru-
mento e le sequenze di montaggio e smontaggio dello Smartact sono dispo-
nibili sul sito web: www.metahosp.com
Solo prendendo visione del contenuto di questa documentazione potrete
evitare errori e garantire un funzionamento corretto del nostro prodotto.
Foto. 1
Foto. 3
Foto. 6
Foto. 4
Foto. 7
Foto. 5
Foto. 2

4
Smartact
Smartact
NO
Max 6 BarMin 2 Bar
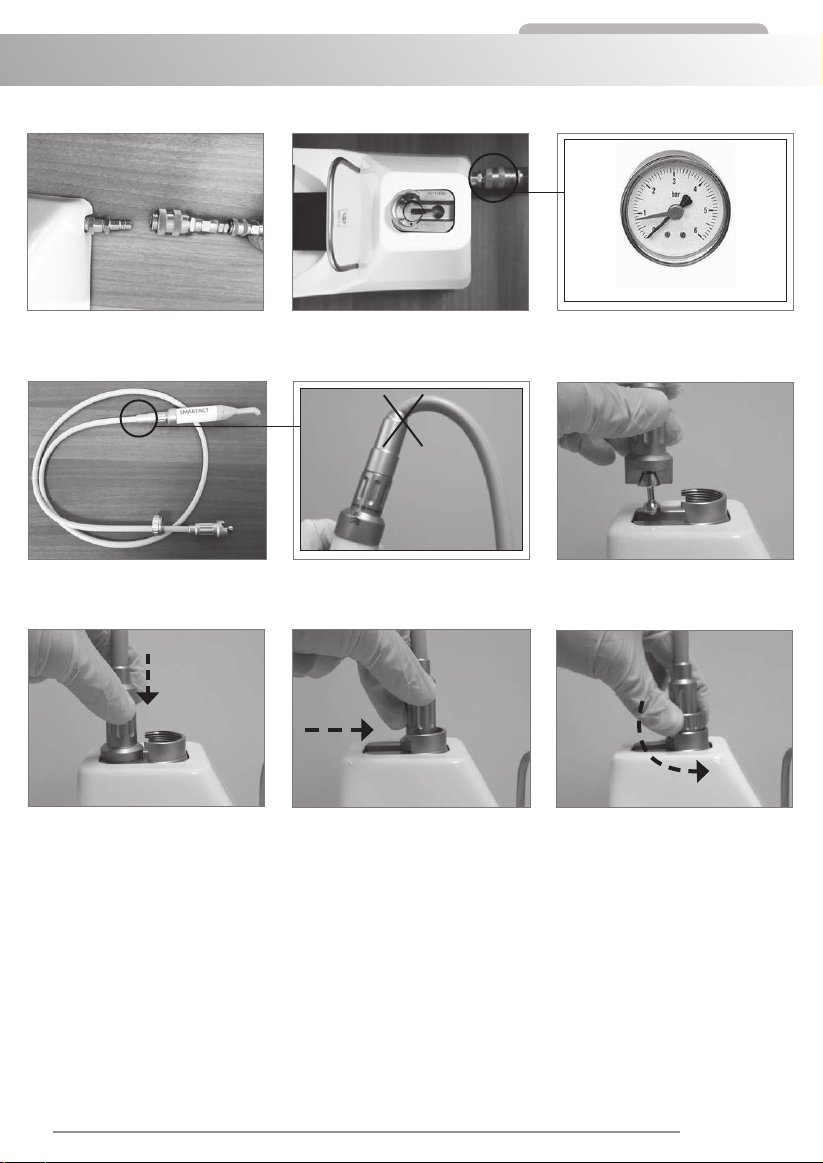
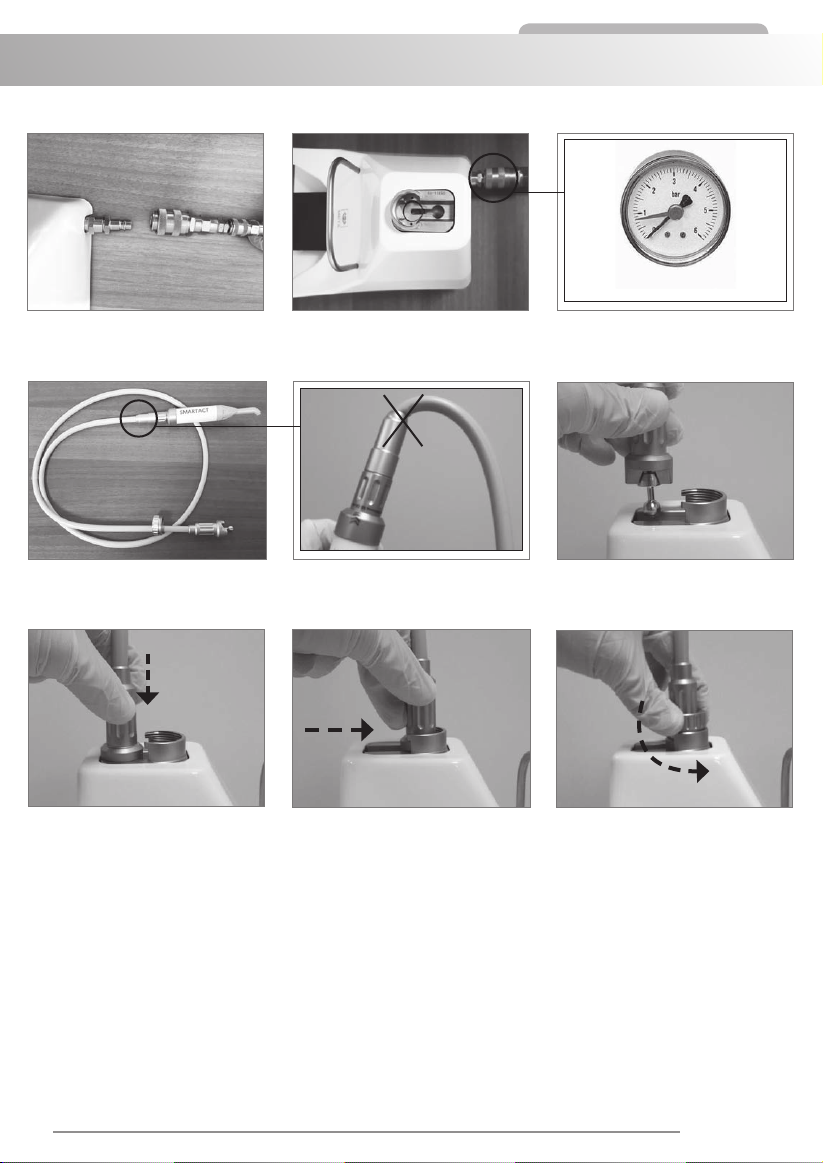
Allacciare la pedaliera alla rete dell’aria com-
pressa. Utilizzare un riduttore di pressione eu-
ropean standard 1.
1 Il riduttore di pressione femmina è un optional non fornito nella confezione.
Inserire il terminale del cavo nella pedaliera.
Impostare la pressione d’esercizio a non meno
di 2 bar (max consentita 6 bar).
Posizionare il terminale all’interno della cavità
che si trova nella parte superiore del pedale.
Cavo di connessione della pedaliera al mani-
polo.
Far scorrere la ghiera orizzontalmente verso
l’alloggiamento circolare.
AGGANCIO DEL MANIPOLO AL PEDALE
Foto. 8
Foto. 10
Foto. 12 Foto. 13 Foto. 14
Foto. 11
Foto. 9

5
Smartact
Smartact
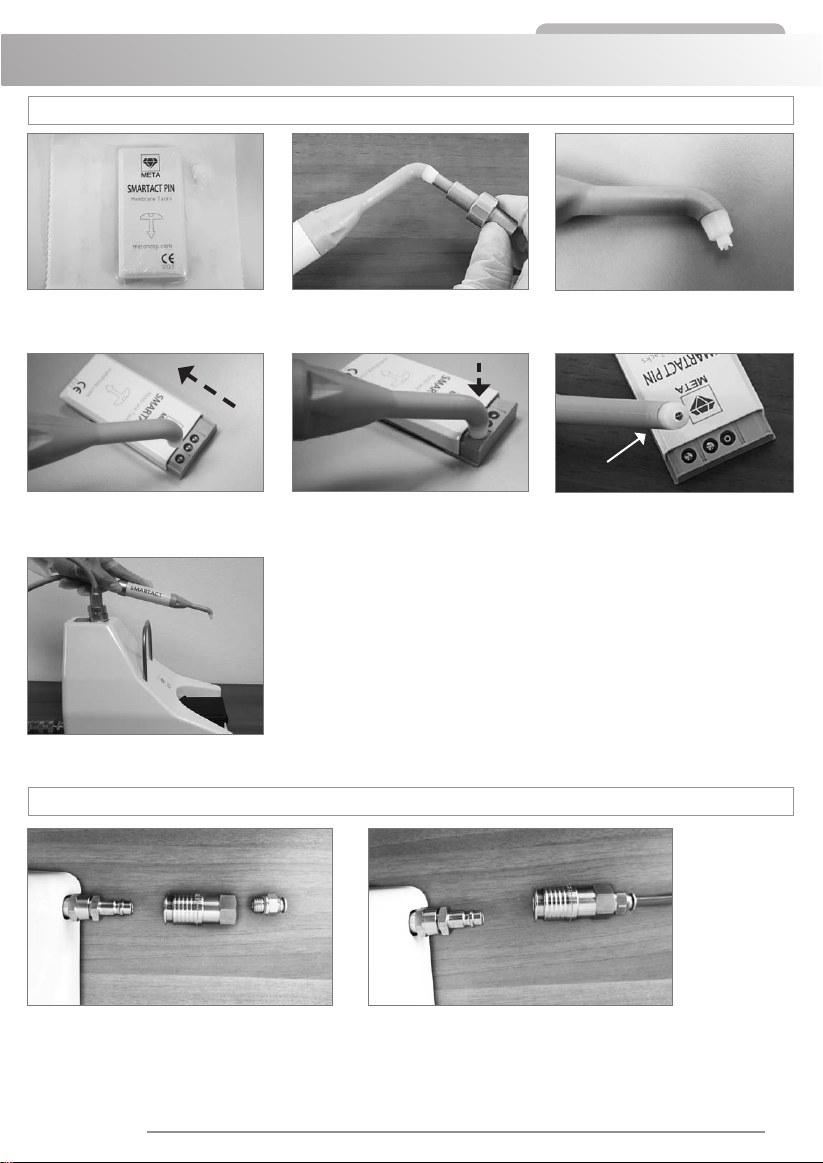
Allegato 2 – Montaggio dei chiodini Smartact sullo strumento
Allegato 3 – Montaggio del kit aggancio aria
Aprire il blister sterile Smartact Pin Codice
4730.
Inserire la presa con attacco femmina ¼, il raccordo dritto ma-
schio cilindrico ed inne il tubo 6 mm ¼ fornito nel kit.
Aprire il contenitore Smartact Pin.
Il sistema Smartact pronto all’uso.
Prelevare la pinza battente monouso dal blister
e avvitarla al corpo curvo con l’apposita chiave
fornita nel kit.
Il sistema così montato può ora essere agganciato al connet-
tore maschio della pedaliera. Successivamente connettere il
sistema con la presa di aria compressa dello studio medico
(se necessario dotarsi di riduttore di pressione per garantire la
pressione di esercizio da 2 a 6 bar).
Inserire il battente monouso all’interno dell‘ap-
posita sede e prelevare il chiodino (Foto 21).
Prestare massima attenzione ed assicurarsi di
aver ingaggiato correttamente il letto e avvitato
la pinza battente no a ne corsa.
Chiodino inserito nel battente monouso.
Foto. 17
Foto. 20
Foto. 21
Foto. 23Foto. 22
Foto. 18 Foto. 19
Foto. 15 Foto. 16
6
Smartact
Smartact
EN INSTRUCTIONS FOR USE
Intended use
Smartact is a pneumatic system enabling positioning of tacks to secure
and stabilise a membrane as part of bone regeneration in oral surgery. It
can be used to stabilise both resorbable and non-resorbable membranes.
The Smartact system includes a pneumatic pedal to apply a force (ad-
justable depending on the type of use and linked to the type of bone) to
insert the tacks instantly thus rmly securing the membrane to the bone.
The extremely compact handpiece is designed with a tapered shape and
curved tip so that even the most inaccessible areas of the mouth can be
reached easily. Smartact is manufactured using corrosion-proof materials
free of toxic substances.
Smartact is supplied non-sterile. The device must be washed
and sterilised before each use.
The Smartact device must be used exclusively by skilled
medical staff.
The surgeon must assess the suitability of patients for bone
regeneration and the appropriate surgical procedure.
Do NOT use Smartact unless you are sure all components
have been assembled correctly (see assembly instructions).
to the footswitch to prevent accidental operation. Medical
staff and the patient must wear goggles to protect their eyes.
Carefully follow the assembly sequence (see assembly in-
structions).
Always insert the disposable tack insertion device and the
tack before using Smartact.
Make sure the disposable tack insertion device (see photos
17 and 18) is inserted correctly to prevent accidental swal-
lowing by the patient.
Make sure the tack is secured correctly to the disposable
tack insertion device (see photos 19, 20 and 21) to prevent
accidental swallowing by the patient.
For safety reasons adjust the device to the SOFT application
force setting when not in use.
Before use, check the device package is intact.
Do not use the product if the package is damaged.
Always wear sterile gloves when handling the Smartact de-
vice and strictly follow appropriate procedures in order to
guarantee sterility.
Discard after use in special medical waste containers in com-
pliance with the regulations in force.
Meta does not shoulder any responsibility for improper use
of the product.
Assembling the device before use
Carefully follow the assembly sequence; missing, partial or incorrect assem-
bly of a component may result in:
• failed or poor operation;
• damage to the device.
The assembly sequence is shown in enclosure 1.
When you have assembled the device, it is recommended the cable and
handpiece are protected using a suitable disposable sleeve to facilitate sub-
sequent cleaning and sterilisation of the device.
Inserting Smartact Pin tacks on the device
Carefully follow the tack insertion sequence. Missing, partial or incorrect as-
sembly of a component may result in:
accidental swallowing by the patient of the tack in the tack inser-
tion device;
• failed or poor operation;
• damage to the device.
The assembly sequence is shown in enclosure 2.
Use of tacks produced by other manufacturers is not recommended.
Meta shall not be held responsible for this improper use of the device which
may put the patient at risk and seriously damage the device.
Setup and use
Insert the tack in the disposable tack insertion device, as shown in enclosure
2, position the device so it is aligned with the receiving plane at the graft area
and operate the footswitch. If necessary operate the footswitch a second
time to apply the tack fully. On the basis of the clinical case and with refer-
ence to bone density and alveolar crest anatomy (thickness, slope, etc.), the
surgeon must decide the number of footswitch operations required.
The device allows the user to select the level of application force (soft - me-
dium – hard).
The SOFT setting is recommended for areas of the lateral sinus oor.
The MEDIUM setting is recommended for areas of the maxilla with variable
cortical bone thickness and type II or III bone density.
The HARD setting is recommended for areas of the mandible with type I
bone density.
It is recommended you perforate the cortical bone to assess bone consis-
tency before selecting the Smartact setting.
The path of the cable must be as straight as possible without any tight curves
to ensure good system operation.
Disassembling the device after use
When you have nished using the device, disassemble it by following the as-
sembly procedure described in enclosure 1 in reverse order. Carefully wash
and clean the device before storing it.
Cleaning and sterilising the device
The device is supplied non-sterile. The device must be disinfected, cleaned
and sterilised before each use. Disconnect the cable from the footswitch
(without removing the handpiece) making sure you do not fold it too much as
this may damage it. Clean using special germicidal detergents immediately
after the surgical procedure. Use suitable detergents. Do not use hydrogen
peroxide (H2O2) or chlorine-based detergents. Place it in a special bag for
the sterilisation process.
Warning! The footswitch can be washed using suitable germicidal detergents
but cannot be sterilised in an autoclave.
Sterilise the cable and handpiece in a steam autoclave at 121°C for 30
minutes. Always use validated sterilisation cycles in compliance with current
legislation. Sterility is guaranteed if the bag is intact. Always check the bag
before using the device.
Maintenance
Routine maintenance involves washing and cleaning the device correctly in
compliance with that stated above.
Connecting the device to the compressed air supply
The device must be connected to the compressed air supply with a pressure
value of 2 bar.
If the pressure is:
• less than 2 bar: insufcient operating force;
• more than 2 bar: higher pressure values affect footswitch operation
speed but not the force exerted on the handpiece spring.
The recommended operating pressure is between 2 and 6 bar.
Optional compressed air connection kit
The optional compressed air connection kit can be supplied on request at
the time of purchase.
See the sequence described in enclosure 3 for details of how to assemble
the components correctly. The kit contains quick-release components for
connection to the footswitch and a compressed air hose which the user must
connect to the compressed air supply using a special coupling in compliance
with the air outlet installed in the dental practice.
Smartact commercial warranty
The commercial warranty provided by Meta is a guarantee of good operation
against defects arising as a result of long-term use.
Smartact is guaranteed in compliance with current legislation for 12 months
from the date of sale specied on the invoice.
The warranty is declared null and void in the event of improper use of the
device. Improper use includes the following: repairs and maintenance per-
formed by persons not authorised by the manufacturer, faults or damage
caused by falls, breakages, lightning strikes or penetration of liquids, faults
or damage caused by mechanical, chemical or thermal effects and devices
tted with components or accessories not authorised by the manufacturer.
Customers must report any faults or defects within two months of discovery
for the warranty to remain valid. If a product or component is changed, any

7
Smartact
Smartact
ANO
B
products or components returned as part of the process become the prop-
erty of the manufacturer. The warranty is not extended as a result of any
action by the manufacturer under the terms of the warranty. Therefore, if a
product or component is changed, the new product or component supplied
is not covered by a new period of warranty. These items are guaranteed
under the terms of the original warranty valid from the date of purchase of
the original goods. All other rights are excluded.
Curved body (a) and insertion device (b).
Use the special torque wrench supplied (photo
3) to screw up fully.
Screw up fully (photo 6). The curved body must
be facing downwards as shown in the photo-
graph.
Insert the insertion device inside the curved
body (photos 1 and 2).
Curved body assembly.
Torque wrench.
Insert the curved body assembly (photo 5) in
the handle.
Enclosure 1 - Assembling the device
ASSEMBLING THE HANDPIECE
These user instructions, together with further information concerning Smart-
act and instructions for assembling and disassembling the device are avail-
able on our website www.metahosp.com
Please take the time to read this information to prevent any errors and en-
sure good operation of the product.
Photo. 1
Photo. 3
Photo. 6
Photo. 4
Photo. 7
Photo. 5
Photo. 2
8
Smartact
Smartact
NO
Max 6 BarMin 2 Bar
Connect the footswitch to the compressed air
supply. Use a European Standard pressure
reducer1.
1 The female pressure reducer is an optional device not included in the scope of delivery.
Insert the terminal of the cable in the footswitch.
Set the operating pressure not less than 2 bar
(max. pressure 6 bar).
Place the terminal inside the cavity located on
the upper part of the footswitch.
Cable for connecting the footswitch to the hand-
piece.
Slide the ring nut horizontally towards the circu-
lar housing.
CONNECTING THE HANDPIECE TO THE FOOTSWITCH
Photo. 8
Photo. 10
Photo. 12 Photo. 13 Photo. 14
Photo. 11
Photo. 9

9
Smartact
Smartact
Enclosure 2 – Assembling Smartact tacks on the device
Enclosure 3 – Assembling the compressed air connection kit
Open the sterile Smartact Pin blister pack (ar-
ticle code 4730).
Insert the ¼ female connector, the straight cylindrical plug con-
nector and then the 6 mm ¼ hose supplied with the kit.
Open the Smartact Pin container.
The Smartact system is ready to use.
Take the disposable tack insertion device from the
blister pack and screw it up on the curved body us-
ing the special torque wrench supplied with the kit.
The assembled system can now be connected to the foot-
switch plug connector. Connect the system to the compressed
air supply of the practice; if necessary use a pressure adapter
to ensure an operating pressure between 2 and 6 bar.
Insert the disposable tack insertion device in
the special housing and pick up the tack (pho-
tos 21).
Make sure you engage the thread correctly and
that the tack insertion device is screwed up fully.
Tack inserted in the disposable tack insertion
device.
Photo. 17
Photo. 20
Photo. 21
Photo. 23Photo. 22
Photo. 18 Photo. 19
Photo. 15 Photo. 16

10
Smartact
Smartact
DE BEDIENUNGSANLEITUNG
Verwendungszweck
Smartact ist ein pneumatisches System zur Positionierung der Nägel für die
Befestigung und Stabilisierung der Membrane bei der Knochenregenerati-
on in der Kieferchirurgie. Es kann zur Stabilisierung sowohl resorbierbarer
als auch nicht resorbierbarer Membranen verwendet werden.
Smartact ist mit einem pneumatischen Pedal ausgerüstet, das das Aufbrin-
gen einer Kraft (regulierbar in Abhängigkeit von der jeweiligen Anwendung
und vom Knochentyp) ermöglicht, mit der der Nagel unverzüglich einge-
setzt und die Membrane stabil am Knochen befestigt wird. Das Handstück
ist so klein wie möglich dimensioniert, schmal geformt und mit abgewinkel-
ter Spitze versehen, damit auch die schlechter zugänglichen Bereiche der
Mundhöhle leicht erreicht werden können. Smartact besteht aus unschädli-
chem und korrosionsfestem Material.
Smartact wird nicht steril geliefert. Es muss vor jedem Ge-
brauch gereinigt und sterilisiert werden.
Das Medizinprodukt Smartact darf ausschliesslich von sach-
kundigem medizinischem Personal verwendet werden.
Der Chirurg muss die Eignung des Patienten für die Eingriffe
zur Knochenregeneration feststellen und die geeignete Rei-
henfolge der chirurgischen Schritte festlegen.
Benutzen Sie Smartact niemals, ohne sich vergewissert zu
haben, dass alle seine Bestandteile korrekt zusammengefügt
sind (siehe Montageanleitung).
Zur Vermeidung unbeabsichtigter Betätigung montieren Sie
zuerst das Handstück und verbinden Sie das Instrument erst
dann mit dem Pedal. Das medizinische Personal und der
Patient müssen entsprechende Schutzbrillen tragen. Prüfen
Sie, ob Sie die ordnungsgemässe Reihenfolge der Montage-
schritte eingehalten haben (siehe Montageanleitung).
Betätigen Sie Smartact niemals, ohne den Einweg-
schlagapplikator und den Nagel eingesetzt zu haben.
Prüfen Sie, ob Sie den Einwegschlagapplikator (siehe Foto
17 und 18) korrekt eingesetzt haben, um das Risiko einer un-
beabsichtigten Aufnahme durch den Patienten zu vermeiden.
Prüfen Sie, ob Sie den Nagel korrekt in den Einweg-
schlagapplikator eingesetzt haben (siehe Foto 19, 20 und 21),
um das Risiko einer unbeabsichtigten Aufnahme durch den
Patienten zu vermeiden.
Wenn das Instrument nicht benutzt wird, wählen Sie zur Si-
cherheit die Einstellung „Soft“.
Vor dem Gebrauch die Verpackung des Instruments auf Un-
versehrtheit prüfen.
Bei beschädigter Verpackung darf das Produkt nicht verwen-
det werden.
Beim Handhaben der Vorrichtung Smartact immer sterile
Handschuhe tragen und die Anweisungen strikt befolgen,
um die Sterilität zu gewährleisten.
-
hausabfälle werfen und entsprechend den einschlägigen
Vorschriften entsorgen.
Meta haftet nicht für den unsachgemässen Gebrauch des
Produkts.
Montage des Instruments vor Gebrauch
Befolgen Sie gewissenhaft die Reihenfolge der Montageschritte, das Fehlen
oder eine unvollständige oder fehlerhafte Montage eines Bestandteils kann zu
folgenden Erscheinungen führen:
• keine oder mangelhafte Funktion;
• Defekt des Instruments.
Die Reihenfolge der Montageschritte ist in Anlage 1 aufgeführt.
Nachdem das Instrument montiert ist, empfehlen wir, die Mundhöhle und even-
tuell auch das Handstück mit Einwegschutzmaterial abzudecken, um das nach-
folgende Reinigen und Sterilisieren des Instruments zu erleichtern.
Montage der Smartact-Nägel im Instrument
Befolgen Sie die Reihenfolge beim Bestücken der Vorrichtung gewissenhaft.
Das Fehlen oder eine unvollständige oder fehlerhafte Montage eines Bestand-
teils kann zu folgenden Erscheinungen führen:
• Risiko einer unbeabsichtigten Aufnahme des Nagels aus dem Ein-
wegschlagapplikator durch den Patienten zu vermeiden.
• keine oder mangelhafte Funktion;
• Defekt des Instruments.
Die Reihenfolge der Montageschritte ist in Anlage 2 aufgeführt.
Von der Verwendung von Nägeln anderer Hersteller wird dringend abge-
raten. Meta haftet nicht für den unsachgemässen Gebrauch des Produkts, der
zu Risiken für den Patienten und gravierenden Schäden an der Vorrichtung
führen könnte.
Einstellung und Gebrauch des Instruments
Nachdem der Nagel in den Einwegschlagapplikator, wie in der Anlage 2 erklärt,
positioniert ist, bringen Sie das Instrument in Achse mit der zu behandelnden
Stelle und betätigen Sie das Pedal. Gegebenenfalls ist das Pedal wiederholt
zu betätigen, bis der Nagel vollständig eingeführt ist. Der Arzt muss auf der
Grundlage der Erkrankung und mit Bezug auf die Knochendichte und die Ana-
tomie der Knochenleiste (Dicke, Neigung usw.) die Anzahl der notwendigen
Wiederholungen festlegen. Das Instrument verfügt über Einstellungen, die
es dem Benutzer ermöglichen, die entsprechende Kraft für das Implantat zu
wählen (soft - medium - hard). Die Einstellung SOFT wird für die Bereiche des
lateralen Bodens der Kiefernhöhle empfohlen. Die Einstellung MEDIUM wird für
die Bereiche des Oberkiefers bei variabler Kortexdicke und einer Knochendich-
te Typ II oder III empfohlen. Die Einstellung HARD wird für die Bereiche des
Unterkiefers bei Kortex mit Knochendichte Typ I empfohlen. Vor der Einstellung
des Smartact wird die vorherige Perforation des Kortex empfohlen, um die Kno-
chenkonsistenz zu prüfen. Während des Gebrauchs darf der Verlauf des Kabels
nicht extrem gebogen sein, damit das System gut funktionieren kann.
Demontage des Instruments, um es wieder abzulegen
Nach dem Gebrauch des Instruments demontieren Sie es und folgen Sie dabei
den in Anlage 1 aufgeführten Montagehinweisen in umgekehrter Reihenfolge.
Bevor Sie das Instrument wieder ablegen, waschen und reinigen Sie es sorg-
fältig.
Reinigen und Sterilisieren des Instruments
Das Instrument wird in nicht sterilem Zustand geliefert. Es ist vor jedem Ge-
brauch zu desinzieren, zu reinigen und zu sterilisieren. Entfernen Sie das
Kabel vom Pedal (ohne das Handstück abzuschrauben) und achten Sie dabei
darauf, es nicht zu sehr zu knicken, damit es nicht beschädigt wird. Nehmen Sie
unmittelbar nach dem chirurgischen Vorgang die Reinigung mit entsprechen-
den keimtötenden Reinigungsmitteln vor. Verwenden Sie für die Reinigungs-
vorgänge geeignete Reinigungsmittel, benutzen Sie kein Wasserstoffperoxid
(H2O2) und keine Reinigungsmittel auf Chlorbasis. Legen Sie es in den entspre-
chenden Behälter für den anschliessenden Sterilisierungsvorgang. Achtung, die
Tretvorrichtung kann mit den oben genannten keimtötenden Reinigungsmitteln
gereinigt werden, sie kann jedoch nicht im Autoklaven sterilisiert werden. Die
Sterilisierung des Kabels und des Handstücks muss 30 Minuten lang im Dampf-
autoklaven bei 121°C erfolgen, wobei die Sterilisationszyklen stets den gelten-
den gesetzlichen Vorschriften entsprechen müssen. Die Sterilität ist gewähr-
leistet, wenn das Behältnis unversehrt ist. Prüfen Sie es steht vor Gebrauch.
Wartung
Die planmässige Wartung besteht darin, das Instrument ordnungsgemäss zu
waschen und zu reinigen, wie im vorangegangenen Abschnitt angegeben.
Anschluss des Instruments an Druckluft
Das Instrument wird an die auf 2 bar eingestellte Druckluftanlage angeschlos-
sen.
Was geschieht, wenn der Druck
• niedriger als 2 bar ist: unzureichende Funktion
• höher als 2 bar ist: der höhere Druck wirkt sich auf die Geschwindigkeit
beim Betätigen des Pedals, jedoch nicht auf die Kraft aus, die auf die
Feder des Handstücks wirkt.
Für den Betrieb wird ein Druck zwischen 2 und 6 bar empfohlen.
Luftkupplung optional
Die Luftkupplung wird als Bausatz auf Anfrage beim Kauf optional geliefert.
In Anlage 3 führen wir die Reihenfolge der Schritte für die korrekte Montage
der Einzelteile auf. Der Bausatz besteht aus dem Zubehör für den schnellen
Anschluss an das Pedal und einer Luftleitung, an die der Nutzer die entspre-
chenden Anschlüsse je nach Typ des Ausgangs der in seiner Praxis installierten
Druckluftanlage vornehmen muss.
Kommerzielle Garantie für das Instrument
Die von Meta angebotene kommerzielle Garantie ist eine Garantie der fehler-
freien Funktion und auf innerhalb der Garantiezeit auftretende Mängel.
Die Garantie für das Produkt Smartact beruht auf den gesetzlichen Bestimmun-
gen und beträgt 12 Monte ab dem in der Rechnung aufgeführten Verkaufs-
datum.
Bei unsachgemässem Gebrauch wird keine Garantie gewährt. Als unsachge-

11
Smartact
Smartact
ANO
B
mäss werden folgende Handlungen deniert: Reparaturen oder Eingriffe, die
von Personen vorgenommen wurden, die nicht vom Hersteller autorisiert sind,
Mängel oder Schäden, die durch Herunterfallen, Bruch, Blitzschlag oder Ein-
dringen von Flüssigkeiten verursacht wurden, Mängel oder Schäden, die durch
mechanische, chemische oder thermische Einwirkungen verursacht wurden,
Produkte, die mit Zusätzen oder Zubehör ausgestattet wurden, die nicht vom
Hersteller genehmigt sind. Der Kunde muss den Konformitätsmangel innerhalb
von zwei Monaten ab dem Datum, an dem er ihn festgestellt hat, anzeigen, um
seine Ansprüche geltend zu machen. Bei Austausch des Produkts oder eines
Einzelteils werden die ersetzten Produkte oder Einzelteile wieder Eigentum des
Herstellers. Die ausgeführte Garantieleistung führt nicht zur Verlängerung der
Abgewinkeltes Gehäuse (a) und Schlagappli-
kator (b).
Einschrauben mit dem zur Ausrüstung gehören-
den entsprechenden Schlüssel (Foto 3) bis zum
Anschlag .
Einschrauben bis zum Anschlag (Foto 6) Die
abgewinkelte Einheit muss nach unten gerichtet
sein, wie im Foto gezeigt.
Setzen Sie den Einwegschlagapplikator in das
abgewinkelte Gehäuse ein (Foto 1-2).
Abgewinkelte einheit.Schraubenschlüssel.
Setzen Sie die abgewinkelte Einheit (Foto 5) in
den Griff ein.
Anlage 1 - Montage des Instruments
MONTAGE DES HANDSTÜCKS
Garantiezeit. Deshalb beginnt bei Austausch des Produkts oder eines seiner
Einzelteile keine neue Garantiezeit für die zum Austausch gelieferten Waren
oder Einzelteile, sondern es muss Bezug auf das Kaufdatum der Originalware
genommen werden. Jegliche anderen Ansprüche sind ausgeschlossen.
Diese Anleitung nden Sie zusammen mit weiteren Informationen über das
Instrument und den Ablauf der Montage- und Demontageschritte des Produkts
Smartact auf der Website: www.metahosp.com.com.
Nur, wenn Sie den Inhalt dieser Dokumentation kennen, können Sie Fehler
vermeiden und eine einwandfreie Funktion unseres Produktes sicherstellen.
Foto. 1
Foto. 3
Foto. 6
Foto. 4
Foto. 7
Foto. 5
Foto. 2
12
Smartact
Smartact
NO
Max 6 BarMin 2 Bar
Verbinden sie die Treteinheit mit dem Druck-
luftnetz. Verwenden sie einen Druckminderer
European Standard1.
1 Der hohle Druckminderer ist optional und wird nicht in der Verpackung mitgeliefert.
Führen Sie das Kabelendstück in die Treteinheit
ein.
Als Betriebsdruck legen Sie nicht weniger als 2
bar (maximal zulässig 6 bar).
Positionieren Sie das Endstück in die Öffnung,
die sich im oberen Teil der Treteinheit bendet.
Verbindungskabel zwischen Treteinheit und
Handstück.
Führen Sie die Hülse horizontal an den runden
Sitz heran.
MONTAGE DES HANDSTÜCKS AN DAS PEDAL
Foto. 8
Foto. 10
Foto. 12 Foto. 13 Foto. 14
Foto. 11
Foto. 9

13
Smartact
Smartact
Anlage 2 - Montage der Smartact-Nägel in das Instrument
Anlage 3 - Montage der Luftkupplung
Öffnen Sie den sterilen Smartact Pin-Blister
Code 4730.
Fügen Sie die Hülse mit dem ¼ Aufnahmesockel, den ge-
raden zylindrischen Stecker und schliesslich die im Bausatz
mitgelieferte 6 mm ¼ Leitung zusam.
Öffnen Sie das Smartact Pin-Behältnis.
Das Smartact-System ist gebrauchsfertig.
Nehmen Sie den Einwegschlagapplikator aus dem
Blister und schrauben Sie es mit dem im Bausatz
mitgelieferten entsprechenden Schlüssel in das ab-
gewinkelte Gehäuse.
Das so montierte System kann nun an den Kupplungsstecker
der Treteinheit angekuppelt werden. Verbinden Sie nachei-
nander das System mit dem Drucklufteinlass der Arztpraxis
(statten Sie sich gegebenenfalls mit einem Druckminderer
aus, damit ein Betriebsdruck von 2 bis 6 bar gewährleistet ist.
Setzen Sie den Einwegschlagapplikator in den
entsprechenden Sitz und entnehmen Sie den
Nagel (Foto 21).
Gehen Sie sehr aufmerksam vor und prüfen
Sie, ob das Gewinde richtig greift und ob Sie
den Schlagapplikator bis zum Anschlag festge-
schraubt haben.
In den Einwegschlagapplikator eingesetzter
Nagel.
Foto. 17
Foto. 20
Foto. 21
Foto. 23Foto. 22
Foto. 18 Foto. 19
Foto. 15
Foto. 16

14
Smartact
Smartact
FR INSTRUCTIONS D’UTILISATION
Utilisation prévue
Le Smartact est un système pneumatique qui permet le positionnement de
clous de xation et de stabilisation de la membrane pour la régénération
osseuse en chirurgie orale. Il peut être utilisé pour stabiliser les membranes
résorbables et les membranes non résorbables.
Le Smartact est doté d’une pédale pneumatique qui permet d’imprimer une
force (réglable selon les indications d’utilisation en fonction du type d’os) qui
permet d’introduire instantanément le clou et de xer ainsi de manière stable la
membrane à l’os. La pièce à main a été conçue de telle sorte que ses dimen-
sions minimes et sa forme eflée avec l’extrémité recourbée lui permettent
d’atteindre facilement les zones les plus difcilement accessibles de la cavité
orale. Le Smartact est réalisé à l’aide de matériaux résistants à la corrosion et
exempts de substances dangereuses.
Le Smartact est fourni non stérile. Il doit être lavé et stérilisé
avant chaque utilisation.
Le dispositif Smartact doit être utilisé exclusivement par un
personnel médical compétent.
Le chirurgien doit établir que le patient est apte à subir les
interventions de régénération osseuse et doit établir la sé-
quence chirurgicale appropriée.
Ne jamais utiliser le Smartact sans s’être préalablement assu-
ré que tous ses composants ont été correctement assemblés
(voir les instructions de montage).
Pour éviter un actionnement accidentel, assembler tout
d’abord la pièce à main et ensuite seulement relier l’instrument
à la pédale. Le personnel médical et le patient doivent porter
des lunettes de protection. Veiller à respecter la séquence de
montage (voir instructions de montage).
Ne jamais actionner le Smartact sans avoir mis en place la
pince battante jetable et le clou.
Veiller à mettre correctement en place la pince battante jetable
(voir les photos 17 et 18) pour prévenir le risque d’ingestion
accidentelle par le patient.
(voir les photos 19, 20 et 21) pour prévenir le risque d’inges-
tion par le patient.
Quand l’instrument n’est pas utilisé, utiliser le réglage SOFT
par souci de sécurité.
Avant utilisation, s’assurer que le conditionnement de l’instru-
ment est intact.
Ne pas utiliser le dispositif dans le cas où le conditionnement
serait endommagé.
Lors de la manipulation du dispositif Smartact, veiller à tou-
jours utiliser des gants stériles et à respecter de rigoureuses
Après utilisation, jeter dans les conteneurs pour déchets sani-
taires prévus à cet effet, conformément à la réglementation
applicable.
Meta ne saurait répondre de l’utilisation impropre du dispo-
sitif.
Montage de l’instrument avant utilisation
Suivre scrupuleusement la séquence de montage ; l’absence d’un composant,
son mauvais montage ou son montage partiel peuvent :
empêcher/compromettre le bon fonctionnement ;
• provoquer la rupture de l’instrument.
• La séquence de montage est indiquée sur le schéma 1 joint en annexe.
Après avoir assemblé l’instrument, il est recommandé de couvrir le câble et
éventuellement la pièce à main à l’aide de gaines de protection jetables, de
façon à faciliter ensuite la phase de lavage et de stérilisation de l’instrument.
Montage des clous Smartact Pin sur l’instrument
Veiller à respecter scrupuleusement la séquence d’armement du disposi-
tif. L’absence d’un élément, son mauvais montage ou son montage partiel
peuvent :
exposer au risque d’ingestion accidentelle par le patient du clou
et de la pince battante ;
• empêcher/compromettre le bon fonctionnement ;
• provoquer la rupture de l’instrument.
La séquence de montage est indiquée sur le schéma 2 joint en annexe.
L’utilisation de clous d’autres fabricants est fortement déconseillée. Meta
ne saurait répondre de cette utilisation impropre de l’instrument susceptible
d’exposer le patient à des risques et d’endommager gravement le dispositif.
Réglage et utilisation de l’instrument
Après avoir positionné le clou sur le battant jetable comme indiqué dans
l’annexe 2, positionner l’instrument dans l’axe du plan de réception sur la zone
de greffe et actionner la pédale. Si nécessaire, actionner à nouveau la pédale
jusqu’à ce que le clou soit complètement introduit. En fonction du cas clinique
et en référence à la densité osseuse et à l’anatomie de la crête (épaisseur,
inclinaison, etc.), le médecin doit établir le nombre de répétitions.
L’instrument est doté d’un réglage qui permet à l’utilisateur d’appliquer la force
voulue (soft – medium – hard) pour la greffe.
Le réglage SOFT est recommandé pour les zones du plancher latéral du sinus.
Le réglage MEDIUM est recommandé pour les zones de la mâchoire avec os
cortical d’épaisseur variable et d’une densité osseuse de Type II ou III.
Le réglage HARD est recommandé pour les zones de la mâchoire avec os
cortical d’une densité osseuse de Type I.
Avant de procéder au réglage du Smartact, il est recommandé de perforer la
couche corticale pour tester la consistance osseuse.
Durant l’utilisation, la trajectoire du câble ne doit pas présenter de courbes
excessives pour ne pas provoquer le mauvais fonctionnement du système.
Démontage de l’instrument avant rangement
Après avoir utilisé l’instrument, le démonter en suivant les instructions de mon-
tage de l’annexe 1 en sens inverse. Procéder ensuite à un soigneux lavage et
nettoyage de l’instrument avant de le ranger.
Lavage et stérilisation de l’instrument
L’instrument est fourni non stérile. Il doit être désinfecté, lavé et stérilisé avant
toute utilisation. Décrocher le câble de la pédale (sans dévisser la pièce à
main) en veillant à ne pas le plier excessivement pour ne pas l’endommager.
Aussitôt après la procédure chirurgicale, procéder au lavage à l’aide de déter-
gents germicides. Pour les lavages, utiliser des détergents appropriés ; ne pas
utiliser de peroxyde d’hydrogène (H2O2) ni de détergents à base de chlore. Le
ranger dans une enveloppe pour procéder ensuite à sa stérilisation.
Attention : la pédale peut être lavée à l’aide des détergents germicides sus-
mentionnés mais ne peut être stérilisée en autoclave.
La stérilisation du câble et de la pièce à main doit être effectuée en autoclave
à vapeur à 121°C pendant 30 minutes, en veillant à toujours appliquer des
cycles de stérilisation validés conformément aux normes en vigueur. Le main-
tien de la condition de stérilisation est garanti par le parfait état de l’enveloppe,
aussi veiller à toujours la contrôler avant de l’utiliser.
Entretien
L’entretien consiste à nettoyer et laver correctement l’instrument dans le res-
pect des modalités indiquées au point précédent.
Branchement de l’instrument à l’air comprimé
L’instrument doit être branché à l’alimentation comprimé réglé sur 2 bar.
Que se passe-t-il si la pression est :
• inférieure à 2 bar : fonctionnement insufsant ;
• supérieure à 2 bar : une pression supérieure a un effet sur la vitesse
d’actionnement de la pédale mais non pas sur la force imprimée au
ressort de la pièce à main.
Pour garantir le bon fonctionnement, il est recommandé d’utiliser une pression
comprise entre 2 et 6 bar.
Kit raccordement air (option)
Le kit de raccordement d’air est fourni sur demande comme option au moment
de l’achat.
Pour assembler correctement les composants, se reporter à la séquence dé-
crite dans l’Annexe 3. Le kit contient les accessoires de raccordement rapide
à la pédale et un tuyau de passage d’air auquel l’utilisateur doit effectuer le
raccordement à l’aide des embouts prévus à cet effet en fonction du type de
sortie d’air comprimé installée dans le cabinet médical.
Garantie commerciale de l’instrument
La garantie commerciale accordée par Meta est une garantie de bon fonction-
nement qui couvre les défauts d’utilisation prolongée.
Le dispositif Smartact est garanti conformément aux dispositions légales pen-
dant une durée de 12 mois à compter de la date de vente indiquée sur la
facture.
La garantie n’est pas applicable en cas d’utilisation impropre du dispositif.
Par utilisation impropre, il faut entendre par exemple : les réparations ou les
interventions effectuées par des personnes non autorisées par le fabricant,
les défauts ou les dommages provoqués par des chutes, par des ruptures,

15
Smartact
Smartact
ANO
B
par la foudre ou par des inltrations de liquides, les défauts ou les dommages
provoqués par des causes mécaniques, chimiques ou thermiques, par des dis-
positifs dotés d’éléments ou d’accessoires non autorisés par le fabricant. Pour
faire valoir ses droits à la garantie, le client doit déclarer le défaut de conformité
dans un délai de deux mois à compter de la date à laquelle ce même défaut a
été constaté. En cas de changement du produit ou d’un composant, le produit
ou le composant retourné au titre du changement sont la propriété du fabricant.
La prestation effectuée au titre de la garantie ne prolonge pas la durée de cette
dernière. Aussi, en cas de changement du produit ou d’un composant, au pro-
duit ou au composant nouvellement fourni au titre de la garantie, la durée de la
Corps courbe (a) et dispositif battant (b).
A l’aide de la clé fournie à cet effet (photo 3),
visser à fond.
Visser à fond (photo 6). Le corps courbe doit
être orienté vers le bas comme indiqué sur la
photo.
Introduire le dispositif battant dans le corps
courbe (photos 1-2).
Groupe corps courbe.Clé de vissage.
Introduire le corps courbe (photo 5) sur la pièce
à main.
Annexe 1 - Montage de l’instrument
ASSEMBLAGE DE LA PIÈCE À MAIN
garantie restante reste celle calculée à compter de la date d’achat d’origine du
produit. Tout autre droit, de quelque nature que ce soit, est exclu de la garantie.
Les présentes instructions d’utilisation, conjointement aux informations sur
l’instrument et les procédures de montage et de démontage du Smartact, sont
disponibles sur le site : www.metahosp.com
Il est indispensable de prendre connaissance du contenu de cette documen-
tation pour éviter les risques d’erreur et pour garantir le bon fonctionnement
du produit.
Photo. 1
Photo. 3
Photo. 6
Photo. 4
Photo. 7
Photo. 5
Photo. 2

16
Smartact
Smartact
NO
Max 6 BarMin 2 Bar
Raccorder la pédale à l’alimentation d’air com-
primé. Utiliser un réducteur de pression au Stan-
dard Européen1.
1 Le réducteur de pression femelle est une option non fournie avec le produit.
Brancher le raccord du câble à la pédale.
Régler la pression de service sur un minimum
de 2 bar (pression max. admise 6 bar).
Placer le raccord dans le logement présent sur
la partie supérieure de la pédale.
Câble de raccordement de la pédale à la pièce
à main.
Faire coulisser horizontalement la bague vers le
logement circulaire.
RACCORDEMENT DE LA PIÈCE À MAIN À LA PÉDALE
Photo. 8
Photo. 10
Photo. 12 Photo. 13 Photo. 14
Photo. 11
Photo. 9
17
Smartact
Smartact
Annexe 2 – Montage des clous Smartact sur l’instrument
Annexe 3 – Montage du kit de raccordement air
Ouvrir le blister stérile Smartact Pin Code 4730.
Introduire la prise à embout femelle ¼, le raccord droit cylin-
drique mâle et le tuyau de 6 mm ¼ fourni avec le kit.
Ouvrir le conteneur Smartact Pin.
Le système Smartact est prêt à être utilisé.
Prélever, dans le blister, la pince battante
jetable et la visser sur le corps courbe à l’aide
de la clé fournie à cet effet avec le kit.
Ainsi monté, le système peut à présent être xé au connecteur
mâle de la pédale. Ensuite, raccorder le système à la prise
d’air comprimé du cabinet médical (au besoin, se doter d’un
réducteur de pression pour garantir une pression de service
comprise entre 2 et 6 bar).
ntroduire le battant jetable à l’intérieur du loge-
ment prévu à cet effet et prélever le clou (Photos
21).
Veiller à bien s’assurer que le letage a été cor-
rectement engagé et que la pince battante a été
vissée à fond.
Clou placé sur le battant jetable.
Photo. 17
Photo. 20
Photo. 21
Photo. 23Photo. 22
Photo. 18 Photo. 19
Photo. 15 Photo. 16

18
Smartact
Smartact
ES INSTRUCCIONES DE USO
Uso previsto
Smartact es un sistema neumático que permite la colocación de clavos
para jar y estabilizar la membrana en regeneración ósea en cirugía oral.
Puede utilizarse para estabilizar tanto las membranas reabsorbibles como
las membranas no reabsorbibles.
Smartact está dotado de un pedal neumático que permite imprimir una
fuerza (regulable en los distintos usos, según el tipo de hueso), que intro-
duce instantáneamente el clavo, jando así de forma estable la membrana
al hueso. El mango se ha diseñado con dimensiones reducidas al mínimo,
con forma ahusada y con punta curvada para alcanzar fácilmente incluso
las zonas menos accesibles de la cavidad oral. Smartact está realizado
con material libre de sustancias peligrosas y resistente a la corrosión.
Smartact se suministra no estéril. Debe lavarse y esterilizar-
se antes de cada uso.
El dispositivo Smartact debe utilizarse exclusivamente por
personal médico competente.
El cirujano debe determinar la idoneidad del paciente para
las intervenciones de regeneración ósea y la secuencia qui-
rúrgica oportuna.
No usar nunca el Smartact sin asegurarse de que todos sus
componentes se hayan ensamblado correctamente (véanse
las instrucciones de montaje).
Para evitar un accionamiento accidental, ensamblar primero
el mango y después enganchar el instrumento al pedal. El
personal médico y el paciente deben usar gafas de protec-
ción adecuadas. Asegurarse de respetar la secuencia de
montaje correcta (véanse las instrucciones de montaje).
No accionar nunca el Smartact sin haber introducido la pinza
batiente de un solo uso y el clavo.
Asegurarse de introducir correctamente la pinza batiente de
un solo uso (véanse fotos 17 y 18) para evitar riesgo de in-
gestión accidental por parte del paciente.
Asegurarse de enganchar correctamente el clavo a la pinza
batiente de un solo uso (véanse fotos 19, 20 y 21) para evitar
riesgo de ingestión accidental por parte del paciente.
Cuando no se esté usando el instrumento, introducir la regu-
lación SOFT por seguridad.
Antes del uso, asegurarse de que el envase del instrumento
no esté dañado.
No utilizar el producto si el envase está dañado.
Durante la manipulación del dispositivo Smartact utilizar
siempre guantes estériles y respetar los procedimientos co-
rrespondientes para garantizar la esterilidad.
Después del uso, depositar en contenedores adecuados
para residuos sanitarios, de conformidad con la legislación
vigente en la materia.
Meta no se hace responsable del uso inadecuado del pro-
ducto.
Cómo montar el instrumento antes del uso
Seguir rigurosamente la secuencia de montaje. Si no se monta un componente
o se hace de forma parcial o incorrecta, puede dar lugar a:
• falta de funcionamiento o mal funcionamiento;
• rotura del instrumento.
La secuencia de montaje se indica en el esquema Anexo 1.
Después de ensamblar el instrumento, se recomienda cubrir el cable y even-
tualmente también el mango con fundas de protección adecuadas de un solo
uso, para facilitar la fase posterior de lavado y esterilización del instrumento.
Cómo montar los clavos Smartact Pin en el instrumento
Seguir rigurosamente la secuencia para armar el dispositivo. Si no se monta
un elemento o se hace de forma parcial o incorrecta, puede dar lugar a:
• riesgo de ingestión accidental por parte del paciente del clavo de la
pinza batiente;
• falta de funcionamiento o mal funcionamiento;
• rotura del instrumento.
La secuencia de montaje se indica en el esquema Anexo 2.
Se desaconseja en gran medida el uso de clavos de otros fabricantes.
Meta no responde de este uso inadecuado del instrumento, que podría causar
riesgos para el paciente y dañar seriamente el dispositivo.
Regulación y uso del instrumento
Después de colocar el clavo sobre el batiente de un solo uso, como se explica
en el Anexo 2, colocar el instrumento en línea con el plano receptor sobre la
zona de injerto y accionar el pedal. Si es necesario, repetir el accionamiento
del pedal hasta la introducción completa del clavo. El médico, según el caso
clínico y tomando como referencia la densidad ósea y anatomía de la cresta
(espesor, inclinación, etc.) deberá establecer el número de repeticiones ne-
cesarias.
El instrumento tiene una regulación que permite al usuario elegir la fuerza idó-
nea (soft - medium - hard) para el injerto.
La regulación SOFT (suave) se recomienda para las zonas del suelo lateral
del seno.
La regulación MEDIUM (media) se recomienda para las zonas del maxilar con
cortical de espesor variable y densidad ósea tipo II o III.
La regulación HARD (fuerte) se recomienda para las zonas de la mandíbula
con cortical de densidad ósea tipo I.
Antes de proceder a la regulación del Smartact se recomienda la perforación
previa de la cortical para probar la consistencia ósea.
Durante el uso, la trayectoria del cable no debe estar en condiciones extremas
de curvatura para no provocar malfuncionamiento del sistema.
Cómo desmontar el instrumento para guardarlo
Después de usar el instrumento, desmontarlo siguiendo en orden inverso las
instrucciones de montaje ilustradas en el Anexo 1. Proceder posteriormente a
un lavado preciso y a la limpieza del instrumento antes de guardarlo.
Cómo lavar y esterilizar el instrumento
El instrumento se suministra no estéril. Debe desinfectarse, lavarse y esterili-
zarse antes de cada uso. Retirar el cable del pedal (sin desatornillar el mango)
con cuidado de no doblarlo en exceso para no dañarlo. Proceder al lavado con
detergentes germicidas adecuados inmediatamente después del procedimien-
to quirúrgico. Para el lavado, usar detergentes adecuados, no usar peróxido
de hidrógeno (H2O2) ni detergentes con base de cloro. Colocarlo en la bolsa
correspondiente para la fase posterior de esterilización.
Atención: la pedalera puede lavarse con los detergentes germicidas adecua-
dos, indicados anteriormente, pero no se puede esterilizar en autoclave.
La esterilización del cable y del mango debe realizarse en autoclave a vapor
a 121 °C durante 30 minutos, utilizando siempre ciclos de esterilización vali-
dados de conformidad con las normativas vigentes. El mantenimiento de la
esterilidad está garantizado por la integridad de la bolsa. Comprobarla siempre
antes del uso.
Mantenimiento
El mantenimiento ordinario consiste en el correcto lavado y limpieza del instru-
mento según los modos indicados en el punto anterior.
Conexión del instrumento al aire comprimido
El instrumento debe conectarse a la instalación de aire comprimido regulado
a 2 bar.
Si la presión es:
• inferior a 2 bar: funcionamiento insuciente;
• superior a 2 bar: la mayor presión incide en la velocidad de acciona-
miento del pedal, pero no en la fuerza impresa al muelle del mango.
El funcionamiento recomendado es entre 2 y 6 bar de presión.
Acoplamiento de aire opcional
El kit de acoplamiento de aire se suministra de forma opcional a petición en el
momento de la adquisición.
En el Anexo 3 se indica la secuencia para el ensamblaje correcto de los com-
ponentes. El kit contiene accesorios para el acoplamiento rápido al pedal y un
tubo de paso de aire al que el usuario deberá engancharse con los correspon-
dientes conectores, según el tipo de salida de aire comprimido instalada en el
consultorio médico.
Garantía comercial del instrumento
La garantía comercial ofrecida por Meta es una garantía de buen funciona-
miento contra los defectos por el uso prolongado.
El dispositivo Smartact está garantizado según las disposiciones legales du-
rante 12 meses desde la fecha de venta que aparece en la factura.
La garantía no es aplicable en caso de uso no adecuado del dispositivo. Se
denen como usos no adecuados, por ejemplo, las siguientes acciones: repa-
raciones o intervenciones realizadas por parte de personal no autorizado por el
fabricante, defectos o daños provocados por caída, rotura, rayo o inltraciones

19
Smartact
Smartact
ANO
B
de líquidos, defectos o daños provocados por inuencias de tipo mecánico,
químico o térmico, dispositivos dotados de integraciones o accesorios no
autorizados por el fabricante. El cliente, para ejercer sus derechos, deberá
denunciar el defecto correspondiente en un plazo de dos meses desde la fe-
cha en la que se detectó dicho defecto. En caso de sustitución del producto
o de un componente, los productos o las partes individuales restantes, tras la
sustitución, serán propiedad del fabricante. La prestación realizada en garan-
tía no prolonga el período de la garantía. Por lo tanto, en caso de sustitución
del producto o de uno de sus componentes, para el producto o el componente
individual suministrado en sustitución no habrá un nuevo período de garantía,
Cuerpo curvo (a) y dispositivo batiente (b).
Con la llave correspondiente suministrada (foto
3), atornillar hasta el nal de carrera.
Atornillar hasta el nal de carrera (foto 6). El
cuerpo curvo debe estar hacia abajo, como se
muestra en la imagen.
Introducir el dispositivo batiente dentro del cuer-
po curvo (foto 1-2).
Conjunto cuerpo curvo.Llave para atornillar.
Introducir el conjunto cuerpo curvo (foto 5) en
el mango.
Anexo 1 - Montaje del instrumento
ENSAMBLAJE DEL MANGO
sino que se tendrá en cuenta la fecha de adquisición del producto original. Se
excluyen otros derechos, de cualquier tipo.
Las presentes instrucciones de uso, junto con información adicional sobre el
instrumento y las secuencias de montaje y desmontaje de Smartact, están
disponibles en el sitio web: www.metahosp.com.
Solo observando el contenido de esta documentación se pueden evitar errores
y garantizar un funcionamiento correcto de nuestro producto.
Foto. 1
Foto. 3
Foto. 6
Foto. 4
Foto. 7
Foto. 5
Foto. 2

20
Smartact
Smartact
NO
Max 6 BarMin 2 Bar
Fijar la pedalera a la red de aire comprimido.
Usar un reductor de presión European Stan-
dard 1.
1 El reductor de presión hembra es opcional y no se incluye en el suministro.
Introducir el extremo del cable en la pedalera.
Congurar la presión de funcionamiento a 2 bar
mínimo (máx. permitida 6 bar).
Colocar el terminal dentro de la cavidad que se
encuentra en la parte superior del pedal.
Cable de conexión de la pedalera al mango.
Deslizar la contera horizontalmente hasta el
alojamiento circular.
ENGANCHE DEL MANGO AL PEDAL
Foto. 8
Foto. 10
Foto. 12 Foto. 13 Foto. 14
Foto. 11
Foto. 9
Table of contents
Languages:
Popular Valve Positioner manuals by other brands

M-system
M-system MEX-D instruction manual

Flowserve
Flowserve Logix 3200MD Installation, operation and maintenance

Burkert
Burkert 2103 Series Additional instructions

Baker Hughes
Baker Hughes Masoneilan SVI FF quick start

Flexco
Flexco RBP1 Installation, operation and maintenance guide

Baker Hughes
Baker Hughes Masoneilan SVi 1000 instruction manual


