Metalform Tow and Collect Mini 700 User manual
Owner’s Guide & User Manual
Tow and Collect Mini 700
Page 1 of 31
Tow and Collect
Mini 700
Owner’s Guide
&
User Manual

Owner’s Guide & User Manual
Tow and Collect Mini 700
Page 2 of 31
DISCLAIMER!
Read this Manual from start to finish before attempting to assemble, use or maintain the Equipment to
which it refers. Do not attempt assembly, use or maintenance unless you know what you are doing. We
accept no responsibility if you fail to follow the instructions in this Manual.
If you do not understand a point in this Manual, don’t guess. Don’t take short cuts. If in doubt, stop!
Contact us or our authorised representatives for advice. We are here to help.
The Equipment is designed for easy assembly and use by persons who are reasonably familiar with farm
implements and machinery. However, some of the maintenance procedures may require special tools or
consumables or a level of experience with farm implements and machinery than you may not possess. If
you encounter any difficulties, contact us or your own mechanic or technician for assistance.
To reduce packaging and freight costs, the drawbar is not attached to the Equipment. Assembly of the
drawbar to the Equipment is your responsibility.
For each customer, operating conditions will vary, sometimes greatly. Such variations may affect the
Equipment’s performance. We have no control over your unique operating environment. Hence, we make
no representations or warranties concerning the Equipment’s performance under your actual operating
conditions.
We made every effort to explain the assembly, operating, maintenance and safety procedures as clearly
and completely as possible. Nonetheless, it is not possible to anticipate, nor address, every conceivable
problem that may arise. This problem is compounded by the fact that no two operating environments are
exactly the same. Therefore, we are not able to guarantee that this Manual will address every issue or
problem that might arise concerning the assembly, operation, maintenance or safety of the Equipment to
which it relates.
This Manual is intended to provide you with general guidance. For specific guidance and support, contact
us or our authorised representative.
If you do not follow the assembly, use, maintenance and safety procedures in this Manual, the Equipment
may not function as expected. More seriously, it may cause property damage, personal injury or other
losses.
Use the Equipment at your own risk. We accept no liability for direct, indirect, incidental, special, or
consequential damages resulting from your failure to follow the assembly, use, maintenance and safety
procedures in this Manual. The foregoing limitation extends to damages for personal injury, damages to
your vehicle and other property damage, whether suffered by you or by a third party.
We used all due care in preparing this Manual. However, we accept no liability for errors or omissions.
We reserve the right to change the design or specifications of the Equipment, or the information in this
Manual, without notice.
Assembly, use and maintenance of the Equipment is entirely your risk and responsibility.

Owner’s Guide & User Manual
Tow and Collect Mini 700
Page 3 of 31
INTRODUCTION
Welcome
Metalform Tow and Farm takes this opportunity to welcome you as the new owner of a
Tow and Collect. We want you to get the best results from your new Collector and this user manual will
help you achieve this objective.
The safe operation and maintenance of your Tow and Collect is very important to prevent personal injury,
damage to the machine, other property and the environment.
We suggest you read and fully understand its coverage and your responsibilities of ownership prior to
operating the machine or carrying out maintenance.
Best wishes and kind regards,
New Zealand
Metalform Tow and Farm
74 Miller Street
Dannevirke, 4930
New Zealand
Phone: +64 6 374 7043
Email: sales@towandfarm.co.nz
Web: www.towandfarm.co.nz
Australia
Metalform Tow and Farm
105-117 Boundary Road
Laverton North, VIC 3026
Australia
Phone: 1300 630 279
Email: sales@towandfarm.com.au
Web: www.towandfarm.com.au
UK / Europe
Tow and Farm
Wood End
Prospect Road
New Farm Road Industrial Estate
Alresford
Hampshire, SO24 9QF
England
Phone: +44 1962 600 030
Email: sales@towandfarm.co.uk
Web: www.towandfarm.co.uk
USA / Canada
Tow and Farm, Inc.
105 Kendall Park Lane S,
Atlanta GA 30336
USA
Phone: 877 778 7181
Email: sales@towandfarm.com
Web: www.towandfarm.com
Owner’s Guide & User Manual
Tow and Collect Mini 700
Page 4 of 31
INTRODUCTION
Notes about Safety
Your safety and the safety of others are very important. Using this machine safely is an important
responsibility.
To help you make informed decisions about safety, we have provided operating procedures and other
information in this manual. This information alerts you to potential dangers and hazards that could injure
yourself or others.
You will find safety information in the following forms;
•Safety Labels –displayed on the machine.
•Safety Messages –proceeded by a safety alert symbol and one of these three signal words;
DANGER, WARNING and CAUTION.
•Safety Headings –such as IMPORTANT SAFETY INFORMATION
•Instructions –how to use the machine correctly and safely.
This book is filled with safety information –please read it carefully!
WARNING!
Do not start, operate or service machine until
you have read and understand the Owners
Guide and User Manual.
Failure to do so could result in serious injury.

Owner’s Guide & User Manual
Tow and Collect Mini 700
Page 5 of 31
CONTENTS
SAFETY...........................................................................................................................................................6
WARRANTY....................................................................................................................................................7
DELIVERY.......................................................................................................................................................8
Final Assembly............................................................................................................................................8
FEATURES & CONTROLS...........................................................................................................................10
Location of Features and Controls............................................................................................................10
Machine Height Adjustment ......................................................................................................................11
Tine Height Adjustment.............................................................................................................................11
Catcher Opening .......................................................................................................................................12
Catcher Closing.........................................................................................................................................12
OPERATION .................................................................................................................................................13
Safe Operation Precautions......................................................................................................................13
Before Operation.......................................................................................................................................13
Using the Tow and Collect ........................................................................................................................14
Hints for Operation ....................................................................................................................................14
Troubleshooting.........................................................................................................................................15
SERVICING...................................................................................................................................................16
The Importance of Maintenance ...............................................................................................................16
Maintenance Safety...................................................................................................................................16
Maintenance Schedule..............................................................................................................................17
Tyre Pressure............................................................................................................................................17
Lubrication.................................................................................................................................................17
Chain Tensioning ......................................................................................................................................19
Replacing the Canvas Skirt.......................................................................................................................20
Replacing the Brushes..............................................................................................................................21
Replacing the Tines...................................................................................................................................23
CONSUMER INFORMATION .......................................................................................................................24
Technical Information................................................................................................................................24
Serial Number Location.............................................................................................................................24
Spare Parts List.........................................................................................................................................25
Spare Parts Exploded View.......................................................................................................................29
Consumer Help and Information ...............................................................................................................30

Owner’s Guide & User Manual
Tow and Collect Mini 700
Page 6 of 31
SAFETY
Read and understand this owner’s manual before operating this machine. Failure to do so could result
in personal injury or equipment damage.
Know and understand the operation of all the controls. Never permit anyone to operate the machine
without proper instructions.
WARNING!
•NEVER allow any person to ride on the Tow and Collect.
•NEVER use on slopes with an incline greater than 9º (1:5 gradient).
•ENSURE you read and understand the owner’s manual for the tow vehicle before operation.
•KEEP children and pets away from area of operation.
•ENSURE the tow hitch is in good repair and fit for towing. Ensure the tow ball on the tow vehicle is
the correct size for the Tow and Collect.
•Never allow any person to stand close to the machine when it is operating.
•Where possible avoid operating in areas with rocks and loose debris as these can be flung out at
speed and may also jam the brush spindle.
•Eye protection and ear protection must be worn at all times.
•Do not open catcher while moving.
•Do not place hands or feet under the collector.
•Never allow a person under the age of 18 years to operate the Tow and Collect.
•Never use the Tow and Collect under the influence of alcohol or drugs.

Owner’s Guide & User Manual
Tow and Collect Mini 700
Page 7 of 31
WARRANTY
We warrant the Tow and Collect against defects in materials and workmanship. The term of this warranty
is one year from date of purchase.
This is a parts only warranty. You are responsible for disassembling the defective part and reassembling
the new part. We shall not be responsible or liable for the cost of field labour or other charges incurred by
you in removing and/or reassembling any part.
This warranty is void in circumstances where: (a) The Tow and Collect has been misused, abused,
neglected or damaged; (b) The Tow and Collect has been improperly assembled, repaired, serviced or
maintained; (c) The Tow and Collect has been modified; (d) The Tow and Collect has been connected to
other equipment with which it is not compatible; or (e) The Tow and Collect has been used for purposes
other than for which it was designed.
To make a warranty claim, contact us at the address below. Describe the problem to us. We will tell you
what to do next.
If we need to inspect, test or repair the part that is the subject of your claim, it is your responsibility to ship
the part to us at your cost. If we accept your warranty claim, we shall either repair or replace the defective
part in our discretion. We shall then ship the part back to you at our cost.
If the Tow and Collect is off-warranty or otherwise not subject to a valid warranty claim, we will repair or
replace the Tow and Collect, or part thereof, at your cost
Our sole responsibility is to repair or replace a part that is subject to a valid warranty claim. Under no
circumstance will we be liable for direct, indirect, incidental, special or consequential costs or damages to
the maximum extent permitted by law. The foregoing disclaimer extends to damages for personal injury,
damages to other equipment, other property damage, whether suffered by you or by a third party.
We accept no liability resulting from your failure to heed the assembly, use, maintenance and safety
instructions in our Owner’s Guide & User Manual.
This is an express warranty. We disclaim any other express or implied warranties, including warranties of
merchant-ability or fitness for purpose, to the maximum extent permitted by law.
Some jurisdictions do not allow limitations or disclaimers of implied or statutory warranties. Some
jurisdictions do not allow disclaimers or exclusions of consequential or incidental damages. Therefore, the
above disclaimers, limitations and exclusions may not apply in all jurisdictions in which we sell the Tow and
Collect.
This warranty gives you specific legal rights. You may have other rights or remedies pursuant to the laws
in your territory. Nothing in this limited warranty should be construed as limiting or restricting any other
statutory right or remedy that is available to you, except for such limitations or restrictions herein as may be
allowed by the law of the territory.

Owner’s Guide & User Manual
Tow and Collect Mini 700
Page 8 of 31
DELIVERY
The Tow and Collect is delivered assembled, apart from the tow bar.
Before you complete the final assembly of the Tow and Collect, carefully check the entire machine for
transit damage and report any problems immediately.
See the instructions below to complete the assembly of the Tow and Collect.
The tools required to attach the draw bar are included with your machine.
Final Assembly
To finish the assembly of the Tow and Collect, you must attach the tow bar to the main machine as
described in the steps below.
Tools required;
13mm Spanner
16mm Spanner
17mm Spanner
18mm Spanner
What’s in the box?
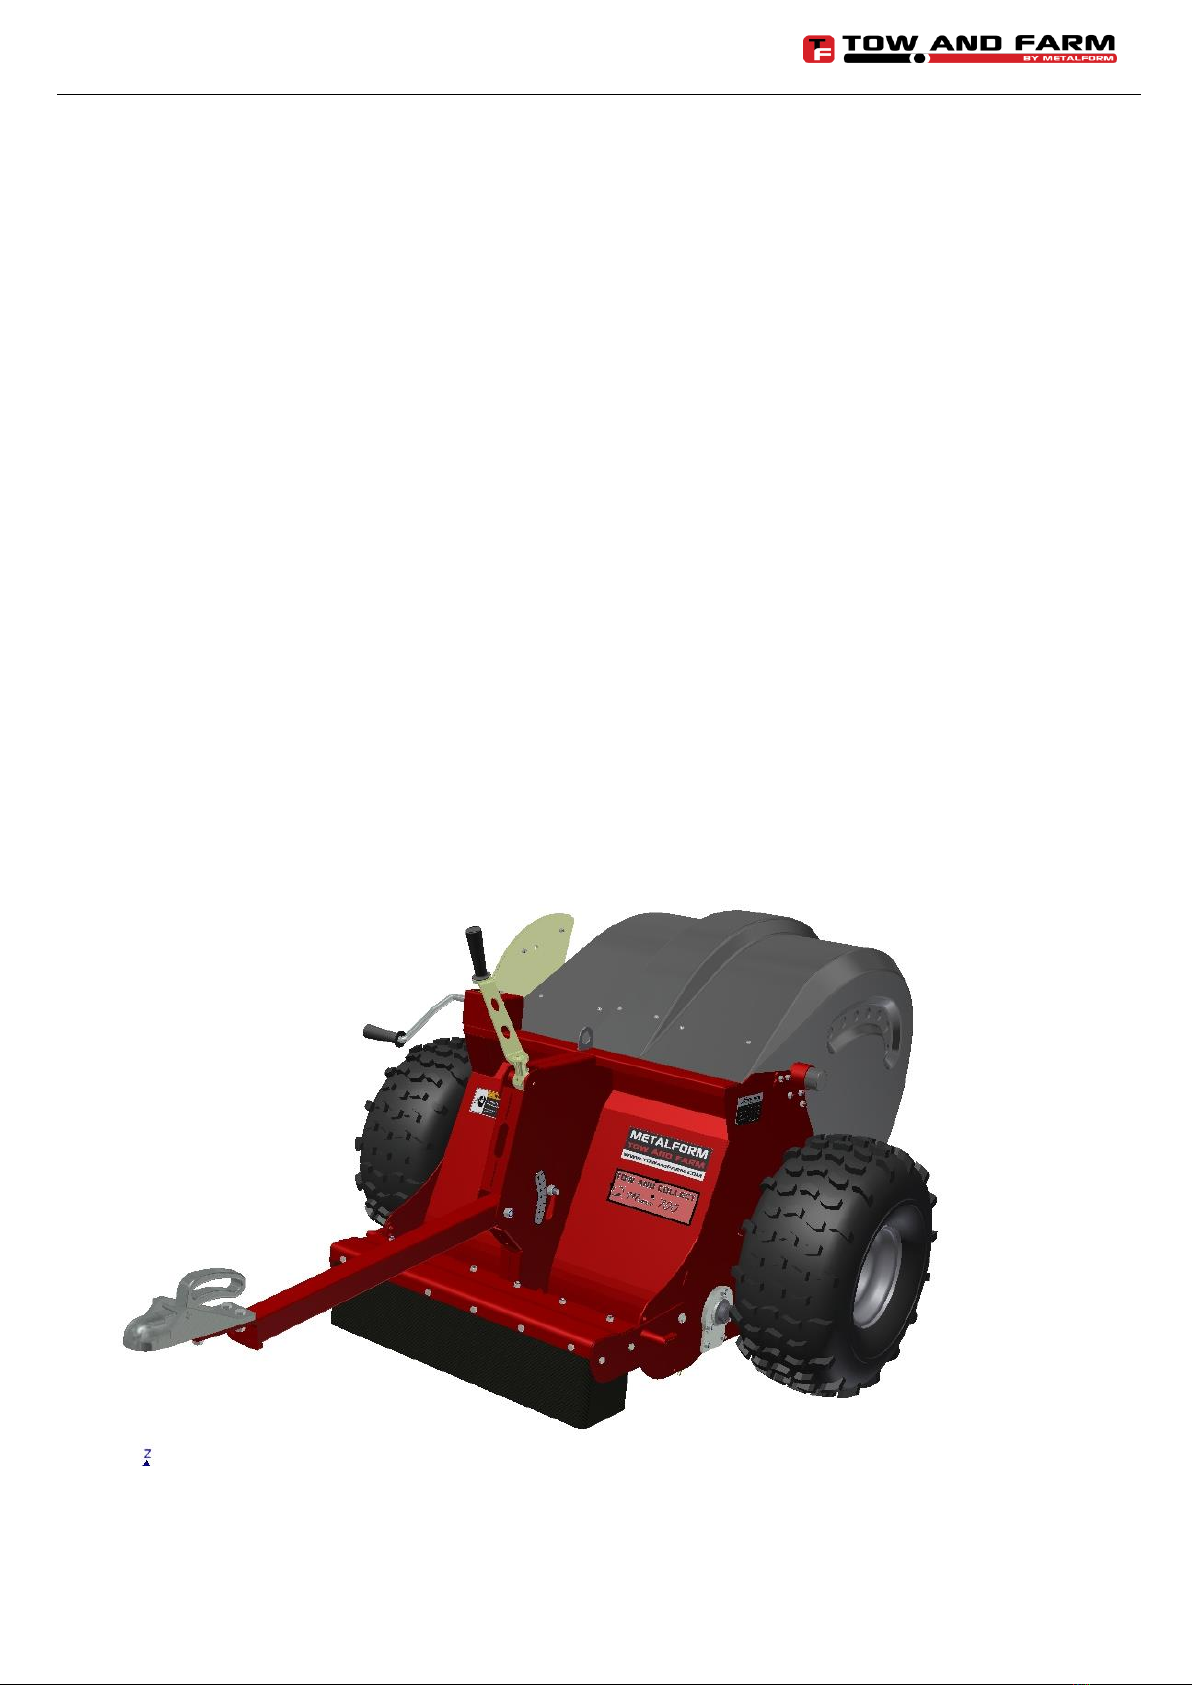
- Main Body (fig 1)
- Drawbar (fig 2)
- Bolts x 2 (M12 x 70)
- Nuts x 2 (M12 Nyloc)
- User Manual
Fig 1
Fig 2
Owner’s Guide & User Manual
Tow and Collect Mini 700
Page 9 of 31
DELIVERY
Final Assembly (continued)
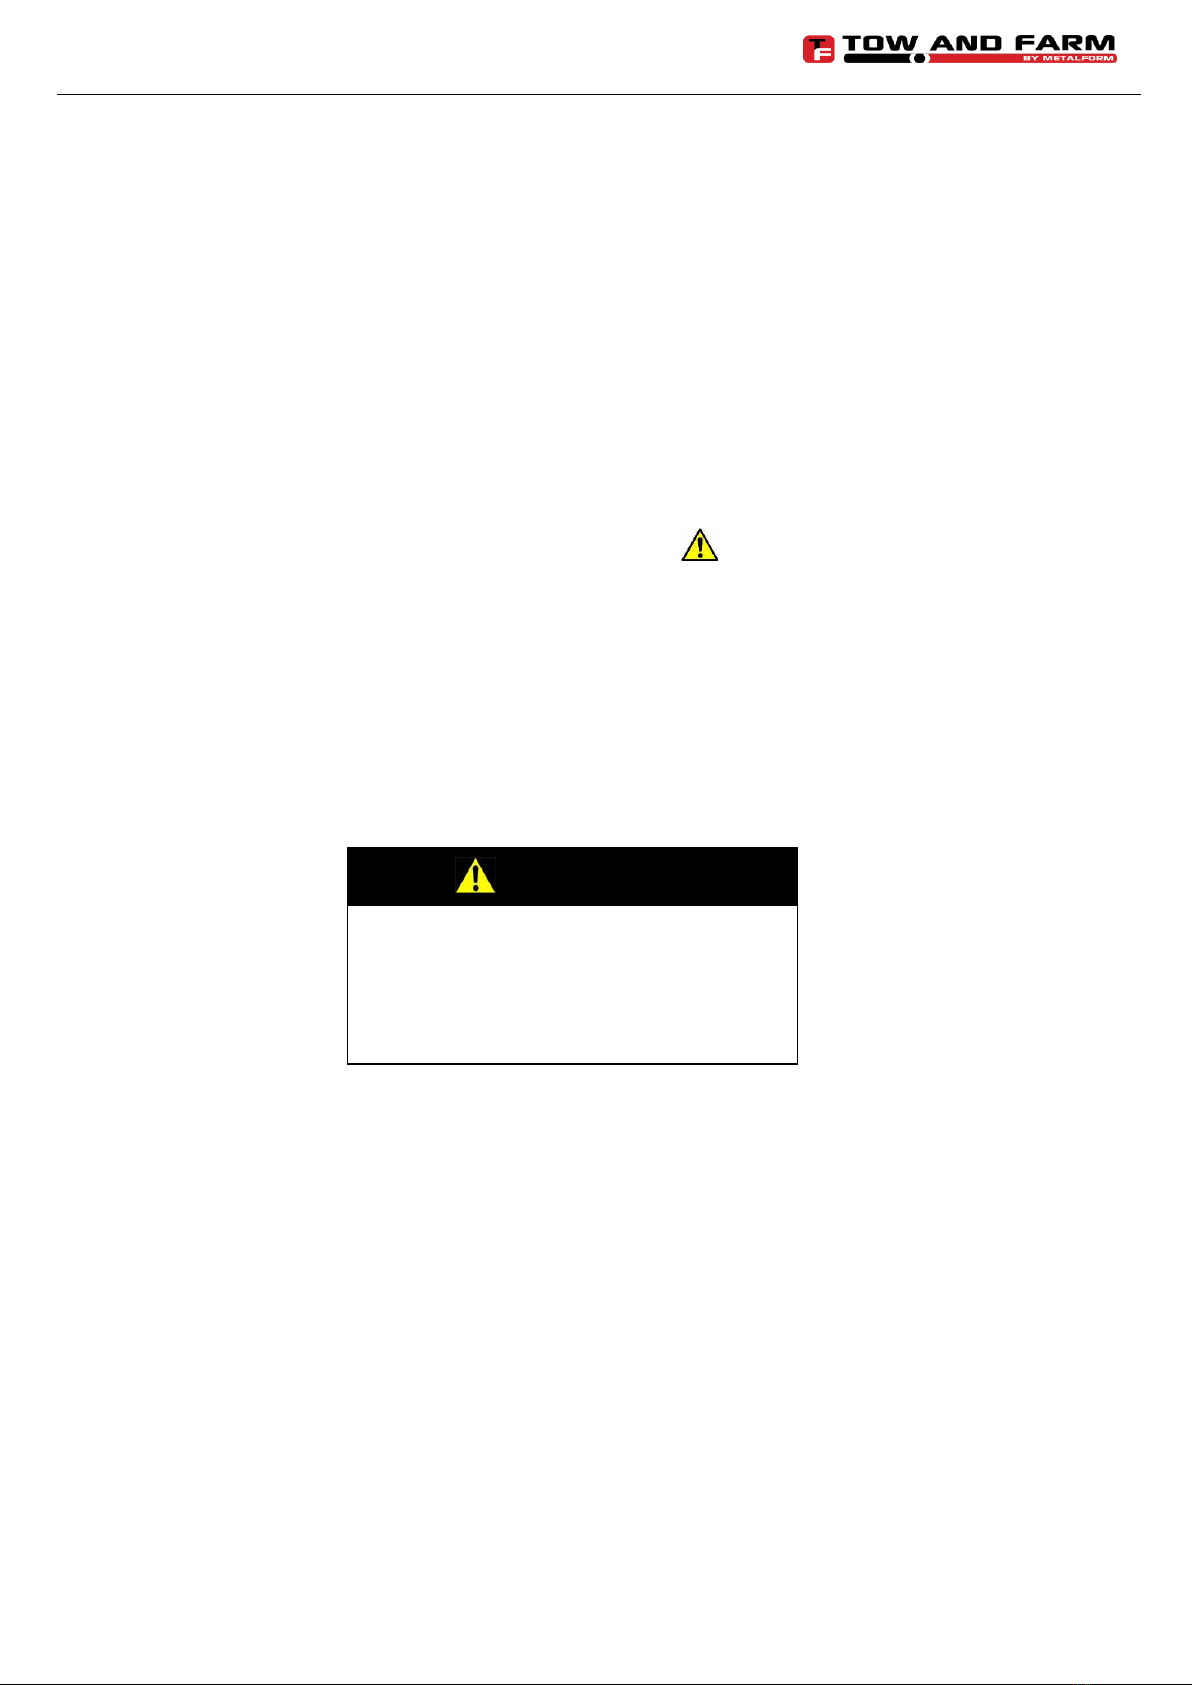
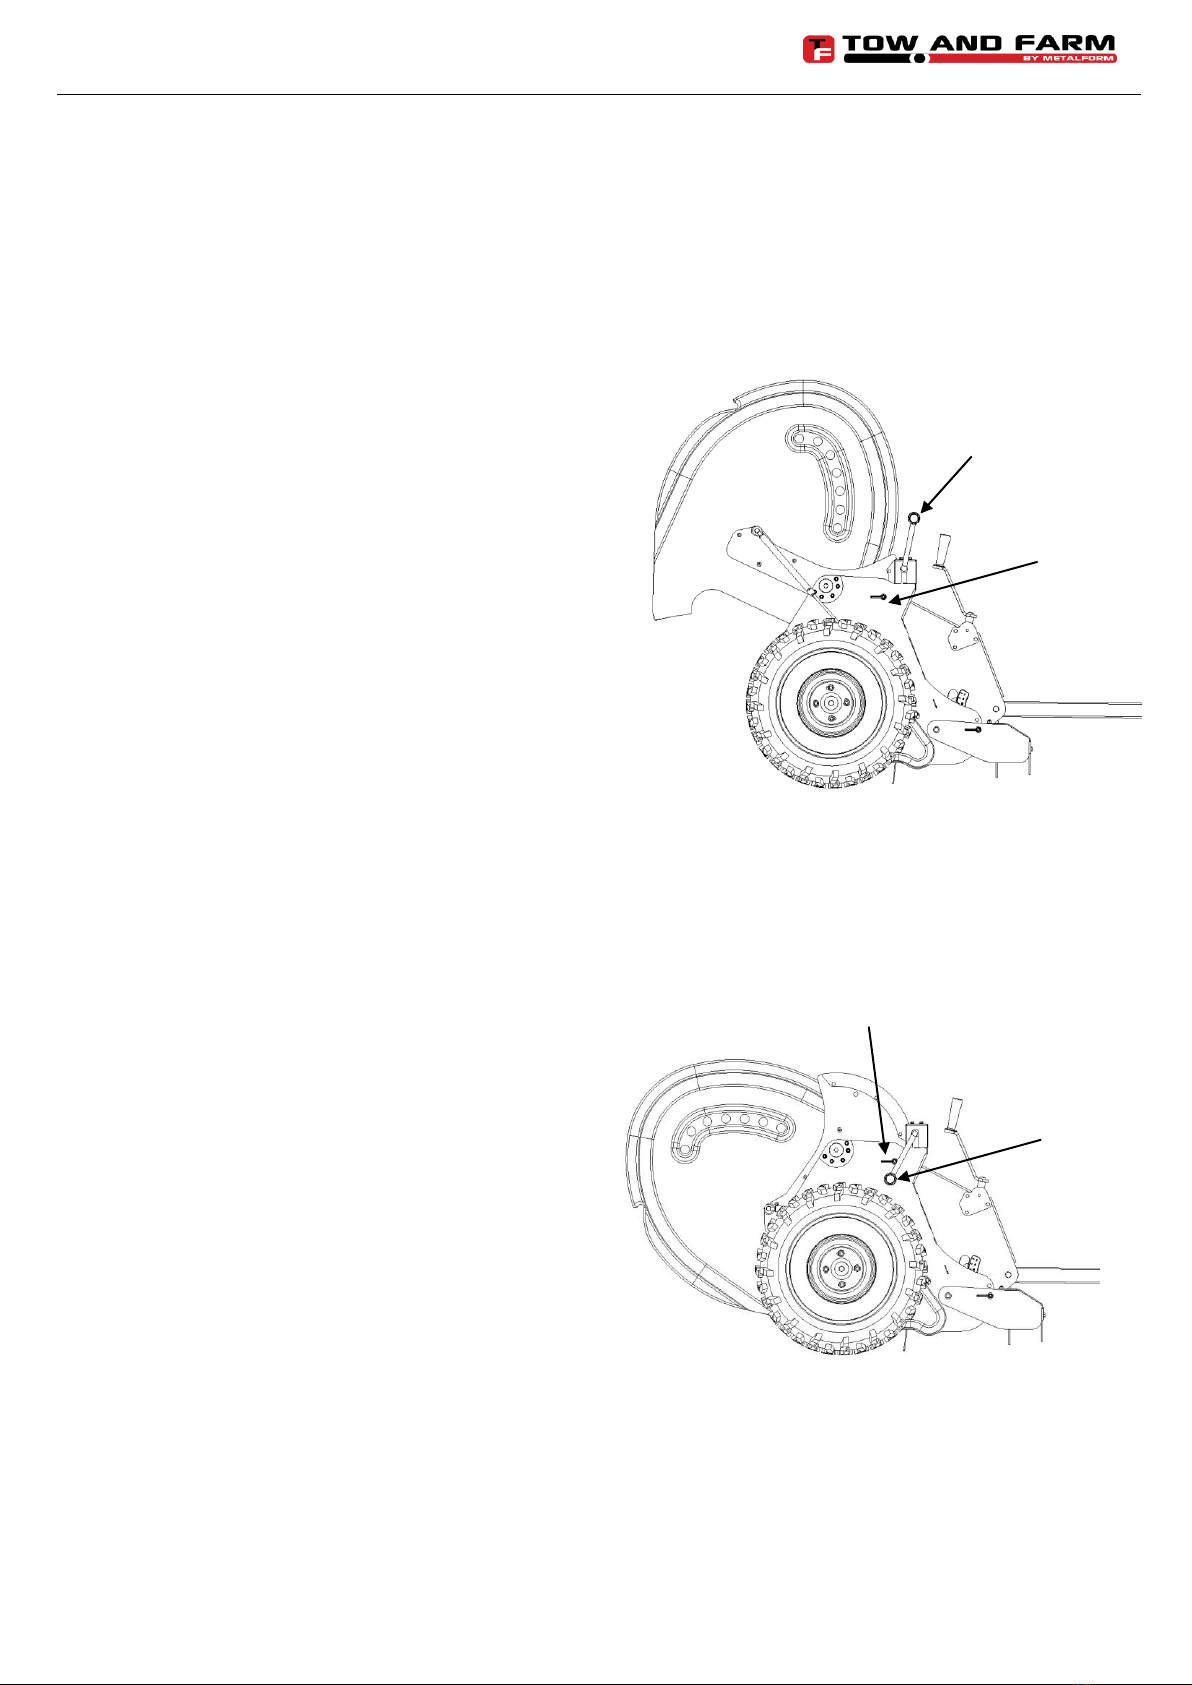
Step 1
Step 2
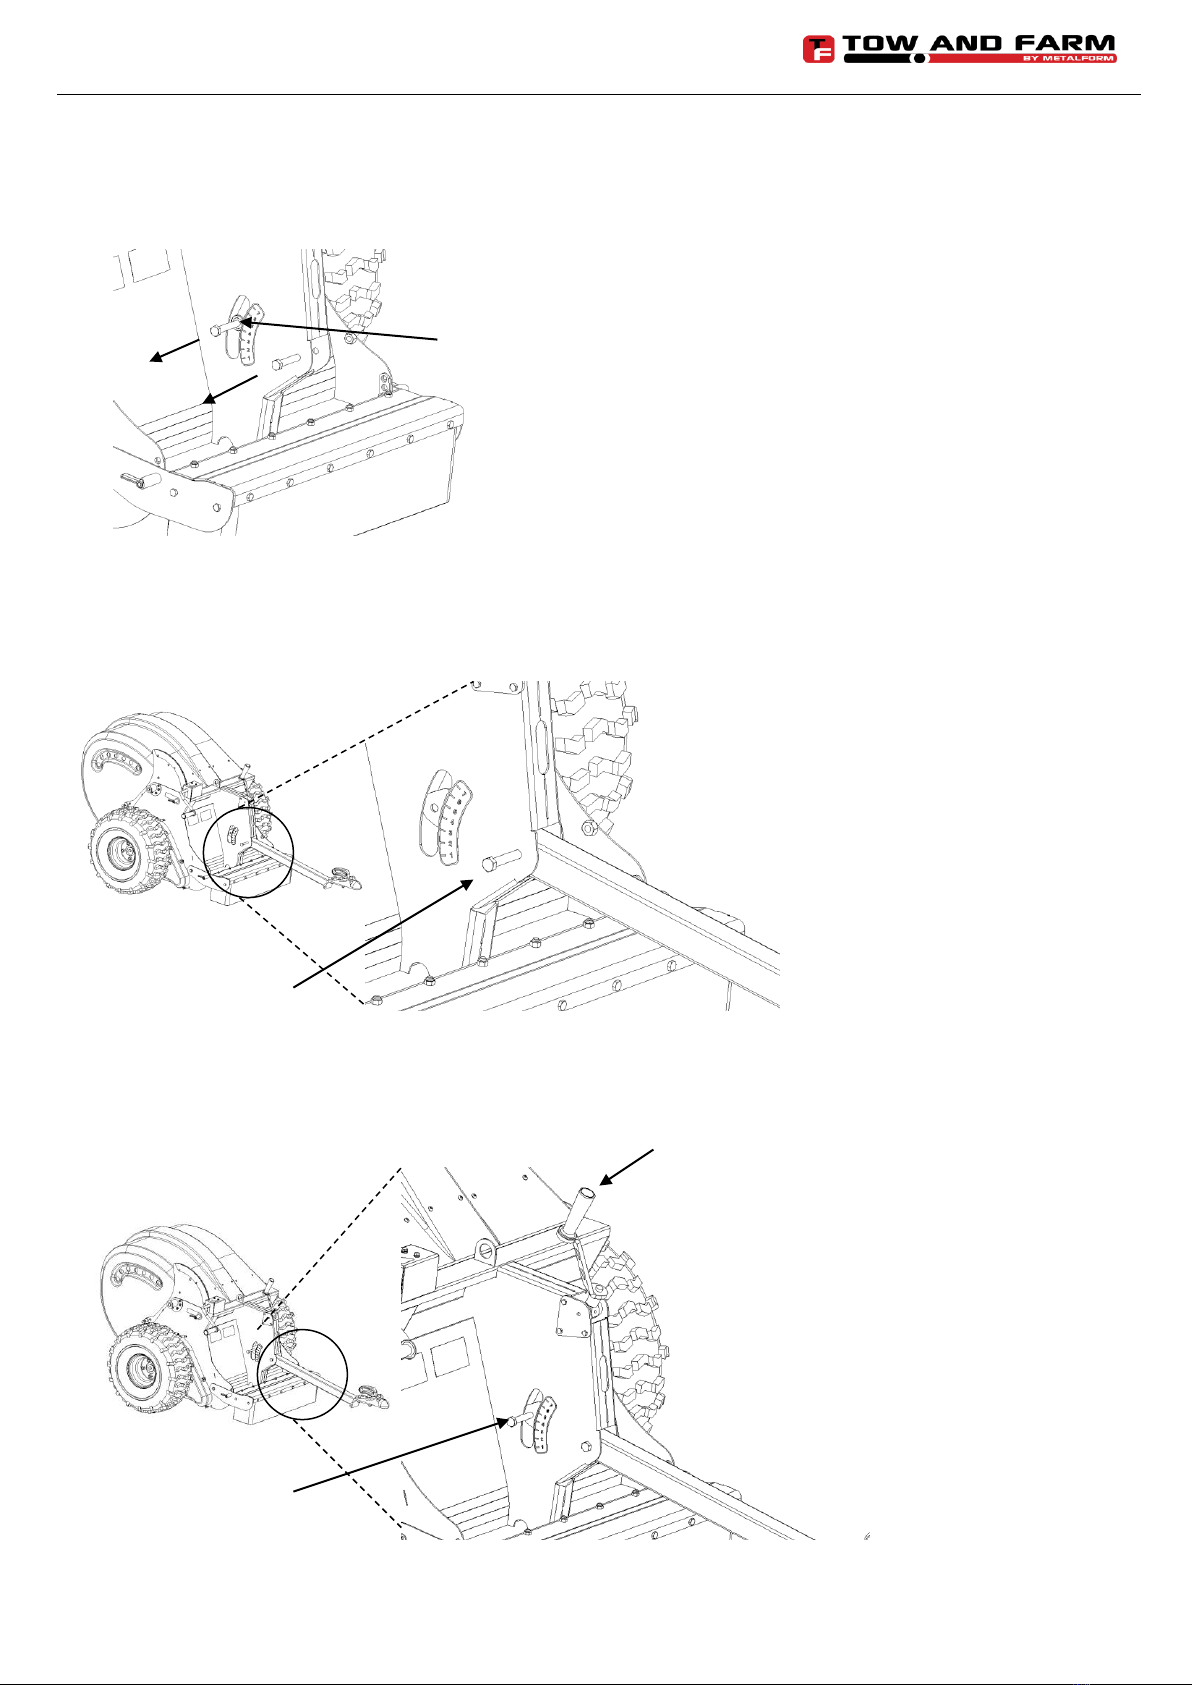
Step 3
Remove bolts and nuts as shown
in drawing on left. Put aside until
required.
Note: When you remove the rear
bolt, ensure the bush (1) is not
removed from holder.
Insert drawbar into machine as
shown on left.
Insert FRONT bolt and nut first.
Tighten bolt and nut until they
just contact steel, and then do
one half more turn.
Note: Do not do up so tight it that
it wont pivot!
Adjust height adjuster handle
until drawbar hole lines up with
height adjuster bush.
Insert bolt and nyloc nut and
tighten. This can be tightened to
a reasonable limit.
Height Adjuster
Handle
Bolt
(1)
Bolt

Owner’s Guide & User Manual
Tow and Collect Mini 700
Page 10 of 31
Tow coupling
Tine assembly
lock pin (LH)
Tine assembly
lock pin (RH)
Canvas skirt
Height guide sticker
Chain cover
release screw
Catcher
opening handle
Catcher
open/close
lock pin
Height adjuster
handle
Polyurethane
catcher
Catcher vent
& view holes
FEATURES & CONTROLS
Location of Features and Controls
“Auto-ratcheting”
wheel - LH
“Auto-ratcheting”
wheel - RH
Owner’s Guide & User Manual
Tow and Collect Mini 700
Page 11 of 31
(1)
(2)
(2)
FEATURES & CONTROLS
Machine Height Adjustment
Height adjustment should only be done once the machine has been attached to the tow vehicle. This is
because tow hitches vary in height.
- To raise the machine height, wind the height
adjuster handle (1) in a clockwise direction.
This will lift the brushes up.
- To lower the machine working height, wind
the adjuster handle (1) in an anti-clockwise
direction. This will lower the brushes down.
Tine Height Adjustment
The scouring tines on the front of the collector can be used when required, then adjusted out of
the way when not required. Tines are useful for when picking up hard manure or if the grass is
long. It breaks up the manure and makes it easier to pick up.
NOTE: Tine adjustment should only be done once the machine has been attached to the tow
vehicle and the machine height has been set.
1. Rotate lock pin (2) to release, on one side of
tine bar.
2. On the other side of the machine, support the
weight of tine bar assembly and release other
lock pin (2).
3. Position the tine assembly at desired height
and rotate both lock pins (2) to secure the
assembly.
Owner’s Guide & User Manual
Tow and Collect Mini 700
Page 12 of 31
(3)
(4)
)
(3)
(4)
FEATURES & CONTROLS
Catcher Opening
Note: Do not over-fill the catcher!
If the catcher is over-filled it will be difficult to empty.
Warning: The catcher opening is assisted with a pressurised gas strut. Ensure the catcher handle (3) is
held securely during entire opening process!
1. Hold catcher handle securely (3)
2. Rotate and pull lock pin (4) to release.
3. Carefully wind catcher opening handle (3) to
lift open catcher.
Note: Use the lock pin (4) to hold the catcher open if
necessary.
Suggested emptying procedure:
1. Reverse the Collector to a suitable dump site.
2. Open the catcher as described above
3. Move tow vehicle forward 1 metre (3 feet)
4. Close the catcher
Catcher Closing
Warning: The catcher is assisted with a pressurised
gas strut. Ensure the catcher handle (3) is held
securely during entire closing process!
1. Securely hold the catcher handle (3), and
rotate lock pin (4) to release.
2. Wind catcher handle (3) to close.
3. While still holding the catcher handle (3),
rotate lock pin (4) to lock catcher closed.
Owner’s Guide & User Manual
Tow and Collect Mini 700
Page 13 of 31
OPERATION
Safe Operation Precautions
Before operating machine for the first time, please review the important SAFETY information on page 5.
Before operating machine, read and understand the owners manual and safety precautions of the tow
vehicle.
Before Operation
•Ensure chain is lubricated (see Maintenance Schedule on page 17)
•Ensure the tow bar height is correctly set so that the body of the collector sits level to the ground
(different tow vehicles have different tow ball heights, so it’s important to set the Tow and Collect to
the correct height.)
•Check that tyre pressure is in the range 5 –7 psi (34 –48 kPa). Check the condition of the tyres,
look for signs of wear, cuts and impact damage. Ensure that the tyre pressure is the same in each
wheel.
DO NOT over inflate tyres: If the pressure is too high the Tow and Collect will bounce on rough
terrain, however if the pressure is too low, as the catcher fills the extra weight will compress the
tyres and lower the effective brush height.
NOTE: Each wheel is fitted with an automatic ratcheting system so that the brushes only engage when
the Tow and Collect is pulled forward.
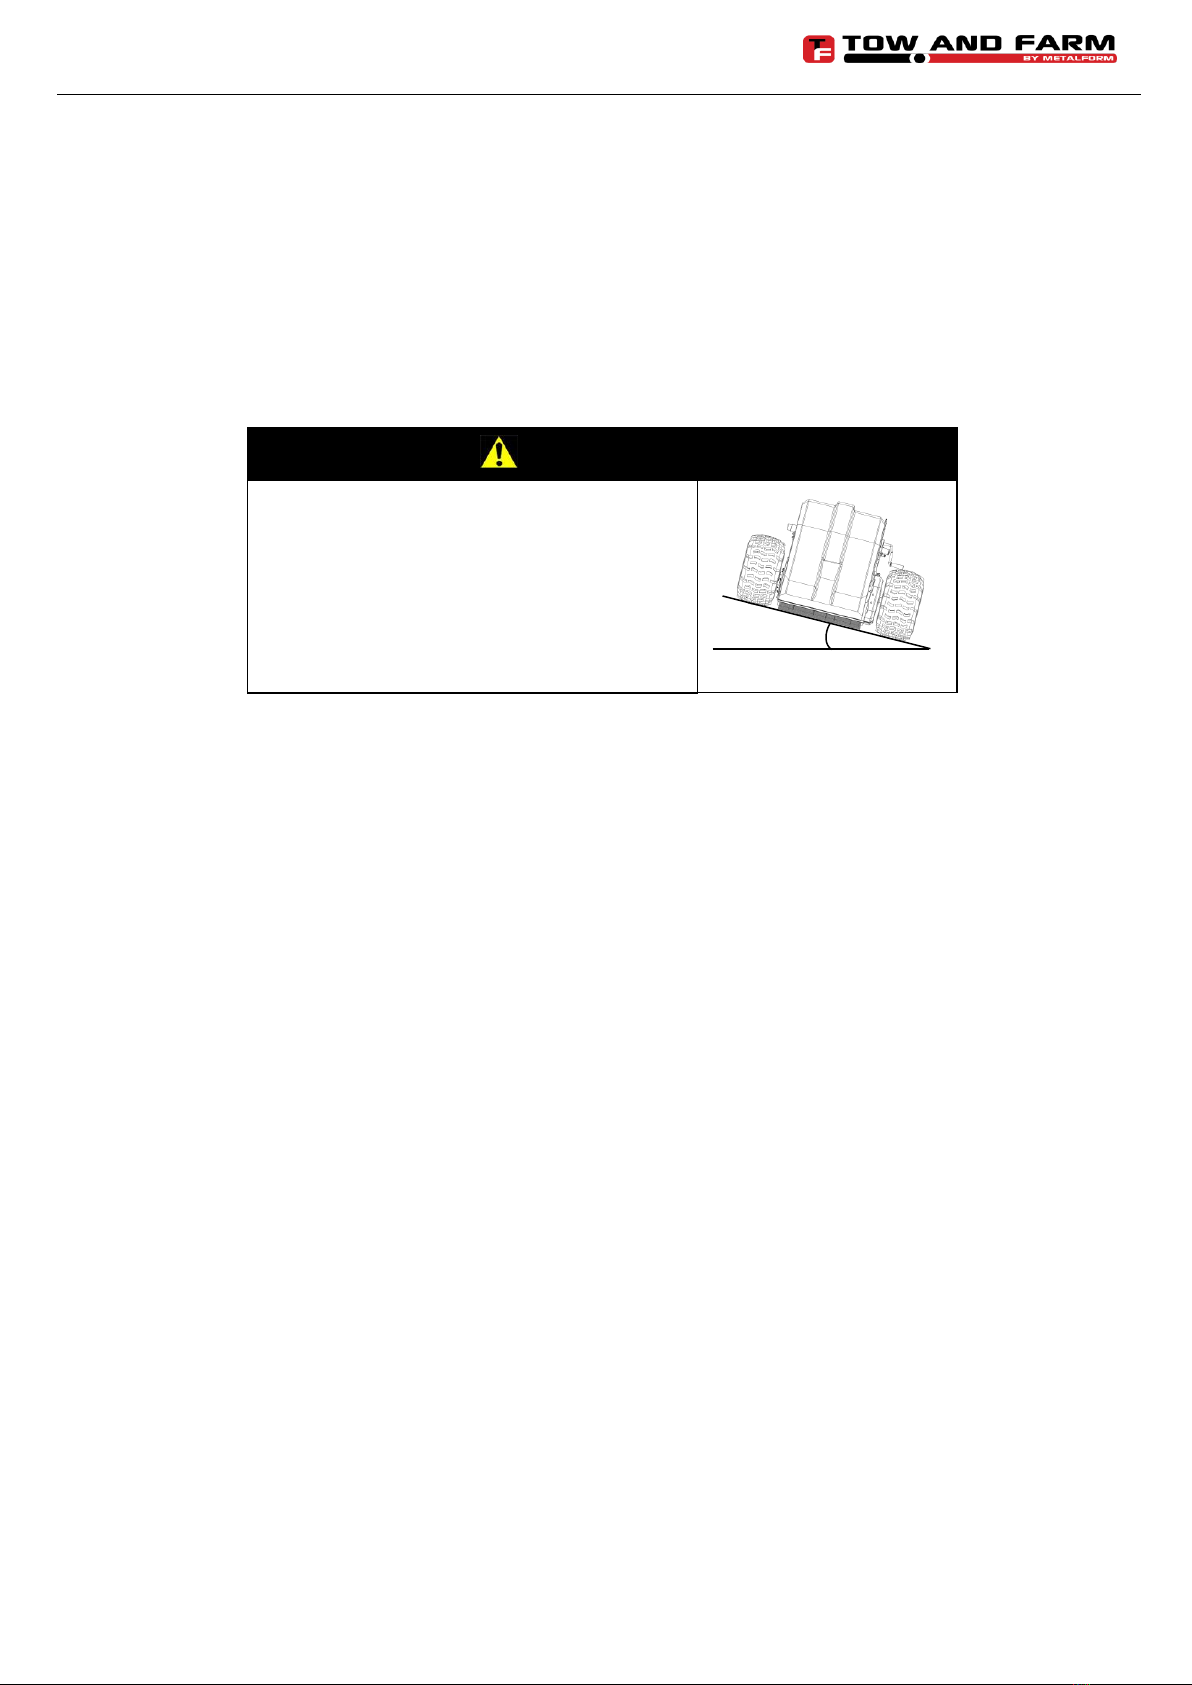
DANGER!
DO NOT use on slopes with an incline greater
than 9º (1:5 gradient)
Exceeding this slope angle will cause the Tow
and Collect and the tow vehicle to be
unbalanced and may tip over causing death or
serious injury.
9º MAX

Owner’s Guide & User Manual
Tow and Collect Mini 700
Page 14 of 31
OPERATION
Using the Tow and Collect
The Tow and Collect has been designed to reduce time collecting manure and provide healthier pastures
for your horses.
1. Hitch the Tow and Collect onto your ATV, 4-wheeler or any other similar stable vehicle.
2. Set the height of the Tow and Collect - dependent on grass length and ground conditions
3. Drive around the paddock/field focusing on the areas requiring manure/debris pickup
4. Reverse the Tow and Collect to a suitable dumping site. Empty the catcher easily, with the gas
strut assisted opening mechanism (as described in Catcher Opening on page 11)
See www.towandfarm.com for videos and more information.
Hints for Operation
NOTE: Recommended tow vehicle capacity is 300cc or higher. Minimum is 250cc.
•Finding the perfect settings for your Tow and Collect largely depends on the current conditions of
your pasture. So if you don’t get it right the first time, don’t be concerned.
•Using the Tow and Collect regularly improves the health of your pasture and animals. Regular
pickups will also make the process easier by slowly removing all thatch and debris from the
pasture.
•The first time you use your Tow and Collect, try driving in a ‘grid’ fashion (see
image on right). This is so the approach on the pasture comes from all directions.

Owner’s Guide & User Manual
Tow and Collect Mini 700
Page 15 of 31
OPERATION
Troubleshooting
My Tow and Collect does not pick up the manure or debris!
- Ensure the brush height is set so the brushes are ‘only just’touching the ground.
- If the grass length is greater than 100mm (4”), cut grass first (suggested product is the Tow and
Mow. see www.towandfarm.com)
- Recommended travelling speed is 8-12 kph (5-8 mph).
- Check for brush wear. When the brushes slowly wear down, they become less efficient. Replace
brushes when bristles get too short (see page 20).
- Check that inside the Tow and Collect is not jammed. Open catcher and clean chute.
The catcher is hard to empty
- Don’t overfill catcher. If machine begins to perform badly, it may mean the catcher is full.
- If catcher is overfilled, the manure/debris will be too compacted, making it hard to empty.
The manure is too hard and dry to pick up
- When the manure is very dry, use the tines to lift the manure and break the seal on the ground.
The manure is too wet to pick up
- Lift tine assembly up and out of the way.
My Tow and Collect wheels keeps breaking traction
- Check that brush height is not too low making them difficult to rotate.
- Check there is no foreign objects or ‘stringy’ material caught around the brush shaft. Pay special
attention to bearings at both ends.
- If the grass is too wet and/or long, you can try filling the wheels with 25% water.
- If grass is very wet, wait until grass is dryer and try again.
My Tow and Collect makes ‘clicking noises’in reverse and during turns
- This is normal and the Tow and Collect has been designed to do this. The wheels use an
automatic ratcheting system so that the brushes only engage when it is pulled forward.
My Tow and Collect pulls out grass or picks up too much dead grass
- Because it uses a rotating brush, it will pick up everything it can. The more you use it, the less
dead grass there will be for it to collect.

Owner’s Guide & User Manual
Tow and Collect Mini 700
Page 16 of 31
SERVICING
The Importance of Maintenance
Good maintenance is essential for safe, economical and trouble-free operation.
To help you properly care for your Tow and Collect, the following pages include a maintenance schedule,
routine inspection procedures, and simple maintenance procedures using basic hand tools. Other service
tasks that are more difficult, or that require specific tools, should be carried out by a qualified service
technician or qualified mechanic.
The maintenance schedule applies to normal operating conditions.
Maintenance Safety
•Read the instructions before you begin and make sure you have the tools and the skills required.
•To reduce possibility of fire or explosion, be careful when working around gasoline. Use only a non-
flammable solvent, NOT gasoline, to clean parts. Keep cigarettes, sparks and flames away from
all fuel-related parts.
To ensure the best quality and reliability, use only new genuine Tow and Farm parts or their equivalent for
repair and replacement.
WARNING!
Always follow procedures and precautions in
the owner’s manual.

Owner’s Guide & User Manual
Tow and Collect Mini 700
Page 17 of 31
SERVICING
Maintenance Schedule
Item
Each Use
Every
month or
10 hrs
Every
3 months
or 25 hrs
Every
6 months
or 50 hrs
Every
12 months
or 100 hrs
Refer to
Page
Check Tyre Pressure
√
17
Lubrication
√
17
Check Chain Tension
√
19
Canvas Skirt Replacement
√
19
Brush Replacement
√
21
Tine Replacement
√
23
Perform at every indicated month or operating hour interval, whichever comes first.
Tyre Pressure
Check that tyre pressure is in the range 5 –7 psi (34 –48 kPa). Check the condition of the tyres, look for
signs of wear, cuts and impact damage. Ensure that the tyre pressure is the same in each wheel.
DO NOT over inflate tyres; If the pressure is too high the Tow and Collect will bounce on rough terrain,
however if the pressure is too low, as the catcher fills the extra weight will compress the tyres and lower the
effective brush height.
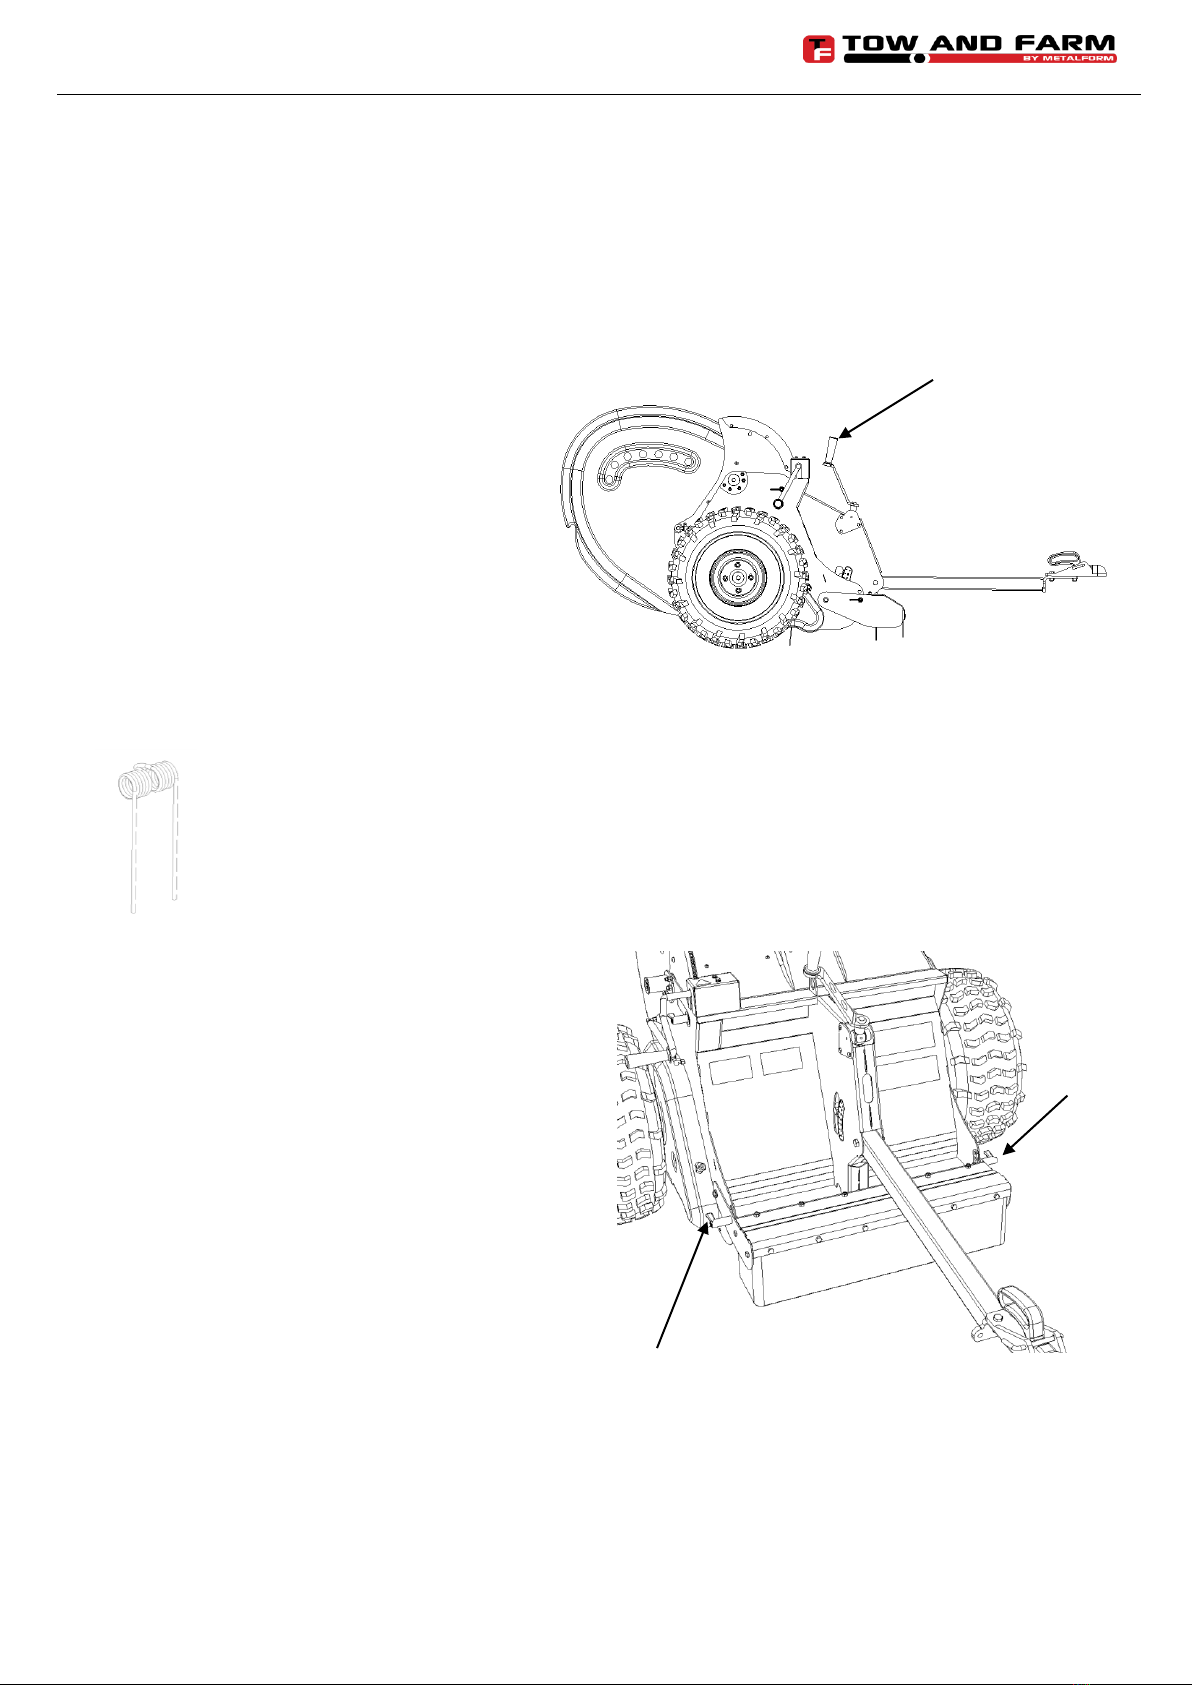
Lubrication
Grease Nipples
There are 2 grease nipples that are located on the height
adjuster assembly.
See drawing on right for exact location.
Ensure they are lubricated (with Multi-Purpose grease or
similar) each interval as per Maintenance Schedule to
provide smooth operation and eliminate unnecessary wear
on the height adjuster assembly.
2 x M6
Grease Nipples

Owner’s Guide & User Manual
Tow and Collect Mini 700
Page 18 of 31
Screw Handle
Chain Cover
SERVICING
Lubrication
Chain
The rotating brushes are ground driven off both wheels which is connected by a chain on the RH side of
the Tow and Collect.
Ensure the chain is lubricated at each interval as per Maintenance Schedule on page 17.
CAUTION: Make sure the Tow and Collect is
disconnected from the tow vehicle before attempting to
remove Chain Cover (step 1).
1. Loosen screw handle counter-clockwise and
remove with fingers.
2. Slide Chain Cover forward and out.
3. Hold chain lube can 200mm (8”) away from chain
and spray onto chain where visible.
NOTE: Use chain lube spray or equivalent.
4. Move Tow and Collect FORWARD 600mm (25”)
and repeat step 3.
CAUTION: Ensure no loose clothing or other
persons are near the Tow and Collect whilst
moving forward.
5. Replace cover and tighten screw handle.
Chain
Owner’s Guide & User Manual
Tow and Collect Mini 700
Page 19 of 31
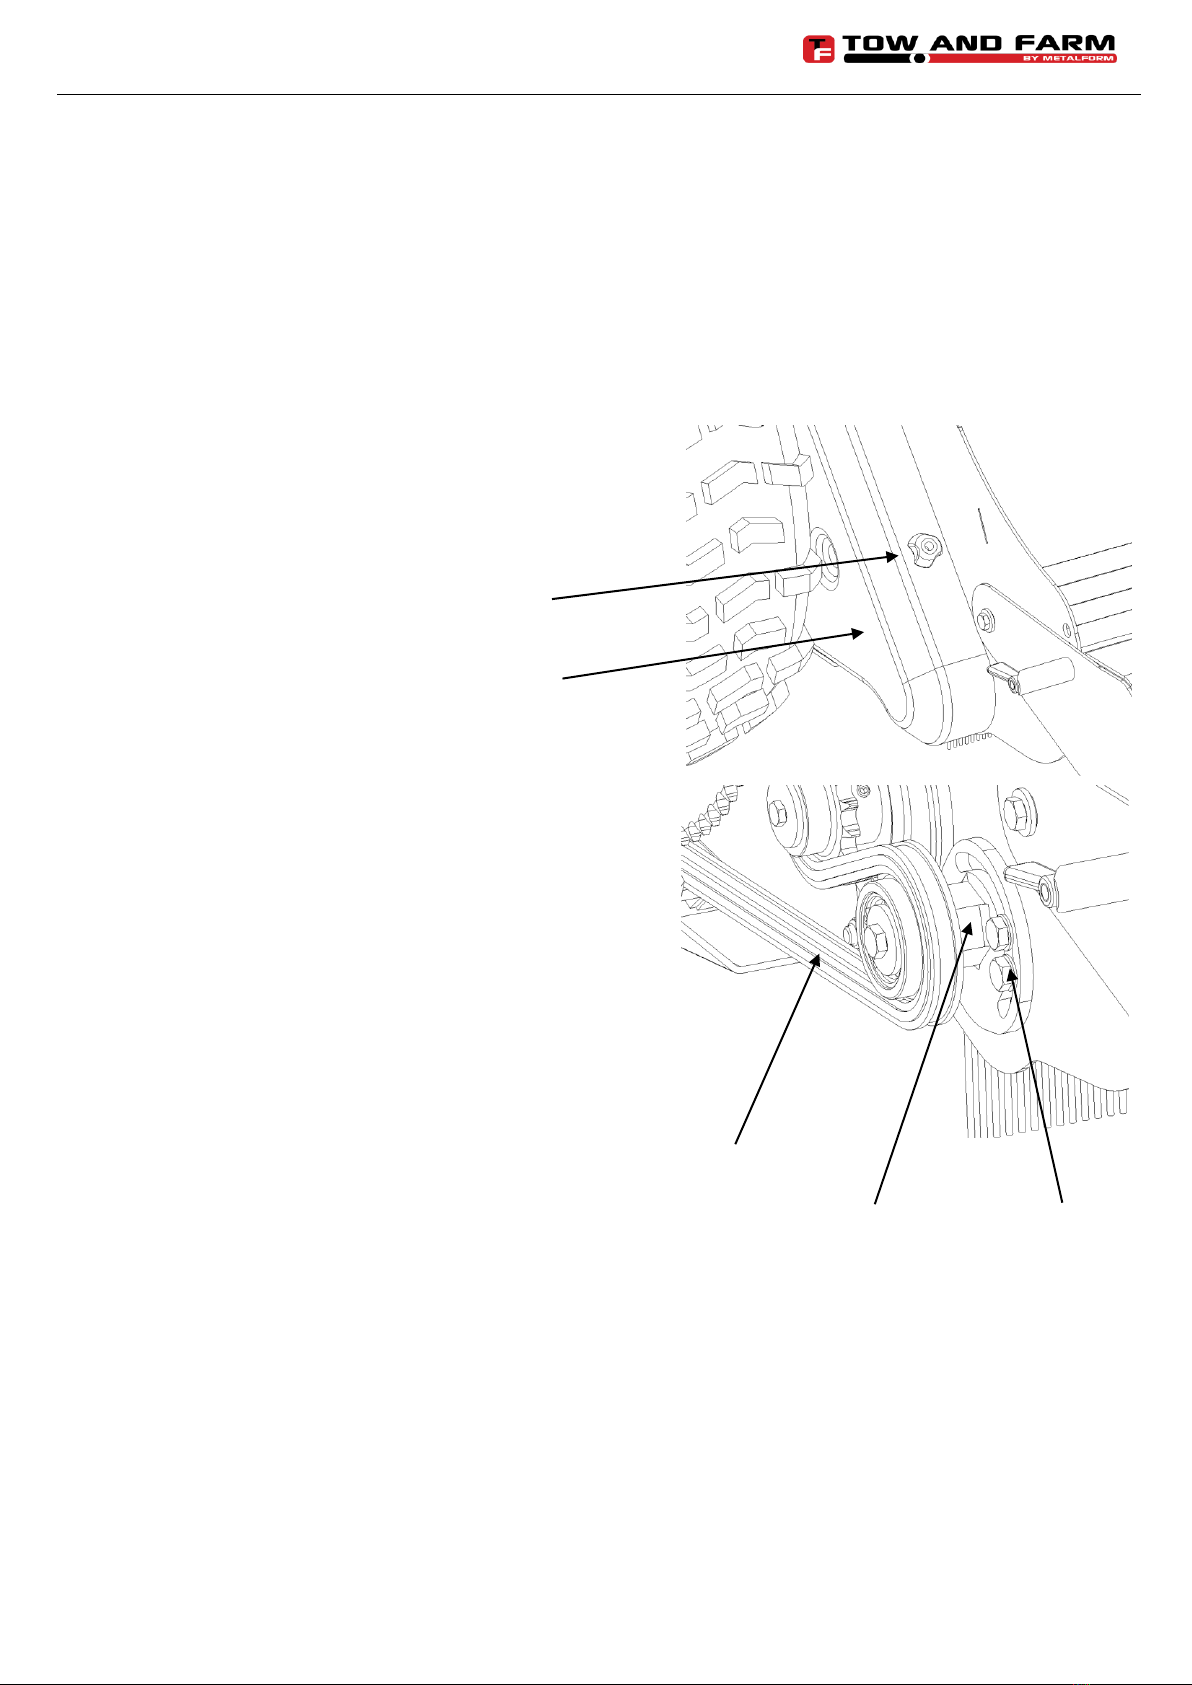
Screw Handle
Chain Cover
2 x M8
Lock Bolts
Hex Shaft
Chain
SERVICING
Chain Tensioning
NOTE: The following task is recommended to be carried out by a qualified service technician or qualified
mechanic.
Ensure chain tension is checked each at interval as per Maintenance Schedule on page 17.
1. Loosen screw handle counter-clockwise and remove.
2. Slide Chain Cover forward and out.
3. Loosen both M8 Lock Bolts with supplied spanner
(loosen only –do not remove!)
4. Using the 32mm supplied spanner, fit to top of Hex
Shaft on chain tensioner and apply force clockwise.
5. While maintaining force on tensioner assembly,
tighten up one M8 Bolt.
6. Tighten other M8 Bolt.
7. Replace cover and tighten screw handle.

Owner’s Guide & User Manual
Tow and Collect Mini 700
Page 20 of 31
M8 x 20 Bolt
M8 Nyloc Nut
Canvas Skirt
Cross-section view
of Canvas Skirt and
mounting position.
Canvas Skirt
SERVICING
Replacing the Canvas Skirt
NOTE: The following task requires special tools (not supplied) and is recommended to be carried out by a
qualified service technician or qualified mechanic.
Ensure canvas skirt is changed at each interval as per Maintenance Schedule on page 17.
The Canvas Skirt is shown on the machine in the diagram on the
right.
1. Remove Canvas Skirt by loosening
and removing 6 x M8 Bolts and Nuts.
2. Replace Canvas Skirt
3. Tighten all bolts.
Table of contents
Other Metalform Farm Equipment manuals


