Metallkraft WPP 15 User manual

WPP 15
Operating instructions
WPP 15
WPP SERIES
Hydraulic workshop press
WPP 20
WPP 30
WPP 30

WPP Series | Version 1.02
Imprint
Product identification Metallkraft
Workshop press Article number
WPP 15 4001015
WPP 20 4001020
WPP 30 4001030
Manufacturer Stürmer Maschinen GmbH
Dr.-Robert-Pfleger-Str. 26
D-96103 Hallstadt
Fax: 0951 96555 - 55
E-Mail: [email protected]
Internet: www.metallkraft.de
Information about the operating instructions
Genuine operating instructions
Edition: 10.10.2018
Version: 1.02
Language: English
Author: SN
Copyright information Copyright © 2018 Stürmer Maschinen GmbH, Hallstadt, Germany.
Stürmer is the sole owner of the content of these operating instructions.
Forwarding and reproduction of this document as well as use and notification
of its content is not permitted without explicit consent. Infringements shall
oblige to payment of compensation.
Subject to technical modifications and changes.
Imprint

WPP Series | Version 1.02 3
Contents
1 Introduction................................................................................................4
1.1 Copyright .............................................................................................. 4
1.2 Customer service.................................................................................. 4
1.3 Disclaimer ............................................................................................. 4
2 Safety..........................................................................................................5
2.1 Legend of symbols ............................................................................... 5
2.2 Operator responsibility ......................................................................... 6
2.3 Operating staff qualification.................................................................. 7
2.4 Personal protective equipment............................................................. 8
2.5 General safety instructions ................................................................... 8
2.6 Safety identifications on the workshop press ....................................... 9
3 Intended use ..............................................................................................9
3.1 Improper use ...................................................................................... 10
3.2 Residual risks...................................................................................... 10
4 Technical Data .........................................................................................10
5 Transport, packaging, storage..............................................................12
5.1 Delivery and transport ........................................................................ 12
5.2 Packaging........................................................................................... 13
5.3 Storage ............................................................................................... 13
6 Description of the device........................................................................13
6.1 Scope of delivery ................................................................................ 15
7 Assembly and connection......................................................................15
7.1 Installation location ............................................................................. 15
7.2 Montage.............................................................................................. 16
8 Operation..................................................................................................18
8.1 Set table height WPP 15 and 20 ......................................................... 19
8.2 Adjusting the table height WPP 30 ..................................................... 20
8.3 Set up the workspace ......................................................................... 21
8.4 Build up the pump pressure............................................................... 22
8.5 Retracting the hydraulic cylinder........................................................ 22
9 Cleaning and maintenance.....................................................................23
9.1 Cleaning and lubrication of the machine............................................ 23
9.2 Visual inspection................................................................................. 24
9.3 Lubricating points ............................................................................... 24
9.4 Service and maintenance / repair....................................................... 24
9.5 Maintenance tasks.............................................................................. 25
9.6 Recommended supplies..................................................................... 25
9.7 Disturbances, possible causes and measures .................................. 25
10 Disposal, reusing used machines........................................................26
10.1 Decommission .................................................................................. 26
10.2 Disposal of electrical equipment ...................................................... 26
10.3 Disposal of lubricants ....................................................................... 26
11 Spare parts.............................................................................................27
11.1 Spare parts orders........................................................................... 27
11.2 Spare parts drawings ..................................................................... 28
12 Hydraulic - diagram..............................................................................32
13 EC Declaration of conformity...............................................................33
14 Maintenance schedule ..........................................................................34
15 Notes.......................................................................................................35

4WPP Series | Version 1.02
Introduction
1 Introduction
You have made an excellent choice in purchasing a METALLKRAFT hydraulic
workshop press.
Carefully read the operating instructions prior to commissioning.
They describe correct commissioning, intended use and safe as well as effi-
cient operation and maintenance of your hydraulic workshop press.
The operating instructions form part of the hydraulic workshop press. Keep
these operating instructions at the installation location of your hydraulic work-
shop press. Please also note the locally applicable accident prevention regu-
lations and general safety regulations for the use of hydraulic workshop
presses.
Illustrations in this operating manual serve the general understanding and
may deviate from the actual design.
1.1 Copyright
The contents of these operating instructions are protected by copyright. Their
application is permitted within the context of the use of the hydraulic work-
shop press. Any further use shall not be permitted without written consent by
the manufacturer.
1.2 Customer service
Please contact your specialist retailer if you have any questions regarding
your workshop press or require any technical information. Your specialist re-
tailer will be happy to support you with specialist advice and information.
Germany:
Stürmer Maschinen GmbH
Dr.-Robert-Pfleger-Str. 26
D-96103 Hallstadt
Repair service:
Fax: 0951 96555-111
E-Mail: service@stuermer-maschinen.de
Internet: www.metallkraft.de
Spare parts orders:
Fax: 0951 96555-119
E-Mail: ersatzteile@stuermer-maschinen.de
We are always interested in information and experiences that arise from the
application and can be valuable for the improvement of our products.
1.3 Disclaimer
All data in these operating instructions has been compiled on the basis of the
state-of-the-art, valid standards and guidelines as well as our many years of
expertise and experience.

Safety
WPP Series | Version 1.02 5
The manufacturer shall not be liable for damage in the following cases:
- Non-observance of these operating instructions
- Unintended use
- Deployment of untrained staff
- Conversions at one's own responsibility
- Technical modifications
- Use of unauthorised spare parts
The actual scope of delivery may deviate from the descriptions and illustra-
tions in this document as a result of special variants, optional extras or recent,
technical modifications.
The obligations defined in the supply contract shall apply in addition to the
general terms and conditions and the manufacturer's general terms and con-
ditions as well as the statutory regulations valid at the time of the conclusion of
the contract.
2 Safety
This section provides an overview of all important safety packages for per-
sonal protection as well as safe and reliable operation. The sections on indi-
vidual service life phases contain additional, specifically applicable safety in-
formation.
2.1 Legend of symbols
Safety instructions Safety instructions in these operating instructions have been highlighted with
symbols. Safety instructions are indicated by signal terms that express the
degree of risk involved.
DANGER!
This combination of symbol and signal term indicates a
directly dangerous situation which may cause death or seri-
ous injury if not averted.
WARNING!
This combination of symbol and signal term indicates
potentially hazardous situations which may cause death or
serious injury if not averted.
ATTENTION!
This combination of symbol and signal term indicates a
potentially hazardous situation which may cause minor or
light injuries if it is not averted.

6WPP Series | Version 1.02
Safety
Tips and recommendations
Observe the safety information in these operating instructions to minimise the
risk of personal injury as well as material damage and prevent hazardous sit-
uations.
2.2 Operator responsibility
Operator Operators are defined as the persons who operate the machine for commer-
cial or profit-based purposes or provide the machine to third parties for use or
application and bear the legal product responsibility in terms of the protection
of users, staff or third parties during operation.
Obligations of the operator If the machine is used for commercial purposes, opera-tors are subject to the
legal stipulations in terms of occupational safety. For this reason, the safety
instructions in these operating instructions as well as the safety, accident pre-
vention and environmental protection regulations valid at the installation loca-
tion must be complied with. In this process, the following shall apply in partic-
ular:
- Operators shall obtain information about valid occupational safety regu-
lations and determine additional hazards as part of a risk assessment
which result from the specific operating conditions at the machine's in-
stallation location. Said risk assessment shall be reflected in operating
instructions for machine operation.
- During the entire machine operating time operators must check whether
the operating instructions they created meet current standards and
adapt the operating instructions where necessary.
- Operators shall clearly manage and specify the responsibilities for in-
stallation, operation, trouble-shooting, maintenance and cleaning.
- Operators must make sure that all persons handling the machine have
read and understood these operating instructions. Operators must also
regularly train staff and notify of the hazards.
- Operators shall provide staff with the required protective equipment and
wearing the required protective equipment shall be mandatory.
Operators shall also be responsible for maintaining the machine in a techni-
cally perfect condition. For this rea-son, the following shall apply:
ATTENTION!
This combination of symbol and signal term indicates a
potentially hazardous situation which may cause minor or
light injuries if it is not averted.
NOTE!
This combination of symbol and signal term indicates a po-
tentially dangerous situation which may cause material dam-
age or harm the environment if it is not averted.
Tips and recommendations
This symbol highlights useful tips and recommendations as
well as information for efficient and reliable operation.

Safety
WPP Series | Version 1.02 7
- Operators shall make sure that the maintenance intervals described in
these operating instructions are complied with.
- Operators shall regularly check that the safety equipment is fully func-
tional and complete.
2.3 Operating staff qualification
The different tasks described in these operating instructions require different
levels of skills in terms of the qualifications of operating staff working with the
machine.
Exclusively persons of whom it can be expected that they reliably complete
assigned tasks shall be authorized to carry out any tasks. Persons whose re-
actions have been impaired shall not be authorized, e.g. drug users, users
under the influence of alcohol or medication.
These operating instructions specify the following personal qualifications for
the different tasks:
Operating staff Operating staff has undergone an induction by the operator about the en-
trusted tasks and potential hazards resulting from improper behavior. Operat-
ing staff shall exclusively be permitted to carry out any tasks beyond opera-
tion in normal mode if this has been specified in the operating instructions
and operators have explicitly entrusted operating staff with the task.
Electrician Due to their professional training, knowledge and experience as well as
knowledge of the relevant standards and regulations, the electrician is in a
position to carry out work on electrical installations and to recognize and
avoid possible dangers independently.
The electrician is specially trained for the work environment in which he works
and knows the relevant standards and regulations.
Specialist staff As a result of specialist training, expertise, experience and skills in terms of
the relevant standards and regulations, specialist staff is able to complete the
tasks they are entrusted with and independently identify hazards and avert
risks.
Manufacturer Certain work must be carried out by manufacturer specialist staff only. Other
staff is not permitted to carry out this work. Contact our customer service to
have the work carried out.
WARNING!
Risk from inadequately qualified persons!
Inadequately qualified persons are unable to assess the
risks when handling the machine, thus putting themselves
and others at risk of severe or fatal injuries.
- All work must be carried out by qualified persons only.
- Keep inadequately qualified persons away from the work
area.

8WPP Series | Version 1.02
Safety
2.4 Personal protective equipment
Personal protective equipment is intended to protect the health and safety of
persons at work. Staff must wear the personal protective equipment indicated
in individual sections of these operating instructions when carrying out the dif-
ferent tasks on the machine.
The personal protective equipment is described in the following section:
2.5 General safety instructions
Pay attention to the following: - Use the protection guards and fix them securely. Never work without
protection guard and keep them function-able.
- Always keep the machine and its working environment clean. Ensure
adequate lighting.
- The workshop press may not be modified in its design and may not be
used for purposes other than those foreseen by the manufacturer.
- Never work under the influence of concentration-disturbing illnesses, fa-
tigue, drugs, alcohol or medicines.
- Keep children and persons unfamiliar with the workshop press away
from your work environment.
Protective goggles
Protective goggles are intended to protect the eyes from fly-
ing parts.
Ear protection
The Hearing protection protects ears from hearing damage
caused by noise.
Head protection
The industrial helmet protects the head against falling
objects and knocking against fixed objects.
Protective gloves
Protective gloves are intended to protect the hands from
components with sharp objects as well as fric-tion, abra-
sion, and deep-cut injuries.
Safety shoes
Safety shoes protect feet from pinching, falling parts and
slipping on slippery surfaces.
Protective clothing
Protective clothing is tight-fitting work clothing with-out pro-
truding parts, usually with a low tear resistance.

Intended use
WPP Series | Version 1.02 9
- Do not pull on the mains lead to pull the plug out of the socket. Protect
the cable from heat, oil and sharp edges.
- Disruptions that affect safety have to be eliminated immediately.
- Protect the workshop press from moisture (danger of short circuit).
- Before using the workshop press, make sure that no parts are dam-
aged. Damaged parts must be replaced immediately to avoid danger
sources.
- Do not overload the workshop press! You work better and safer in the
specified performance range.
- Only use original spare parts and accessories to avoid possible risks
and risks of accidents.
2.6 Safety identifications on the workshop press
The following safety identifications have been attached to the workshop press
(Fig. 1) which must be observed.
Fig. 1: Safety identifications - 1
Warning sign: Danger high voltage
, Pinching hazard for the upper
limbs | 2 Prohibition sign: Do not enter |
3 Mandatory signs: Read the operating manual, Pull out the mains plug, wear eye protec-
tion, Safety clothing, wear safety shoes
The safety markings and instructions attached to the workshop press must
not be removed. Damaged or missing safety markings can lead to malfunc-
tions, personal injury and material damage. They have to be replaced imme-
diately.
If the safety markings are not immediately recognizable and comprehensible,
the workshop press must be taken out of operation until new safety markings
have been affixed.
3 Intended use
The hydraulic pillar workshop press WPP 15, WPP 20 and WPP 30 is intended
for use in mechanical workshops in the automotive and engineering indus-
tries. It is ideally suited for pressing and removing bearings, bushes, shafts
and bolts as well as for stamping, bending and punching. The hydraulic en-
ergy is built up by means of a hydraulic hand pump. The workshop press con-
vinces with its small footprint and easy handling. The table height adjustment
takes place on model WPP 30 via a mechanism with winch.
Proper use also includes compliance with all information in this manual. Any
use beyond the intended use or otherwise is considered misuse.
12
3
NOTE!
The improper use, unauthorized modifications or alter-
ations to the workshop press as well as the disregard of the
safety regulations or the operating instructions exclude a
liability of the manufacturer for resulting damage to per-
sons or objects and cause the warranty to lapse!

10 WPP Series | Version 1.02
Technical Data
3.1 Improper use
By observing the intended use, no reasonably foreseeable misuse is possi-
ble, which could lead to dangerous situations with personal injury.
3.2 Residual risks
Even if all safety regulations are followed and the machine is used correctly,
there are still residual risks listed below:
- There is a risk of injury to the upper limbs (e.g., hands, fingers).
- Danger of falling workpieces.
- During set-up and set-up work, it may be necessary to disassemble the
safety guards provided by the customer. This creates various residual
risks and potential dangers that every operator must be aware of.
4 Technical Data
WARNUNG!
Danger by misuse!
Misuse of the workshop press can lead to dangerous situa-
tions.
- Only operate the workshop press in the power range
specified in the technical data.
- Never bypass or override the safety devices.
- Only operate the workshop press in a technically per-
fect condition.
Model WPP 15 WPP 20 WPP 30
Press force 15 t 20 t 30 t
max. load Prism jaw 3,5 t 5 t 7,5 t
Piston stroke [mm] 160 160 160
Stroke traverse path 340 mm 380 mm 450 mm
Dimension and weight
Clear width [mm] 500 610 710
Max. Installation
height [mm]
1000 1000 1000
Depth of the hole
frame [mm]
150 150 150
Length [mm] 900 950 1150
width/deepth [mm] 600 600 600
Height [mm] 1890 1900 1980
Weight [kg] 120 140 230

Technical Data
WPP Series | Version 1.02 11
Dimensions
Fig. 2: Dimensions workshop press
Equipment
Fig. 3: Equipment workshop press
12 WPP Series | Version 1.02
Transport, packaging, storage
5 Transport, packaging, storage
5.1 Delivery and transport
Delivery Check the hydraulic workshop press for visible transport damage upon deliv-
ery. Immediately notify the haulage company or retailer if you identify damage
on the hydraulic workshop press.
Transport
The workshop press may only be loaded and unloaded and transported by
qualified specialist personnel.
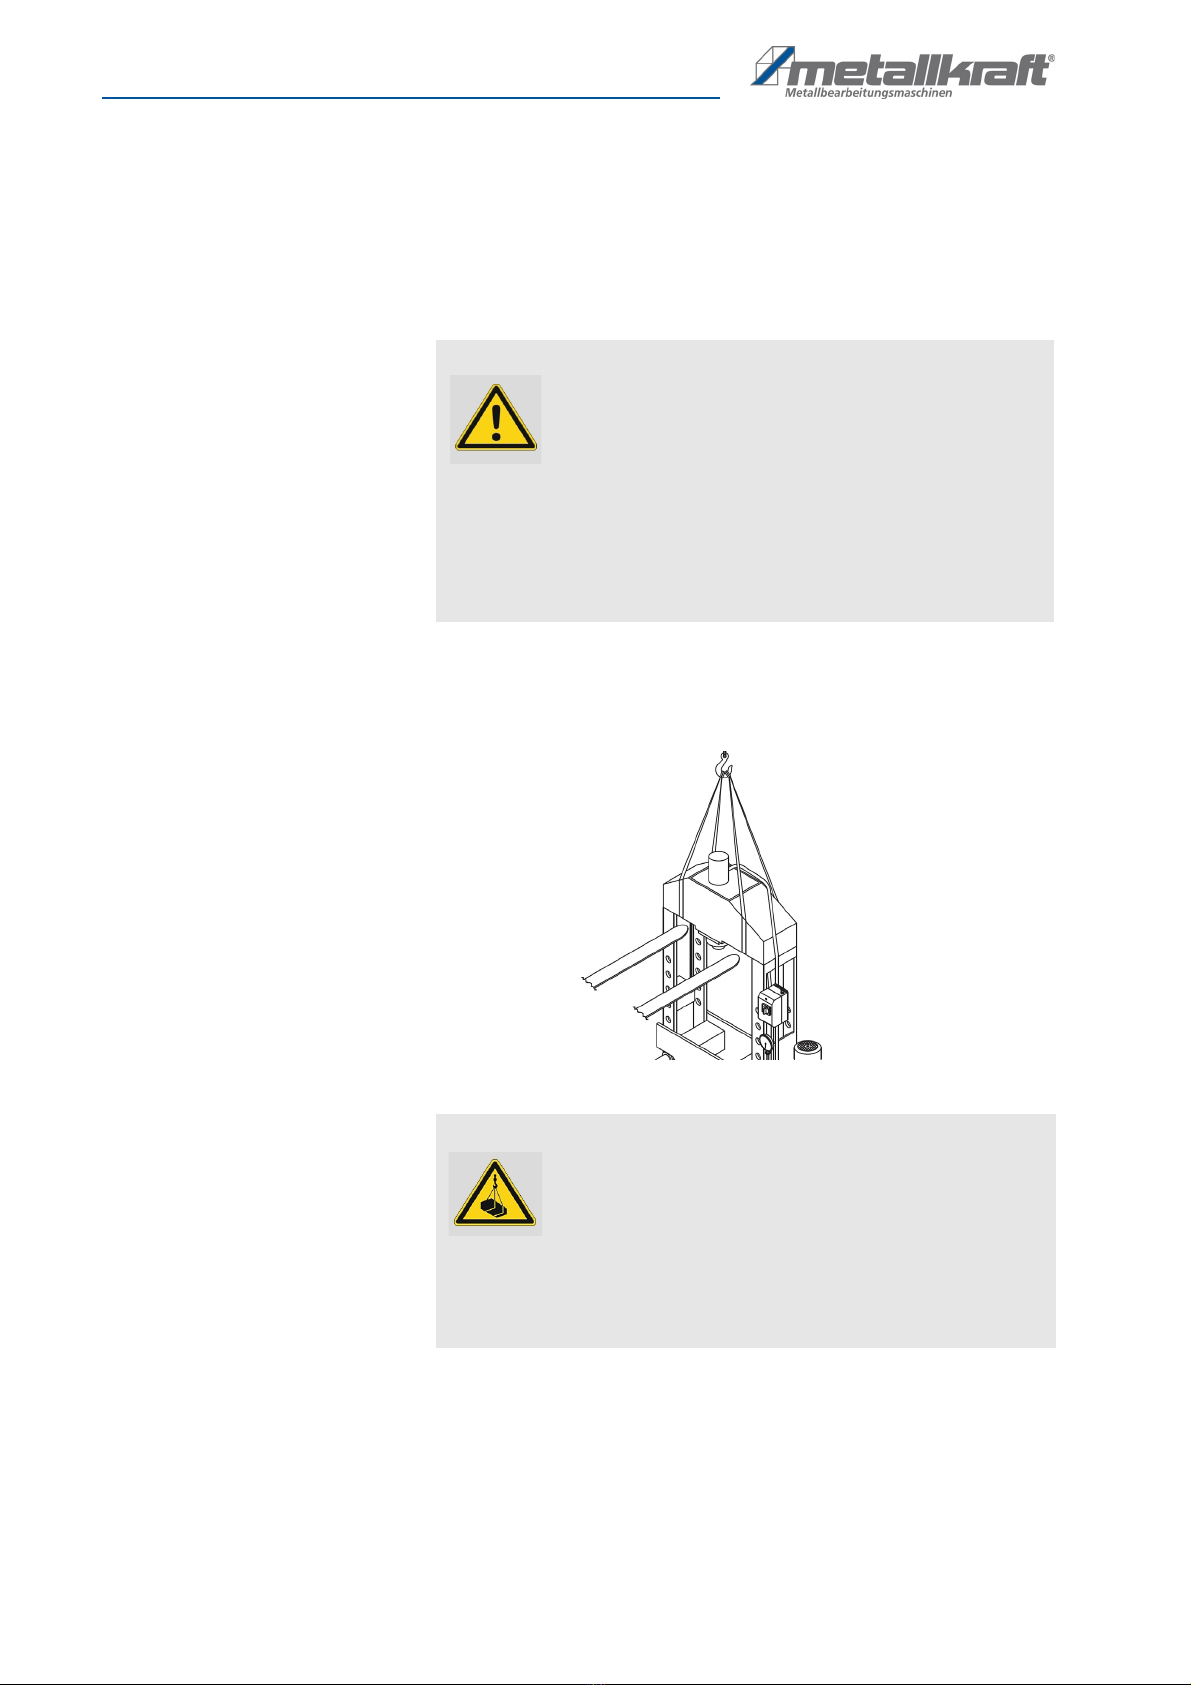
Transport with crane:
.
Fig. 4: Transport with crane or forklift
The workshop press can be placed in a suitable location with a crane. To do
this, the workshop press must be attached to the crane in accordance with
the regulations (Fig. 4). Transport only with steel cables and hooks designed
for the weight of the press. The lifting points intended for transport by crane or
forklift must be used on the workshop press. The workshop press must not be
rocked during transport by crane.
WARNING!
Danger to life!
If the weight of the workshop press and the permissible lift-
ing capacity of the lifting gear are not observed during
transport or lifting, the workshop press may tip over or fall.
- During transport and lifting work, pay attention to the
weight of the workshop press and the permissible load ca-
pacity of the lifting equipment.
- Check lifting gear and load attachment means for perfect
condition.
DANGER!
Danger to life due to falling of the load!
Falling loads can cause serious injury or even death.
- Never step under suspended loads.
- Fix loads carefully.
- When leaving the workplace, lower the load.

Description of the device
WPP Series | Version 1.02 13
5.2 Packaging
All packaging materials and packing aids used for the hydraulic workshop
press are suitable for recycling and must always be disposed of using mate-
rial-based recycling systems.
Packaging materials made of cardboard must be shredded and disposed of
as part of waste paper recycling.
The foils are made of polyethylene (PE), padding is made of polystyrene (PS).
Dispose of these substances at a recycling center or hand them over to the
relevant waste disposal company.
5.3 Storage
Store the workshop press thoroughly cleaned in a dry, clean, dust- and frost-
free environment.
It must not be put down with chemicals in a room. If the machine is stored for
a long time, all bare metal parts must be greased against rusting.
Storage temperature range: -10 ° C to +40 ° C
6 Description of the device
Figures in these operating instructions may deviate from the original.
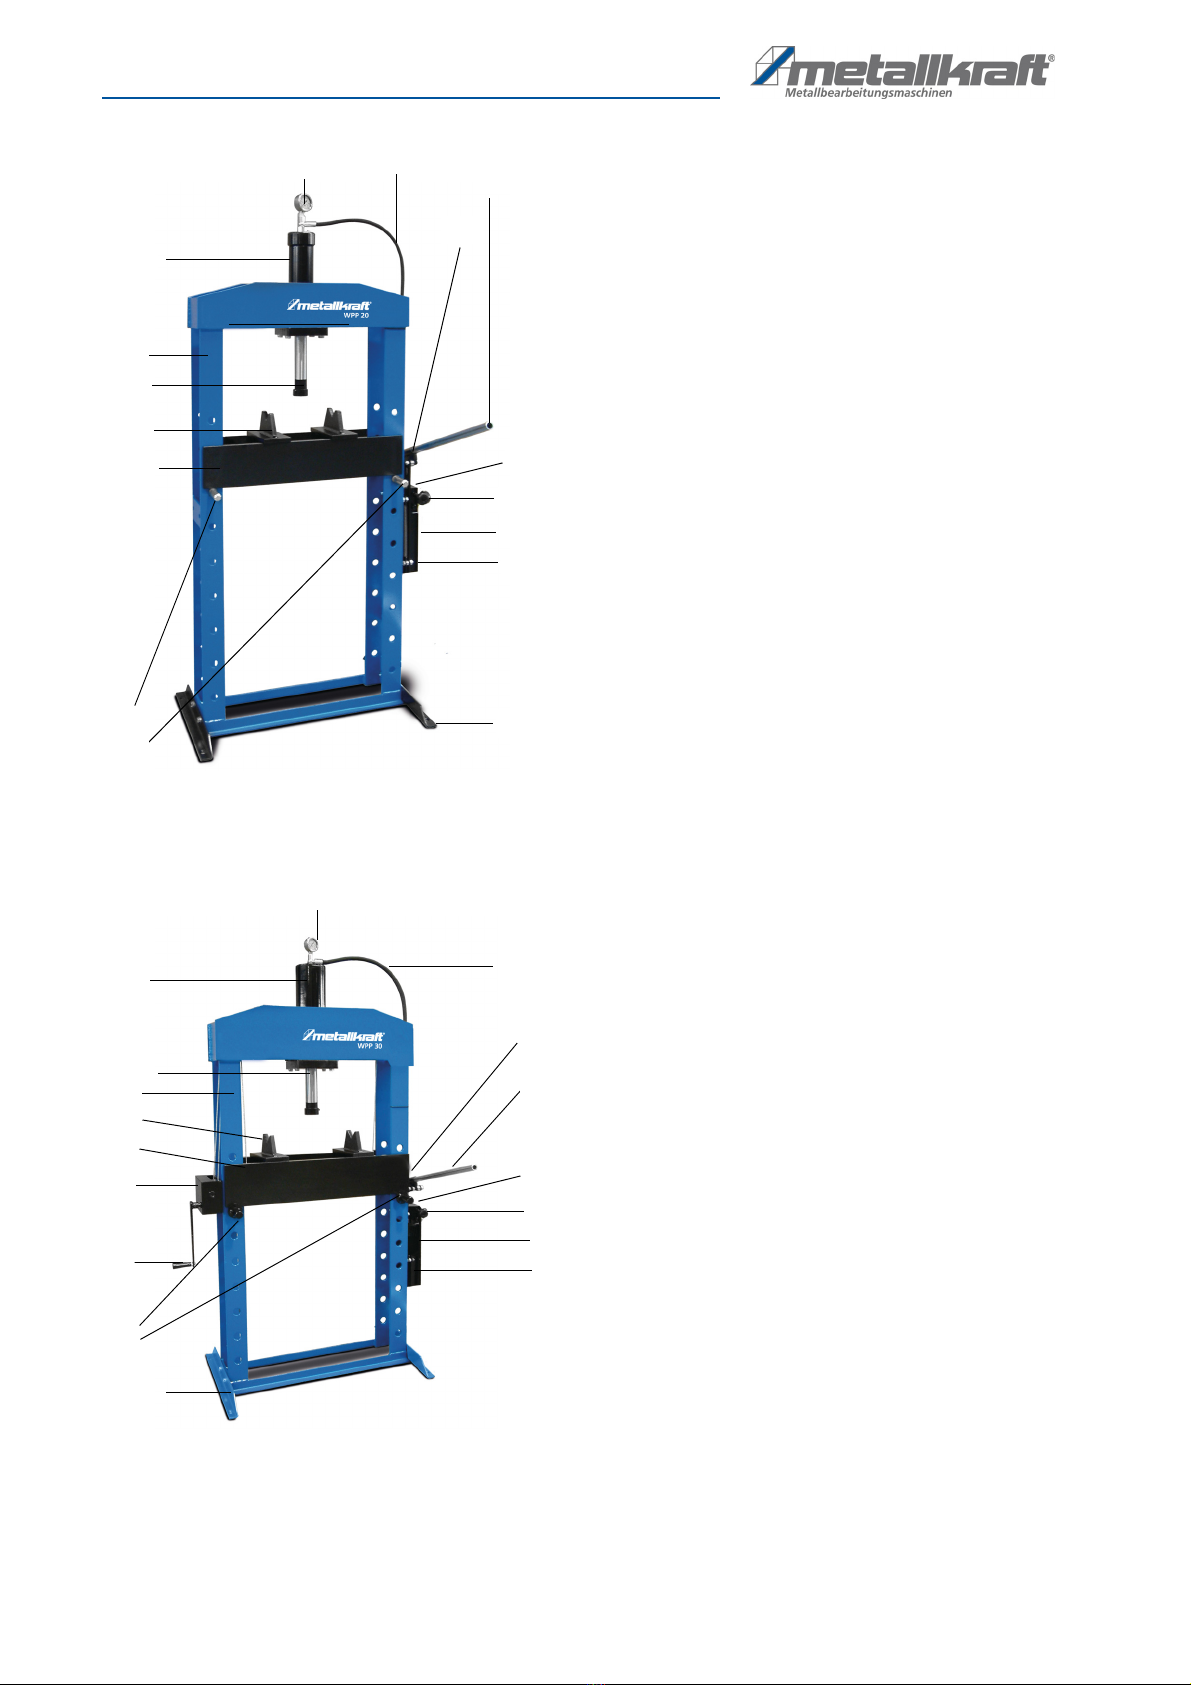
Fig. 5: Description of the workshop press WPP 15
1. Hydraulic cylinder
2. Press ram
3. Machine frame
4. Supporting prism
5. Press table
6. Headed dowel of the press table
7. Machine foot
8. Manometer
9.Connection hose from hand pump to hydraulic cylinder
10.Pump lever, removable
11.Bushing for the pump lever
12.Changeover valve for up an down stroke of the
hydraulic cylinder.
13.Adjustment screw for the withdrawal speed
14.Oil filling hole with vent function
15.Oil tank
8
9
10
1
2
3
5
12
13
15
6
7
11
14
14 WPP Series | Version 1.02
Description of the device
Fig. 6: Description of the workshop press WPP 20
Fig. 7: Description of the workshop press WPP 30
1. Hydraulic cylinder
2. Press ram
3. Machine frame
4. Supporting prism
5. Press table
6. Headed dowel of the press table
7. Machine foot
8. Manometer
9.Connection hose from hand pump to hydraulic cylinder
10.Pump lever, removable
11.Bushing for the pump lever
12.Changeover valve for up an down stroke of the
hydraulic cylinder.
13.Adjustment screw for the withdrawal speed
14.Oil filling hole with vent function
15.Oil tank
9
8
1
3
4
6
10
7
15
13
2
11
14
5
12
1.Hydraulic cylinder, positionable beside
2.Press ram
3.Machine frame
4.Supporting prism
5.Press table
6.Rope winch
7.Crank of the rope winch
8.Headed dowel of the press table
9.Machine foot
10.Manometer
11.Connection hose from hand pump to hydraulic cylinder
12.Bushing for the pump lever
13..Pump lever, removable
14.Changeover valve for up an down stroke of the
hydraulic cylinder.
15.Adjustment screw for the withdrawal speed
16.Oil filling hole with vent function
(in the back of the cover)
17.Oil tank
1
2
3
7
8
9
10
4
5
6
17
16
15
14
13
12
11
Assembly and connection
WPP Series | Version 1.02 15
6.1 Scope of delivery
- 2-piece prism set for inserting round material
- Winch for raising and lowering the table (at WPP 30)
7 Assembly and connection
7.1 Installation location
Design the work area around the workshop press in accordance with local
safety regulations.
In order to achieve good functionality and a long life of the workshop press,
the installation site should meet the following criteria.
- The ground must be level, firm and vibration-free.
- The foundation must not let any lubricant through.
- The installation or working area must be dry and well ventilated and
there must be no risk of fire or explosion.
- Do not operate machines that cause dust and chips near the workshop
press.
- There must be sufficient space for the operating personnel, for material
transport as well as for adjustment and maintenance work.
- The site must have good lighting. (Minimum value: 300 lux, measured at
the tool tip). With lower illuminance, additional lighting must be ensured,
for example by means of a separate workplace luminaire.
- Working temperature range + 10 ° C to + 50 ° C
Installation of the workshop press
WARNING!
Danger to life due to undersized buildings!
Overloading of ceiling structures leads to serious property
damage and bodily injury up to death!
- If the workshop press is placed on a self-supporting build-
ing ceiling, the dynamic loads due to the movements must
be taken into account - the foundation must bear the work-
shop press.
NOTE!
Property damage due to uneven ground!
An uneven surface causes deformations within the work-
shop press. This leads to an inaccurate machining of the
workpieces.
- Set up the workshop press on a flat, vibration-free and
even surface.
WARNING!
Risk of crushing!
The workshop press can tilt when setting up and cause
serious injuries.
- The workshop press must be set up by at least 2 people
together.

16 WPP Series | Version 1.02
Assembly and connection
Step 1: Check the ground for horizontal alignment. If necessary, compensate
slight unevenness.
Step 2: Precisely align the workshop press with a spirit level by adjusting with
the foundation screws and shims. Check the exact alignment of the
machine at regular intervals (quarterly).
Step 3: Fix the workshop press with ground anchors (for example Fischer FZA
or equivalent) on the ground.
Fig. 8: Anchoring of the workshop press
7.2 Montage
Wearing safety gloves!
Wear safety shoes!
Wear protective clothing!
NOTE!
- After setting up, remove the protective agent from the bare
metal parts, which have been applied to protect against
rusting.
- Use usual solvents.
- No water, no nitrolic solvents or similar use!
NOTE!
The moving parts must be free from dirt and dust.
- If necessary, lubricate the moving parts as listed in the
chapter on cleaning and maintenance.
ATTENTION!
Before the first start-up, the following operating points must
be executed.
ATTENTION!
Fill up only with suitable hydraulic oil. Do not use brake oil.
Do not overfill oil container; an increased amount of oil can
cause problems.

Assembly and connection
WPP Series | Version 1.02 17
The workshop press is delivered ready for use as possible. This means that in
the course of commissioning only a few work steps have to be done.
The following points have to be carried out:
- Use the exploitation drawing for the construction of the workshop press.
- Be sure to tighten all screw connections of the assembled press before
first use!
- Attach the workshop press with suitable ground anchors in the founda-
tion. Pay attention to the load-bearing capacity of the substrate. Pay at-
tention to the load-bearing capacity of the substrate.
A tipping over of the press must not be allowed, even if an external force
is applied.
- Fill the pump with hydraulic oil and close the inlet opening with the yel-
low plastic vent plug.
Type of oil: Hydraulic oil with a viscosity of 22 mm² / s to 25 mm² / s (at 40 ° C)
Oil quantity: 0.9 to 1.2 liters for WPP 15 and 20, 2.3 liters for WPP 30
Fig. 9: Assembly
Ram return
Fast ram
Ram operation
Slow ram

18 WPP Series | Version 1.02
Operation
8 Operation
WARNING!
Danger due to insufficient qualification of persons!
Unqualified persons can not assess the risks involved in
handling the workshop press and expose themselves and
others to the risk of serious or fatal injuries
- All work should only be carried out by qualified persons.
- Keep inadequately qualified persons out of the work area.
WARNING!
Risk of crushing!
The upper limbs must be kept away from the machine when
machining the workpiece.
WARNING! DANGER OF EXPLOSION !
Never press containers of highly flammable or explosive
substances, aerosols or pressurized containers.
Never press objects made of brittle materials such as con-
crete or stone.
ATTENTION!
The following rules must be followed.
- Never carry out any work on the workshop press under the
influence of alcohol, drugs or medication and / or over-fa-
tigue or concentration-disturbing illnesses.
- The workshop press may only be operated by a trained
person.
ATTENTION!
Before you start using the workshop press for the first time,
do the following:
- Check all screw connections on the installed workshop
press and re-tighten if necessary.
- Fill the tank with hydraulic oil and close the filler hole.
- Remove the air out of the hydraulic system.
- Check the hydraulic lines and connections for leaks.
- Check the electrical wiring and connections.
Wear protective glove!
Wear safety shoes!

Operation
WPP Series | Version 1.02 19
The machine is designed for steel processing and not for processing flamma-
ble or harmful substances. The customer is responsible for the choice of the
material to be processed. It must also be ensured that the safety of nearby
operating personnel is ensured.
The material should meet the following requirements:
- Dry and clean, free of oil.
- The diameter must correspond to the specifications.
- The material should have a degree of hardness throughout.
- Buying high quality material is advisable.
- The surface of the areas to be processed should be smooth.
The following recommendations should be helpful during processing:
- The operator should have a basic knowledge of this type of machine.
- Operators should not wear wide garments, necklaces, rings, etc. to pre-
vent them from being pulled into the running machine.
8.1 Set table height WPP 15 and 20
In order to work safely on the hydraulic workshop press, the correct working
height of the table must be adjusted by means of the support bolts.
Fig. 10: Adjusting the table height
Wear protective clothing!
WARNING!
Risk of crushing!
If the press table is not completely resting on the support pin, it
can cause bruising. Before adjusting the table height, check
that the table is completely resting on the support bolt.
1. Press table
2. Headed dowel
3. Supporting prism
4. Pump lever
5. Cup
6. valve for Up / down
movement of the
piston

20 WPP Series | Version 1.02
Operation
8.2 Adjusting the table height WPP 30
Step 1: Lift the press table by turning the winch handle clockwise.
Step 2: If the press table is to be lowered, first pull the support bolts out of the
stand bores.
Step 3: Bring the table up to the desired height level. Leave room for inserting
the support bolts.
Step 4: Insert the support bolts into the stand holes.
Step 5:Turn the crank of the winch counterclockwise and lower the press ta-
ble down to the support bolts.
Fig. 11: Positioning the table height WPP 15, 20 and 30
Step 1: Lift the press table with your hands.
Step 2: Pull the support bolt out of the stator holes on the raised side. Hold the
press table in his position.
Step 3: Bring the table up to the desired height level. Leave room for inserting
the support bolts.
Step 4: Insert the support bolts into the stand holes.
Step 5: Lower the press table onto the support bolts. Check that the table is
positioned horizontally.
.
ATTENTION!
Any work may only be carried out if the press table lies
completely on both support bolts and the hand-wheel of the
winch is completely free to move. The table must not hang
on the ropes.
ATTENTION!
Note the heavy weight of the press table. If necessary,
adjust the height of the press table with the assistance of a
second person.
This manual suits for next models
5
Table of contents
Other Metallkraft Power Tools manuals


