Meyra 1.595-603 User manual

OPERATING MANUAL
ELECTRIC WHEELCHAIR
Model 1.595 – 603 vertical junior
Model 1.595 – 604 vertical senior
GB
We move people.

2
Contents
Introduction .................................................................................................. 6
Indications..................................................................................................... 7
Acceptance .................................................................................................... 7
Adjustment ................................................................................................... 7
Specifications................................................................................................ 8
Use ................................................................................................................. 8
Overview ....................................................................................................... 9
Model: 1.595 – 603 / 1.595 – 604 .........................................................................9
Quick guide ................................................................................................. 10
Driving behavior ........................................................................................ 12
Speed limitation .................................................................................................12
Functional checks ...............................................................................................12
Brakes .......................................................................................................... 13
Operating brakes................................................................................................13
Parking brake .....................................................................................................13
Selection lever.....................................................................................................13
Locking the brake .........................................................................................13
Releasing the brake ......................................................................................13
Drive-/push mode ...............................................................................................14
Selecting the push mode..............................................................................14
Selecting the motor mode ...........................................................................14
Selecting the operation ............................................................................. 15
Pre-operation checks..........................................................................................16
Charging procedure......................................................................................17
Operating module ...................................................................................... 18
Positioning the operating module....................................................................18
Function description .....................................................................................18
Horizontal adjustment..................................................................................18
Turning the operating module to the side .................................................19
Remove the operating module....................................................................20
Fitting of the operating module..................................................................20

3
Arm supports .............................................................................................. 21
Angle of the arm supports ...........................................................................21
Swivelling up the arm supports ...................................................................22
Swivelling down the arm supports..............................................................22
Back support ............................................................................................... 23
Head support .............................................................................................. 23
Adjustment of the head support.................................................................23
Removing and height adjusting the head support....................................23
Holder for chin operation ............................................................................23
Leg support ................................................................................................. 24
Folding up the leg support ..........................................................................24
Knee cushions .....................................................................................................25
Removing/attaching the knee cushions ......................................................25
Side cushions .............................................................................................. 26
Adjusting the side cushions..........................................................................26
Removing the side cushions .........................................................................26
Removing / attaching the side cushion pad................................................26
Back support cushions ............................................................................... 26
Torso supports ............................................................................................ 27
Splay wedge ............................................................................................... 27
Removing/attaching the splay wedge.........................................................27
Chest support ............................................................................................. 28
Removing/attaching the chest support.......................................................28
Depth adjustment of the chest support......................................................28
Lifting/lowering the chest support..............................................................29
Seat .............................................................................................................. 30
Seat inclination (camber)...................................................................................30
Special safety information for raising the seat, seat height adjustment,
standing and lying functions.............................................................................31
Raising the seat ..................................................................................................31
Seat height adjustment .....................................................................................32
Getting up from the sitting position ................................................................33
Lying position .....................................................................................................34
Getting up from the lying position...................................................................35
Adjusting the seat depth ...................................................................................36

4
Chest strap .................................................................................................. 36
Fastening the breast strap............................................................................36
Opening the breast strap .............................................................................36
Retaining strap ...................................................................................................37
Fastening the retaining strap.......................................................................37
Adjustment of belt length ...........................................................................37
Shoulder strap ....................................................................................................38
Fastening the shoulder strap .......................................................................38
Adjustment of belt length ...........................................................................38
Emergency switch ...................................................................................... 39
Raising the seat .............................................................................................39
Lowering the seat .........................................................................................39
Loading and transportation ...................................................................... 40
Loading ...............................................................................................................40
Transport security ...............................................................................................40
Passenger transport in handicapped transport vehicles (HTV).......................41
Maintenance ............................................................................................... 41
Maintenance.......................................................................................................41
Maintenance schedule..................................................................................42
Fuses ....................................................................................................................44
Replacing the fuses .......................................................................................44
Tyre damage on pneumatic tyres......................................................................44
Lighting ...............................................................................................................45
Adjusting the headlights..............................................................................45
Back light .......................................................................................................45
Headlights......................................................................................................46
Indicator.........................................................................................................47
Information for the specialist dealer ................................................................48
Programming the driving behaviour...........................................................48

5
Technical data ............................................................................................. 49
Kilometric performance.....................................................................................49
Fuses ....................................................................................................................50
Lighting ...............................................................................................................50
Vehicle independent data .................................................................................51
Vehicle specific data...........................................................................................53
Meaning of the labels on the electric wheelchair...........................................54
Meaning of the symbols on the type plate......................................................55
Fault correction .......................................................................................... 56
Inspection certificate ................................................................................. 57
Warranty / Guarantee................................................................................. 58
Inspection certificate for transfer .....................................................................59

6
INTRODUCTION
We thank you for the confidence you
have placed in our company by choos-
ing an electric wheelchair from this
series.
The model of your selection, fulfils
the wish for mobility and more inde-
pendence by way of a new styling of
the proven MEYRA-Ortopedia tech-
nology.
With all equipment and their accesso-
ries the electric wheelchair offers the
respective adaptation to your disabil-
ity.
Like any other vehicle, an electric
wheelchair is a technical aid. It is sub-
ject to explanations, requires regular
care and can cause danger when used
improperly. The correct handling must
therefore be learned. This operating
manual is to help you get accustomed
to the handling of the electric wheel-
chair as well as to prevent accidents.
☞Note:
Please note that the illustrated
equipment variants can deviate
from your model.
– We have therefore also listed chap-
ters with options that might not be
applicable for your vehicle.
!Attention:
Read and observe the following
documentation belonging to the
electric wheelchair before first use:
– this operating manual,
– the operating manual < Operating
module NEMO >,
– the safety and general handling in-
structions < Electronic vehicles >.
☞Note:
Children and juveniles should read
the documentation belonging to
the electric wheelchair together
with their parents respectively a
supervisor or accompanying per-
son before first use.
For users with visual impairments the
PDF-files of the above mentioned doc-
uments can be accessed on our web-
site < www.meyra-ortopedia.com >.
☞Contact your specialist dealer
when required.
Alternatively users with visual impair-
ments can have the documentation
read out by a helper.

7
INDICATIONS
If the following indications occur we
recommend the application of this
mobility product:
☞Walking disability resp. extremely
limited walking ability as part of
the basic need to move around in
your own home.
☞The need to be able to leave home
for a short walk in fresh air or in or-
der to reach the places, commonly
in the perimeter of the home, re-
quired to fulfil basic needs.
ACCEPTANCE
All products are checked for faults
in the factory and packed in special
boxes.
☞Note:
However, we request that you
check the vehicle for possible
transport damage immediately on
receipt – preferably in the pres-
ence of the carrier.
☞Note:
The packaging of the electric
wheelchair should be stored for a
further transport that might be-
come necessary.
ADJUSTMENT
☞Note:
The first adjustment of the electric
wheelchair to the user as well as
the required handling introduc-
tion is carried out by educated per-
sonnel.
The electric wheelchair is handed over
to the user in an operationally ready
state under observance of all relevant
safety regulations and adjusted to the
individual requirements.
☞Note:
Existing manual adjustments are to
be adjusted for the drive mode in
such a fashion that a secure han-
dling of the electric wheelchair is
warranted.
!Attention:
Always have retrospective adapta-
tion and adjustment work carried
out by a specialist dealer.
☞Note:
☞We recommend a regular control
if the wheelchair adjustment in or-
der to ensure a long-term optimal
provision even with changing ill-
ness/handicap patterns of the user.
☞Especially for children and juve-
niles an adjustment every 6 months
is recommendable.

8
SPECIFICATIONS
The electric wheelchair is an environ-
ment-friendly electronic vehicle. It is
a multifunction wheelchair, compact
and agile with reclining and rising
functions, especially designed for the
extreme provision of adolescents and
adults, for indoor and outdoor use on
level, firm surfaces.
With all equipment and their accesso-
ries the electric wheelchair offers die
respective adaptation to your respec-
tive disability.
☞The model has been assigned the
'Use Class B' as per the EN12184
standard.
USE
The electric wheelchair is solely des-
ignated to transport one person in-
structed in its use. Other pulling or
transporting uses do not comply with
its intended purpose.
Before use on outdoor public routes
the electric wheelchair is to be fit with
an optionally available lighting jig.
Depending on the leg support adjust-
ment it can cross obstacles with a max.
height of 40 mm resp. 70 mm.
☞Adjust the seat or leg support for
the required ground clearance of
the leg support-support castors to
overcome obstacles.

1 2 3
4
5
6
789
10 11
12
13
14
9
OVERVIEW
Model: 1.595 – 603 / 1.595 – 604
The overview shows the most important components and operating equipment.
Pos. Description
10 Seat unit
11 Head support
12 Operating module
13 Drive wheel
14 Steering wheel
Pos. Description
1 Breast strap
2 Back support upholstery
3 Arm support
4 Side cushion
5 Knee cushion
6 Calf pad
7 Leg support / Footplate
8 Leg support-support castor
9 Selection lever drive-/push mode

10
QUICK GUIDE
☞Note:
The following quick guide does not
replace the reading and observing
of the documentation belonging
to the wheelchair.
Operation of the adjustments
through the operating module
6 adjustment menus can be selected
with the Mode – key:
☞Back support with arm support ad-
justment
☞Camber/ seat inclination
☞Leg supports with length align-
ment adjustment
☞Reclining function
☞Seat height adjustment
☞Standing function
After selecting the menu the adjust-
ment from the basic position can
be activated with the Plus - key, right
turn signal - key or by moving the joy-
stick to the right.
After selecting the menu the adjust-
ment into the basic position can
be activated with the Minus - key, left
turn signal - key or by moving the joy-
stick to the left.
Locking down the adjustments
1. The leg support adjustment is
locked when the reclining function
is activated.
☞First bring the reclining function
into the basic position.
2. During the adjustment from the
lying position into the standing po-
sition other adjustment functions,
with the exception of the back
support adjustment, are locked.
3. All other adjustment functions are
locked when the standing function
is activated.
4. The speed is limited to 3 km/h
when the seat height adjust-
ment is in the base position or less
than 10 mm below or more than
100 mm above the base position.

1.
2.
3.
4.
5.
6.
11
External adjustment keyboard
The adjustments can be activated di-
rectly through the external adjust-
ment keyboard.
The two upper keys correspond to the
first adjustment menu:
☞The right keys correspond to the
plus-key and the left keys the mi-
nus-key of the operating module.
1. Back support with arm support ad-
justment
2. Camber/ seat inclination
3. Leg supports with length align-
ment adjustment
4. Reclining function
5. Seat height adjustment
6. Standing function

12
DRIVING BEHAVIOR
Optimising the driving behaviour of
the electric wheelchair with the per-
sonal circumstances is to be co-ordi-
nated by our customer service tech-
nician and your specialist dealer or
therapist.
The adaptability offers sufficient driv-
ing comfort as well as a high operat-
ing safety.
You determine the speed and driv-
ing direction yourself when driving
through the movement of the joystick
and the maximum top speed setting
of your electric wheelchair.
Speed limitation
The speed limitation to 3 km/h serves
the safety and is activated in the fol-
lowing settings:
☞Seat height lower than 10 mm
☞Seat height higher than 100 mm
☞Back support in final position
☞Reclining function in final position
☞From the start of the rising func-
tion
Functional checks
The functions and safety of the elec-
tric wheelchair must be checked be-
fore the start of each journey.
☞For this observe chapter < Inspec-
tions before starting to drive > in
the Operating manual of the Op-
erating module NEMO.

2
1
3
13
BRAKES
Operating brakes
The motors work electrically as oper-
ating brake and carefully brake the
electric wheelchair down without
jerks to stillstand.
Parking brake
The parking brakes only work when
the selection lever is in the drive
mode position. They disengage auto-
matically when the wheelchair starts
off. They are disengaged manually by
moving the selection lever to the push
mode position. Also view chapter <
Drive-/push mode >.
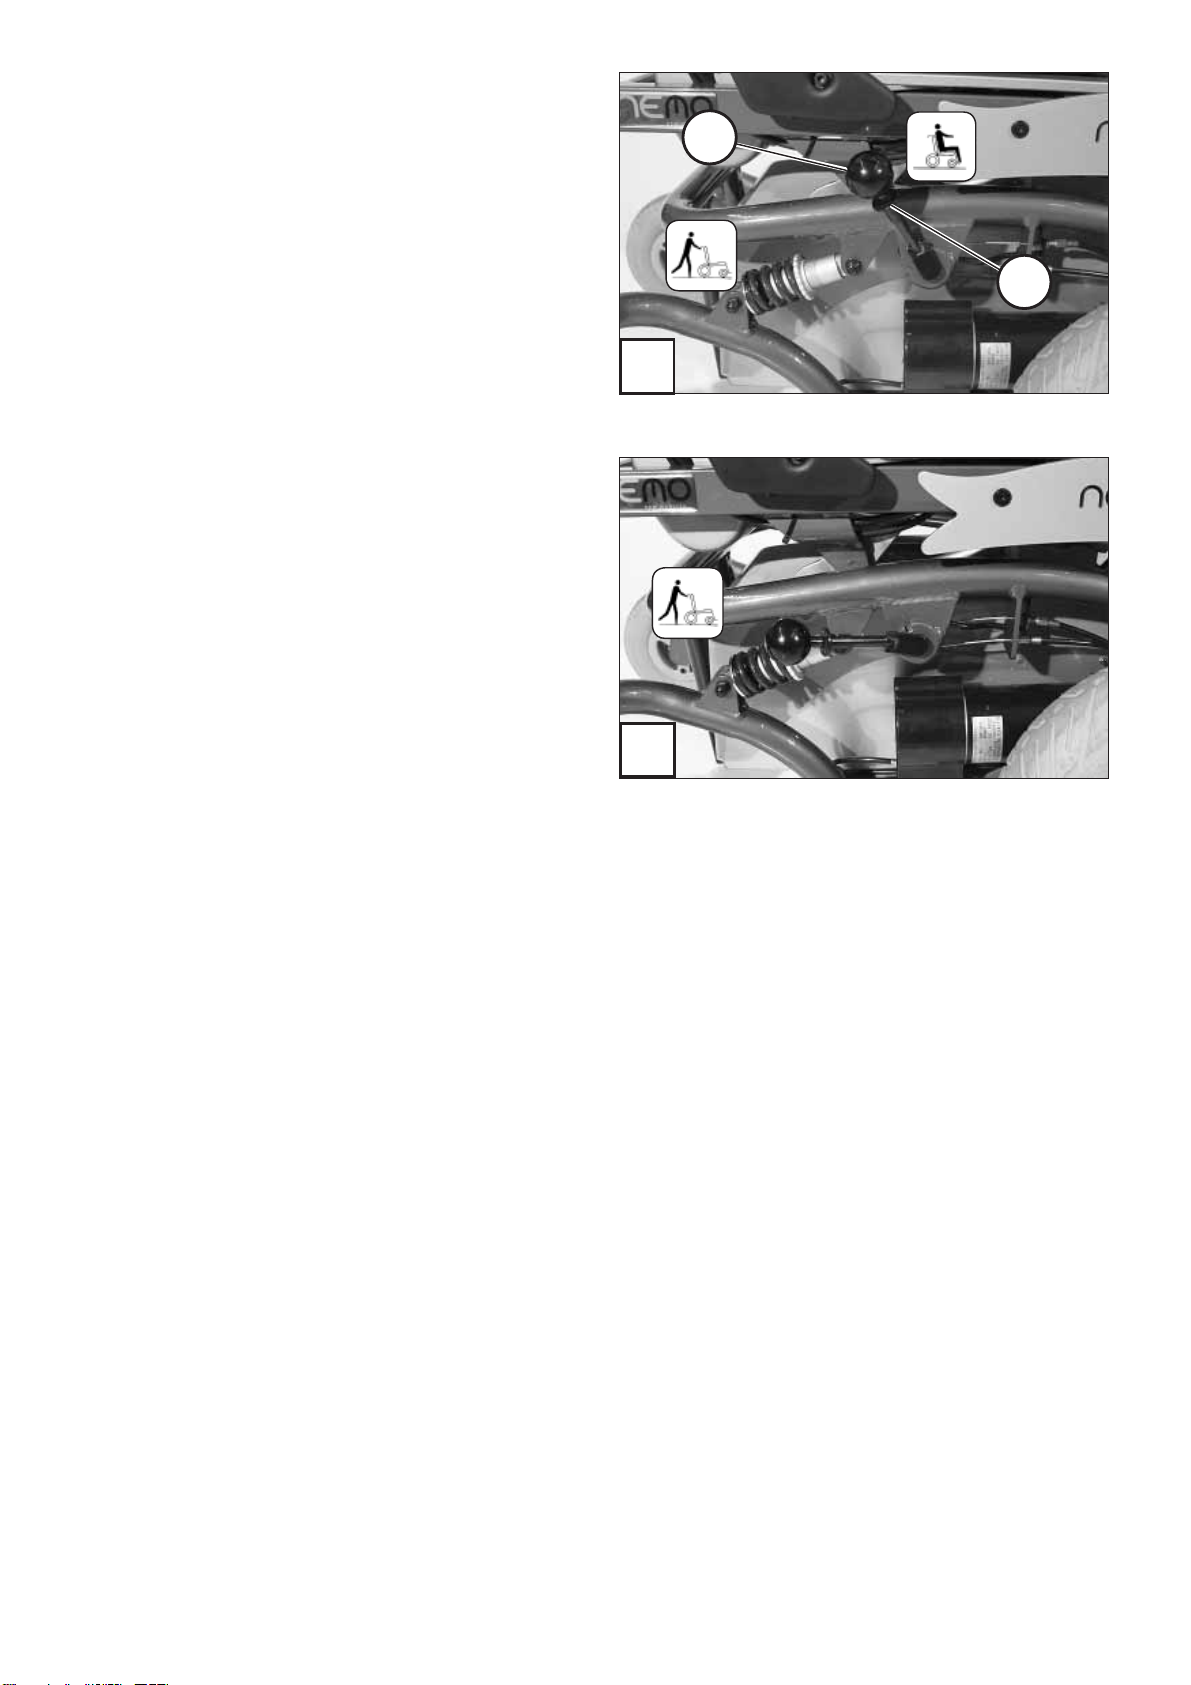
Selection lever
Locking the brake
Swivel the selection lever forward as
far as possible [1].
!Attention:
It is impossible to push the electric
wheelchair when in drive mode.
•The brake performance reduces
with
the brake pads are worn.
Releasing the brake
Activate the pull knob (3) on the se-
lection lever and swivel the selection
lever back as far as possible [2].
!Attention:
Do not get into/out of the electric
wheelchair unless it is switched off
and the selection lever has been
set to "drive mode"!
•Inadvertently knocking the control
lever will set the electric wheel-
chair in motion without control! –
Danger of accidents!
4
1
3
2
14
Drive-/push mode
The lever (1) for switching the drive
motors between the drive mode and
push mode is located on the right side
of the electric wheelchair.
!Attention:
Push the electric wheelchair only
for manoeuvring or in emergency
cases but never on gradients.
•The electric magnetic brakes are
switched off in the push mode. A
braking of the electric wheelchair
is then only possible by switching
to the drive mode. Therefore do
not switch to the push mode on
gradients.
Selecting the push mode
1. Switch off the operating module
because the pushing will otherwise
be made difficult by the electric
system.
2. Pull the locking sleeve (3) up and
then push the selection lever to
the rear [4].
☞The electric wheelchair can now be
pushed.
Selecting the motor mode
1. Push the selection lever to the
front (1) until it audibly latches [2].
2. Switching the operating module
on. The vehicle is now ready for
use.
3
2
1
15
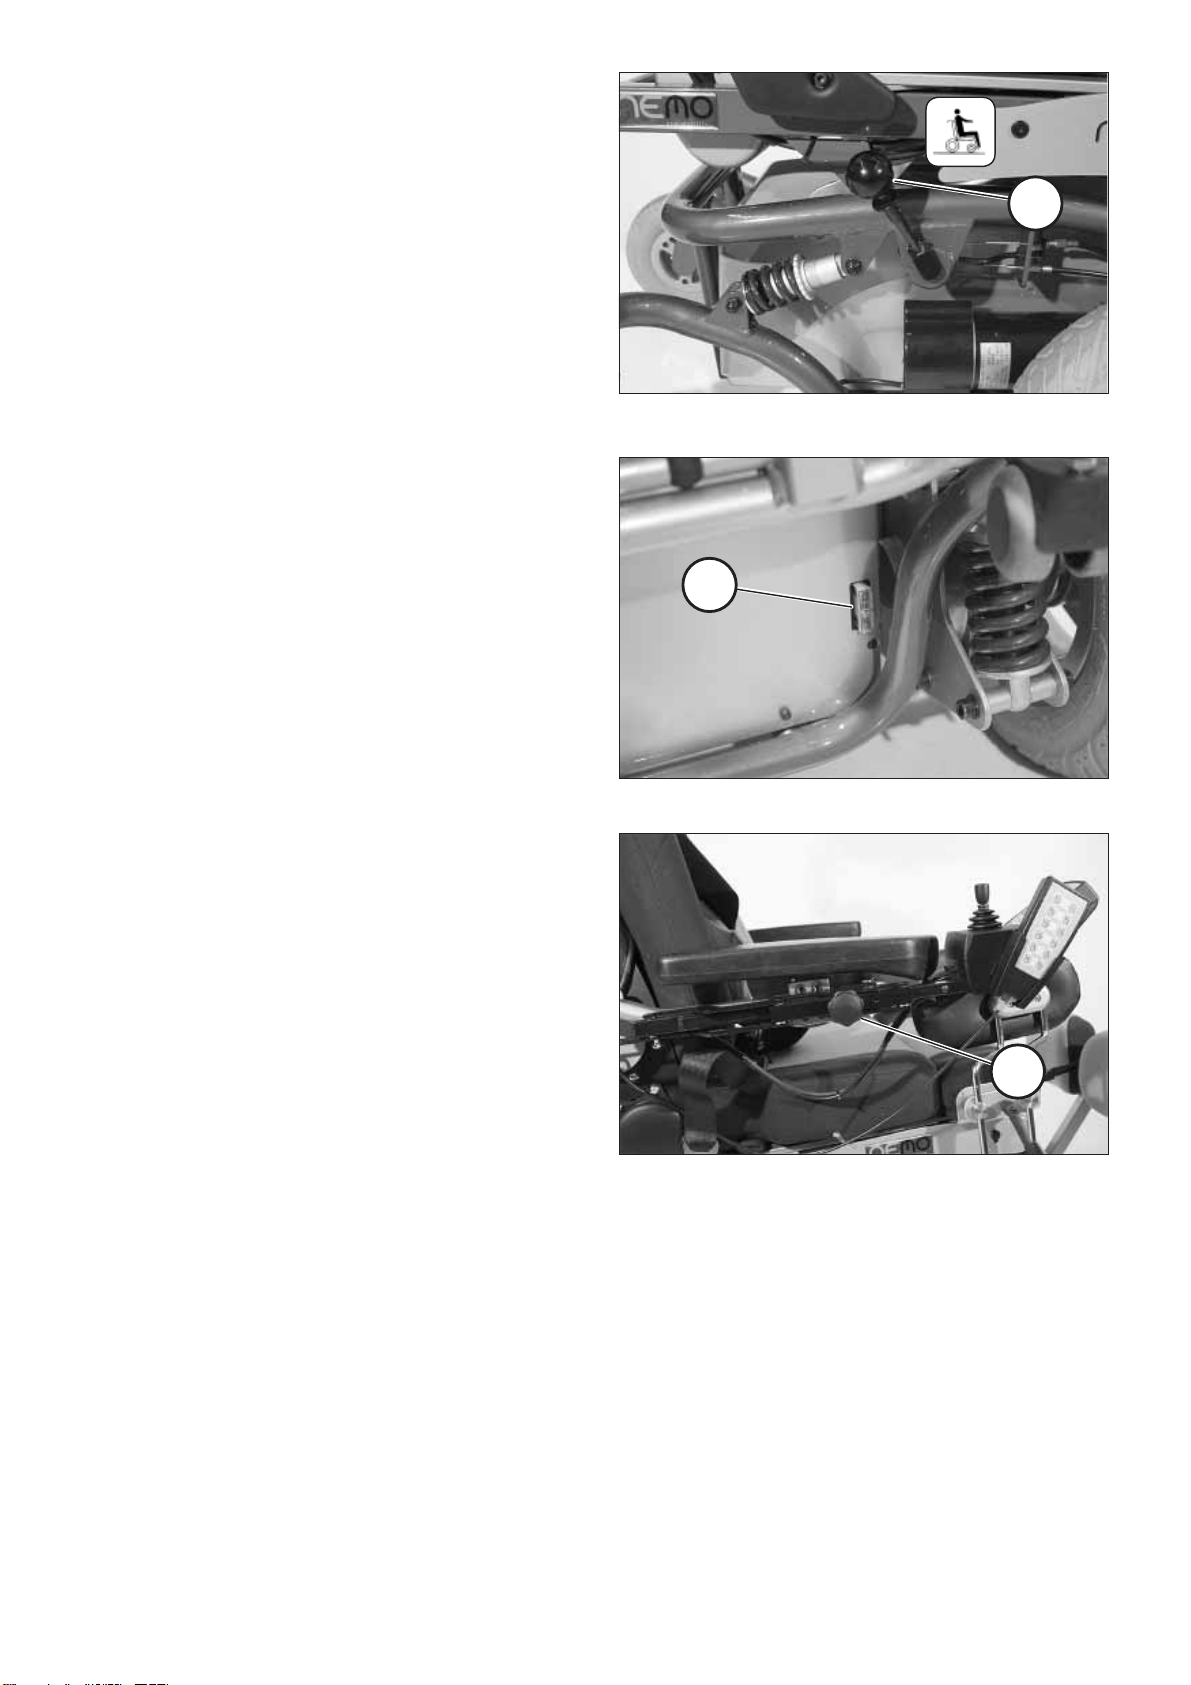
SELECTING THE OPERA-
TION
In order to obtain operational readi-
ness of the electric wheelchair the fol-
lowing directions are to be carried out
in the indicated order.
1. Shift to drive mode
Swivel the selection lever forward as
far as possible (1).
2. Check the correct fit of the bat-
tery/mains fuse
The fuse for the main current has to
sit tightly in the fuse holder (2).
3. Checking the position of the
operating module
The operating module should be po-
sitioned in such a way that you can
comfortably and safely steer the elec-
tric wheelchair.
☞Therefore observe chapter < Posi-
tioning the operating module >.

1
16
4. Switching the operating mod-
ule on
Press the ON/OFF-key on the control
panel of the operating module.
☞Observe the operating manual
< Operating module NEMO >.
☞Note:
Only actuate the joystick (1) after
the self-test of the electronics has
been completed!
Pre-operation checks
Before starting to drive, the following
should be checked:
☞the battery charge level,
☞the pre-selected maximum top
speed setting.
– For this observe the operat-
ing manual < Operating module
NEMO >.

1
2
17
Charging procedure
1. Switch the operating module off.
The selection lever should be in the
drive mode position.
2. Insert the battery charger plug
into the operating module (1).
!Attention:
Do not insert any objects other
than the battery charger plug into
the battery charging socket. – Dan-
ger of short circuit!
3. Switch on the battery charger, re-
spectively, plug the mains plug of
the battery charger into a conven-
ient mains socket. The battery is
now charging.
☞The charging process only runs
with an intact battery fuse (2)!
4. Disconnect the battery charger
from the mains socket at the end
of the charging process and then
pull the charging plug out of the
operating module.

2
1
18
OPERATING MODULE
Positioning the operating
module
Function description
You will find a detailed description of
the keys and symbols in the operating
manual for < Operating module >.
The position of the operating module
can be adjusted to suit the individual
size of the user. The operating module
can also be removed for transporta-
tion or storage and can be laid on the
seat or stored separately.
!Attention:
Switch off the operating module
before adjusting/removing it.
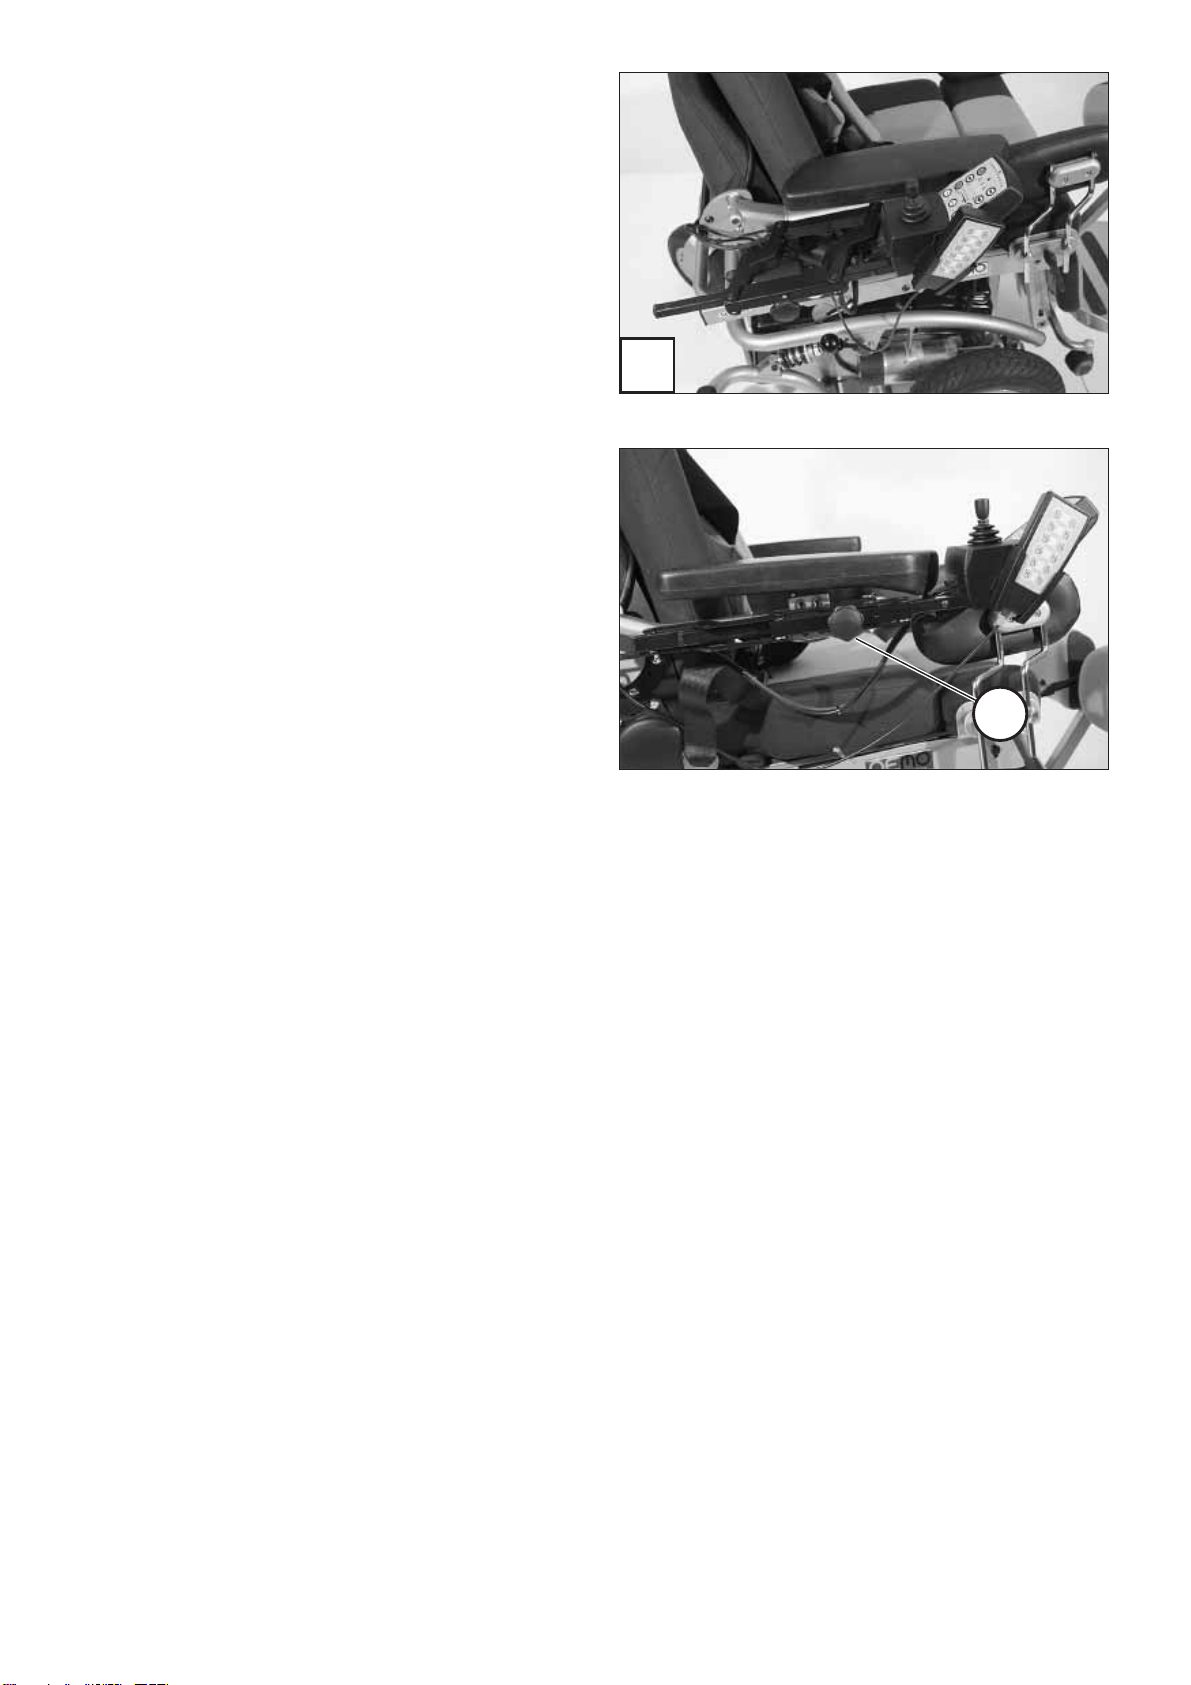
Horizontal adjustment
Slacken the clamping screw (1) for
horizontal adjustment. Slide the op-
erating module into the desired posi-
tion and in doing so carefully guide
the cable along. Retighten the clamp-
ing screw again securely.

1
2
19
Turning the operating module to
the side
With the optional swivel away oper-
ating module adapter the operating
module can be swivelled back to the
side (1) so that it is located parallel to
the arm support. This makes it possi-
ble, for example:
– to drive closer to a table,
– remove the operating module
more easily.
For regular drive mode the operating
module can be swivelled back toward
the front until it engages back into
the locking catch (2).
☞Note:
☞Press it toward the swivelling de-
vice for easier swivelling.
☞Should the operating module be
positioned too close to the arm
support, move it slightly forward
before swivelling.
!Attention:
Do not grab into the area of the
cross brace. – Danger of jamming!
1
4
20
Remove the operating module
Swivel the operating module to the
side first before removing it (1).
– Loosen the clamping screw (4) of
the clamping guide and pull the
operating module out toward the
front.
☞Carefully route the cable when do-
ing this.
Fitting of the operating module
– For drive mode insert the operat-
ing module from the front into the
bracket.
– Swivel the operating module back
to the front until it locks into place.
– Adjust the operating module to
the desired height and retighten
the clamping screw (4).
☞Carefully route the cable when do-
ing this.
Other manuals for 1.595-603
1
This manual suits for next models
1
Table of contents
Other Meyra Wheelchair manuals

Meyra
Meyra 9.500 User manual

Meyra
Meyra Optimus 2 User manual

Meyra
Meyra X1 User manual

Meyra
Meyra 9.050 User manual

Meyra
Meyra PROFI 3-T 2.874 User manual

Meyra
Meyra 1.360 User manual

Meyra
Meyra Polaro II 1.745 User manual

Meyra
Meyra 2.360 Manual

Meyra
Meyra Eurochair2 2.750 User manual

Meyra
Meyra 1.650 iCHAIR MEYLIFE User manual


Popular Wheelchair manuals by other brands


Drive
Drive Travelite Chair In A Bag Owner's handbook

Future Mobility Healthcare
Future Mobility Healthcare Northern lite user manual

Invacare
Invacare TDX 3 owner's manual

Breezy
Breezy BasiX2 Directions for use

Sunrise Medical
Sunrise Medical Breezy Entree Directions for use

Invacare
Invacare Flexo Instructions for use


