Meyra 1.736 User manual

GB OPERATING MANUAL
FOLDING WHEELCHAIR, MODEL
1.736
We move people.

2
Contents
Introduction .................................................................................................. 6
Acceptance .................................................................................................... 7
Adaptation .................................................................................................... 7
Handling the wheelchair ............................................................................. 7
Specifications ........................................................................................................7
Use .........................................................................................................................8
Auxiliary drives .....................................................................................................8
Overview ....................................................................................................... 9
Driving behaviour ...................................................................................... 10
Safety information .............................................................................................10
Supplementary user/safety information...........................................................10
Brake............................................................................................................ 12
Pressure brakes ...................................................................................................13
Locking the pressure brakes.........................................................................13
Releasing the pressure brakes......................................................................13
Drum brake for attendant ...........................................................................14
Leg supports ............................................................................................... 16
Calf strap........................................................................................................16
Folding up the footplates ............................................................................17
Swivelling away the leg supports ................................................................17
Dismantling the leg supports.......................................................................18
Attaching the leg supports ..........................................................................18
Adjusting the height of the footplate ........................................................19
Angle adjustable footplates.........................................................................19
Continuous leg support .....................................................................................20
Folding up the footboard ............................................................................20
Folding down the foot board ......................................................................20
Height adjustment of the footboard ..........................................................20
Adjusting the height of the footboard.......................................................21
Angle adjustable footboards .......................................................................21

3
Height-adjustable leg support ..........................................................................22
Folding up the foot plates ...........................................................................22
Swivelling off and removal of the leg supports .........................................22
Attaching the leg supports ..........................................................................23
Height adjustment of the leg support ........................................................23
Adjusting the height of the footplate ........................................................24
Depth adjustment of the calf cushion.........................................................24
Armrests...................................................................................................... 25
Remove the arm support..............................................................................25
Inserting the arm support ............................................................................26
Height adjustment of the arm supports .....................................................26
Mudguard.................................................................................................... 27
Adapting the clothes guard .........................................................................27
Seat .............................................................................................................. 28
Seat strap, standard ......................................................................................28
Seat cushion........................................................................................................29
Adjusting the seat depth..............................................................................29
Back support ............................................................................................... 30
Back support belt, standard ..............................................................................30
Adjusting the back support belt..................................................................30
Angle adjustable back support .........................................................................31
Adjustment of the back support angle.......................................................31
Adjustment of the back tube bracket.........................................................31
Height adjustable back support........................................................................32
Adjusting the back support height .............................................................32
Adjustable back ..................................................................................................33
Push handles............................................................................................... 35
Height adjustable push handles........................................................................35
Height adjustment ........................................................................................35
Removing the push handles.........................................................................36
Inserting the push handles...........................................................................36
Push handles with tube guidance.....................................................................37
Height adjustment ........................................................................................37
Adjusting the clamping strength.................................................................37

4
Wheels ......................................................................................................... 38
Drive wheels .......................................................................................................38
Quick release axle .........................................................................................38
Handrims.............................................................................................................39
Steering wheels ..................................................................................................39
Tyres.....................................................................................................................39
Support castors .......................................................................................... 40
Swivel-away support castors .............................................................................40
Swinging the support castors.......................................................................40
Insertable anti-tip castors ..................................................................................41
Removing/attaching the support castor......................................................41
Adjusting the support castor .......................................................................41
Correct support castors length.....................................................................41
Manoeuvre rollers ...................................................................................... 42
Shunting castors without brakes ......................................................................42
Seatbelt ....................................................................................................... 43
Fastening the seatbelt with buckle .............................................................43
Adjusting the belt length.............................................................................43
Therapy table.............................................................................................. 44
Mount the therapy table..............................................................................44
Individual adjustment ............................................................................... 45
Seat height /Seat angle......................................................................................45
Drive wheel position.....................................................................................46
Steering wheel position ...............................................................................46
Back support belt height ...................................................................................47
Folding/Transport ....................................................................................... 48
Folding/Unfolding ..............................................................................................48
Folding the wheelchair.................................................................................48
Carrying the wheelchair ...............................................................................49
Unfolding the wheelchair ............................................................................49

5
Loading and transportation ...................................................................... 50
Safety information........................................................................................50
Transport in vehicles .....................................................................................50
Transport security..........................................................................................50
Transport in handicapped transport automobile ............................................51
Maintenance ............................................................................................... 53
Cleaning and Care..............................................................................................53
Upholstery and covers ..................................................................................53
Plastic parts....................................................................................................53
Finish ..............................................................................................................53
Chassis ............................................................................................................54
Disinfection.........................................................................................................54
Reinstallment......................................................................................................54
Maintenance ............................................................................................... 54
Maintenance instructions ..................................................................................55
Flat tyre ...............................................................................................................58
Tyre change ...................................................................................................58
Adjusting the brakes..........................................................................................59
Fine adjustment of the pressure brakes......................................................59
Repair ..................................................................................................................60
Customer service.................................................................................................60
Spare parts ..........................................................................................................60
Disposal..........................................................................................................60
Inspection.................................................................................................... 61
List of annual maintenance work .....................................................................62
Inspection certificate through the dealer ........................................................63
Technical specifications ............................................................................. 65
Tools.....................................................................................................................69
Tightening torque for screwed connections....................................................69
Meaning of the labels on the wheelchair ........................................................70
Notes............................................................................................................ 71
Guarantee ................................................................................................... 74

6
INTRODUCTION
We thank you for the confidence you
have placed in our company by choos-
ing a wheelchair from this series.
The model 1.736, fulfils the wish for
mobility and more independence by
way of a new styling of the proven
MEYRA technology.
With all equipment and their accesso-
ries the wheelchair offers die respec-
tive adaptation to your disability.
Like any other vehicle, a wheelchair is
a technical aid. It requires explanation,
a little care and holds dangers when
used improperly. The correct handling
must therefore be learned.
This manual is to help you get accus-
tomed to the handling of the wheel-
chair as well as to prevent accidents.
☞Note:
Please note that the illustrated
equipment variants can deviate
from your model.
– We have therefore also listed
chapters with options that might
not be applicable for your vehicle.
!Attention:
Read and observe the following
documentation belonging to the
wheelchair before first operation:
– this operating manual,
– the safety information < Mechani-
cal wheelchairs >.
☞Note:
Children should read the documen-
tation belonging to the wheelchair
together with their parents respec-
tively a supervisor or attendant be-
fore first use.

7
ACCEPTANCE
All products are checked for faults
in the factory and packed in special
boxes.
☞Note:
☞However, we request that you
check the vehicle for possible
transport damage immediately on
receipt – preferably in the presence
of the carrier.
☞The packaging of the wheelchair
should be stored for a further
transport that might become nec-
essary.
ADJUSTMENT
Our specialist workshop supplies your
wheelchair ready for use and adjusted
to suit your special requirements.
☞Note:
The tools required for adjustments
and maintenance is listed under
chapter < Technical Data >.
HANDLING THE WHEEL-
CHAIR
Specifications
The wheelchair, model 1.736 was de-
veloped for adults and adolescents.
Three frames are available:
– short,
– medium,
– long.
The wheelchair solely serves to trans-
port one person in the seat and not as
a hauling aid, transporters or similar.

8
Use
Through its constructive advantages
the wheelchair can universally be
implemented on hard surfaces and
therefore an allround-wheelchair:
– for indoors (e.g. apartment, day
care),
– outdoors (e.g. in parks),
– as a companion on tours (e.g. in a
bus or train).
The wheelchair offers manifold ad-
justment possibilities to individual vi-
tal statistics.
The wheelchair should be adapted
to your needs by a specialist dealer
before the first use. The adaptation
will take into account the driving ex-
perience, the physical limits of the
user and the main place of use of the
wheelchair.
!Attention:
Always have adaptation and ad-
justment work carried out by a
specialist dealer.
Auxiliary drives
Before attaching auxiliary drives the
following notes have to be consid-
ered:
!Attention:
Attachment of auxiliary drives may
only be done on wheelchair mod-
els cleared for these.
☞The list of wheelchair models
cleared for auxiliary drives can be
acquired at any authorised dealer.

1 2
3
4
5
6
7
8
9
10
11
12
13
9
OVERVIEW
The overview shows the most important components of the wheelchair.
Pos. Description
1 Back support
2 Arm support
3 Seat cushion
4 Leg support
5 Calf strap
6 Footrest
7 Steering wheel
8 Toggle joint brake/Pressure
Brake
Pos. Description
9 Push handle
10 Side element
11 Handrims
12 Drive wheel
13 Tilt aid

10
DRIVING
Alignment of the driving behaviour
and the personal abilities is to be car-
ried out together with your specialist
dealer or therapist and is achieved af-
ter a short acquaintance period, test
drive.
!Attention:
Drive with extreme caution during
these first trips!
• Observe the section < driving train-
ing > in the safety instructions <
Mechanical wheelchairs >!
Safety information
!Attention:
Please follow all instructions in the
safety information < Mechanical
wheelchairs >.
• A directly opposed change of direc-
tion from backward motion with-
out steering into a forward motion
with simultaneously inward swivel-
ling steering wheels has the effect
of a full stop.
• Applying a safety belt prevents
falling out toward the front.
• In order to raise the backward tilt-
ing stability supporting wheels can
be mounted later on.
• When propelling the wheelchair
over the tyre there is a risk of inju-
ry in the area of the pressure bra-
ke.
Supplementary user/safety
information
• Clean, passive lighting is required
for driving in public traffic.
• Do not throw or drop parts belong-
ing to the wheelchair! – Detach-
able parts like e.g. side elements
and drive wheels have to be used
properly To guarantee their func-
tion.
• Removable parts, e.g. side ele-
ments and drive wheels must be
checked for correct locking before
starting to drive. Drive wheels with
defective linchpin (quick-fit) axles
can detach from the wheelchair
during the drive.
• By adding on or removing acces-
sories/components the dimensions
and weight of the wheelchair
change which can affect the driv-
ing behaviour.

11
• Never leave children/adolescents in
wheelchairs unsupervised.
• Always approach small obstacles,
e.g. steps or curbs, slowly and at a
right angle (90°) until the steering
wheels almost touch the obstacle.
Briefly stop the wheelchair and
then drive over the obstacle.
• Keep well clear of rail grooves, rails
and gully covers or similar sources
of danger. If not possible, cross such
obstacles at a right-angle (90°).
• Maintain a sufficient safety dis-
tance between the wheelchair and
drops, steps and obstacles. This
distance must allow enough time
to react and enough distance to
brake/turn.
• Always reduce the speed before a
curve. A sharper curve requires a
lower speed. Never lean outwards
in a curve.
• Tyres are made of a rubber mix-
ture and can leave permanent or
difficult-to-remove marks on some
surfaces (e.g. plastic, wooden or
parquet flooring, carpets, mats).
• To prevent damages due to cor-
rosion do not use ore store the
wheelchair in damp rooms.
Recommendation for driving in
twilight or darkness
• Avoid as far as possible driving on
roads or bicycle paths during dark-
ness. Wear light-coloured clothing
that can be seen at a distance.

1
12
BRAKE
By locking the brakes the wheelchair
is to secured against unintentional
rolling off (parking brake).
The locking brake belongs to the most
important safety features of a wheel-
chair and is available as a pressure
brake (1).
!Attention:
Please observe the maintenance
instructions as well as instructions
in the section < General safety in-
structions > and < Brakes > in the
safety instructions < Mechanical
wheelchairs >.
• The wheelchair loaded with the
user may not let itself be pushed in
with the brakes engaged.
• In order to prevent an unintention-
al curve while braking the wheel-
chair on slopes, both brakes are to
be activated simultaneously.
– Depending on the inclination of
the road a sideward tilting has to
be reckoned with.
• Do not support the body on the
lateral brake levers.
• The brake performance reduces
with
– tyre profile is worn
– tyre pressure is too low
– tyres are wet.
!Attention:
Arrange an immediate repair of
the brakes by your specialist work-
shop if the braking performance
reduces.
• Do not park wheelchairs with PU
tyres with activated pressure or
butterfly-brakes. – Deformations in
the running surface may remain.
• If possible propel the wheelchair
over the handrims. – Perhaps dan-
ger of jamming in the area of the
brake!
2
1
13
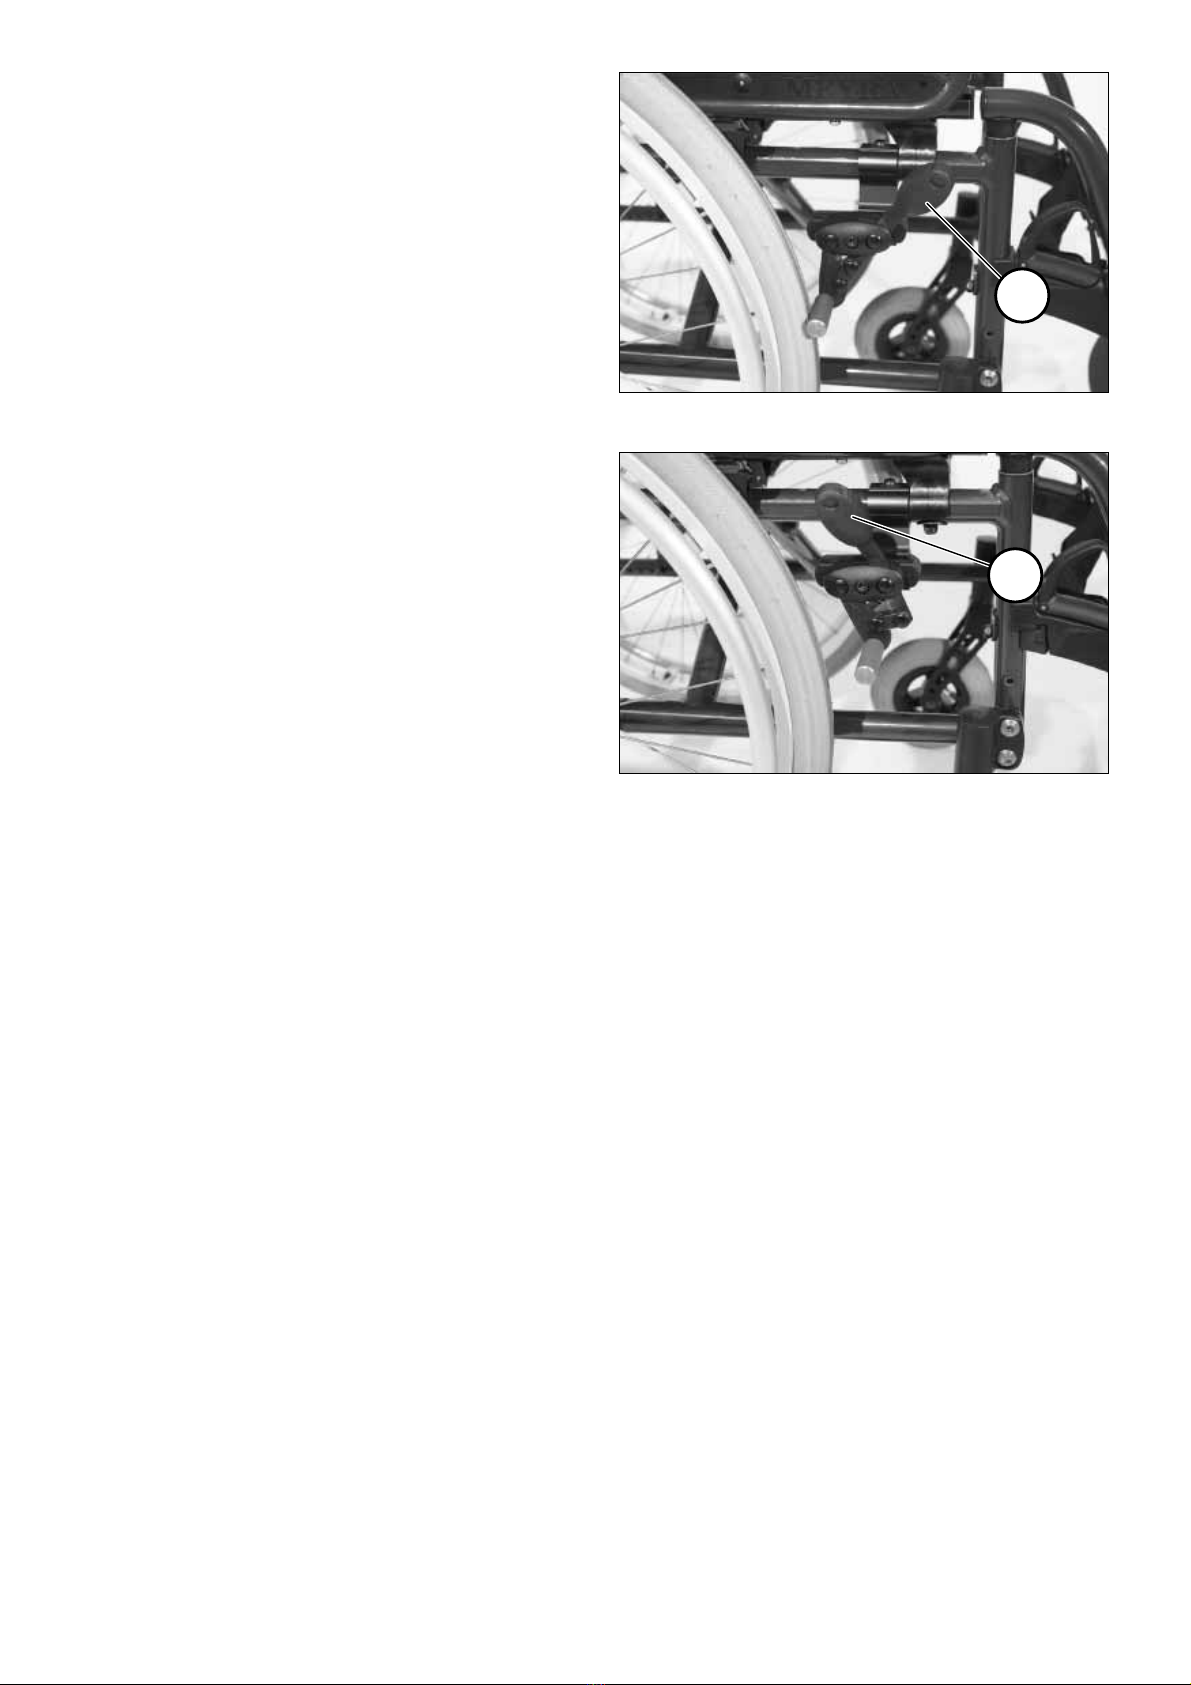
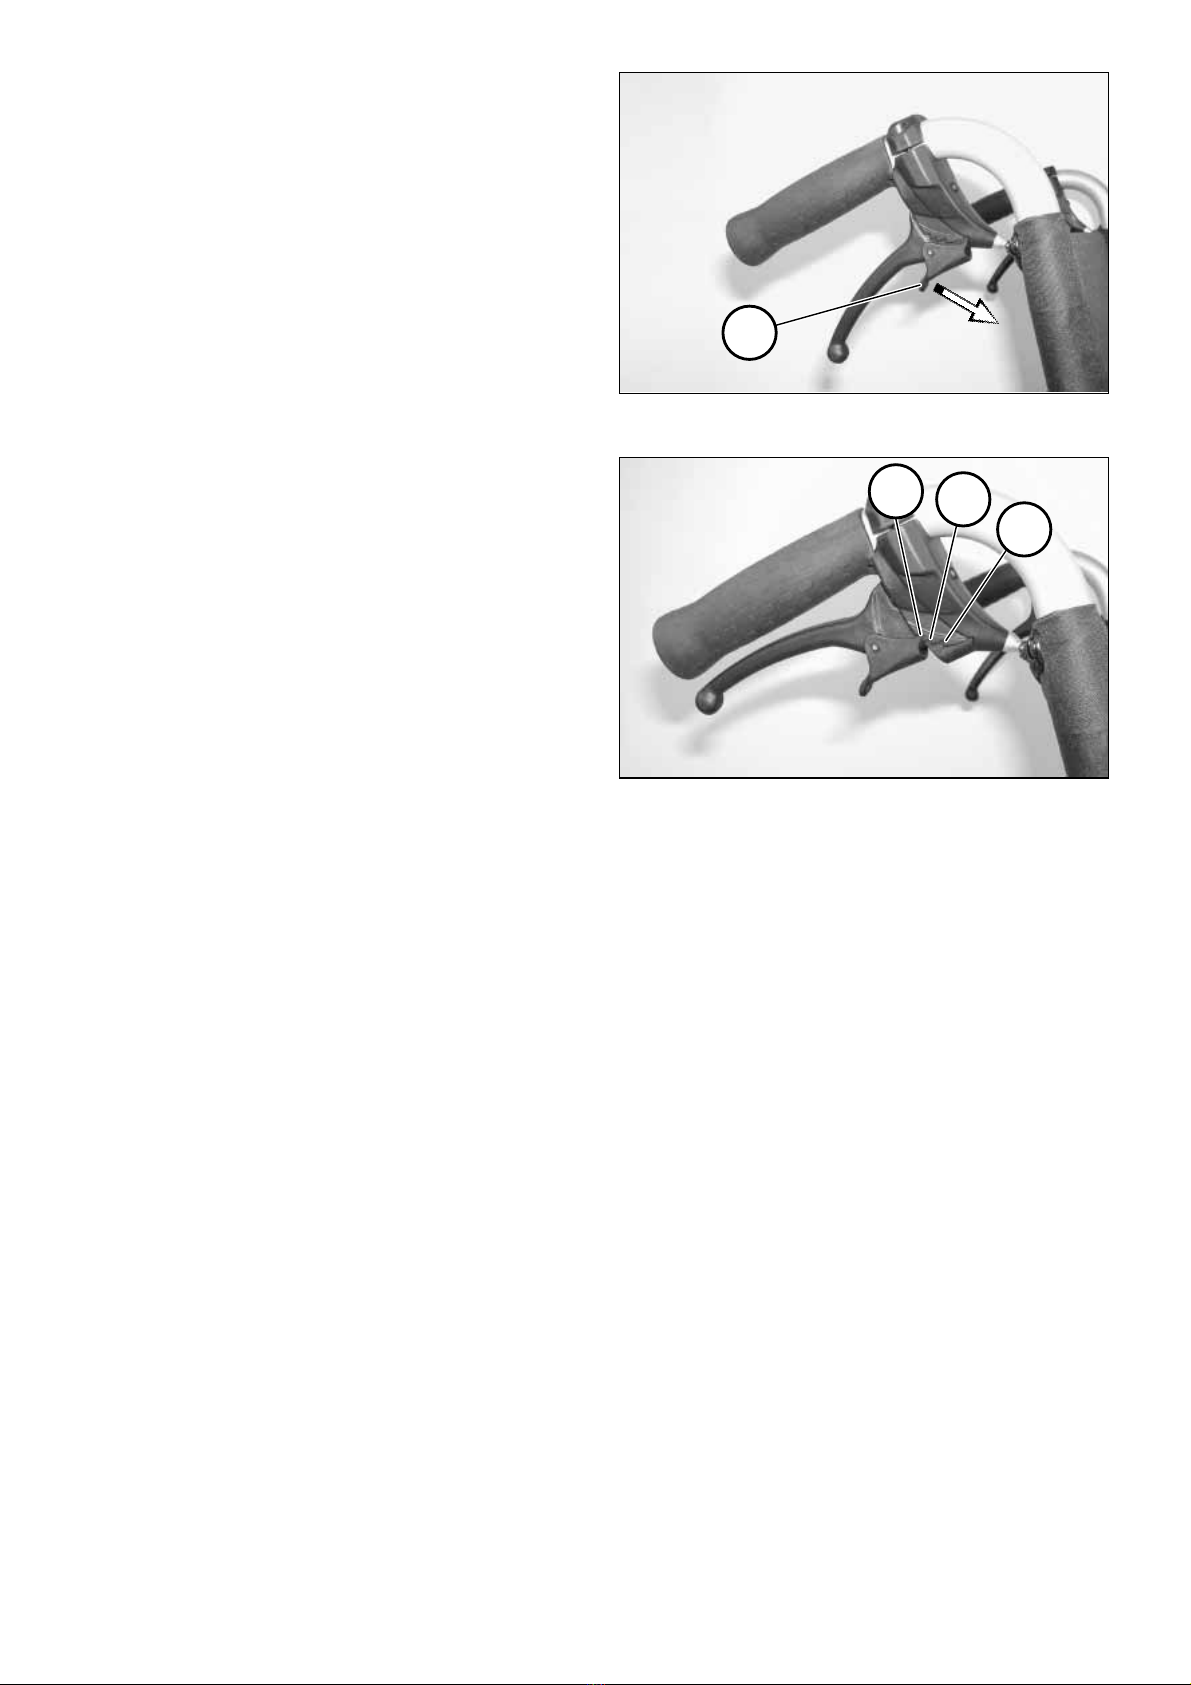
Pressure Brake
A metered braking from driving
speed (operating brake) is possible
with the brake levers (1) of the pres-
sure brakes.
Service brake
Press the two brake levers evenly only
slightly to the front, this brakes the
wheelchair in a metered fashion.
Locking the pressure brakes
To secure the wheelchair against any
unintentional rolling, press both brake
levers forward all the way (1).
☞Note:
It should not be possible to push
the wheelchair forward when both
brakes are locked.
Releasing the pressure brakes
Pull both brake levers back all the way
(2).
1
A
B
C
14
Drum brake for attendant
A metered braking from driving speed
(operating brake) is possible with the
brake levers of the drum brakes.
The wheelchair is also to be secured
against unintentionally rolling away
(parking brake) by engaging these
brakes.
Locking the drum brakes
Pull both brake levers evenly to secure
the wheelchair against unintentional
rolling away.
Press the latch (1) forward.
Release the brake lever. – Depending
on the adjustment the latch engages
in the first (A) or second (B) locking
position and activates the brake.
☞Note:
☞The wheelchair loaded with the
user may not let itself be pushed in
with the brakes engaged.
☞If the third locking position (C) is
required to activate the brake, it
must be readjusted by a specialist
workshop.

2
1
15
Loosen the drum brakes
Pull both brake levers (1) until the
latches (2) automatically jump out of
the lock.
Release both brake levers. – The park-
ing brakes are release and the wheel-
chair ready to go.
!
Attention:
For driving the front and rear brake
levers must be disengaged.
☞Note:
The braking effect depends upon:
– the condition of the tyres,
– the condition and attachment of
the brakes,
– the brake lever adjustment,
– the road condition.
!
Attention:
The braking effect decreases with:
– worn brake pads,
– loose brake lever,
– defective drum brakes.
•If the effect of the brake lessens
immediately have them readjusted
in a specialist workshop.

1
2
16
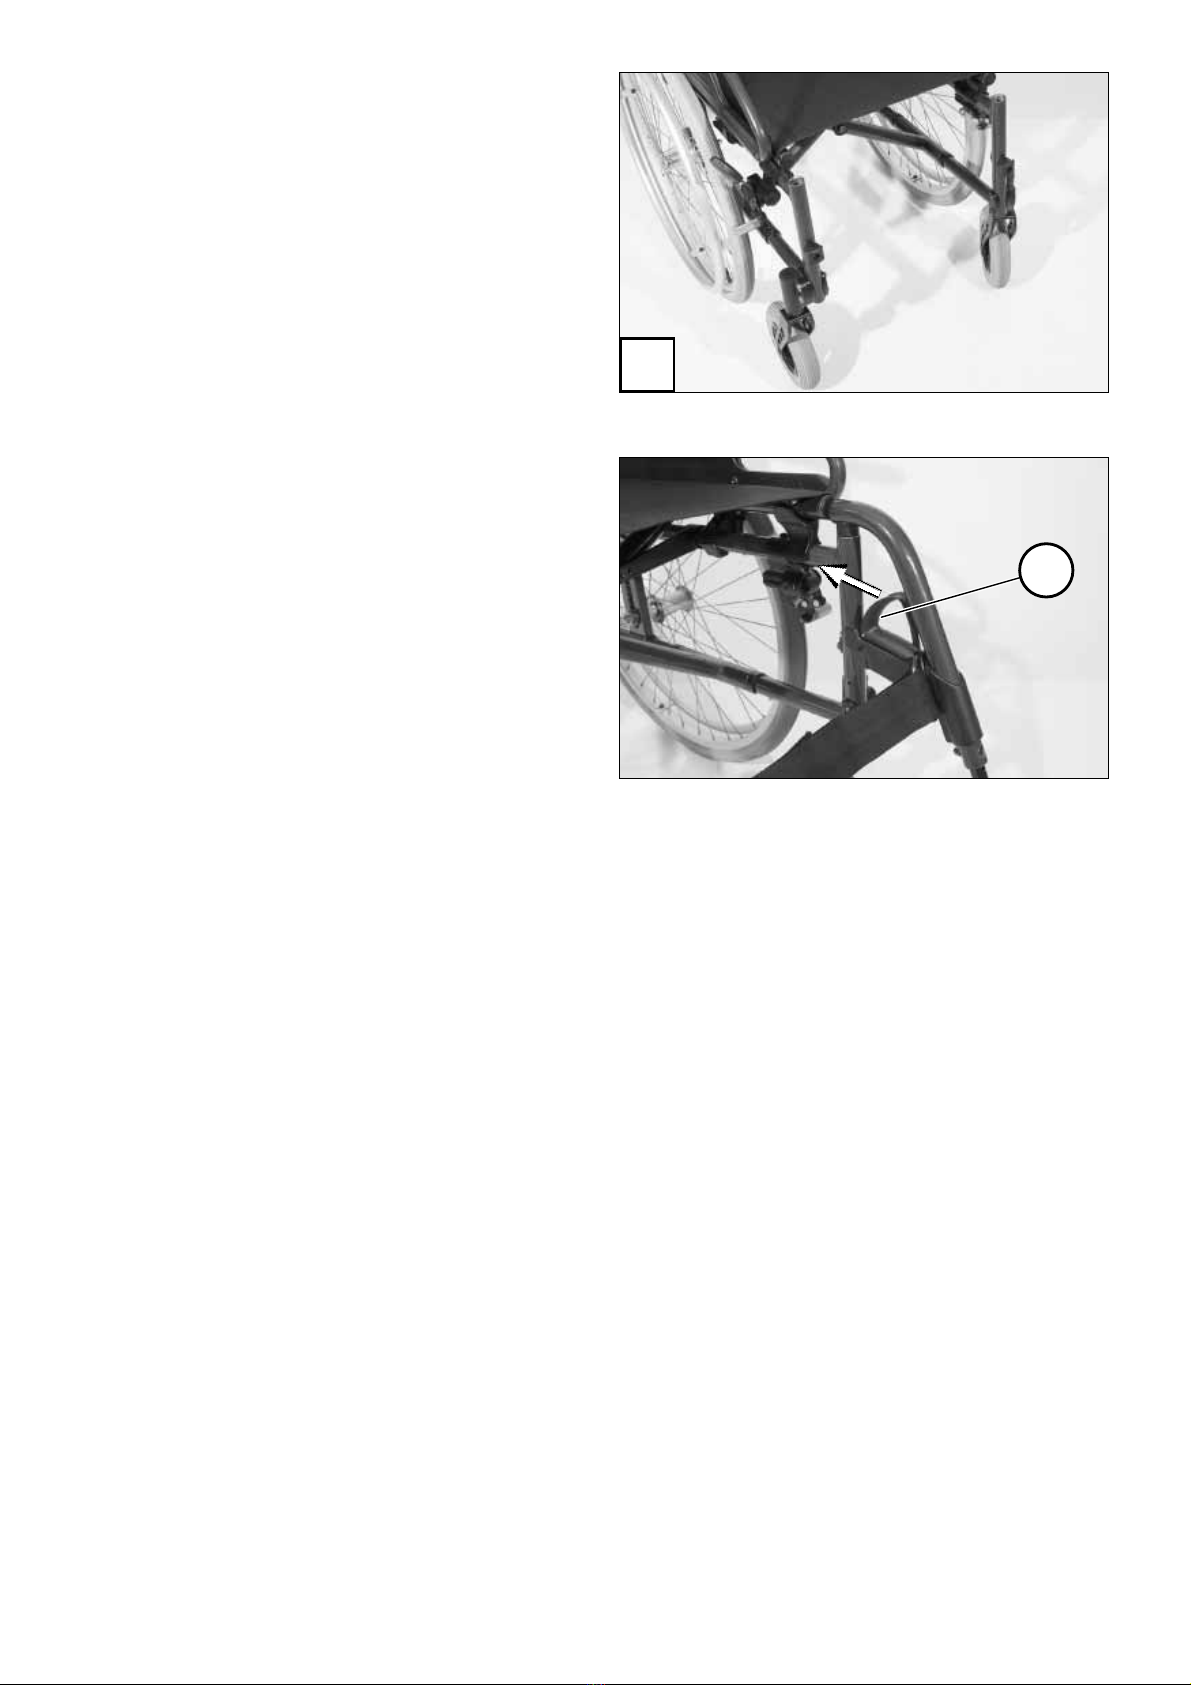
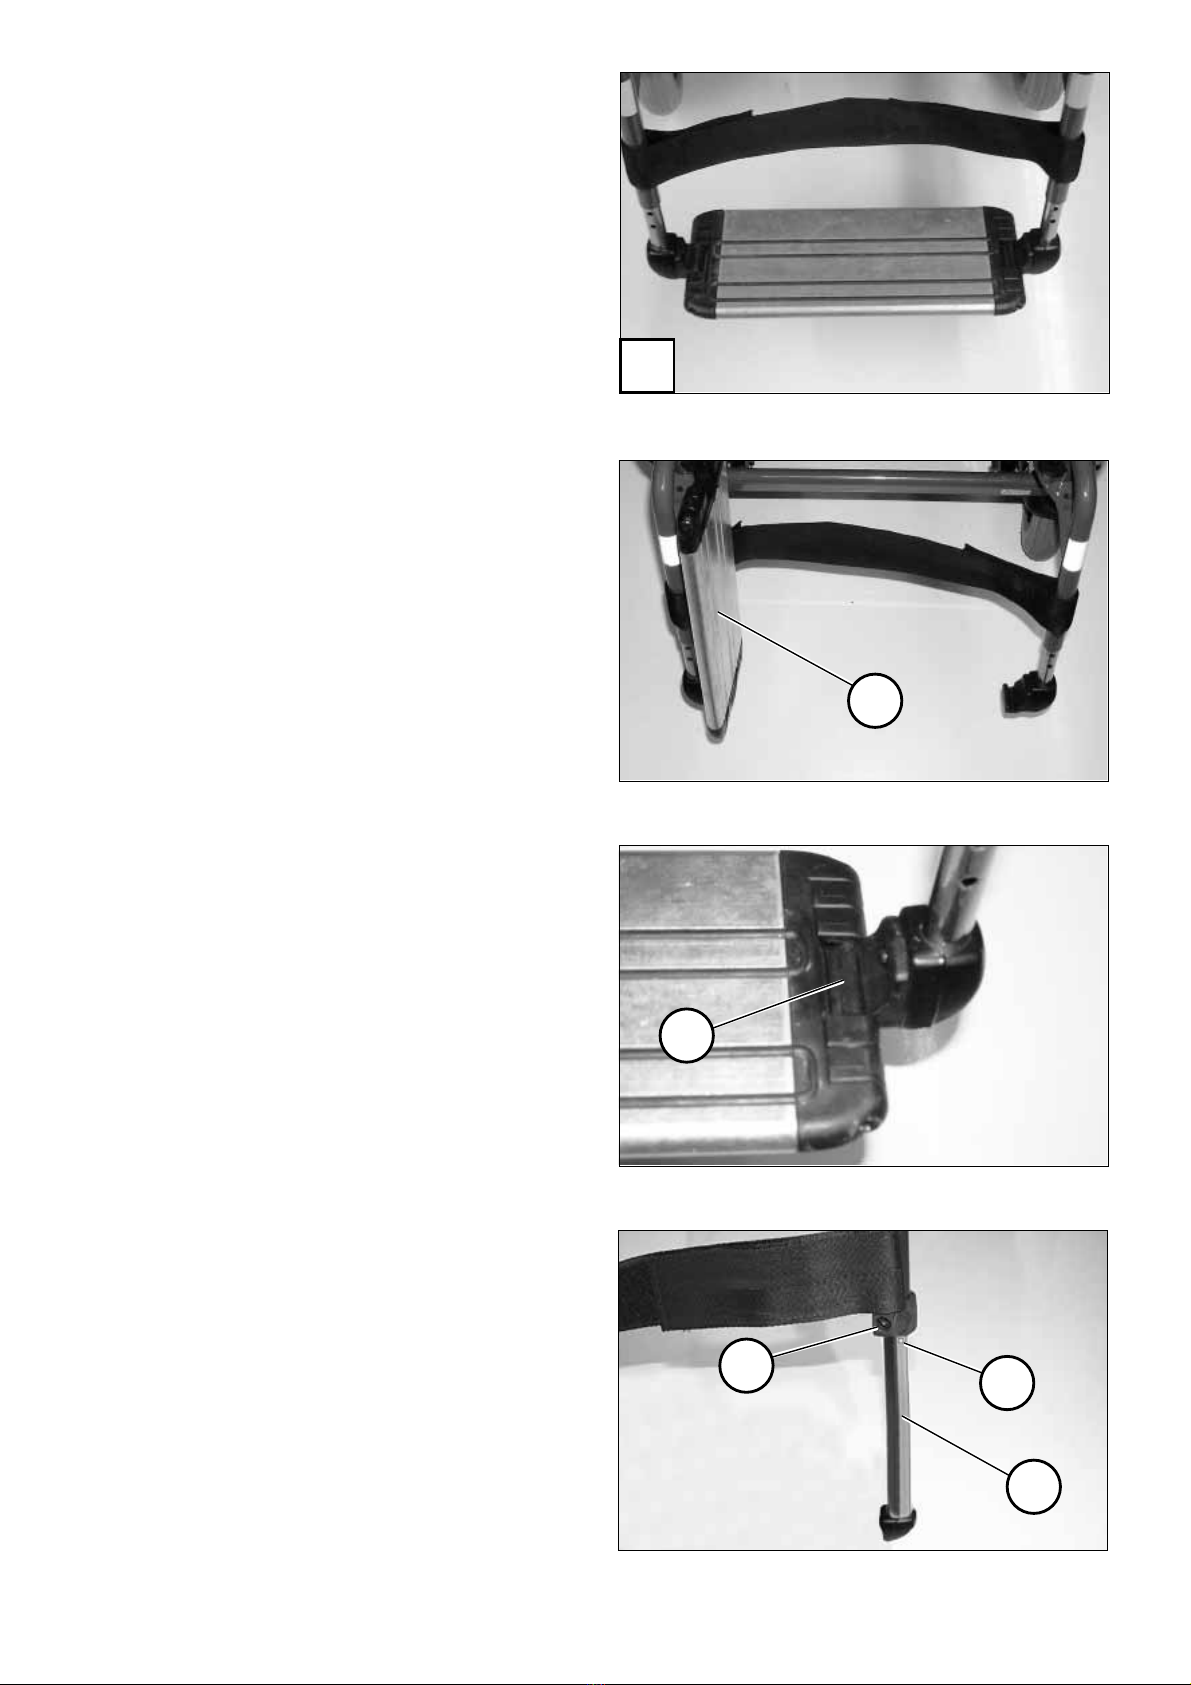
LEG SUPPORTS
!
Attention:
Do not use the leg supports to lift
or carry the wheelchair.
•The parking brakes are to be en-
gaged before all assembly work. –
This prevents the wheelchair from
rolling away accidentally.
Calf strap
The calf strap (1) prevents the feet
from sliding off of the footplates.
– It is guided around special liga-
ment (2) and adjusted in length
with a velcro fastener.
Removal of the calf belt is achieved by
opening the velcro straps.
!
Attention:
Never drive without leg strap (ex-
cept when shuffling)! – The leg
strap is omitted for height adjust-
able leg supports and is replaced
by the leg padding.

2
1
3
4
17
Folding up the footplates
The footplates are to be folded up
for entry into, exiting the wheelchair
or scuttling (forward motion of the
wheelchair with the feet) (1).
Turning the leg supports to the
side
For easy transfer out of/into the
wheelchair as well as driving closer to
a closet, bed or bathtub the leg sup-
ports can be swivelled away toward
the in-/outside (3) and (4).
– Therefore pull or press the respec-
tive locking lever (2) and swivel the
corresponding leg support inward/
outward.
☞Note:
For this the calf strap is to be loos-
ened on one side.
!
Attention:
Swivelled-away leg stump supports
are automatically unlocked and
can easily fall off. Note this when
handling (e.g. transport).
•When swivelling them back make
sure that the leg support audibly
locks into place.
☞Note:
After swivelling the leg support in-
ward again do not forget to check
the corresponding locking device.
Afterwards replace the calf strap.
2
1
18
Removing the leg supports
For easy transfer into and out of the
wheelchair as well as a reduced wheel-
chair length (important for transport)
the leg support can be removed (1).
☞Note:
Before swivelling the leg support
loosen or remove the calf belt on
one side.
– Remove both feet from the foot-
plates.
– Pull or press the locking lever back-
ward (2).
– Swivel the leg support sideways
and take them off toward the top
(1).
Attaching the leg supports
With the leg support in a swivelled-
aside position, hang it in and then
swivel it to the front until the locking
device audibly latches.
☞Note:
After swivelling the leg support in-
ward again do not forget to check
the corresponding locking device.
Afterwards replace the calf strap.
1
23
19
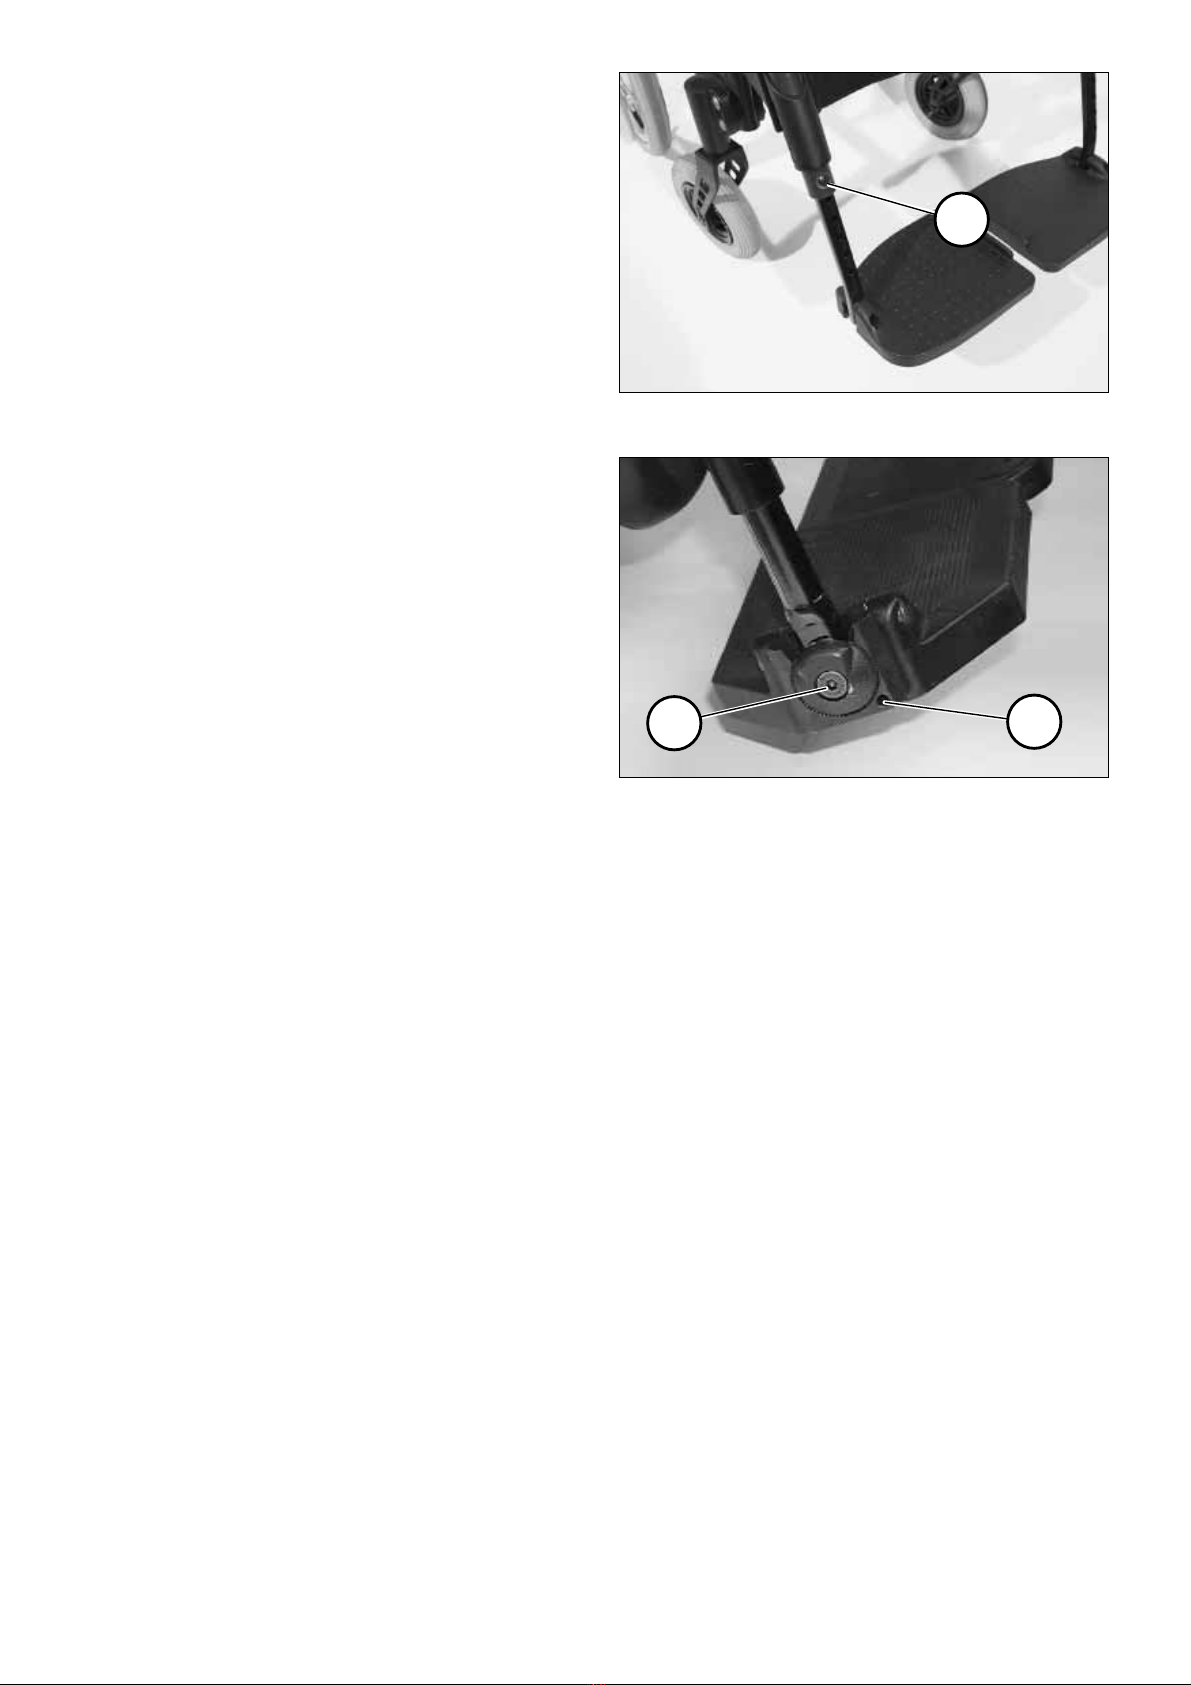
Adjusting the height of the foot-
plate
Remove the clamping screw (1) to ad-
just the height.
Telescope the foot plate to the de-
sired height and then secure it with
the clamping screw.
Angle adjustable footplates
After loosening the clamping screw (2)
pull out the dovetail connection and
adjust the angle of the footplates.
☞The setting screw (3) serves to hori-
zontally correct the angle of the
footplates.
Afterwards retighten the clamping
screw.
– In doing so the teeth of the angle
adjustment must join again
6
2
3
4
5
1
20
Continuous leg support
The footboard of the continuous leg
support (1) can be folded up to the
side.
Folding up the foot board
For an unobstructed foot area, fold
up the left side of the foot board to
the right as far as it will go (2).
Folding down the foot board
Fold down the left side of the foot
board until it rests on the foot board
holder (3).
Height adjustment of the foot-
board
Loosen the clamping screw (4) to ad-
just the height.
Telescope the foot plate to the desired
height and then retighten the screw.
☞Note:
The maximum extension is indi-
cated by a marking (6) on the tube
(5).
Table of contents
Other Meyra Wheelchair manuals

Meyra
Meyra 1.594 User manual

Meyra
Meyra 2.445 User manual

Meyra
Meyra FX One 1.150 User manual

Meyra
Meyra 1.735 User manual

Meyra
Meyra X1 User manual

Meyra
Meyra Power Tommy 1.440 User manual

Meyra
Meyra Polaro II 1.745 User manual

Meyra
Meyra EUROCHAIR 2 PRO 2.850 User manual

Meyra
Meyra 2.322 Manual

Meyra
Meyra 2.432 User manual

Meyra
Meyra 1.158 NANO C User manual

Meyra
Meyra 1.610 MC1 User manual

Meyra
Meyra 9.050 User manual

Meyra
Meyra 5HCDA User manual

Meyra
Meyra iChair DYNAMIC 1.623 Manual

Meyra
Meyra Ortopedia 1.054 User manual

Meyra
Meyra 2.322 User manual

Meyra
Meyra Netti DYNAMIC AdaptPro User manual

Meyra
Meyra 2.360 Manual

Meyra
Meyra 9.050 User manual


