Miamily HIPSTER SMART User manual

6CARRYING
POSITIONS
IMPORTANT!
READ CAREFULLY
AND KEEP FOR
FUTURE
REFERENCE
HIPSTER
SMART
Instructions Manual
Birth to 4 years old
3.2 kg to 20 kg (7 lbs to 44 lbs)
SWISS DESIGN
3D BABY CARRIER
2
•Read all instructions before assembling and
using this carrier
• Keep instructions for future use
• Check to assure all buckles, snaps, straps and
adjustments are secure before each use
• Check for ripped seams, torn straps or fabric,
or damaged fasteners before each use
• Ensure proper placement of child in the
carrier for safety and leg placement
• Child must face towards you until he or she
can hold head upright
• Premature infants, infants with respiratory
problems, and infants under 4 months old are
at risk of suffocation – for safety reasons, be
sure to check with your doctor if the carrier is
suitable for use with your baby
• For low birth weight babies and children with
medical conditions, seek advice from a health
professional before using the product
FALL HAZARD
Infants can fall through a wide leg opening
or out of carrier.
• Before each use, make sure all buckles, snaps,
and straps are secure
• Take special care when leaning forward
• Never bend at waist, bend at knees
• Only use this carrier for children between 7lbs
and 44 lbs
• Hold your baby close at all times when using
the carrier with carrier straps
SUFFOCATION HAZARD
Infants under 4 months old can suocate if
face is pressed too tight against your
body.
• Do not strap the baby too tight against your
body
• Always allow room for head movement
• Keep infant’s face free from obstructions at
all times
• Never use the carrier when balance or
mobility is impaired due to exercise,
drowsiness, or medical conditions
• Never use the carrier while engaging in
activities such as cooking and cleaning which
involve a heat source or exposure to chemicals
• Never wear the carrier while driving or being a
passenger in a motor vehicle
• Your balance may be adversely affected by
your movement and that of your child
• Take care when bending or leaning forward or
sideways
• This carrier is not suitable for use during
sporting activities
• Stop using the carrier if parts are missing or
damaged
SAFETY AND WARNING PRECAUTIONS
WARNING
FALL & SUFFOCATION HAZARD
EN
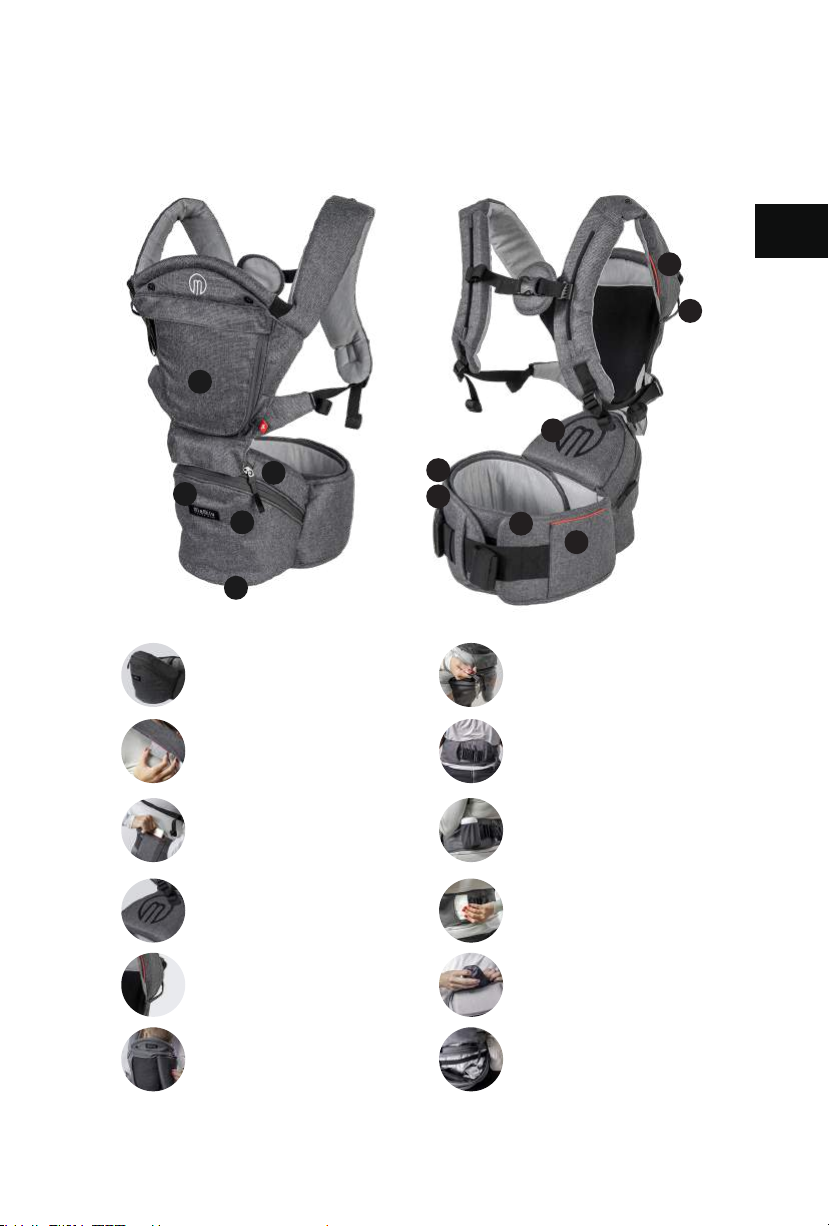
KEY FEATURES
EN
110
9
8
3
4
5
2
12
7
6
11
3
1)
3D HIP SEAT
2)
INVISIBLE CREDIT CARD SLOT
3)
SMART PHONE POCKET
4)
ANTI SLIP SILICON PAD
5)
TOY PACIFIER LOOP
6)
BREATHABLE MESH
7)
EXTENDABLE KEY RING
8)
WAIST BELT ZIPPER
9)
MILK BOTTLE HOLDER
10)
CHANGING PAD POCKET
11)
HIDDEN EXTRA STORAGE
12)
DIAPER STORAGE
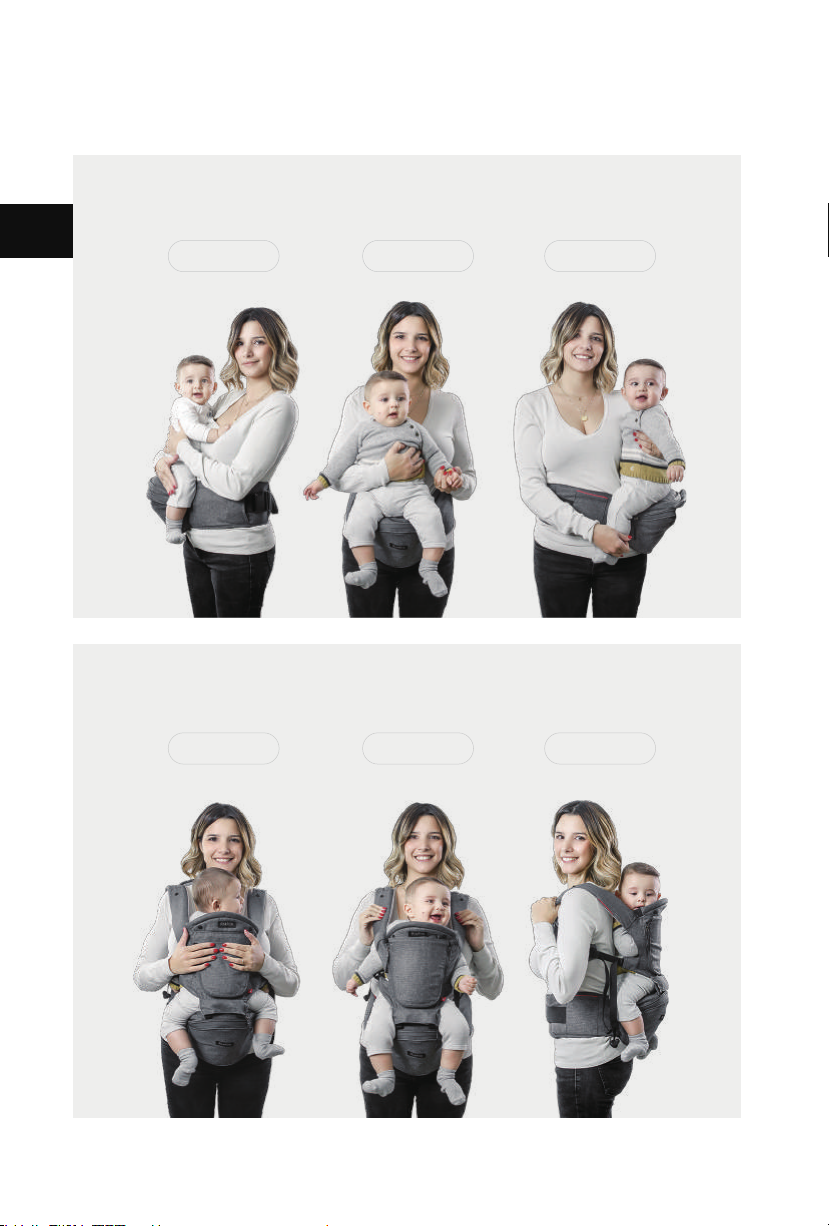
FACING IN FACING OUT BACK CARRY
FACING IN FACING OUT SIDE CARRY
6 CARRY POSITIONS
EN
4

AGE RANGE
HOW TO PUT ON HIP SEAT
3WAYS TO USE HIP SEAT WITH NEWBORN
EN
0 m + 4 m + 6 m + 8 m +
Starting from birth, use the 3D
hip seat to support your arms
when carrying your baby.
When using double shoulder
with newborn, infant insert is
required (sold separately)
1. Wrap the wait belt around
your waist. The tighter the
belt,the more back support
you will have
1. Hold your baby in your
arms and rest your arm on the
hip seat for support
2. Hold your baby facing out
in your arms and rest your
arm on the hip seat for
support
5
3. When burping your baby,
carry your baby facing
towards you and rest your
arm on the hip seat for
support
Depending on what's
more comfortale for
you,you can wear the
hip seat around your
waist or around your
hips
QUICK TIP!
2. Slide buckle through the
safety loop for extra security.
3. The safety loop will hold on
to the buckle in case the
buckle was not buckled in
correctly.
4. Place baby on the hip seat
facing in, facing forward or on
your side
When baby has strong head
and neck control (usually
around 4 months),connect 3D
hip seat with double shoulder
for facing in carry position
Forward facing carry position is
safe and fun when the 3D hip
seat ensures baby's hips are
supported and not dangling
Back carry position is a great
option for heavier babies,it
allows more mobility and
comfort on your back

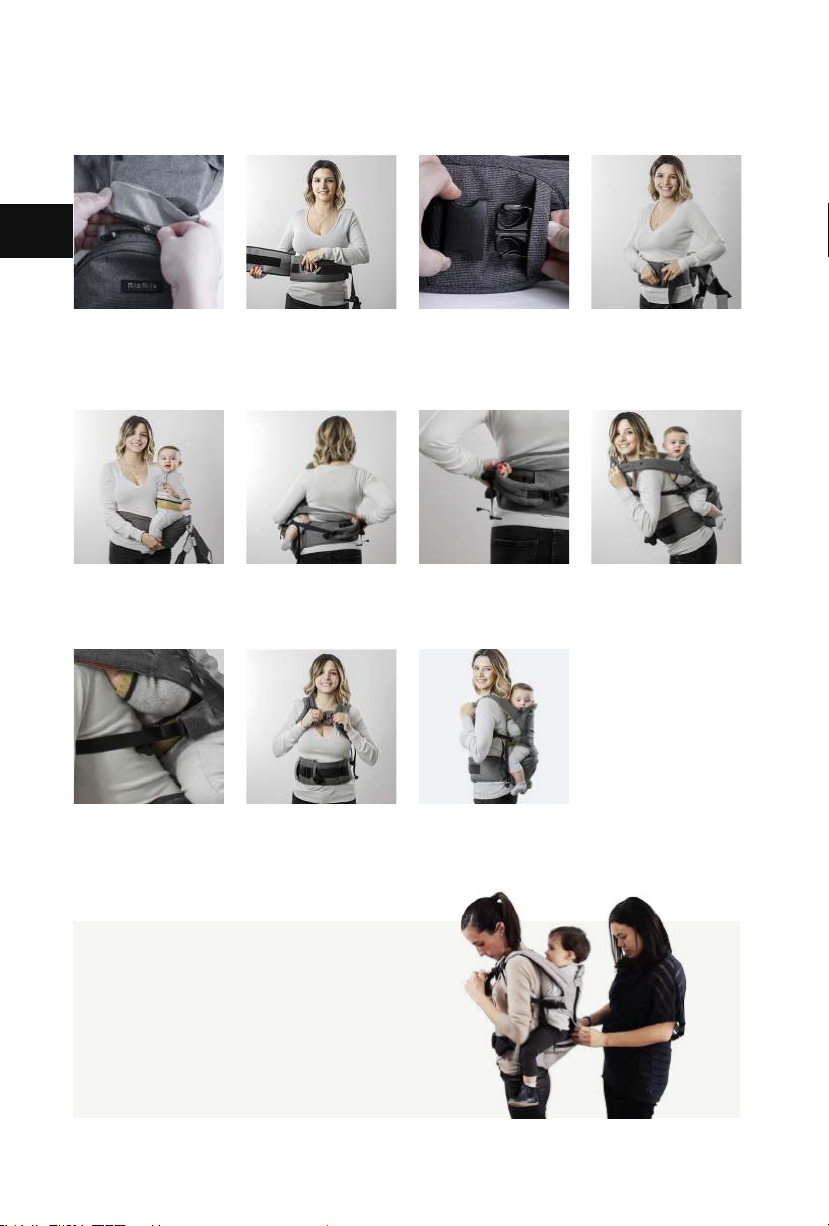
HOW TO CONNECT DOUBLE SHOULDER
6
EN
FACING IN WITH THE DOUBLE SHOULDER (4M+)
SAFETY BELT FOR BABIES UNDER 8 MONTHS
1. Remove the connection
piece from the zipper pocket
2. Attach the hip seat to the
double shoulder using the
zipper
3. IMPT: Push dowm the self
lock zipper head to lock the
zipper
4. Secure the attachment with
the two external buckles
1. Connect the double
shoulder to the hip seat
2.Wrap the wait belt around
your waist and secure with
velcro
3. Slide buckle through the
safety loop for extra security
4. Place baby on the hip seat
facing in towards you
5. Put on the right shoulder
straps
6. Put on the left shoulder
straps
7. Clip in the back buckle 8. IMPT: Baby should tight in
the carrier, a loose fit would
risk baby falling out.
1. Slide the safety belt through
the two loops
2.Wrap the safety belt around
baby
3. All babies under 8 months are
recommended to use the safety
belt for extra safety
QUICK TIP!
You can remove the
strap completely
when baby no longer
needs it

FACING OUT WITH THE DOUBLE SHOULDER (6M+)
EN
7
USING INFANT INSERT WITH DOUBLE SHOULDER
1. Connect the double
shoulder to the hip seat
2. Wrap the wait belt around
your waist and secure with
velcro
3. Slide buckle through the
safety loop for extra security
4. Place baby on the hip seat
facing away from you
5. Put on the right shoulder
straps
6. Put on the left shoulder
straps
7. Clip in the back buckle 8. IMPT: Check in with your
baby often.When baby is tired,
turn baby to sleep facing in
1. Lay infant insert on a table 2. Place baby inside the infant
insert
3. Secure baby using by
clipping the snaps on both
sides
4. With both hands,lift infant
insert with baby inside and
place on hip seat
5. Secure the side loops on the
side straps for extra security
6. Secure the top loops onto
double shoulder to suppotr
baby's head
7. Use infant insert until baby
has strong head and neck
support
QUICK TIP!
Leg position of the
baby will vary
depending on baby's
size. For newborn,
baby's legs should be
in fetal position. For
bigger infants,rest
legs on seat cushion
with legs sticking out
of infant insert
BACK CARRYING WITH THE DOUBLE SHOULDER (8M+)
EN
8
1. Connect the double
shoulder to the hip seat,
loosen the shoulder straps all
the way
2. Wrap the wait belt around
your waist and secure with
velcro
3. Slide buckle through safety
loop
4. Position the hip seat on your
left side
5. Place baby on the hip seat
facing you
6. Use your right hand to reach
behind you for the right
shoulder straps
7. Slide your left hand through
the left shoulder straps
8. Lean forward and adjust the
hip seat to your back
9. Adjust the shoulder straps
for a tight fit
10. Clip in the back buckle in
front of your chest
11. IMPT: Baby should not be
able to move around in the
carier, a loose fit would risk
baby falling out.
QUICK TIP!
Back carry can be useful for pregnant moms,once the bump gets
a bit too big for front carry positions.
Back carry position can be tricky at first so having someone to
help you for the first few times is recommended.
When baby is on your back,a great way to check in on your baby
is using your phone's camera as a mirror.

ADJUSTING FOR PETITE SIZE
EN
9
REMOVING 3 WAY LOCK BUCKLE FOR
CRISS CROSS STRAPS
For petite frames, you can
remove the longer waist belt
for a better fit
Make sure to slide the buckle
through the safety loop for
extra safety
1.To criss cross the straps,
remove the straps and bucke
them in on the opposite side
2.To release the side buckels,
press down on the middle
button first
3.Press the sides at the same
time to release the buckle
4.Now, clip in the buckle on
the opposite side
QUICK TIP!
Criss crossing the straps is a great option for people who need
more back support
QUICK TIP!
If you need a wider
fit,our extender belt
(sold seprately) can
extend the waist fit
to 180 cm
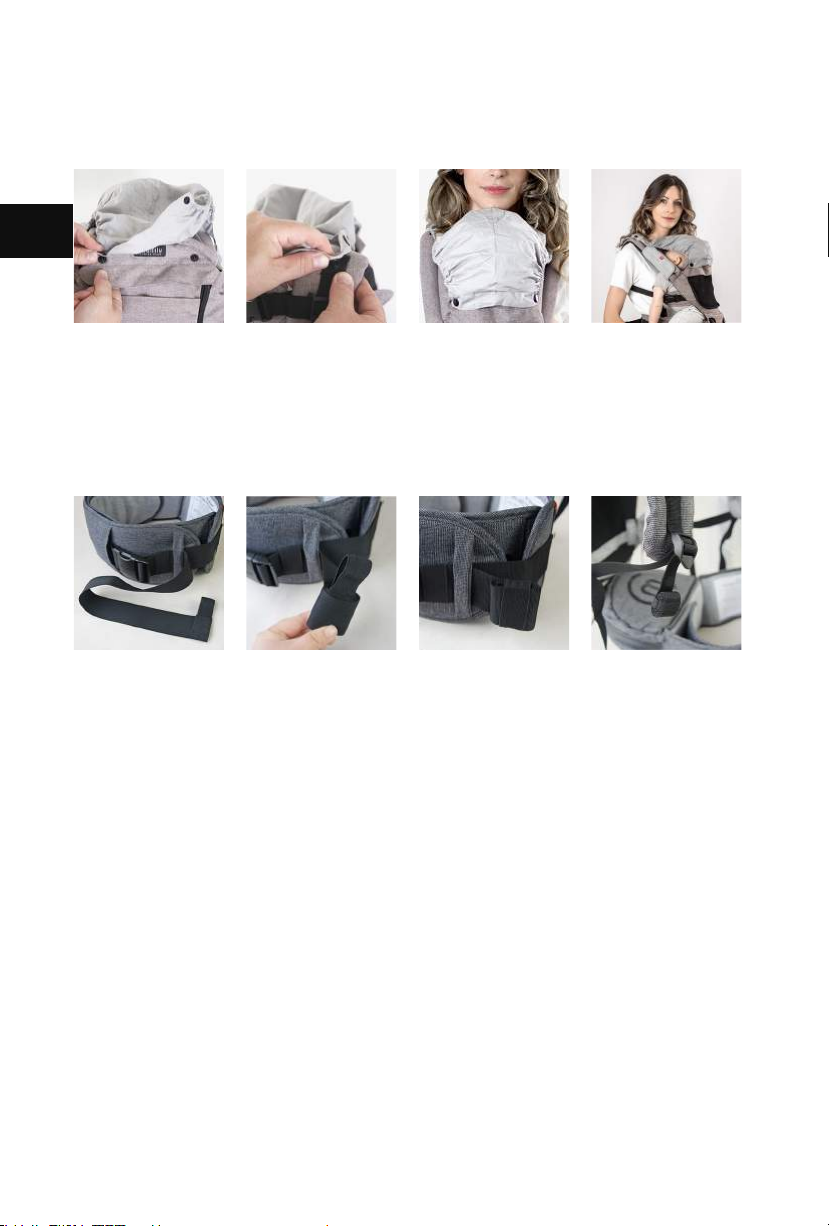
USING THE HEAD COVER FOR SUN PROTECTION
AND NURSING
HOW TO KEEP STRAPS TIDY
EN
10
1.Attach the bottom snaps to
the front of the front panel
2.Attach the straps to the
double shoulders, adjust
accordingly to your baby's
height
3.Use the head cover for sun
protection and support for
your baby's head when baby is
asleep
4.When nursing your baby,
lower the hip seat so baby's
head is at the right height and
use the head cover for privacy
1.There is an elastic loop at the
end of every strap
2.Roll up any excess straps 3.Use loop to secure the straps 4.Also the shoulder straps can
be neatly wrapped up
HIPSTER™ Smart is made with 100%
polyester, stain resistant material,
and is machine washable. Remove
hip seat insert before washing. Use
with cold water in gentle cycle only.
Air dry only, do not tumble dry. For
light cleaning, simply wipe with a
wet towel.
HIPSTER™ CARE
All MiaMily carriers come with a
1-year product warranty and it
covers any manufacturer defects. If
you have a defective carrier, please
email questions@miamily.com with
your replacement request,
including a photo of the defective
part, your order number, and your
shipping information so we can
process your replacement. Our
warranty does not cover normal
wear and tear, misuse or damages
caused by the user.
WARRANTY
HIPSTER™ Smart complies with global wide safety standards: US safety standard ASTM F2236 and CPSIA
2014, and the Consumer Product Safety Improvement Act of 2014 (US/Canada), EN71-3 standard
(Europe), GB 35270-2017 (China), and EN13209-2:2005 (worldwide)
EN
11

WWW.MIAMILY.COM
Jan. 2019
SKU : HIP1209LG
Overtea SA
Via Cara’ 20b, manno, 6928, Switzerland
Table of contents
Other Miamily Baby Carrier manuals


Popular Baby Carrier manuals by other brands


MaxiCosi
MaxiCosi Easia Instructions for use & warranty

BushBaby
BushBaby pinnacle Fitting instructions

BushBaby
BushBaby Cocoon Fitting instructions

BlueBox
BlueBox Infantino Upscale Customizable Carrier Owners manual instructions

MaxiCosi
MaxiCosi Rodi XP ISOFIX Instructions for use

Inglesina
Inglesina Front instruction manual