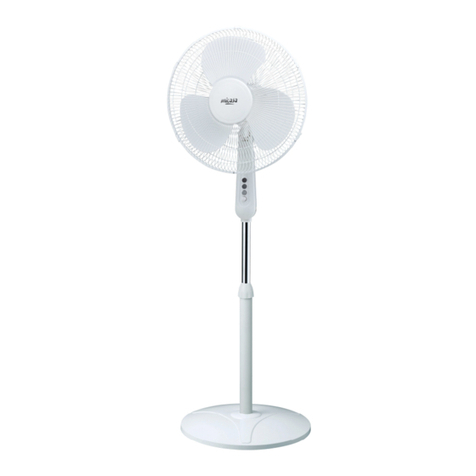
Micasa MA0125CF User manual

16” (40cm) MULTIFUNCTIONAL COOLING FAN
Model: MA0125CF
READ AND FOLLOW THESE INSTRUCTIONS. RETAIN FOR FUTURE
REFERENCE

Electrical Safety and You
Before using this appliance please read and fully understand the safety directions in this manual. Ensure that you know how
to operate the appliance. All electrical equipment presents a risk to the end user. We ask that you use this appliance in a
sensible safe manner in accordance with the instructions supplied for your own safety.
If for any reason the appliance does not function correctly or shows signs of damage please return it immediately to the
retailer or contact the help line.
New Zealand call toll free 0508 ASIA PACIFIC (274 2722)
Australia call +64 9 974 9206
Features
16” (40cm) Blade diameter
Emergency stop function if contact with protective grill is made
Convenient foot switches withon/off function and speed regulation
Built-in ionizer – refreshes air
Infrared remote control (batteries not included, works with 2 x AAA 1.5 Volt)
Large and bright LCD display
Timer function (0.5 to 7.5 hours)
Switchable vertical and/or horizontal oscillation
3 speed settings
Aromatic smell set – gives out aromatic fragrance (fragrance not provided)
Power consumption: 65 watt
Provides a cooling breeze and pleasant room climate, thanks to ion technology. Convenient and safe with an infrared remote
control, foot switches and emergency stop function.
Operation Guide
Power Connection
Connect to a suitable 220-240V~ 50Hz power supply only. This appliance is designed to operate safely across both New
Zealand and Australian power supplies. This appliance must be earthed.
Operation
Assembly
Warning: Do not insert the power plug into the power socket before set-up is completed.
Installing the stand onto the base
Put the power cord through the hole of base (1), stand the support on the base as shown and fix them tightly by nut (2).

Installing the main body onto the support
Put the base with support on the flat floor as shown below, connect the main body electrical connection (1) and the support
with the holes matching well (2 +3), and then fix the main body with the support tightly by fixing the screw.
Installing back rear grid
Fix the rear grid (4) onto the motor tightly with the grid protection.
Installing the fan blade
Install the fan blade on the motor axes by fixing the blade propeller tightly.

Installing the front fan guard
Hold the rear guard and press the front guard towards the rear guard, ensure that the whole periphery of the front guard
clicks into the rear guard. And then combine both parts together with clip and screw on the front guard.
Remote Control
Insert 2 pieces of AAA batteries into the remote control (batteries not supplied). Ensure the plus and minus terminals are
correctly aligned when loading the batteries. Remove batteries when not in use for a long time.
Remote control functions are similar to that indicated on the fan control panel. The remote control does not have the ANION
mode button. The remote control works with the fan’s remote sensor. Use the remote control in an area free from obstacles.
ON OFF
There is an ON/OFF switch located on the fan base. Press OFF to turn off, press ON/SPEED to turn on.

ON/SPEED MODE
Press ON/SPEED once, the standard fan mode indicator will run clockwise with the device operating at LOW speed
levels. Press ON/SPEED once, twice or three times for LOW, MIDDLE and HIGH speed selection.
MODE SETTING
Set [Natural] or [Sleep] mode by pushing Mode button.
Press MODE: The natural ventilation fan mode control light indicate
Press MODE: When display indicates the sleep icon display then the fan will turn to the sleep wind mode operating
program, which will minimise the risks of catching a cold during sleep.
OSC (Oscillating/swing) FUNCTION
The initial function will be stationary for the oscillation mode for the cooling fan.
Press OSC once: the fan will oscillate horizontally.
Press OSC twice: the fan will oscillate vertically.
Press OSC three times: the fan will oscillate horizontally and vertically.
TIMER FUNCTION
Choose between 0.5 - 7.5 hours: the indicator will show required timer setting. Note. When the indicator shows 0.0, the fan
will not oscillate.
ACTIVE OXYGEN FUNCTION – button on the stem of the cooling fan
Press (ANION) button, the control light will on and the sign will flicker, indicating the oxygen generator is on. If
pressed again, the control light will off and show indicating that the oxygen generator is off.
MANUAL FAN ADJUSTMENT
Adjust the DEVICE REAR COVER manually to adjust the fan tilt angle.
AROMATIC SMELL SET
The front cap in the middle of the grill is aligned with holes which allow you to add a fragrance inside the cap. You can
create an aromatic fragrance (fragrance not provided) when the fan is in operation. Turn the cap anti-clockwise to loosen the
cap. You can remove the cap and fill inside any aromatic fragrance. Attach the cap and then turn clockwise to tighten the
cap.

FAN SAFETY
Warning! Ensure that all safety guards are correctly fitted before use.
Warning! Ensure that all fan blades are securely fitted before use.
Warning! Ensure that the fan is switched OFF from the mains supply before removing the guard.
Warning! For fans installed at a high level. Ensure that the fan is installed so that the blades are more than 2.1m above the
floor.
Warning! To reduce the risk of electric shock, do not use this fan with any solid state speed control device unless that device
has been specifically supplied for this fan.
Warning! Avoid contact with moving parts. Do not insert objects or body parts into the safety grill when the fan is operating.
Warning! Do not cover the safety grill or place near curtains.
Warning! This fan should not be placed in the immediate vicinity of water, such as bathtub, wash bowls, swimming pool or
other area were splashing may occur.
Cleaning
Always disconnect the appliance from the power supply when cleaning.
Warning! Do not immerse this appliance itself in any liquid. Do not use harsh chemicals or solvents as these may damage
the plastics.
Wipe the exterior of the fan with a damp cloth to remove dust and dirt only. Dry with a dry towel.
When not in use store safely and complete along with this manual.
Parts Description

Important Safety Instructions
Warning! Children
This appliance is not intended for use by persons (including children) with reduced physical, sensory or mental capabilities,
or lack of knowledge, unless they have been given supervision or instruction concerning safe use of the appliance by a person
responsible for their safety. Young children must be supervised to ensure that they do not play with the appliance. Safely
dispose of any plastic bags or other packaging that may present a hazard to young children of suffocation or choke hazard.
Warning! Unattended Appliances
Do not leave any appliance unattended when not in use. Do not place appliance under or near any combustible material
such as walls, cupboards or curtains or near children. Always unplug any appliance when not in use.
Safety
For household indoor use only, do not use outdoors. Not for commercial use.
This appliance must not be operated by means of an external timer or separate remote control system.
Always allow a gap around the appliance and do not cover the appliance.
This appliance must not be located directly below a socket outlet.
Warning! Moisture
Do not immerse this appliance in any liquid. Do not operate with wet hands or near any vessel filled with water. Do not
splash the appliance with water.
Power Cord
Do not abuse or damage the supply cord. If for any reason the cord is damaged, it must be replaced by the manufacturer, its
service agent or a similarly qualified person in order to avoid hazard. A replaceable cord must be replaced with an authorised
replacement from an authorized service agent.
Use
This appliance is intended to be used in household and similar applications such as
– Staff kitchen areas in shops, offices and other working environments
– Farm houses
– By clients in hotels, motels and other residential type environments
– Bed and breakfast type environments.
Service
Refer all servicing to qualified personal. This appliance has no user servicing parts or requirements. Return the appliance to
the retailer if it is damaged in any way or not operating properly.
Specifications
220-240V~ 50Hz 65 Watts

Warranty
This product is covered by a 12 month repair or replacement with proof of purchase. Return any faulty appliance to the
retailer with proof of purchase.
Our goods come with guarantees that cannot be excluded under the Australian and New Zealand Consumer Law. You are
entitled to a replacement or a refund for a major failure and for compensation for any other reasonably foreseeable loss or
damage. You are also entitled to have the goods repaired or replaced if the goods fail to be of acceptable quality and the
failure does not amount to a major failure.
Distributed by
Asia Pacific Brands Limited
PO Box 113001 Broadway
Newmarket, 1149
Auckland, New Zealand
New Zealand call toll free 0508 ASIA PACIFIC (274 2722)
Australia call +64 9 974 9206
Table of contents
Other Micasa Fan manuals
Popular Fan manuals by other brands

LUCCI Air
LUCCI Air Nordic manual

Hunter
Hunter 41535-01 installation instructions

Hunter
Hunter Contempo 59013 Owner's guide and installation manual

Tornado
Tornado HI-FAN-24MOWF-A-1P instruction manual

Maico
Maico ECA 120 SERIES Mounting and operating instructions

Russell Hobbs
Russell Hobbs RHMF40 Instructions and warranty