Michigan Instruments Thumper 1007CCMII User manual

REV: 2019-04 1
ThumperModel 1007CCMII
Mechanical CPR System
Operation Manual
(Part Number h 14799-01)
Manufactured in the USA by:
4717 Talon Court SE
Grand Rapids, MI 49512 USA
Tel: (800) 530 9939 or (616) 554 9696
Fax: (616) 554 3067
e-mail: [email protected]
website: www.michiganinstruments.com
REV: 2019-04 2
Copyright
PROTECTED UNDER ONE
Copyright © OR MORE OF THE
FOLLOWING U.S. PATENTS:
6,171,267 5,743,864
M
Michigan Instruments
4717 Talon Court SE
Grand Rapids, MI 49512 USA
All rights reserved
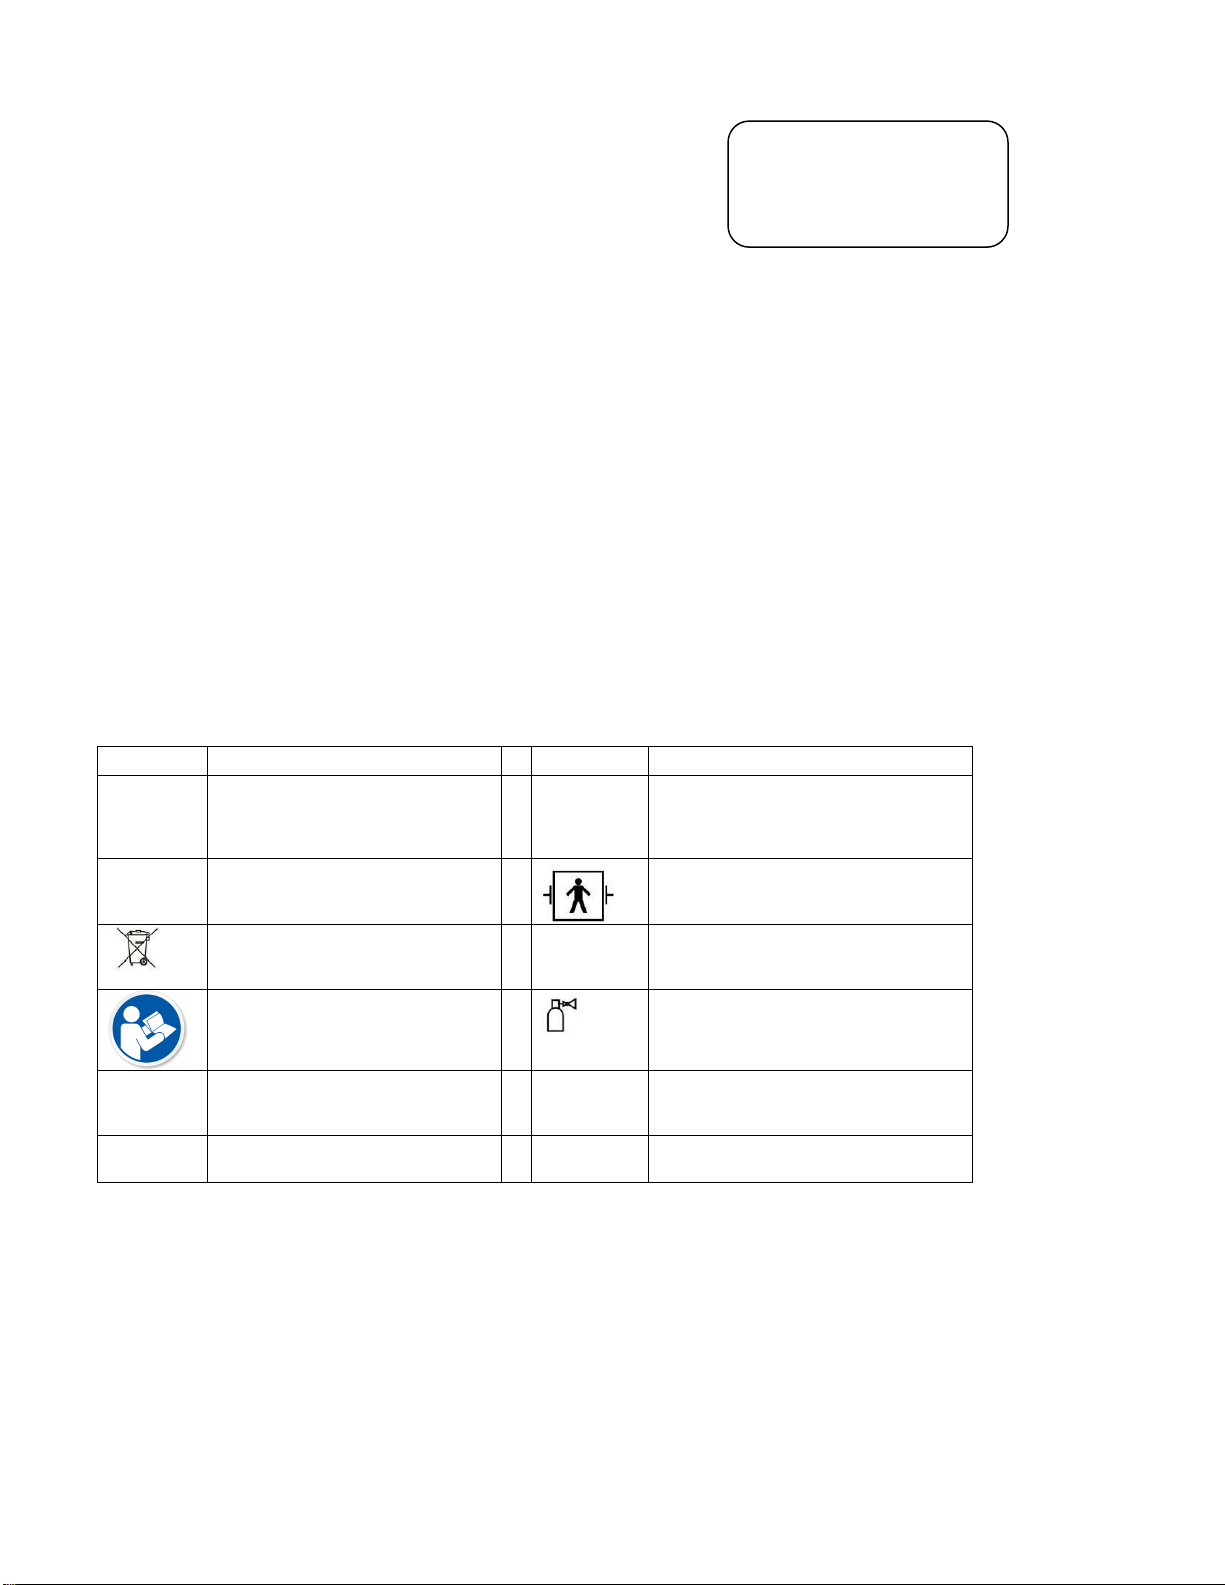
Symbols used on the device and in this manual:
Symbol
Meaning
Symbol
Meaning
M
Manufacturer –Name/Address
information. Date of manufacture
appears under symbol in YEAR-MO
format (on device).
Y
Caution - Attention: Consult
Accompanying Documents. Operators
are to refer to information provided with
the device.
i
Consult Instructions for Use –
additional information available.
Defibrillation Protection
(Type BF Patient)
Special Disposal Required
f
Serial Number
Read Operator’s Manual or
Instructions For Use (IFU).
Gas Supply (operating range indicated)
h
Catalog Number –Part number reference.

REV: 2019-04 3
TABLE OF CONTENTS
SECTION TITLE TOPIC PAGE
A INTRODUCTION
The ThumperModel 1007CCMII Operation Manual 5
Use of Warnings, Cautions and Notes 5
Indication for Use 6
Contraindication 6
Benefits of Mechanical CPR 6
General Warnings and Cautions 7
B PRODUCT DESCRIPTION
ThumperCardiopulmonary Resuscitator 9
General Description 9
ThumperSystem Components and Accessories 9
ThumperModel 1007CCMII Arm/Column/Base Assembly 10
Controls and Labeling 11
The BackBoard 13
Mobile Oxygen Carrier (MOC) 13
The Carrying/Storage Case 14
C SETUP AND OPERATION
Precautions 15
Recommendations 15
Positioning the Patient 16
ThumperModel 1007CCMII Deployment 17
To Remove the Thumperfrom the Patient 21
D STORAGE AND SHIPPING
Storage 23
Shipping 23
Disposal 23
E CARE, CLEANING, AND DISINFECTION
General Care 25
Avoiding Contamination 25
General Cleaning 25
Disinfection Guidelines 25
Mobile Oxygen Carrier (MOC) 25
Periodic Preventive Maintenance 26
Shift Check 27
Functional Check 29
Troubleshooting Guide 31
ThumperModel 1007CCMII Detailed Specifications 32
Parts List for ThumperModel 1007CCMII 33
F WARRANTY/FACTORY SERVICE
Warranty Agreement 35
Purchase Records 35
Factory Service Policy 36
Warranty Repairs 37
G GLOSSARY
Terms Used in Manual 39

REV: 2019-04 4
(Blank Page Intentional)

REV: 2019-04 5
SECTION A INTRODUCTION
Federal law restricts this device to sale by or on the order
of a licensed medical practitioner.
THE THUMPERMODEL 1007CCMII OPERATION MANUAL
Note: The purpose of the Operation Manual is to explain the use, care,
and user maintenance of the ThumperModel 1007CCMII, not to teach
cardiopulmonary resuscitation.
Proper use of the Thumperrequires a thorough understanding of this manual, appropriate
training, and adequate practice with the device. This manual contains important information
on all aspects of operating and maintaining the device. After a complete review, use it as a
guide to practice with the Thumperuntil completely confident and comfortable with its
operation.
Keep the manual in a location where it is available for quick reference. The format is
designed to allow each section to be scanned quickly for answers to specific questions. The
Table of Contents can be used to find major headings and topics. For example, the Setup
and Operation section will guide a new user through the proper procedures for using the
equipment. The Care, Cleaning, and Disinfection section can be used to plan an effective
preventive maintenance program.
USE OF WARNINGS, CAUTIONS AND NOTES
As used in this Operation Manual-- Warnings, Cautions and Notes are depicted as:
Warning: intended to alert users to the possibility of injury,
serious adverse reaction, or death associated with use or
misuse.
Caution: intended to alert users to the possibility of a
problem associated with use or misuse.
Note: intended to alert users to particularly useful information.

REV: 2019-04 6
INDICATION FOR USE
The ThumperCPR System is used to perform Cardiopulmonary Resuscitation (CPR) on adult
patients only in cases of clinical death as defined by a lack of spontaneous breathing and pulse.
Warning: The Thumperis to be used solely for the purpose
of delivering mechanical cardiopulmonary resuscitation
(CPR) in accordance with established American Heart
Association (AHA) guidelines for manual CPR. It is to be
used in cases of clinical death to provide CPR support under
the direction and control of a licensed physician. Use of this
device for any other purpose is strongly discouraged.
CONTRAINDICATION
There are situations where CPR is not the appropriate method of intervention. Familiarity with
accepted medical practices in your area is very important. Always consult local protocol for the
proper integration of the Thumperinto your cardiac arrest management regimen of care.
Caution: Current American Heart Association guidelines do not
recommend the use of mechanical CPR on infants and children.
Warning: This device is to be used by personnel knowledgeable
in safe and effective first response (first aid) practices and
techniques. Always observe safe and proper first aid
procedures in the application and use of this device.
BENEFITS OF MECHANICAL CPR
With the purchase of the Thumper®CPR System, you join thousands of health care
professionals worldwide who benefit from the many advantages of mechanical CPR. These
benefits are well recognized by key professional groups. The Advanced Cardiac Life Support
Manual published by the American Heart Association describes some of the benefits of
mechanical CPR devices as follows:
"... they can 1) standardize the technique of CPR, 2) eliminate user fatigue,
3) free trained persons to participate in the delivery of ACLS when there is a
limited number of rescuers, and 4) assure adequacy of compression when a
patient requires continued resuscitation during transportation."

REV: 2019-04 7
GENERAL WARNINGS AND CAUTIONS
Warning: Improper application of this equipment can cause
serious injury. This Operation Manual must be thoroughly
understood in order to use this device correctly and to avoid
possible serious injury.
Warning: Federal law restricts this device to sales by or on the
order of a licensed medical practitioner.
Warning: As this device is powered by compressed medical
grade Oxygen, safe Oxygen handling practices and procedures
are to be implemented with its use.
Caution: It is very important to follow the instructions for
preventive maintenance and cleaning procedures after each
use. They are found in the Care, Cleaning, and Disinfection
section of this manual.
Caution: Submersion of the Thumper® Arm in water will cause
infiltration of water into internal critical parts. This may lead to
corrosion and eventual operational failure. This includes
inadvertent injection of water as from a contaminated Oxygen
cylinder or humidified gas supplies.
Caution: Infiltration of foreign material into the Thumper®may
cause operational failure.
Caution: When carrying the Thumperor moving the Arm up or
down the Column, always use the Handle provided. Do NOT use
the hose spanning the Column and Arm as a handle as this will
stress the hose and clamps.

REV: 2019-04 8
(Blank Page Intentional)

REV: 2019-04 9
SECTION B PRODUCT DESCRIPTION
THUMPERCARDIOPULMONARY RESUSCITATOR
The Michigan Instruments Thumper®is a portable, automatic cardiopulmonary resuscitation
(CPR) medical device which has been in use since 1964. The present Thumper®Model
1007CCMII is functionally similar to the previous models 1003, 1004, 1005, and 1007 in
regards to cardiac compression delivery. The 1007CCMII model does not incorporate a
synchronized ventilator as previous models had.
NOTE: The 1007CCMII model is designed to provide continuous chest
compressions only. Ventilation must be delivered to the patient by auxiliary means
such as mouth to mouth resuscitation, a ventilation bag, demand valve or other
ventilator type. The 1007CCMII model provides a RUN/STOP switch to suspend
compressions for ventilation delivery, patient monitoring and other intervention
measures.
GENERAL DESCRIPTION
The Thumper®Model 1007CCMII system provides consistent CPR support for cardiac arrest
patients under conditions, which might otherwise hinder the effectiveness of manual tech-
niques. It can be used to perform external cardiac compression in conformance with AHA
CPR guidelines.
The Thumper®Model 1007CCMII is a mechanical “automatic” CPR device that can be set up
in seconds. It is powered by compressed Oxygen and is electrically insulated, allowing it to
be freely and safely used in conjunction with routine patient monitoring and defibrillation
procedures. The Thumper®Model 1007CCMII, once correctly applied over the patient’s
sternum, is designed to measure the patient’s anterior-posterior (A-P) chest diameter and
deliver the equivalent sternal deflection of 20% of that diameter.
NOTE: 2010 AHA Guidelines recommend for adult patients, a minimum
compression depth of at least 2” (5cm). If the A-P chest diameter number
indicated on the Thumper®is less than 5, then deliver compressions minimally
to the depth indicated by the -5- marking on the dome.
THUMPER®SYSTEM COMPONENTS AND ACCESSORIES
The Thumper®system consists of three major components:
(1) The Thumper®Model 1007CCMII Arm/Column/Base Assembly
(2) The BackBoard (BackBoard/Shoulder Straps)
(3) The Mobile Oxygen Carrier / appropriate O2wall access adapter
A fourth component, the Carrying/Storage Case is available to transport/store the device
when not in use.
REV: 2019-04 10
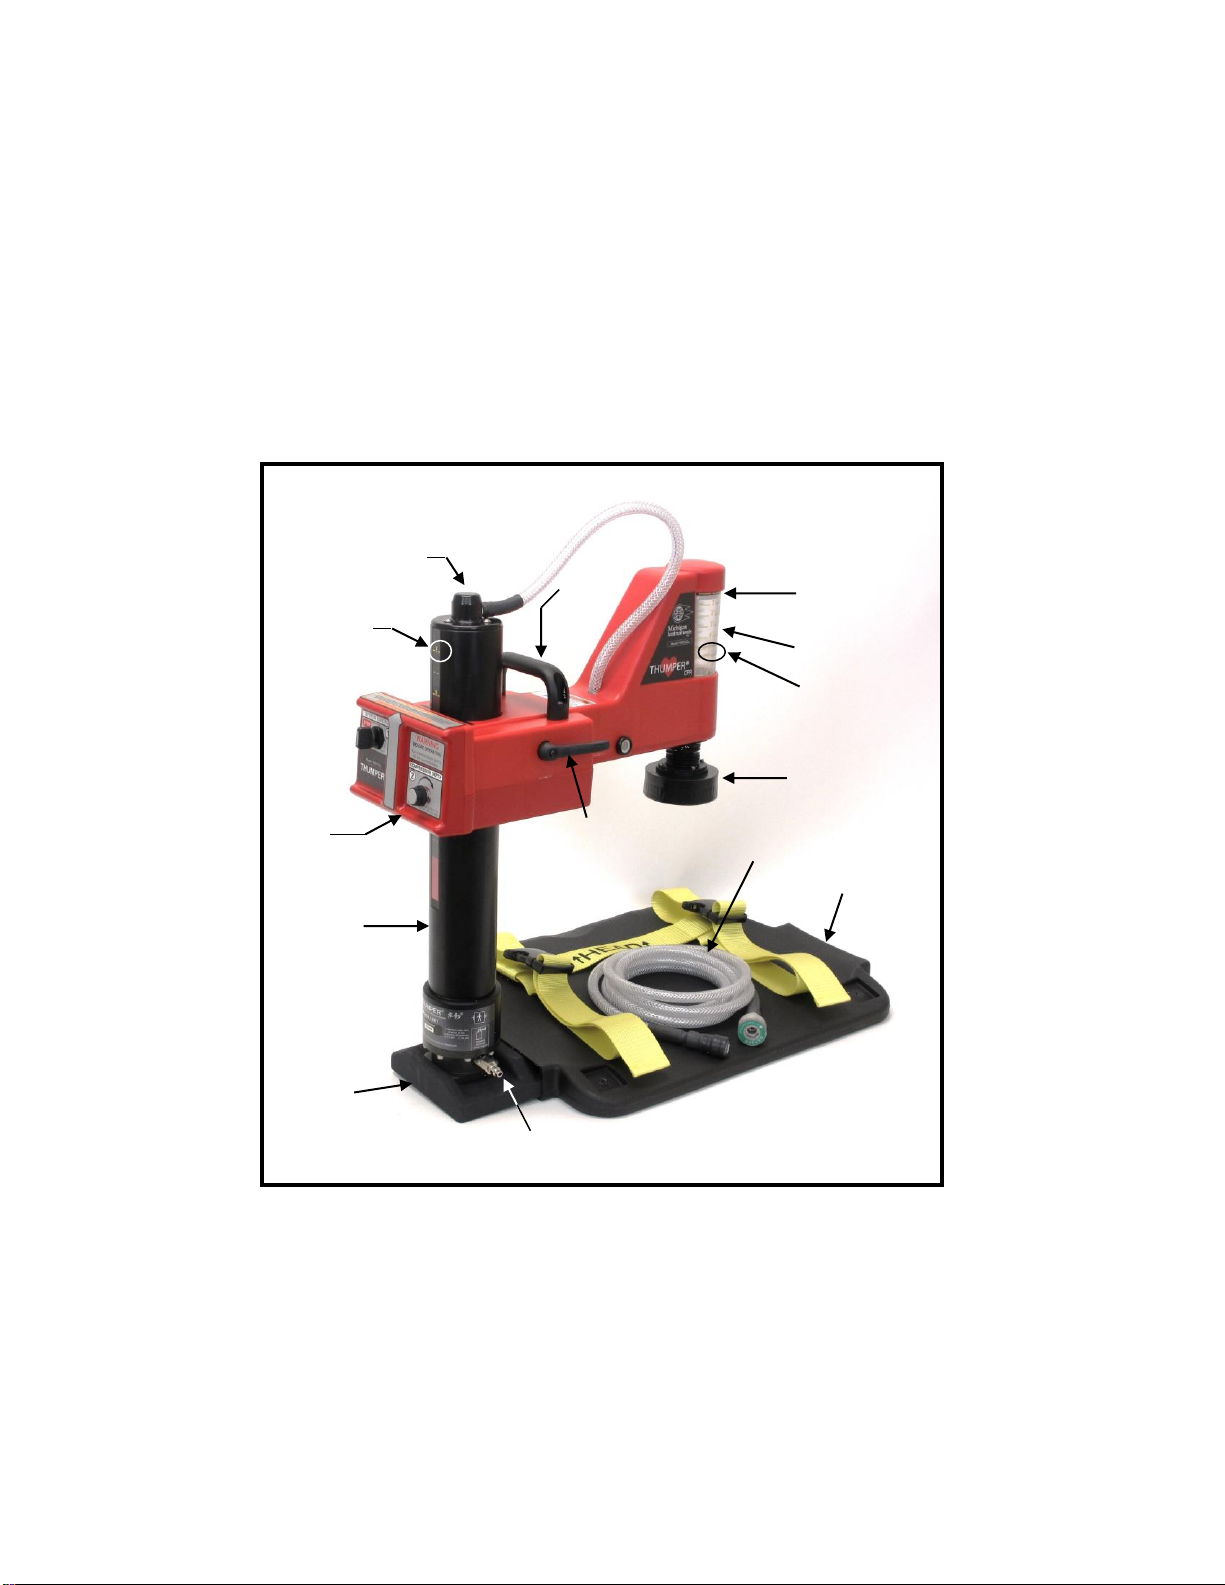
Thumper® Model 1007CCMII Arm/Column/Base Assembly
The Arm and Column positions the Piston and Massager Pad correctly over the patient’s
sternum. It is designed to provide a sternal deflection percentage based on the patient A-P
chest diameter. Sternal deflection is nominally set to 20% of the A-P diameter. The depth of
each chest compression is easily monitored using the markings on the Dome surrounding
the Piston. The Column also serves as a storage tank that holds sufficient Oxygen to drive
the Thumperfor several compressions during an Oxygen source change.
Figure 1 –ThumperModel 1007CCMII Arm/Column/Base Assembly
Piston
(inside Dome)
Arm
Base
O2Supply
Connector
Handle
Dome
Massager Pad
Arm Lock Lever
Sternal
Deflection
Number
A-P Diameter
Sternal
Deflection
Number
Pressure
Indicator
Column
O2Supply
Hose
BackBoard
O2Supply Connector
REV: 2019-04 11
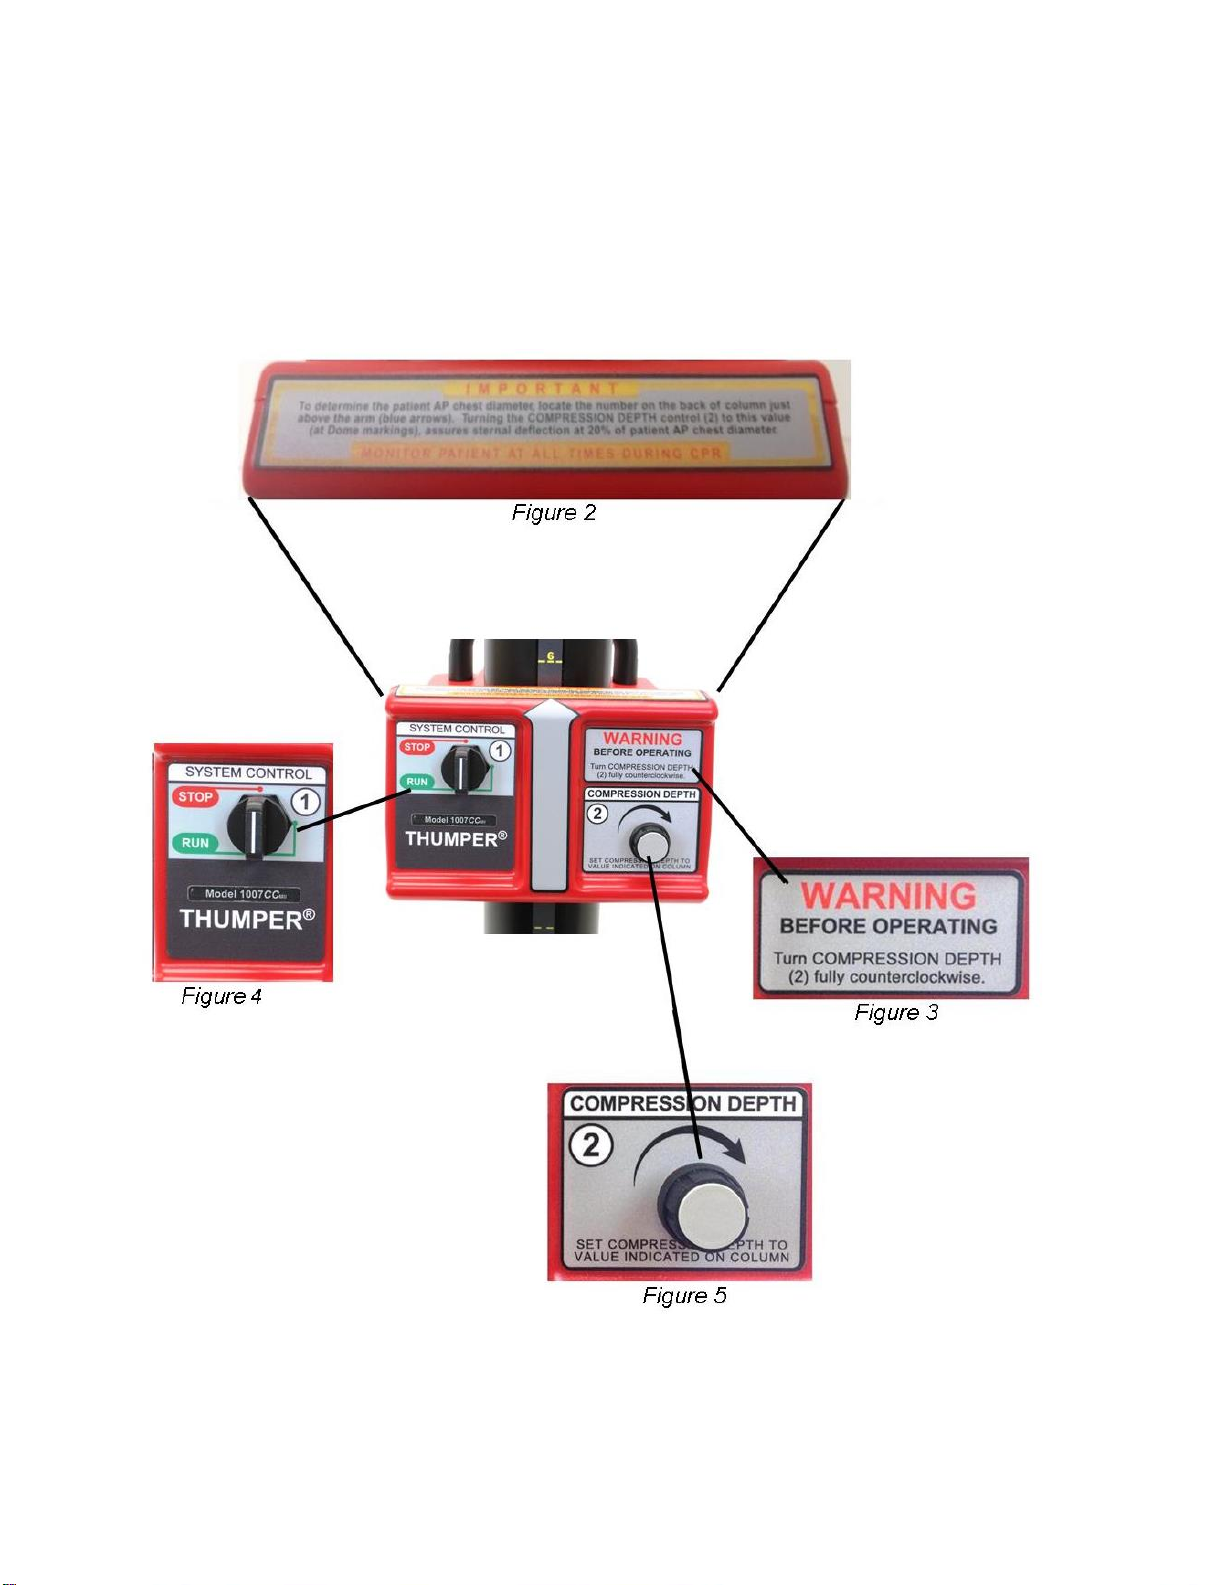
CONTROLS AND LABELING
The ThumperModel 1007CCMII’s controls are conveniently located in one area to assist the
user.
Refer to the following illustration for Figure references to the controls and labeling described.

REV: 2019-04 12
Control Layout: Once the system has been properly set up and connected to an adequate
(50-90 psi (3.515 to 6.327 kgf/cm2)) compressed Oxygen source, the user must then work
with the following controls/labels to provide correct operation.
IMPORTANT -- The correct patient A-P chest diameter is determined by locating the
number on the back of the Column just above the Arm where the arrows are located.
Set the compression depth indicator number on the Dome to match the A-P diameter
number indicated on the Column. This label also serves to remind the operator to
monitor the patient at all times during CPR.
Refer to Figure 2 for an illustration of this label.
WARNING / BEFORE OPERATING -- Ensure that all controls are in the
“STOP” or “decreased” (fully counterclockwise) position before connection
of Oxygen or placement on the patient. By verifying the position of all
controls prior to operation, the user is assured of proper operation.
Refer to Figure 3 for an illustration of this label.
The following controls operate the ThumperModel 1007CCMII System:
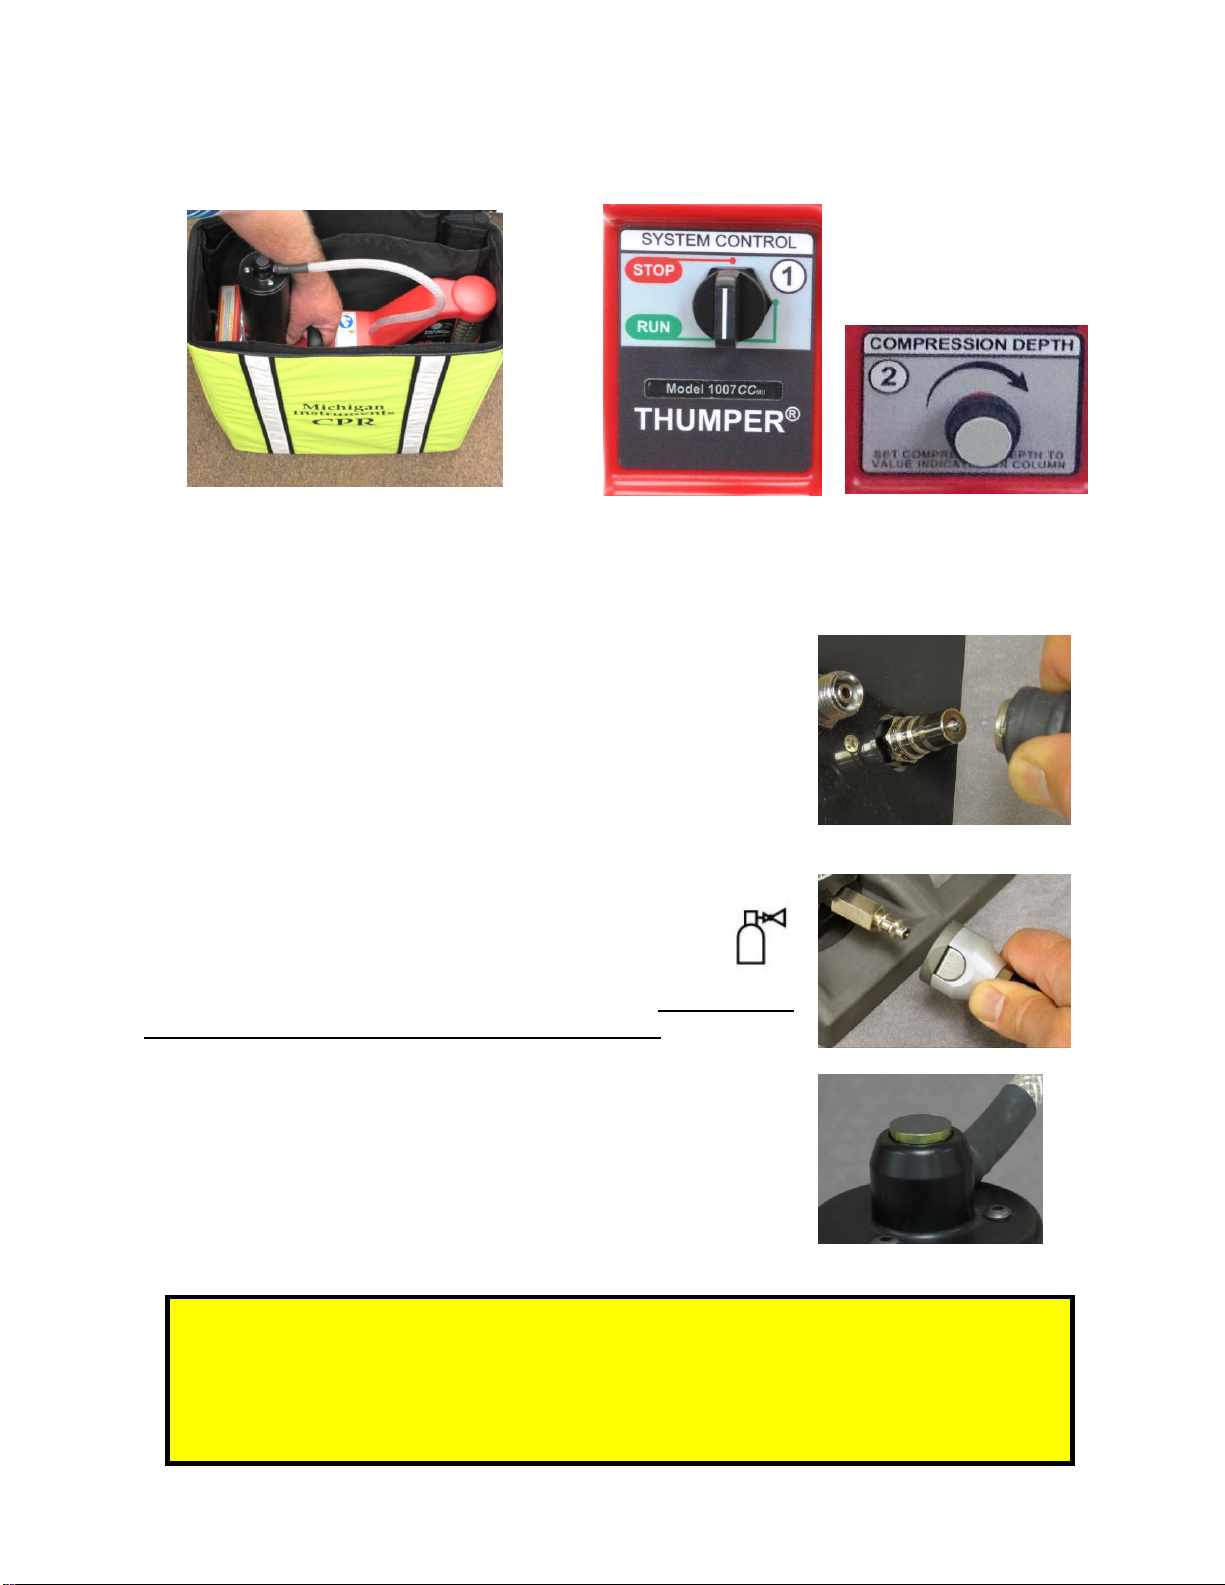
1. SYSTEM CONTROL RUN/STOP (Control #1): This control allows the operator to turn
on (RUN) chest compressions or turn off (STOP) chest compressions. The system is
controlled by pressing in and rotating the switch to the desired position (RUN or STOP).
RUN: With the control in this position, the system will deliver chest compressions to the
depth set by COMPRESSION DEPTH (Control #2).
STOP: With the control in this position, chest compressions are suspended and not
delivered. In the STOP position, chest compressions can be suspended to assist in
patient monitoring.
Refer to Figure 4 for an illustration of this control.
Note: The compression timing circuit cycles whenever Oxygen
pressure is applied, even when the System Control is in the STOP
position. This cycling can be detected as an audible clicking sound
emanating from the Thumper.
2. COMPRESSION DEPTH (Control #2): This control is used for setting the depth of
compression on the patient. The depth of compression corresponds to the measured A-P
(Anterior - Posterior) Diameter shown on the scale located on the back of the Column.
The compression depth is increased with a clockwise rotation and decreased with a
counterclockwise rotation.
Refer to Figure 5 for an illustration of this control.

REV: 2019-04 13
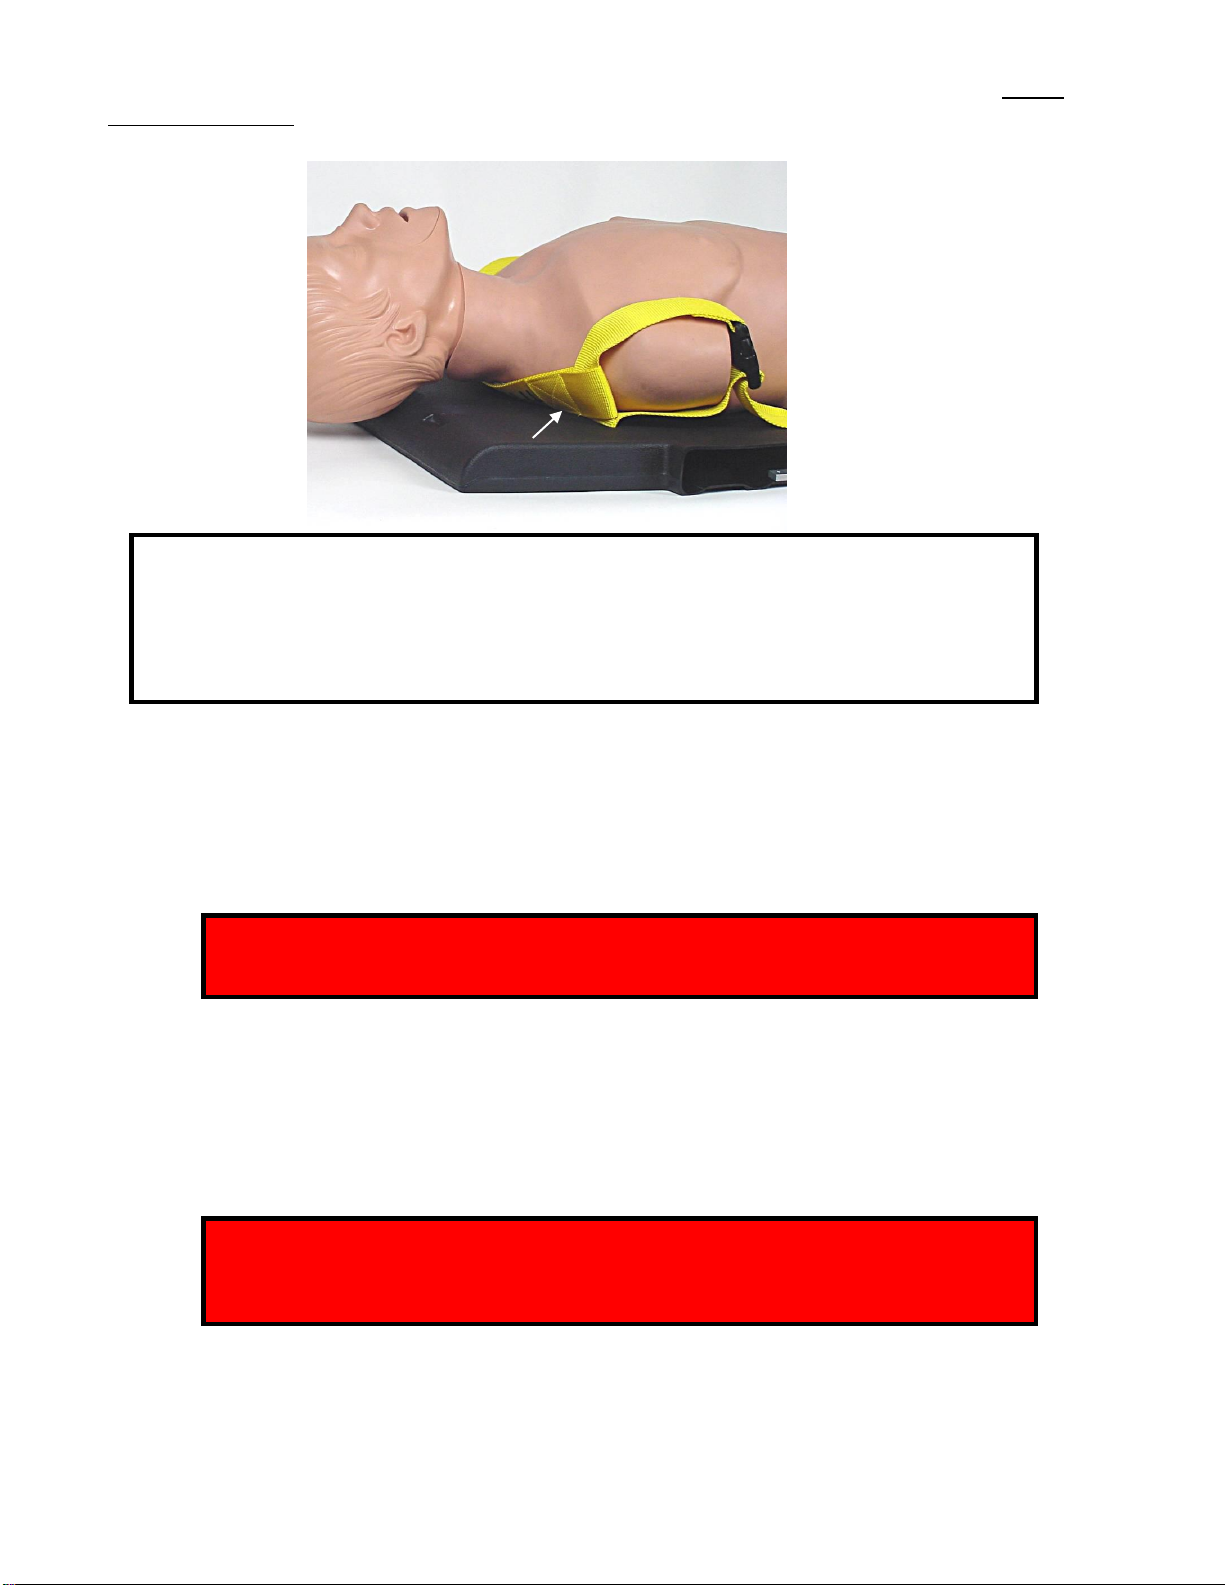
TheBackBoard
The BackBoard is intended for either manual or mechanical CPR. It is designed to provide a
firm, non-rebounding surface upon which CPR can be performed, and introduces a slight
hyperextension of the patient’s neck to facilitate upper airway management. It allows use of
the Thumper® on either right or left side of patient. Two shoulder straps help immobilize the
patient securing them to the BackBoard. The cross strap helps to keep the shoulder straps
separated and indicates the position of the head relative to the BackBoard.
Note: Optimal Thumper®CPR performance requires using the BackBoard.
Figure 6 –The BackBoard
Mobile Oxygen Carrier (MOC),
or Appropriate Wall Access Adapter
The Thumper®Model 1007CCMII is equipped with an O2Supply Hose used to connect the
device to a source of compressed medical Oxygen. It incorporates couplers on each end and a
check valve to retain the Oxygen during a source change. Wall adapters are available that
connect to the O2Supply Hose to allow connection to the various and most common hospital
(and ambulance) Oxygen pipeline systems.
The Mobile Oxygen Carrier is an Oxygen tank carrier, available in two configurations, which
provide constant pressure and high flow source gas for the Thumper®Model 1007CCMII and
an additional DISS outlet. It is designed to power the Thumper®Model 1007CCMII whenever
the device is in use where no Oxygen pipeline source is available, (for example, when
transporting a cardiac arrest patient from the scene to the ambulance and from the
ambulance to the hospital). One of the two outlets is dedicated to accept the Thumper
Model 1007CCMII O2Supply Hose, while the other DISS outlet is available to supply other
Oxygen driven devices. MOC regulator(s) are preset to satisfy Thumperrequirements.
A single tank version is available that will accept a “DD” size carbon fiber cylinder. A dual
tank version is available in two sizes that accept either "D" or "E" size aluminum cylinders.
Shoulder
Straps
Cross Strap
REV: 2019-04 14
Single tank carrier for “DD” carbon fiber cylinder Dual tank carrier for “D” or “E” aluminum cylinders
(Regulator available separately) (Cylinders not included)
Figure 7 –Mobile Oxygen Carriers (MOC)
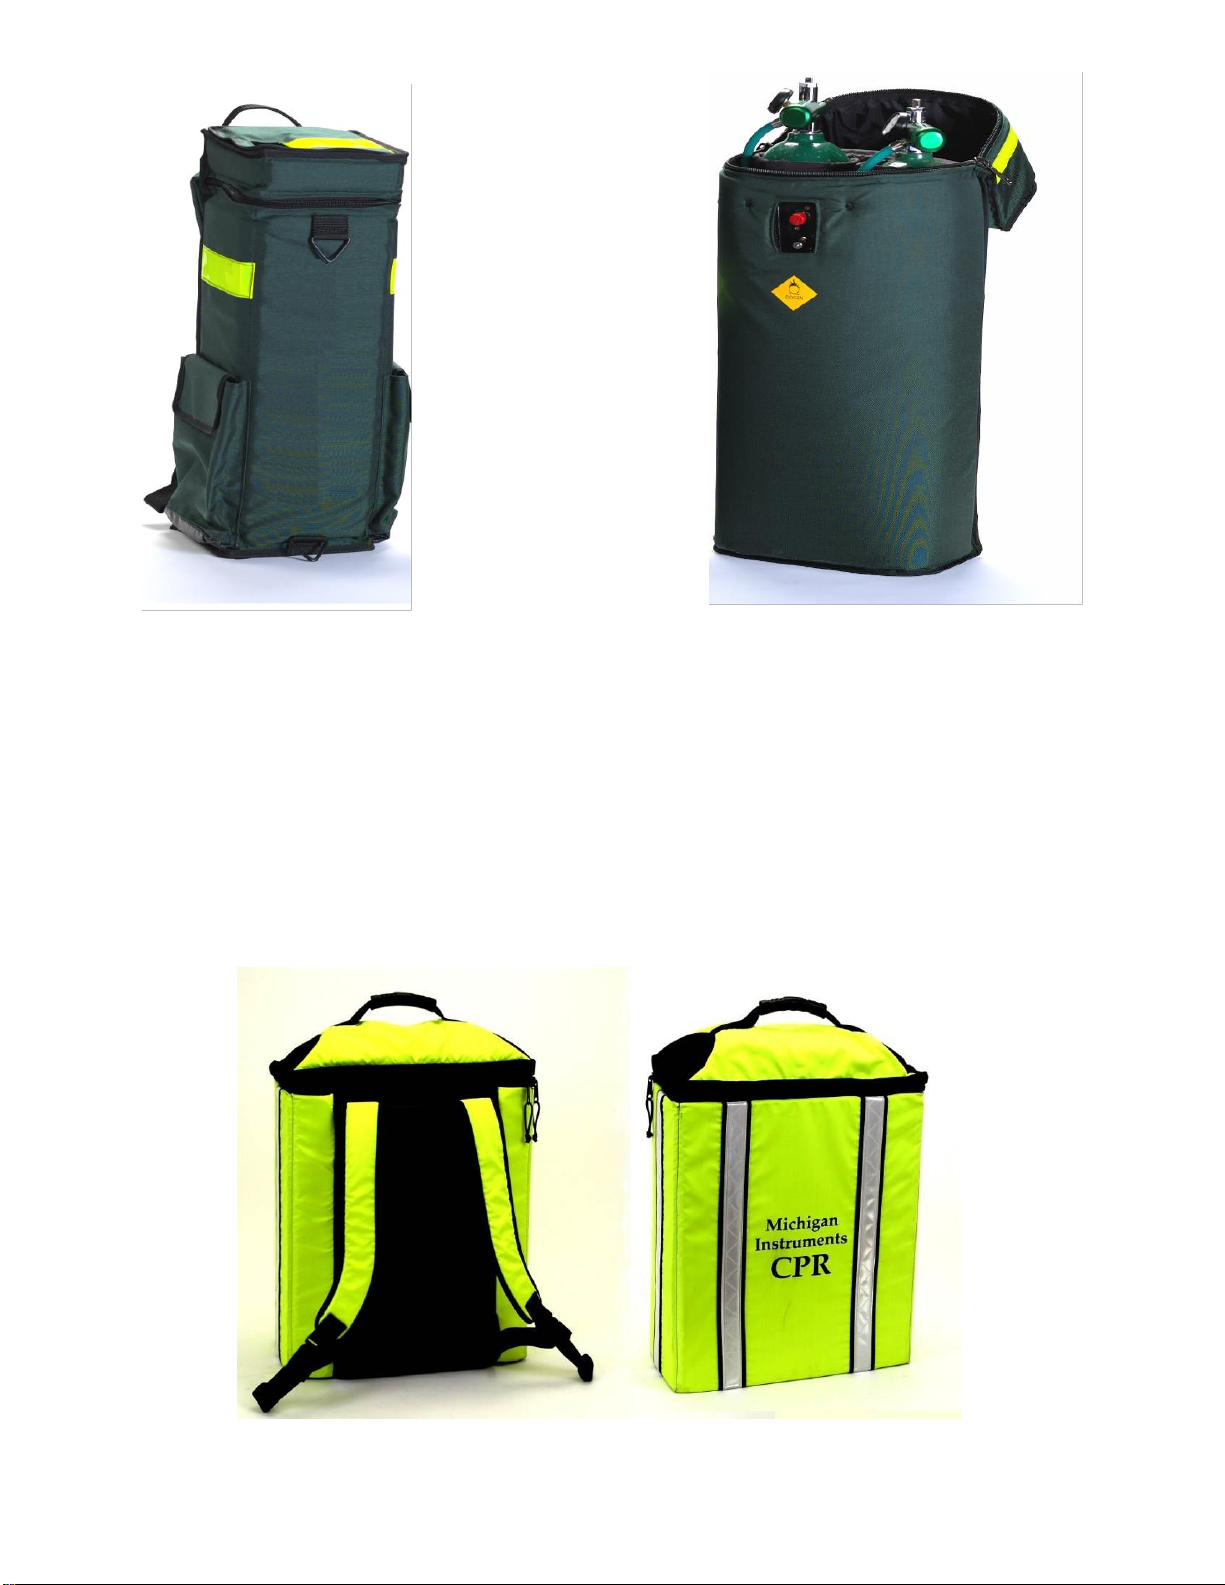
The Carrying/Storage Case
The carrying/storage case is constructed of a durable nylon. The Thumper, O2Supply
Hose and code related supplies are stored in the case in a manner which permits immediate
access to the device and facilitates easy setup at an emergency site.
Figure 8 –Carrying/Storage Case

REV: 2019-04 15
SECTION C SETUP AND OPERATION
PRECAUTIONS
Before setting up and using the Thumper, there are several important precautions that must
be observed at all times.
1. The Thumpermust only be used in cases of clinical death as defined by lack of
spontaneous breathing and pulse.
2. Manual CPR should be started on the patient immediately. Do not postpone CPR while
waiting for the Thumper. The Thumpercan be easily set up and applied to the patient
without interrupting manual CPR efforts.
3. The Thumpermay be used in all cases with adult patients where manual CPR would
normally be initiated. However, there are situations where CPR is not the appropriate
method of intervention. Familiarity with accepted medical practices in your area is very
important.
4. Personnel certified in manual CPR must always be present to monitor the patient during
Thumperoperation in the unfortunate event of a mechanical failure.
5. When transporting the patient with the Thumperin operation, ensure the patient is secured
snugly to the BackBoard using the provided shoulder straps. Also, ensure the patient is
properly secured (using retention straps) to the stretcher as well. Failure to do so can allow
the Thumperand BackBoard to shift position on the patient possibly causing the Massager
Pad to wander off the patient’s sternum.
6. When applying the Thumper®to an obese patient, place the arm of the patient around the
Thumper®so that the Column is positioned near the arm pit of the patient. This will better
facilitate positioning the Massager Pad directly over the patient’s sternum.
RECOMMENDATIONS
It is recommended that the Arm/Column of the Thumper®
be attached to the Base while stored in the
Carrying/Storage Case.
Additionally, the Arm should be positioned over the Base
so that it is perpendicular to the O2Supply Connector
located at the bottom of the Column. Lower the Arm until
the arrow is positioned at the -4- location on the Column
and lock in place.
By doing so, the Thumper® is ideally positioned to
expedite removal from the Carrying/Storage case and
application to the patient.
O2Supply
Connector
REV: 2019-04 16
When placing the BackBoard under the patient, ensure the cross strap is positioned under
the patient's neck. Do not position the cross strap over the neck of the patient.
Training with a CPR Manikin can be beneficial in becoming familiar with:
✓Setup on the patient using the BackBoard
✓Transitioning from manual CPR to mechanical CPR
✓Setting the compression depth
✓Interventions such as pausing operation to monitor the patient
POSITIONING THE PATIENT
The following steps are provided as a recommendation.
1. When applying the BackBoard, “Log roll” the patient into position, taking care to keep the
cervical spine immobilized.
WARNING: When moving a patient in cases of suspected C-spine
injury, always support the patient’s head in a neutral position.
2. Place the BackBoard under the patient orienting the head of the patient in the direction
indicated by the HEAD marking on the cross strap. Ensure the cross strap is positioned
under the patient's neck. Connect the retaining straps over the shoulder and under the arm
pit of the patient, then buckle and tighten the straps securely on both sides of the patient.
3. Secure the patient to the spine board with retention straps at the forehead, hips and feet.
Warning: Do not place retention straps or other restraints over
the patient’s abdominal area. Tight garments around the
abdomen should be removed or loosened.
4. Manual CPR can begin on the patient immediately. There is no need to postpone CPR
while waiting for Thumper®deployment and application to the patient.
Correct Cross
Strap Position
REV: 2019-04 17
THUMPERMODEL 1007CCMII DEPLOYMENT
1. Thumper®Model 1007CCMII Setup:
A. Remove the Thumper®from the case. B. Ensure the RUN/STOP switch (Control #1) is
set to STOP and the Compression Depth
(Control #2) is turned fully counterclockwise.
C. Ensure the Oxygen source is energized then attach the O2
Supply Hose to the Oxygen source first. Pull the collar back
from the O2Source end connector, press firmly onto the male
connector of the Oxygen source then release the collar to
secure the connector. Pull slightly on the hose to ensure a
secure connection.
D. Attach the opposite end of the hose to the Thumper®
O2Supply Connector by inserting the hose
connector while slightly turning it at the same time to
align the hexagons then press firmly to attach. Pull
slightly on hose to ensure a secure connection. Do not press
the release button while attaching the connector. Only press
the release button to disconnect the connector.
E. Listen for audible clicks (cycling) and verify that the green
Pressure Indicator shows an adequate input pressure is
available.
CAUTION: The Thumper®requires a medical grade Oxygen source capable
of delivering pressure from 50 to 90 psi (3.515 to 6.327 kgf/cm2), with a
minimum flow rate of at least 45 LPM. Always follow safe Oxygen handling
practices with Oxygen cylinders and regulators.
REV: 2019-04 18
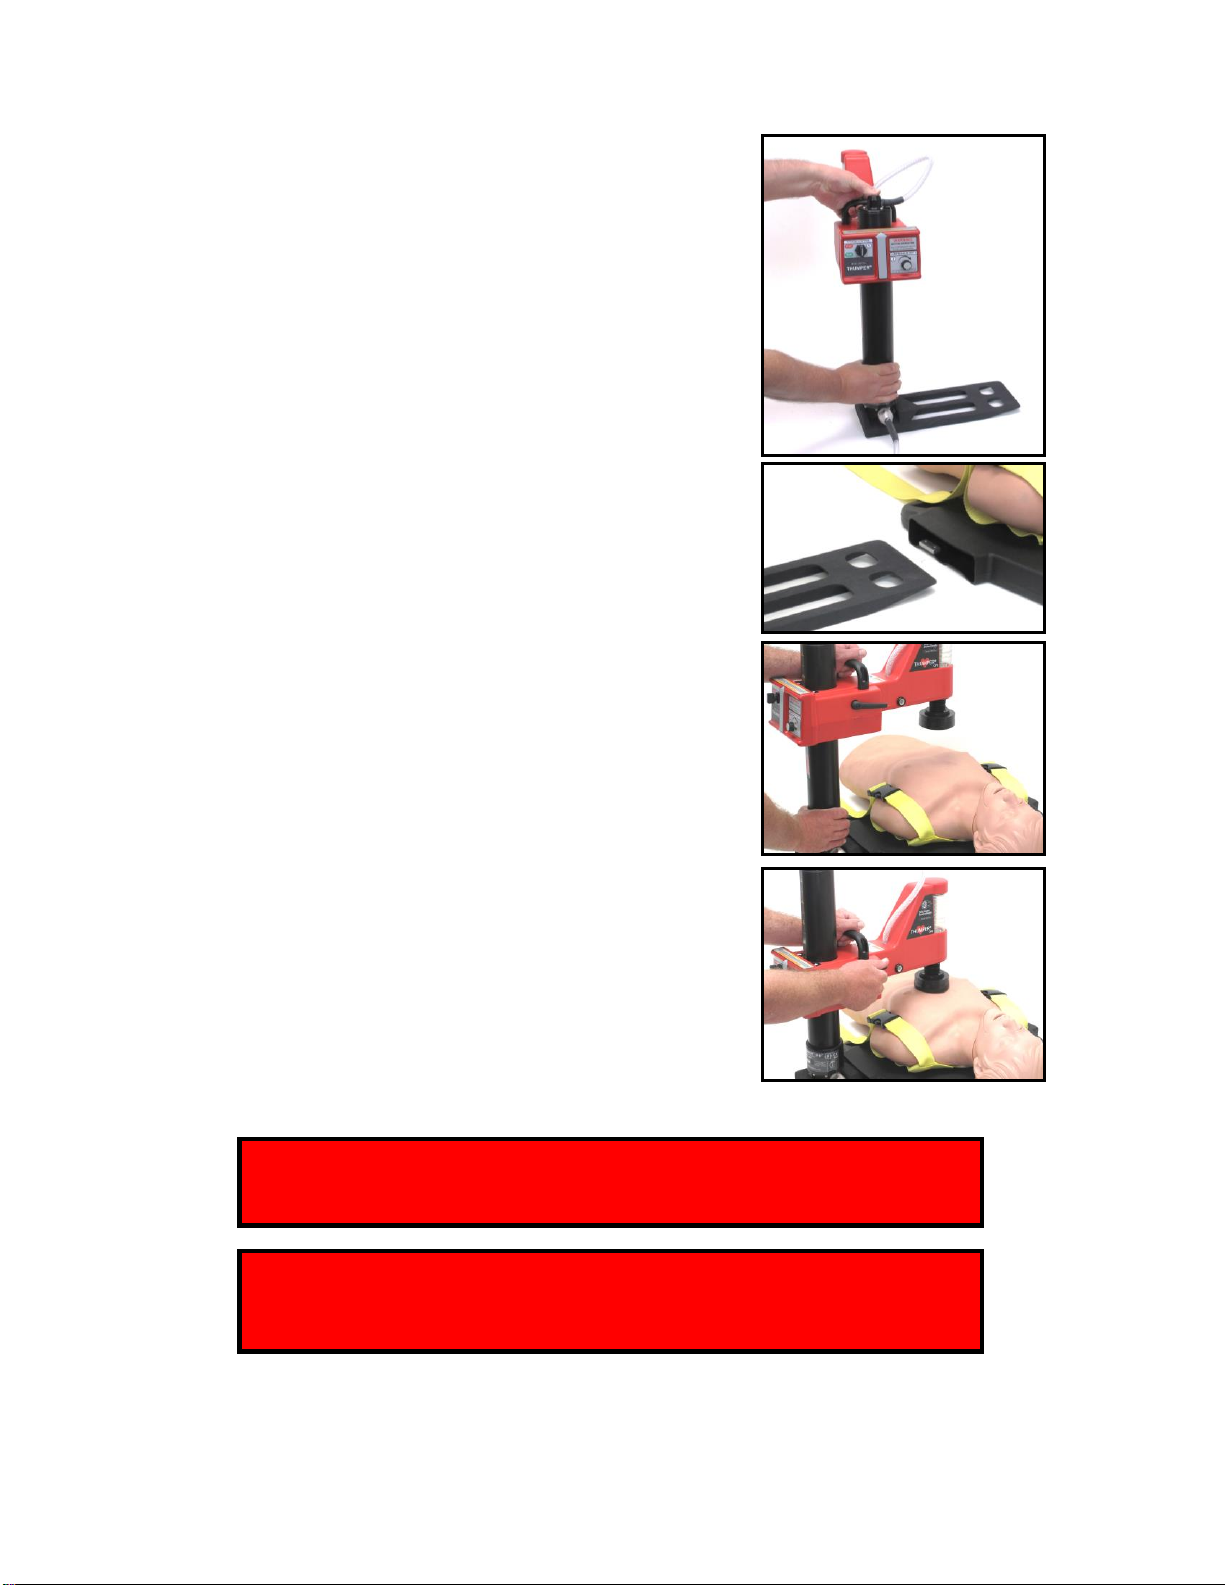
2. Thumper®Model 1007CCMII Application to the Patient:
A. Before inserting the Thumper® into the BackBoard,
ensure the Arm is raised and locked near the top of
the column and positioned so that the dome is
towards the patient’s feet. NOTE: When oriented in
this position, the Thumper®is top-heavy and prone
to fall over. Grasp the Thumper®at the Base and
Handle.
B. Insert the Base into the side slot of the BackBoard
on whichever side of the patient is most convenient.
C. With the base fully inserted into the BackBoard and
during a pause in the manual CPR effort, loosen the
arm lock and swing the Arm over the patient’s chest
locating the Massager Pad over the sternum, as you
would for the heel of your hand when performing
manual CPR.
D. Lower the Arm until the Massager Pad contacts the
patient’s chest. Then, apply slight downward
pressure on the Arm to position the Piston inside the
Dome to align with the “-”mark on the Dome.
Tighten the Arm Lock Lever.
Warning: The Massager Pad must not extend over the
xiphoid process. This could result in injury to the patient.
Warning: Injury to patient may occur if Arm is adjusted too
low, as indicated by the top of the Piston moving up beyond
“-” on the Dome.

REV: 2019-04 19
Warning: Patient chest compressions may be insufficient to
be effective if Arm is adjusted too high as indicated by the top
of the Piston not moving up to “-” on the Dome.
Warning: Patient is more likely to shift from optimum
position relative to Massager Pad if Arm is adjusted too high,
as indicated by the top of the Piston not moving up to “-” on
the Dome.
Caution: If the Arm Lock Lever is not securely tightened, Arm
height or Massager Pad location may shift position relative to
the patient.
E. Determine the depth of compression by referring
to the Sternal Deflection Number located on the
scale on the back of the Column. The arrows
indicate the depth required to provide the 20%
A-P sternal deflection for the patient.
Warning: Do NOT use the Thumper®if the
arrows indicate in the red area of the scale.
NOTE: 2010 AHA Guidelines recommend for adult patients, a minimum
compression depth of at least 2" (5cm). If the A-P chest diameter number
indicated on the Thumper®is less than 5, then deliver compressions
minimally to the depth indicated by the -5- marking on the dome.
3. Thumper®Model 1007CCMII Activation:
Warning: Failure to ensure that Control #2 COMPRESSION DEPTH is
turned fully counterclockwise upon initial application to the patient and
prior to turning Control #1 RUN/STOP to the RUN position will deliver
compressions to the patient at the depth last set by Control #2. This
depth may not be the correct A-P Diameter for that patient and could
possibly cause serious injury or death to the patient.
With the RUN/STOP in the ‘STOP’ position:
A. Ensure Control #2 is rotated fully counterclockwise and the Pressure Indicator at the
top of the Column shows “green” indicating adequate Opressure.
B. Activate the ThumperModel 1007CCMII by first turning the RUN/STOP Control #1 to
RUN.
C. Rotate COMPRESSION DEPTH Control #2 slowly clockwise until sufficient compression
depth is demonstrated by viewing the Piston at eye level. Increase the control until the
top of the Piston reaches the A-P Diameter Sternal Deflection Number on the Dome

REV: 2019-04 20
corresponding to the Sternal Deflection Number reading taken from the scale on the back
of the Column. This will deliver the recommended A-P Diameter for the patient.
Warning: Injury to patient may occur if Compression Depth
(Control #2) is set too deep or inadvertently bumped.
Warning: Patient chest compressions may be insufficient if
Compression Depth (Control #2) is set too shallow or
inadvertently bumped.
Warning: With the Thumper®Model 1007CCMII in use, care must
be taken to prevent kinking or collapsing of the O2Supply Hose.
4. Procedure to Interrupt (Suspend) Compressions:
To perform pulse checks, ventilate the patient or perform analysis with an AED (and/or
defibrillate manually), simply turn Control #1 to the STOP position. This will interrupt
compressions. To resume compressions turn Control #1 to RUN. The same depth of
compression previously set by Compression Depth Control #2 will be delivered.
Caution: When the Thumper®Model 1007CCMII is used in
conjunction with automatic external defibrillators (AED’s), or
other therapeutic devices which must utilize an ECG signal,
interruption of the cardiac compressions as described herein
may be required to avoid the ECG motion artifact associated with
cardiac compressions.
The Thumper®Model 1007CCMII is electrically insulated and should cause no
interference during routine cardiac monitoring or manual defibrillation.
However, conductive fluids or gels may provide stray current paths. It is
advised operators should not touch the Thumper® during defibrillation.
Warning: Do not touch the Thumper®during defibrillation.
This manual suits for next models
1
Table of contents
Other Michigan Instruments Medical Equipment manuals


Popular Medical Equipment manuals by other brands


Fresenius Medical Care
Fresenius Medical Care 5008 operating instructions

Fresenius Medical Care
Fresenius Medical Care 2008K2 troubleshooting guide

Arthrex
Arthrex Synergy Resection quick start guide

bort medical
bort medical Immob quick guide

Getinge
Getinge Arjohuntleigh Skin IQ Microclimate Manager Instructions for use

AMO
AMO iDesign G300 Operator's manual


