Midea 350105 User manual

350105
Food Processor
USER MANUAL
Please read the manual carefully before operating your product.
Retain it for future reference.

Read the instructions, keep them safe, pass them on if you pass the
appliance on. Remove all packaging before use.
Follow basic safety precautions, including:
1. Don’t put the motor unit in liquid, don’t use it in a bathroom, near
water, or outdoors.
2. Unplug before fitting or removing an attachment.
3. Switch off(0) before fitting the jug to the motor unit.
4. Switch off(0) and wait till the blades come to a
complete stop before removing the lid from the jug.
5. Keep your hands away from the blades – they’re sharp.
6. Don’t use the appliance unless the lid is in place.
7. Don’t fill with anything hotter than you can comfortably
handle (i.e. below 40°C).
8. Don’t put spoons, spatulas, or any other object into the jug while
the appliance is plugged in.
9. Don’t leave the appliance unattended while plugged in.
10.Sit the motor unit on a dry, firm, level surface.
11.Route the cable so it doesn’t overhang, and can’t be tripped over
or caught.
12.Don’t let the jug overflow. If liquid gets under the motor unit, it
may be sucked into the motor, damaging it.
13.Don’t fill the jug above the max mark – if you do, the contents may
force the lid open when you start the motor.
14.You may use the processor and disc for cutting/grating for up to 2
minutes. Any other use should be restricted to 1½ minutes. After
this, let the motor rest for 2 minutes.
15.Don’t use the appliance for any purpose other than those
described in these instructions.
16.Don’t use the appliance if it’s damaged or malfunctions.
17.If the cable is damaged, return the appliance, to avoid hazard.
19 This appliance can be used by children aged from 8 years and above
and persons with reduced physical, sensory or mental capabilities or
lack of experience and knowledge if they have been given supervision
or instruction concerning use of the appliance in a safe way and
understand the hazards involved.
20 Children shall not play with the appliance. Cleaning and user
18.When the machine has overload protection,do not touch the
machine,to stay in continue to use when machine is back to normal.
.
.
Important Safeguards
1

maintenance shall not be made by children without supervision.
21 This appliance is not intended for use by persons (including children)
with reduced physical,sensory or mental capabilities, or lack of
experience and knowledge, unless they have been given supervision or
instruction concerning use of the appliance by a person responsible for
their safety.
22 Children should be supervised to ensure that they do not play with the
appliance.
23 If the supply cord is damaged, it must be replaced by the manufacturer,
its service agent or similarly qualified persons in order to avoid a
hazard.
24 Household use only
25 Switch off the appliance and disconnect from supply before changing
accessories or approaching parts that move in use.
26.Do not use the appliance if the rotating sieve or the protecting cover is
damaged or has visible cracks.
27.Do not use the appliance if the rotating sieve is damaged.
Be careful when handling the sharp cutting blades, emptying the bowl and
during cleaning the appliances.
Be careful if hot liquid is poured into the food processor or blender as it
can be ejected out of the appliance due to a sudden steaming
.
.
.
.
.
household use only
Important Safeguards
2
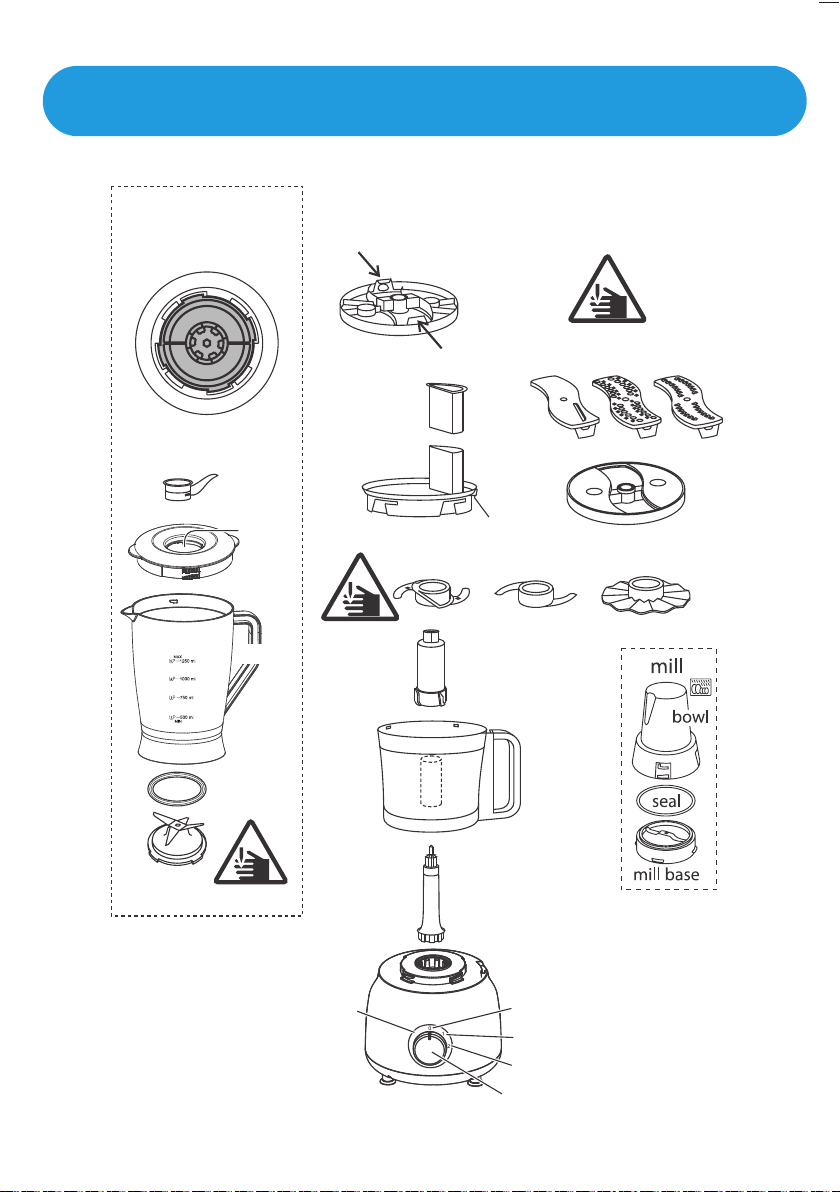
General Description
blender
underside
blade unit
cap pips
hole
lid
jug
handle
seal
blade
unit
food processor
underside
disc
coarse
grater
fine
grater
slicer
pusher
lid tube
tab
disc
blade mixer creamer
support
handle
jug
spindle
P
turbo P
motor unit
0 off
1 low
2 high
speed control
3

4
Capacity
Power
FrequencyVoltage
Model
Product
name
1500ml500W
350105
220-240V~ 50/60Hz
Food
Processor
1. Sit the motor unit on a dry, firm, level surface.
2. Route the cable so it doesn’t overhang, and won’t trip or catch.
3. Lower the jug on to the motor unit, then turn the jug clockwise, to
lock it in place.
4. Remove the lid.
5. Put the ingredients into the jug – don’t fill past the max mark.
6. Put the lid on the jug.
7. Check that the speed control is set to 0.
8 Put the plug into the power socket (switch it on, if it’s switchable)..
9. Turn the speed control clockwise (1 = low, 2 = high).
10.Turn it back to 0 to turn the motor off.
11 Use low speed (1) for lighter applications, using mainly liquid
ingredients, and high speed (2) for heavier applications, using
mainly solid ingredients.
12 Turning it anti-clockwise to P will give you a short burst at high
speed, for more precise control. In this direction, the control is
spring-loaded. When you let go, it’ll return to 0.
13 You may use the processor and disc for cutting/grating for up to 2
minutes. Any other use should be restricted to 1½ minutes. After
this, let the motor rest for 2 minutes.
.
.
.
Technical Data
In Brief
Power Up
Speed Control

Using The Blender
Crushing Ice
Care and Maintenance
Blade Unit
5
.
22.Switch off (0) and unplug before cleaning.
23.Wash the jug,lid and cap in warm soapy water,rinse well,drain,
and air dry.
24.Wipe the outside of the motor unit with a clean damp cloth.
25.Don’t put any part of the appliance in a dishwasher.
26.You may remove the blade unit for cleaning.
27.This is best done with the jug upside down.
28.Grip the jug handle with one hand.
29.Grip the bottom of the blade unit with the other hand.
30.Turn the blade unit clockwise till it comes loose from the jug base.
14.Lower the jug on to the motor unit, then turn the jug clockwise, to
lock it in place.
15.Pull the lid up and off the jug - it’s stiff, because of the seal.
16.Put the ingredients into the jug - don’t fill past the max mark.
17.Put the lid on the jug, and push it down to seal it.
18.Align the pips on the cap with the slots in the hole, fit the cap in
the hole, and turn clockwise. Don’t rut the blender without the cap.
19.To add ingredients while the motor is running:
a)turn the cap clockwise to unlock it, and lift it off
b) add the ingredients via the hole
c)replace the cap and turn it anti-clockwise to lock it
20.Start with half to threequarters of a cup of ice, or 4 to 6 cubes,
and add 15ml (1 tbsp) of water.
21.Put the lid on the blender, then turn the speed control to P for a
second or so, check the state of the ice, and repeat till the
ice is the consistency that you need.

6
31.Carefully, pull it up and out of the bottom of the jug.
32.Wash the seal and blade unit in warm soapy water, rinse, and air
dry.
33.Take great care with the blades – don’t handle them directly, use
a nylon washing-up brush.
34.Replace the seal round the blade unit.
35.Turn the blade unit upside down, and replace it in the bottom of
the jug base.
36.Turn the blade unit anti-clockwise to tighten it.
Using the Processor
With the Support
37.Unplug the appliance.
38.Fit the spindle to the top of the motor unit.
39.Lower the jug on to the motor unit, then turn the jug clockwise, to
lock it in place.
40.Choose the attachment you need.
41.Use the chopper for pulverizing ingredients.
42.Use the mixer to mix ingredients together.
43.Use the creamer to thicken cream, to beat eggs, and to cream
eggs and sugar together.
44.Fit the attachment over the support, and slide it to the bottom.
45.Lower the support into the centre of the jug, over the spindle.
46.Put the ingredients into the jug - don’t fill it past the max mark.
47.Hold the lid with the tube slightly behind the jug handle, set it on
the jug, then turn it clockwise, to lock the tab into the top of the
handle.
48.To add ingredients while the motor is running:
a)lift the pushed out of the tube
b)add the ingredients via the tube
c)replace the pusher
49.To remove the lid, turn it anti-clockwise to unlock it, then lift it off.

7
With the Disc
50.Fit the slicer or one of the graters into the disc.
51.Lower the disc over the top of the spindle.
52.Hold the lid with the tube slightly behind the jug handle, set it on
the jug, then turn it clockwise, to lock the tab into the top of the
handle.
53.Remove the pusher, and drop the ingredients down the tube.
54.Replace the pusher, and use it to push the ingredients gently
down the tube.
Don’t use fingers or cutlery to push food down the
tubeonly the pusher.
55.The blade(s) on top of the disc will slice or grate the
food into the bowl.
56.Don’t let the bowl gets more than about half full - stop and empty
it.
57.To remove the lid, turn it anti-clockwise to unlock it, then lift it off.
58.Turn the disc over, and press one of the metal ends in and down,
to remove the slicer/grater.
Using the mill
59.
60.Turn the mill upside down.
61.Turn the mill base clockwise,to release it,and lift it out of the mill.
62.Put the goods to be ground into the bowl-dry goods only.
★For best results, don’t fill it more than one third full.
63.Replace the mill base, inside the mill, and turn it anti-clockwise,
to lock it in place.
64.Turn the mill right way up.
65.Lower the mill on to the motor unit, then turn the it clockwise, to
lock it in place.
66.Turn the speed control to P in short bursts till you achieve the
size of grind you want.
67.Let the speed control return to 0, and wait till the blades stop
moving.
68.Turn the mill anti-clockwise to unlock it, and lift it off the motor
unit.
69.Turn the mill upside down.
70.Tap the mill a couple of times to move all the grounds into the
bowl.
71.Turn the mill base clockwise, to release it,and lift it out of the mill.
72.Empty the bowl.
Unplug the appliance.
Care and Maintenance
73.Switch off(0) and unplug before cleaning.
74.Wash the jug, lid and cap in warm soapy water, rinse well, drain,
and air dry.
75.Wipe the outside of the motor unit with a clean damp cloth.
76.Don’t put any part of the appliance in a dishwasher.
Recipes
8

Recipes
9
ENVIRONMENTAL PROTECTION
To avoid environmental and health problems due to hazardous
substances in electrical and electronic goods, appliances
markded with this symbol mustn’t be disposed of with unsorted
municipal waste, but recovered, reused, or recycled.
quick cheese & tomato pizzas (2 medium pizzas)
2 sachets active dried yeast 2 tsp sugar
240ml lukewarm water 440g strong white flour
2 tbsp olive oil 1 tsp salt
1×300g jar pizza sauce 200g mozzarella cheese
Mix the water, yeast, and sugar in a bowl, and leave it for 5 minutes. Fit the
mixer. Process the flour and salt at low speed. Add the water, yeast, and
sugar mixture via the tube. Add the oil, and process at high speed till a
dough ball forms, then reduce speed. Run for 20 seconds, and rest for
2 minutes. Do this twice more, then let the dough rest for 10 minutes.
Divide the dough into 2 balls, and stretch or roll each ball to fit a lightly oiled
baking tray. Top with the pizza sauce. Use the coarse grater to grate the
mozzarella cheese. Spread the cheese over the pizzas and add other
toppings if desired. Bake in a pre-heated oven at 190℃/gas mark 5 for
15-20 minutes.
Table of contents
Other Midea Food Processor manuals


