Miditech Audiolink User manual

1
Miditech Audiolink USB
"Class Compliant" USB Audio Interface
(WinXP/Vista no drivers necessary)
16 Bit/ 48 kHz resolution line stereo interface
XLR Mic preamp with 48 V Phantom Power
and gain control
HI-Z guitar preamp with gain control
Adjustable stereo headphone output
Full duplex with compatible recording software
USB powered
Include: Magix Samplitude SE
ASIO driver
Typical applications:
Recording from microphone, instruments and LINE devices,
e.g. cassette, CD-players or mp3-players
Low latency when playing VST instruments

2
Audiolink USB audio interface Owner’s Manual
Thank you for deciding to purchase the Miditech Audiolink, we are certain you will be delighted
with its performance and advanced features. This interface brings an unparalleled level of USB
audio quality to the Mac or PC, with pristine 16-bit/48kHz A/D and D/A converters, ultra-low jitter
clock, and low noise mic/line/hi-Z preamps. Audiolink enables you to easily digitize all your analog
sound sources, to record from microphones and instruments, and from any LINE level devices, e.g.
music cassette decks or CD players etc. Not only does Audiolink offer a simple solution to
digitizing analog sounds, it also gives you the very best HiFi audio quality. The included recording
software Magix "Samplitude SE" offers you the capability to edit previously digitized music or
speech. These operating instructions will give you some guidance on how to install and operate
your Audiolink functions, also check the section on how to use the free bundled companion Magix
program - "Samplitude SE".
Audiolink technical data and features:
Simple computer connection via USB
"Class Compliant" device - NO driver installation necessary, runs directly under Windows
2000 SP4, Windows XP SP2 and Windows Vista
16 Bit AD/DA Converters
Supported Sampling Frequencies (Hz): 8000, 9600, 11025, 12000, 16000, 22050, 24000,
32000, 44100 & 48000
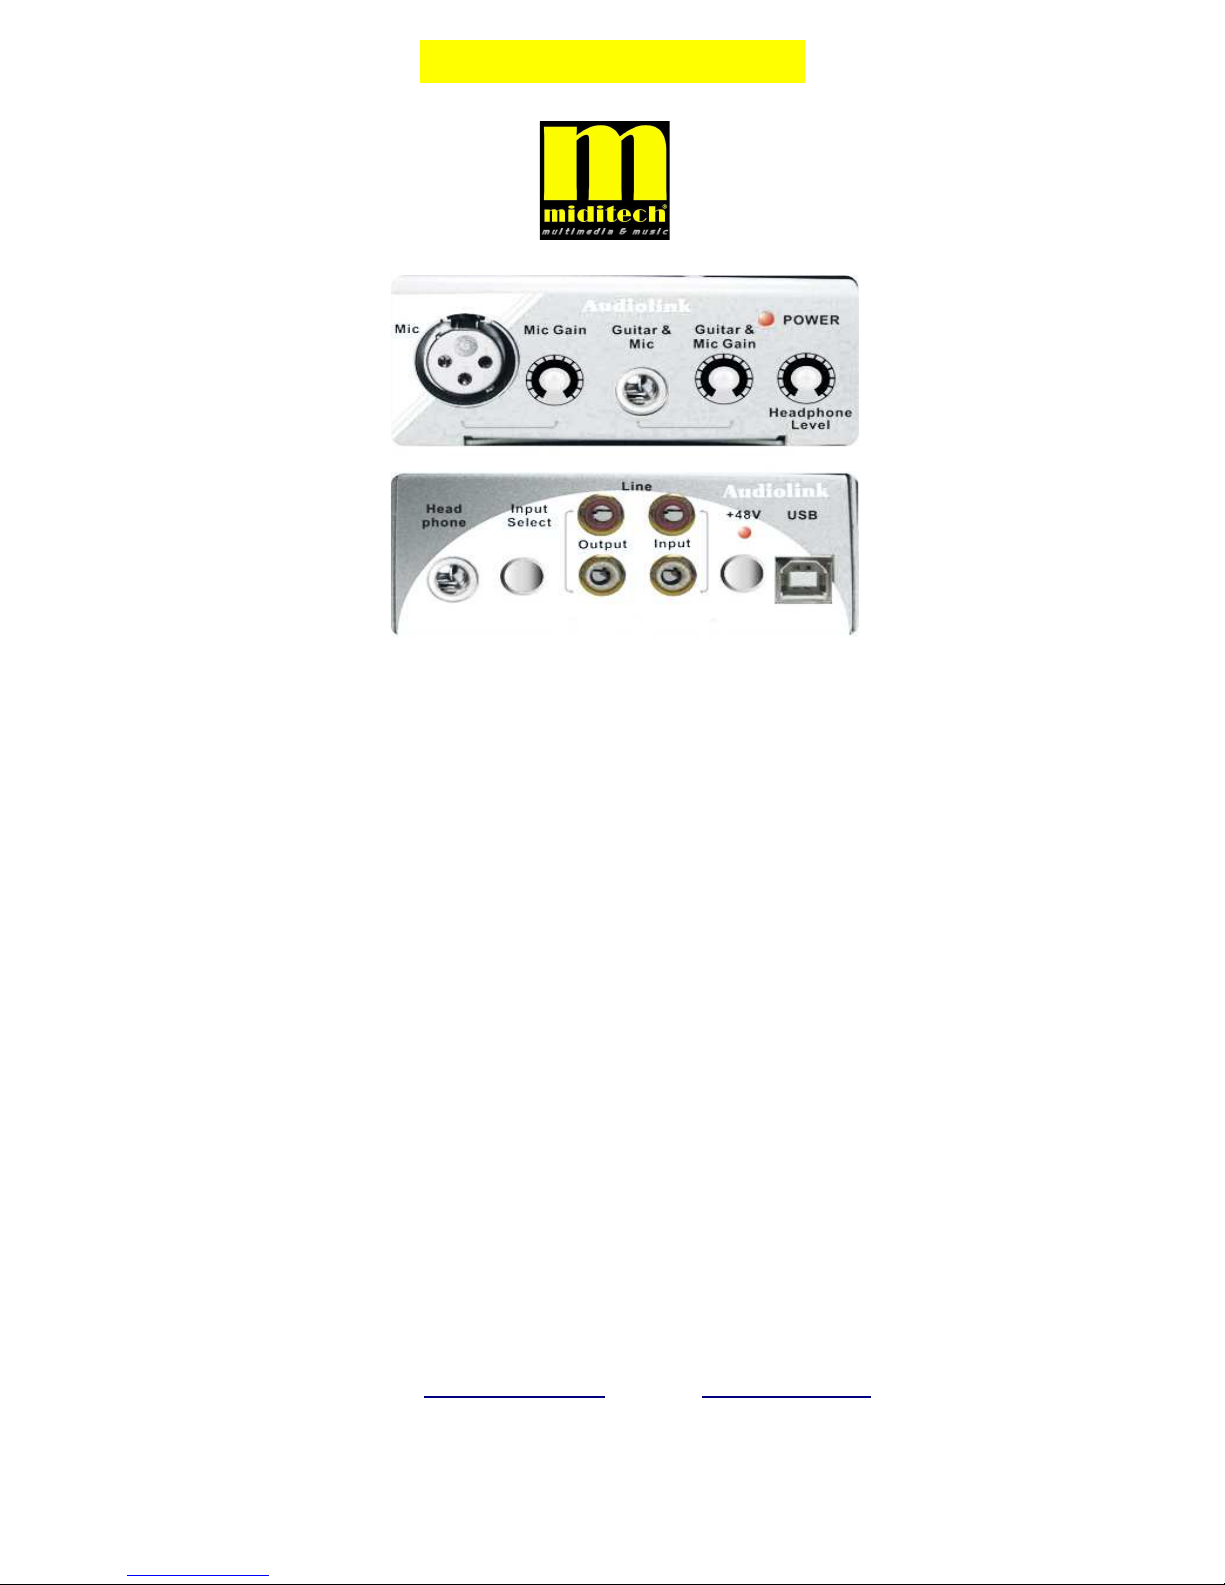
Microphone input (XLR balanced) with 48v phantom power and level control
High-impedance instrument/line inputs (balanced/unbalanced 1/4” TRS)
Gain control knob for input channel (+40 dB max)
Supports professional two-channel recording and playback
Extremely wide dynamic range and low signal-to-noise for ultra-quiet, professional-quality
recording
Unbalanced Outputs (-10 dBV nominal, +1.7 dBV max), 1/4” & Stereo Line: dynamic range:
>100 dB (typical, -60 dB input,A-weighted), signal-to-noise ratio: >100 dB (typical,A-
weighted), THD: -87 dB (typical)
Input XLR MIC: dynamic range: >100 dB (typical, -60 dB input,A-weighted), signal-to-noise
ratio: >100 dB (typical,A-weighted), THD: -80 dB (typical)
Input INSTR./LINE: dynamic range: 96 dB (typical, -60 dB input,A-weighted), signal-to-
noise ratio: 96 dB (typical,A-weighted), THD: -78 dB (typical)
Adjustable stereo headphone output for headphones.
USB Powered for total mobility, i.e. power supplied via USB connection of the computer
System Requirements
The Audiolink has been designed to work with Windows XP or Windows Vista
Windows PC:
Minimum Required:
• 350 MHz Pentium II
• 64MB RAM
• CD-ROM Drive
• Native USB 1.1 Port, on motherboard
• Windows 2000 (SP2),XP (SP1) Home or Pro (128 MB RAM required for XP Pro)
Recommended:
• 700 MHz Pentium III
• 128MB RAM

3
• CD-ROM Drive
• Windows 2000 (SP2), Windows XP (SP1) Home or Pro, Windows Vista
Hardware Setup
Front panel
1. XLR MIC Input : This XLR balanced connector accepts a microphone level signal for Channel
1 of the Audiolink.
2. MIC level control: This control regulates the level of the signal going from the MIC input.
3. GUITAR/MIC Input : This 1/4“-IN connector accepts an instrument or microphone level signal
for Channel 2 of the Audiolink.
4. GUITAR/MIC level control: This control regulates the level of the signal going from the
GUITAR/MIC input.
5.Headphone output level control: This control regulates the level of the output signal to the
headphone.
6. Power Indicator: This LED indicator lights when the Audiolink is receiving power through its
USB port.
Rear panel
7. Headphone Output Jack: This 1/4” stereo jack plays back outputs 1 and 2 through the Left and
Right sides of your headphones.
8. RCA input 1 and 2: These RCA input accepts the line level stereo signal. If you are recording a
stereo line-level source, plug the left channel into LINE Input 1 and the right channel into LINE
Input 2.
9. Input select : Switch to select between MIC/INST or LINE input.
10. RCA Output 1 and 2 : These unbalanced RCA outputs the signal which is from your computer
and should be connected to a pair of powered speakers, a mixer or a stereo amplifier.
12. USB Jack: This jack connects the Audiolink to your computer, using a USB 1.1 (or higher)
connection.
Connection and operating devices:
The product case is printed with all relevant information! There is one XLR Mic socket and one
MIC/INSTR. socket with adjustment switches for the input levels next to them. On the front right
side you can find the headphone level control. On the opposite side there is the headphone out, and
4 Phono (RCA) sockets for the Input and Output. Connect the LINE out sockets with a regular
Phono (RCA) cable to an amplifier. All outputs, the LINE out and the headphone out, all provide
the same mix.
USB Connection
The Audiolink communicates with your computer through a USB port. It is also powered by the
same USB connection. Because of this, we recommend that you plug the Audiolink into one of the
built-in USB ports on your computer, not through a keyboard connection or USB hub.
To connect your Audiolink, locate an unused USB port on your computer and connect it to the
Audiolink jack with the included USB cable.Often computers USB jacks will are located on a rear
panel and will probably be marked with a USB symbol. With Windows XP & Vista, the Audiolink
is class-compliant, making driver installation optional — to begin using the Audiolink, you may
simply plug the unit into a USB port . However, choosing to install the driver will allow the
following added functions:
Windows XP and Vista - Device Control Panel and ASIO support with low-latency drivers
Connecting the Audiolink to your computer
Connecting the Audiolink to a computer is very easy! Simply connect your Audiolink, with the

4
included USB cable, to a free USB port on your computer. When the Audiolink is attached the red
POWER LED lights up briefly to signal a good power supply to the Audiolink. The installation
under Windows will then take place automatically, a few seconds after connecting to your
computer-system it will find a "USB Audio Codec" or "USB Audio Device", which can be used in
each application and adjusted in the system control. Using the USB connection your digitized audio
data can now be transferred to your computer!
MIC and MIC/Instrument inputs
Connect your Microphone on input 1 or your electric guitar on input 2 or both together! If you use a
Microphone, which needs phantom power you find the phantom power switch on the rear panel of
the Audiolink. You can adjust the input levels of Microphone 1 and Instrument 2 independently
with the two Input level controls adjacent to the input sockets.
LINE input
Connect your Player device to the two RCA sockets marked „LINE input“ on the rear panel of the
Audiolink, the right channel is a red socket and the left channel is white. You can connect any
devices with a LINE level output, e.g. Tape deck or CD players.
LINE-Output (Stereo RCA Jacks)
Connect your amplifier to these outputs for monitor recordings or sounds from the computer.
Headphone-Output (Stereo Jack 6,3 mm)
Connect a headphone to this output to monitor recordings or sounds from the computer.
SOFTWARE INSTALLATION
Windows XP/VISTA
Follow these instructions to install the ASIO2ks ASIO drivers on a Windows XP/VISTA computer.
1. First connect the Audiolink Pro to your computer using the supplied USB cable, turn it on.
2. Windows will detect the new USB device and install the USB audio device automatically.
3. Insert the Software/Manual Installation CD into your CD-ROM drive. Find the asio2ks.cpl in the
AudioLink Pro series driver directory.
4. Copy asio2ks.cpl into your System32 folder.
5. Go to Control Panel, double-click ASIO2KS and make your settings.
8. Your Miditech Audiolink Pro is now ready to use.

5
Control Panel Setup
Once setup is complete, you can control most aspects of the Audiolink Pro using its control
panel.To launch the control panel in your operating system, check the following instructions:
The control panel has the following sets of controls:
Configuration:
Device: Please chose the Audiolink Pro USB audio device.
Output: the 2 channel output of Audiolink Pro.
Format: you can set your Audiolink Pro playback sampling rate from 16bit/44.1kHz~24bit/96kHz.
Input: the 2 channel input of Audiolink Pro.
Format: you can set your Audiolink Pro input sampling rate from 16bit/44.1kHz~24bit/96kHz.
Latency setting: shorter latency time will require more CPU resources, 4~11msec for an average
PC. If you hear interference noise such as a “POP…”, increase latency to higher setting such as
8~20msec.
References to the driver attitude under Windows audio sequencer programs such as Cubase,
sonar or Samplitude:
The Audiolink Pro runs under hard disk recording programs in "Full Duplex Mode" (simultaneous
admission and rendition) but usually only with ASIO Multimedia drivers, the Windows WDM
driver only permits one direction (admission or rendition) at the same time. We recommend that you
download the Audiolink Pro ASIO2ks ASIO driver from our homepage www.miditech.de, or copy
it from the installation CD-ROM. The ASIO2ks driver makes it possible to use monitoring- and full
duplex- modes. Additionally, the latency time of the audio signal will be substantially reduced.
Hard disk-recording software "Magix Samplitude SE"
The bundled software, which is shipped with the Audiolink Pro, is special software for multiple
hard disk recording, cutting and editing recorded music and speech.
Regarding the driver set-up in "Samplitude SE"

6
To set-up the drivers for Audiolink Pro in "Samplitude SE", click the menus "options" and "system
options" in the „audio set-up“. If you have installed the ASIO2ks driver, you can adjust this here as
a "record and play“ device - please choose the ASIO2ks driver for Audiolink Pro. Below this the
actual latency time will be displayed after selecting the driver, also, by clicking the button
„Attitudes“ you can adjust the buffer size and the latency time of the driver itself. The latency time
is system-dependent and is different in various personal computers. Choose a value as low as
possible, if you adjust too low you hear interference noises, set the buffer and latency time of the
driver just above the noise threshold.
We hope you get a lot of enjoyment from this exciting program! After installation and activation via
www.magix.de this version is fully functioning.
Further information on extensions, updates and other products from Miditech please check out our
homepage http://www.miditech.de!
Changes of the technical data and the design are possible
No liability is assumed for misprints
Table of contents
Other Miditech Accessories manuals
Popular Accessories manuals by other brands

Minebea Intec
Minebea Intec Maxxis 5 Count PR 5900/82 operating instructions

ECO Sensors
ECO Sensors C-21 Instructions for use

First Alert
First Alert SFA200 user manual

COOK Medical
COOK Medical MINC K-MINC-1000 user manual

SkyBound
SkyBound 2 ARCH TRAMPOLINE NET Assembly and installation manual

Festo
Festo SFAH Instructions & Operating