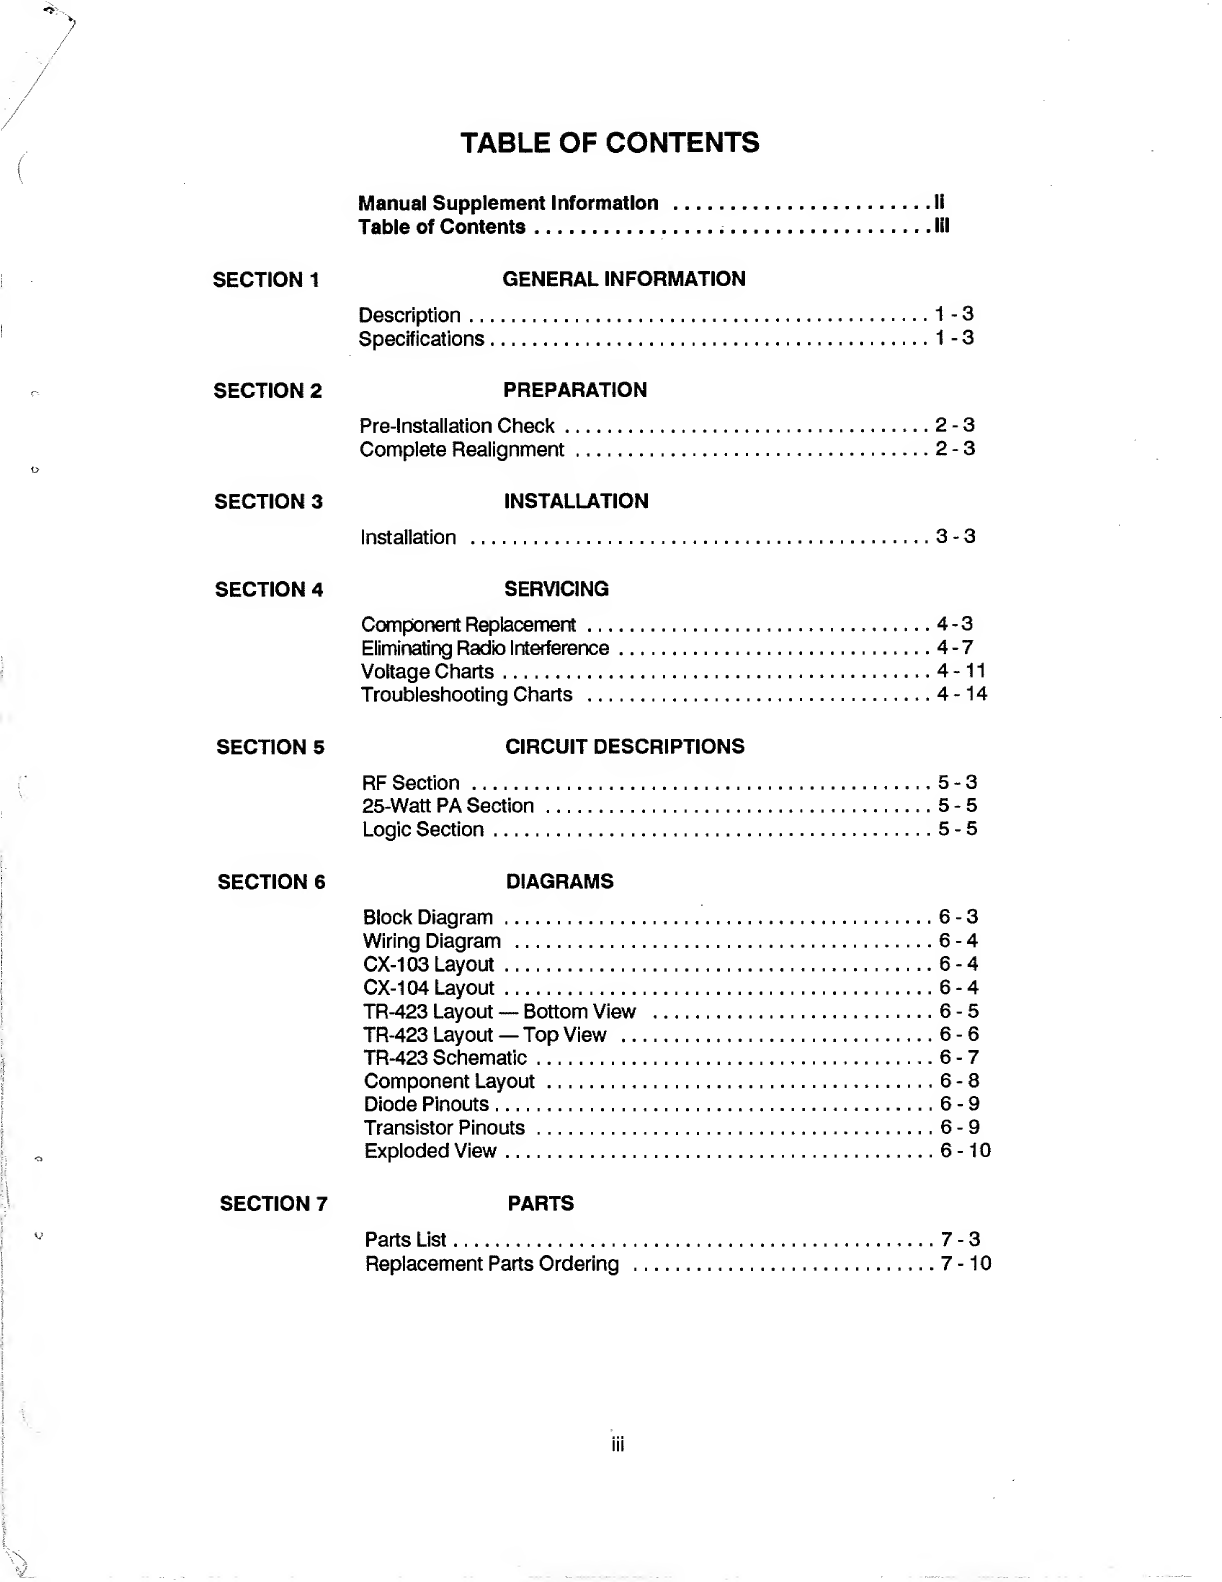
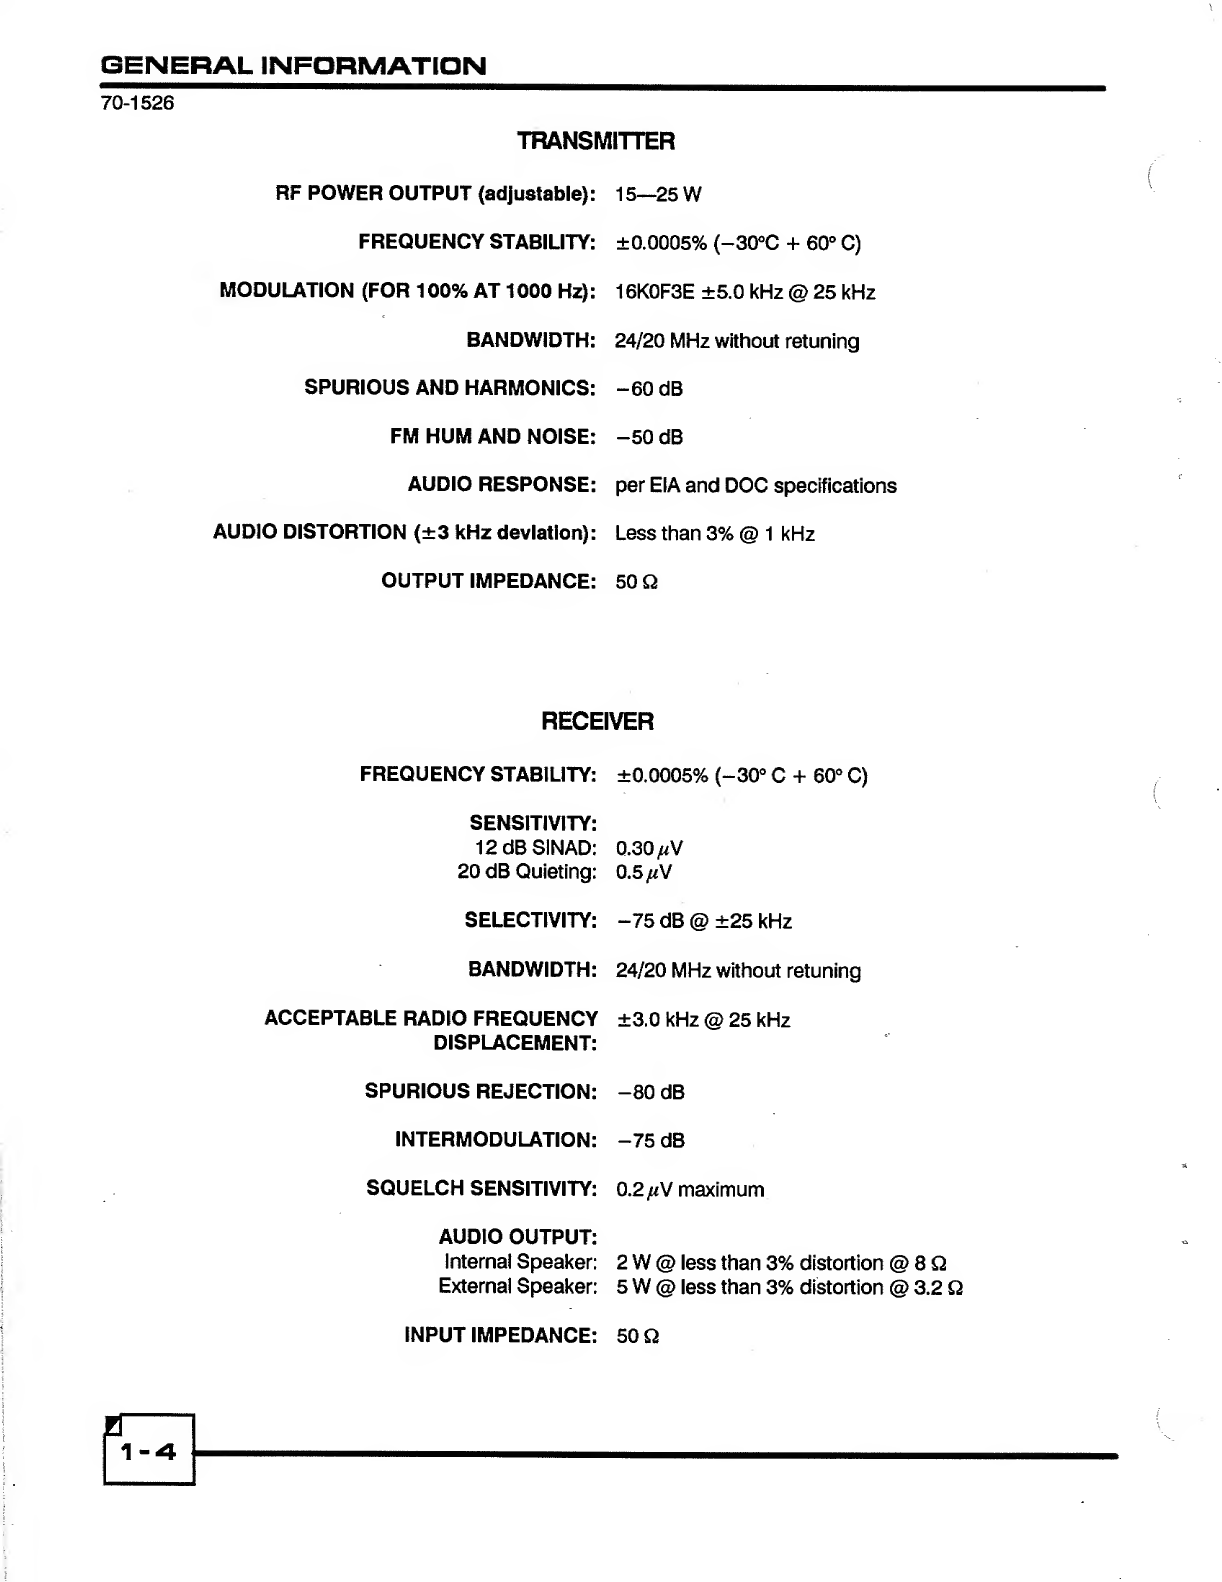
Midland 70-1526A User manual

441
DLAN
D
LAND
MOBILE
RADIO
SERVICE
MANUAL
MOBILE
TRANSCEIVER
UHF
BAND
[406
-
430
MHz,
450
-
470
MHz)
15-25
WATT
MANUAL
NO.:
70-152600
09-1526-SM-4/91-2M

This
manual
section
is
designed
to
facilitate
the
set-up
and
service
of
the
Midland
70-1526
transceivers.
As
necessary,
service
maual
supplements
will
be
published
and
distributed
on
the
following
forms:
Manual
Addition
(MA)
.For
supplemental
information
useful
in
product
service
or
improvement.
Printed
on
BLUE
paper.
Change
Notice
(CN).For
details
about
changes
made
during
production
by
model
and
serial
number.
Printed
on
YELLOW
paper.
Manual
Correction
(MC).For
correcting
literature
errors
not
related
to
production
changes.
Printed
on
GREEN
paper.
Technical
Bulletin
(TB)
.......
For
solutions
to
field
problems
and
tips
for
performance
improvement.
Printed
on
PINK
paper.
Comments
or
suggestions
concerning
areas
of
manual
improvement
are
welcome.
ii

TABLE
OF
CONTENTS
Manual
Supplement
Information.......
.11
Table
of
Contents
......
lil
SECTION
1
GENERAL
INFORMATION
Description...1-3
Specifications.....1-3
SECTION
2
PREPARATION
Pre-Installation
Check.2-3
Complete
Realignment.
2
-
3
SECTION
3
INSTALLATION
Installation
..3-3
SECTION
4
SERVICING
Component
Replacement.......4-3
Eliminating
Radio
Interference
.....
4
-
7
Voltage
Charts.
.
4
-
1
1
Troubleshooting
Charts
........
4
-14
SECTION
5
CIRCUIT
DESCRIPTIONS
RF
Section
.5-3
25-Watt
PA
Section...5-5
Logic
Section.5-5
SECTION
6
DIAGRAMS
Block
Diagram...6-3
Wiring
Diagram
.6-4
CX-103
Layout.....6-4
CX-104
Layout....
6
-
4
TR-423
Layout
—
Bottom
View
...6-5
TR-423
Layout
—
Top
View
.6-6
TR-423
Schematic...6-7
Component
Layout.
,
6
-
8
Diode
Pinouts......
6
-
9
Transistor
Pinouts.......6-9
Exploded
View.
6
-
1
0
SECTION
7
PARTS
Parts
List....7-3
Replacement
Parts
Ordering
...
7
-
1
0


SECTION
1
—
General
Information
SECTION
2
—
Preparation
SECTION
3
—
installation
SECTION
4
—
Servicing
SECTION
5
—
Circuit
Descriptions
SECTION
6
—
Diagrams
SECTION
7
—
Parts


GENERAL
INFORMATION
70-1526
NOTES

_
GENERAL
INFORMATION
70-1526
DESCRIPTION
The
70-1526
Midland
8-Channel
Wide
Band
transceivers
are
programmable
frequency-synthesized
two-
way
FM
mobile
radios
that
operate
in
the
UHF
frequency
range.
They
are
programmable
for
up
to
eight
channels.
The
70-1526
is
designed
to
operate
within
either
of
two
frequency
ranges:
406—430
MHz
(A-Band),
or
450—470
MHz
(B-Band).
Transmit
RF
power
is
adjustable
for
15—25
Watts.
SPECIFICATIONS
Refer
to
EIA-152-C,
EIA/TIA-204-D,
EIA-220-B,
and
DOC
RSS-119
for
standard
of
performance
and
method
of
measurement.
GENERAL
OPERATING
FREQUENCY
RANGE:
A-Band:
406^430
MHz
B-Band:
450—470
MHz
CHANNEL
SEPARATION:
24
MHz
CHANNEL
SPACING:
25
kHz
CHANNEL
STEPPING:
12.5
kHz/5
kHz
optional
CHANNEL
CAPACITY:
Programmable
for
up
to
eight
channels
POWER
SUPPLY:
13.6
V
DC
negative
to
ground
CURRENT
DRAIN:
Transmit
(at
25
W):
10.0
A
Receive
(@
rated
audio):
2.0
A
Standby
(std,
varies
with
options):
400
mA
OPERATING
TEMPERATURE:
-30°
C
+
60°
C
DIMENSIONS
(H
xWxD):
2x7x87/
8
i
n
(50x
178x225mm)
WEIGHT:
2.5
kg

GENERAL
INFORMATION
70-1526
TRANSMITTER
RF
POWER
OUTPUT
(adjustable):
FREQUENCY
STABILITY:
MODULATION
(FOR
100%
AT
1000
Hz):
BANDWIDTH:
SPURIOUS
AND
HARMONICS:
FM
HUM
AND
NOISE:
AUDIO
RESPONSE:
AUDIO
DISTORTION
(±3
kHz
deviation):
OUTPUT
IMPEDANCE:
15—25
W
±0.0005%
(—30°C
+
60°
C)
16K0F3E
±5.0
kHz
@
25
kHz
24/20
MHz
without
retuning
-60
dB
-50
dB
per
EIA
and
DOC
specifications
Less
than
3%
@
1
kHz
50
Q
RECEIVER
FREQUENCY
STABILITY:
SENSITIVITY:
12
dB
SINAD:
20
dB
Quieting:
SELECTIVITY:
BANDWIDTH:
ACCEPTABLE
RADIO
FREQUENCY
DISPLACEMENT:
SPURIOUS
REJECTION:
INTERMODULATION:
SQUELCH
SENSITIVITY:
AUDIO
OUTPUT:
Internal
Speaker:
External
Speaker:
±0.0005%
(-30°
C
+
60°
C)
0.30
fiV
0.5/fV
-75
dB
@
±25
kHz
24/20
MHz
without
retuning
±3.0
kHz
@
25
kHz
-80
dB
-75
dB
0.2/A/
maximum
2
W
@
less
than
3%
distortion
@
8
Q
5W@
less
than
3%
distortion
@
3.2
Q
INPUT
IMPEDANCE:
50
Q

GENERAL
INFORMATION
70-1526
CTCSS/DCS
OPERATING
TEMPERATURE
RANGE:
-30°
C
—
+60°
C
CTCSS
TONES:
All
EIA
tones
from
67.0
Hz
to
250.3
Hz,
plus
97.4
Hz
DCS
CODES:
All
codes
from
000
to
777,
normal
and
invert
ENCODE
TONE/DCS
MODULATION
LEVEL:
500
Hz
—1000
Hz
deviation
ENCODER
RESPONSE
TIME:
CTCSS/DCS
50
ms
max
ENCODER
TONE
DISTORTION
(67
Hz—250.3):
3%
max
TONE/SQUELCH
OPENING
SINAD:
8
dB
max
HUM
AND
NOISE:
32
dB
DECODER
RESPONSE
TIME:
CTCSS:
200
ms
max
(for
tones
above
100
Hz)
DCS:
324
ms
max
—
Specifications
subject
to
change
without
notice
—
—H
-5

GENERAL
INFORMATION
70-1526
NOTES


PREPARATION
70-1526
NOTES

PREPARATION
70-1526
PRE-INSTALLATION
CHECK
The
70-1526
TX/RX
Units
are
capable
of
operating
across
a20/24
MHz
frequency
spread
and
do
not
require
optimizing
alignment,
even
when
reprogrammed
with
new
customer
frequencies.
Only
genera!
transmitter/receiver
performance
should
be
checked.
Complete
realignment
may
be
necessary
after
a
component
that
affects
transceiver
tuning
has
been
replaced.
Either
the
70-1080A
Programmer
or
70-1489
PC
Programming
software
(with
70-1308A
programming
interface)
may
be
used.
SET-UP
1.
Remove
the
PWR/VOL
knob.
Using
a
flat
blade
screwdriver,
carefully
pry
the
unit
cover
outward
at
the
slots
marked
"RELEASE"
near
the
rear
of
each
side.
Lift
the
cover
from
the
chasis,
starting
at
the
back.
2.
Connect
a
resistive,
50-Q
RF
load
(with
a
wattmeter)
to
Antenna
Connector
J501.
Con¬
nect
13.6
V
DC
power
to
J415.
Turn
the
radio
on,
turn
MON
on,
and
turn
selective
signaling
options
off.
CARRIER
FREQUENCY
1.
Initiate
transmit
on
any
channel.
Measure
transmitted
RF
carrier
frequency
without
modulation
and,
if
needed,
set
carrier
fre¬
quency
to
within
±400
Hz
of
channel
fre¬
quency
using
the
programmer
(either
the
70-1080A
programmer
or
70-1489
software).
2.
Initiate
transmit
on
any
channel.
Measure
power
of
RF
output
at
50-Q
Antenna
Connec¬
tor
J501.
Adjust
RV402
to
obtain
25
W
RF
output
power.
MAXIMUM
DEVIATION
1.
Select
a
channel
with
a
transmit
frequency
of
406
MHz
for
A-Band,
or
450
MHz
for
B-Band.
If
CTCSS
or
DCS
is
used,
be
sure
this
channel
is
programmed
to
send
the
same.
2.
Disconnect
the
hand
microphone
from
its
front
panel
receptacle
J301.
Apply
3
Vrms
of
1000
Hz
signal
to
pin
1
of
Mic
Jack
J301,
then
initiate
transmit
by
grounding
pin
4.
Make
sure
total
carrier
deviation
is
below
±5
kHz
(includ¬
ing
CTCSS/DCS
signal),
if
adjustment
is
needed,
see
MODULATOR
ALIGNMENT
on
page
2
-
4.
COMPLETE
REALIGNMENT
Complete
realignment
is
needed
only
if
a
component
that
affects
alignment
has
been
replaced
RADIO
REPROGRAMMING
WITH
TEST
FREQUENCIES
IS
REQUIRED.
SET-UP
1.
Remove
the
PWR/VOL
knob.
Using
a
flat
blade
screwdriver,
carefully
pry
the
unit
cover
outward
at
the
slots
marked
"RELEASE*
near
the
rear
of
each
side.
Lift
the
cover
from
the
chasis,
starting
at
the
back.
2.
Connect
a
resistive
50-Q
RF
load
and
watt¬
meter
to
Antenna
Connector
J501.
Connect
13.6
V
DC
power
to
transceiver
J415.
3.
Connect
a
3.2-Q,
20-W
resistor
to
pins
4
and
6
of
the
Accessory
Plug.
The
jumper
between
pins
5
and
6
must
be
temporarily
removed
to
make
this
connection.
The
resistor
serves
as
a
constant
load
to
replace
the
speaker’s
in¬
consistencies.
CAUTION:
Both
speaker
terminals
are
LIVE.
Never
ground
either
one.
Connect
grounded
receive-
audio
measuring
equipment
to
only
one
side
of
the
speaker,
and
chassis
ground.
Normally,
voltage
measurement
will
be
half
of
true
values.
4.
Turn
the
radio
on,
set
the
VOLUME
control
to
a
mid-position.
5.
Connect
the
programmer
(the
70-1080A
or
70-1308A
interface)
to
Programming
Port
J402.
Upload
the
radio
programming
Data-
Packet
into
the
Programmer
and
initiate
its
Remote
Control
Mode.
Refer
to
the
appropri¬
ate
manual
for
details.

PREPARATION
70-1526
SYNTHESIZER
ALIGNMENT
•
VCO
Resonance
1.
Select
the
Remote-Control
mode
of
the
pro¬
grammer.
For
A-Band
models,
enter
a
test
frequencies
of
406.00
MHz
for
both
RX
and
TX.
For
B-Band
models,
enter
a
test
frequency
of
450.00
MHz.
2.
Adjust
Channel
RX
Tank
L713
for
1.5
V
DC
at
CM701
pin
2
(VCO
steering).
3.
Activate
transmit
mode
(using
the
program¬
mer)
and
adjust
transmitter
VCO
L733
for
1.5
V
DC
at
CM701
pin
2.
•
Reference
Oscillator
4.
I
n
i
tiate
transmit
on
any
channel.
Measure
transmitted
RF
carrier
frequency
without
modulation
and,
if
needed,
adjust
the
carrier
frequency
and
bring
the
radio
to
within
±400
Hz
of
operating
frequency.
25
W
PA
SECTION
AUGNMENT
1.
Change
the
TX
test
frequency
to
the
desired
frequency.
2.
Activate
transmit
mode,
then
adjust
CV501
to
obtain
maximum
RF
power
at
Antenna
Con¬
nector
J501.
3.
Set
RF
output
power
to
25
W
using
RV402.
MODULATOR
AUGNMENT
•
Modulation
Limiting
1.
Disconnect
the
hand
microphone
from
its
front
panel
receptacle
J301.
Apply
3
Vrms
of
1000
Hz
signal
to
pin
1
of
Mic
Jack
J301,
then
initiate
transmit
(if
not
using
a
programmer,
ground
J301
pin
4).
2.
Measure
total
carrier
deviation
and,
if
needed
adjust
modulation
limiting
to
obtain
±5
kHz
using
RV403.
•
Microphone
Gain
3.
No
alignment
for
Microphone
gain
is
required.
•
CTCSS/DCS
4.
Remove
the
1
kHz
audio
signal
from
external
mic
jack.
5.
Add
DCS
code
+023
to
the
transmit
test
mode
testing
frequency
in
the
programmer.
6.
Adjust
RV1
for
750
Hz
±
10
Hz
deviation.
7.
Adjust
RV401
so
that
modulation
waveform
from
modulation
analyzer
matches
the
correct
waveform
shown
in
Figure
2-1.
8.
Change
the
transmit
test
code
in
the
program¬
mer
to
250.3
Hz
CTCSS
tone.
Carefully
adjust
RV401
for
750
Hz
±10
Hz
deviation.
9.
Change
the
transmit
test
code
in
the
program¬
mer
to
67.0
Hz
CTCSS
tone.
Carefully
adjust
RV1
for
750
Hz
±10
Hz
deviation.
n
u
INCORRECT
Figure
2-1
—
Modulation
Waveforms

PREPARATION
RECEIVER
1.
Change
the
RX
test
frequency
to
418
MHz
for
A-Band
radios,
or
460
MHz
for
B-Band.
•
First
injection
2.
No
adjustment
for
the
first
injection
is
needed.
•
Preselector
Alignment
3.
No
adjustment
for
the
preselector
(L201,
L202,
L203,
L204,
L205,
L206
and
L207)
is
required.
•
Quadrature
Detector
4.
Apply
1
mV
of
modulated
(by
1
kHz
tone
at
±3
kHz
deviation)
on-channel
RF
signal
to
Antenna
Jack
J501.
Adjust
Detector
L250
for
maximum
audio
output.
70-1526
•
First
i.F.
5.
Apply
enough
modulated
(by
1
kHz
tone
at
±3
kHz
deviation)
on-channel
carrier
to
main¬
tain
12
to
15
dB
SINAD.
Adjust
L245—L247
for
best
SINAD.
•
Squelch
6.
Set
the
left
side
Squelch
switch
on.
Set
Squelch
Range
RV241
fully
clockwise.
7.
Apply
0.2
[N
of
unmodulated
on-channel
RF
signal
to
the
50
Q
antenna
connector.
Adjust
Squelch
range
RV241
counter-clockwise
just
until
squelch
opens
(audio
on).
Table
2-1
—
Required
Test
Equipment
TEST
INSTRUMENT
INSTRUMENT
CAPABILITIES
USE
Regulated
DC
Power
Supply
13.6
V
DC,
10
A
adjustable
voltage
Radio
power
source
RF
Wattmeter
for
70-1526
50
W,
406—470
MHz
50-Q
circuit
Transmitter
power
measurements
RF
Load
Resistor
50-Q;
50
W
Antenna
dummy
load
Frequency
Modulation
Meter
406—470
MHz;
peak
-
responding,
±5
kHz
range
Modulation
level
measurements
Frequency
Meter
or
Frequency
Counter
406—470
MHz
1.0
ppm
accuracy
Carrier
frequency
measurements
Audio
Generator
1000
kHz
sine-wave;
0—4
Vmis
output
Modulation
level
measurements
RF
Signal
Generator
406—470
MHz
range;
0.1—1
lyrV
output;
±3
kHz
FM
mod.
with
1
kHz
tone
All
receiver
measurements
Distortion
Analyzer
1
kHz
notch;
1%
measuring
range
Receiver
performance
test
and
IF
alignment
Load
Resistor
(audio)
3.2-Q,
20
W
Speaker
load
for
ail
receiver
measurements
AC
Voltmeter
10
rnVtolOVrms
Audio
level
adjustments
Oscilloscope
DC
to
500
kHz
bandwidth
Digital
Multimeter
0.1
to
20
V
DC
Test
point
measurements
and
powe.r
p.piy.
.set-up
70-1080A
Programmer,
or
70-1489
PC
Programming
software
and
70-1308A
PC
Programming
interface
Manual
radio
control

PREPARATION
CV501
L247
L246
L245
□
□
□
□
o
L248
M
RV401
RV241
RV403
RV402


INSTALLATION
70-1526
NOTES
This manual suits for next models
1
Table of contents
Other Midland Radio manuals

Midland
Midland Titan Series User manual

Midland
Midland ER250BT Manual

Midland
Midland GXT200 User manual

Midland
Midland G18 Manual

Midland
Midland DBR2500 User manual

Midland
Midland 248 User manual

Midland
Midland ALAN 48 EXCEL User manual

Midland
Midland M-88 Manual

Midland
Midland G-220 User manual

Midland
Midland PRO902 User manual

Midland
Midland G7XT Manual

Midland
Midland CT 510 Manual

Midland
Midland 70-050 User manual

Midland
Midland CB-1 User manual

Midland
Midland 77-120ESP User manual

Midland
Midland ALAN 8001S EURO User manual

Midland
Midland DV-2066 Troubleshooting guide

Midland
Midland G-223 User manual

Midland
Midland MXT575 User manual

Midland
Midland 4001 User manual