Midstream Docker Series User manual

INSTALLATION GUIDANCE
Docker Series

2 3
DOCKER SERIES INSTALLATION GUIDANCE midstreamlighting.com +44 (0) 207 584 8310
INSTALLATION INSTRUCTIONS INSTALLATION INSTRUCTIONS
Contents
1. General notes
Equipment list H&S check
Section PAGE
1 General notes 3
2 Safety instructions 3
3 Contents 4
4 Bracket mounting and aiming 5
5 Type S bracket mounting 7
6 Floodlight connection 9
7 Electrical connection 10
8 Electrical specications 12
9 Dimensions 13
This user manual contains important information on safe
operation of the Luminaire.
Read and follow all safety notes and all instructions.
Save this manual for future reference.
Make sure that it is available to all persons using this device.
All wiring should be done by a licensed electrician in
accordance with state codes, local codes, and National
Electric Code (NEC) standards or International Electro
technical Commission (IEC) standards.
The Luminaire is suitable for wet locations.
DO
9Store the Luminaire with care, avoiding placing the lenses
to the ground which may scratch or damage them.
9To avoid damaging the Luminaire, keep it in the original
packaging when storing.
9To avoid damaging the Luminaire, keep it in the original
packaging when storing.
DO NOT
8Apply mains voltage through the control system cable.
This will damage the luminaire that will no longer be
covered by warranty.
8Unnecessarily remove the Luminaire from the box
8Leave the LED Luminaire switched on when rested on the
ground with optics facing down.
8Place the Luminaire with the lens on the pavement, dirt
and metal surfaces.
8Clean the lenses with any industrial detergent, but with
water-soaked cloth if needed
Two persons required to
complete the installation
Contains parts and
assemblies susceptible to
damage by electrostatic
discharge (ESD)
The Luminaire should
be positioned so that
prolonged staring into the
luminaire at a distance
closer than 4 m (13 ft) is
not expected
Hard hats, safety
shoes, Hi-Vis vest and
safety gloves must
always be worn
Disconnect the electrical
supply power before
commencing the
installation: failure to do
so could result in serious
injury
The luminaire is not to be
placed face down on any
surface other than the
provided foam pad
The light source of this
appliance must only
be replaced by the
manufacturer, its
after-sales service or
qualied personnel
DO NOT USE A
GENERATOR!
2. Safety instructions
Use the device only as described in this user manual. Any other
use or use under other operating conditions is considered to be
improper and may result in personal injury or property damage
as well as voiding the warranty.
No liability will be assumed for damages resulting from improper
installation. This device may be used only by persons with
sucient physical, sensorial, and intellectual abilities and having
corresponding knowledge and experience.
Note
Prior to start the installation, check the equipment list to be sure of using the correct
tools (the mounting screw(s) and nut(s) are not supplied).
DO NOT USE PERCUSSION DRILLS!
21 mm standard wrench
#6 allen key
#8 allen key
18 mm standard wrench
24 mm standard wrench
30 mm standard wrench
Monkey pliers
Electrician scissors for wires
Slotted manual screwdriver for connector’s screws
(blade dimensions: 3,5(w) x 0,6(t)mm)
Wear safety shoes to protect yourself from material
dropping
Never energize the lamp if wiring operation are not
completed

4 5
DOCKER SERIES INSTALLATION GUIDANCE midstreamlighting.com +44 (0) 207 584 8310
INSTALLATION INSTRUCTIONS INSTALLATION INSTRUCTIONS
USE A2-80 STAINLESS STEEL BOLTS OR
8.8 CLASS STEEL BOLTS WITH HOT DIP
GALVANIZED COATING.
DO NOT USE PERCUSSION DRILLS!
3. Contents 4. Bracket mounting and aiming
Insert screws
Insert each screw with its plain and spring washer through
the hole and the loop of the tting bracket ange and
loosely tighten.
Align the bracket’s central screw hole with desired
mounting surface.
Fitting bracket x1 Set of connectors x1
Safety cable and carabiner hook
1
A
23456 7 8
B
C
D
E
FF
E
D
C
B
A
1 2 3 45 6 7 8
MIDSTREAM
382.1+1.6
0
Thickness 4
176.7 31.6
45°
31.6
45°
326.9
3535
195 195
110 30 30 110
15 23 15
208.3
35
70
11
9
40
R20.49
R29.5
59
90°
1.6 0.83.2
( )
REV. DOCUMENT N° DESCRIPTION ZONE DATE DRAWN CHECKED
This drawing is property of MIDSTREAM LIGHTING LTD. All rights reserved the partial or total reproduction of it is forbidden without express consent.
MIDSTREAM LIGHTING LTD - 1 CHESHAM STREET - LONDON - SW1X 8ND - UNITED KINGDOM - Ph +44 207 584 8310
ST00118P015B0 1/2 1:2
Drawing Number Sheet Scale
STAFFA APPARECCHIO / FITTING BRACKET A2 B0
DESCRIPTION Format Rev.
FG PC MIDSTREAM 18-Jan-19
Drawing by Checked by Date
Approved by 1.5
TREATMENT
Weight Kg
AISI 316
Roughness
MATERIAL
precise 0.05 0.1 0.15 0.2 0.3 0.5 - -
Angles 30°
All materials employed
have to be selected
among RoHS compliant
materials:
the EC directives
to be referred to are
2002/95/EC and
correlated subsequent
ones.
medium X0.1 0.2 0.3 0.5 0.8 1.2 2 3
Shaft h11
coarse 0.2 0.5 0.8 1.2 2 3 4 5
Holes H11
Tolerance class up to
6
over 6
up to 30
over 30
up to120
over 120
up to315
over 315
up to1000
over 1000
up to2000
over 2000
up to4000
over
4000
Lead screws 6H / Screws 6g
ISO Metric Screw
DIMENSIONS WITHOUT TOLERANCE DEGREE:
FINISHING:
POWDER COATING FOR OUTDOOR (POLYESTER)
AVG THICKNESS 80 micron
MATT FINISH - GLOSS 20 +10
COLOUR: BLACK RAL 9005
SHEET THICKNESS: 4 mm
Insert and tighten the central bolt to secure the position of the
bracket. Tightening torque: 250 Nm for M20 bolt, 130 Nm for
M16 bolt, 80 Nm for M12 bolts.
1
A
23456 7 8
B
C
D
E
FF
E
D
C
B
A
1 2 3 45 6 7 8
MIDSTREAM
382.1+1.6
0
Thickness 4
176.7 31.6
45°
31.6
45°
326.9
3535
195 195
110 30 30 110
15 23 15
208.3
35
70
11
9
40
R20.49
R29.5
59
90°
1.6 0.83.2
( )
REV. DOCUMENT N° DESCRIPTION ZONE DATE DRAWN CHECKED
This drawing is property of MIDSTREAM LIGHTING LTD. All rights reserved the partial or total reproduction of it is forbidden without express consent.
MIDSTREAM LIGHTING LTD - 1 CHESHAM STREET - LONDON - SW1X 8ND - UNITED KINGDOM - Ph +44 207 584 8310
ST00118P015B0 1/2 1:2
Drawing Number Sheet Scale
STAFFA APPARECCHIO / FITTING BRACKET A2 B0
DESCRIPTION Format Rev.
FG PC MIDSTREAM 18-Jan-19
Drawing by Checked by Date
Approved by 1.5
TREATMENT
Weight Kg
AISI 316
Roughness
MATERIAL
precise 0.05 0.1 0.15 0.2 0.3 0.5 - -
Angles 30°
All materials employed
have to be selected
among RoHS compliant
materials:
the EC directives
to be referred to are
2002/95/EC and
correlated subsequent
ones.
medium X0.1 0.2 0.3 0.5 0.8 1.2 2 3
Shaft h11
coarse 0.2 0.5 0.8 1.2 2 3 4 5
Holes H11
Tolerance class up to
6
over 6
up to 30
over 30
up to120
over 120
up to315
over 315
up to1000
over 1000
up to2000
over 2000
up to4000
over
4000
Lead screws 6H / Screws 6g
ISO Metric Screw
DIMENSIONS WITHOUT TOLERANCE DEGREE:
FINISHING:
POWDER COATING FOR OUTDOOR (POLYESTER)
AVG THICKNESS 80 micron
MATT FINISH - GLOSS 20 +10
COLOUR: BLACK RAL 9005
SHEET THICKNESS: 4 mm
6 7
DOCKER SERIES INSTALLATION GUIDANCE midstreamlighting.com +44 (0) 207 584 8310
INSTALLATION INSTRUCTIONS INSTALLATION INSTRUCTIONS
1
A
2 3 456 7 8 9 10 11 12
B
C
D
E
F
G
H
1 2 3 4 5 67 8 9 10 11 12
H
G
F
E
D
C
B
A
MIDSTREAM
REV. DOCUMENT N° DESCRIPTION ZONE DATE DRAWN CHECKED
This drawing is property of MIDSTREAM LIGHTING LTD. All rights reserved the partial or total reproduction of it is forbidden without express consent.
MIDSTREAM LIGHTING LTD - 1 CHESHAM STREET - LONDON - SW1X 8ND - UNITED KINGDOM - Ph +44 207 584 8310
Drawing Number VITE_TCEI_M10X25 27-Jan-21
VITE TCEI UNI5931 M12X75 INOX A2
Docker 300 UL - swaying bracket Date
3:1 3/3
Description Scale Sheet
FG PC MIDSTREAM 13.5 Kg 0
Drawing by Checked by Approved by Weight Rev.
Slightly loosen the screws to easily orient the bracket (±90° with
respect to the vertical). When the luminaire is tilted as required,
tighten the screws.
When the LED Luminaire installation has been completed, insert
the safety cable through the side plate. Connect the safety
cable to the holding frame with the supplied carabiner hook.
M10 screws: 25 Nm
M8 screws: 15 Nm
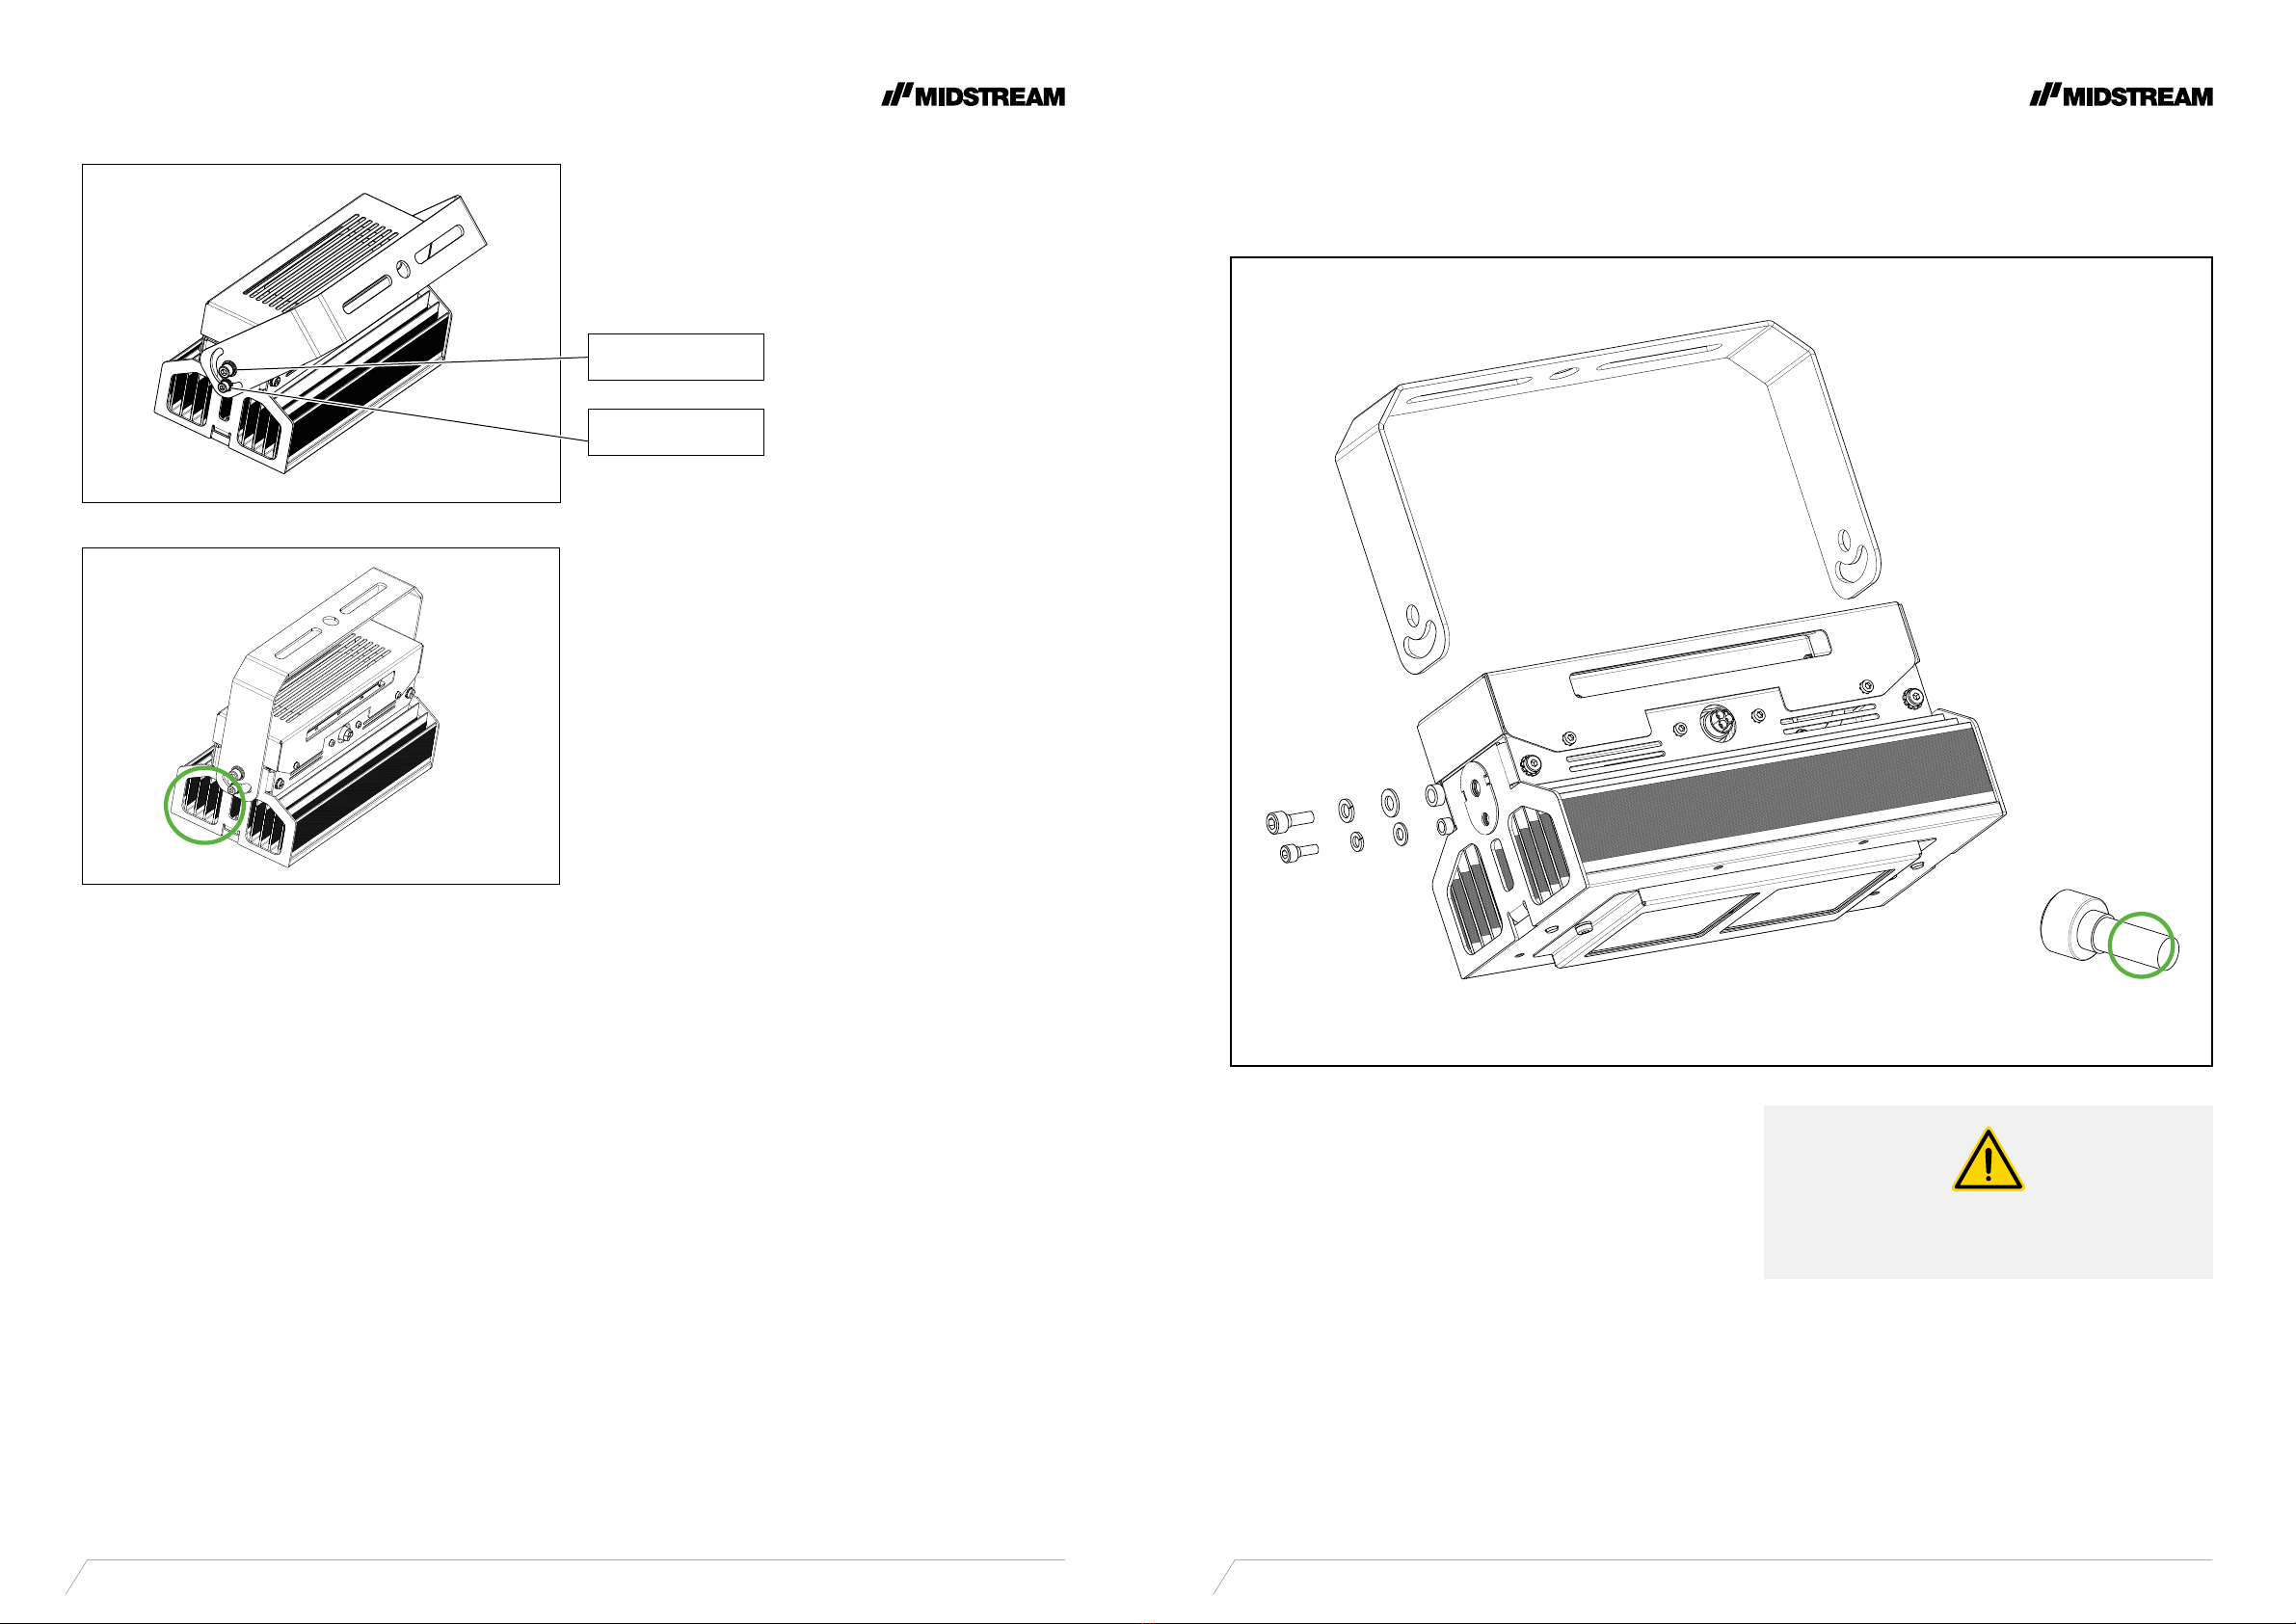
5. Type S bracket mounting
1
A
2 3 456 7 8 9 10 11 12
B
C
D
E
F
G
H
1 2 3 4 5 67 8 9 10 11 12
H
G
F
E
D
C
B
A
MIDSTREAM
REV. DOCUMENT N° DESCRIPTION ZONE DATE DRAWN CHECKED
This drawing is property of MIDSTREAM LIGHTING LTD. All rights reserved the partial or total reproduction of it is forbidden without express consent.
MIDSTREAM LIGHTING LTD - 1 CHESHAM STREET - LONDON - SW1X 8ND - UNITED KINGDOM - Ph +44 207 584 8310
Drawing Number ST00118P06300 27-Jan-21
bushing 10x16x7 mm
Docker 300 UL - swaying bracket Date
7:1 2/2
Description Scale Sheet
FG PC MIDSTREAM 13.5 Kg 0
Drawing by Checked by Approved by Weight Rev.
Remove the side screws that hold the bushings in place
and mount the bracket, inserting the bushings inside their
proper seats.
1
A
2 3 456 7 8 9 10 11 12
B
C
D
E
F
G
H
1 2 3 4 5 67 8 9 10 11 12
H
G
F
E
D
C
B
A
MIDSTREAM
REV. DOCUMENT N° DESCRIPTION ZONE DATE DRAWN CHECKED
This drawing is property of MIDSTREAM LIGHTING LTD. All rights reserved the partial or total reproduction of it is forbidden without express consent.
MIDSTREAM LIGHTING LTD - 1 CHESHAM STREET - LONDON - SW1X 8ND - UNITED KINGDOM - Ph +44 207 584 8310
Drawing Number ST00118P06300 27-Jan-21
bushing 10x16x7 mm
Docker 300 UL - swaying bracket Date
7:1 2/2
Description Scale Sheet
FG PC MIDSTREAM 13.5 Kg 0
Drawing by Checked by Approved by Weight Rev.
Dispose some thread locker on the bottom
part of the screws

8 9
DOCKER SERIES INSTALLATION GUIDANCE midstreamlighting.com +44 (0) 207 584 8310
INSTALLATION INSTRUCTIONS INSTALLATION INSTRUCTIONS
8
1
A
2 3 456 7 8 9 10 11 12
B
C
D
E
F
G
H
1 2 3 4 5 67 8 9 10 11 12
H
G
F
E
D
C
B
A
MIDSTREAM
REV. DOCUMENT N° DESCRIPTION ZONE DATE DRAWN CHECKED
This drawing is property of MIDSTREAM LIGHTING LTD. All rights reserved the partial or total reproduction of it is forbidden without express consent.
MIDSTREAM LIGHTING LTD - 1 CHESHAM STREET - LONDON - SW1X 8ND - UNITED KINGDOM - Ph +44 207 584 8310
Drawing Number VITE_TCEI_M10X25 27-Jan-21
VITE TCEI UNI5931 M12X75 INOX A2
Docker 300 UL - swaying bracket Date
3:1 3/3
Description Scale Sheet
FG PC MIDSTREAM 13.5Kg 0
Drawing by Checked by Approved by Weight Rev.
Tighten the screws on both sides of the oodlight and check
that the bracket can freely swing without any interference.
When the LED Luminaire installation has been completed, insert
the safety cable through the side plate. Connect the safety
cable to the holding frame with the supplied carabiner hook.
6. Floodlight connection
Control system
1-10 V
2 poles – yellow
(where installed)
Power supply
3 poles - white
Use a main circuit breaker with a rated
current of 10 a at least.
Do not apply mains voltage through the
control system cable.
This will damage the luminaire.
Mains cable
Power connection (not supplied)
Control cable
0-10 V, DALI (not supplied)

10 11
DOCKER SERIES INSTALLATION GUIDANCE midstreamlighting.com +44 (0) 207 584 8310
INSTALLATION INSTRUCTIONS INSTALLATION INSTRUCTIONS
7. Electrical connection
The power supply cable and the control cable are not supplied
V+
V-
SCALE 3:10
SEE DETAIL
A
GROUND
Dim
+
Dim
-
12v
NEUTRAL
Dim
+
Dim
-
12v
LIVE
Dim
+
Dim
-
12v
The connector socket can t a H05RN-F or H07RN-F rubber
cable with 12 mm as maximum outer diameter and 1,5 mm2as
maximum conductor section; the cable must have three wires:
L (live) – N (neutral) – GND (ground).
25mm "Self-piercing"
Tighten the nut using a 21 mm spanner and connect the
socket to the plug on the LED luminaire and tighten the housing
to ensure IP68 protection. Test the luminaire before attaching it
to the nal connection point.
Insert each wire into the socket terminal, matching wire color
with the “L”, “N” and “GND” symbol on the socket and tighten
the screws.
Remove the cable sheath a maximum of 25 mm. The wires do
not need to be stripped because the connector is equipped
with piercing clip terminals.
Insert the cable through the socket housing of the connector.
If the cable diameter is greater than 9 mm, remove the inner
part of the gasket.
Insert the socket into the housing until the inner part “clicks” in
and then insert the gasket.
POWER
3 POLE
CONTROL
2 POLE
CLICK

12 13
DOCKER SERIES INSTALLATION GUIDANCE midstreamlighting.com +44 (0) 207 584 8310
INSTALLATION INSTRUCTIONS INSTALLATION INSTRUCTIONS
12
8. Electrical specifications
Docker 150 Docker 300
Input Voltage 90-305 V AC 90-305 V AC
Input Frequency 50 – 60 Hz 50 – 60 Hz
Absorbed Power 145 W 300 W
Inrush current* 50 A (twidth=0.5 ms) 50 A (twidth=0.5 ms)
Power Factor ≥0.95 ≥0.95
Docker 150 Docker 300
Weight 8 kg 11.5 kg
Windage 0.072 m20.102 m2
* Measured at 50% Ipk at 230 Vac input, 25°C cold start per NEMA 410
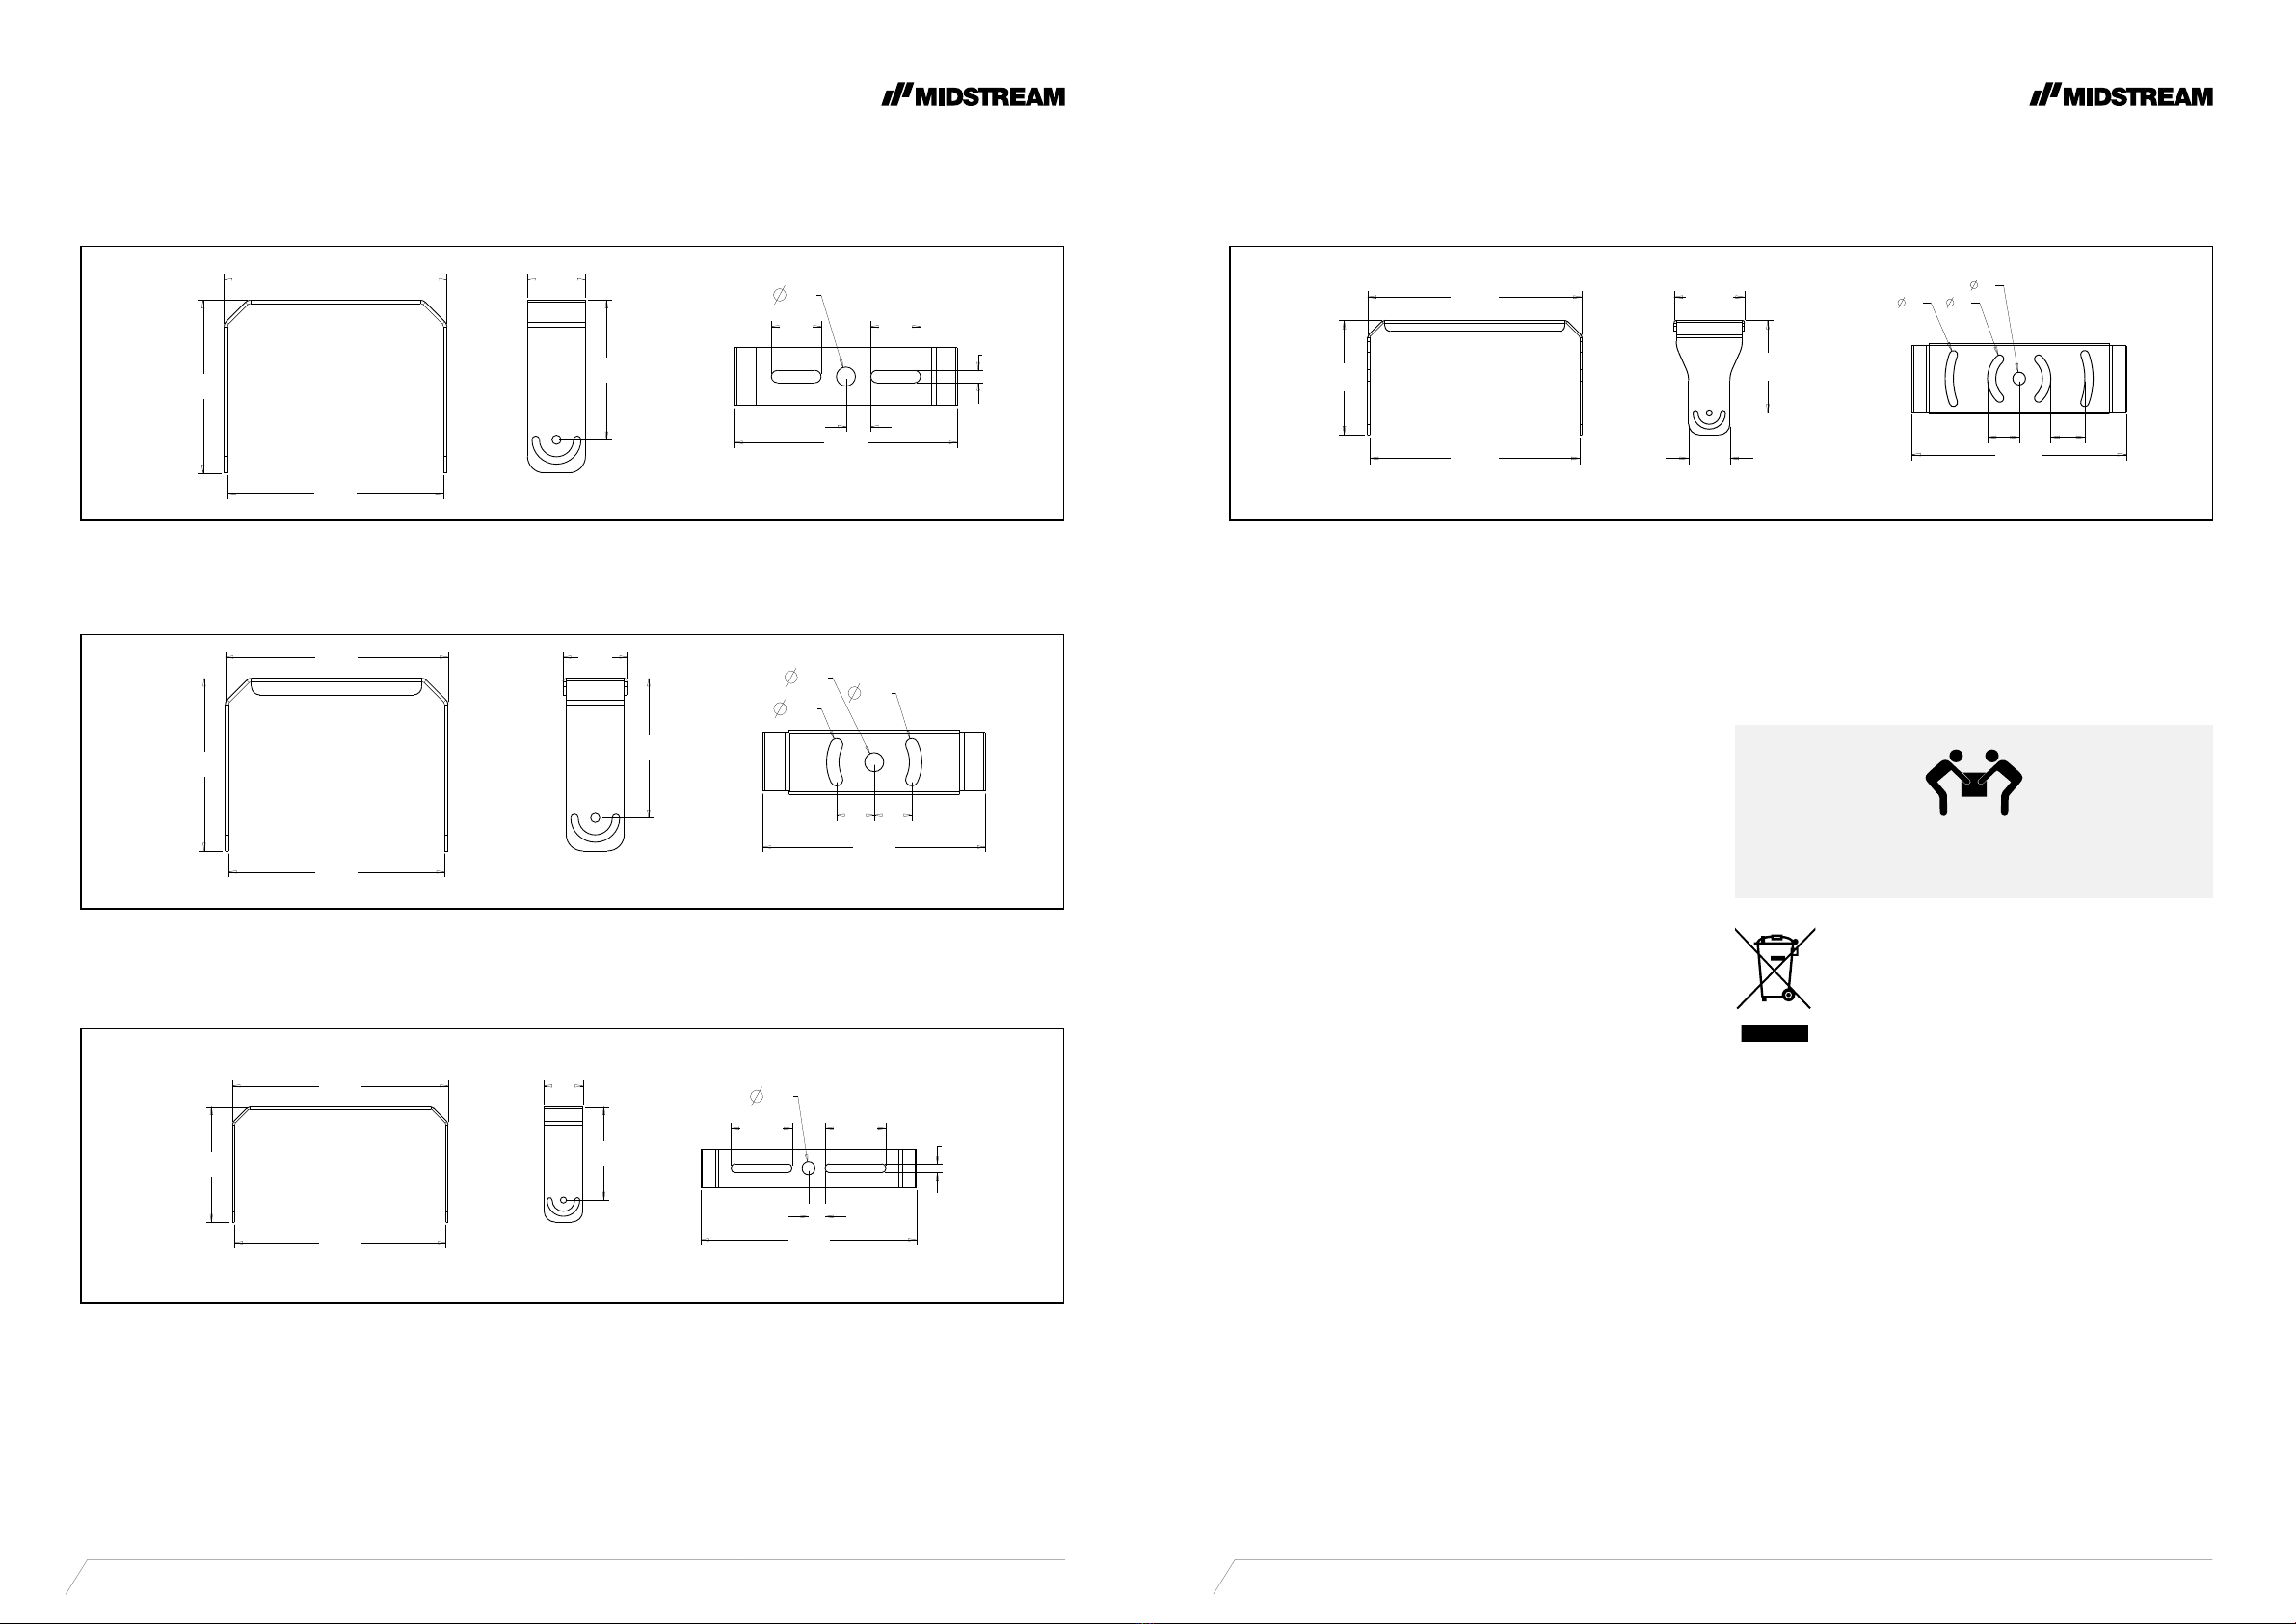
9. Dimensions
269
261
208
70
168
269
23
6060
30
15
269
261
78
269
23
45 45
15
15
382
390
208
70
168
390
15
110110
23
30
382
208
390 128
75
168
390
23
15 15
57.5 62
376
298
201
168
298
255
168
201
269
261
208
70
168
269
23
6060
30
15
269
261
78
269
23
45 45
15
15
382
390
208
70
168
390
15
110110
23
30
382
208
390 128
75
168
390
23
15 15
57.5 62
376
298
201
168
Docker 150
Docker 300
14 15
DOCKER SERIES INSTALLATION GUIDANCE midstreamlighting.com +44 (0) 207 584 8310
INSTALLATION INSTRUCTIONS INSTALLATION INSTRUCTIONS
This device is subject to the European directive 2002/96/EC.
Do not dispose of the device with your normal household waste.
Dispose of this device through an approved waste disposal rm
or through your local waste facility.
When discarding the device, comply with the rules and
regulations that apply in your country.
If in doubt, consult your local waste disposal facility.
20200511 – Information contained in this handbook may be subjected to change without notice
Further information
269
261
208
70
168
269
23
6060
30
15
269
261
208
70
168
269
23
6060
30
15
269
261
78
269
23
45 45
15
15
382
390
208
70
168
390
15
110110
23
30
382
208
390 128
75
168
390
23
15 15
57.5 62
269
261
208
70
168
269
23
6060
30
15
269
261
78
168
208
269
23
45 45
15
15
269
261
208
70
168
269
23
6060
30
15
269
261
78
269
23
45 45
15
15
382
390
208
70
168
390
15
110110
23
30
150 Type A / Type S 300 Type B
150 Type B
300 Type A / Type S
Further information available on our
website www.midstreamlighting.com
Download
This manual is also available as a PDF le for you to download.
Online guides
Our online guides provide detailed information on technical
basics and terms.
Service
If you have any problems with the device our customer service
will gladly assist you.
Two persons required to complete
the installation

2020
For translations, digital versions or more
information please head to
https://www.midstreamlighting.com/installation-guides
European HQ
Midstream Ltd. Wessex House, 1 Chesham Street,
London SW1X 8ND, United Kingdom
Te: +44 207 584 8310
US HQ
Midstream Lighting Ltd. 66 West Flagler Street,
Miami, FL 33130, USA
T: (888) 549-6775
midstreamlighting.com
This manual suits for next models
2
Table of contents
Other Midstream Lighting Equipment manuals


Popular Lighting Equipment manuals by other brands


Columbia Lighting
Columbia Lighting CNW instruction manual

DS Produkte
DS Produkte GA-Y257 instructions

Knightsbridge
Knightsbridge EMSWING Installation & maintenance manual

Knightsbridge
Knightsbridge KIT16 Installation & maintenance manual

Saxby Lighting
Saxby Lighting 43787 Instruction leaflet

Experia
Experia Superactive instruction manual


