Miele KM 402 User manual

Operating instructions
Deep fat fryer
KM 402
It is essential to read these
operating instructions before GiZH
installing or using the machine,
to avoid the risk of accident
or damage to the machine. M.-Nr. 04 930 491

Description of the appliance. . . . . . . . . . . . . . . . . . . . . . . . . . . . . . . . . . . . . . . . . 3
Warning and Safety instructions . . . . . . . . . . . . . . . . . . . . . . . . . . . . . . . . . . . . . 4
Before using for the first time. . . . . . . . . . . . . . . . . . . . . . . . . . . . . . . . . . . . . . . 10
General notes . . . . . . . . . . . . . . . . . . . . . . . . . . . . . . . . . . . . . . . . . . . . . . . . . . . . 10
Disposal of the packing
material . . . . . . . . . . . . . . . . . . . . . . . . . . . . . . . . . . . . . . . . . . . . . . . . . . . . . . . . . 11
Disposal of your old appliance . . . . . . . . . . . . . . . . . . . . . . . . . . . . . . . . . . . . . . . 11
Cleaning and heating up for the first time . . . . . . . . . . . . . . . . . . . . . . . . . . . . . . . 12
Using the fryer . . . . . . . . . . . . . . . . . . . . . . . . . . . . . . . . . . . . . . . . . . . . . . . . . . . 13
Switching on and off . . . . . . . . . . . . . . . . . . . . . . . . . . . . . . . . . . . . . . . . . . . . . . . 13
Before frying . . . . . . . . . . . . . . . . . . . . . . . . . . . . . . . . . . . . . . . . . . . . . . . . . . . . . 13
Frying . . . . . . . . . . . . . . . . . . . . . . . . . . . . . . . . . . . . . . . . . . . . . . . . . . . . . . . . . . . 14
Blanching. . . . . . . . . . . . . . . . . . . . . . . . . . . . . . . . . . . . . . . . . . . . . . . . . . . . . . . . 14
Frying tips . . . . . . . . . . . . . . . . . . . . . . . . . . . . . . . . . . . . . . . . . . . . . . . . . . . . . . . 17
After frying . . . . . . . . . . . . . . . . . . . . . . . . . . . . . . . . . . . . . . . . . . . . . . . . . . . . . . 18
Safety cut-out switch . . . . . . . . . . . . . . . . . . . . . . . . . . . . . . . . . . . . . . . . . . . . . . . 19
Cleaning and care . . . . . . . . . . . . . . . . . . . . . . . . . . . . . . . . . . . . . . . . . . . . . . . . 20
Lid, ceramic surround . . . . . . . . . . . . . . . . . . . . . . . . . . . . . . . . . . . . . . . . . . . . . . 20
Frying reservoir . . . . . . . . . . . . . . . . . . . . . . . . . . . . . . . . . . . . . . . . . . . . . . . . . . . 21
Frying basket . . . . . . . . . . . . . . . . . . . . . . . . . . . . . . . . . . . . . . . . . . . . . . . . . . . . . 21
Problem solving guide. . . . . . . . . . . . . . . . . . . . . . . . . . . . . . . . . . . . . . . . . . . . . 22
Electrical connection. . . . . . . . . . . . . . . . . . . . . . . . . . . . . . . . . . . . . . . . . . . . . . 23
After sales service . . . . . . . . . . . . . . . . . . . . . . . . . . . . . . . . . . . . . . . . . . . . . . . . 25
Data plate . . . . . . . . . . . . . . . . . . . . . . . . . . . . . . . . . . . . . . . . . . . . . . . . . . . . . . . 25
Contents
2

aLid
bFrying basket with:
cHandle (fold-away, removable)
dHanging facility
eBasket hanging support
fHeating element (can be raised up;
rating - 2700 kW)
gTemperature indicator light
hOperating indicator light
iDrain tap
jControl knob
kFrying basket
(capacity: min. 3.0 litres, max. 4.0
litres)
lMains connection cable
mPlug
Depending on country of destination,
the appliance may be supplied with
Description of the appliance
3
b
c
de
g
f
m
n
l
k
i
j
h

or without a plug. The plug shown is
for illustration only.
Description of the appliance
4

This appliance complies with all rele-
vant legal safety requirements. Im-
proper use of the appliance can,
however, present a risk of both per-
sonal injury and material damage.
Before installing and using the appli-
ance for the first time, read the oper-
ating and installation instructions
carefully. They give information on
safety, on the operation and care of
the appliance. This way you will
avoid the risk of accident and dam-
age to the appliance.
Do not let children access the appli-
ance or its controls. Supervise its
use by the elderly or infirm.
Keep these instructions in a safe
place for reference and pass them
on to any future user.
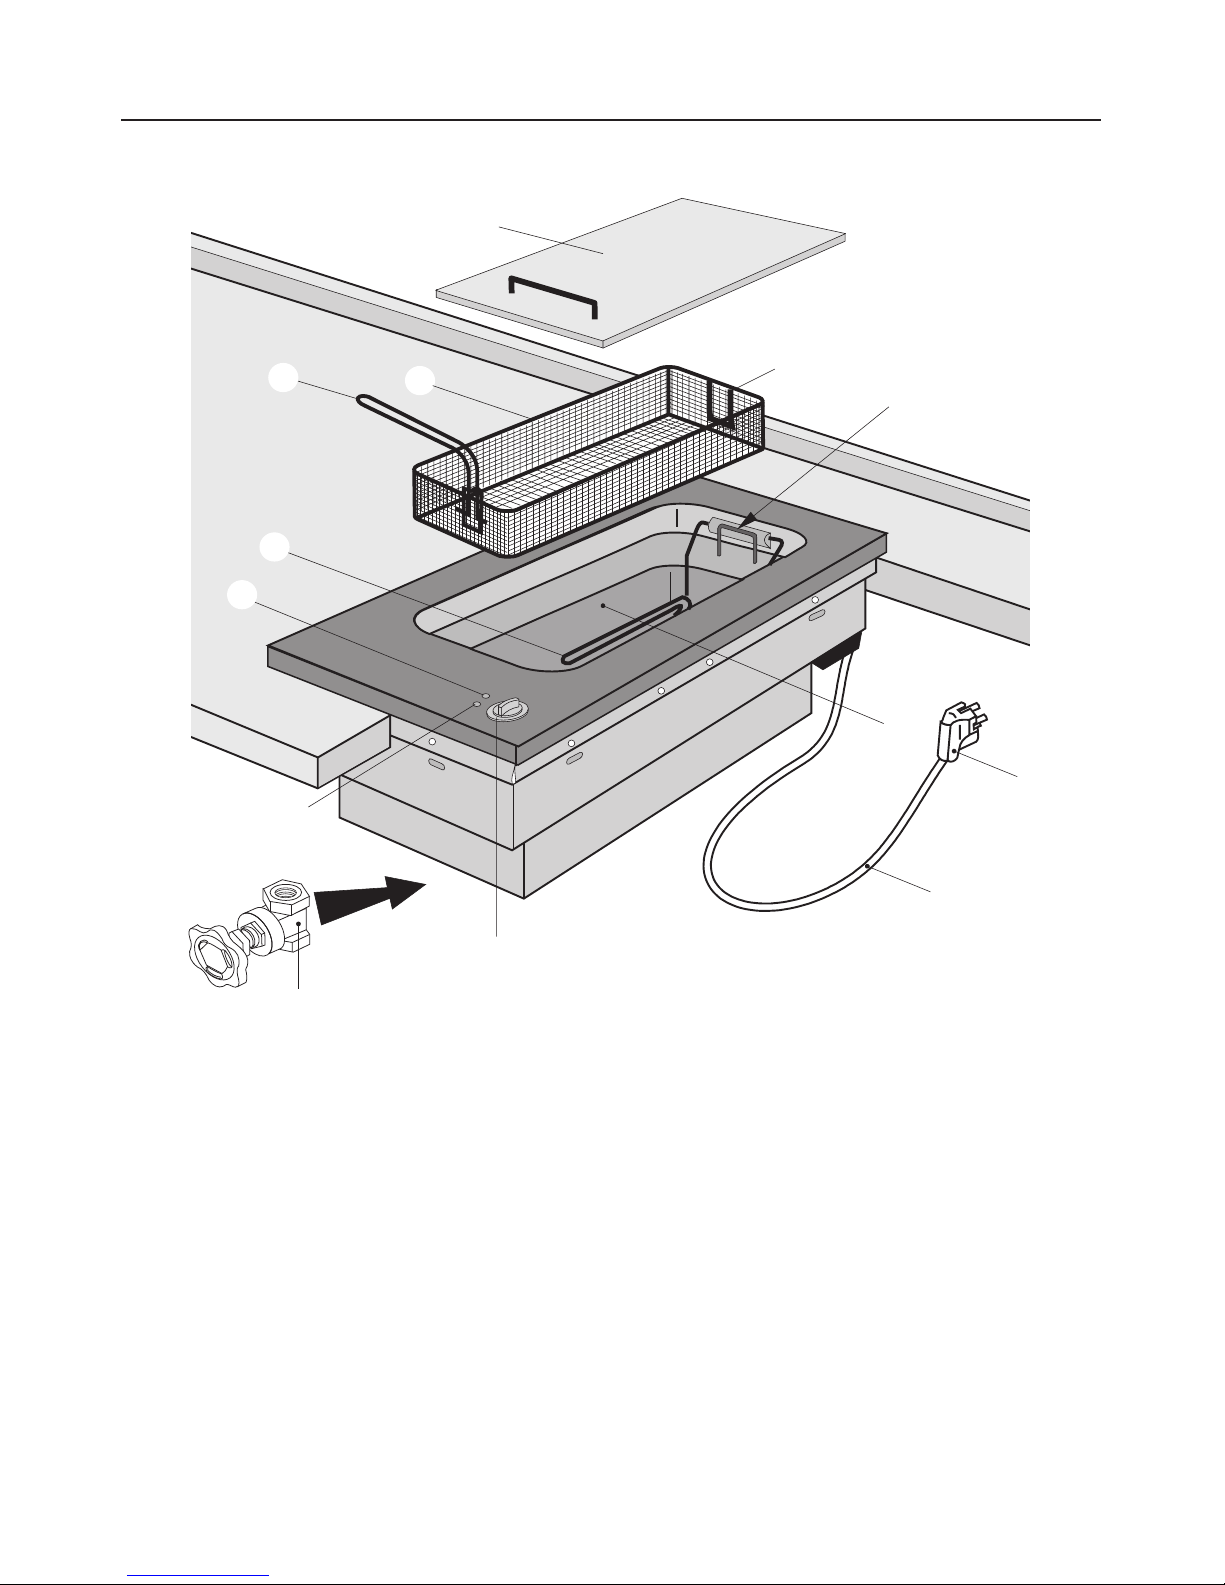
Building in and connection
If the appliance is supplied without
a plug, or if the plug is removed,
the appliance must be installed and
connected by a suitably qualified and
competent person in strict accordance
with national and local safety
regula-tions. The manufacturer cannot
be held responsible for damage
caused by incorrect installation or con-
nection.
The electrical safety of this appli-
ance can only be guaranteed when
continuity is complete between the ap-
pliance and an effective earthing sys-
tem which complies with local and na-
tional safety regulations. It is most
important that this basic safety require-
ment is tested by a qualified electrician.
The manufacturer cannot be held re-
sponsible for the consequences of an
inadequate earthing system such as an
electric shock.
Do not connect the appliance to
the mains electricity supply by an
extension lead. Extension leads do not
guarantee the required safety of the ap-
pliance (e.g. danger of overheating).
This equipment is not designed for
maritime use or for use in mobile
installations such as caravans, aircraft
etc. However it may be suitable for
such usage subject to a risk assess-
ment of the installation being carried
out by a suitably qualified engineer.
Warning and Safety instructions
5

Correct usage
For safety reasons the appliance
must only be operated after it has
been built in. This is necessary to en-
sure that all electrical components are
shielded.
This appliance is for domestic use
only and is not intended for com-
mercial use.
Use this appliance for the prepara-
tion of food only. Any other use is at
the owner’s risk and could be danger-
ous. The manufacturer cannot be held
responsible for damage caused by im-
proper use or misuse of the appliance.
Do not use the appliance to heat
up the room and never switch it on
when the heating element is in the
raised-up position. The high tempera-
ture could cause inflammable objects
nearby to catch fire.
This appliance must not be set up
or operated in the open air.
The fryer should only be switched
on when the lid has been taken off
and it has been filled with oil.
Warning and Safety instructions
6

Protecting the appliance from
damage
Do not drop anything on the ce-
ramic surface. Even a light object
such as a salt cellar, could cause dam-
age in certain circumstances.
Under no circumstances use a
steam cleaning appliance to clean
this appliance. Pressurised steam
could cause permanent damage to the
surface and to components, for which
the manufacturer cannot accept re-
sponsibility.
In countries where there are areas
which may be subject to infestation
by cockroaches or other vermin, pay
particular attention to keeping the appli-
ance and its surroundings in a clean
condition at all times. Any damage
which may be caused by cockroaches
or other vermin will not be covered by
the appliance guarantee.
Warning and Safety instructions
7

Protection from burning
Never leave the appliance unat-
tended when it is switched on and
when frying is taking place. Overheated
oil can catch fire and could even set
the cooker hood on fire. On no account
should there be an open flame in the vi-
cinity.
If frying oil does catch fire despite
this do not attempt to put out the
flames with water. Stifle the fire with a
suitable fire blanket or by covering with
the lid.
Avoid touching the appliance and
the frying oil when they are hot.
Both will remain hot for quite a while af-
ter the appliance has been switched
off. Only the handle of the frying basket
can be touched safely. Keep children at
a distance.
Do not store anything which might
arouse a child’s interest in storage
areas above or next to the appliance.
Otherwise they could be tempted into
climbing onto the appliance with the
risk of burning themselves.
You may prefer to use heat-resis-
tant pot holders or gloves when us-
ing the appliance.
Take care not to let pot holders or
gloves get damp or wet, as this causes
heat to transfer through the material
quicker with the risk of burning yourself.
Clean or change dirty oil or fat in
good time. Oil or fat containing im-
purities is liable to catch fire.
Do not empty hot fat or oil into a
plastic container. The high temper-
ature could cause this to melt.
Ensure that children are kept away
from the fryer and cannot get near
to the drain tap of the fryer where oil
which is still hot could be drained out.
Warning and Safety instructions
8

With a damaged appliance
It is important that the appliance is
not used if there are any signs of
damage, breakages, cracks or dents
on the ceramic surface.
In the event of any damage to the
appliance it must be switched off
immediately and disconnected from the
electricity supply. Contact the Service
Department. Do not use the appliance
until it has been repaired. Continued
use would be dangerous as liquids,
etc, boiling over could penetrate to the
electrical components through any
crack.
Ensure power is not supplied to the
appliance while installation or re-
pair work is being carried out.
Any repairs may only be carried
out by suitably qualified and com-
petent persons to ensure safety. Re-
pairs and other work by unqualified
persons could be dangerous.
While the appliance is under guar-
antee repairs should only be un-
dertaken by a service engineer author-
ised by the manufacturer. Otherwise the
guarantee is invalidated.
Warning and Safety instructions
9

Further safety notes
When using an electric socket near
the appliance, care should be
taken that the cable of the electrical ap-
pliance does not come into contact with
the hot fryer. The insulation on the cable
could become damaged, giving rise to
an electric shock hazard.
Always ensure that food is suffi-
ciently cooked or reheated. Many
factors will affect the overall cooking
time, including the size and amount of
food, its temperature, changes to the
recipe and the shape and size of cook-
ing container. Some foods may contain
micro organisms which are only de-
stroyed by thorough cooking at high
temperatures. Therefore when cooking
or reheating food, e.g. poultry, it is par-
ticularly important that food is fully
cooked through. If in doubt select a lon-
ger cooking or reheating time. It is im-
portant that the heat is allowed to
spread evenly throughout the food be-
ing cooked.
Ensure that children are kept away
from the appliance when it is
switched on.
To protect the environment used
frying oils and fats should be dis-
posed of with the household waste after
they have cooled down. Do not dispose
of used oils and fats down the sink. The
water pipes could become blocked or
damaged.
Before disposing of an old appli-
ance, switch off and disconnect it
from the power supply. Cut off and ren-
der any plug useless. Cut off the cable
directly behind the appliance to prevent
misuse. This should be done by a com-
petent person.
Ensure that the appliance presents
no danger to children while being
stored for disposal.
Warning and Safety instructions
10

Disposal of the pac ing
material
The transport and protective packing
has been selected from materials which
are environmentally friendly for disposal
and can normally be recycled.
Ensure that any plastic wrappings,
bags etc. are disposed of safely and
kept out of the reach of babies and
young children. Danger of suffocation!
Rather than just throwing these materi-
als away, please ensure that they are
offered for recycling.
Disposal of an old appliance
Old appliances contain materials which
can be reclaimed or recycled. Please
contact your dealer, your local waste
collection centre or scrap merchant
about potential recycling schemes.
Before disposing of an old appli-
ance, switch off at the mains elec-
tricity supply. Cut off and render any
plug useless. Cut off the cable di-
rectly behind the appliance to pre-
vent misuse. This should be done by
a competent person. Ensure that the
appliance presents no danger to
children while being stored for dis-
posal.
Caring for the environment
11

General notes
A data plate for your appliance is sup-
plied with this documentation. It should
be stuck into the space provided at the
end of the instruction book. The ad-
dress of the nearest Service Depart-
ment is given on the back page.
Before using for the first time
12

Cleaning and heating up for
the first time
Before using the fryer for the first time,
clean it as follows:
^Fill the oil reservoir with approx. 4
litres of water and add a little wash-
ing up liquid. Ensure that the water
level is not higher than the maximum
level indicator which is marked on the
rear of the reservoir.
^Turn the control in a clockwise direc-
tion to 130 °C and bring the water to
the boil.
^When the water has started to boil,
switch off the fryer by turning the
control back anti-clockwise to "0".
Empty the water through the drain
tap into a heat resistant container.
(see section on "After frying").
^Rinse the oil reservoir out with hot
water.
^Close the drain tap, raise the heating
element and dry the reservoir with a
clean cloth.
^Clean all other appliance surfaces
with a damp cloth only, and then wipe
dry.
Metal components have a protective
coating which may give off a slight
smell when the appliance is heated up
for the first time. The smell and any va-
pours will dissipate after a short time
and do not indicate a faulty connection
or appliance.
Before using for the first time
13

Switching on and off
To switch the fryer on, turn the control
in a cloc wise direction a. To switch
off, turn the control in an anti-cloc -
wise direction bto "0".
You cannot turn the control to "0" by
turning it past 200 °C.
When the appliance is switched on, the
temperature indicator light gand the
oprating indicator light hcome on. The
temperature indicator light tacts on and
off in conjunction with the heating ele-
ment.
Only operate the fryer without the lid.
Never switch it on when it is empty
or when the heating element is
raised up.
Before frying
Before frying make sure that the oil res-
ervoir has been filled with enough frying
oil (min. 3 litres / 3 kg, max. 4 litres / 4
kg).
Only use oil or fat specified for frying
either in liqiud or solid form.
Only use oil / fat which which can be
heated to a high temperature and
never mix different types together.
Correct procedure:
^Fill tthe oil reservoir with oil / fat. Solid
fat should be cut up into small pieces
first.
When re-using fat which has solidi-
fied in the reservoir, make a hole in
the fat as far as the element. This al-
lows any water which has gathered
under the fat to evaporate.
^Turn the control to 100 °C and wait
until the fat has melted.
When all the fat has melted check the
level in the reservoir. This needs to be
between the minimum and maxiumum
level indicators which are marked on
the narrow rear side of the reservoir.
Using the fryer
14

Frying
Correct procedure:
^Set the frying temperature required
(see chart) and wait until the temper-
ature indicator light goes out for the
first time. The oil has now reached
the set temperature.
^Place the frying basket containing the
food to be fried into the hot oil.
If the oil froths a lot, remove the bas-
ket briefly from the reservoir and then
slowly immerse it into the hot oil
again.
^When the food is ready, remove the
basket from the hot oil, shake it a little
to remove excess oil and then hang
the basket on the hanging support.
Do not leave the food suspended over
the reservoir for too long as the steam
from the oil can cause the food to lose
its crispness. Finally, place the food on
some paper towel to blot up any excess
oil.
Ensure that you do not touch the hot
oil / fat. Protect your hands in partic-
ular by wearing oven gloves.
Blanching
It is also possible to use this appliance
for blanching vegetables by using wa-
ter instead of oil or fat.
Using the fryer
15

Food (fresh) Quantity Temperature
in °C
Frying time
in minutes
Breaded chicken
portions
2 x 250 g pieces 180 8-10
Unbreaded turkey
steaks
2 x 250 g pieces 180 3-5
Cumberland
sausages
4 180 7-8
Camembert 4 pieces 180 2-3
Raw battered
vegetables
500 g 180 8-10
Raw battered
mushrooms
500 g 180 2-3
Saute potatoes 500 g 180 2-3
Croquette potatoes 500 g pre-frying 170
frying 180
2-4
3-5
Fried bread 500 g 200 30 secs - 1 min
Chips 500 g pre-frying 170
frying 180
4-6
2-4
Crisps 500 g 180 3-5
Jam doughnuts 5 pieces 170 6-8
Pineapple fritters 2 pieces 180 2-3
Banana fritters 2 pieces 180 3-4
Please note:
The times given are only a guide. The actual cooking times will depend on the size
and quantity of food cooked.
Using the fryer
16

Food (frozen) Quantity Temperature
in °C
Frying time
in minutes
Fish fingers 300 g 180 4-6
Beef burgers 220 g 180 5-6
Potato croquettes 500 g 170 pre-frying 1-2
frying 3-4
Chips 500 g
1000 g
180
180
4-6
8-10
Spring rolls 2 x 60 g 180 8-10
Scampi 250 g 180 4-5
unbreaded
Plaice fillets
300 g 170 3-5
Squid rings 250 g 180 2-3
Please note:
The times given are only a guide. The actual cooking times will depend on the size
and quantity of food cooked.
Using the fryer
17

Frying tips
^The oil or fat must be hot enough to
seal the food quickly. If the tempera-
ture is too low the food will absorb
too much fat which will make it diffi-
cult to digest.
For this reason, wait until the temper-
ature indicator goes out (which
means the set temperature has been
reached), before you place more
food in the fryer.
^Do not fry too much food all at once
as this cools the oil too quickly.
^Heat the oil only for as long as neces-
sary. This will keep it in good condi-
tion for longer.
^Food should be as dry as possible as
moisture can cause frothing. Dab
food which is damp dry with kitchen
paper towel. Remove traces of ice
from deep frozen food.
^Lower the frying basket slowly so that
the oil does not froth over.
^Rinsing freshly cut potatoes under
running water and then drying them
thoroughly with kitchen paper towel
will prevent them sticking together.
^Place baking made with yeast dough
in the basket with the risen side fac-
ing downwards and then turn
half-way through the cooking time.
^Never season food before frying.
Salt, seasoning or icing sugar can be
added to the fried food once any ex-
cess oil / fat has been removed.
Never add salt to fried food in the
frying basket while the basket is
over the hot oil. This can cause the
oil to froth over.
Using the fryer
18

After frying
Switch the fryer off. We recommend
that you filter the frying oil. This not only
removes impurities which can affect the
taste of the food but will help the oil last
longer.
How to proceed:
^Allow the oil to cool down but not to
solidify.
If it has already solidified then melt it
again by switching the fryer to 100 °C.
^Place a heat resistant container of a
suitable size, a metal pot for exam-
ple, under the drain tap located un-
derneath the fryer.
^Ensure the oil is not too hot. Open the
drain tap by turning the hand-wheel
on the tap anti-cloc wise a.
^Once the oil has drained out, close
the tap again by turning the
hand-wheel cloc wise bas far as it
will go. Check that you cannot turn it
any further.
^Filter the frying oil by pouring it
through kitchen paper or a metal
sieve lined with kitchen or filter paper.
^Finally pour the filtered oil back into
the oil reservoir to be used again.
Take care that the underside of the
fryer is always easily accessible for
draining oil.
Ensure that the oil is not too hot be-
fore it is drained. Otherwise there
could be a danger of being burnt.
Only use a container which is able to
withstand heat to collect the drained
oil.
Do not replace the lid on the fryer
until the oil or fat has cooled down.
Change the oil when it
–is very dark and does not pour easily.
–smells unpleasant and froths.
–begins to smoke at a temperature of
170 °C or less.
Using the fryer
19
bc

Safety cut-out switch
Your fryer is fitted with a safety cut-out
which automatically switches it off if:
–the oil reservoir is not filled to at least
the lower level indicator.
–the fryer is switched on when empty.
–the fryer is switched on when the
heating element has been raised
(e.g. for cleaning).
The fryer has cut out automatically
when neither the temperature indicator
light nor the operating indicator light is
on and the oil is no longer being
heated.
^Turn the control to "0" and wait until
the heating element has cooled
down.
^Rectify whatever has caused the
automatic cut-out.
^Press the pin (see arrow) which is on
the left rear underside of the fryer in
firmly. The fryer can now be used
again.
Using the fryer
20
Other manuals for KM 402
2
Table of contents
Other Miele Fryer manuals

Miele
Miele CS 1411 User manual

Miele
Miele CS 1411 Specification sheet

Miele
Miele CombiSet CS 1411F User manual

Miele
Miele CS 1411 User manual

Miele
Miele KM 89-2 User manual

Miele
Miele KM 403 User manual

Miele
Miele KM 403 User manual

Miele
Miele CS 1411 User manual

Miele
Miele CS 1411 User manual

Miele
Miele KM 89 User manual