MiiCraft 125 SERIES User manual

3D production system ► Make a better world
1
MiiCraft125 series
125/100/80/50/100X
3D Printer
Operating Manual
Version 1.3

3D production system ► Make a better world
2
Content
1 Product Information................................................................................................3
1.1 Regulatory tatements............................................................................3
1.2 afety Precautions..................................................................................4
1.3 General Information................................................................................5
1.4 Package Contents...................................................................................5
1.5 Product Overview....................................................................................6
2 etting up your 3D Printer- Hardware....................................................................7
2.1 Unpacking...............................................................................................7
2.2 Connecting to the Power adapter and cable...........................................7
2.3 Power button control...............................................................................8
2.4 Installing the Picker.................................................................................9
2.5 Filling the Resin tank...............................................................................9
3 Operating your 3D Printer- oftware......................................................................10
3.1 Installing MiiCraft oftware.....................................................................10
3.2 MiiCraft Controller...................................................................................11-14
4 After finish printing.................................................................................................15
4.1 After finish printing..................................................................................15
4.2 Cleaning the picker.................................................................................15
4.3 Cleaning the resin tank...........................................................................15
Appendix 1. pecifications.......................................................................................16
Appendix 2. Resin curing time.................................................................................17
Appendix 3. Printing Parameter...............................................................................18

3D production system ► Make a better world
3
1.1 Regulatory tatements
FCC NO ICE
This equipment has been tested and found to comply with the limits for a class “A” digital device,
pursuant to Part 15 of the FCC Rules.
These limits are designed to provide reasonable protection against harmful interference. This equipment
generates, uses, and can radiate radio frequency energy and, if not installed and used in accordance with
the instruction manual, may cause harmful interference to radio communications. Operation of this
equipment in a residential area is likely to cause harmful interference in which case the user will be required
to correct the interference at their expense.
COMPLIANCE
This equipment conforms with International Electric Committee (IEC) 60950-1 and meets the
requirements of the applicable EC directives.
1 Product Information

3D production system ► Make a better world
4
1.2 afety Precautions
Please read through the following Safety Precautions before you start using your printer.
(1) Use only the power adapter and accessories provided by the manufacturer.
(2) Before plugging the power adapter into an electrical outlet, verify the local power rating conforms
with the specified voltage and frequency.
(3) This printer needs a grounded, 1-phase electrical power source.
(4) Make sure power and communication cables are well managed to prevent from tripping.
(5) Only use resins supplied by MiiCraft manufacturer. Use of other unauthorized resins may cause
printing failure.
(6) Do not expose the resin tank to direct light source because the resin will solidify under UV light.
(7) Chemical substances like resin may cause skin irritation, please read the guidelines in Material
afety Data heet (M D ) of the resin supplied by manufacturer. It is recommended to wear gloves
when necessary.
(8) When moving the printer for a long distance, be sure to withdraw the remaining resin in reaction
tank and clean the tank in advance to prevent from resin overflow.
(9) Keep doors closed during printing or curing to prevent UV leakage.
(10) UV light may cause injury of eyes, do not stare into the printer directly when it is in operation. It
is recommended to wear UV protective glasses during operating the printer.
(11) Place the device on a level surface and keep the printer in an upright position at all times.
(12) Do not store the printer in extreme hot and cold temperatures.
(13) Do not disassemble or repair the device yourself. Doing so may cause device malfunction or
danger.

3D production system ► Make a better world
5
1.3 General information
Product Name MiiCraft 125/100/80/50/100X
Power Input Printer : 24V DC, 3.75A
With Adapter : 100~240V AC, 2A, 50/60Hz
Net Weight 37.5 kg
Package ize and Weight 80x80x94 cm / 58 kg (Including pallet)
Operating Temperature 10°C to 30°C
Humidity (RH) 40% to 60%
Our printer should keep in dry conditions
torage of Printing Material tore the materials at ambient temperature from 15°C to 28°C
And do not exposure to the light, otherwise resin may solidified
● Liability: In case you do not follow the operating manual we cannot be held responsible for
damages of the machine or injuries on the operator.
●Repair can only be carried out by authorized person of MiiCraft.
1.4 Package Contents
There is a printer and an accessory box inside the package. As soon as you receive our products, please
verify its content and check if there's any exterior damage due to transportation.
3D Printer RJ-45 cable
Cord
Adapter
Scraper
Putty knife
Picker
Tray for resin tank
3D production system ► Make a better world
6
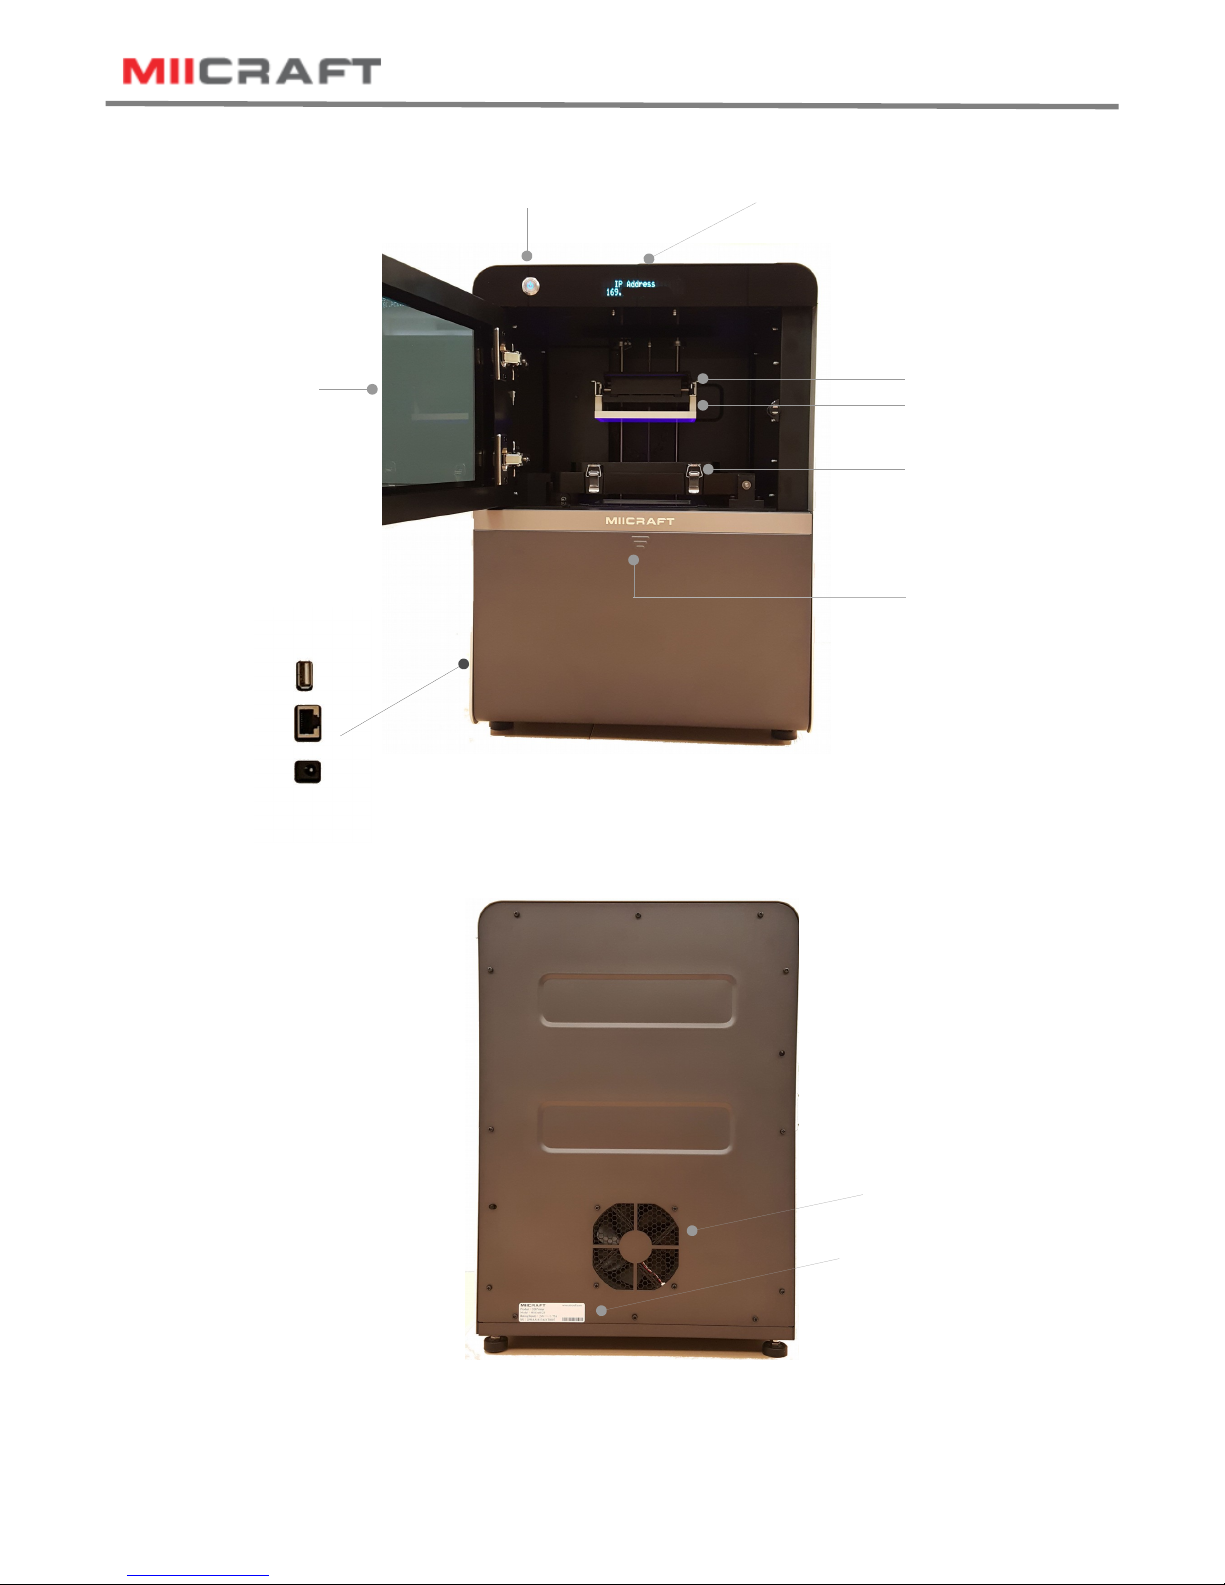
1.5 Product Overview
Power utton
Printer Door
Front Panel
Picker
Resin Tank
US Port
Network Port
Power Jack Front view
ack view
Fan
Product Label
Handle
Storage Area

3D production system ► Make a better world
7
2 Setting up your 3D Printer- Hardware
2.1 Unpacking
2.2 Connecting to the Power adapter and Cable
(1) Connect the power cord and adapter to your device, and then plug it into an electrical outlet
(2) Connect your printer with laptop
-Basic : Connect printer and laptop by RJ-45 cable (Graph1.) [Initiating time 1 minute ]
-LAN : Connect both printer and laptop to local area network [Initiating time a few seconds ]
-IP sharer : Connect both printer and laptop to IP sharer [Initiating time a few seconds ]
WARNING The MiiCraft weighs 37.5kg. Do not attempt to unpack or move the MiiCraft
without assistance. Always use proper lifting techniques to avoid injury.
(1) Remove the top
cardboard
(2) Remove the EPE
surround the inner box
(3) Remove the side cardboard
(4) Remove the inner box
Network port
ARJ-45
cable
Graph1.

3D production system ► Make a better world
8
2.3 Power button control
To turn your printer on, press Power button. The system starts warming up and the power indicator lights
purple. Wait a few seconds. When the Indicator turns blue, the printer is ready to use. Besides Power on and
off, you can use Power button to select file in U B to print. Or download the latest firmware from our website,
and execute firmware upgrade by U B.
Level 1
Insert U B to printer
※Download the latest firmware from
http://www.miicraft.com/support/ to your U B first.
ave as .ZIP file, and select it for upgrade
Upgrade Firmware
elect filez
Level 2 Level 3 and above Power Indicator
Firmware version
-Press power button : change mode in the same level
-Pressed and Hold power button : hold down the power button for up to 2 seconds to enter the next level
Press
Press
Press Press
Hold 2 sec. Hold 2 sec.
Press power button to start
Power Indicator
Color Behavior Printer tatus
Purple Blinking ystem warms up
Blue olid tandby mode
Blinking Printing in progress
Red olid Error
3D production system ► Make a better world
9
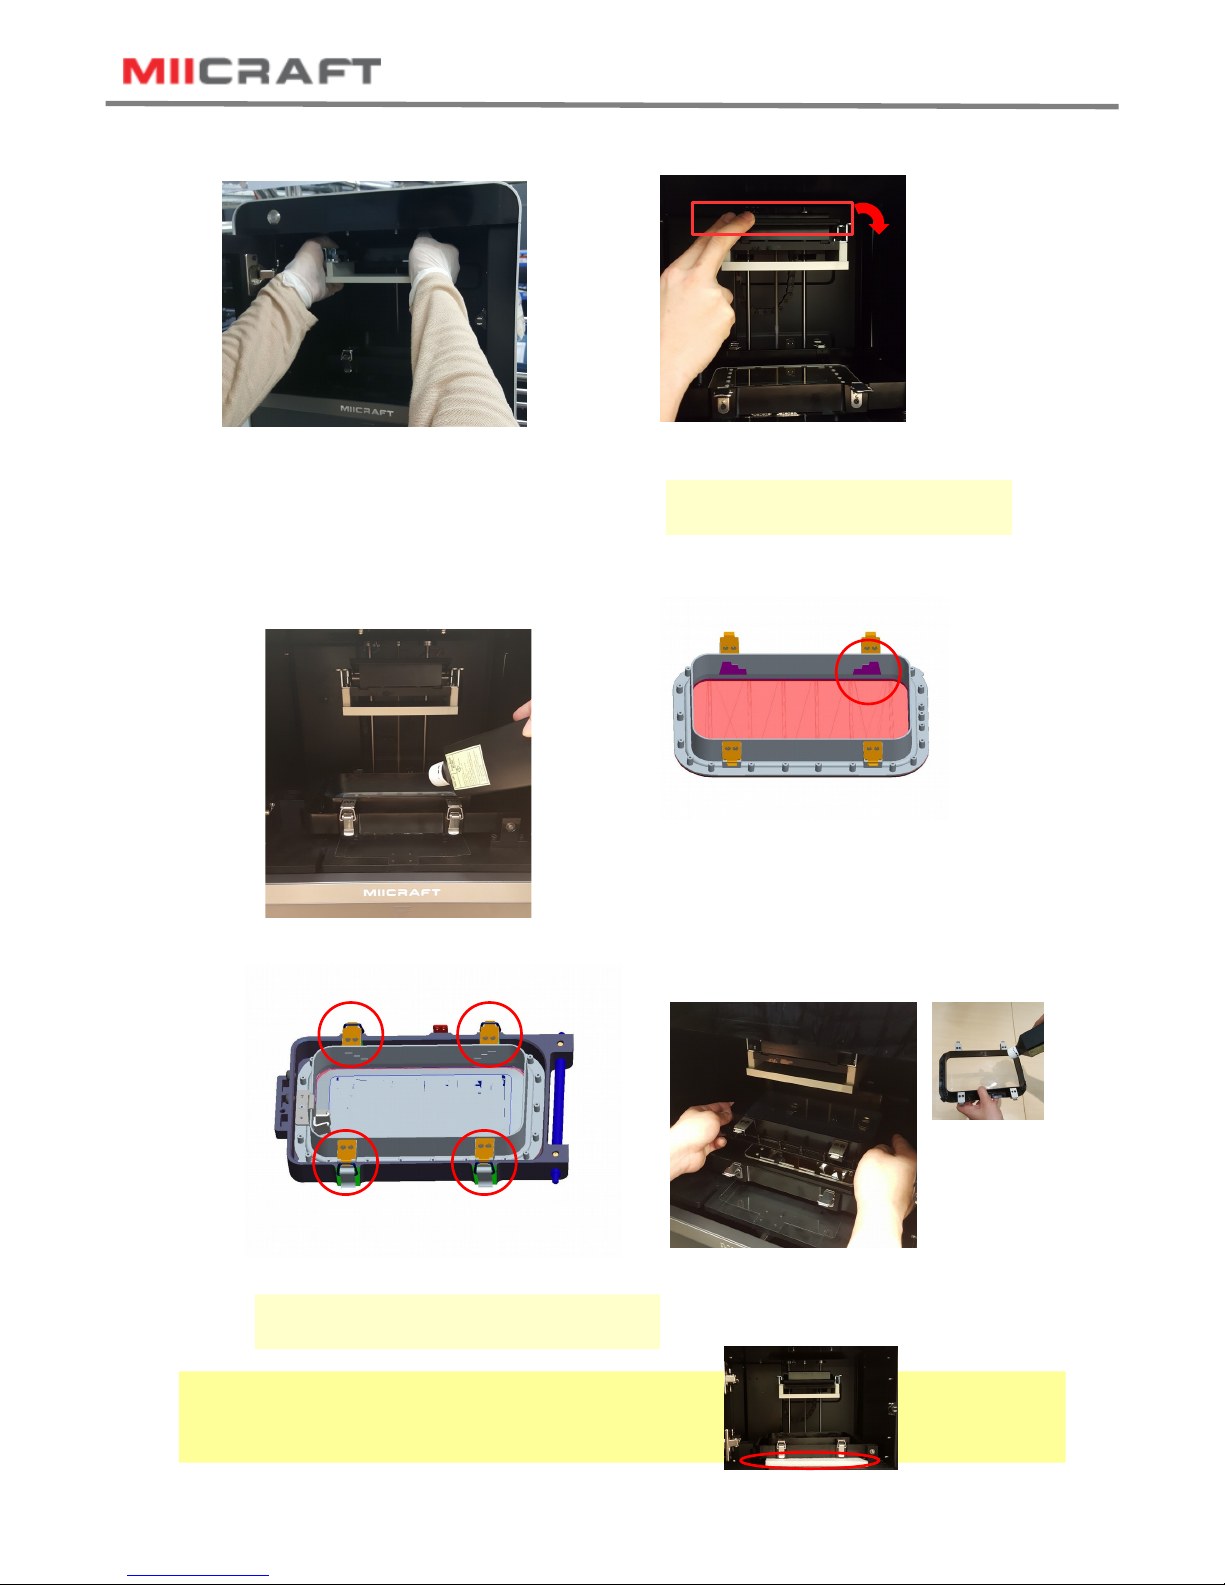
2.5 Filling the Resin tank
- Filling resin within the Printer
- Filling resin outside the Printer
Do not fill exceed the top line, otherwise the resin
will spill over when printing
(1) Unlock the Resin tank from four corners (2) Pick up the resin tank and pour resin
※When installing back the resin tank,
remember to lock it from four corners.
(1) Carry both end of picker and install it
onto the machine
(2) Put down the handle to lock the Picker
Handle
2.4 Installing the Picker
※Remove the Picker
Lift the handle, and remove the Picker
Remind
Before you start to print, please remove EPE under resin tank
EPE
3D production system ► Make a better world
10
3.1 Installing MiiCraft oftware
(1) Download MiiUtility.exe from http://www.miicraft.com/support/
ystem Requirements
-Windows O : Windows7 , Windows8, Windows10 and other updated version
-Browser: Google Chrome
(2) Unzip the downloaded file
(3) Click set_up.exe to create shortcut of MiiUtility .exe
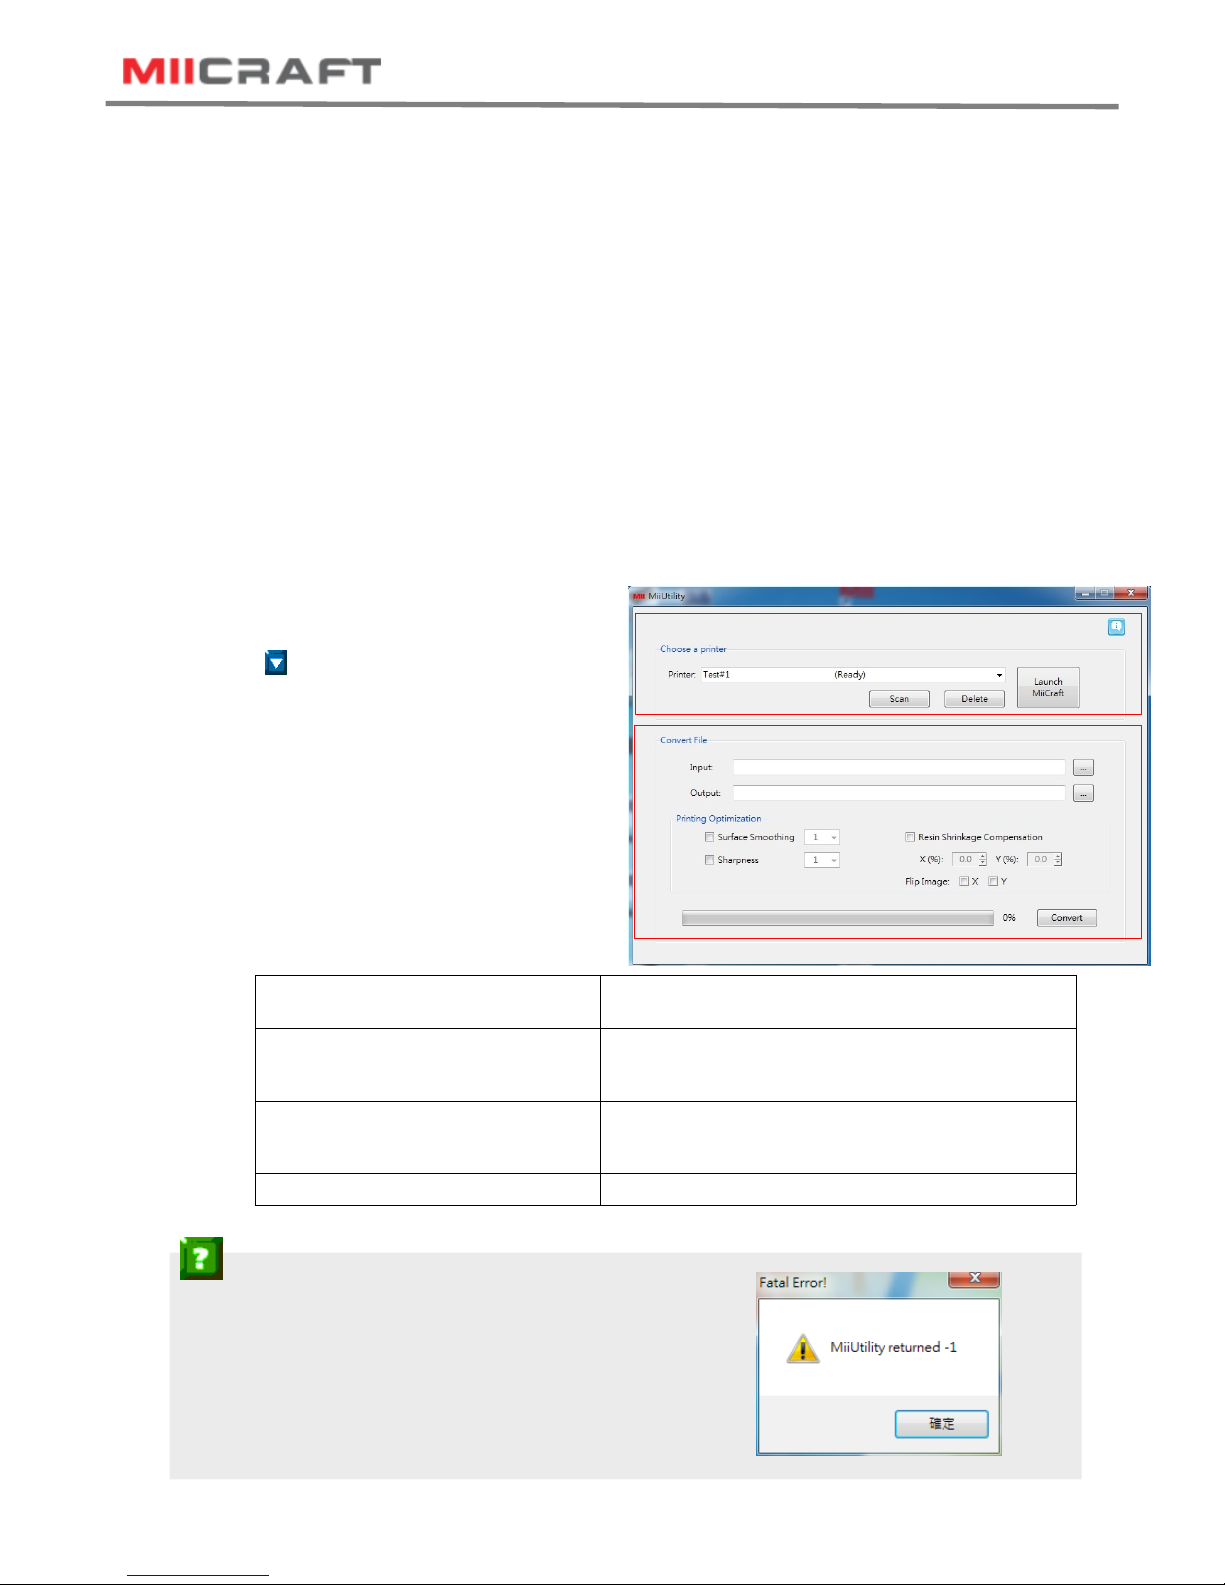
(4) Open MiiUtitlity .exe
(5) Connect to the 3D Printer
If your computer have opened proxy setting, please close it before connecting.
-can: search 3D Printer
- : elect 3D Printer
-Launch MiiCraft: link to MiiCraft controller
-Delete: Delete the scanned record
(6) Convert File
-Input: elect an object file
(Input type: LC file, CW file, ZIP file,
WRK file, MII file)
-Output: ave as .MII file
-Printing Optimization
urface moothing urface smoothing from Z axis, the greater number
means higher compensation from Z axis
harpness Enabling sharpness from X and Y axis
+ → harpen an image
─ → often an image
Resin hrinkage Compensation Compensate resin shrinkage
+0% to 9.9% →Enlarge an image
-0% to -9.9% → hrink an image
Flip Image Flip image by X axis or Y axis
(5)
(6)
Trouble hooting:
How to resolve “ Fatal Error” when installing?
Please enter below links, and install x86.exe, make sure you have
Installed software from both of the links.
Visual C++ Redistributable Packages for Visual tudio 2013
https://www.microsoft.com/en-us/download/details.aspx?id=40784
Visual C++ Redistributable for Visual tudio 2015 Update 1
https://www.microsoft.com/en-us/download/details.aspx?id=49984
3 Operating your 3D Printer- Software

3D production system ► Make a better world
11
3.2 MiiCraft Controller
(1) Link to MiiController
-From MiiUtility : Click 『Launch MiiCraft 』
-Or From Browser : Find printer's IP address on electronic display, and enter it as site
address for Google Chrome.To optimize browsing, please use Google Chrome browser.
(2) How to use MiiController
Print etting
elect file: Insert your 3D image (.mii)
Thickness (um): Thickness per layer
Curing Time(s): The amount of time for UV curing (seconds)
peed: Peeling speed
Gap Adj.(mm): Adjust thickness of the first layer (Basic is 0.2mm)
Base Layers: Define number of base layers
Base Curing(s): Curing time for base layers
Buffer Layers: et the Number of buffer layers
: View 3D image
Print etting elect file from PC
Engineering Mode elect file from Printer
Printing Record
and Update
elect file from U B on
printer
What is buffer layer?
File input limitation from PC: 130MB
File input limitation from U B: 1GB

3D production system ► Make a better world
12
elect file from PC X O X
elect file from Printer O O O
elect file from U B on
printer O O O
(3) Print and inspect
: Delete file in Printer / Delete file in U B on printer
: ave to Printer / ave to U B on printer (Printer's memory capacity is 3GB)
Notifications:
- Do not put your hand into the printer while printing

3D production system ► Make a better world
13
Advanced etting
(1) Here you can set the actions of cartridge and picker. The setting will be saved as one motion cycle,
repeat for every layer.
(2) tart from action 1, choose object module first, and choose action item, and its step and period(Table1).
Keep adding new action item until one cycle is finished.
: ave the setting
: Return to the file's original setting
Object
Module
Action Item tep
(5um/step)
Half step period
(micro second)
Cartridge Up Max.2500
Min.800
Down Max.2500
tay NA NA
Picker Up Max.2500
Down Max.2500
1 Layer 1 Layer
Test Module Action Item Verifying Correct Module Behavior
Z-Motor Up The Z-platform moves upwards.
Down The Z-platform moves downwards.
top The movement stops.
Cartridge Up The cartridge moves upwards.
Down The cartridge moves downwards.
top The cartridge stops.
Reset The cartridge moves to default height.
Projector On The projector turns on.
Off The projector turns off.
Cleaning Tank tart (1) Project a complete pattern to tank, the residue will
be transformed into a solid layer. (2) Using the
scrape, scoop up one side of the layer. Then carefully
lift to remove the layer from the tank.
LED Current
etting
LED
Current
Change the current of optical engine, range from 0.3A
to 6A
Reset Reset LED current to default
Door lock Off Door lock warning close.
On Door lock warning open.
Engineering Mode
Action1
Action2
Action3
Action4
Table1.

3D production system ► Make a better world
14
Printing Record and Update
- Name: file name
- N: erial number
- FW: Firmware version
- Manual IP:
et a static IP address for the
Printer.
- Upgrade FW:
Download the latest
firmware from
http://www.miicraft.com/support/
ave as .ZIP file, and select it
for upgrade
- Printing record
Informations:
-Why and how to use manual IP function?
Manual IP function is for the user whose environment don't have DHCP network, and would like to speed
up the printer connection. First, use manual IP function to set a static IP address on printer. econd, set
the same static IP address on your computer.
-Trouble shooting
If a connection error happen due to manual IP's typing error, please download 『DHCP recover 』file
from http://www.miicraft.com/support/
ave the file in U B, and follow the 『U B upgrade process 』 as page 8 to unlock.
(3) ave and back to Print setting
(4) Within the peed column, select 『Adv. setting 』to implement the motion cycle
-File setting : The motion cycle setting existing in this file
-Adv. setting : The newly saved motion cycle setting
3D production system ► Make a better world
15
4.1 After finish printing
(1) Lift the handle
(2) Remove the Picker and printed model
(3) Use air gun and ethanol to clean the printed model
(4) Post curing (Additional post curing unit is required)
(5) Carefully remove the printed model from the picker. Use putty knife to help separate the printed
model and picker
(6) Do not expose the resin tank to direct light source because the resin will solidify under UV light.
Use tray to cover the resin tank to prevent solidify.
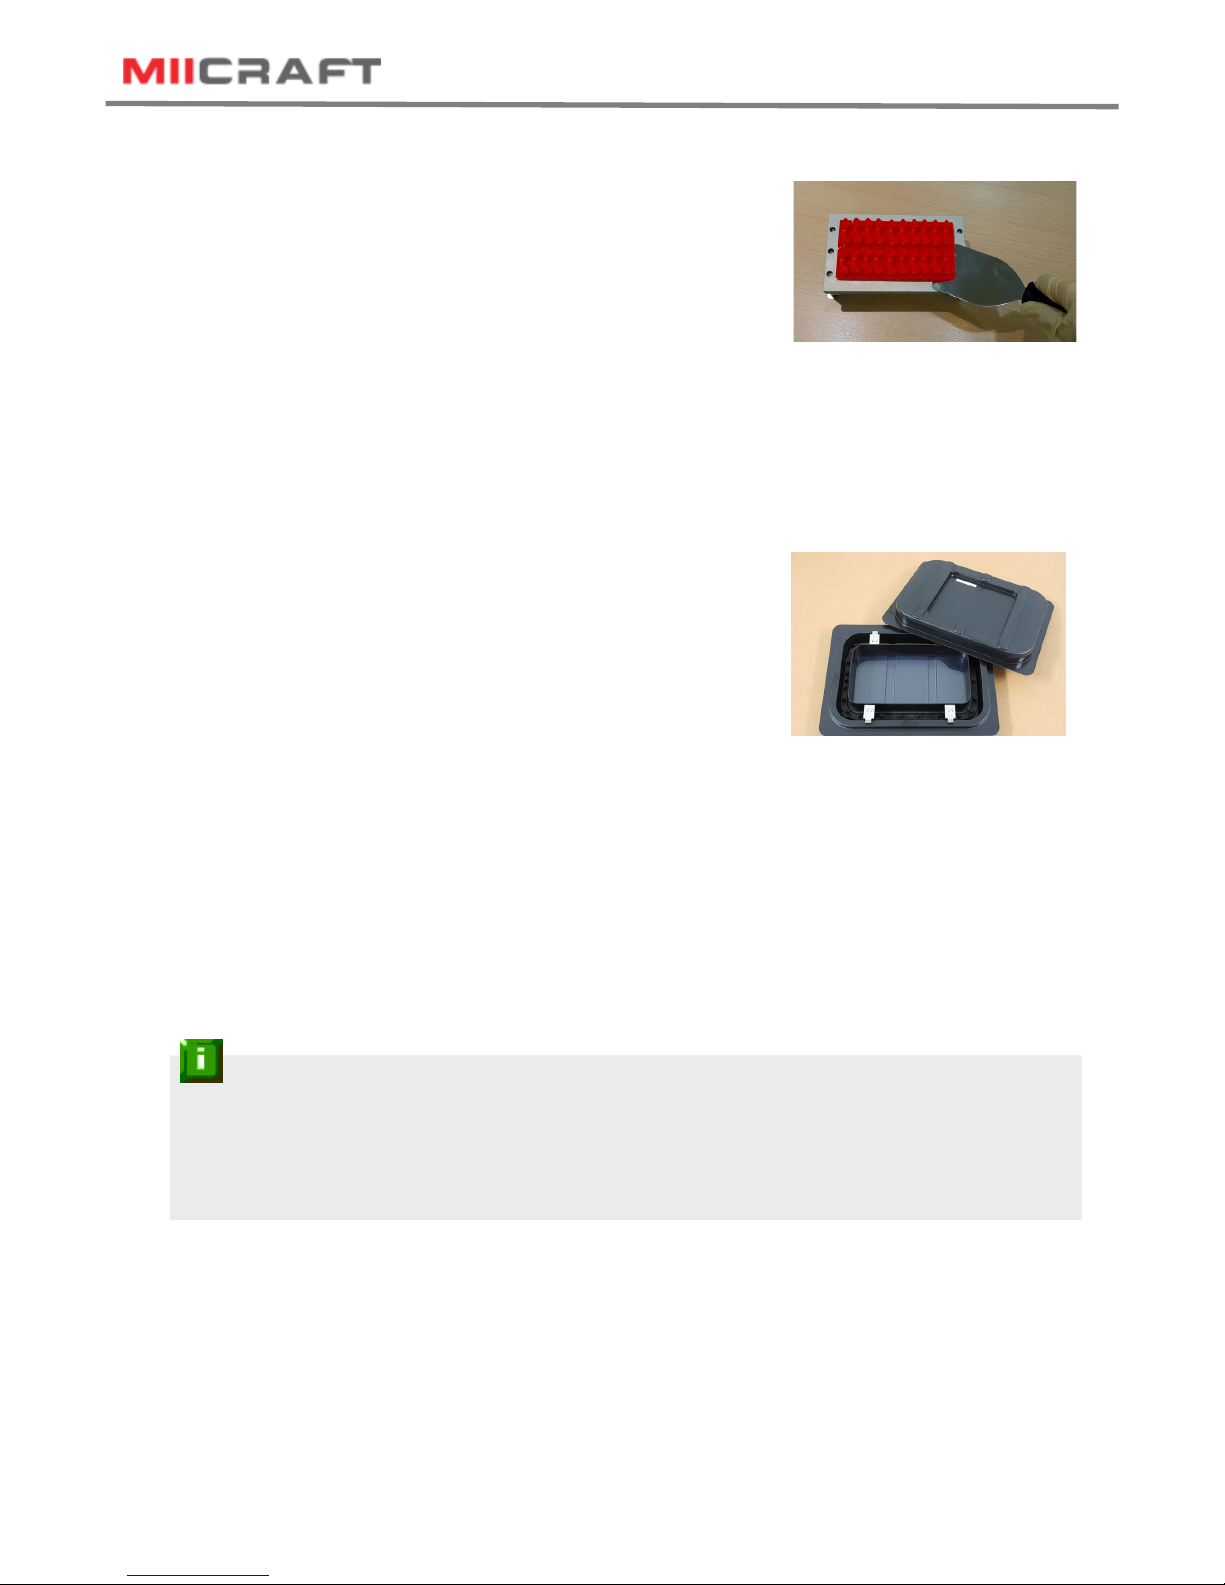
4.2 Cleaning the Picker
Use putty knife or similar object to scrape away the excess printed model on the picker. If any greasy
residue persists, use a soft cloth dipped in alcohol to rub the surface until the grease is removed.
4.3 Cleaning the resin tank
ee “Cleaning Tank” on page 13
Notifications:
- Do not shut down the power during curing
- Do not interrupt the firmware upgrade process. Any interruptions during the firmware upgrade process
may cause your printer to malfunction.
- Update the firmware frequently for better user experience, please refer to page8, page14 for upgrade
4 After finish printing
3D production system ► Make a better world
16
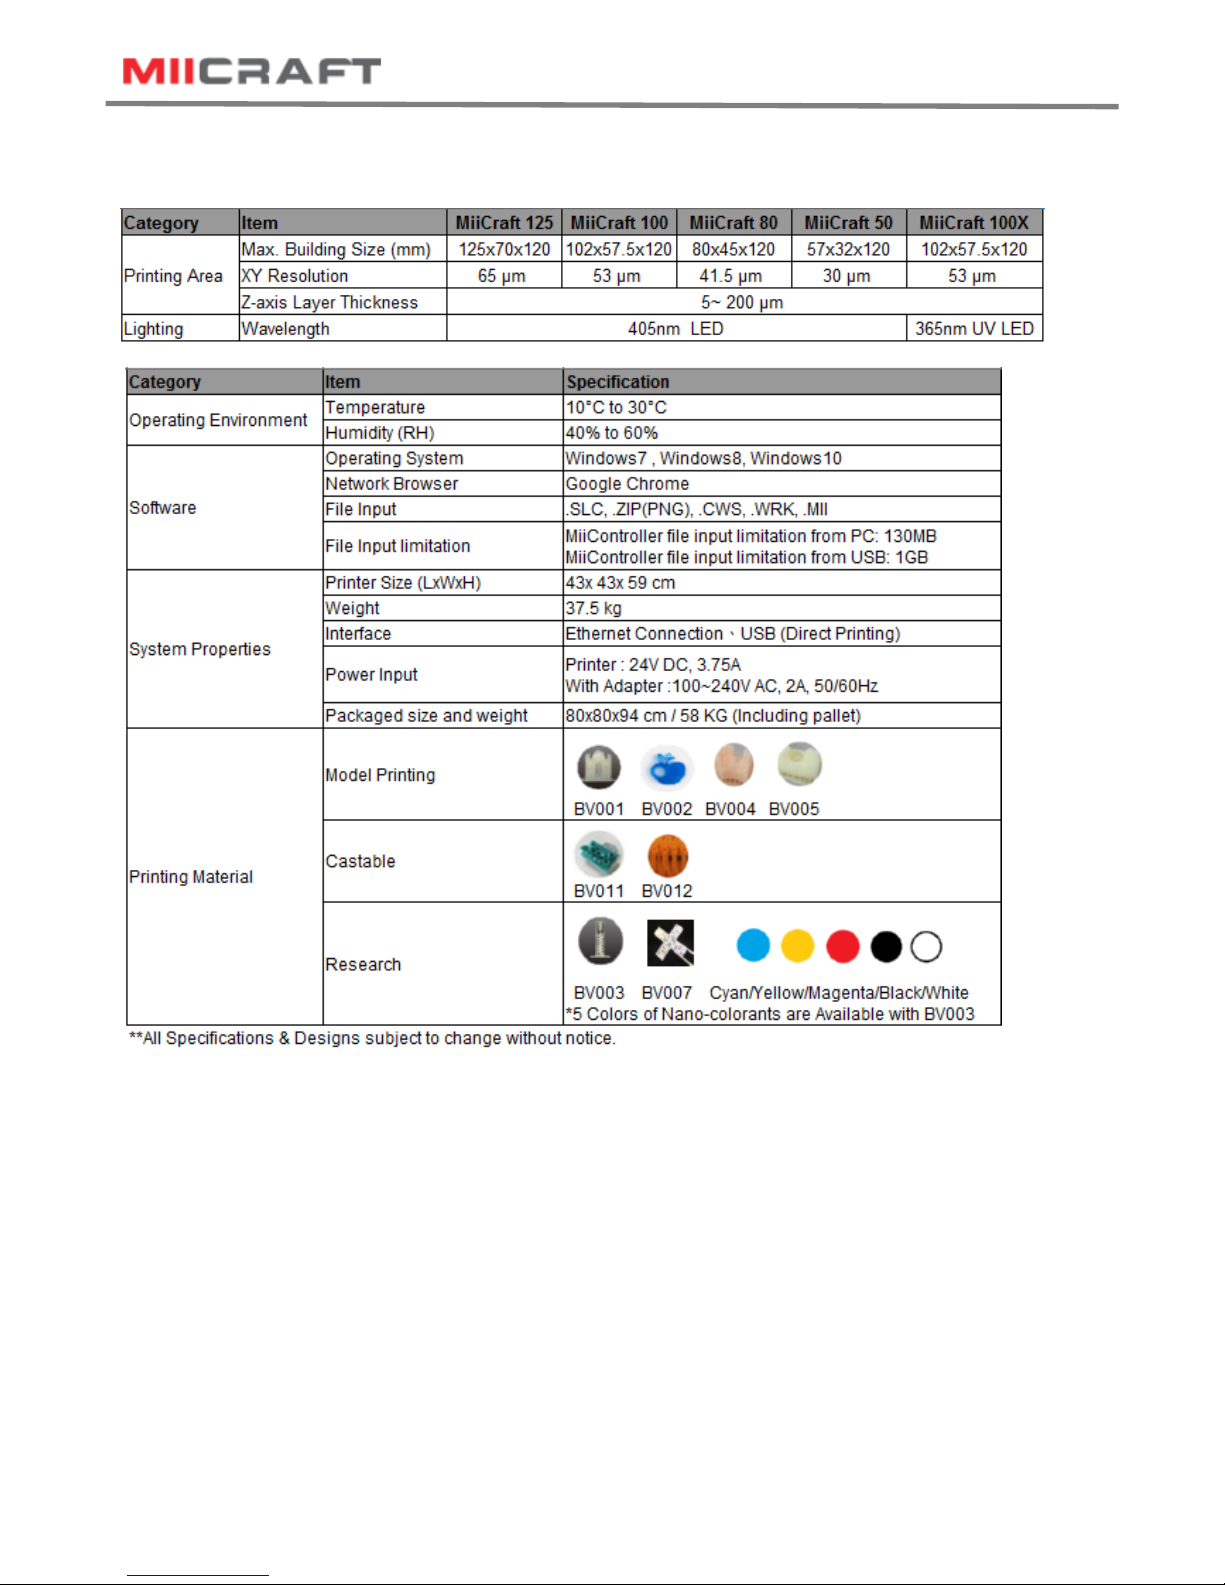
Appendix 1. Specifications
3D production system ► Make a better world
17
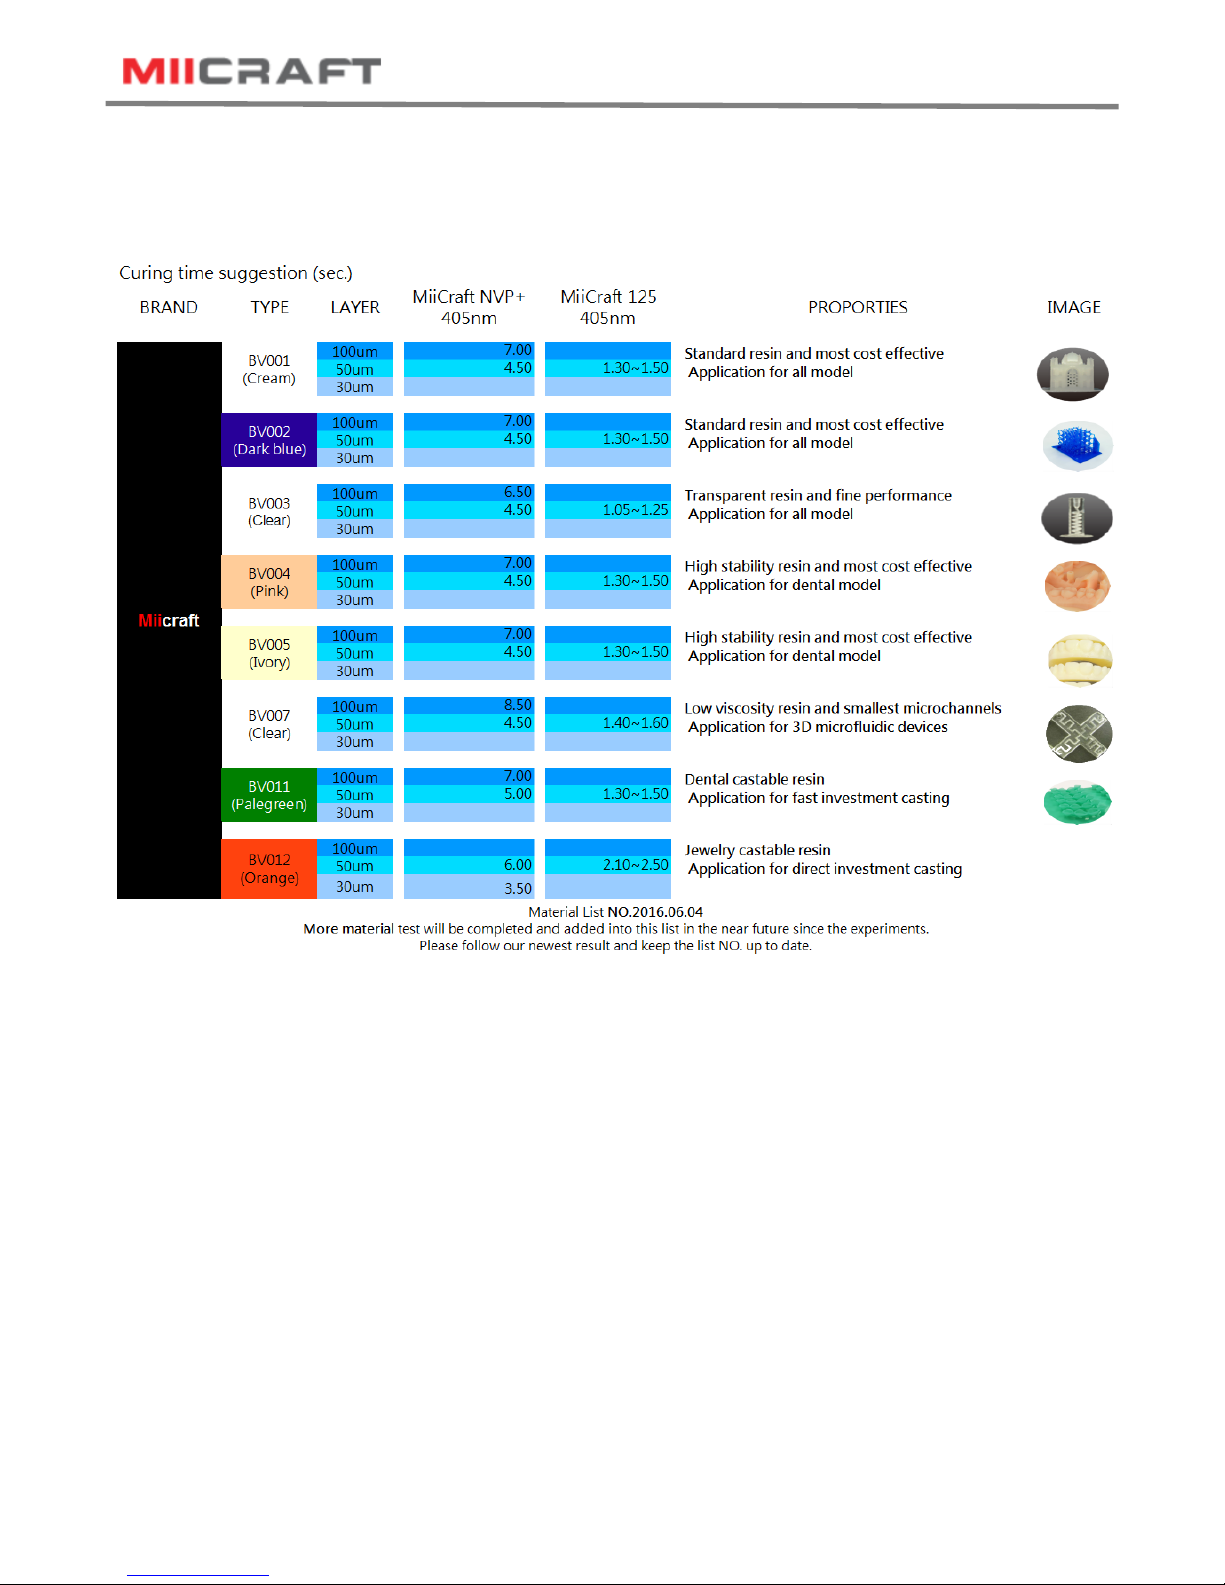
Appendix 2. Resin curing time
3D production system ► Make a better world
18
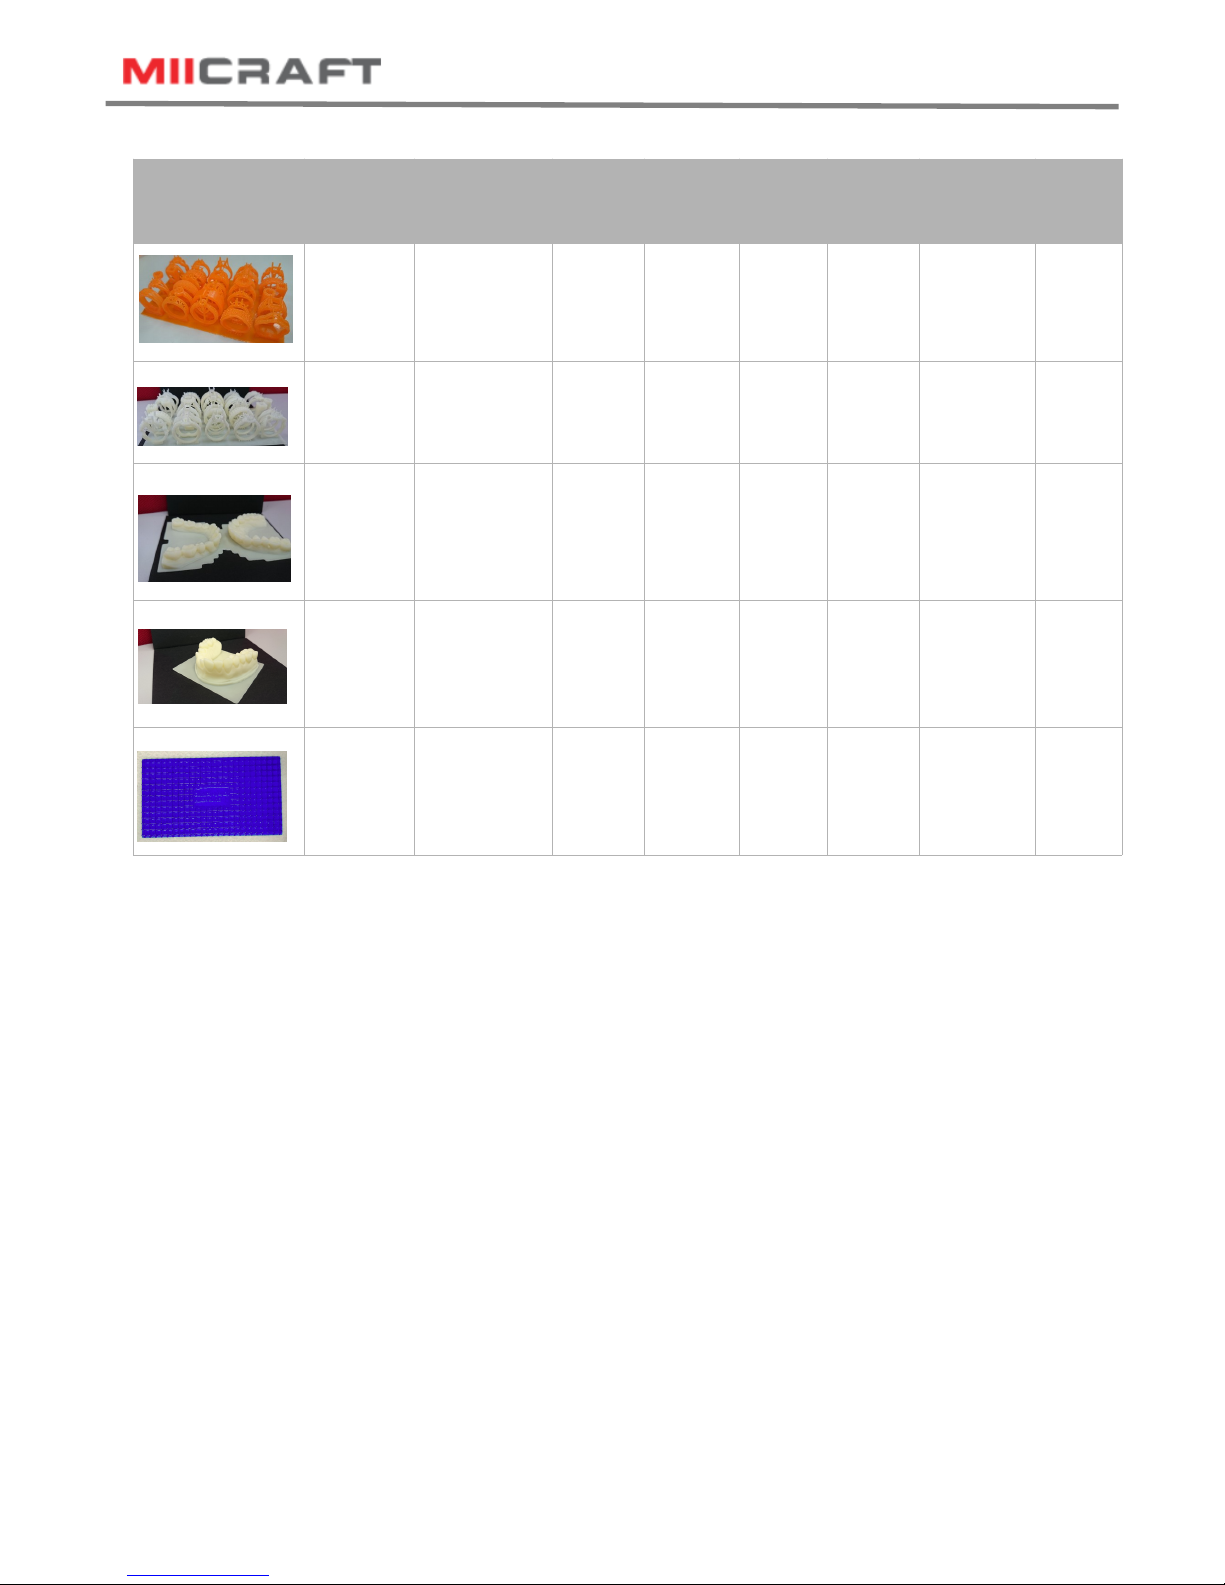
Printed Model Resin
type
hickness
(um)
Curing
time(s)
Speed Gap
Adj
(mm)
Base
Layers
Base
Curing(s)
Buffer
Layers
BV-012 50u 2.5 low 0 1 15 4
BV-005 50u 1.5 low 0 1 12 4
BV-005 50u 1.3 Normal 0 1 12 4
BV-005 50u 1.3 Normal 0 1 12 4
BV-002 50u 1.4 Normal 0.3 1 14 3
Appendix 3. Printing Parameter
For more information, click http://www.miicraft.com/support/printing-parameter/
Table of contents
Other MiiCraft 3D Printer manuals


Popular 3D Printer manuals by other brands

Ultimaker
Ultimaker 2 Go user manual

Automation Technology
Automation Technology C2 Series user manual

Emotion Tech
Emotion Tech MicroDelta Rework user guide

Elegoo
Elegoo NEPTUNE 4 PRO user manual

Creality
Creality Ender-5 Plus user manual

Trak Machine Tools
Trak Machine Tools Airwolf 3D EVO22-T Site preparation guide


